Asus NOVA (P20/P22): instruction
Class: Household, kitchen appliances, electronics and equipment
Type: Computer
Manual for Asus NOVA (P20/P22)
Table of contents
- Welcome Package contents
- Preparing your ASUS NOVA 1. Connect the USB keyboard and mouse* 2. Connect the Ethernet cable
- 4. Connect the AC adapter 3. Connect the monitor. 5. Start up your ASUS NOVA
- Knowing Component parts Front view Rear view Bottom view
- Conguring wireless connection
- Bluetooth wireless connection
- English
- Conguring audio output
- Connecting to digital speakers Configuring audio output settings
- Using Windows Media Center
- ASUS Easy Update
- Recovering your system
- Crashfree BIOS
- Using the Hidden Partition
Welcome
Congratulations on your purchase of the ASUS NOVA P20/P22.
The following sections provides information on how to use your
new ASUS NOVA P20/P22. For more details, refer to the user
manual in the support DVD.
English
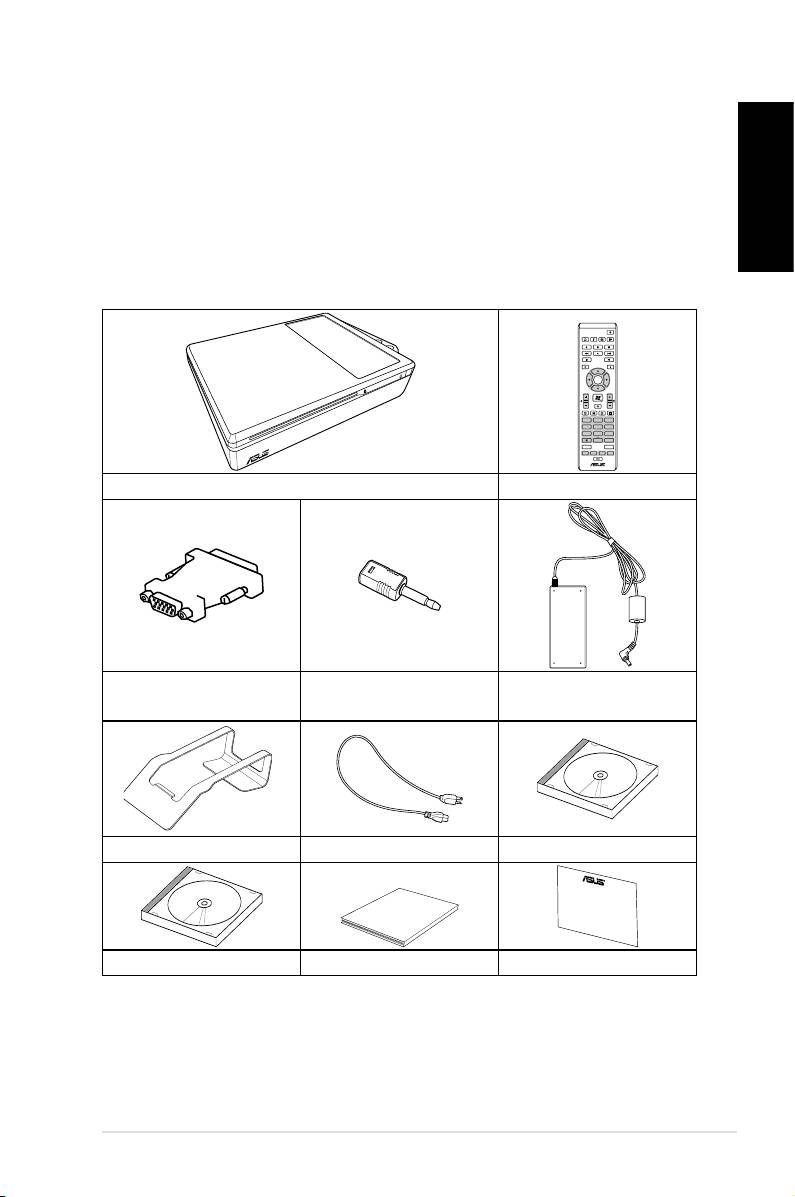
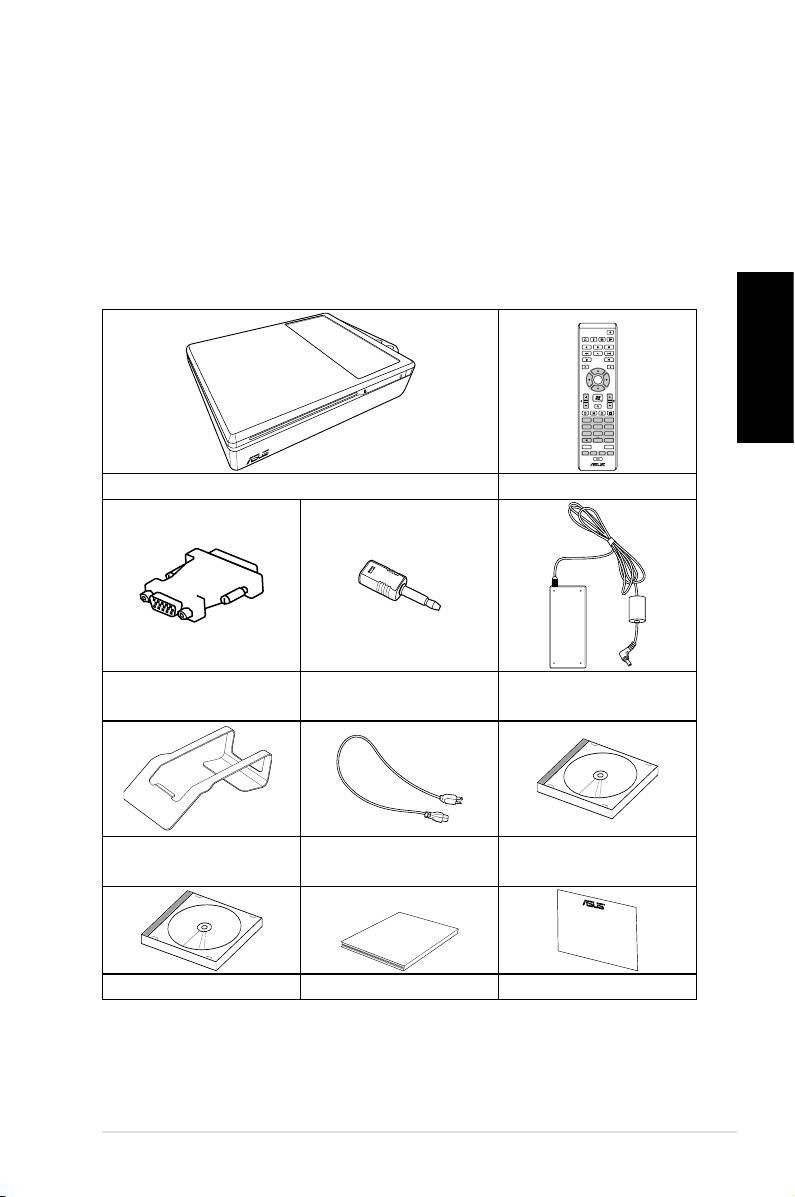
Package contents
ASUS NOVA P20/P22
1
OK
ABC
DEF
GHI
1 2 3
JKL MNO
PQRS
4 5 6
TUV WXYZ
7 8 9
CLEAR ENTER
0 #
P20/P22 Remote control
mini jack-S/PDIF
DVI-D-Sub adapter
AC adapter
adapter
Stand
Power cord
Support DVD
Quick Guid
e
Recovery DVD Quick guide Warranty card
*For more information on how to use your ASUS NOVA, refer
to the detail user manual in the support DVD.
Preparing your ASUS NOVA
These are quick instructions for using your ASUS NOVA.
English
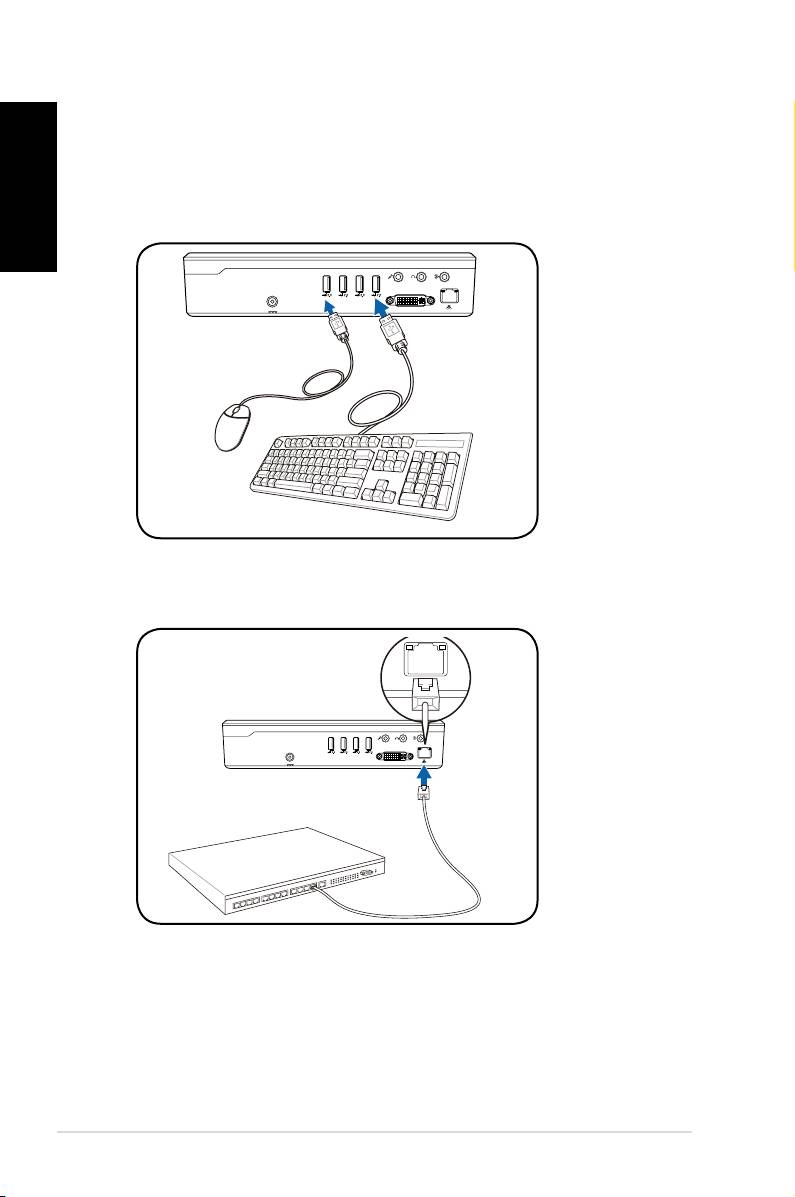
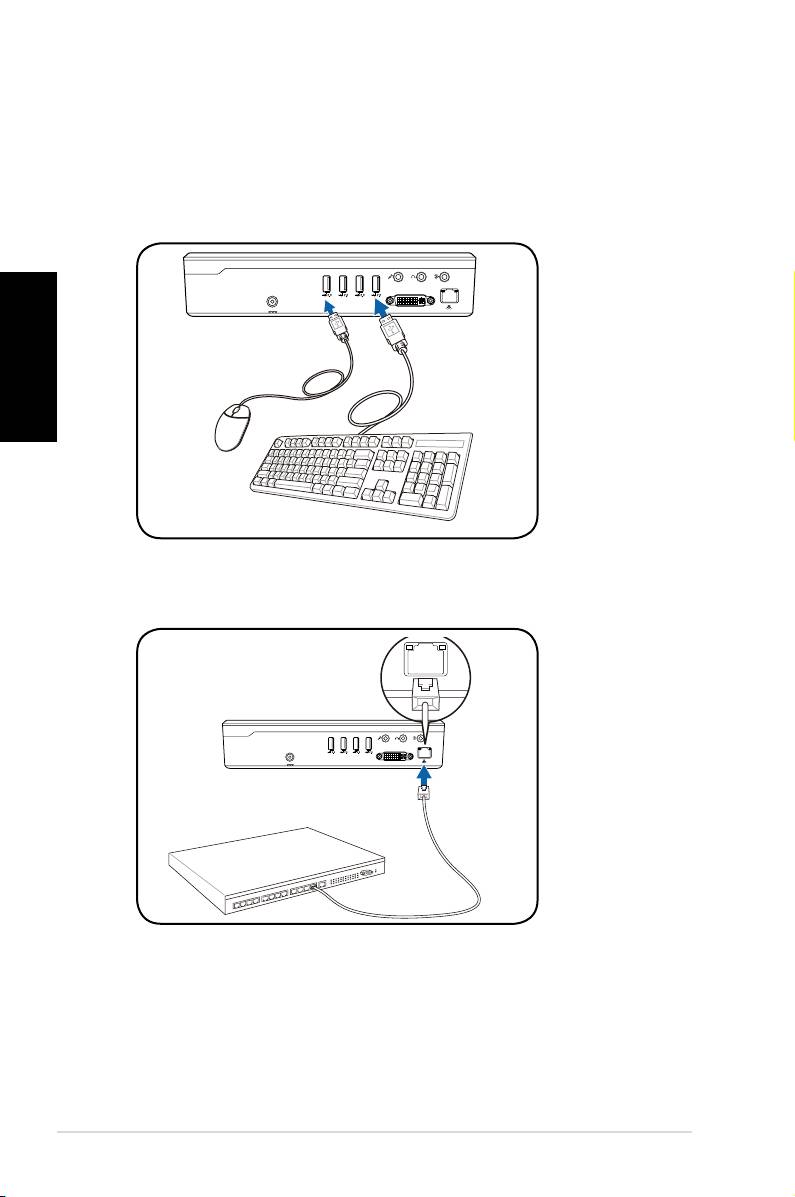
1. Connect the USB keyboard and mouse*
2
Quick Start Guide
S/PDIF
OUT
S/PDIF
IN
CENTER/BASS FRONT
SURROUND
DCIN
DVI
2. Connect the Ethernet cable
S/PDIF
OUT
S/PDIF
IN
CENTER/BASS
FRONT
SURROUND
DCIN
DVI
I
* The package contents does not include USB keyboard and
mouse. Purchase USB peripherals based on your needs.
English
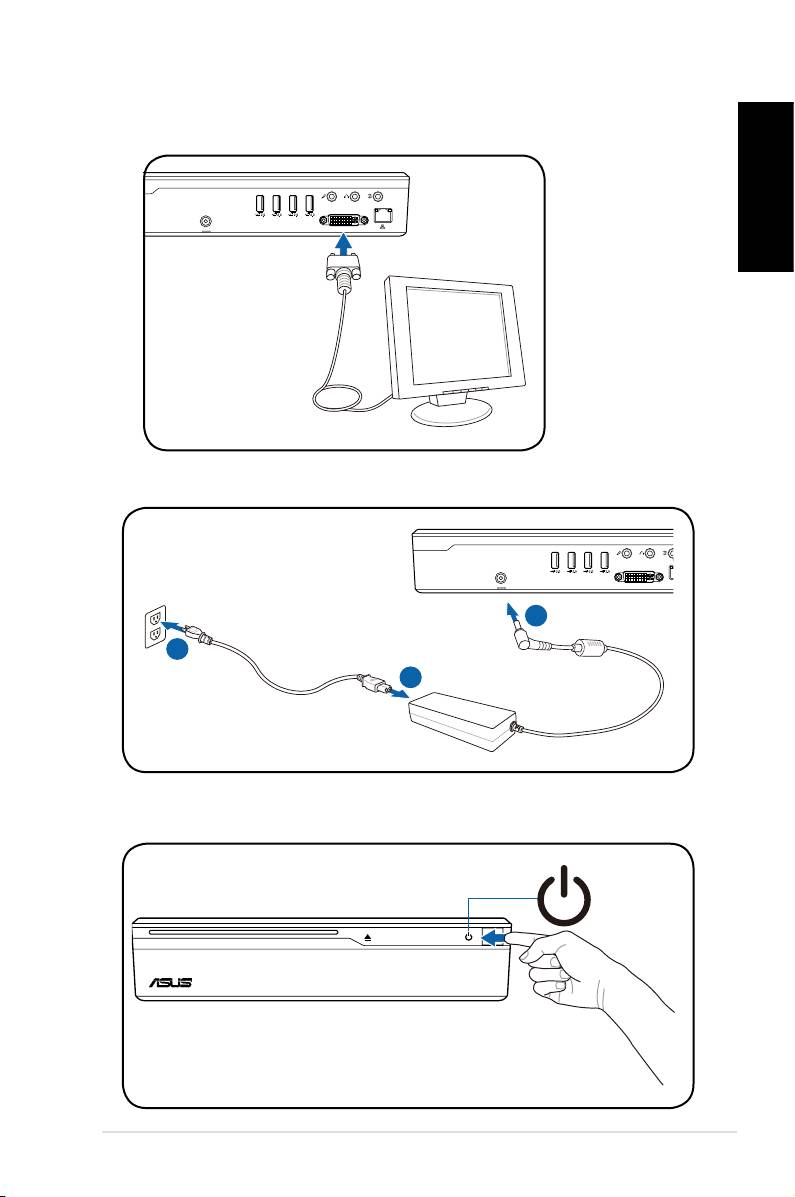
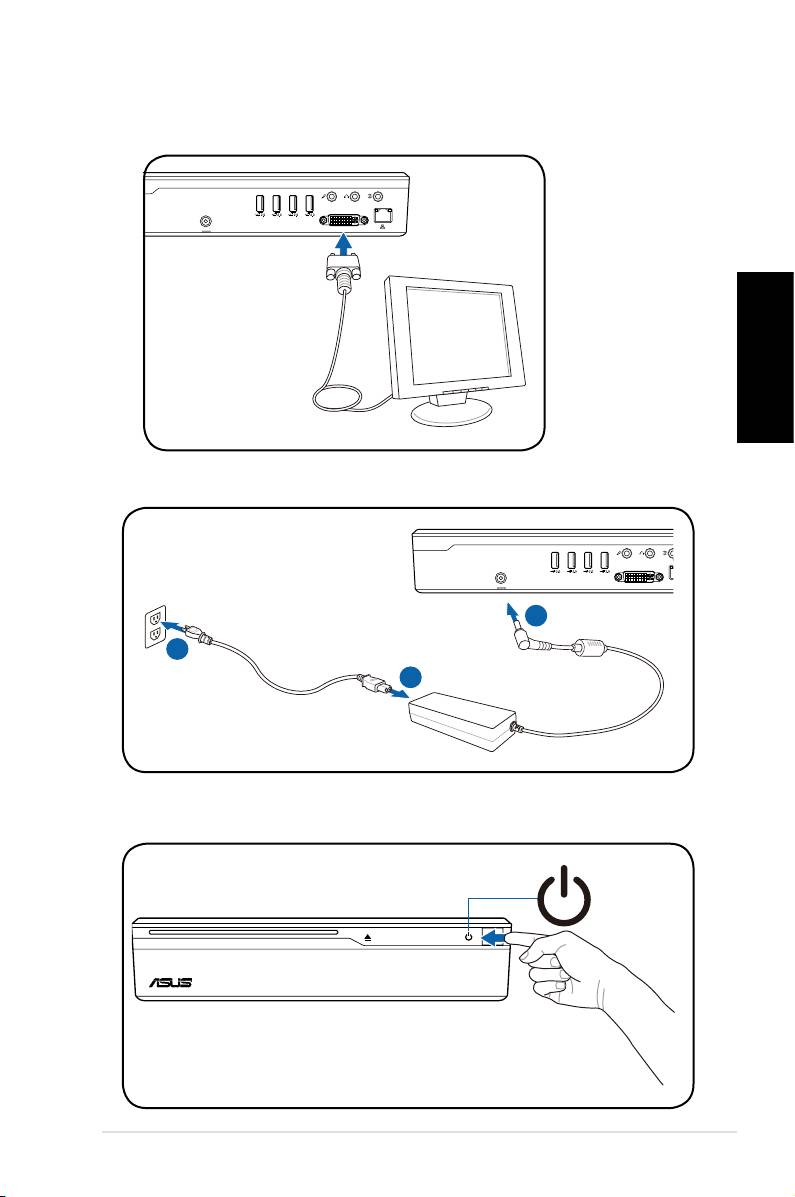
4. Connect the AC adapter
ASUS NOVA P20/P22
3
S/PDIF
OUT
S/PDIF
IN
CENTER/BASS
FRONT
SURROUND
DCIN
DVI
3
2
1
3. Connect the monitor.
S/PDIF
OUT
S/PDIF
IN
CENTER/BASS
FRONT
SURROUND
DCIN
DVI
5. Start up your ASUS NOVA
Knowing Component parts
English
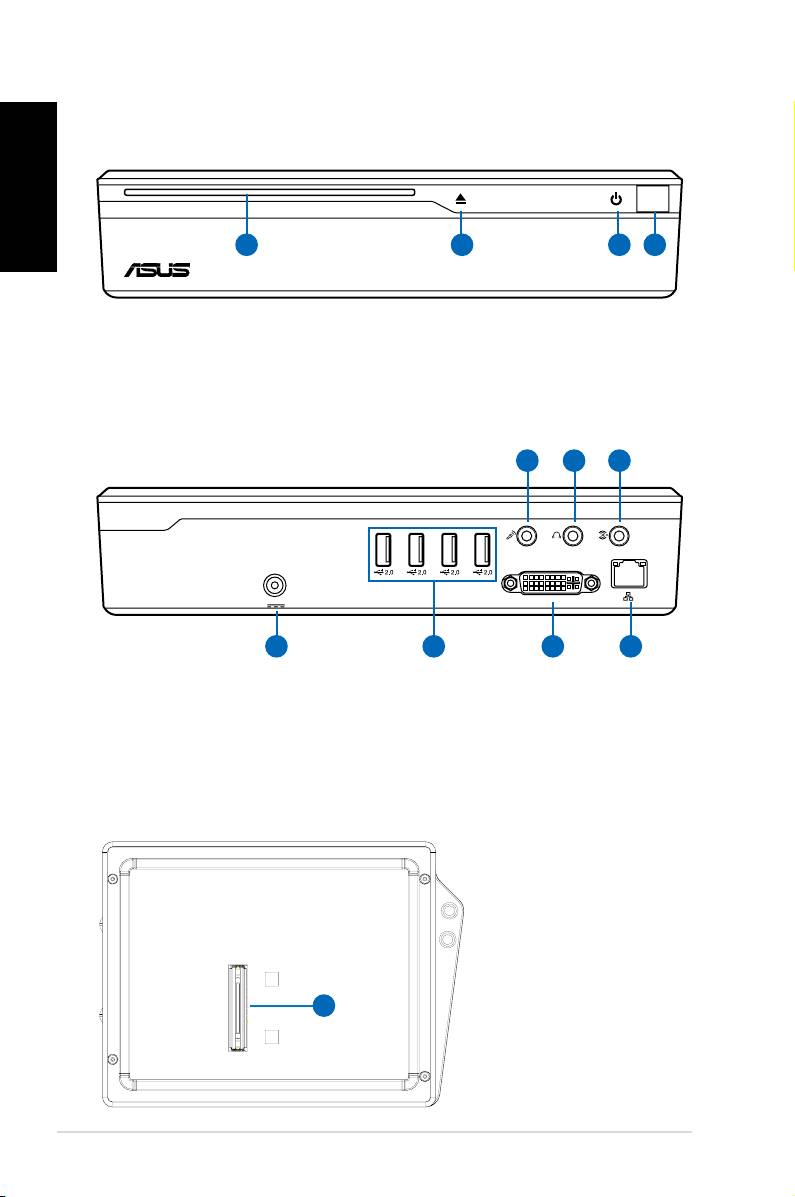
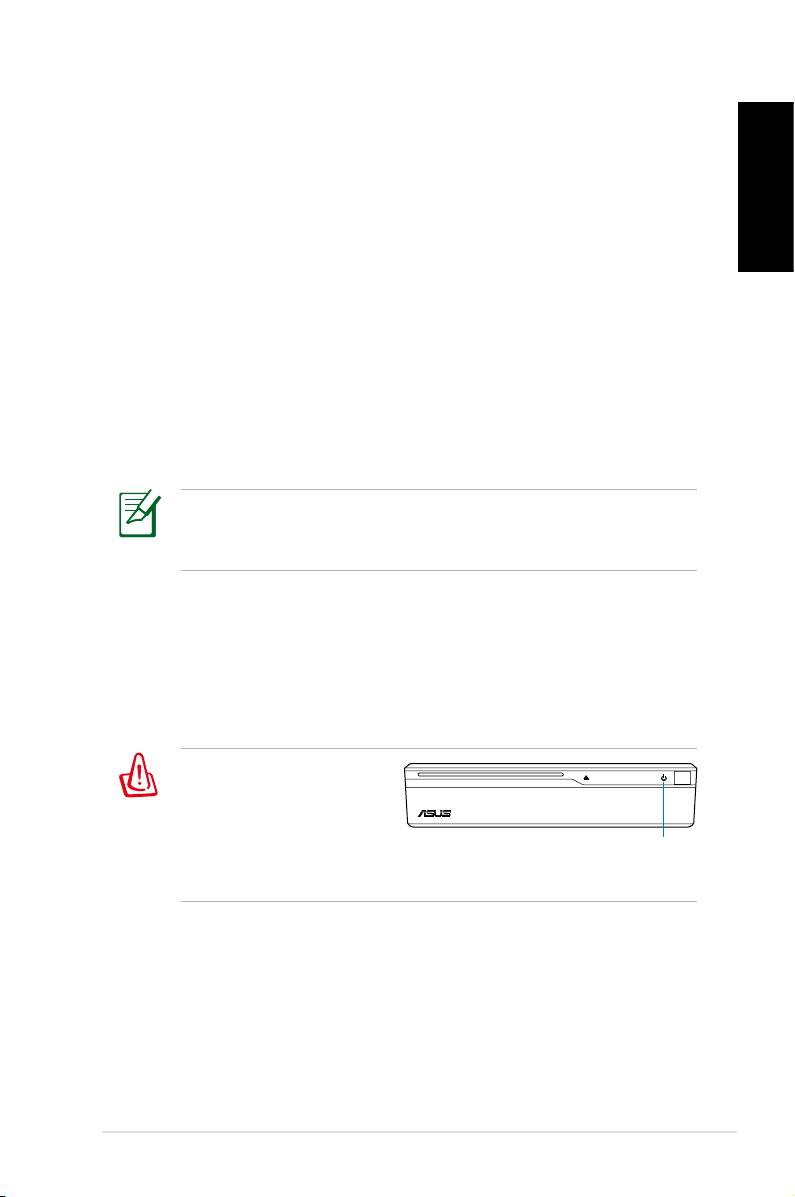
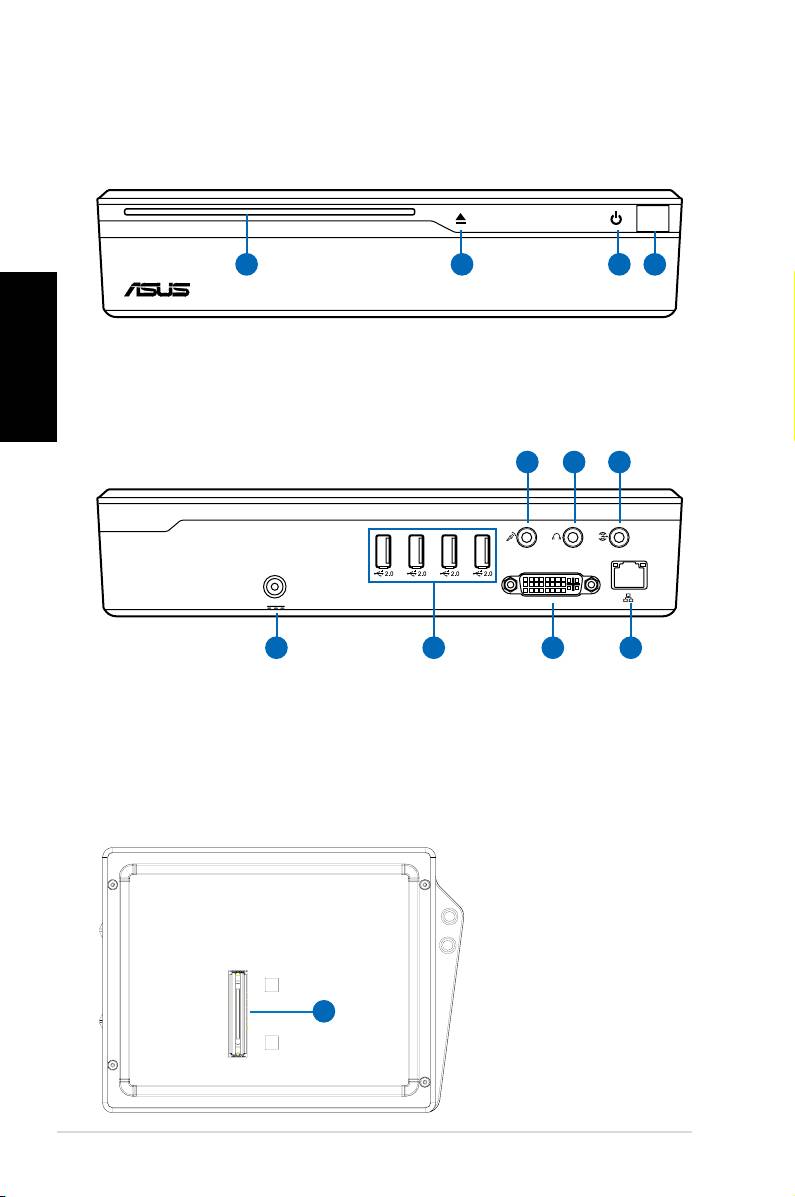
Front view
1 3 42
1. Slot-in optical drive
2. Optical Drive Electronic Eject (touch-sensitive)
3.
Power switch (touch-sensitive)
4.
Infrared port
4
Quick Start Guide
S/PDIF
S/PDIF
OUT
IN
CENTER/BASS FRONT
SURROUND
DCIN
DVI
11 10
9
Rear view
5 6 7 8
5. Power (DC) Input
9. Line in port (S/PDIF in port)
6. USB Port (2.0/1.1)
10. Headphone Output Jack
7. Display (Monitor) Output
11. Microphone Jack
8. LAN Port
Bottom view
12. Docking
Connector*
12
*The optional
docking allows
future capabilities
expansion to ASUS
NOVA.
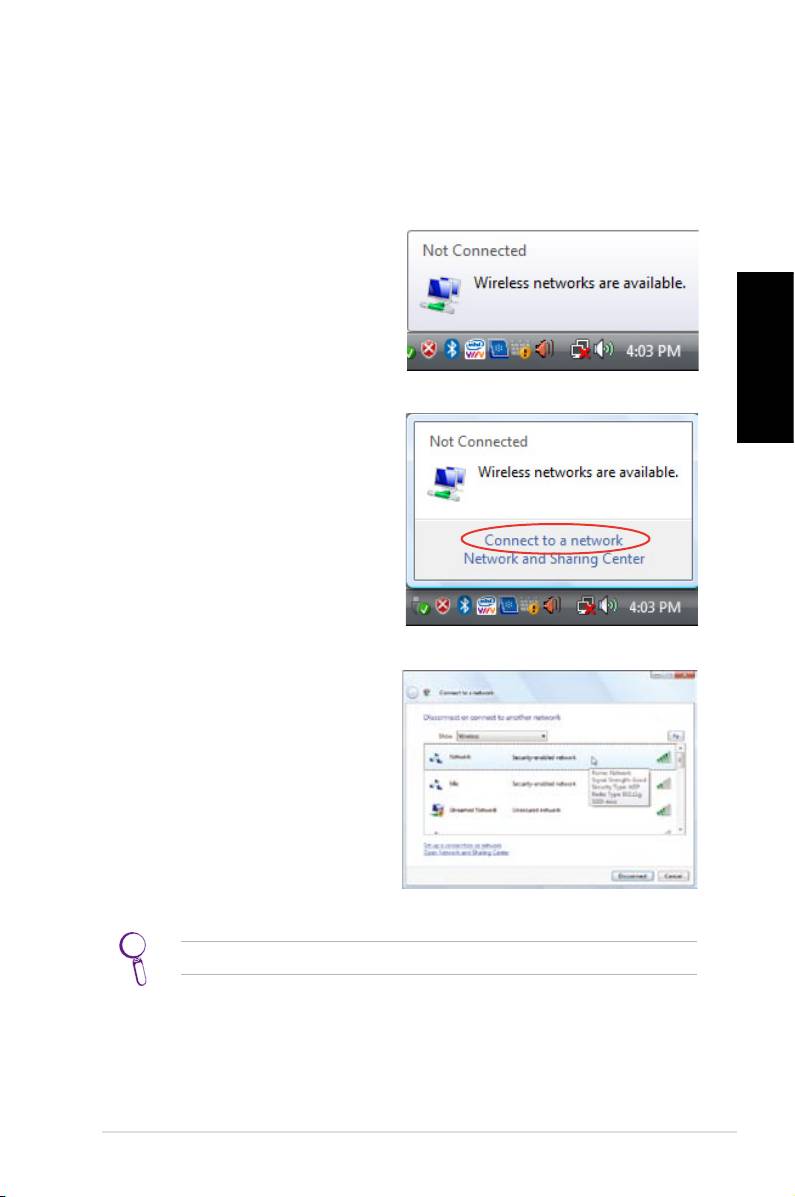
Conguring wireless connection
Wireless Network connection
To connect to a wireless network, follow the instructions below.
English
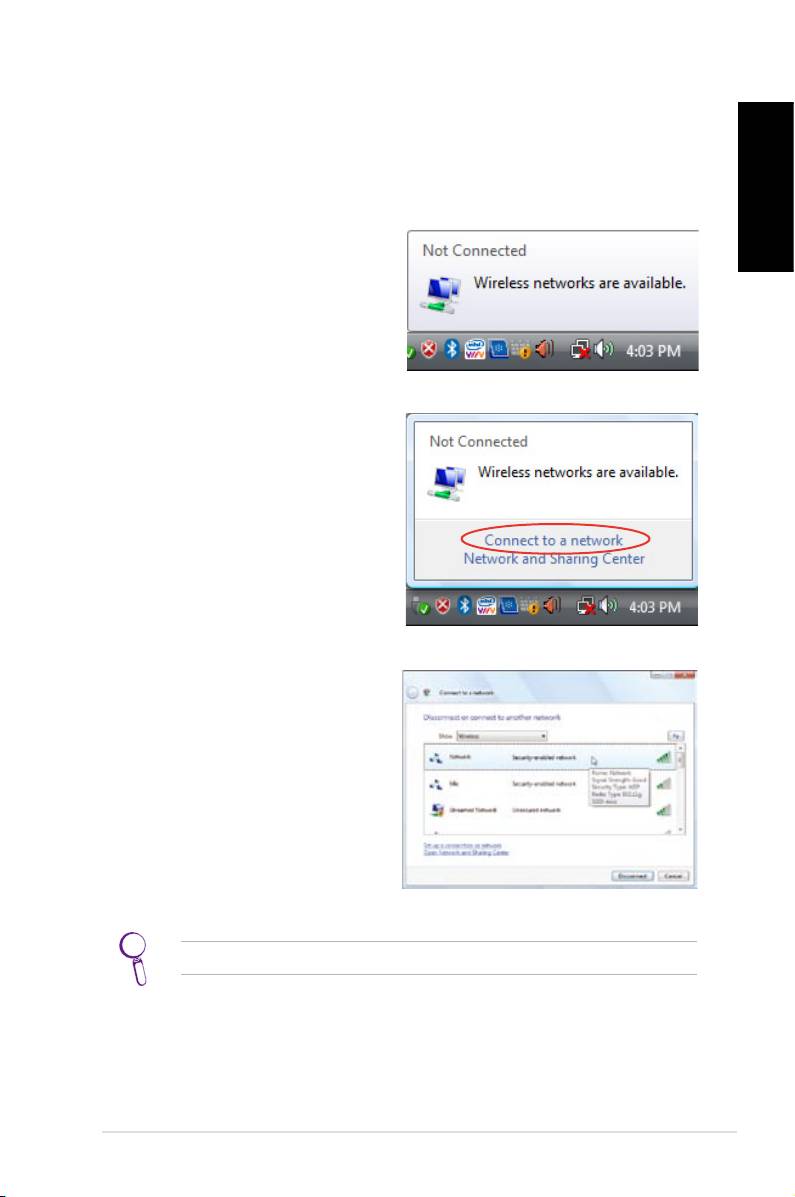
1. Move the cursor to the
network icon on the taskbar
and you will see Not
Connected.
2. Right-click on the network
icon and select Connect to a
network.
3. Select the wireless network
you want to connect to
from the list.
Select Show Wireless if you have many networks in your area.
ASUS NOVA P20/P22
5
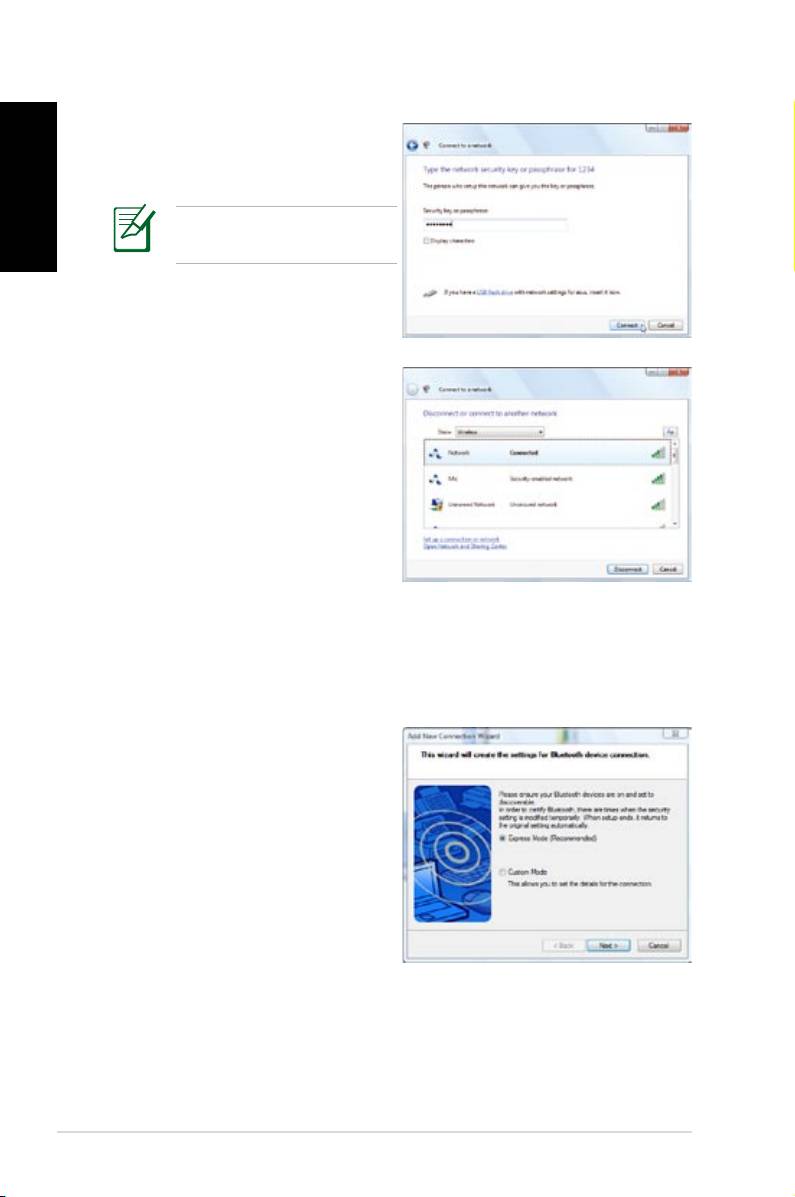
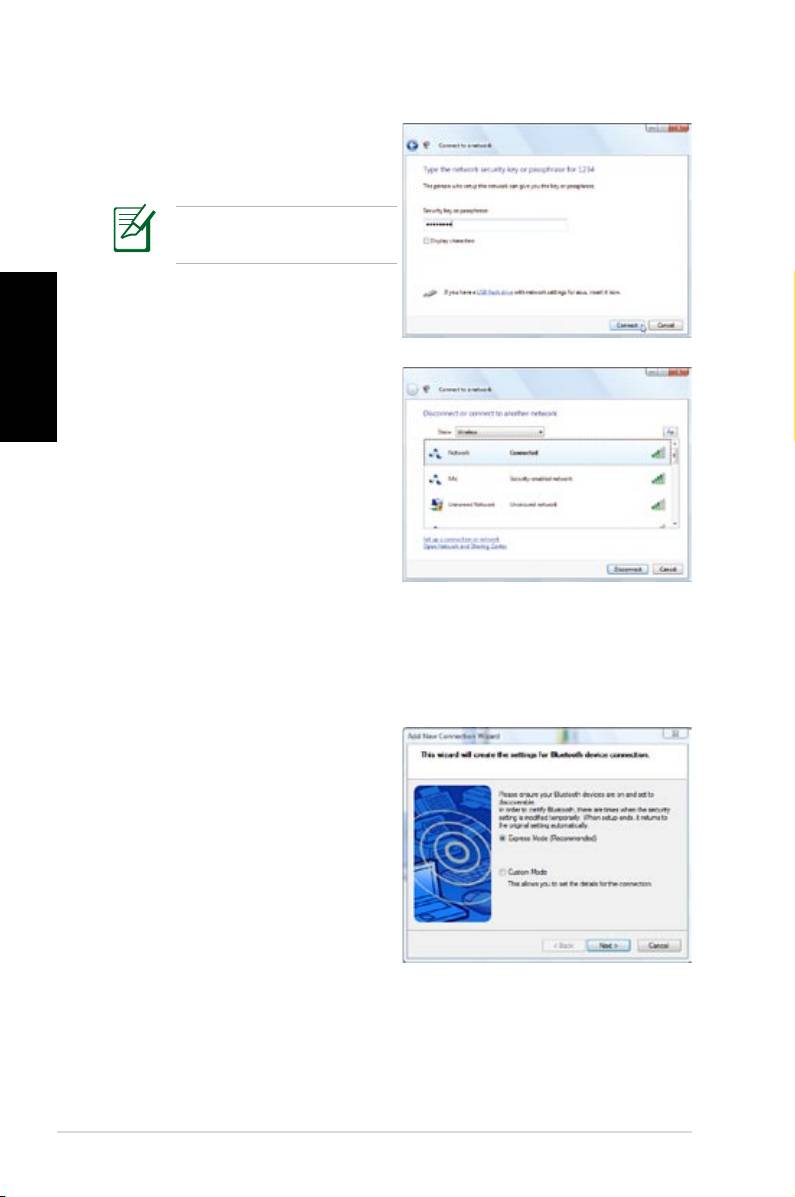
4. When connecting, you may
English
have to enter a password.
This screen will no appear
if no password needed.
5. After connection has been
established, Connected will
be shown.
Bluetooth wireless connection
Follow the instructions below to build Bluetooth wireless
connection.
1. Double-click the Bluetooth
icon on the Windows
taskbar to start the
connection wizard.
6
Quick Start Guide

2. Select the Bluetooth device
you want to connect to from
the list and click Next to
continue.
English
3. You may need to enter
the password if the device
requires authentication.
4. After the setup completes,
click Next to continue.
5. The device you connect to
will be shown.
ASUS NOVA P20/P22
7
English
Name Speaker system
2 (stereo) Left speaker, right speaker.
4 Two front speakers, two rear speakers.
Two front speakers, two rear speakers, a center
5.1
speaker, and a subwoofer.
Headset
Port
6-speaker S/PDIF
2-speaker
Light Blue Line In Surround S/PDIF in
Lime Line Out Front S/PDIF out
Pink Mic In Center/Bass Mic
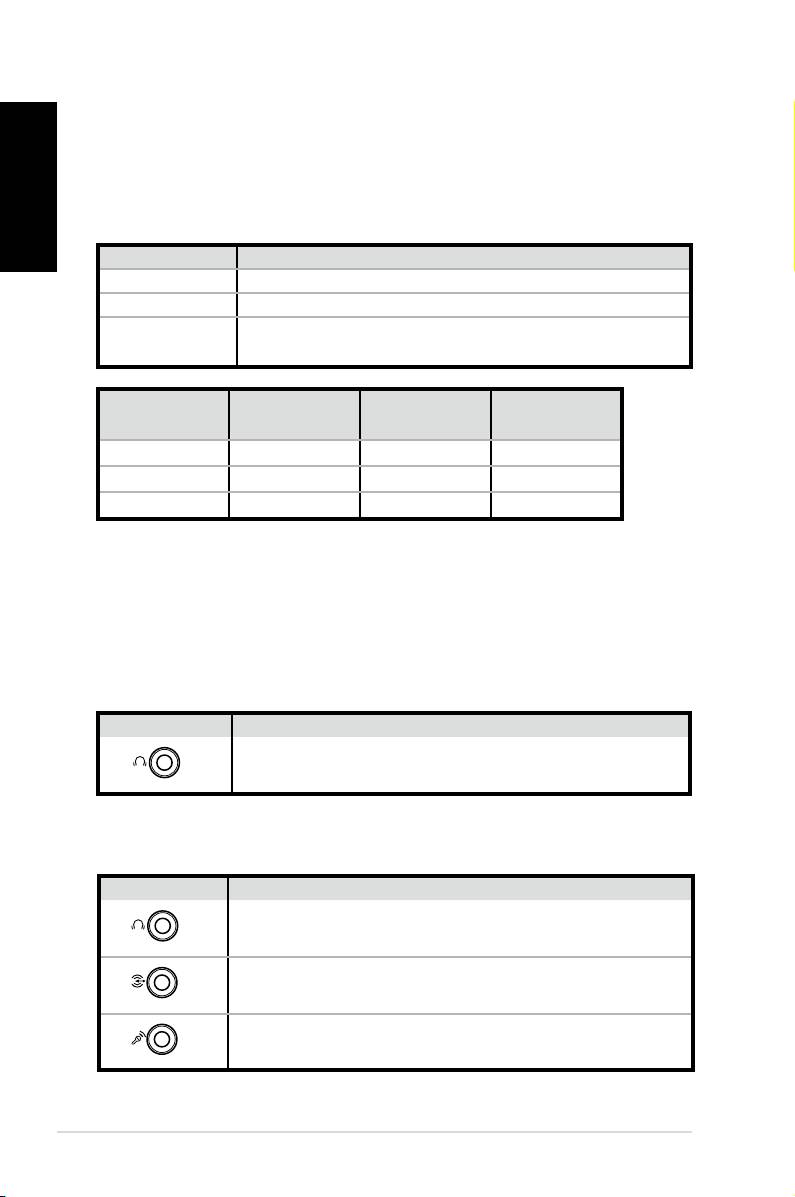
Connecting to analog speakers
Refer to the table below for the audio connectors on the rear
panel and their functions.
For stereo speakers
P20/P22 Description
8
Quick Start Guide
S/PDIF
OUT
FRONT
Front connects to stereo speakers.
P20/P22 Description
S/PDIF
OUT
FRONT
FRONT connects to the FRONT port on the sub-
woofer.
S/PDIF
IN
SURROUND
SURROUND connects to the REAR port on the
subwoofer.
CENTER/BASS
Conguring audio output
Speaker configurations
You may set up the system with the following speaker
configurations:
For a multi-channel audio speaker system
CENT/BASS connects to the SUB/CENTER port on
the subwoofer.
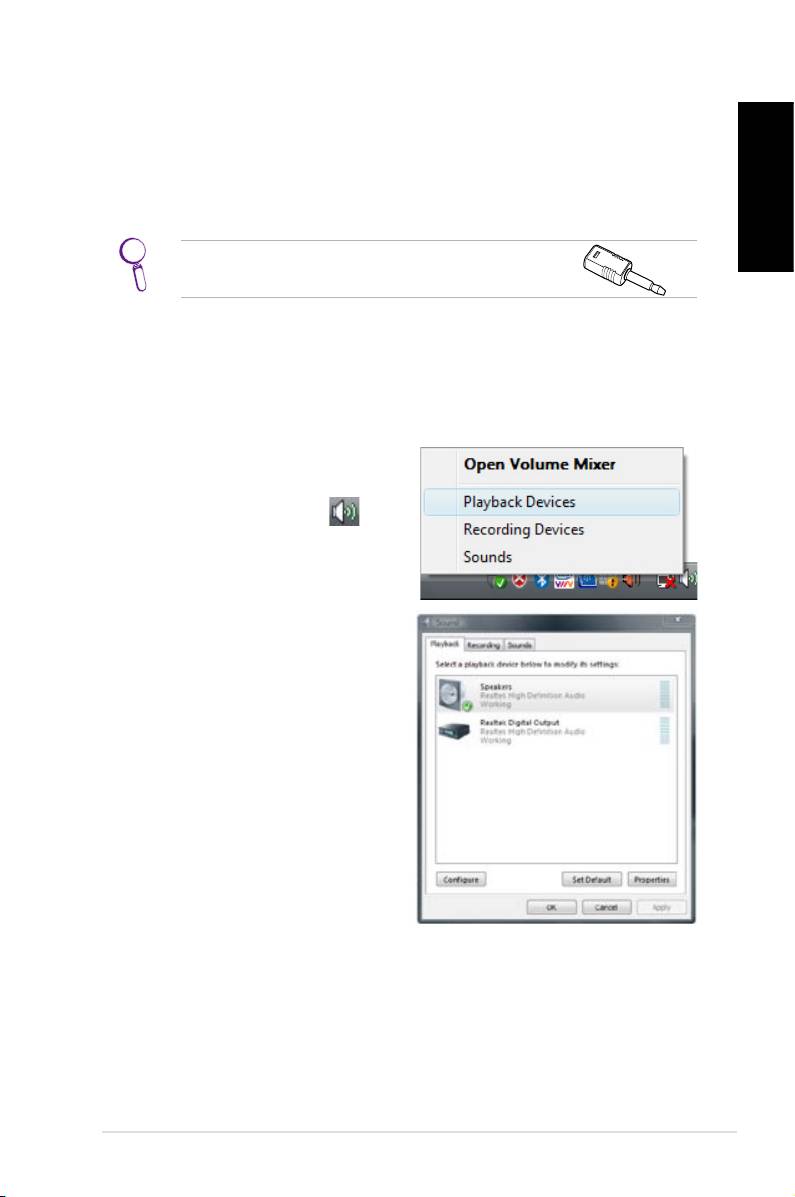
Connecting to digital speakers
• Digital output: Plug an audio cable with a mini jack-s/PDIF
adapter from the S/PDIF Out port on the system rear panel to
your amplifier.
English
Connect the mini jack-S/PDIF adapter before
connecting digital speakers.
Configuring audio output settings
After connecting a speaker system to your NOVA P20/P22, follow
the steps below to configure audio output:
1. From the Windows® Vista™
taskbar, right-click on the
volume control icon
and then select Playback
Devices.
2. Under the Playback
window, select Speakers
and click Set Default if you
are using analog speakers.
Select Realtek Digital
Output if you are using
digital speakers.
3. Click
Configure after selecting Speakers and follow the on-
screen instructions to configure the settings. Click
Properties to configure your digital output preferences if
you select Realtek Digital Output.
ASUS NOVA P20/P22
9
Using Windows Media Center
English
Starting Windows Media Center
You can take full control of the Windows Media Center using your
wireless keyboard and either of your remote controls.
To start Windows Media Center, do one of the following:
• Press the Media Center button
on your Media Center
remote.
• From the Windows® desktop, click
Start > All Programs >
Windows Media Center.
Watching DVDs
Insert a DVD into the Super Multi Drive and the DVD will be
played automatically. You can also press the DVD button on
the remote to play it.
Music
Music provides you with a complete music experience. You can
listen to CDs or other music files, create your own playlists, view
album information, and listen to music by albums, genres, artists,
etc. Refer to the user manual in the support DVD for detailed
instructions.
Pictures + Videos
Enjoy and manage your digital photos/videos or downloaded
pictures/videoclips using Pictures + Videos. You can browse the
pictures individually or playing them as a slide show with music
background. Refer to the user manual in the support DVD for
detailed instructions.
Refer to the user manual in the support DVD for the functions
and button definitions of the remote control.
10
Quick Start Guide
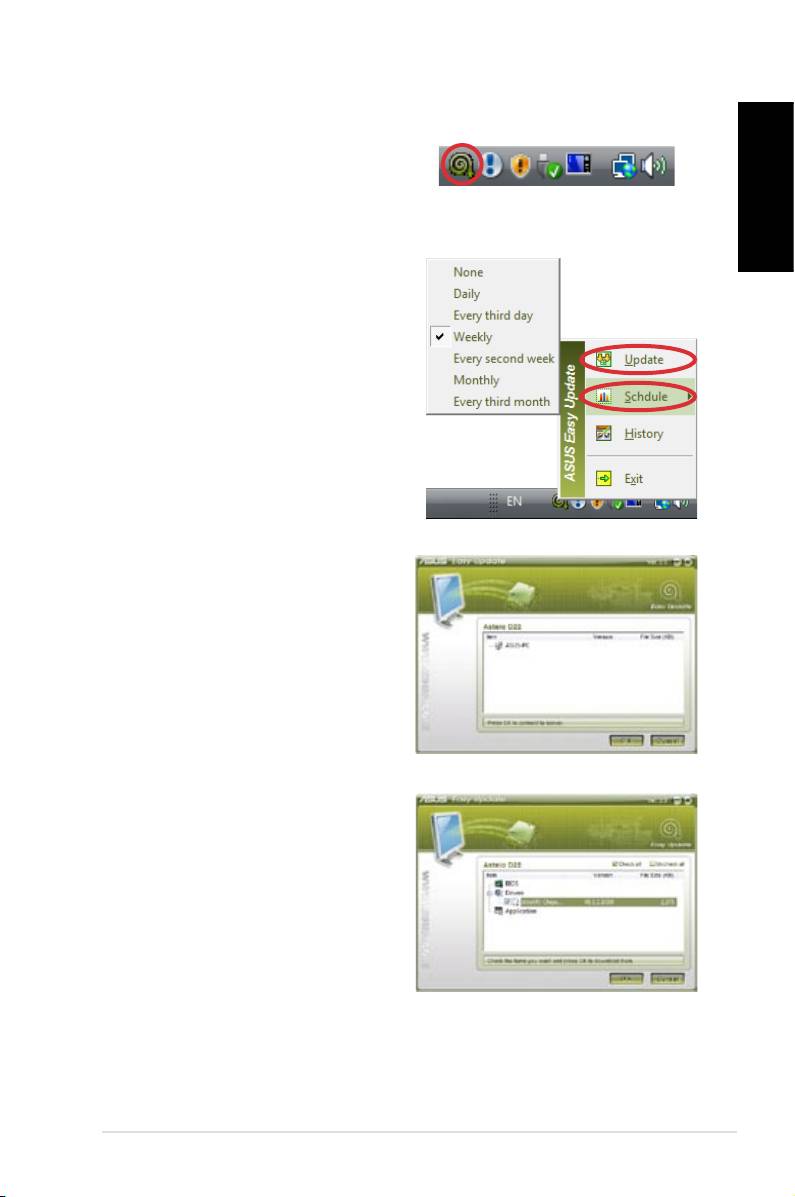
ASUS Easy Update
1. From the Windows® taskbar,
right-click on the ASUS Easy
Update icon.
English
2. Select Schedule to set how
often you want to update
your system.
3. Select
Update to activate
the update.
4. Click
OK to display the items
you can download.
5. Check the item(s) you want
to download, and then click
OK.
ASUS NOVA P20/P22
11

Recovering your system
English
Using the Recovery DVD
The Recovery DVD includes an image of the operating system,
installed on your system at the factory. The Recovery DVD, working
with the Support DVD, provides a comprehensive recovery
solution that quickly restores your system to its original working
state, provided that your hard disk drive is in good working order.
Before using the Recovery DVD, copy your data files (such as
Outlook PST files) to floppy disks or to a network drive and make
note of any customized configuration settings (such as network
settings).
1. Insert the Recovery DVD into the optical drive (System needs
to be powered ON).
2. Restart the system and press
<DEL> on bootup to enter the
BIOS setup. Go to Boot > Boot Device Priority and select
the optical drive (may be labeled as “CDROM:XXXX”) as the
1st Boot Device.
3. Press
<F10> to save the configuration and reboot from the
Recovery DVD.
4.
Select a partition option and click Next. Partition options:
Recover system to a partition only.
This option will delete only the partition you select from
below, allowing you to keep other partitions, and create a
new system partition as drive “C”.
Recover system to entire HD.
This option will delete all partitions from your hard disk drive
and create a new system partition as drive “C”.
5. Follow the on-screen instructions to complete the recovery
process.
You will lose all your data during the system recovery. Ensure
to back up your important data before recovering your
system.
12
Quick Start Guide
6. After the system recovery is completed, eject the the
Recovery DVD from the optical drive.
7. Restart the system and press
<DEL> on bootup to enter the
English
BIOS setup. Go to Boot > Boot Device Priority and reset the
hard disk drive (may be labeled as “HDD:XXXX”) as the 1st
Boot Device.
8. Press
<F10> to save the configuration and reboot the
system.
9. Insert the Support DVD into the optical drive.
10. Click
ASUS InstAll - Drivers Installation Wizard from the
Drivers tab and install all the drivers.
It may take some time to reinstall all the drivers. If the
screensaver starts, press any key to bring back the installation
screen.
Crashfree BIOS
ASUS Crashfree BIOS allows you to restore the original BIOS data
from the support DVD in case when the BIOS update fails or the
BIOS codes and data are corrupted. Change the boot priority and
boot from your support DVD to restore your BIOS.
When you notice the
power LED blinks white
and hear two short
beeps followed by one
power LED
continuous beep at the
system startup, your BIOS codes are damaged.
Follow the instructions below to restore your BIOS:
1. Insert the Support DVD. The system will give two short beeps
and start restoring the BIOS. (No display on screen)
2. When the power LED stops blinking, the restoration is
completed.
3. Press the power switch to start the system. If the system
enters Windows OS, the BIOS has been restored.
ASUS NOVA P20/P22
13

Using the Hidden Partition
English
The Recovery Partition includes an image of the operating
system, drivers, and utilities installed on your system at the
factory. The Recovery Partition provides a comprehensive
recovery solution that quickly restores your system’s software to
its original working state, provided that your hard disk drive is in
good working order. Before using the Recovery Partition, copy
your data files (such as Outlook PST files) to floppy disks or to a
network drive and make note of any customized configuration
settings (such as network settings).
DO NOT delete the partition named “RECOVERY.” The
Recovery Partition is created at the factory and cannot
be restored by the user if deleted. Take your system to an
authorized ASUS service center if you have problems with the
recovery process.
1. Press <F9> during bootup (requires a Recovery Partition)
2. Press
<Enter> to select Windows Setup [EMS Enabled]
3. Read the “ASUS Preload Wizard” screen and click
Next.
4. Select a partition option and click
Next. Partition options:
Recover Windows to a partition only.
This option will delete only the partition you select from
below, allowing you to keep other partitions, and create a
new system partition as drive “C”.
Recover Windows to entire HD.
This option will delete all partitions from your hard disk drive
and create a new system partition as drive “C”.
5. Follow the on-screen instructions to complete the recovery
process.
6. Reboot and insert the Support DVD into the optical drive.
7. Click
ASUS InstAll - Drivers Installation Wizard from the
Drivers tab and install all the drivers.
14
Quick Start Guide
Bienvenido
Enhorabuena por la compra del dispositivo ASUS NOVA P20/P22. La
siguiente ilustración muestra el contenido del paquete del nuevo
dispositivo ASUS NOVA P20/P22. Si alguno de los artículos siguientes
falta o está dañado, póngase en contacto son su distribuidor.
Contenido del paquete
Español
ASUS NOVA P20/P22
15
OK
ABC
DEF
GHI
1 2 3
JKL MNO
PQRS
4 5 6
TUV WXYZ
7 8 9
CLEAR ENTER
0 #
P20/P22 Mando a distancia
Adaptador
Adaptador
Adaptador de CA
DVI-D-SUB
miniconector-S/PDIF
Cable de
Base
DVD de soporte
alimentación
Quick Guid
e
DVD de recuperación Guía rápida Tarjeta de garantía
Preparar el dispositivo ASUS NOVA
A continuación se exponen instrucciones rápidas para usar la
unidad ASUS NOVA.
1. Conecte el ratón y el teclado USB*
Español
16
Guía de inicio rápido
S/PDIF
OUT
S/PDIF
IN
CENTER/BASS FRONT
SURROUND
DCIN
DVI
2. Conecte el cable Ethernet
S/PDIF
OUT
S/PDIF
IN
CENTER/BASS
FRONT
SURROUND
DCIN
DVI
I
* El paquete no incluye el teclado ni el ratón USB. Adquiera
periféricos USB en función de sus necesidades.
Español
4. Conecte el adaptador de CA
ASUS NOVA P20/P22
17
S/PDIF
OUT
S/PDIF
IN
CENTER/BASS
FRONT
SURROUND
DCIN
DVI
3
2
1
3. Conecte el monitor.
S/PDIF
OUT
S/PDIF
IN
CENTER/BASS
FRONT
SURROUND
DCIN
DVI
5. Inicie la unidad ASUS NOVA
Reconocer los componentes del
dispositivo
Vista frontal
1 3 42
Español
1. Unidad óptica de inserción automática
2.
Expulsión electrónica de la unidad óptica (sensible al tacto)
3. Conmutador de alimentación (sensible al tacto)
4. Puerto de infrarrojos
18
Guía de inicio rápido
S/PDIF
S/PDIF
OUT
IN
CENTER/BASS FRONT
SURROUND
DCIN
DVI
11 10
9
Panel posterior
5 6 7 8
5. Entrada de alimentación (CC)
9. Puerto de entrada de línea
(puerto de entrada S/PDIF)
6. Puerto USB (2.0/1.1)
10. Conector de salida de
7. Salida de visualización
auriculares
(monitor)
11. Conector de micrófono
8. Puerto LAN
Vista inferior
12. Base de
conexiones*
*La base de
conexiones
12
opcional permite
expandir la
funcionalidad de la
unidad ASUS NOVA
cuando lo desee.
Congurar la conexión inalámbrica
Conexión de red inalámbrica
Para conectar el dispositivo a una red inalámbrica, siga estas instrucciones.
1. Mueva el cursor al icono de
red de la barra de tareas;
aparecerá el mensaje No
conectado.
Español
2. Haga clic con el botón
secundario en el icono de
red y seleccione Conectarse
a una red.
3. En la lista, seleccione la red
inalámbrica a la que desea
conectarse.
Seleccione Mostrar inalámbricas si tiene varias redes en su área.
ASUS NOVA P20/P22
19
4. Cuando se conecte, puede
que tenga que insertar una
contraseña.
Esta pantalla no aparecerá
si no se necesita contraseña.
Español
5. Una vez establecida la
conexión, aparecerá el
mensaje Conectada.
Conexión inalámbrica Bluetooth
Siga las instrucciones que se indican a continuación para crear una
conexión inalámbrica Bluetooth.
1. Haga doble clic en el icono
Bluetooth de la barra de
tareas de Windows para iniciar
el asistente de conexión.
20
Guía de inicio rápido
