Asus WL-107G: instruction
Class: Networks, communications, telecommunications, internet, security
Type:


Manual for Asus WL-107G
Table of contents
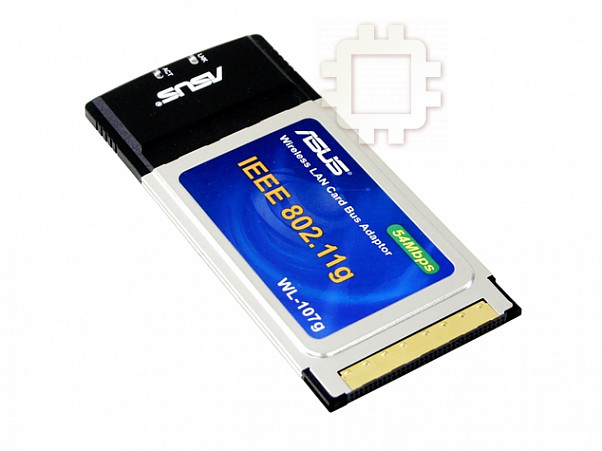
Wireless Local Area Network Card
WL-107g
(For 802.11g & 802.11b Wireless Networks)
Quick Start Guide
®
English
Quick Start Guide
English
System Requirements
To begin using the ASUS WLAN Card, you must have the following
minimum requirements:
• Windows XP/2000/ME/98SE or Linux Redhat (Version 7.1 or later)
• Standard PCMCIA Slot Type II
• 32MB system memory or larger
• 300MHz processor or higher
Installation Procedures
Linux users: This manual is meant for Windows users. Information
pertaining to Linux is located in “readme.txt” in the Linux folder.
Linux drivers are also located in the same folder.
Important: Install the ASUS WLAN card utilities before inserting the
ASUS WLAN Card into your computer.
Follow these instructions to setup the ASUS WLAN card.
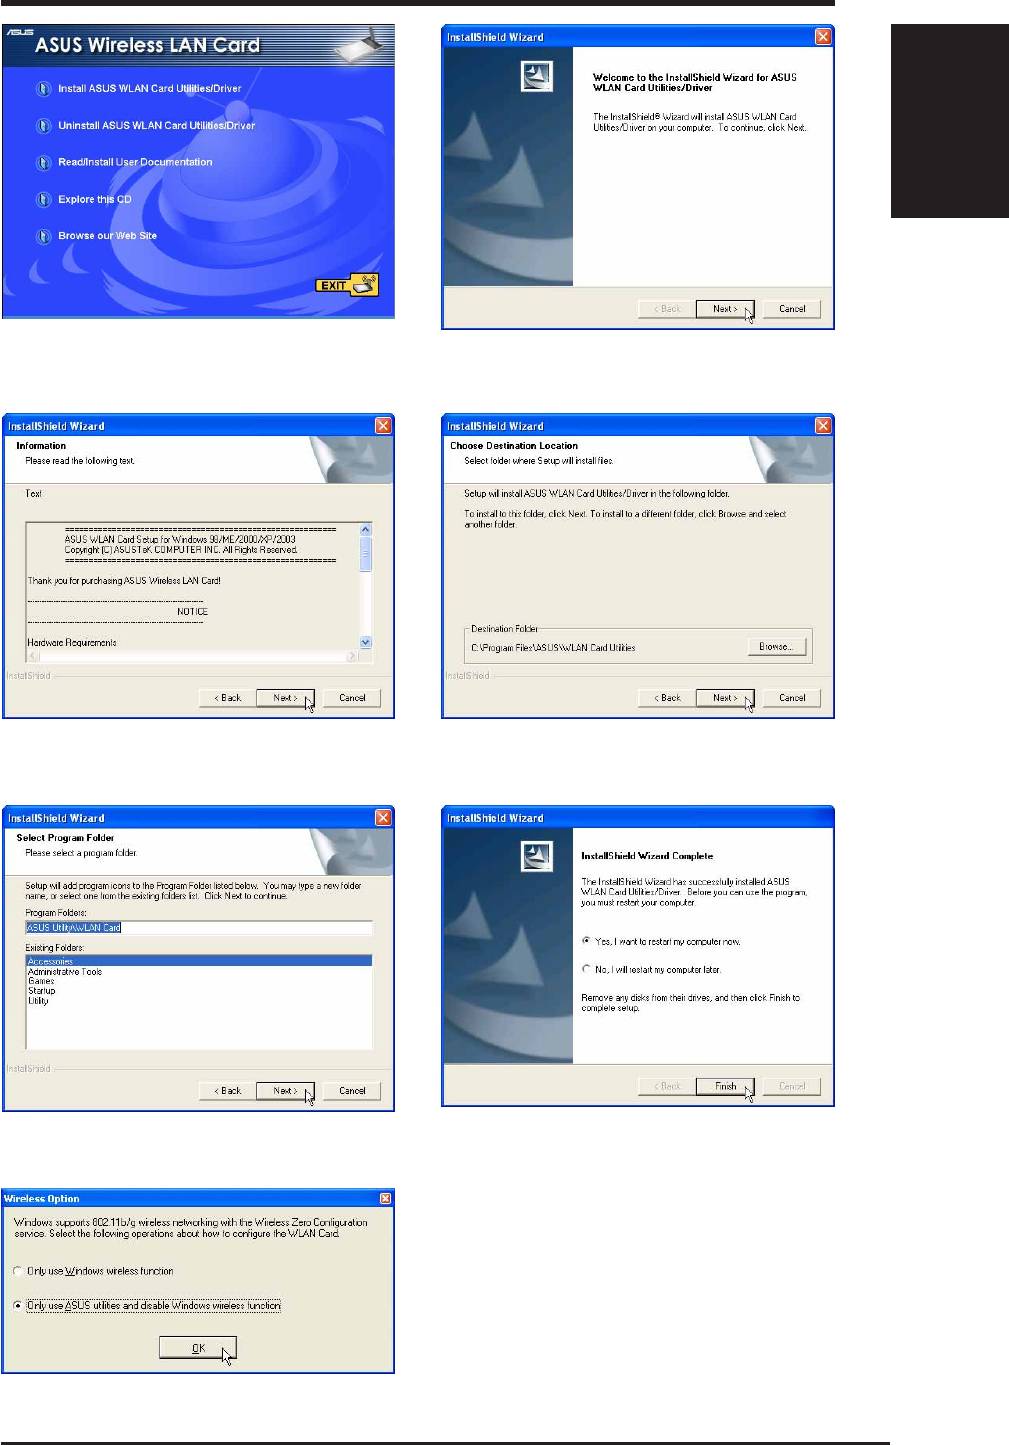
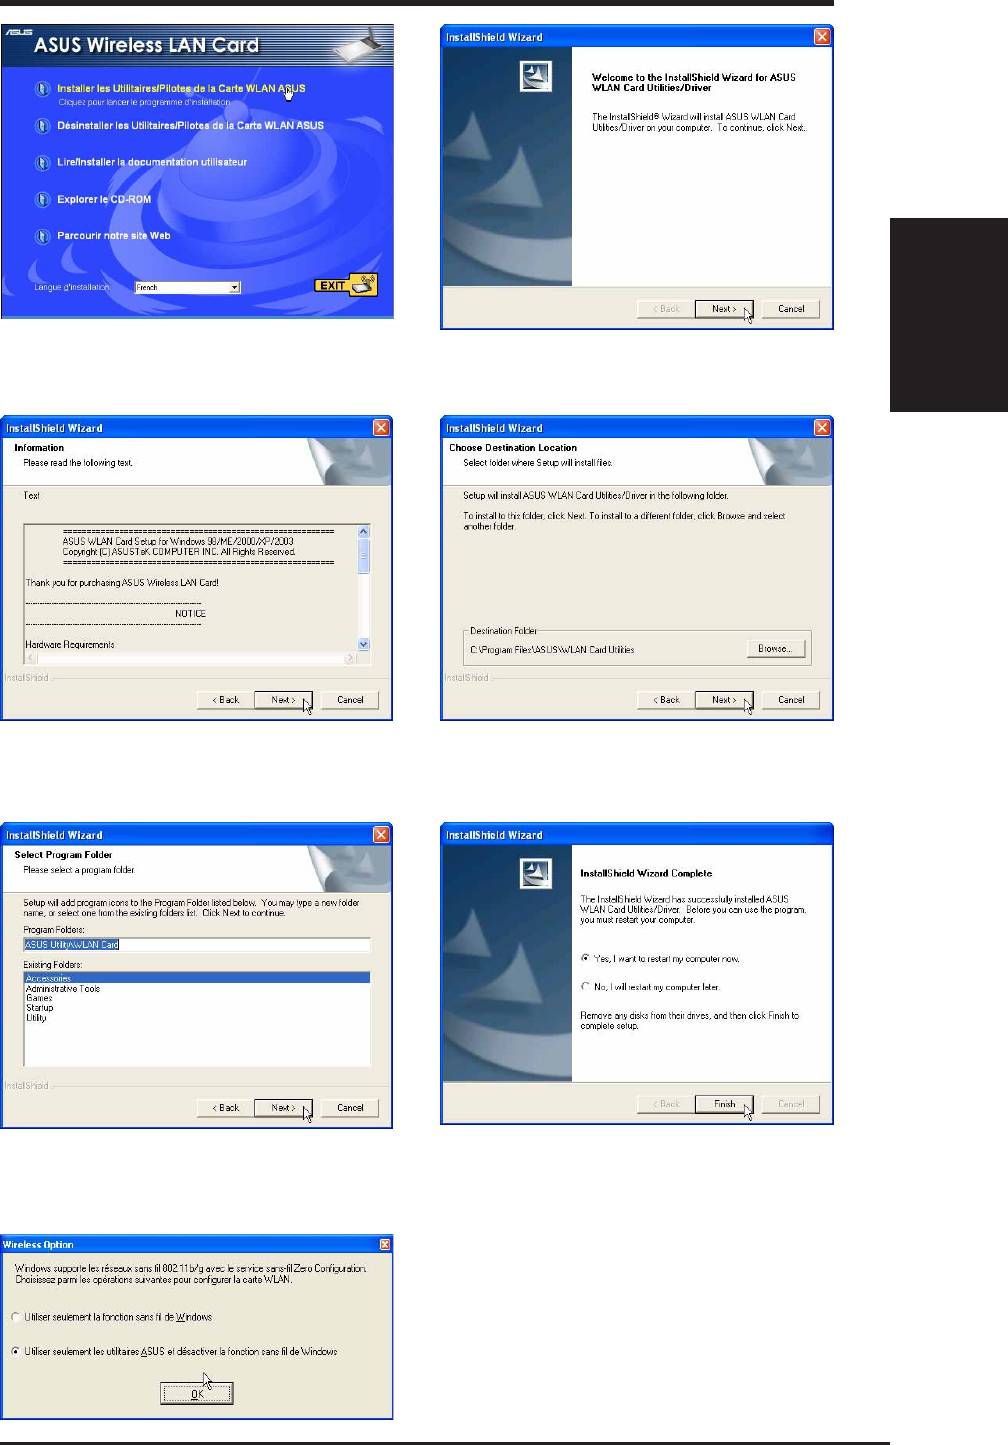
1. Install the ASUS WLAN card utilities and driver from the support CD.
2. Insert the ASUS WLAN card into your computer.
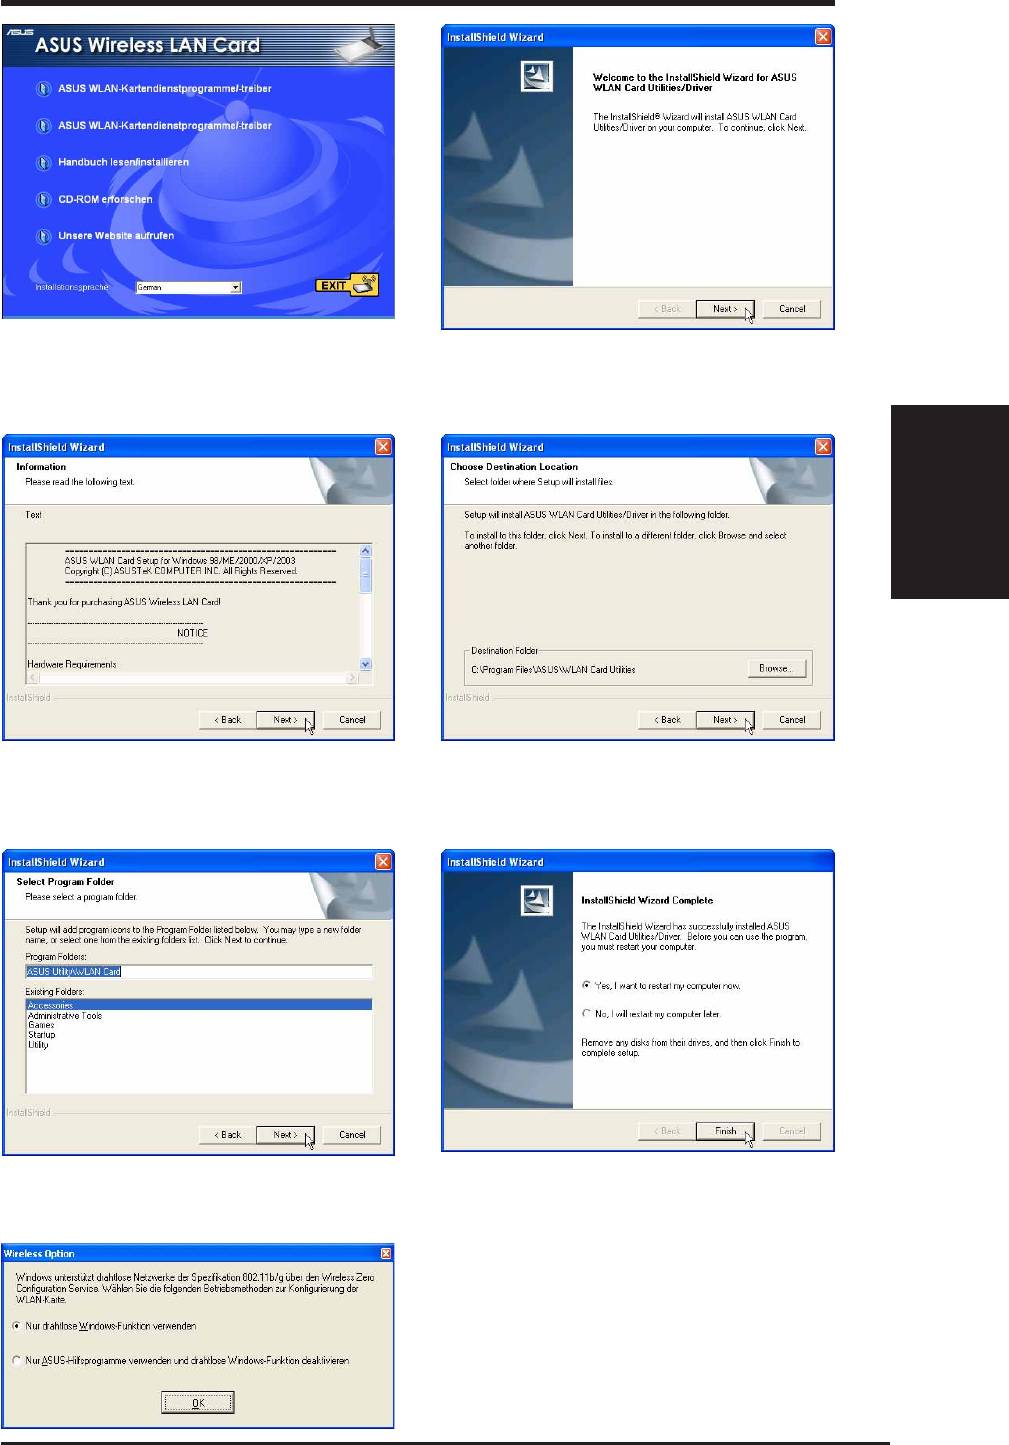
Installing the utilities and driver
Follow these instructions to install the ASUS WLAN card utilities and driver.
Insert the support CD and an autorun menu will appear. If your autorun is
disabled, double click SETUP.EXE in the root directory of the support CD.
2
ASUS WLAN Card
Quick Start Guide
English
English
1. Select your language and click Install
2. Click Next on the Welcome screen.
ASUS WLAN Card Utilities/Driver.
3. Click Next after reading the Information. 4. Click Next to use the default Destination
Folder or click Browse to select another folder.
5. Click Next to place icons in the default pro-
6. When Setup is complete, click Finish to exit
gram folder or type another folder name.
the installation wizard.
7. Windows XP users: When the program is
launched for the first time, you will be asked
which function to use. Select to use ASUS
utilities for more functions.
ASUS WLAN Card
3
Quick Start Guide
Inserting the ASUS WLAN card
English
Follow these instructions to install the ASUS WLAN card into your computer.
1. Turn ON your computer and enter Windows.
2. Insert the ASUS WLAN card into your
computer’s PCMCIA slot until it is
firmly seated.
3. Windows will automatically detect the
ASUS WLAN card. The “Found New
Hardware” wizard dialog will appear
and begin installing the driver. (Windows 98SE / Me users: During in-
stallation, Windows may prompt you to insert the “ Windows 98SE /
Me CD-ROM” which contains some driver files. Insert your “Windows
98SE / Me CD-ROM” and click Yes.)
4. When the ASUS WLAN card setup is completed you can start up the
WLAN utility to configure your ASUS WLAN card. Please refer to the
User’s Manual for more information.
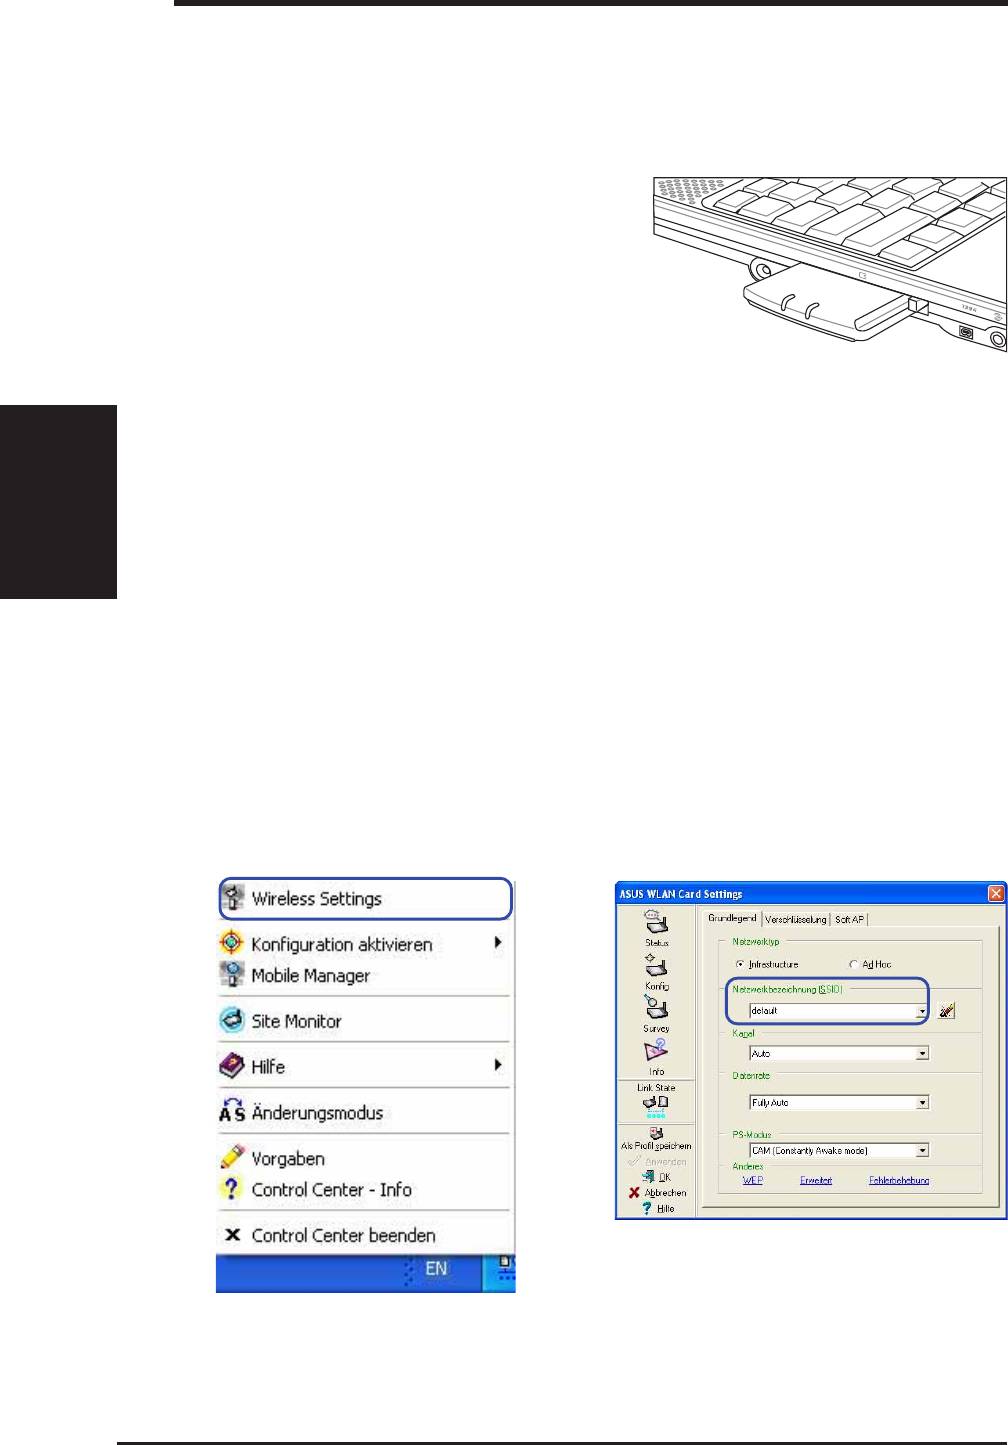
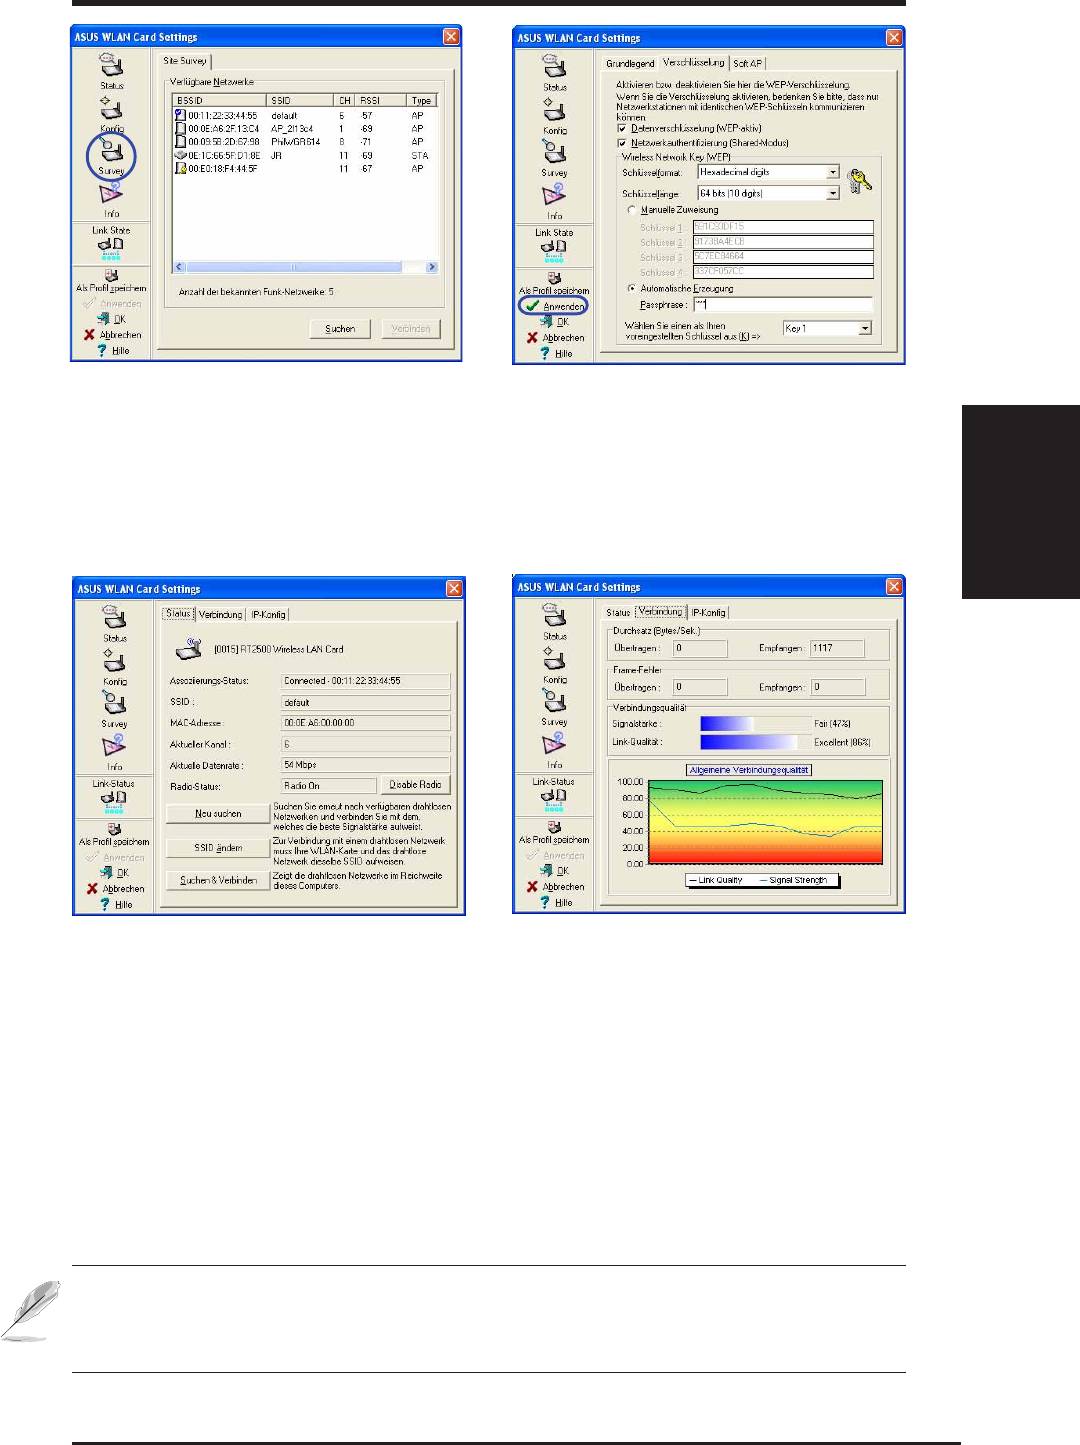
ASUS WLAN Utility Quick Start
After installing the ASUS WLAN Card Utilities, you may need to make some
settings before being able to use your wireless connection.
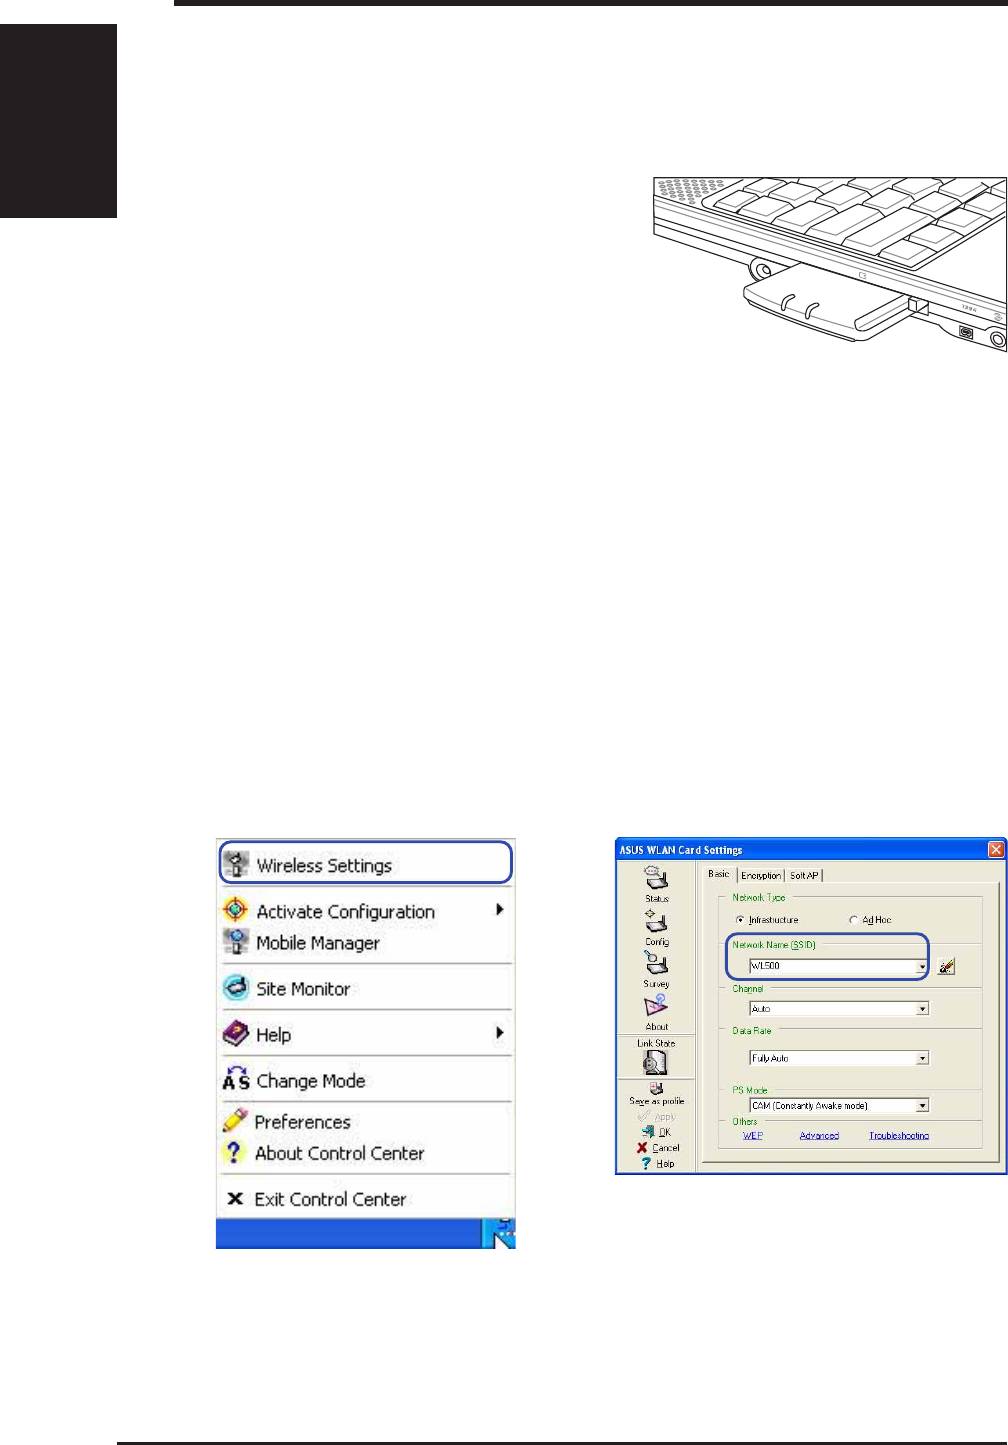
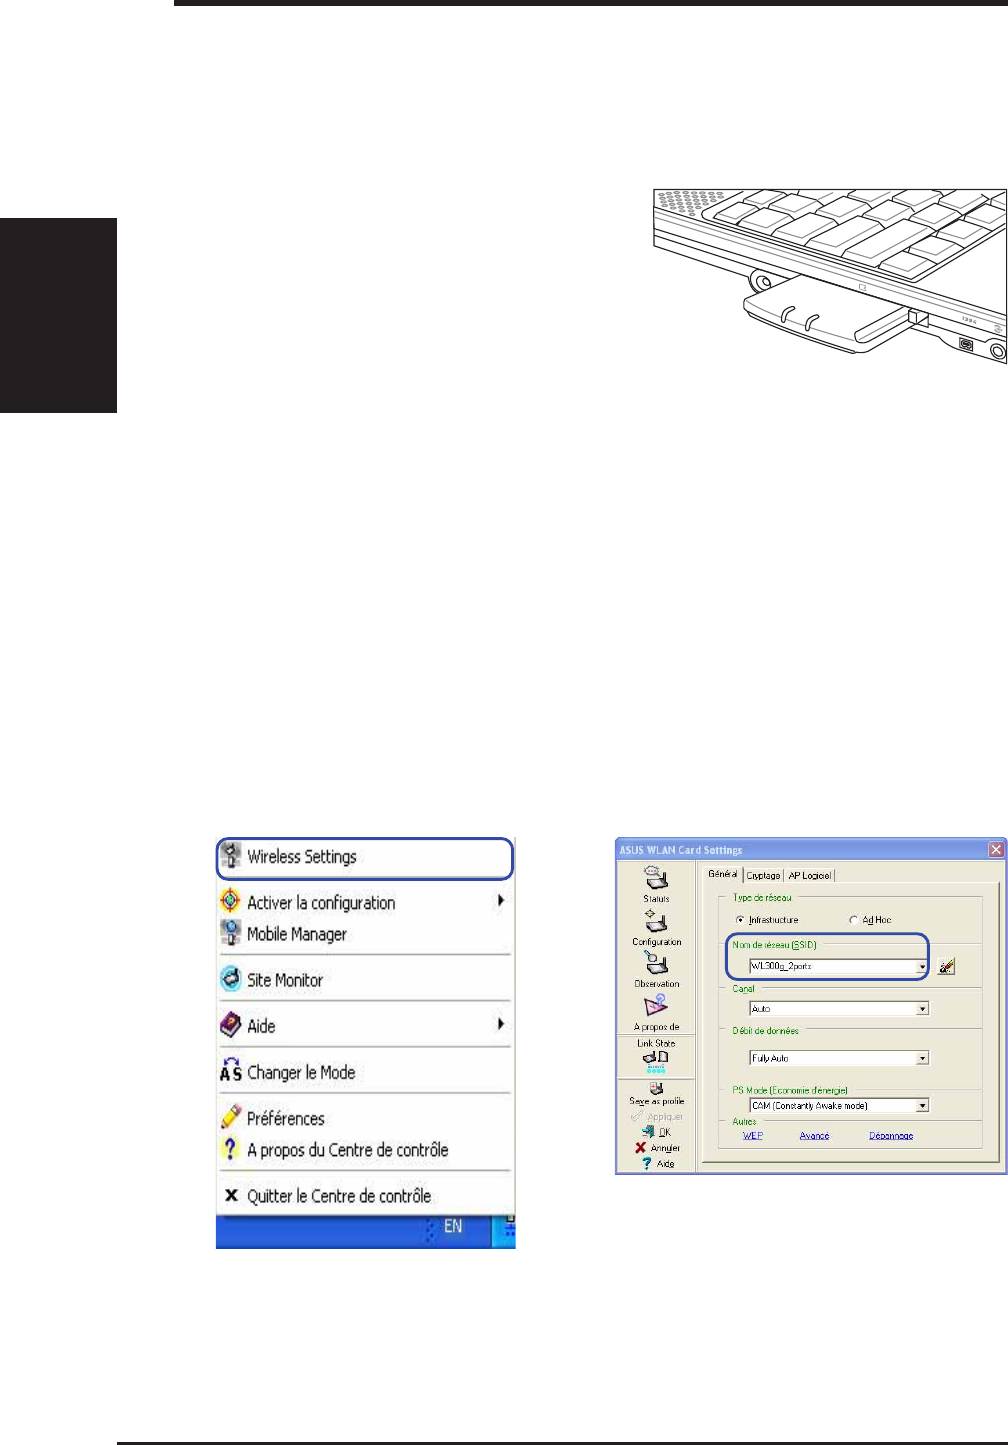
1. Right-click the ASUS WLAN icon and se-
2. Set the Network Name (SSID) to the same
lect “Wireless Settings”
name as the SSID set in your wireless ac-
cess point.
4
ASUS WLAN Card
Quick Start Guide
English
English
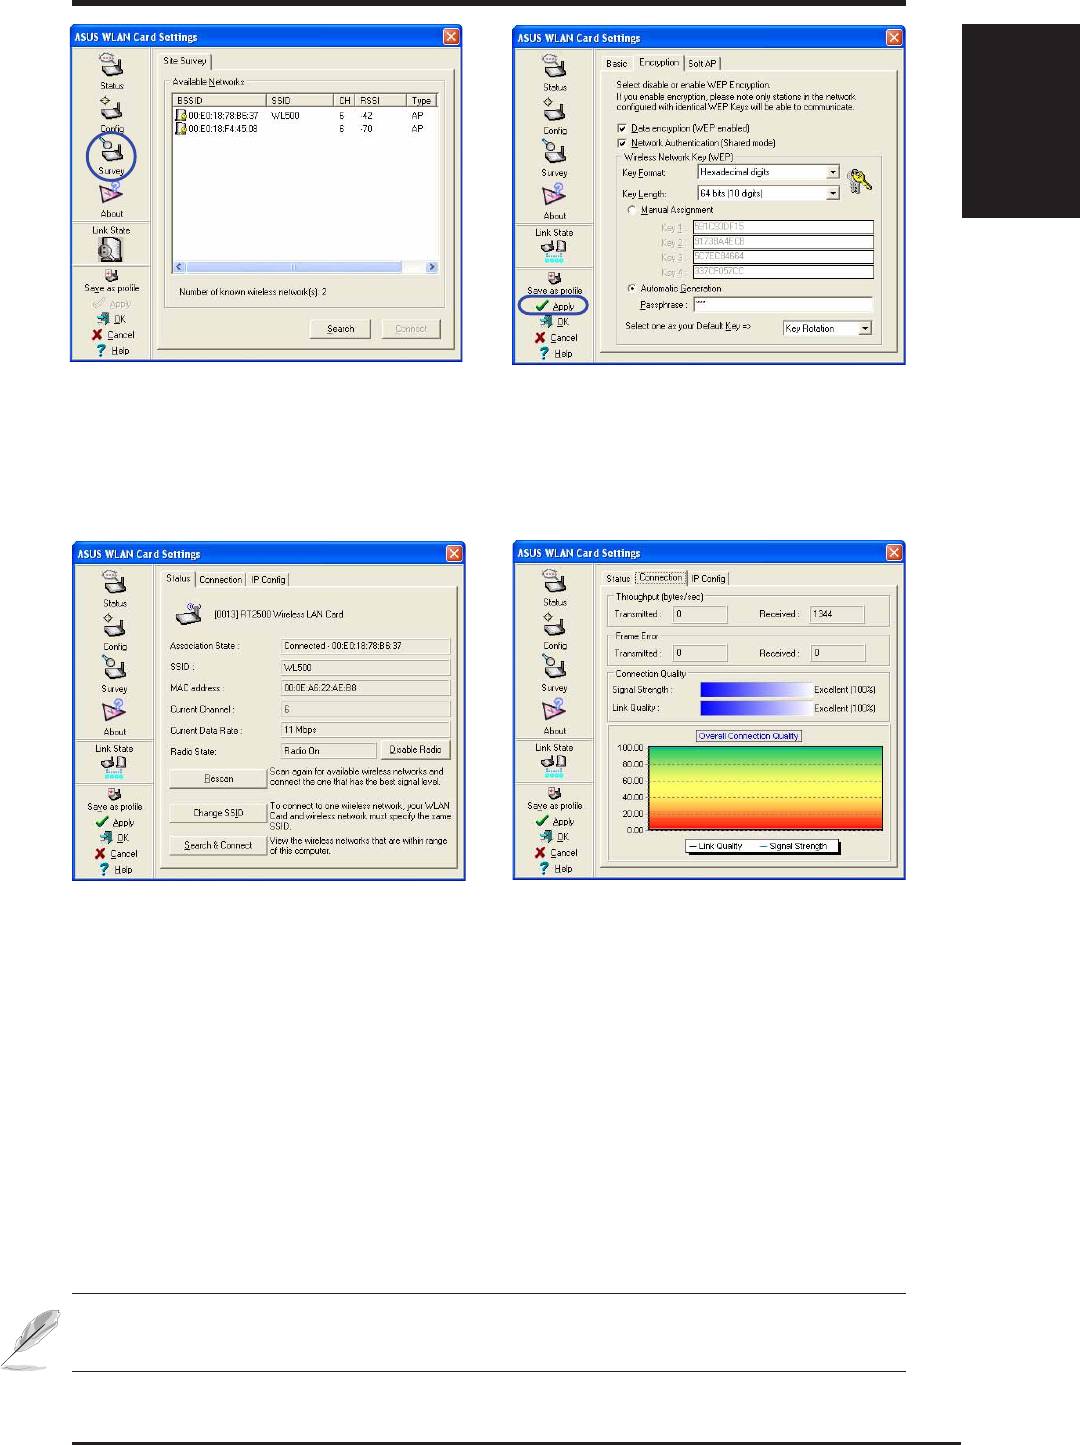
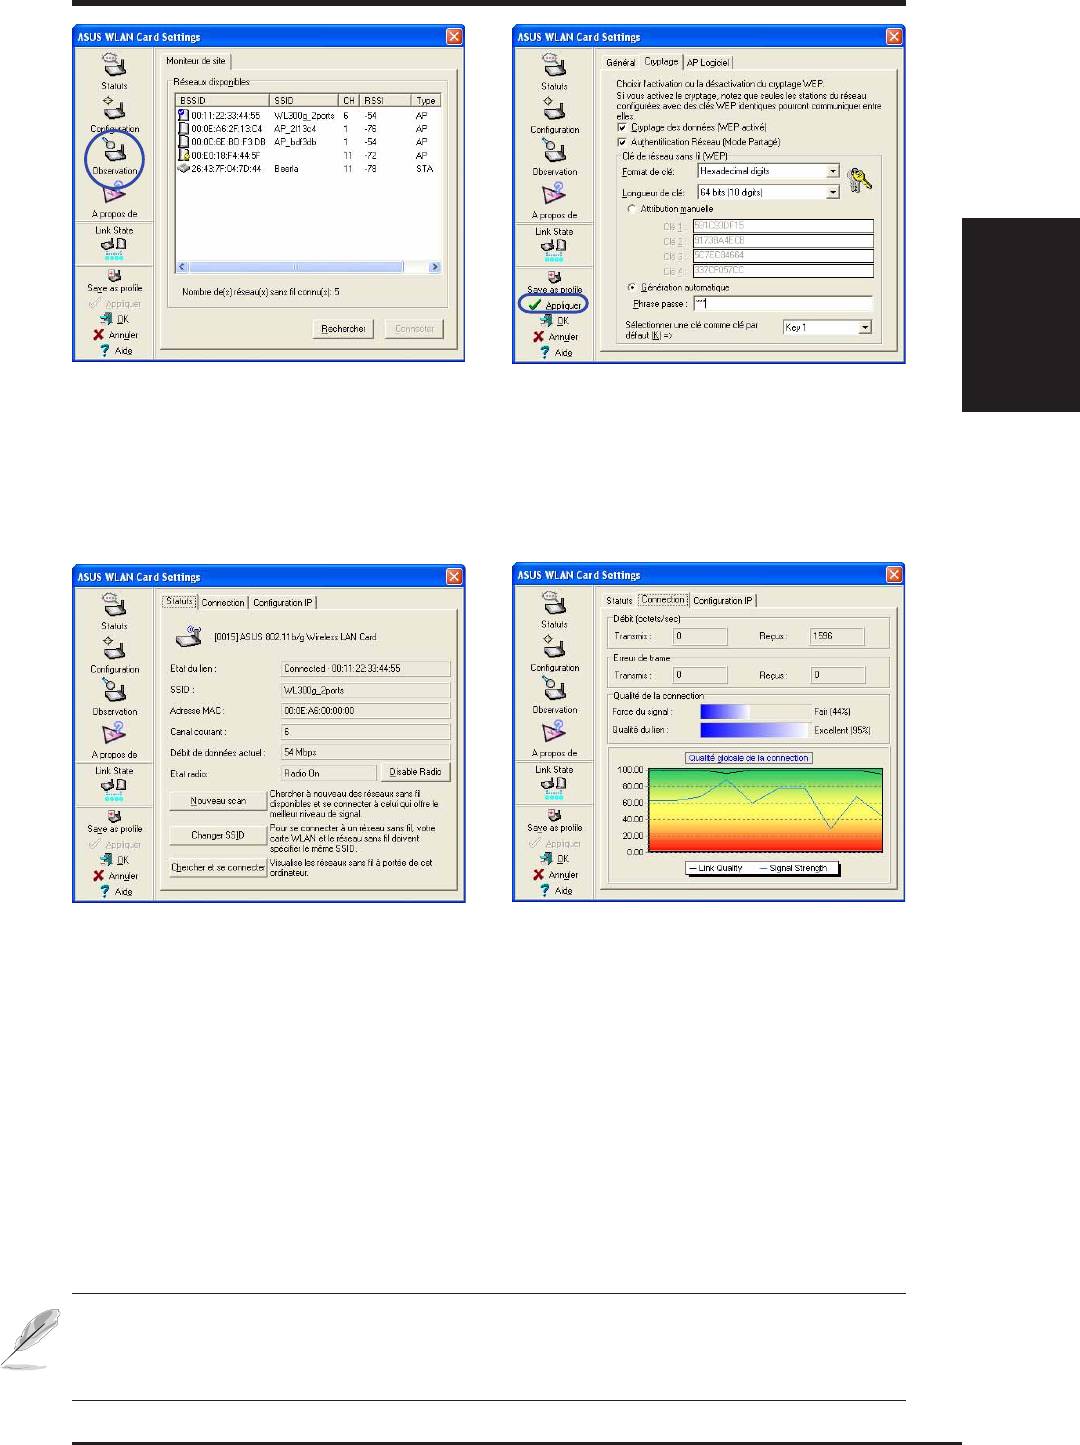
3. Use “Site Survey” if you don’t know the
4. Encryption settings must also match those
name of your access point(s).
set in the access point. Ask your network
administrator about settings if necessary.
Click Apply to save your settings
5. Check the “Status” page to see the “Asso-
6. You can also see the connection quality on
ciation State”. It should show “Connected -
the “Connection” page. Click OK to exit the
xx:xx:xx:xx:xx:xx”.
utility.
NOTE: Please refer to the User’s Manual for details on WEP/WPA
settings and details on using the WLAN utility.
ASUS WLAN Card
5
Quick Start Guide
English
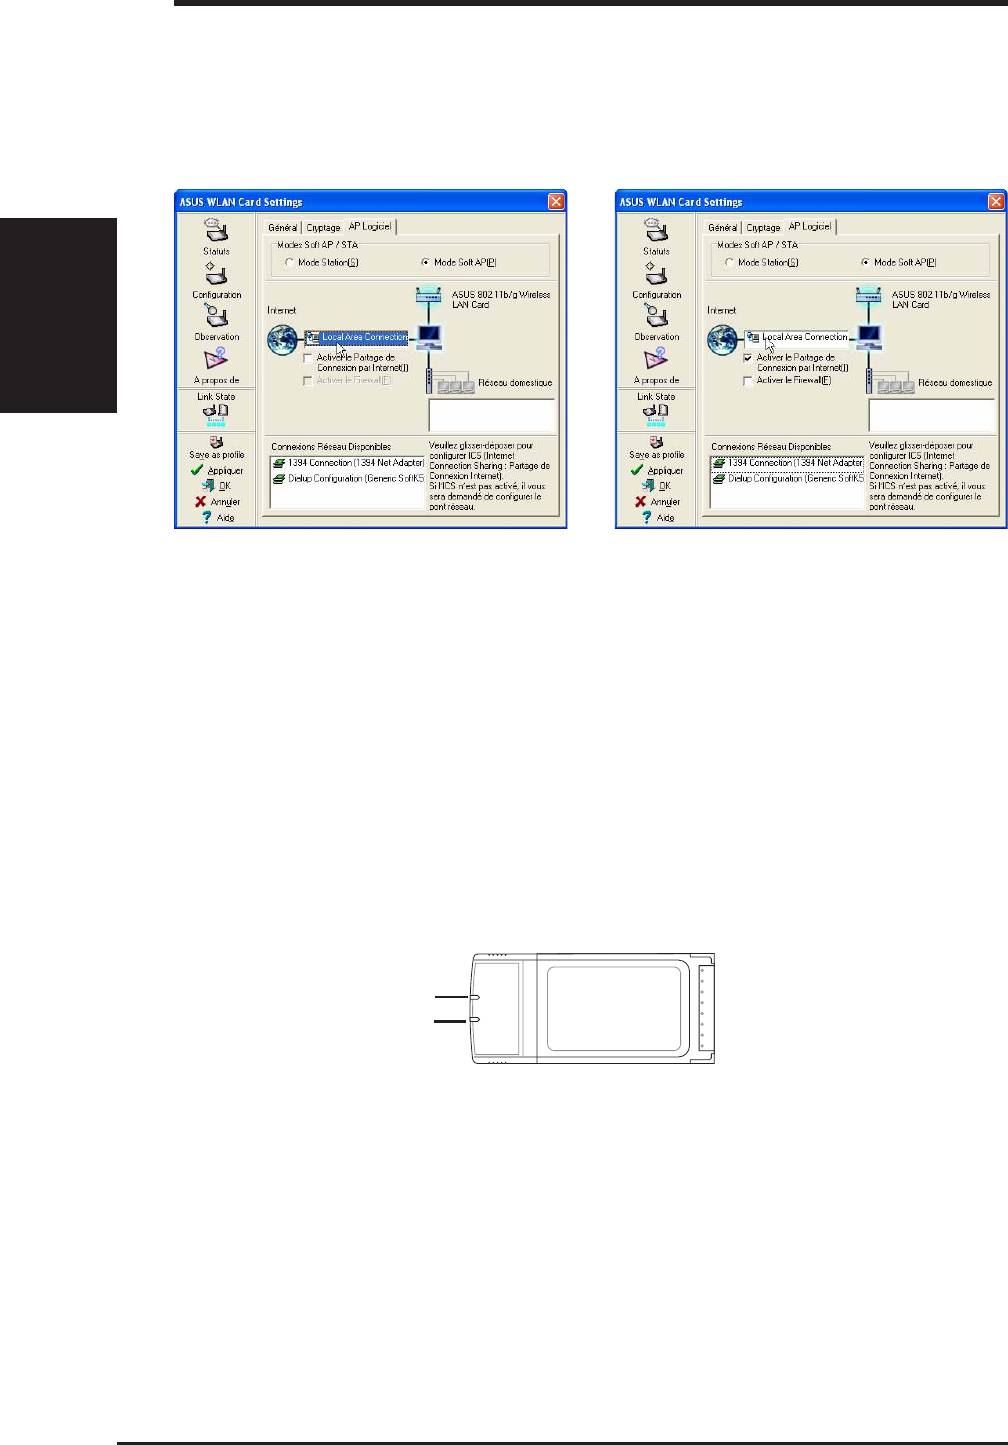
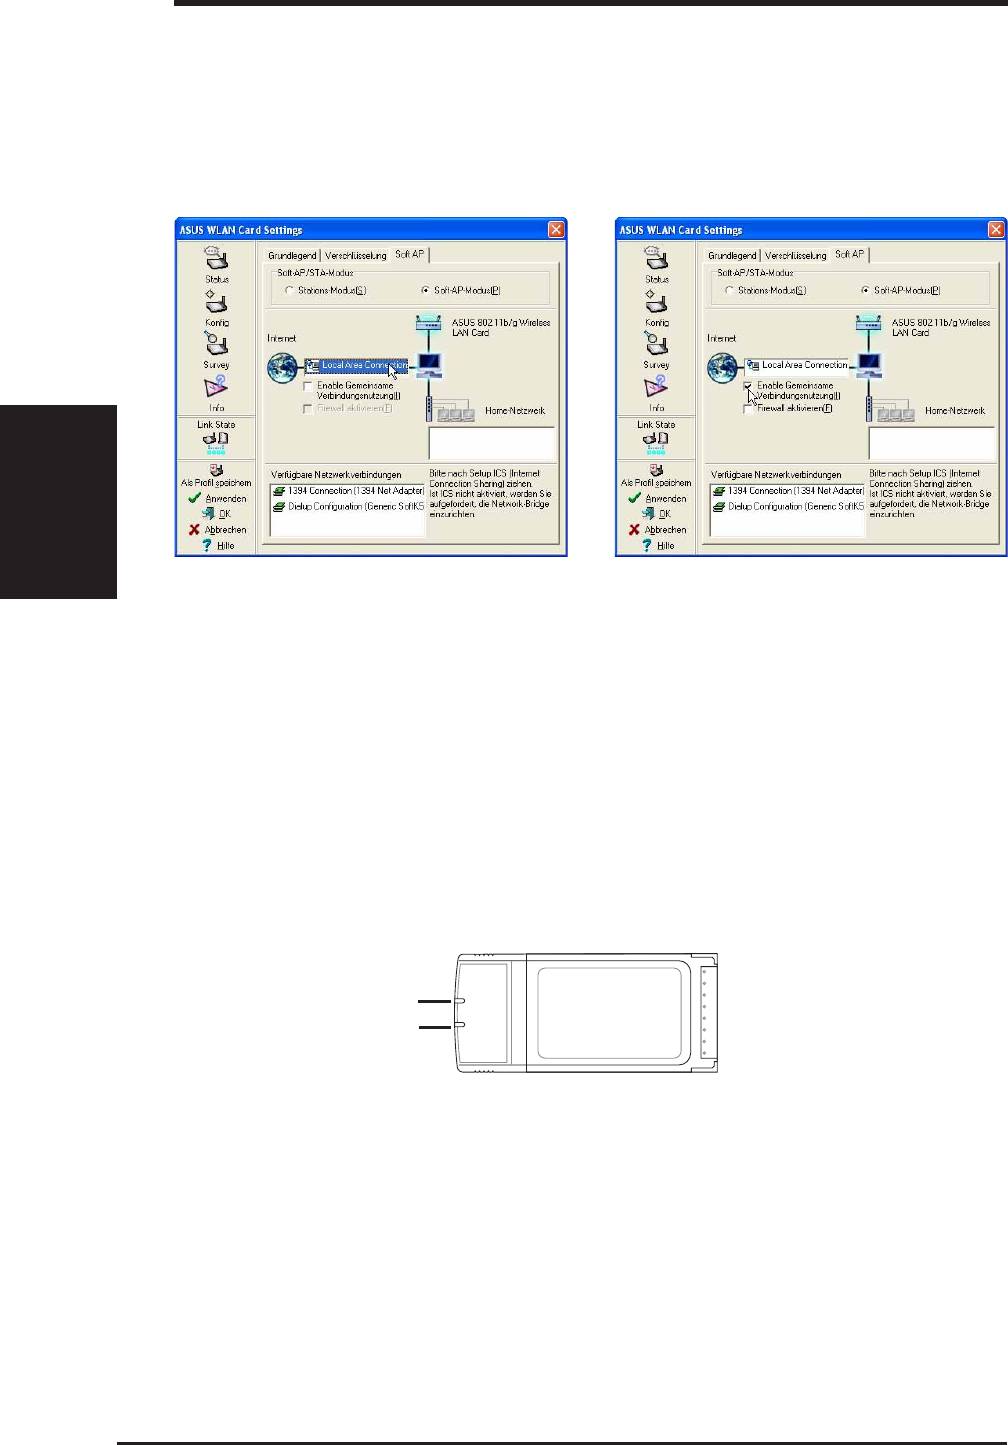
Soft AP (Windows XP Only)
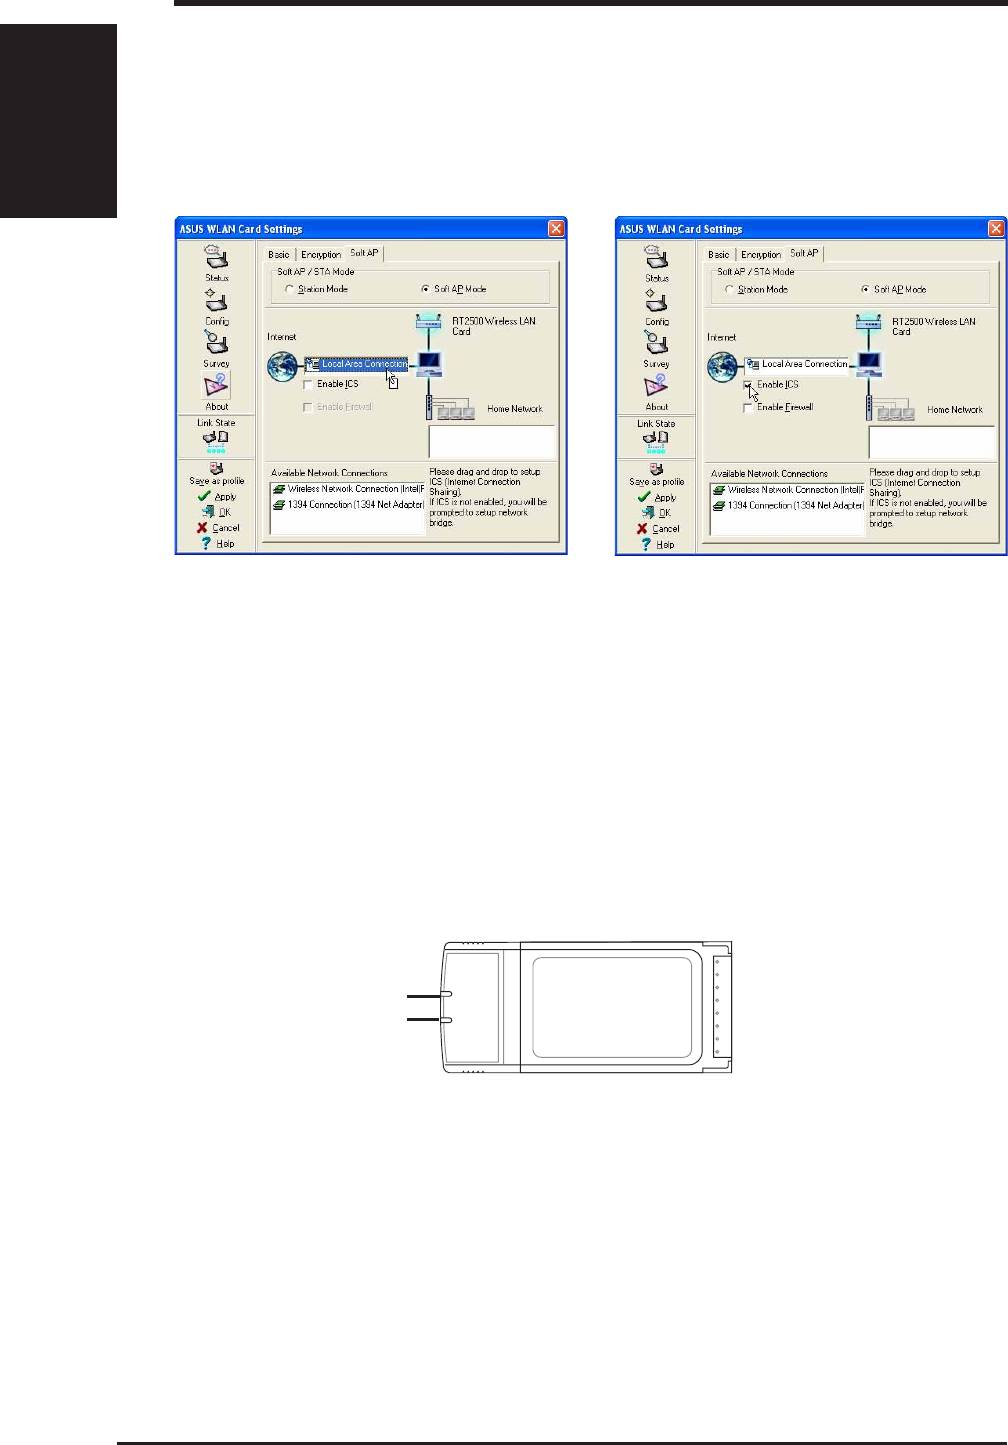
Soft AP mode allows the ASUS WLAN card to act as a virtual access point.
The computer needs to be connected to a wired network using an Ethernet
connection in order to provide network access to WLAN clients.
1. Select Soft AP Mode
3. Enable ICS and Firewall if desired. Refer to
Windows help for information on “Internet
2. Drag and drop a wired network connection
Connection Sharing”.
next to the globe icon.
4. You can easily switch between Soft AP and
Station mode by right clicking the taskbar
icon and selecting “A-S Change Mode”
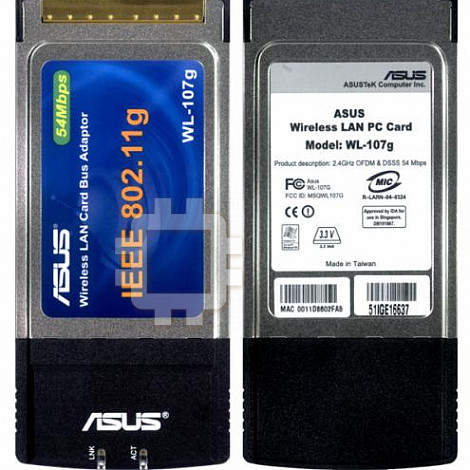
Reading the ASUS WLAN Status Indicators
The part of the ASUS WLAN Card that protrudes out of the PCMCIA socket
consists of two LEDs that indicate the status of the ASUS WLAN Card .
PWR / LNK
ACT
PWR (Power) LED
OFF: No power or error.
ON: Power ON.
LNK (Link) LED
OFF: No power, error, or not connected to a wireless AP or Router.
ON: Lights when connected to a wireless Access Point or Router.
ACT (Activity) LED
OFF: No wireless activity.
Blink: Transmitting or receiving wireless data.
6
ASUS WLAN Card
Français
®
Carte Wireless LAN
WL-107g
(Pour réseaux sans fil 802.11g et 802.11b)
Guide d’installation rapide

Guide d’installation rapide
Configuration requise
Pour commencer à utiliser la carte ASUS WLAN, vous devez avoir au minimum
la configuration suivante:
• Windows XP/2000/ME/98SE ou Linux Redhat (Version 7.1 ou
ultérieures)
Français
• Connecteur Standard PCMCIA Type II
• 32Mo de mémoire système ou plus
• Processeur de 300MHz ou plus
• Lecteur de CD-ROM
Procédures d’installation
Aux utilisateurs de Linux: ce manuel est destiné aux utilisateurs de
Windows. Les informations relatives à Linux sont contenues dans
le fichier “readme.txt”du dossier Linux. Les pilotes Linux sont
également situés dans ce dossier.
Important: installez les utilitaires de la carte WLAN ASUS avant
d’insérer la carte WLAN ASUS dans votre ordinateur.
Suivez ces instructions pour installer la carte WLAN ASUS.
1. Installez les utilitaires et pilotes de la carte WLAN ASUS depuis le CD
technique.
2. Inserez la carte WLAN ASUS dans votre ordinateur.
Installation des utilitaires et des pilotes
Suivez ces instructions pour installer les utilitaires et pilotes de la carte WLAN
ASUS. Insérez le CD technique; un menu autorun s’affiche. Si votre autorun
est désactivé, double-cliquez sur SETUP.EXE dans le répertoire racine du CD
technique.
2
Carte ASUS WLAN
Guide d’installation rapide
1. Choisissez votre langue et cliquez sur
2. Cliquez sur Suivant sur l’écran de
Français
“Installer les Utilitaires/Pilotes de la
bienvenue.
Carte WLAN ASUS ”.
3. Cliquez sur Suivant après avoir lu les
4. Cliquez sur Suivant pour utiliser le
informations.
dossier de destination par défaut ou
cliquez sur Parcourir pour sélectionner un
autre dossier.
5. Cliquez sur Suivant pour placer les
6. Lorsque l’installation est terminée, cliquez
icônes dans le répertoire du programme
sur Terminer pour quitter l’assistant
par défaut ou saisissez le nom d’un autre
d’installation.
répertoire.
7. Utilisateurs de Windows XP: Lorsque le
programme est exécuté pour la première
fois, il vous demandera quelle fonction
utiliser. Choisissez d’utiliser les utilitaires
ASUS afin d’accéder à plus de fonctions.
Carte ASUS WLAN
3
Guide d’installation rapide
Insérer la carte WLAN ASUS
Suivez ces instructions pour installer la carte WLAN ASUS dans votre
ordinateur.
1. Allumez votre ordinateur et entrez sous Windows.
2. Insérez la carte WLAN ASUS dans le
port PCMCIA de votre PC jusqu’à ce
Français
qu’elle y soit bien enfichée.
3. Windows détecte automati- quement
la carte WLAN ASUS. L’assistant
“Nouveau matériel détecté” s’affiche
et commence à installer les pilotes. (Utilisateurs de Windows 98SE /
Me: lors de l’installation, Windows peut vous demander d’insérer le “
CD-ROM Windows 98SE / Me” qui contient quelques fichiers de pilotes.
Insérez votre CD-ROM “Windows 98SE / Me” et cliquez sur Oui.)
4. Lorsque l’installation de la carte WLAN ASUS est achevée, vous pouvez
lancer l’utilitaire WLAN pour configurer votre carte WLAN ASUS.
Reportez-vous au guide de l’utilisateur pour de plus amples informations.
Démarrage rapide des utilitaires ASUS WLAN
Après avoir installé les utilitaires de la carte ASUS WLAN, vous devez effectuer
quelques réglages avant de pouvoir utiliser les connexions sans fil.
1. Cliquez du bouton droit sur l’icône ASUS
2. Pour le paramètre Nom de réseau (SSID),
WLAN et sélectionnez “Wireless Settings”
choisissez le même nom que le SSID réglé
4
Carte ASUS WLAN
Guide d’installation rapide
Français
3. Utilisez “Moniteur de site” si vous ne
4. Les paramètres de cryptage doivent
connaissez pas le nom de votre point
également correspondre à ceux de votre
d’accès.
point d’accès. Informez-vous auprès de
votre administrateur réseau si nécessaire.
Cliquez sur Appliquer pour enregistrer
vos paramètres.
5. Vérifiez la page “Status” pour voir “Etat
6. Vous pouvez aussi voir la qualité de la
du lien”. Il doit afficher “Connected -
connexion sur la page “Connection”.
xx:xx:xx:xx:xx:xx”.
Cliquez sur OK pour quitter l’utilitaire.
NOTE: Reportez-vous au guide de l’utilisateur pour plus de détails
sur les paramètres WEP/WPA et plus de détails sur l’utilisation de
l’utilitaire WLAN.
Carte ASUS WLAN
5
Guide d’installation rapide
Soft AP (Windows XP uniquement)
Le mode Soft AP permet à la carte WLAN ASUS de se comporter comme un
point d’accès virtuel. L’ordinateur doit être connecté à un réseau filaire utilisant
une connexion Ethernet pour fournir l’accès au réseau aux clients WLAN.
Français
1. Choisissez le Mode Soft AP.
3. Activer le Partage de Connexion par
Internet et le Firewall si désiré. Reportez-
2. Faites un “Drag and drop” d’un réseau
vous à l’aide de Windows pour plus
filaire près de l’icone de globe.
d’informations sur le partage de
connexion Internet.
4. Vous pouvez facilement passer du Soft
AP au mode Station d’un simple clic droit
sur l’icone de la barre des tâches et en
choisissant “Changer le Mode A-S”.
Lire les indicateurs de statut ASUS WLAN
La partie de la carte WLAN ASUS qui dépasse hors du port PCMCIA contient
deux LED qui indiquent le statut de la carte WLAN ASUS.
PWR / LNK
ACT
LED PWR (Alimentation)
OFF: Pas d’alimentation ou erreur.
ON: Allumé.
LED LNK (Lien)
Eteint: pas alimenté, erreur, ou non connecté à un routeur ou AP wire
less.
Allumé: connecté à un routeur ou AP wireless.
LED ACT (Activité)
Eteint: pas d’activité wireless.
Clignote: transmet ou reçoit des données wireless.
6
Carte ASUS WLAN
Deutsch
®
Wireless Local Area Network Card
WL-107g
(Für 802.11g und 802.11b Wireless Netzwerke)
Schnellstartanleitung

Schnellstartanleitung
Systemvoraussetzungen
Um die ASUS WLAN Karte zu verwenden, muss Ihr System die folgenden
Voraussetzungen erfüllen:
• Windows XP/2000/ME/98SE oder Linux Redhat (Version 7.1 oder
neuere)
• Standard PCMCIA Schacht Typ II
• 32MB Arbeitsspeicher oder höher
• 300MHz Prozessor oder höher
• CD-ROM-Laufwerk
Deutsch
Installationsvorgang
Unter Linux: Dieses Handbuch wurde für Windows-Benutzer
verfasst. Die Informationen zur Installation unter Linux befinden
sich in der Datei "readme.txt" im Linux-Ordner. Die Treiber für Linux
befinden sich auch in dem selben Ordner.
Wichtig: Installieren Sie die ASUS WLAN-Kartendienstprogramme,
bevor Sie die ASUS WLAN-Karte in Ihren Computer einstecken.
Folgen Sie den nachstehenden Anweisungen, um die ASUS WLAN-Karte zu
installieren.
1. Installieren Sie die ASUS WLAN-Kartendienstprogramme und Treiber
von der Support CD.
2. Stecken Sie die ASUS WLAN-Karte in Ihren Computer ein.
Installieren der Dienstprogramme und Treiber
Folgen Sie den nachstehenden Anweisungen, um die ASUS WLAN-
Kartendienstprogramme und Treiber zu installieren. Legen Sie die Support
CD ein. Ein Menü wird daraufhin automatisch geöffnet. Ist Ihre Autorun-
Funktion deaktiviert, klicken Sie bitte doppelt auf SETUP.EXE in dem
Stammordner der Support CD.
2
ASUS WLAN Karte
Schnellstartanleitung
1. Wählen Sie Ihre Sprache und klicken
2. In der nächsten Anzeige, klicken Sie
anschließend auf ASUS WLAN-
Weiter.
Kartendienstprogramme/-treiber.
Deutsch
3. Lesen Sie die Informationen und klicken
4. Klicken Sie Weiter um den Default-
Sie Weiter.
Zielordner zu verwenden, oder klicken Sie
Durchsuchen um einen anderen Ordner
einzugeben.
5. Klicken Sie Weiter um das Symbol in den
6. Ist die Installation beendet, klicken Sie
Default-Ordner zu plazieren, oder geben
Fertig stellen um den Assistenten zu
Sie einen anderen Ordner an.
beenden.
7. Unter Windows XP: Starten Sie das
Programm zum ersten Mal, geben Sie ein
welche Funktionen verwendet werden
sollen. Wählen Sie ASUS Hilfsprogramm
für mehr Funktionen.
ASUS WLAN Karte
3
Schnellstartanleitung
Einstecken der ASUS WLAN-Karte
Folgen Sie den nachstehenden Anweisungen, um die ASUS WLAN-Karte in
Ihren Computer einzustecken.
1. Stellen Sie Ihren Computer ein und starten Sie Windows.
2. Stecken Sie die ASUS WLAN-Karte
in den PCMCIA-Steckplatz Ihres
Comptuers ein, bis sie richtig sitzt.
3. Windows erkennt automatisch die
ASUS WLAN-Karte. Der "Neue Hard-
ware gefunden"-Assistent erscheint und
beginnt den Treiber zu installieren. (Unter Windows 98SE/Me: Sie werden
möglicherweise während der Installation aufgefordert die "Windows 98SE-
Deutsch
/ Me-CD-ROM", die einige Treiberdateien enthält, einzulegen. Legen Sie
bitte Ihre "Windows 98SE- /Me-CD-ROM" ein und klicken anschließend
auf Ja.)
4. Nach dem Vervollständigen der ASUS WLAN-Karteninstallation
können Sie das WLAN-Dienstprogramm öffnen, um Ihre ASUS WLAN-
Karte zu konfigurieren.Einzelheiten hierzu entnehmen Sie bitte dem
Benutzerhandbuch.
ASUS WLAN Hilfsprogramm Kurzanleitung
Nach der Installation von ASUS WLAN Hilfsprogramm kann es sein das Sie
einige Einstellungen vornehmen müssen, bevor Sie Ihre Wireless Verbindung
nutzen können.
1. Klicken Sie das ASUS WLAN Symbol mit
2. Stellen Sie den Netzwerkbezeichnung
der rechten Maustaste und wählen Sie
(SSID) auf den selben SSID wie Ihr
“Wireless Settings”.
Wireless Access Point.
4
ASUS WLAN Karte
Schnellstartanleitung
3. Verwenden Sie “Site Survey” wenn Sie
4. Die Einstellungen für Datenverschlüsselung
den Namen Ihres Access Points nicht
müssen auch mit denen des Access Points
kennen.
übereinstimmen. Fragen Sie wenn nötig
Ihren Netzwerk Administrator. Klicken Sie
Anwenden um Ihre Einstellungen zu
speichern.
Deutsch
5. Prüfen Sie die “Status” Seite, der
6. Die Qualität der Verbindung können Sie
“Assoziierungs-Status” sollte “Connected
auf der Seite “Verbindung” prüfen. Klicken
- xx:xx:xx:xx:xx:xx” sein.
Sie OK um das Hilfsprogramm zu
beenden.
HINWEIS: Einzelheiten zu WEP/WPA-Einstellungen und zur
Verwendung des WLAN-Dienstprogramms entnehmen Sie bitte dem
Benutzerhandbuch.
ASUS WLAN Karte
5
Schnellstartanleitung
Soft AP (nur unter Windows XP)
Der Soft AP-Modus gestattet der ASUS WLAN-Karte als virtueller Acess Point
zu arbeiten. Der Computer muss über eine Ethernet-Verbindung mit einem
verdrahteten Netzwerk verbunden sein, um WLAN-Clients einen
Netzwerkzugang anzubieten.
Deutsch
1. Wählen Sie den Soft-AP-Modus.
3. Aktivieren Sie nach Bedarf ICS und
Firewall. Informationen zur gemeinsamen
2. Ziehen Sie eine verdrahtete
Nutzung der Internetverbindung
Netzwerkverbindung zu dem Globus-
entnehmen Sie bitte der Windows-Hilfe.
Symbol.
4. Sie können leicht zwischen Soft-AP und
Stations-Modus wechseln, indem Sie auf
das Symbol in der Taskleiste klicken und
"A-S Änderungsmodus" wählen.
Bedeutungen der ASUS WLAN-Statusanzeigen
Der außerhalb des PCMCIA-Steckplatz befindliche Teil der ASUS WLAN-
Karte besitzt zwei LEDs, die den Status der ASUS WLAN-Karte anzeigen.
PWR / LNK
ACT
PWR (Stromversorgung) -LED
Aus: Ausgeschaltet oder Fehler.
Ein: Eingeschaltet.
LNK (Link)-LED
Aus: Kein Strom, Fehler oder nicht mit einem drahtlosen AP oder Router
verbunden.
Ein: Mit einem drahtlosen AP oder Router verbunden.
ACT (Aktivität) -LED
Aus: Keine drahtlose Aktvität
Blinkt: Daten werden drahtlos gesendet oder empfangen.
6
ASUS WLAN Karte
Italiano
®
Scheda Local Area Network Wireless
WL-107g
(Per Reti Wireless 802.11g e 802.11b)
Guida alla Consultazione Veloce
Guida alla Consultazione Veloce
Requisiti di Sistema
Per poter utilizzare la Scheda ASUS WLAN, dovete possedere i seguenti
requisiti minimi:
• Windows XP/2000/ME/98SE o Linux Redhat (Versione 7.1 o
successive)
• Slot Standard PCMCIA Type II
• 32MB o più di memoria di sistema
• 300MHz o più per il processore
• Lettore CD-ROM
Procedure di installazione
Utenti Linux: Questo manuale si rivolge agli utenti Windows. Per
ulteriori informazioni su Linux consultare il file “readme.txt” nella
cartella Linux, la quale contiene anche i driver per Linux.
Italiano
Importante: Installare le utilità ASUS WLAN prima di inserire nel
computer la Scheda ASUS WLAN.
Seguire le istruzioni successive per impostare la scheda ASUS WLAN.
1. Installare le utilità della scheda ASUS WLAN ed il driver dal CD di supporto.
2. Inserire la scheda ASUS WLAN nel computer.
Installazione delle utilità e del driver
Seguire le istruzioni successive per installare le utilità ed il driver per la scheda
ASUS WLAN. Inserire il CD di supporto per far apparire il menu attivato
dall’autorun. Qualora la funzione autorun fosse disabilitata, fare doppio clic
su SETUP.EXE nella directory principale del CD di supporto.
2
Scheda ASUS WLAN


