Asus PCI-G31: instruction
Class: Networks, communications, telecommunications, internet, security
Type:
Manual for Asus PCI-G31
Table of contents
Declaration of Conformity
We, Manufacturer/Importer
(full address)
ASUS COMPUTER GmbH HARKORT STR. 25
40880 RATINGEN, BRD. GERMANY
declare that the product
( description of the apparatus, system, installation to which it refers)
is in conformity with
(reference to the specification under which conformity is declared)
in accordance with 2004/108/EC-EMC Directive and 1995/5 EC-R &TTE Directive
Product name: LAN PCI Adapter
Model name : PCI-G31
EN 50392
Generic standard to demonstrate the compliance
EN 61000-3-2*
Disturbances in supply systems caused
of electronic and electrical apparatus with the basic
restrictions related to human exposure to electromagnetic
EN 61000-3-3*
Disturbances in supply systems caused
fields (0 Hz-300GHz)
EN 301893
Broadband Radio Access Networks (BRAN); 5 GHz
EN 50360
t
he limitation of exposure of the general public
high performance RLAN; Harmonized EN covering
EN 50361
to electromagnetic network equipment fields
essential requirements of article 3.2 of
(0 Hz to 300 GHz) International Commission
the R&TTE Directive
on Non-Ionizing Radiation Protection (1998),
ʳ
Guidelines for limiting exposure in time-varying
Electromagnetic compatibility and Radio spectrum
EN 300328
electric, magnetic ,and electromagnetic fields
Matters (ERM); wideband transmission equipment
operating in the 2.4GHz ISM band and using spread
spectrum modulation techniques. Harmonized EN
covering essential requirements under article 3.2 of
the R&TTE Directive
EN50081-1
Generic emission standard Part 1: Residual,
commercial and light industry
EN300440-1
Electromagnetic compatibility and Radio spectrum
Matters (ERM);Short Range Devices (SRD);Radio
EN300440 -2
Generic immunity standard Part 2: Industrial environment
equipment to be used in the 1 GHz to 40 GHz
EN50082-2
frequency range; Part 1: Technical characteristics
and test methods
Part 2: Harmonized EN under article 3.2 of the
R&TTE Directive
EN 55020
Immunity from radio interference of broadcast receivers
EN 301511
Global System for Mobile communications
and associated equipment
(GSM);Harmonized EN for mobile stations in the
GSM 900 and GSM 1800 bands covering essential
Limits and methods of measurement of radio disturbance
requirements under article 3.2 of the R&TTE
EN 55022
characteristics of information
directive (1999/5/EC)
technology equipment
EN 301 908-1
Electromagnetic compatibility and Radio spectrum
EN 55024
Information Technology equipment-Immunity
EN 301 908-2
Matters (ERM);Base Stations (BS), Repeaters and
characteristics-Limits and methods of measurement
User Equipment (UE) for IMT-2000 Third-Generation
cellular networks; Part 1: Harmonized EN for
Limits and methods of measurement of radio disturbance
IMT-2000, introduction and common requirements,
EN 55013
characteristics of broadcast receivers and associated
covering essential requirements of article 3.2 of the
equipment
R&TTE Directive
EN 50385
Product standard to demonstrate the compliances or radio
EN 301489
-1
Electromagnetic compatibility and Radio spectrum
Base stations and fixed terminal stations for
EN 301489
-17
Matters (ERM); Electromagnetic compatibility(EMC)
wireless telecommunication systems with the basic
standard for radio equipment and services; Part 17:
restriction or the reference level to human exposure to
Specific conditions for wideband data and
radio frequency electromagnetic) field (110MHZ-40GHZ)
HIPERLAN equipment, Part1: Common technical
-General public
requirements
EN 300386
Electromagnetic compatibility and Radio spectrum
Matters (ERM);Telecommunication Electromagnetic
Compatibility (EMC) requirements
CE marking
(EC conformity marking)
The manufacturer also declares the conformity of above mentioned product
with the actual required safety standards in accordance with LVD 2006/95/EC
EN 60065
Safety requirements for mains operated
EN 60950-1
Safety for information technology equipment
electronic and related apparatus for including electrical business equipment
household and similar general use
Manufacturer/Importer
(Stamp)
Date : Jul. 30, 2008
U4063_PCI-G31.indb 1 2/10/09 1:36:47 PM

Appendix
Federal Communications Commission Statement
This device complies with Part 15 of the FCC Rules. Operation is subject to the
following two conditions:
• This device may not cause harmful interference.
• This device must accept any interference received, including interference that
may cause undesired operation.
This equipment has been tested and found to comply with the limits for a class
B digital device, pursuant to part 15 of the FCC Rules. These limits are designed
to provide reasonable protection against harmful interference in a residential
installation.
This equipment generates, uses and can radiate radio frequency energy and, if
not installed and used in accordance with the instructions, may cause harmful
interference to radio communications. However, there is no guarantee that
interference will not occur in a particular installation. If this equipment does cause
harmful interference to radio or television reception, which can be determined
by turning the equipment off and on, the user is encouraged to try to correct the
interference by one or more of the following measures:
• Reorient or relocate the receiving antenna.
• Increase the separation between the equipment and receiver.
• Connect the equipment into an outlet on a circuit different from that to which
the receiver is connected.
• Consult the dealer or an experienced radio/TV technician for help.
Caution: Any changes or modications not expressly approved by the party responsible for
compliance could void the user’s authority to operate the equipment.
Prohibition of Co-location
This device and its antenna(s) must not be co-located or operating in conjunction with
any other antenna or transmitter.
Safety Information
To maintain compliance with FCC’s RF exposure guidelines, this equipment should
be installed and operated with minimum distance 20cm between the radiator and
your body. Use on the supplied antenna.
U4063_PCI-G31.indb 2 2/10/09 1:36:49 PM

Declaration of Conformity for R&TTE directive
1999/5/EC
Essential requirements – Article 3
Protection requirements for health and safety – Article 3.1a
Testing for electric safety according to EN 60950-1 has been conducted. These are
considered relevant and sufficient.
Protection requirements for electromagnetic compatibility – Article 3.1b
Testing for electromagnetic compatibility according to EN 301 489-1 and EN 301
489-17 has been conducted. These are considered relevant and sufficient.
Effective use of the radio spectrum – Article 3.2
Testing for radio test suites according to EN 300 328- 2 has been conducted.
These are considered relevant and sufficient.
CE Mark Warning
This is a Class B product, in a domestic environment, this product may cause radio
interference, in which case the user may be required to take adequate measures.
Reach
Complying with the REACH(Registration, Evaluation, Authorization, and Restriction of
Chemicals) regulatory framework, we publish thee chemical substances in our producs
at ASUS REACH website at http://green.asus.com/english/REACH.htm.
DGT 警語
經型式認證合格之低功率射頻電機,非經許可,公司、商號或使用者均不得擅自變
更頻率、加大功率或變更原設計之特性及功能。
低功率射頻電機之使用不得影響飛航安全及干擾合法通信;經發現有干擾現象時,
應立即停用,並改善至無干擾時方得繼續使用。
前項合法通信,指依電信法規定作業之無線電通信。
低功率射頻電機須忍受合法通信或工業、科學及醫療用電波輻射性電機設備之干
擾。
A4063_PCI-G31.indb 3 2/10/09 1:45:01 PM

Index
1. English ................................................................................1
2. Nederlands .........................................................................6
3. Suomi ...............................................................................10
4. FrançaisFrançais ............................................................................14
5. Deutsch ............................................................................18
6. Ελληνικά ..........................................................................22
7. Italiano ..............................................................................26
8. Português .........................................................................30
9. Español .............................................................................34
10.
38
11. Česky ................................................................................42
12. Eesti ..................................................................................46
13. Magyar ..............................................................................50
14. Latviski ..............................................................................54
15. Lietuvių .............................................................................58
16. Polski ................................................................................62
17. Română ............................................................................66
18.
...............................................................................70
19. Slovensky .........................................................................74
20.
..........................................................................78
U4063_PCI-G31.indb 4 2/10/09 1:36:50 PM
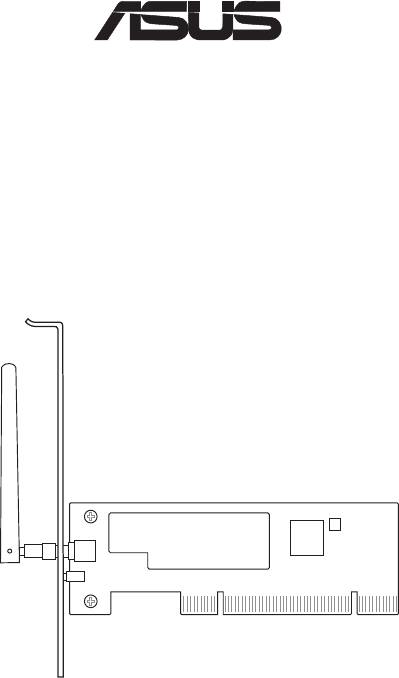
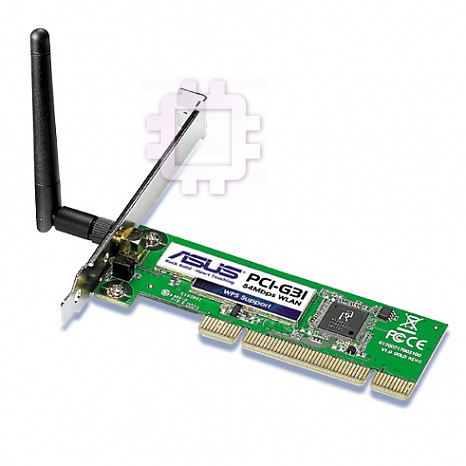
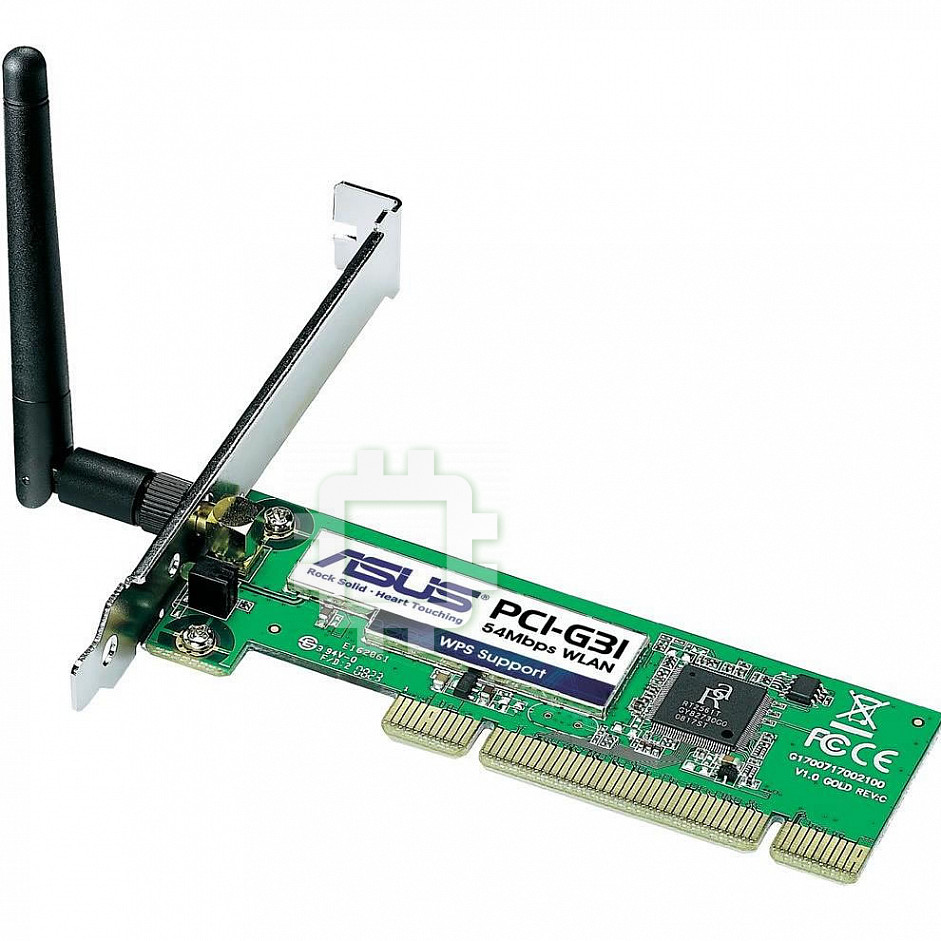
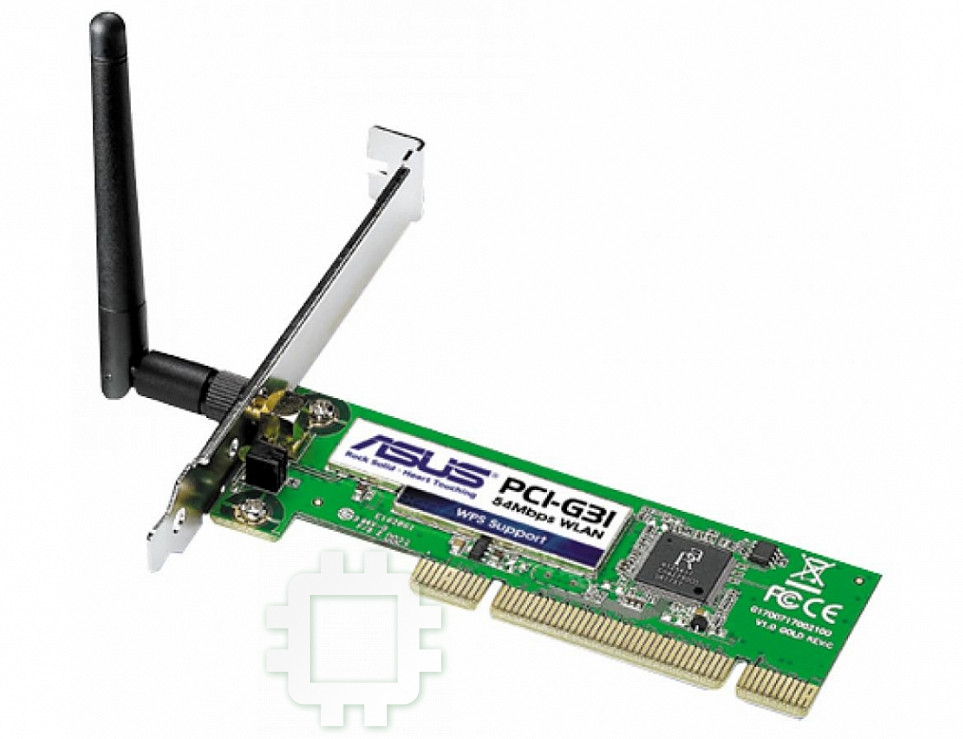
PCI-G31
Wireless Local Area Network Card
(For 802.11g & 802.11b Wireless Networks)
Quick Start Guide
®
U4063_PCI-G31.indb 1 2/10/09 1:36:51 PM
PCI-G31 WLAN Card Quick Start Guide
English
2
ASUS WLAN Card
1. Introduction
1.1 Package contents
Check your PCI-G31 WLAN Card package for the following items.
• ASUS PCI-G31 WLAN Card x1 • External dipole antenna x1
• Quick Start Guide x1 • Support CD x1
• Low prole bracket x1 • Warranty Card x1
NOTE: If any of the above items is damaged or missing, contact your retailer
immediately.
1.2 System requirements
Before using the PCI-G31 WLAN Card, check if your system meets the following
requirements:
®
• Windows
Vista/XP/2000/ME • Standard 32-bit PCI slot
• 32MB system memory or larger • 300MHz processor or higher
1.3 Hardware
Status indicator
The PCI-G31 WLAN Card comes with a status indicator that shows the realtime
status of the WLAN card.
ON: The WLAN card is enabled.
Blinking: The WLAN card has connected to a wireless network successfully and
data is being received or transmitted.
OFF: The WLAN card is disabled.
External dipole antenna
The PCI-G31 WLAN Card package includes an external dipole antenna. We
recommend that you straighten up the antenna for the maximum range and best
link quality.
U4063_PCI-G31.indb 2 2/10/09 1:36:52 PM
PCI-G31 WLAN Card Quick Start Guide
English
3
ASUS WLAN Card
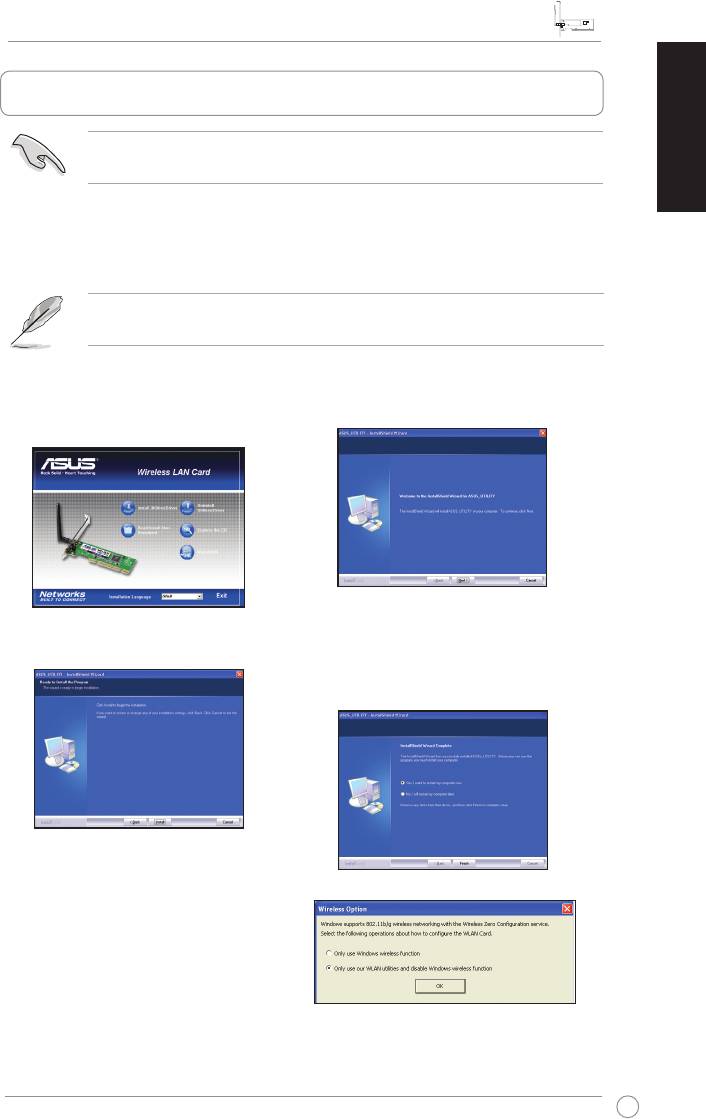
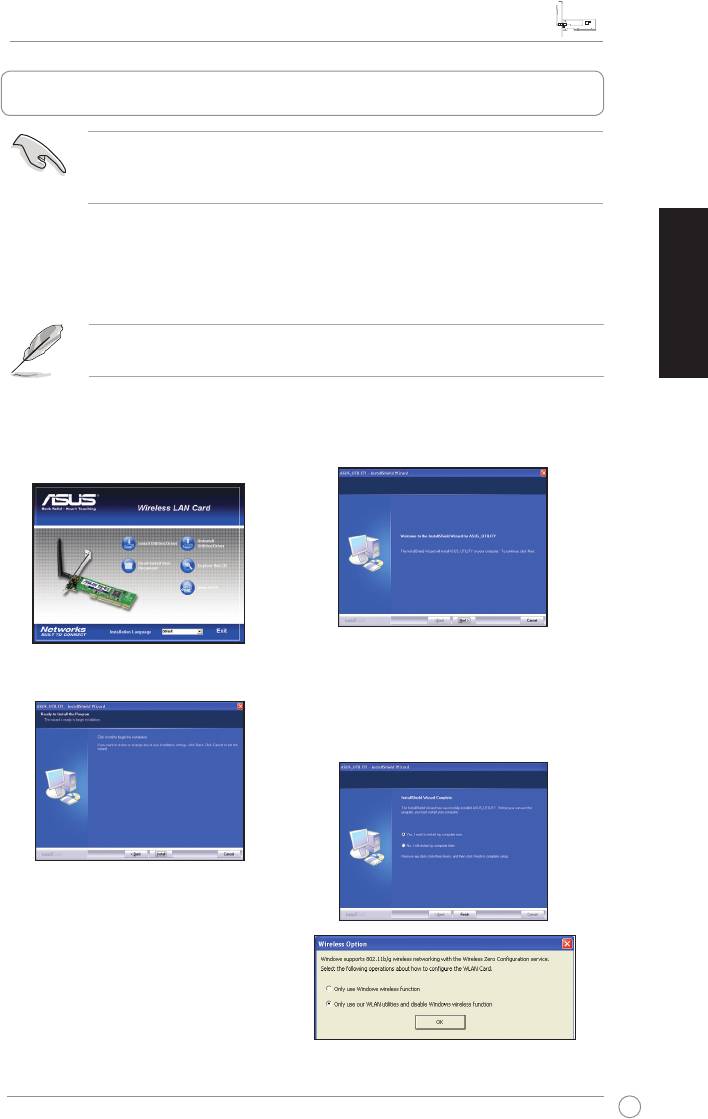
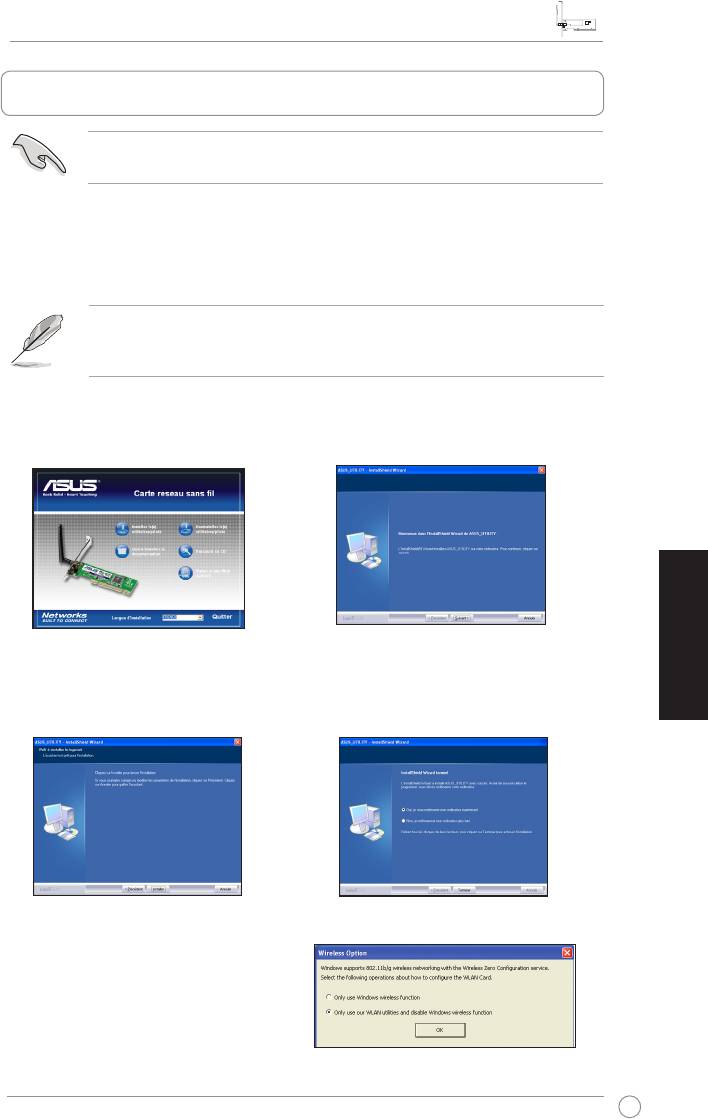
2. Installing the PCI-G31 driver and utilities
IMPORTANT: Install the ASUS PCI-G31 WLAN Card into your computer before
installing the driver and utilities from the bundled Support CD.
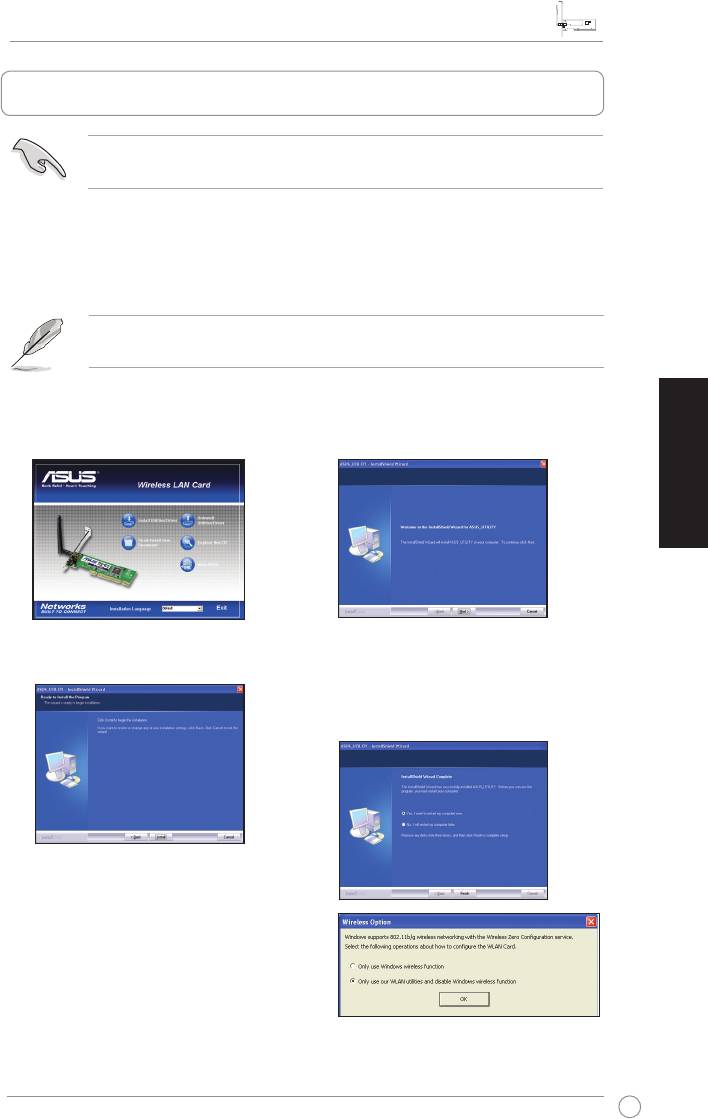
To install the driver and utilities for your ASUS PCI-G31 WLAN Card:
1. Place the bundled Support CD into the optical drive. An Autorun screen appears
if the Autorun function is enabled on your computer.
NOTE: If the Autorun function is not enabled on your computer, double-click
SETUP.EXE from the root directory to run the Support CD.
2. From the Autorun screen, select your
3. An
InstallShield Wizard
screen
language and click
Install Utilities/
appears. Click
Next
to continue.
Driver
.
4. Click
Install
to start the installation.
5. Select
Yes, I want to restart my
computer now
. Click
Finish
to
complete the installation.
6. After your computer reboots, select
Only use our WLAN utilities and
disable Windows wireless function
to allow the ASUS utility to manage
your WLAN card. Click
OK
.
U4063_PCI-G31.indb 3 2/10/09 1:36:55 PM
PCI-G31 WLAN Card Quick Start Guide
English
4
ASUS WLAN Card
3. ConguringPCI-G31usingASUSutility
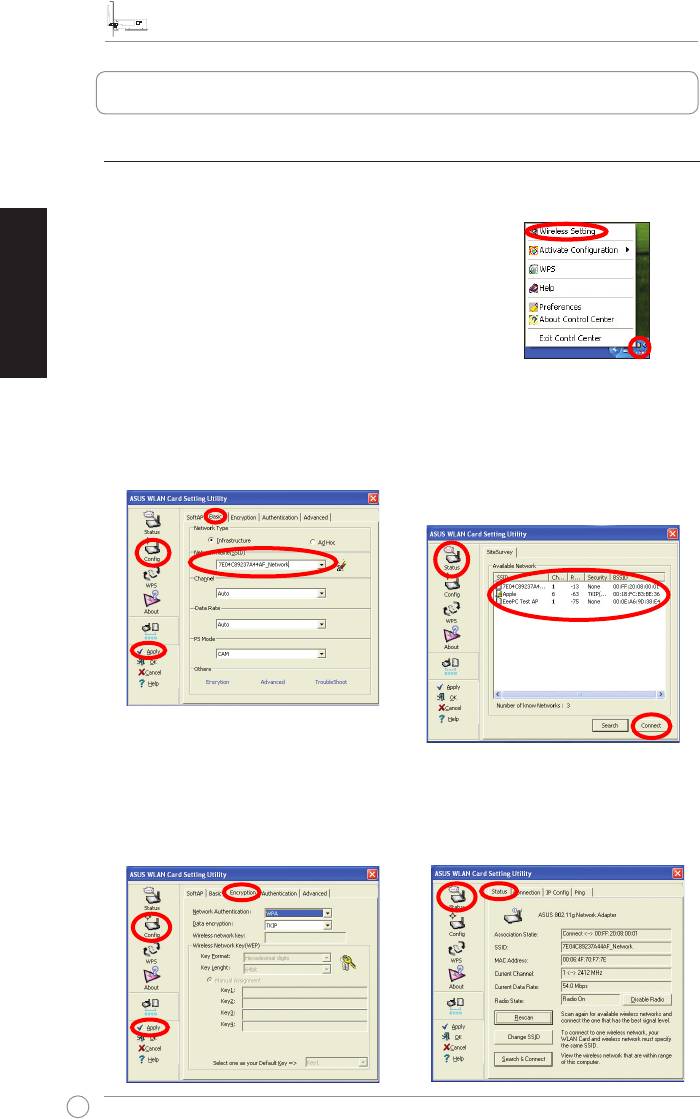
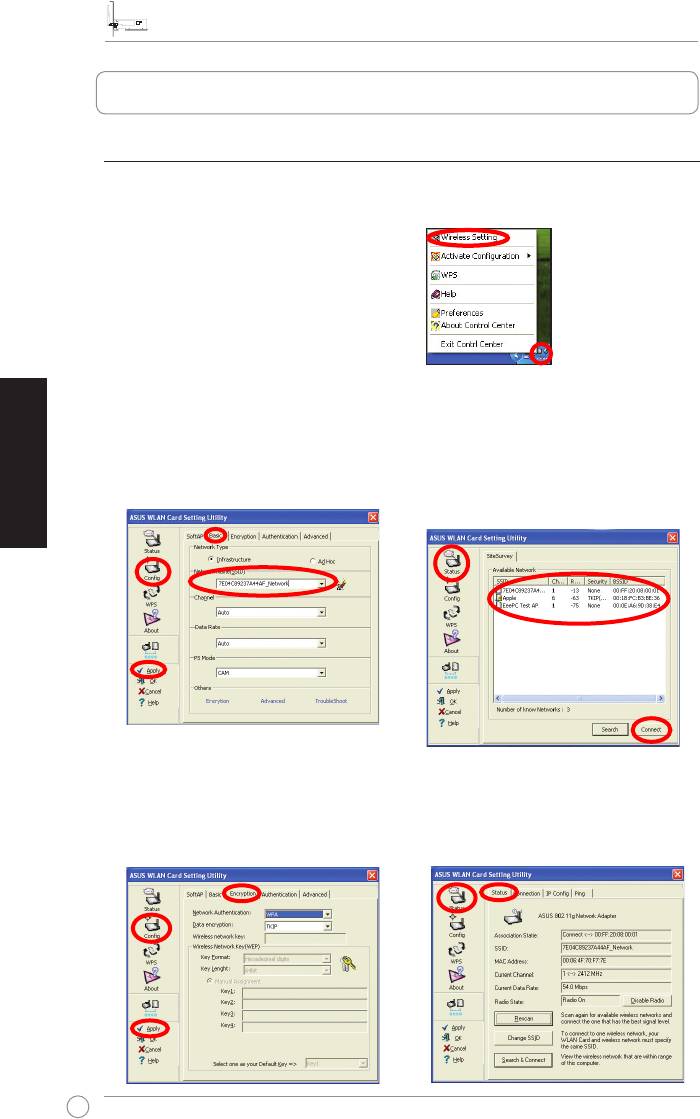
3.1 Connecting to a wireless network manually
To connect PCI-G31 to an access point (AP) (Infrastructure mode) or a station
(Ad Hoc mode) manually:
1. Right-click the ASUS WLAN Card
Setting Utility icon in the
®
Windows
system tray, then select
Wireless Setting
.
2. Set the
SSID
of your WLAN card to
You may also click
Status
>
Search
the same as that of the AP or station
& Connect
to display the
SiteSurvey
you are trying to connect to. Click
page, then select a network from
Apply
.
the
Available Network
list. Click
Connect
.
3. If Security is enabled on the AP or
Setup is completed. The
Status
page
station, do the same security settings
displays information such as the
on your WLAN card as those on the
association state, current data rate,
AP or station. Click
Apply
.
and radio state.
U4063_PCI-G31.indb 4 2/10/09 1:36:57 PM
PCI-G31 WLAN Card Quick Start Guide
English
5
ASUS WLAN Card
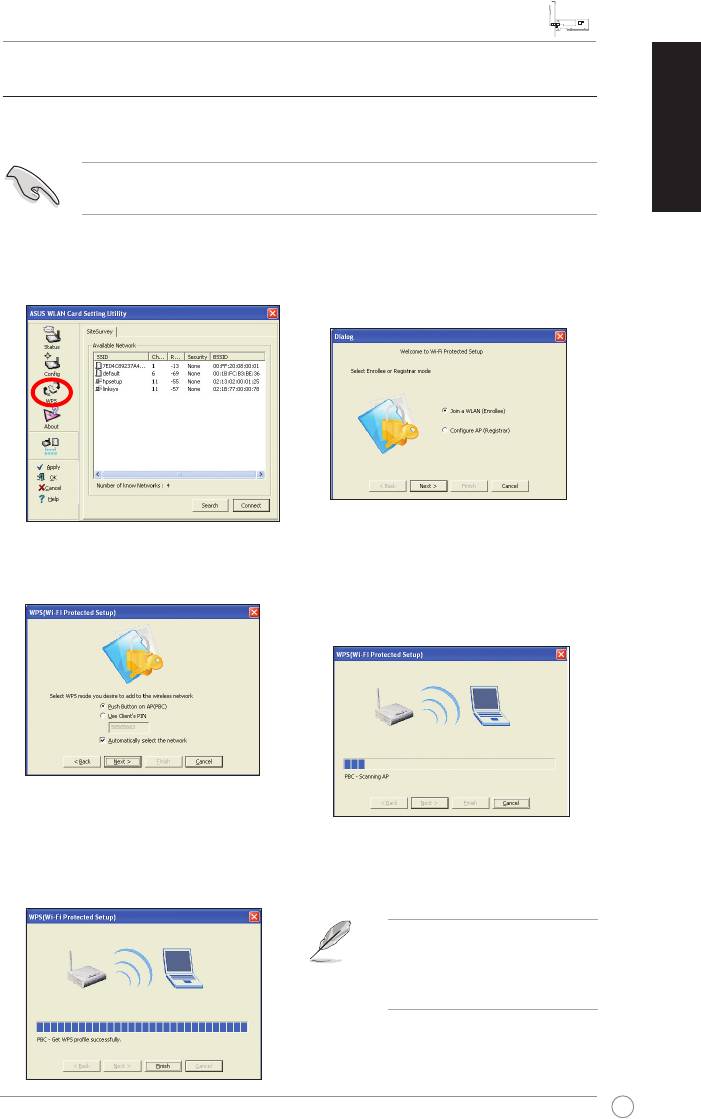
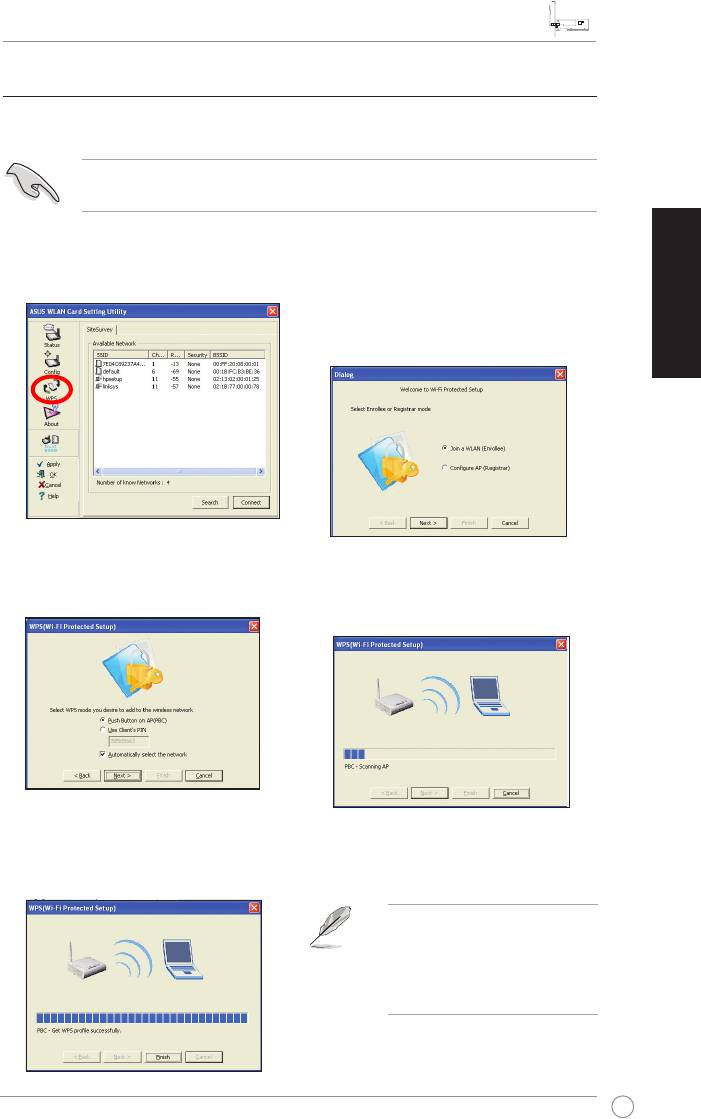
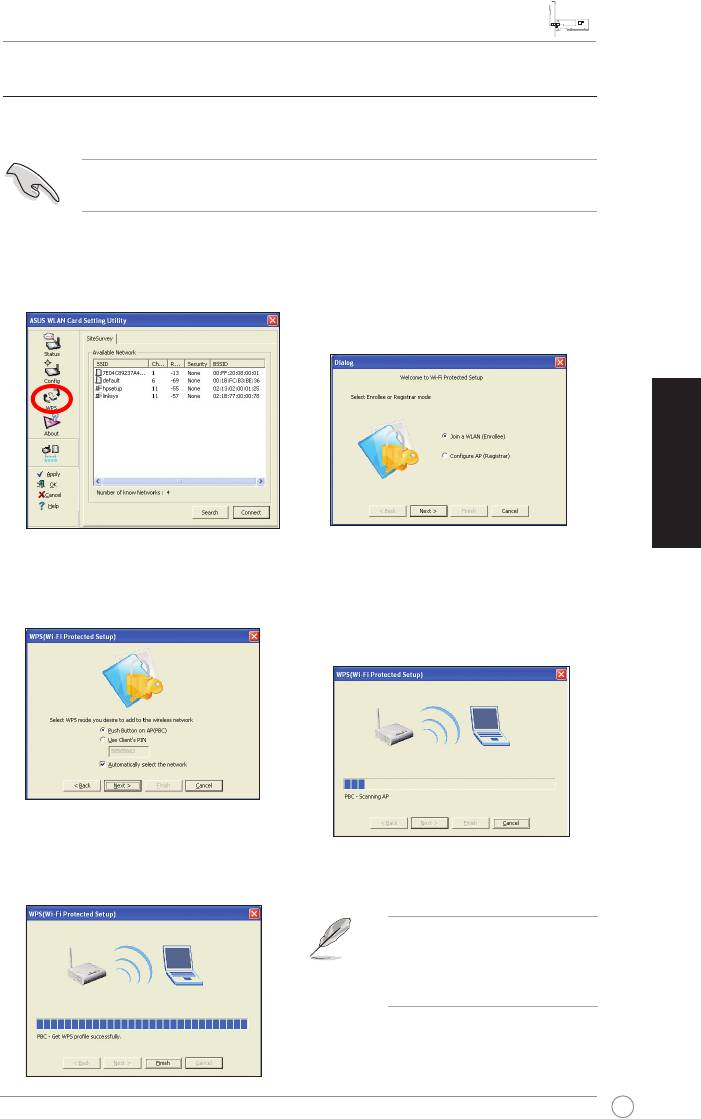
3.2 Connecting to a wireless network using WPS
The ASUS PCI-G31 WLAN Card supports the WPS function that helps you set up
a secure wireless network easily.
IMPORTANT: Ensure that the AP or station you are trying to connect to
supports the WPS function.
To connect PCI-G31 to a WPS-enabled AP or station using the WPS push button:
1. Click the WPS tab.
2. Select
Join a WLAN (Enrollee)
,
then click
Next
.
3. Select
Push Button on AP (PBC)
,
4. Press the WPS button on the AP
then click
Next
.
or station to establish a wireless
connection. The picture indicates that
WPS is scanning for the network.
5. Click
Finish
. The picture indicates
that your WLAN card has connected
to the network successfully.
NOTE: For more details on how
to use this WLAN card, refer to
the user manual included in the
Support CD.
U4063_PCI-G31.indb 5 2/10/09 1:36:59 PM
Snelstartgids PCI-G31 WLAN-kaart
Nederlands
6
ASUS WLAN-kaart
1. Inleiding
1.1 Inhoud verpakking
Controleer of de verpakking van de PCI-G31 WLAN-kaart de volgende items
bevat:
• ASUS PCI-G31 WLAN-kaart x1 • Externe dipool antenne x1
• Snelstartgids x1 • Ondersteunings-cd x1
• Laagproelhaak x1 • Garantiekaart x1
OPMERKING: Als een van de bovenstaande items beschadigd is of ontbreekt,
neem dan onmiddellijk contact op met uw leverancier.
1.2 Systeemvereisten
Voordat u de PCI-G31 WLAN-kaart gebruikt, moet u controleren of uw systeem
voldoet aan de volgende vereisten:
®
• Windows
Vista/XP/2000/ME • Standaard 32-bits PCI-sleuf
• 32 MB systeemgeheugen of groter • Processor 300 MHz of hoger
1.3 Hardware
Statusindicator
De PCI-G31 WLAN-kaart wordt geleverd met een statusindicator die de real time-
status van de WLAN-kaart toont.
AAN: de WLAN-kaart is ingeschakeld.
Knipperend: de WLAN-kaart is verbonden met een draadloos netwerk en de
gegevens worden ontvangen of verzonden.
UIT: de WLAN-kaart is uitgeschakeld.
Externe dipoolantenne
De verpakking van de PCI-G31 WLAN-kaart bevat een externe dipool antenne.
Wij raden u aan de antenne uit te trekken voor een maximaal bereik en de beste
verbindingskwaliteit.
U4063_PCI-G31.indb 6 2/10/09 1:37:00 PM
Snelstartgids PCI-G31 WLAN-kaart
Nederlands
7
ASUS WLAN-kaart
2. Het PCI-G31-stuurprogramma en hulpprogramma's installeren
BELANGRIJK: installeer de ASUS PCI-G31 WLAN-kaart in uw computer
voordat u het stuurprogramma en de hulpprogramma's vanaf de bijgeleverde
ondersteunings-cd installeert.
Het stuurprogramma en de hulpprogramma's voor uw ASUS PCI-G31 WLAN-kaart
installeren:
1. Plaats de bijgeleverde ondersteunings-cd in het optische station. Als de
Autorun-functie is ingeschakeld op uw computer, verschijnt het Autorun-scherm.
OPMERKING: Als de Autorun-functie niet is ingeschakeld op uw computer, dub-
belklikt u in de hoofdmap op SETUP.EXE om de ondersteunings-cd te starten.
2. Selecteer uw taal in het Autorun-
3. Het scherm InstallShield Wizard
scherm en klik op
Install Utilities
verschijnt. Klik op
Next (Volgende)
(Hulpprogramma's)/Driver
om door te gaan.
(Stuurprogramma installeren)
.
5. Selecteer
Yes, I want to restart
4. Klik op
Install (Installeren)
om de
my computer now (Ja, ik wil mijn
installatie te starten.
computer nu opnieuw opstarten)
.
Klik op
Finish (Voltooien)
om de
installatie te voltooien.
6. Selecteer
Only use our WLAN
utilities and disable Windows
wireless function (Alleen onze
WLAN-hulpprogramma's gebruiken
en de draadloze functie van
Windows uitschakelen)
nadat de computer opnieuw is opgestart, zodat het
ASUS-hulpprogramma uw WLAN-kaart kan beheren. Klik op
OK
.
U4063_PCI-G31.indb 7 2/10/09 1:37:03 PM
Snelstartgids PCI-G31 WLAN-kaart
Nederlands
8
ASUS WLAN-kaart
3. DePCI-G31congurerenviahetASUS-hulpprogramma
3.1 Handmatig een verbinding maken met een draadloos netwerk
De PCI-G31 handmatig verbinden met een toegangspunt (AP)
(infrastructuurmodus) of een station (ad hoc-modus).
1. Klik met de rechtermuisknop op het pictogram ASUS
WLAN Card Setting Utility (Instelhulpprogramma
ASUS WLAN-kaart) in het systeemvak van
®
Windows
en selecteer vervolgens
Wireless
Setting (Draadloze instelling)
.
2 Stel de SSID van uw WLAN-kaart
U kunt ook op
Status > Search &
in op dezelfde instelling als het AP
Connect (Zoeken & verbinden)
of station waarmee u probeert een
klikken om de pagina
SiteSurvey
verbinding te maken. Klik op
Apply
(SiteOverzicht)
weer te geven en
(Toepassen)
.
vervolgens een netwerk selecteren in de
lijst
Available Networks (Beschikbare
netwerken)
. Klik op
Connect
(Verbinden)
.
3. Als de beveiliging is ingeschakeld op
De instelling is voltooid. De pagina
het AP of station, moet u dezelfde
Status toont informatie zoals de
beveiligingsinstellingen opgeven op
koppelingsstatus, de huidige
uw WLAN-kaart als deze instellingen
gegevenssnelheid en de radiostatus.
op het AP of station. Klik op
Apply
(Toepassen)
.
U4063_PCI-G31.indb 8 2/10/09 1:37:04 PM
Snelstartgids PCI-G31 WLAN-kaart
Nederlands
9
ASUS WLAN-kaart
3.2 Een verbinding maken met een draadloos netwerk met WPS
De ASUS PCI-G31 WLAN-kaart ondersteunt de WPS-functie die het u
gemakkelijker maakt een beveiligd draadloos netwerk op te zetten.
BELANGRIJK: Controleer of het AP of station waarmee u probeert een
verbinding te maken, de WPS-functie ondersteunt.
De PCI-G31 verbinden met een AP of station met WPS-ondersteuning via de
WPS-drukknop:
1. Klik op het tabblad WPS.
2. Selecteer
Join a WLAN (Deelnemen
aan een WLAN) (Enrollee)
(Ingeschrevene)
en klik daarna op
Next (Volgende)
.
3. Selecteer
Push Button on AP
4. Druk op de AP of het station op de
(Drukknop op AP) (PBC)
en klik
WPS-knop om een draadloze verbinding
daarna op
Next (Volgende)
.
te maken. De afbeelding geeft aan dat
de WPS het netwerk zoekt.
5. Klik op
Finish (Voltooien)
. De
afbeelding geeft aan dat uw WLAN-
kaart een verbinding heeft gemaakt
met het netwerk.
OPMERKING: Raadpleeg de
handleiding die op de onder-
steunings-cd is geleverd voor
meer details over het gebruik
van deze WLAN-kaart.
U4063_PCI-G31.indb 9 2/10/09 1:37:06 PM

PCI-G31 WLAN -kortin pikakäynnistysopas
Suomi
10
ASUS WLAN -kortti
1. Johdanto
1.1 Pakkauksen sisältö
Tarkasta PCI-G31 WLAN -kortin pakkaus seuraavien kohteiden osalta.
• ASUS PCI-G31 WLAN -kortti x1 • Ulkoinen dipoliantenni x1
• Pikakäynnistysopas x1 • Tuki-CD x1
• Matalan proilin pidin x1 • Takuukortti x1
HUOMAA: Jos jokin yllä olevista osioista on vaurioitunut tai puuttuu, ota välit-
tömästi yhteys myyjään.
1.2 Järjestelmävaatimukset
Ennen kuin käytät PCI-G31 WLAN -korttia, tarkasta täyttääkö järjestelmäsi
seuraavat vaatimukset:
®
• Windows
Vista/XP/2000/ME • Vakio 32-bittinen PCI-korttipaikka
• 32MB järjestelmämuisti tai suurempi • 300 MHz prosessori tai suurempi
1.3 Laitteisto
Tilanosoitin
PCI-G31 WLAN -kortti tulee tilanosoittimen kanssa, joka näyttää WLAN-kortin
reaaliaikaisen tilan.
PÄÄLLÄ: WLAN-kortti on otettu käyttöön.
Vilkkuva: WLAN-kortti on liitetty langattomaan verkkoon onnistuneesti, ja dataa
ollaan vastaanottamassa tai lähettämässä.
POIS: WLAN-kortti on poistettu käytöstä.
Ulkoinen dipoli-antenni
PCI-G31 WLAN -korttipaketti sisältää ulkoisen dipoli-antennin. Suosittelemme, että
ojennat antennin maksimialuetta ja parasta linkin laatua varten.
U4063_PCI-G31.indb 10 2/10/09 1:37:07 PM
PCI-G31 WLAN -kortin pikakäynnistysopas
Suomi
11
ASUS WLAN -kortti
2. PCI-G31-laiteohjaimen ja apuohjelmien asentaminen
TÄRKEÄÄ: Asenna ASUS PCI-G31 WLAN -kortti tietokoneeseesi ennen laiteo-
hjaimen ja apuohjelmien asennusta niputetulta tuki-CD:ltä.
Laiteohjaimen ja apuohjelmien asentaminen ASUS PCI-G31 WLAN -korttiasi
varten:
1. Laita niputettu tuki-CD sisään optiseen asemaan. Autorun-näyttöruutu ilmestyy,
jos Autorun-toiminto on otettu käyttöön tietokoneessasi.
HUOMAA: Jos Autorun-toimintoa ei ole otettu käyttöön tietokoneessasi, kak-
soisnapsauta SETUP.EXE juurihakemistosta tuki-CD:n suorittamiseksi.
2. Valitse kieli autorun-valikosta ja
3.
InstallShield Wizard (Ohjattu
napsauta
Install Utilities (Asenna
asennusnäyttöruutu)
ilmestyy.
apuohjelmat)/Driver (laiteohjain)
.
Jatka painamalla
Next (Seuraava)
.
4. Napsauta
Install (Asenna)
5. Valitse
Yes, I want to restart my
asennuksen käynnistämiseksi.
computer now (Kyllä, haluan
käynnistää tietokoneeni nyt
uudelleen)
. Napsauta
Finish
(Lopeta)
asennuksen lopettamiseksi.
6 Sen jälkeen kun tietokoneesi käynnistyy
uudelleen, valitse
Only use our
WLAN utilities and disable Windows
wireless function (Käytä WLAN-
apuohjelmiamme ja poista käytöstä
Windowsin lagaton toiminto)
salliaksesi ASUS-apuohjelman hallita
WLAN-korttiasi. Napsauta
OK
.
U4063_PCI-G31.indb 11 2/10/09 1:37:10 PM
PCI-G31 WLAN -kortin pikakäynnistysopas
Suomi
12
ASUS WLAN -kortti
3. PCI-G31:nkongurointiASUS-apuohjelmaakäyttäen
3.1 Langattoman verkon liittäminen manuaalisesti
PCI-G31:n liittämiseksi tukiasemaan (AP) (Infrastruktuuri-tila) tai asema (Ad Hoc
-tila) manuaalisesti:
1. Napsauta hiiren oikealla
painikkeella ASUS WLAN -kortin
asetusapuohjelman kuvaketta
®
Windows
-järjestelmätarjottimella,
sen jälkeen valitse
Wireless Setting
(Langaton asetus)
.
2. Aseta WLAN-korttisi
SSID
samaksi
Voit myös napsauttaa
Status (Tila) >
kuin tukiasemasi (AP) tai asema,
Search & Connect (Etsi ja Yhdistä)
johon yrität yhdistää. Napsauta
Apply
näyttääksesi
SiteSurvey (Sivukatsaus)
(Käytä)
.
-sivun, sen jälkeen valitse verkko
Available Network (Käytettävä
verkko)
-luettelosta. Napsauta
Connect
(yhdistä)
.
3. Jos turvallisuus on otettu käyttöön
Asetus on suoritettu loppuun.
Status
tukiasemalla (AP) tai asemalla, tee
(Tila)
-sivu näyttää tiedot kuten
sama turvallisuusasetus WLAN-
association state (liitäntätila), current
kortillasi kuin tukiasemalla (AP) tai
data rate (nykyinen datanopeus), ja
asemalla. Napsauta
Apply (Käytä)
.
radio state (radio-tila).
U4063_PCI-G31.indb 12 2/10/09 1:37:12 PM
PCI-G31 WLAN -kortin pikakäynnistysopas
Suomi
13
ASUS WLAN -kortti
3.2 Langattomaan verkkoon liittäminen WPS:ää käyttäen
ASUS PCI-G31 WLAN -kortti tukee WPS-toimintoa, joka auttaa sinua asettamaan
langattoman verkon helposti.
TÄRKEÄÄ: Varmista, että tukiasema (AP) tai asema, johon yrität yhdistää
tukemaan WPS-toimintoa.
Liittääksesi PCI-G31:n WPS-käyttöönotettuun tukiasemaan (AP) tai asemaan
käyttämällä WPS-painiketta:
1. Napsauta WPS-välilehteä.
2. Valitse
Join a WLAN (Enrollee)
(Liity WLAN (Enrollee):iin)
, sen
jälkeen napsauta
Next (Seuraava)
.
3. Valitse
Push Button on AP (Valitse
4. Paina WPS-painiketta tukiasemalla
painike tukiasemalla) (PBC)
, sen
(AP) tai asemalla langattoman
jälkeen napsauta
Next (Seuraava)
.
liitännän muodostamiseksi. Kuva
osoittaa, että WPS on etsimässä
verkkoa.
5. Napsauta
Finish (Lopeta)
. Kuva
osoittaa, että WLAN-korttisi on liitetty
verkkoon onnistuneesti.
HUOMAA: Katso lisätietoja
tämän WLAN-kortin liittämisestä
käyttäjän käsikirjasta, joka on
sisällytetty tuki-CD:lle.
U4063_PCI-G31.indb 13 2/10/09 1:37:14 PM

GuidededémarragerapidedelacarteréseausanslPCI-G31
Français
14
Carte réseau sans l ASUS
1. Introduction
1.1 Contenu de la boîte
Vériez que la boîte de votre carte réseau sans l PCI-G31 contient les éléments
suivants :
• Carte WLAN ASUS PCI-G31 x1 • Antenne dipôle externe x1
• Guide démarrage rapide x1 • CD de support x1
• Adaptateur demi-hauteur x1 • Carte de garantie x1
NOTE : Si l’un des éléments ci-dessus est endommagé ou manquant,
contactez votre revendeur immédiatement.
1.2 Pré-requis système
Avant d’utiliser votre carte réseau sans l PCI-G31, veuillez vérier que votre
système puisse satisfaire aux critères suivants :
®
• Windows
Vista/XP/2000/ME • Slot PCI 32-bits standard
• Mémoire de 32Mo ou plus • CPU cadencé à 300MHz ou plus
1.3 Matériel
Indicateur d'état
La carte réseau sans l PCI-G31 intègre un indicateur d’état vous informant du
statut en temps réel de la carte.
Allumé : La carte réseau sans l est activée.
Clignotant : La carte est connectée à un réseau sans l et des données sont en
cours de réception/transmission.
Éteint : La carte réseau sans l est inactive.
Antenne dipôle externe
La carte réseau sans l PCI-G31 est accompagnée d’une antenne dipôle externe.
Il est recommandé d’utiliser l’antenne pour accroître la portée maximum et
d’améliorer la qualité du signal sans l.
U4063_PCI-G31.indb 14 2/10/09 1:37:15 PM
GuidededémarragerapidedelacarteréseausanslPCI-G31
Français
15
Carte réseau sans l ASUS
2. Installerlepiloteetl'utilitairesansl
IMPORTANT : Installez la carte sans l ASUS PCI-G31 sur votre ordinateur
avant de tenter d’installer le pilote et les utilitaires à partir du CD de support.
Pour installer le pilote et les utilitaires de la carte réseau sans l ASUS PCI-G31 :
1. Placez le CD de support dans votre lecteur optique. L’écran d’installation du
pilote et des utilitaires apparaît si l’Exécution automatique a été activée sur
votre ordinateur.
REMARQUE : Si l’Exécution automatique n’est pas activé sur votre ordinateur,
parcourez le contenu du DVD de support pour localiser le chier ASSETUP.EXE
dans le répertoire racine du CD de support.
2. À partir de l’écran d’installation,
3. L’écran de l’assistant d’installation
sélectionnez votre langue et cliquez
apparaît. Cliquez sur
Suivant
pour
sur
Installer le(s) utilitaire(s)/pilote
.
continuer.
4. Cliquez sur
Installer
pour démarrer
5. Sélectionnez
Oui, je veux
l’installation.
redémarrer mon ordinateur
maintenant
, puis cliquez sur
Terminer
pour terminer l’installation.
6. Après le redémarrage de l’ordinateur,
cochez
Only use our WLAN utilities
and disable Windows wireless
function
(Utiliser notre utilitaire sans
l et désactiver la fonctionnalité sans
l de Windows ) pour permettre à
l’utilitaire ASUS de gérer votre carte
réseau sans l. Cliquez sur
OK
.
U4063_PCI-G31.indb 15 2/10/09 1:37:17 PM

GuidededémarragerapidedelacarteréseausanslPCI-G31
Français
16
Carte réseau sans l ASUS
3. Congurerl’utilitairesanslASUS
3.1 Connexionmanuelleàunréseausansl
Pour une conguration manuelle du PCI-G31 à un point d’accès (mode
Infrastructure) ou une station (mode Ad Hoc) :
1. Faites un clic droit sur l’icône de
l’utilitaire sans l ASUS située dans
la zone de notication de Windows,
puis sélectionnez
Wireless Setting
(paramètres sans l).
2. Dénissez le
SSID
de votre carte
Vous pouvez aussi cliquer sur
réseau sans l your sur celui de votre
Status
(État) >
Search & Connect
point d’accès ou station. Cliquez sur
(Recherche et connexion) pour
Apply
(Appliquer).
afcher l’onglet
SiteSurvey
(Analyse
de site). Sélectionnez un réseau puis
cliquez sur
Connect
(Se connecter).
3. Si le point d’accès ou la station est
La conguration est terminée.
sécurisé, entrez les paramètres de
L’onglet
Status
(État) afche les
sécurité appropriés. Cliquez sur
informations relatives à l’état du lien,
Apply
(Appliquer).
le débit actuel et l’état du module
sans l.
U4063_PCI-G31.indb 16 2/10/09 1:37:19 PM

")

