Asus WL-160N: instruction
Class: Professional equipment
Type:
Manual for Asus WL-160N
Table of contents

Index
1 English ......................................................................... 1
2 Deutsch .........................................................................5
3 Français.........................................................................8
4 Italiano ......................................................................... 11
5 Русский .......................................................................14
6 Español .......................................................................17
7 Português ....................................................................20
8 Nederlands ..................................................................23
9 Magyar .........................................................................26
10 Srpski ..........................................................................29
11 Polski ...........................................................................32
12 Česky ...........................................................................35
13 Türkçe..........................................................................38
14 Bahasa Indonesia .......................................................41
15
한국어
...........................................................................44
16
繁體中文
.......................................................................47
17
簡體中文
.......................................................................51
ASUS WLAN Adapter
1
English
Quick Start Guide
Installation Procedures
Important: Install the WLAN Adapter utilities before inserting the WLAN
Adapter into your computer.
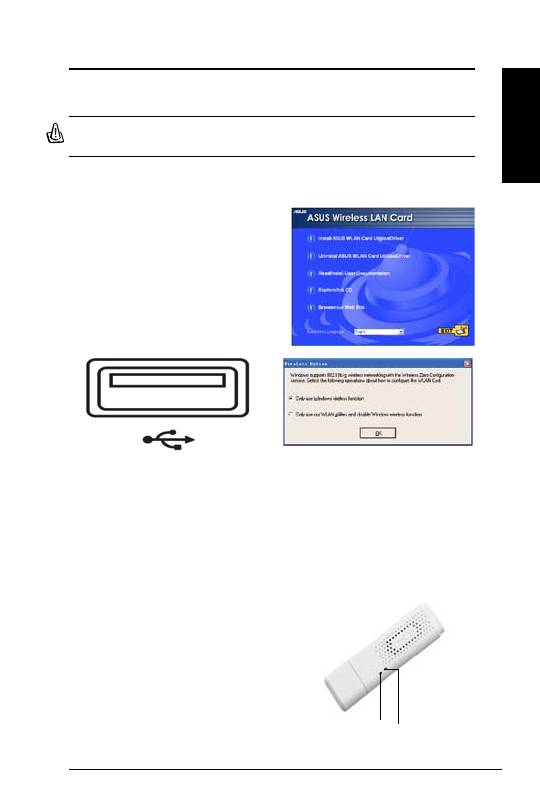
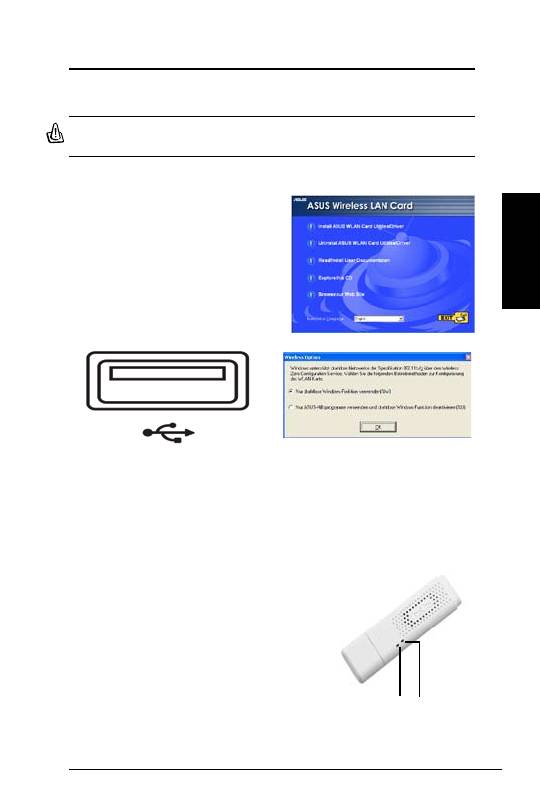
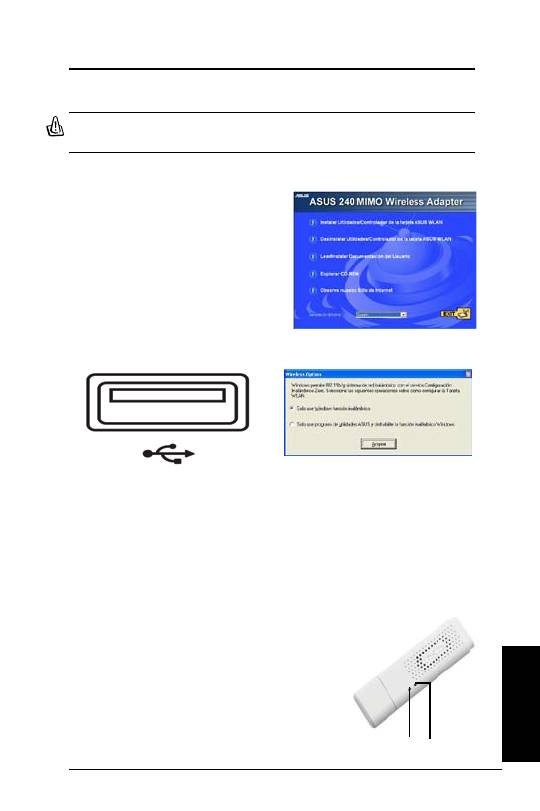
Installing the WLAN utilities and driver
Follow these instructions to install the
WLAN Adapter utilities and driver. Insert
the support CD into your optical drive.
If autorun is enabled in your computer,
the CD automatically displays the utility
menu. Click
Install ASUS WLAN Card
Utilities/Driver
. If autorun is disabled,
double-click SETUP.EXE in the root
directory of the CD.
Insert the WLAN Adapter into your computer
’s USB port using the correct orientation.
Windows will automatically detect and
configure the WLAN Adapter using the
utilities and drivers installed in the previous
steps.
Windows XP users: When the program is
launched for the first time (during Windows
restart), you are asked to choose one utility
to configure the WLAN Adapter. Select "Only
use Windows wireless function".
Reading the WLAN status indicators
The device comes with two LEDs that indicate the status of the WLAN
Adapter.
ACT LED
Blinking:
Transmitting data; the blinking
speed indicates the link speed.
OFF:
Radio off or Adapter is disabled.
LINK LED
ON:
Connected to wireless device.
OFF:
No wireless connection.
LINK
ACT
2
ASUS WLAN Adapter
English
Quick Start Guide
Windows
®
XP Wireless Options
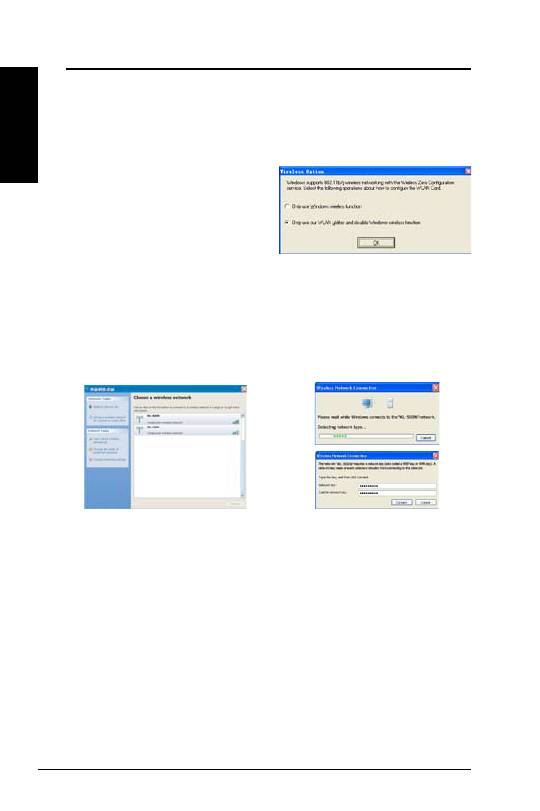
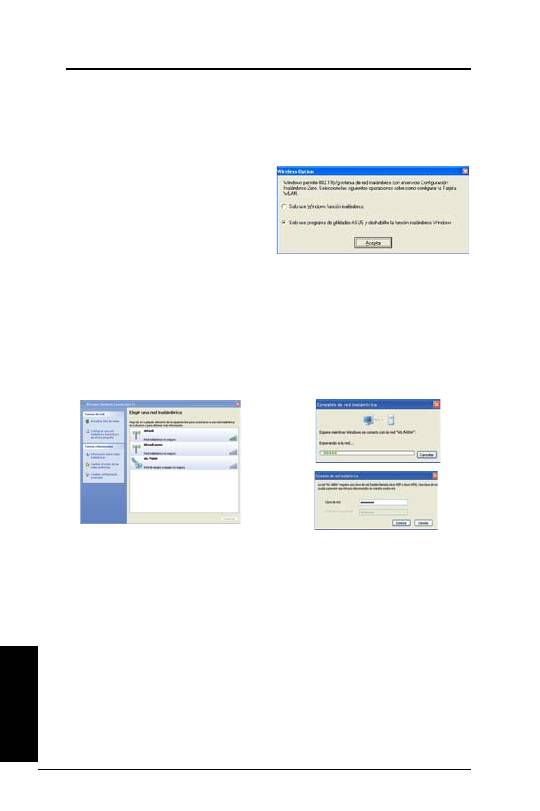
The wireless options window shown below is only available for Windows
®
XP.
It appears when you run the Control Center utility at the first time. Select the
utility you want to use for configuring your WLAN Adapter.
Only use Windows wireless function
–
Only use Windows
®
XP Wireless
Zero Configuration service to configure
the WLAN Adapter.
Only use our WLAN utilities and
disable XP wireless function
–
Only use ASUS WLAN utilities to configure the WLAN Adapter.
(recommended)
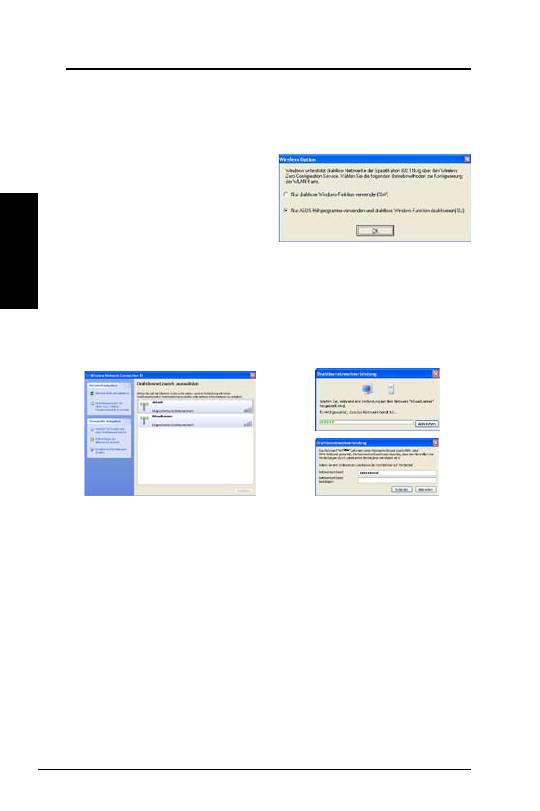
Configuring with Windows
®
Wireless Zero Configuration service
If you want to configure your WLAN Adapter via Windows
®
Wireless Zero
Configuration (WZC) service, follow the instruction below to make the settings.
2. A window prompts out asking
you for the key if you have set up
encryption on your wireless router,
input the keys and click
Connect
.
The connection is complete.
1. Double-click the wireless network
icon on the task bar to view available
networks.Select the AP and click
Connect
.
ASUS WLAN Adapter
3
English
Quick Start Guide
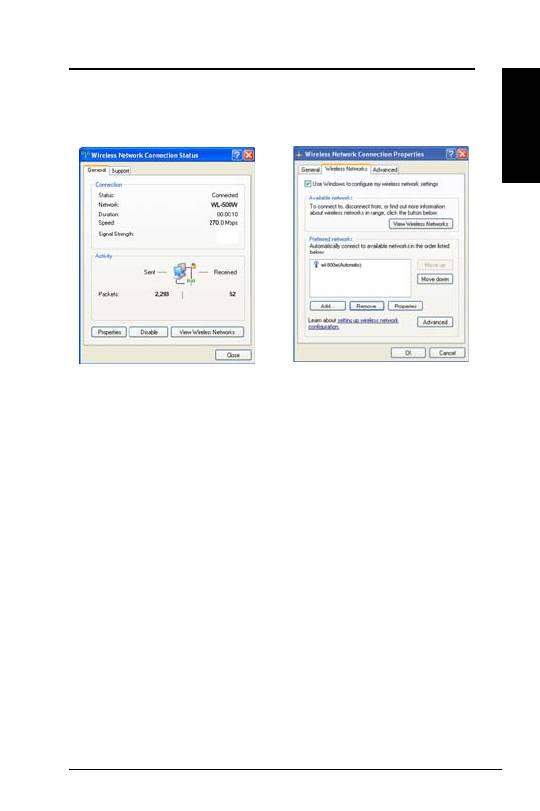
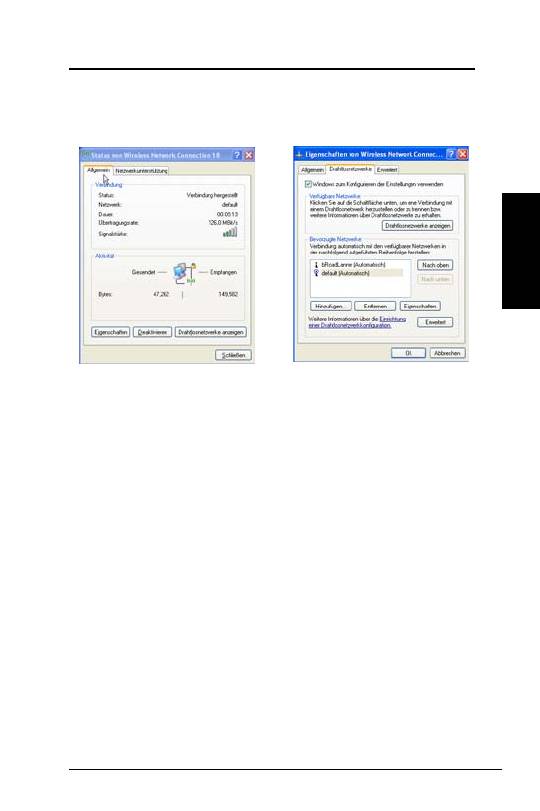
To set up the wireless connection properties, right-click the wireless icon on the
taskbar and select
Open Network Connection
. Then right-click the network
connection icon and select
Property
to open the Wireless Network Connection
Status page.
1. The
General
page shows status, duration,
speed, and signal strength. Signal
strength is represented by green bars with
5 bars indicating excellent signal and 1
bar meaning poor signal.
2. Select “Wireless Networks” tab to show
Preferred networks
. Use the
Add
button
to add the “SSID” of available networks
and set the connection preference order
with the
Move up
and
Move down
buttons. The radio tower with a signal
icon identifies the currently connected
access point. Click
Properties
to set the
authentication of the wireless connection.

4
ASUS WLAN Adapter
English
Quick Start Guide
FCC Warning Statement
This device complies with Part 15 of the FCC Rules. Operation is subject to the following two
conditions:
(1) this device may not cause harmful interference, and
(2) this device must accept any interference received, including interference that may cause
undesired operation.
This equipment has been tested and found to comply with the limits for a class B digital
device, pursuant to part 15 of the FCC Rules. These limits are designed to provide reasonable
protection against harmful interference in a residential installation.
This equipment generates, uses and can radiate radio frequency energy and, if not installed
and used in accordance with the instructions, may cause harmful interference to radio
communications. However, there is no guarantee that interference will not occur in a particular
installation. If this equipment does cause harmful interference to radio or television reception,
which can be determined by turning the equipment off and on, the user is encouraged to try to
correct the interference by one or more of the following measures:
- Reorient or relocate the receiving antenna.
- Increase the separation between the equipment and receiver.
- Connect the equipment into an outlet on a circuit different from that to which the receiver is
connected.
- Consult the dealer or an experienced radio/TV technician for help.
CAUTION:
Any changes or modifications not expressly approved by the party responsible for compliance
could void the user’s authority to operate the equipment.
Prohibition of Co-location
This device and its antenna(s) must not be co-located or operating in conjunction with any other
antenna or transmitter
Safety Information
To maintain compliance with FCC’s RF exposure guidelines, this equipment should be installed
and operated with minimum distance 20cm between the radiator and your body. Use on the
supplied antenna.
Testing for electric safety according to EN 60950-1 has been conducted. These are considered
relevant and sufficient.
Protection requirements for electromagnetic compatibility – Article 3.1b
Testing for electromagnetic compatibility according to EN 301 489-1 and EN 301 489-17 has been
conducted. These are considered relevant and sufficient.
Effective use of the radio spectrum – Article 3.2
Testing for radio test suites according to EN 300 328- 2 has been conducted. These are considered
relevant and sufficient.
CE Mark Warning
This is a Class B product, in a domestic environment, this product may cause radio interference, in
which case the user may be required to take adequate measures.
Declaration of Conformity for R&TTE directive 1999/5/EC
Essential requirements – Article 3
Protection requirements for health and safety – Article 3.1a
ASUS WLAN Adapter
Deutsch
Schnellstartanleitung
ACT LED
Blinkt:
Daten werden empfangen oder
übertragen; die Blinkgeschwindigkeit zeigt die
Verbindungsgeschwindigkeit an
AUS:
Sender ausgeschaltet, oder Karte
deaktiviert.
LINK LED
AN:
Verbindung mit einem Wireless-Gerät.
AUS:
Keine Verbindung.
Installation der WLAN-Software und des Treibers
Folgen Sie diesen Anweisungen, um die
WLAN-Kartensoftware und -Treiber zu
installieren. Legen Sie die Support-CD in
Ihr CD-Rom-Laufwerk. Sofern Autostart
auf Ihrem System aktiviert ist, zeigt die
CD automatisch das Programme-Menü
an. Klicken Sie auf
ASUS WLAN-
Kartendienstprogramme/-treiber
. Falls
Autorun deaktiviert ist, doppelklicken Sie
SETUP.EXE im CD-Hauptverzeichnis.
Schieben Sie die WLAN-Karte vorsichtig in
den PCMCIA-Steckplatz Ihres Computers.
In den folgenden Schritten erkennt
Windows automatisch die WLAN-Karte und
konfiguriert sie mit Hilfe der Programme
und Treiber.
Windows XP-Benutzer: Wenn das
Programm zum ersten Mal ausgeführt wird
(nach dem Neustart von Windows ), werden
Sie dazu aufgefordert, ein Programm zur
Konfiguarion der WLAN-Karte zu wählen.
Wählen Sie die obere Option, wie im Bild.
WLAN-Statusanzeigen ablesen
Das Gerät verfügt über zwei LEDs, die
den Status der WLAN-Karte anzeigen.
LINK
ACT
Installation
Wichtig: Installieren Sie die WLAN-Kartensoftware, bevor Sie die WLAN-
Karte in Ihren Computer einstecken.
ASUS WLAN Adapter
Deutsch
Schnellstartanleitung
Windows
®
XP Drahtlos-Optionen
Das hier gezeigte Fenster mit Drahtlos-Optionen wird nur unter Windows
®
XP angezeigt, und zwar dann, wenn das Control Center-Hilfsprogramm zum
ersten Mal ausgeführt wird. Wählen Sie das Programm, mit dem Sie Ihre
WLAN-Karte konfigurieren wollen.
Nur drahtlose Windows-Funktion
verwenden –
Verwenden Sie zur
Konfiguration nur den Windows
®
XP
Wireless Zero Configuration-Service
Nur ASUS-Hilfsprogramme
verwenden und drahtlose Windows-Funktion deaktivieren –
Verwenden
Sie zur Konfiguration Ihrer WLAN-Karte nur ASUS WLAN-Hilfsprogramme.
(empfohlen)
Konfiguration mit dem Windows
®
Wireless Zero Configuration-Service
Wenn Sie Ihre WLAN-Karte über den Windows
®
Wireless Zero Configuration
(WZC)-Service konfigurieren möchten, führen Sie folgende Schritte aus.
2. Sie werden aufgefordert, den
Schlüssel Ihres Wireless-Routers
einzugeben, falls Sie ein Ver-
schlüsselungsverfahren benutzen.
Geben Sie den Schlüssel ein und
klicken Sie auf
Verbinden
. Die
Verbindung ist hergestellt.
1. Doppelklicken Sie das
Netzwerksymbol in der Taskleiste,
um die verfügbaren Netzwerke
anzuzeigen. Wählen Sie WL-100W
und klicken Sie auf
Verbinden
.
ASUS WLAN Adapter
Deutsch
Schnellstartanleitung
Um die Eigenschalften Ihrer Wireless-Verbindung festzulegen, rechtsklicken
Sie auf das Wireless-Symbol in der Taskleiste und wählen Sie
Netzwerk-
verbindungen öffnen
. Danach rechtsklicken Sie auf das Verbindungssymbol
und wählen Sie
Eigenschaften.
Das Eigenschaften-Fenster öffnet sich.
1. Unter
Allgemein
werden Status, Dauer,
Übertragungsrate und Signalstärke
angezeigt. Die Signalstärke wird durch
insgesamt fünf grüne Balken dargestellt.
Fünf Balken stehen für hervorragende
Signalstärke, ein Balken signalisiert ein
schlechtes Signal .
2. Unter “Drahtlosnetzwerke” werden
Bevorzugte Netzwerke
angezeigt.
Mit
Hinzufügen
können Sie “SSIDs”
verfügbarer Netzwerke hinzufügen
und mit
Nach oben
und
Nach unten
die Verbindungsreihenfolge festlegen.
Der derzeit gewählte AP wird durch ein
Antennensymbol angezeigt. Klicken Sie
auf
Eigenschaften
, um die Authentifi-
zierungsmethode für die Wireless-
Verbindung festzulegen.
Carte réseau sans fil ASUS
Français
Guide de démarrage rapide
LINK
ACT
Procédures d'installation
Important: Installez les utilitaires de la carte WLAN, avant d'installer cette
dernière sur votre ordinateur.
Insérez délicatement la carte réseau sans
fil dans le port USB 2.0 de votre ordinateur.
Windows détectera et configurera
automatiquement la carte WLAN grâce aux
utilitaires et pilotes précédemment installés.
Lire les indicateurs d'état
La carte WLAN intègre une LED qui indique son état.
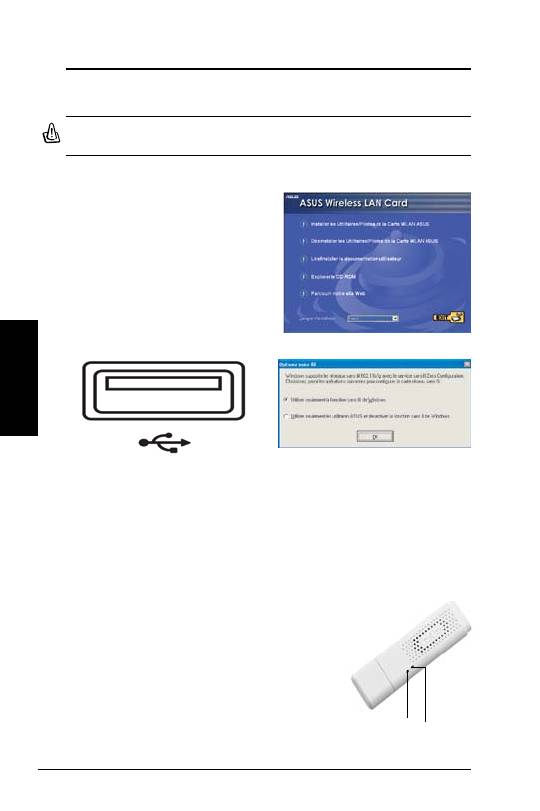
Installer les utilitaires et le pilote WLAN
Suivez ces instructions afin d’installer
les utilitaires et le pilote pour réseau
sans fil. Insérez le CD de support
dans le lecteur optique. Si la fonction
d’exécution automatique est activée, le
CD affichera automatiquement le menu
Utilitaires. Cliquez sur
Installer les
utilitaires/Pilotes pour la Carte WLAN
ASUS.
Si l'exécution automatique est
désactivée, double-cliquez sur SETUP.
EXE dans le répertoire racine du CD.
Sous Windows XP : Quand le programme
est lancé pour la première fois (au
redémarrage de Windows), il vous sera
demander de choisir un utilitaire pour
configurer la carte WLAN. Sélectionnez
"Utiliser seulement la fonction sans fil de
Windows".
LED d’activité
Clignote :
Transmission de données ; la vitesse du
clignotement indique celle du lien.
Eteinte :
La carte est désactivée ou aucun signal
radio.
LED de liaison
Allumée :
Connexion à un périphérique sans fil.
Eteinte :
Aucune connexion sans fil.
Carte réseau sans fil ASUS
Français
Guide de démarrage rapide
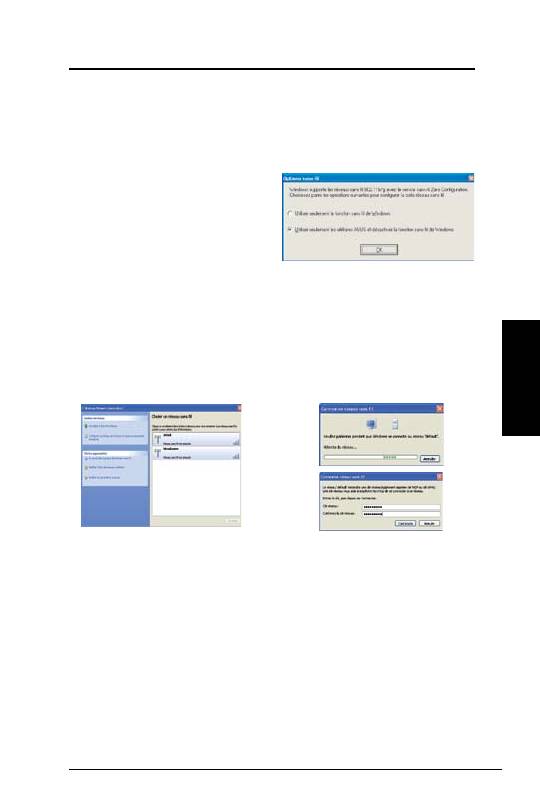
Options sans fil sous Windows
®
XP
La fenêtre “Options sans fil” (voir ci-dessous) n’est disponible que sous
Windows
®
XP. Elle apparaît quand vous lancez l’utilitaire Control Center
pour la première fois. Sélectionnez l’utilitaire que vous souhaitez utiliser
pour configurer votre carte WLAN.
Utiliser seulement la fonction
sans fil de Windows –
Utiliser
uniquement le service Wireless Zero
Configuration de Windows
®
XP pour
configurer la carte WLAN.
Utiliser uniquement nos utilitaires
WLAN et désactiver la fonction sans fil de Windows –
Utiliser
uniquement les utilitaires ASUS WLAN pour configurer la carte WLAN
(Recommandé).
Configuration via le service Wireless Zero Configuration de Windows
®
Si vous souhaitez configurer votre carte WLAN via le service Wireless
Zero Configuration (WZC) de Windows
®
, suivez les instructions suivantes.
2. Une fenêtre vous invitera à saisir
la clé de chiffrement que vous
avez définie pour votre routeur
sans fil. Saisissez la clé, et cliquez
sur
Connecter
. La connexion est
établie.
1. Double-cliquez sur l'icône
Réseau sans fil de la zone de
notification pour visualiser les
réseaux disponibles. Sélectionnez
le point d'accès et cliquez sur
Connecter
.
10
Carte réseau sans fil ASUS
Français
Guide de démarrage rapide
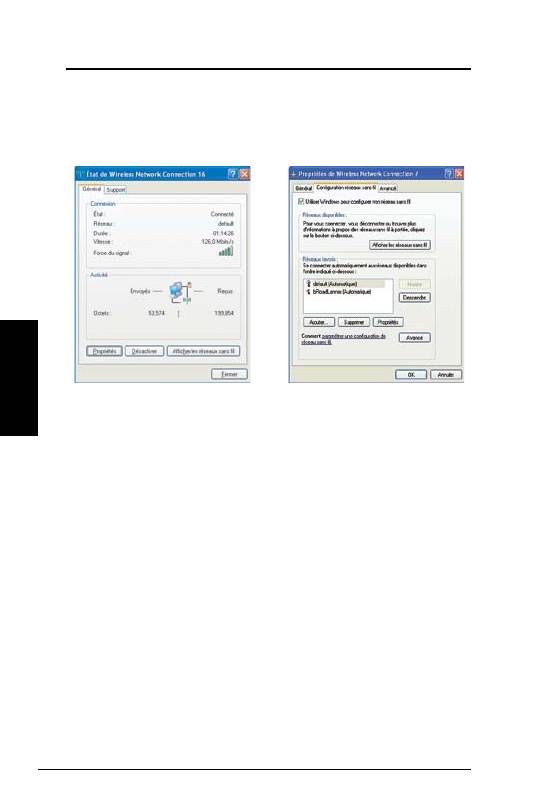
Pour définir les propriétés de la connexion sans fil, faites un clic-droit sur
l'icône Réseau sans fil de la zone de notification et choisissez
Ouvrir les
connexions réseau
. Puis faites un clic-droit sur l'icône de connexion
réseau et sélectionnez
Propriétés
pour ouvrir la page Etat de Wireless
Network Connection.
1. La page
Général
affiche l’état, la durée,
la vitesse et la puissance du signal.
Cette dernière est symbolysée par un
certain nombre de barres vertes, qui
s’échelonnent d’une barre pour un signal
médiocre, jusqu’à cinq barres pour un
signal excellent.
2. Sélectionnez l’onglet “Configuration
Réseaux sans fil” pour afficher
Réseaux
favoris
. Utilisez le bouton Ajouter pour
ajouter le “SSID” des réseaux disponibles
et définir les préférences de connexion
par ordre grâce aux boutons
Monter
et
Descendre
. La tour de radio représente
le point d’accès actuellement connecté.
Cliquez sur
Propriétés
pour mettre en place
l’authentification pour la connexion sans fil.
Adattatore WLAN ASUS
11
Italiano
Guida Rapida
LED ACT (Attività)
Lampeggiante:
Trasmissione dati in corso;
la rapidità del lampeggio indica la velocità di
trasmissione.
SPENTO:
Comunicazione radio disattiva,
oppure scheda disabilitata.
LINK LED (Collegamento)
ACCESO:
Connessione con dispositivo wireless.
SPENTO:
Assenza di connessione wireless.
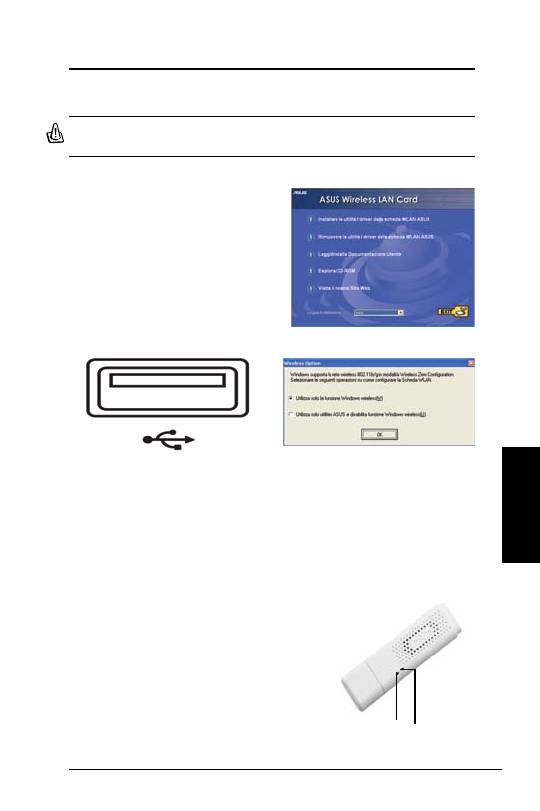
Procedure di Installazione
Importante: installare le utilità dell' Adattatore WLAN, prima di inserire l'
Adattatore WLAN nel computer.
Installazione delle Utilità e del Driver WLAN
Attenersi alle seguenti istruzioni per
installare le utilità ed il driver dell’ Adattatore
WLAN. Inserire il CD di supporto nell’unità
ottica. Se sul computer è attivata la
funzione di esecuzione automatica, il CD
visualizza automaticamente il menu delle
utilità. Fare clic su
Installa utilità / driver
scheda WLAN
ASUS. Se non è attivata
la funzione di esecuzione automatica,
fare doppio clic sul file SETUP.EXE dalla
directory principale del CD.
Inserire con delicatezza l' Adattatore
WLAN nella porta USB del computer, con
la corretta orientazione. Windows rileverà
automaticamente l' Adattatore WLAN
usando le utilità ed i driver installati in
precedenza.
Utenti Windows XP: La prima volta che si
avvia il programma (dopo avere riavviato
Windows), sarà richiesto di scegliere una
utilità per configurare l' Adattatore WLAN.
Selezionare:”Utilizza solo la funzione
wireless di Windows”.
Lettura degli Indicatori di Stato WLAN
Il dispositivo è provvisto di due LED, indicanti lo stato dell’ adattatore WLAN.
LINK
ACT
12
Adattatore WLAN ASUS
Italiano
Guida Rapida
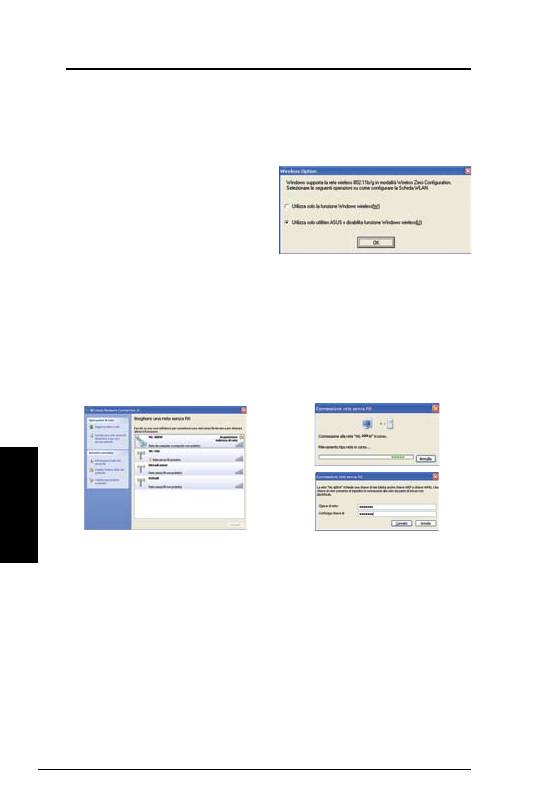
Opzioni Wireless per Windows
®
XP
La finestra delle opzioni wireless mostrata di seguito è disponibile solamente per
Windows
®
XP. Appare quando si esegue per la prima volta l’utilità Control Center.
Selezionare l’utilità prescelta per configurare l’ Adattatore WLAN.
Utilizza solo la funzione Windows
wireless–
Usa solo il servizio Wireless
Zero Configuration di Windows
®
XP per
configurare l’ Adattatore WLAN
Utilizza solo utilities ASUS e disabilita
funzione Windows wireless
–
Usa solo
le utilità ASUS WLAN per configurare l’
Adattatore WLAN (consigliata)
Configurazione tramite il servizio Wireless Zero Configuration di
Windows
®
Attenersi alle istruzioni che seguono per configurare l' Adattatore WLAN con il
servizio Wireless Zero Configuration (WZC) di Windows
®
.
2.Se il router wireless è stato
configurato con crittografia,
appare una finestra richiedente
l’immissione della chiave.
Immettere la chiave e cliccare
Connetti
. La connessione è così
completata.
1. Cliccare due volte sull' icona
della wireless sulla barra delle
applicazioni per visualizzare le
reti disponibili.
Selezionare l' AP e
cliccare
Connetti
.
Adattatore WLAN ASUS
13
Italiano
Guida Rapida
Per impostare le proprietà della connessione wireless, cliccare col tasto destro
del mouse sull’ icona wireless sulla barra delle applicazioni e selezionare
Apri
connessione di rete
.
Poi, fare clic col tasto destro del mouse sull’icona della
connessione di rete e selezionare
Proprietà
per aprire la pagina sullo stato
della connessione senza fili (Wireless Network Connection Status).
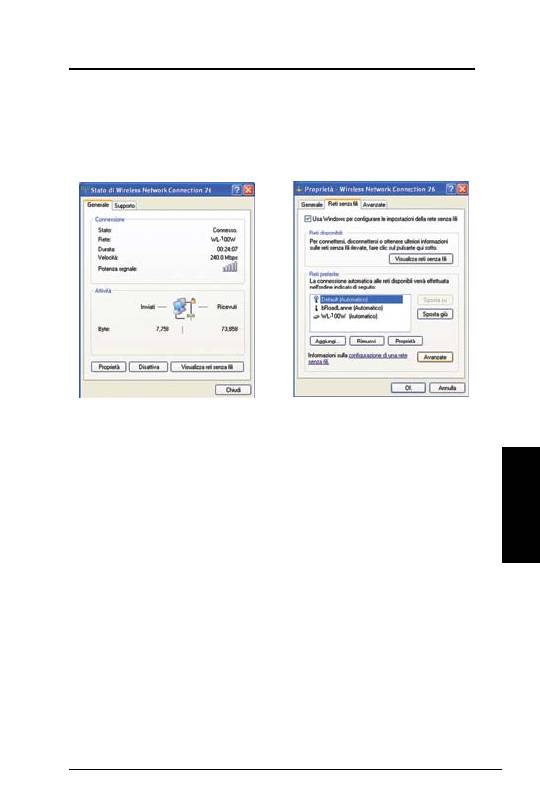
1. La pagina
Generale
mostra stato,
durata, velocità e potenza del segnale.
La potenza del segnale è rappresentata
da barre verdi, dove 5 barre indicano un
segnale eccellente ed 1 barra indica un
segnale debole.
2. Selezionare la scheda
”Reti senza fili”
per mostrare
Reti preferite
. Servirsi del
pulsante
Aggiungi
per aggiungere lo “
SSID” delle reti disponibili ed impostare l
’ordine preferito di connessione con il
pulsante
Sposta su
e
Sposta giù
. L
’icona dell’antenna radio identifica il
punto d’accesso connesso al momento.
Cliccare su
Proprietà
per impostare l’
autenticazione della connessione wireless.
14
ASUS WLAN адаптер
Руководство по быстрой установке
Русский
Процедуры установки
Внимание: Устанавливайте утилиты WLAN перед установкой WLAN адаптера
в компьютер.
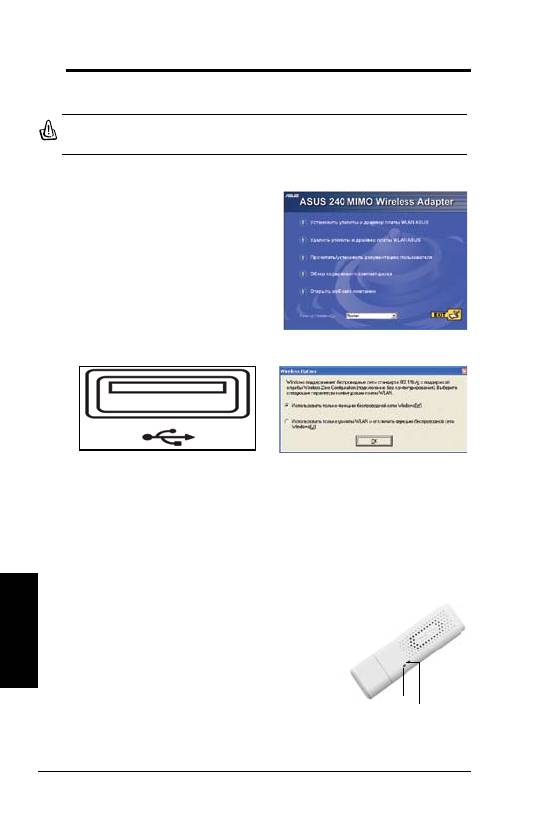
Установка утилит и драйверов
Для установки утилит и драйвера WLAN
адаптера выполните следующие шаги.
Вставьте сопровождающий компакт-диск
в оптический привод компьютера. Если на
вашем компьютере включен автоматический
запуск, компакт-диск автоматически выведет
меню утилиты. Нажмите
Установить
утилиты и драйвер платы WLAN ASUS.
Если автоматический запуск не активирован,
дважды нажмите на SETUP.EXE в корневом
каталоге на компакт-диске.
Осторожно вставьте WLAN адаптер в разъем
PCMCIAвашего компьютера. Программа Windows
автоматически найдет и сконфигурирует
WLAN адаптер с помощью утилит и драйверов,
установленных ранее.
Индикаторы состояния WLAN
Данное устройство оборудовано двумя светодиодами, показывающими состояние
WLAN адаптера.
ACT LED ( РАБОЧЕЕ СОСТОЯНИЕ)
МИГАЮЩИЙ:
Передача данных, скорость мигания
отображает скорость соединения.
ВЫКЛЮЧЕН:
Отключена радиосвязь или адаптер
выключен.
LINK LED (СОЕДИНЕНИЕ)
ВКЛЮЧЕН:
Соединен с беспроводным устройством.
ВЫКЛЮЧЕН:
Нет беспроводного соединения.
LINK
ACT
Пользователи Windows XP: Когда программа
запускается впервые (во время перезапуска
Windows), вы должны выбрать один из способов
для конфигурирования WLAN адаптера. Выберите
Использовать только утилиту WLAN.
ASUS WLAN адаптер
15
Руководство по быстрой установке
Русский
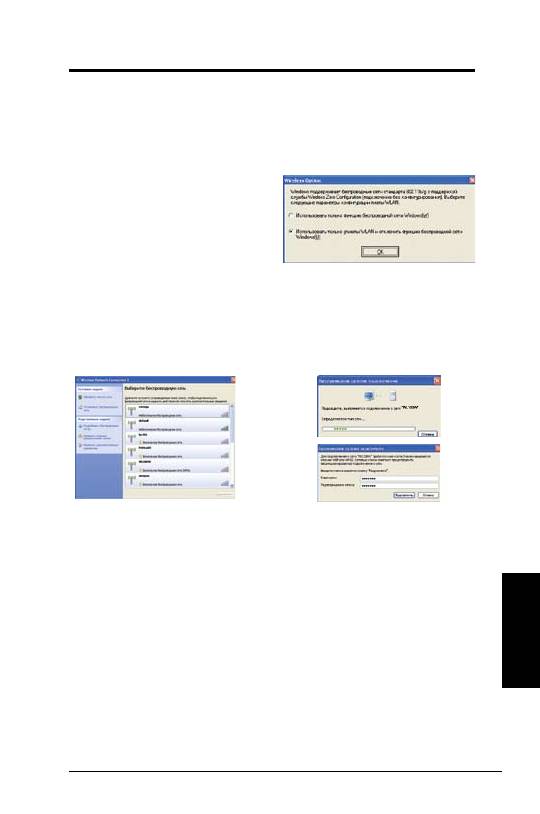
Служба беспроводной сети Windows
®
XP
Окно опций беспроводного соединения, приведенное ниже, доступно только в Windows
®
XP. Оно выводится при первом запуске утилиты центра управления. Выберите нужную
утилиту для конфигурации вашего WLAN адаптера.
И с п о л ь з о в а т ь т о л ь к о с л у ж б у
беспроводной сети Windows
-
Использовать только службу конфигурации
беспроводного соединения Windows
®
XP.
Использовать только утилиту WLAN
–
Использовать только утилиту ASUS WLAN
для конфигурации WLAN адаптера. (рекомендуется)
Конфигурация с помощью службы беспроводной сети Windows
®
Если вы желаете конфигурировать ваш WLAN адаптер с помощью службы беспроводной
сети Windows
®
, необходимо выполнить нижеследующие действия.
2. Появится окно, запрашивающее ключ, если
вы установили шифрование на вашем
беспроводном маршрутизаторе,введите
ключи и нажмите Подключить.Соединение
выполнено.
1. Щелкните дважды на значок беспроводной
сети на панели задач для просмотра
доступных сетей. Выберите WL-500W и
нажмите Подключить.
16
ASUS WLAN адаптер
Руководство по быстрой установке
Русский
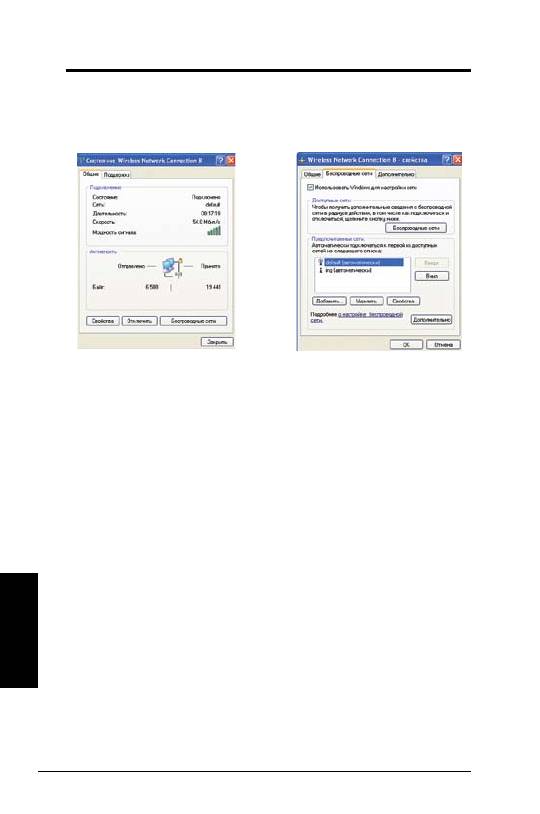
Для установки свойств беспроводного соединения щелкните правой кнопкой мыши
на значке беспроводного соединения на панели задач и выберите
Открыть сетевое
соединение.
Потом правой кнопкой мыши щелкните на значок сетевого соединения и
выберите
Свойства
, чтобы открыть
Беспроводные сети
.
1 . В к л а д к а
О б щ и е
в ы в о д и т с о с т о я н и е ,
длительность, скорость и мощность сигнала.
Сила сигнала отображается зелеными
полосками, 5 полосок означают отличное
качество сигнала, 1 полоска – низкое.
2. Нажмите кнопку
беспроводные сети
для
вывода окна
Предпочитаемые сети.
С
помощью кнопки
Добавить
добавьте SSID
доступных сетей и установите порядок
приоритетности соединения с помощью
кнопок
Вверх
и
Вниз
.Значок радиомачты с
сигналом определяет текущее соединение
с точкой доступа. Нажмите
Свойства
для
настройки аутентификации беспроводного
соединения.
Adaptador ASUS WLAN
17
Guía de Instalación Rápida
Español
LED “ACT”
Intermitente:
Transmitiendo datos;la velocidad de
intermitencia indica la velocidad del enlace.
APAGADO:
Sin señal de radio o adaptador
desactivado.
LED “LINK”
ENCENDIDO:
Adaptador conectado a un dispositivo
inalámbrico.
APAGADO:
Sin conexión inalámbrica.
Procedimientos de Instalación
Importante: Instale las utilidades del adaptador WLAN antes de insertar
ésta en su PC Portátil.
Instalación de utilidades y controladores
Siga estas instrucciones para instalar
las utilidades y el controlador del
adaptador WLAN. Inserte el CD de
soporte en su unidad óptica. Si la
función de autoejecución ha sido
activada en su PC, podrá ver el menú
de utilidades de forma automática. Si
la función de autoejecución ha sido
desactivada, haga doble clic en el
archivo SETUP.EXE desde el directorio
raíz del CD. Finalmente, haga clic en
Install ASUS WLAN Adapter
Utilities/Driver
.
Inserte el adaptador WLAN con cuidado en la
ranura PCMCIA de su PC. Windows realizará
una detección automática y lo configurará
utilizando las utilidades y controladores
instalados previamente.
Usuarios de Windows XP: Cuando el programa
es ejecutado por primera vez (durante el inicio
de Windows), será necesario que seleccione
una utilidad para configurar el adaptador
WLAN. Seleccione "Solo use Windows función
inalámbrico".
Indicadores de estado
Este adaptador WLAN incluye dos LEDs de estado.
LINK
ACT
18
Adaptador ASUS WLAN
Guía de Instalación Rápida
Español
Opciones inalámbricas en Windows
®
XP
Esta ventana sólo está disponible en Windows
®
XP. Aparece cuando
ejecuta la utilidad del Centro de Control por primera vez. Seleccione la
utilidad que desee usar para configurar su adaptador WLAN.
S o l o u s e Wi n d o w s f u n c i ó n
inalámbrico –
Utilizará sólo el
servicio de configuración Windows
®
XP Wireless Zero Configuration.
Solo use programa de utilidades
ASUS y deshabilite la función
inalámbrico de Windows
– Utilizará sólo las utilidades ASUS para configurar el adaptador WLAN
(recomendado).
Configuración con Windows
®
Wireless Zero Configuration
Siga las instrucciones a continuación para configurar su adaptador WLAN
a través del servicio Windows
®
Wireless Zero Configuration (WZC).
2. Si ha configurado encriptación
en su enrutador inalámbrico,
necesitará escribir claves. Si es
así introdúzcalas éstas y haga
clic en
Conectar
. La conexión
se completará.
1. Haga doble clic en el icono de
redes inalámbricas de la barra
de tareas para ver las redes
disponibles. Seleccione WL-
100W y haga clic en
Conectar
.
