Asus P5V-VM DH: Appendix
Appendix: Asus P5V-VM DH
Table of contents
Appendix
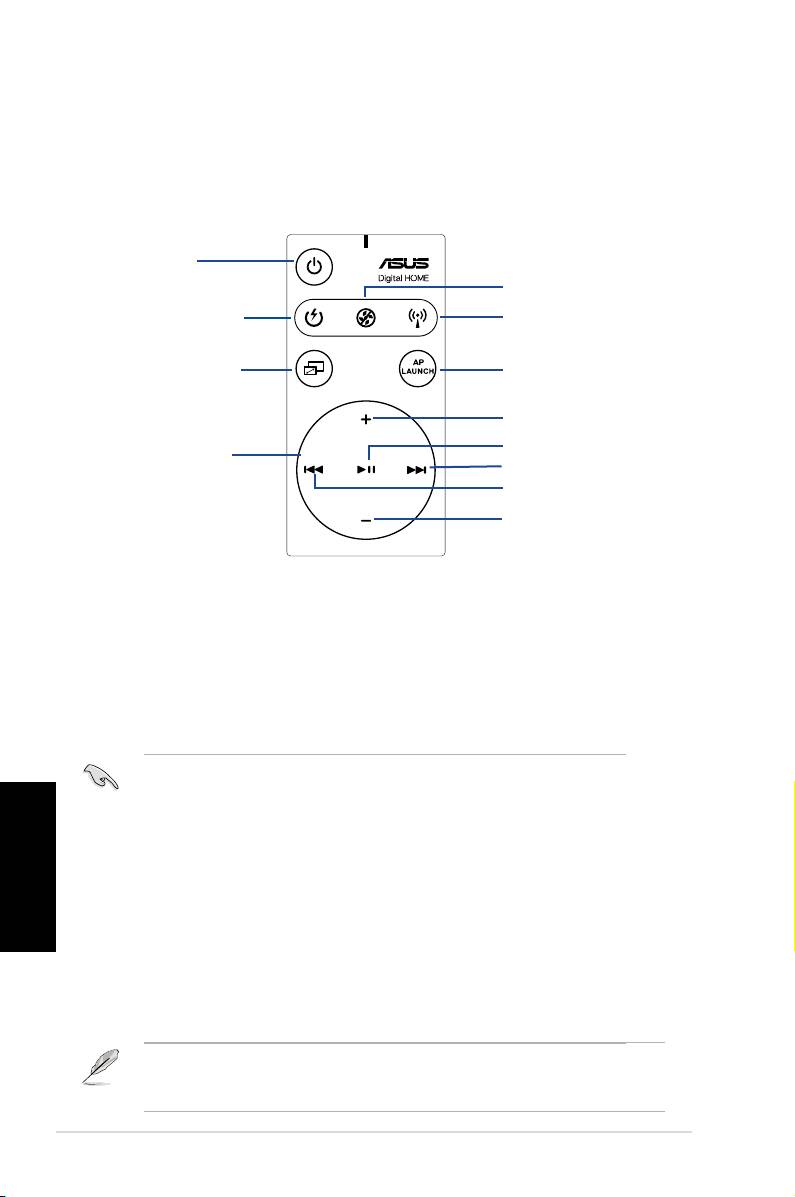
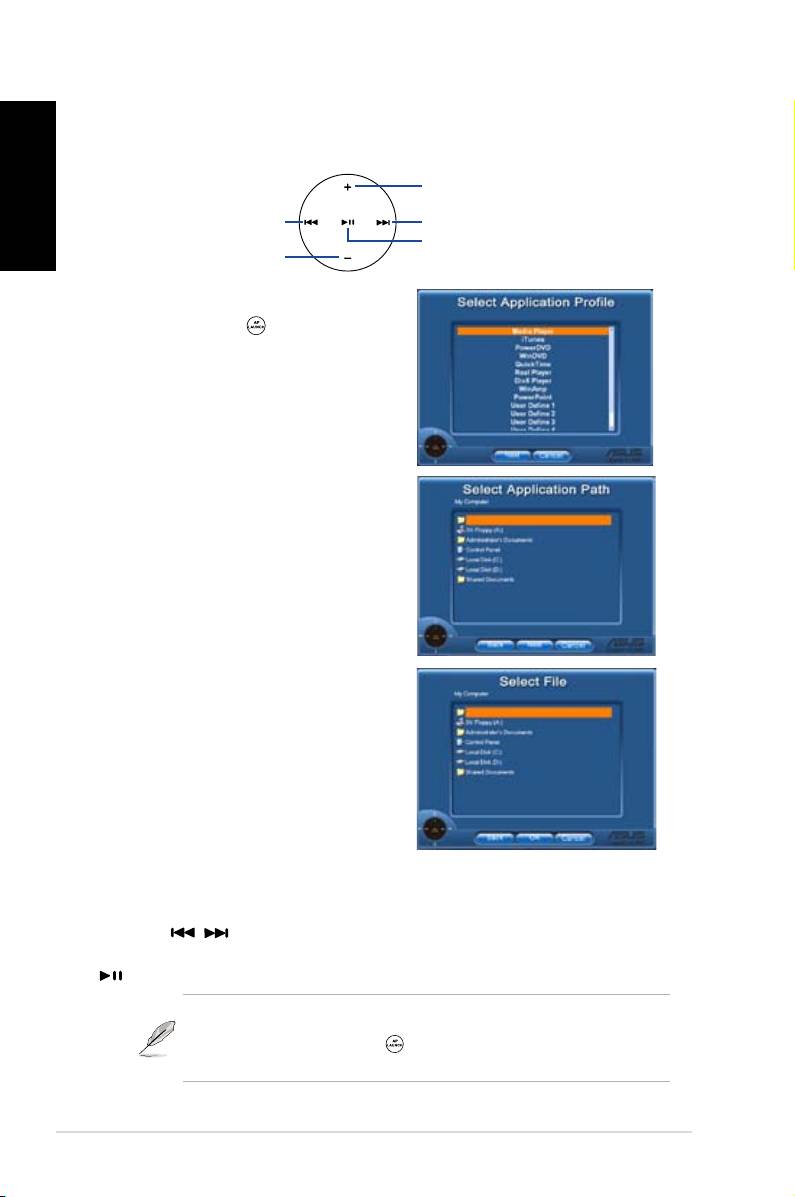
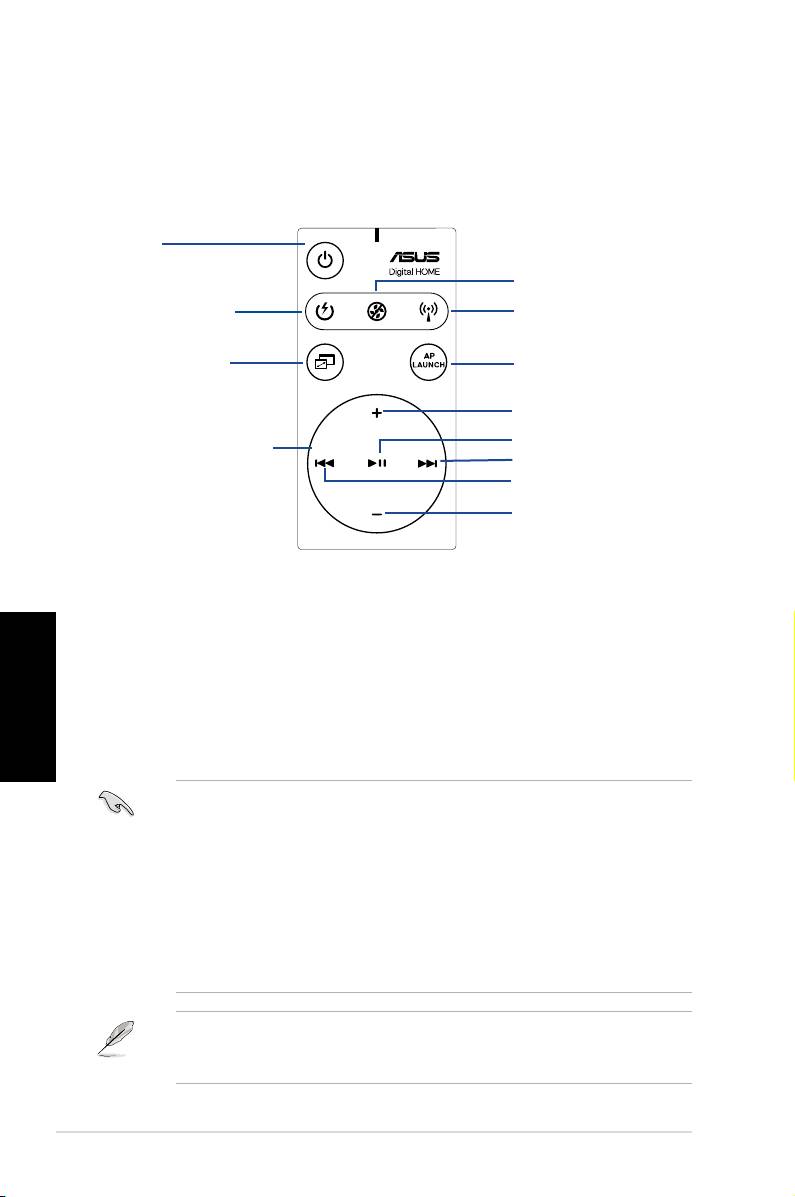
The Function Buttons and AP Prole
English
The ASUS DH Remote software helps you set up the correspondence
between the function buttons on the remote to the function hotkeys of nine
popularapplicationsinadvanceandleavesvesetsfor
User Dene
.
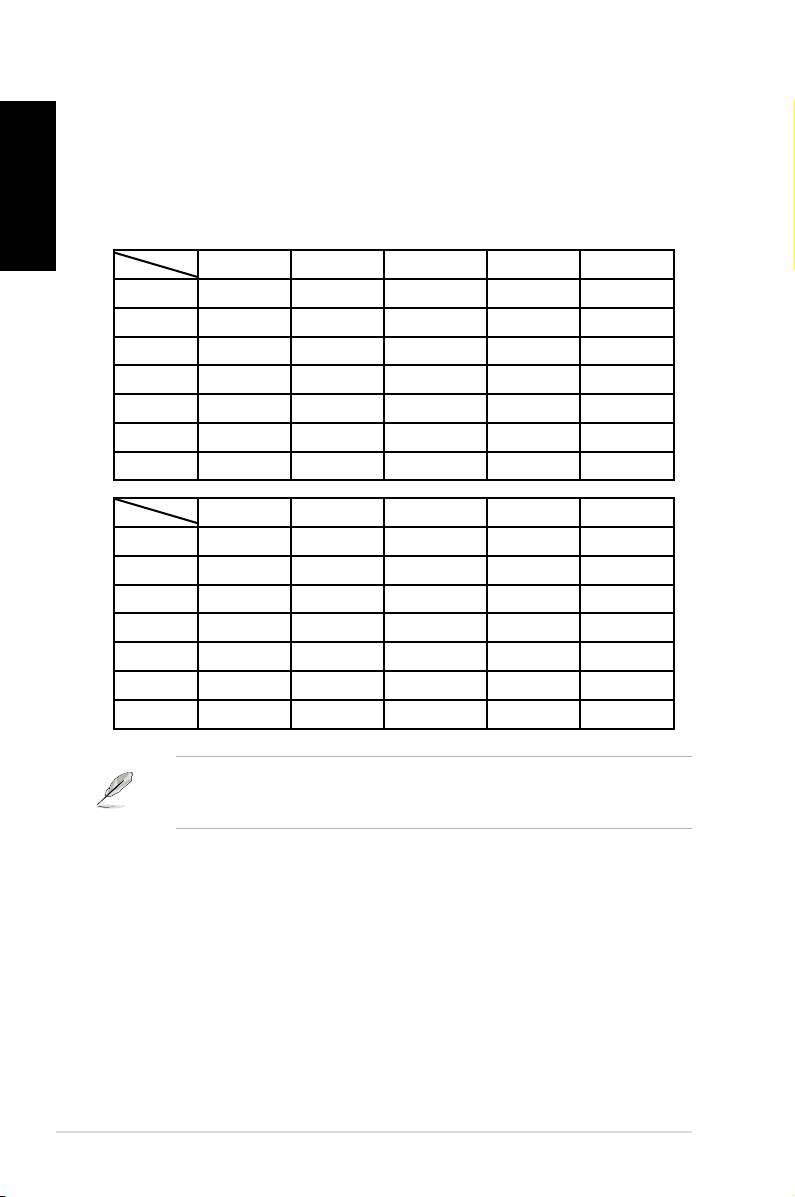
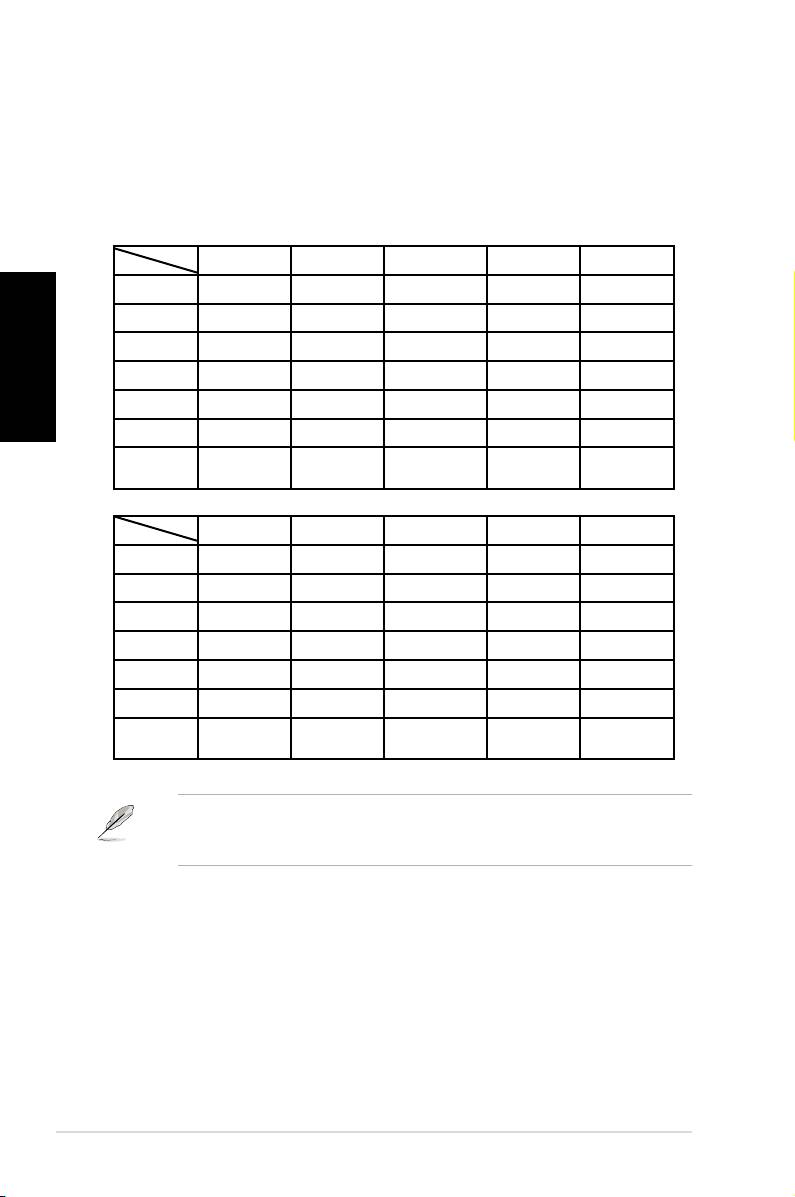
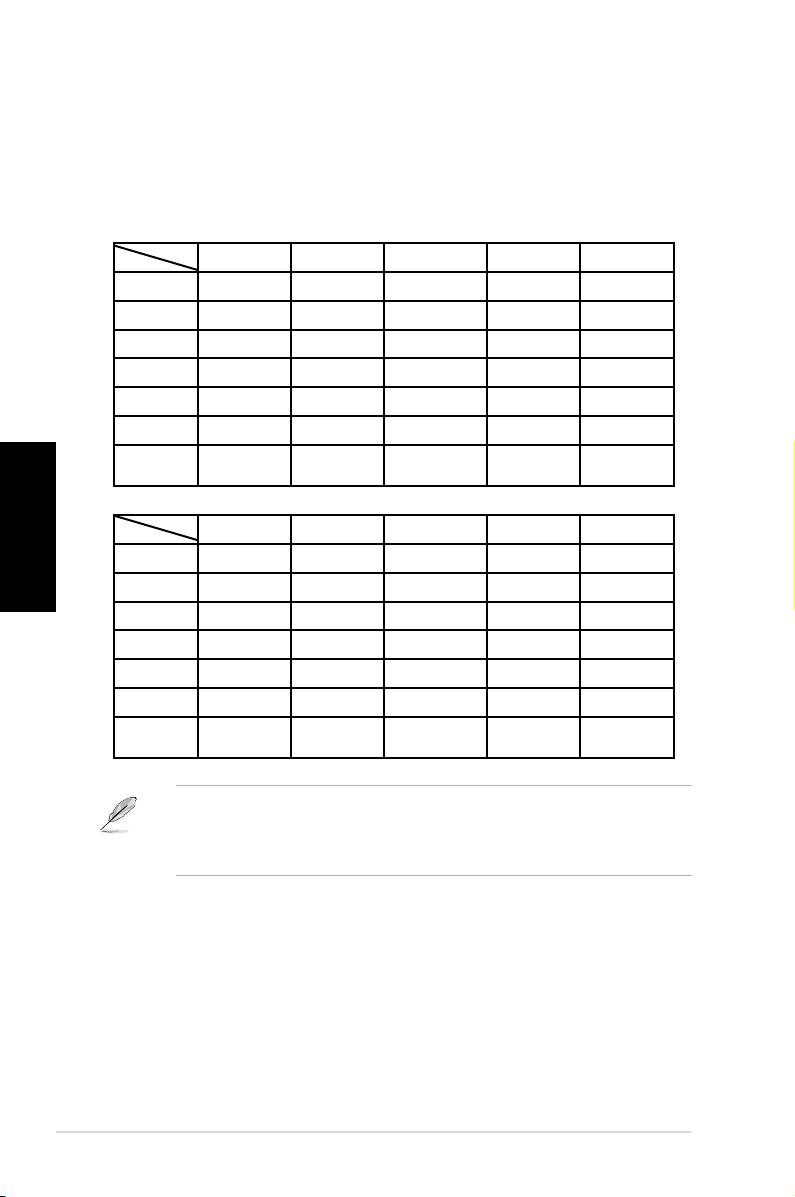
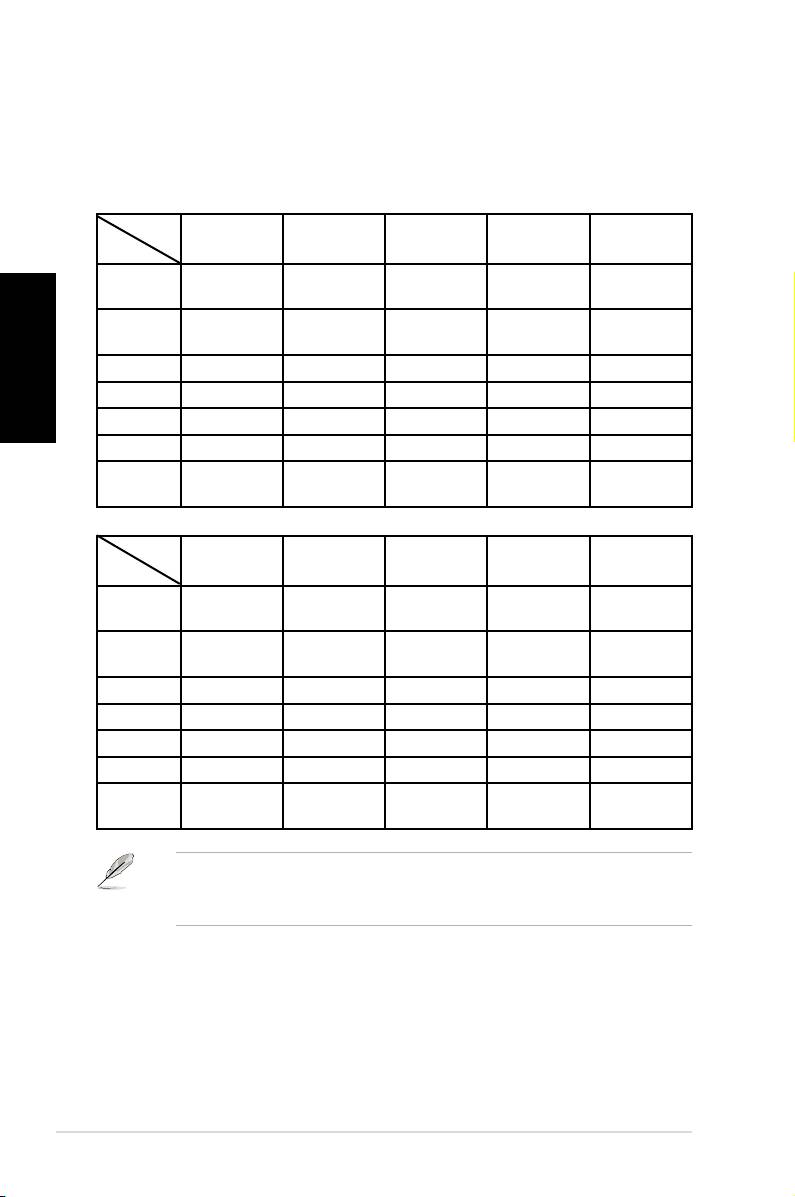
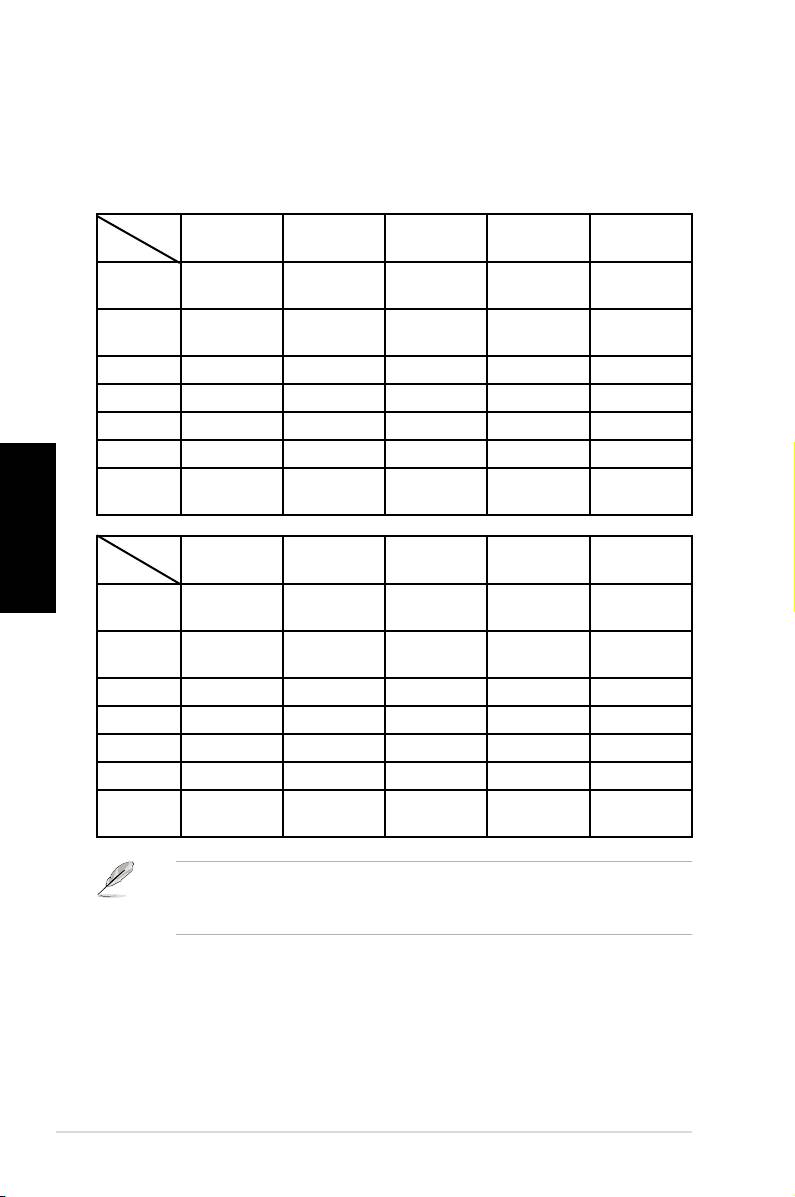
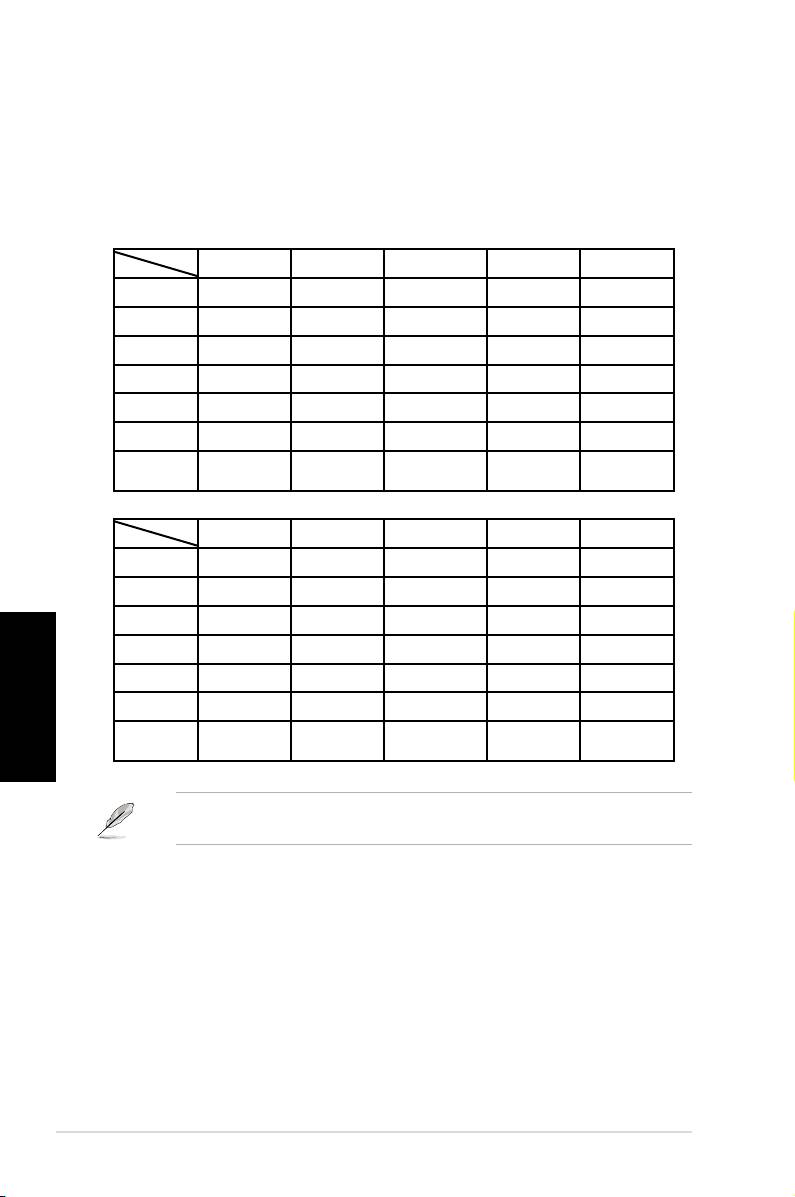
Media Player iTunes PowerDVD WinDVD QuickTime
Full Screen v v v v v
Play/Pause v v v/x v v
Vol+ v v v v v
Vol- v v v v v
Ch+ v v v v x
Ch- v v v v x
*NOTE
only play, no pause
Real Player DivX Player WinAmp Power Point User Defne
Full Screen v v x v
Play/Pause v v v/x Full Screen
Vol+ v x v B
Vol- v x v ESC
Ch+ v x v Page Down
Ch- v x v Page Up
*NOTE
only play, no pause
Ifyoundthe9defaultapplicationsinsufcientandwould liketoadddifferent
applications, you are able to rename the 5 sets User Dene and create your
preferred applications and favorable setups.
8
DH Remote

™
DH Remote
Français
Guide
Copyright © 2006 ASUSTeK COMPUTER INC. Tous droits réservés.
Bienvenue
Fatigué d’avoir à être collé à votre PC et de manipuler souris et clavier ? Avec la
télécommande ASUS DH Remote, vous pouvez lire, mettre en pause, ou ajuster le
volume de vos musiques favorites sans avoir à quitter le confort de votre canapé.
Prenez DH Remote en main et contrôlez votre PC à distance.
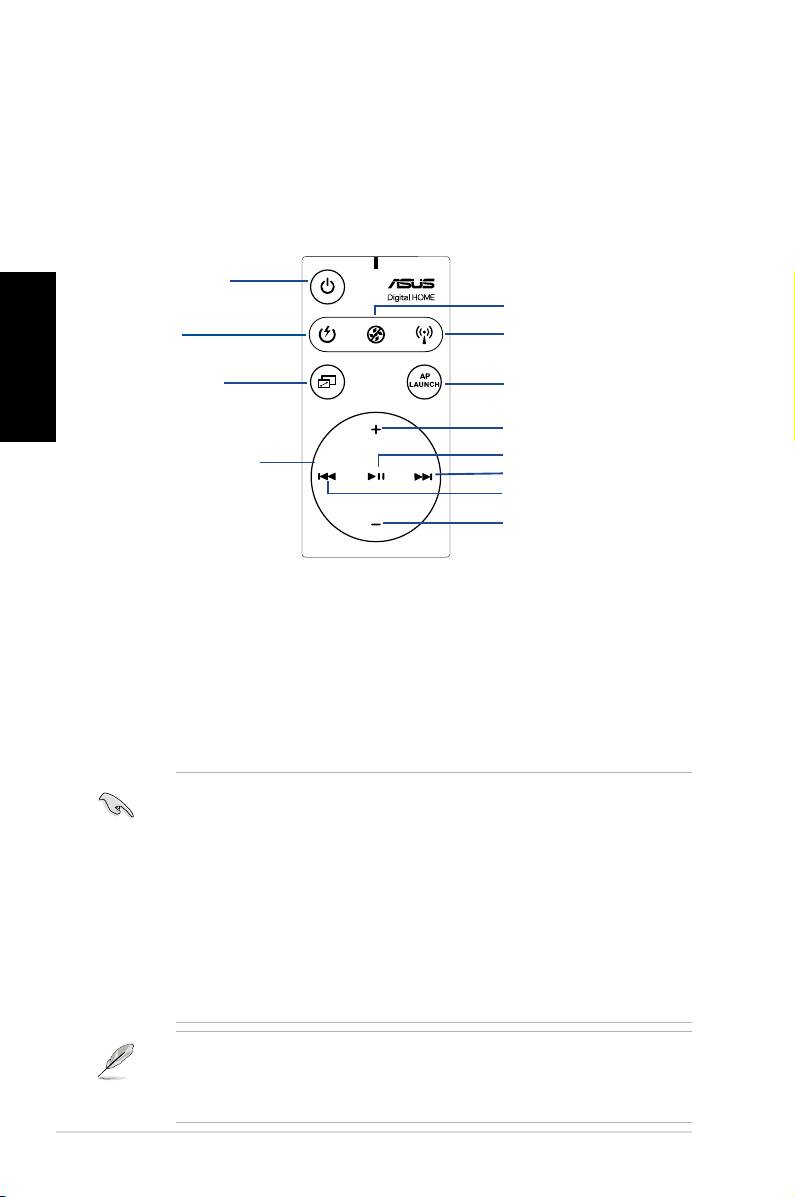
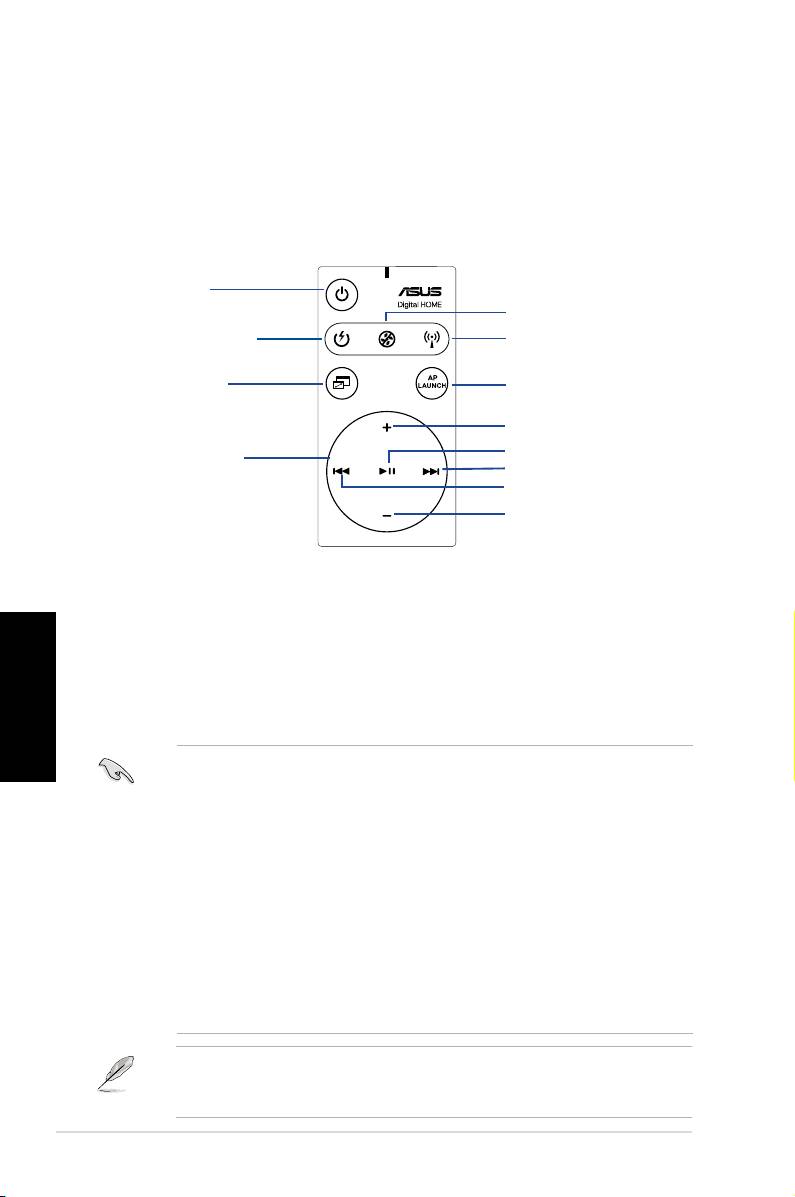
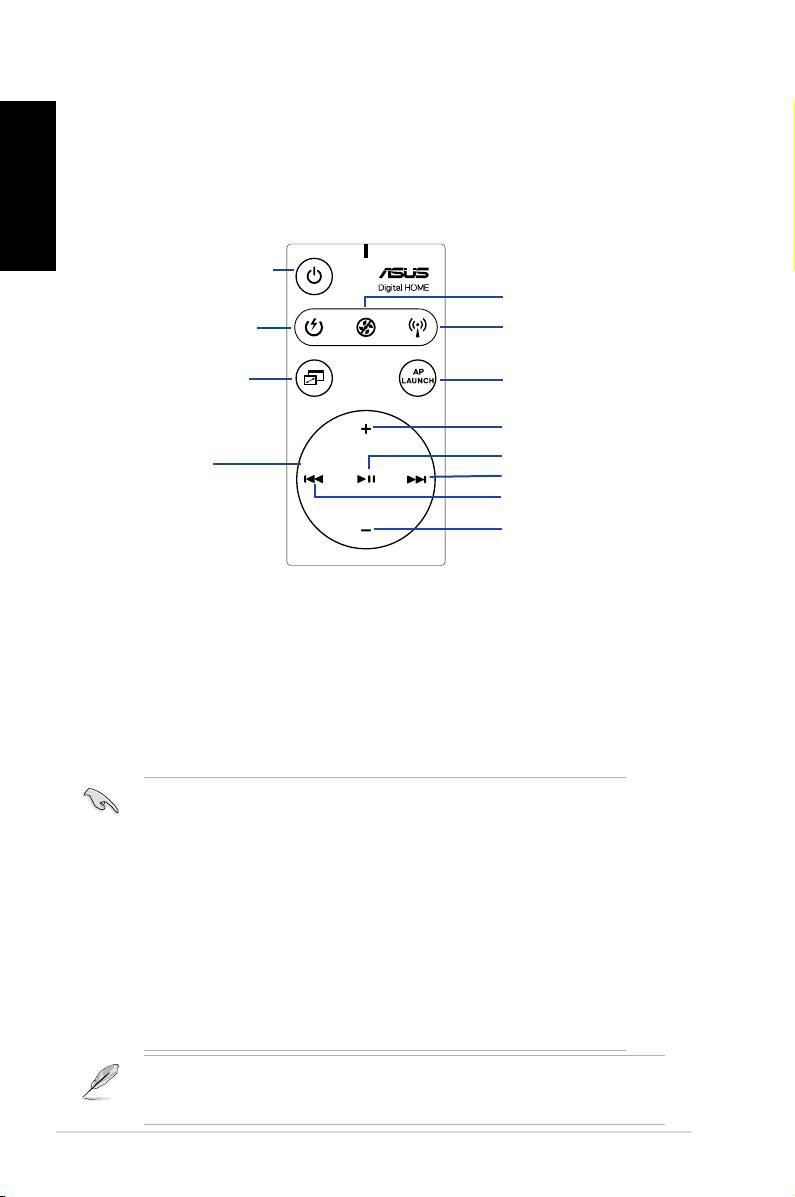
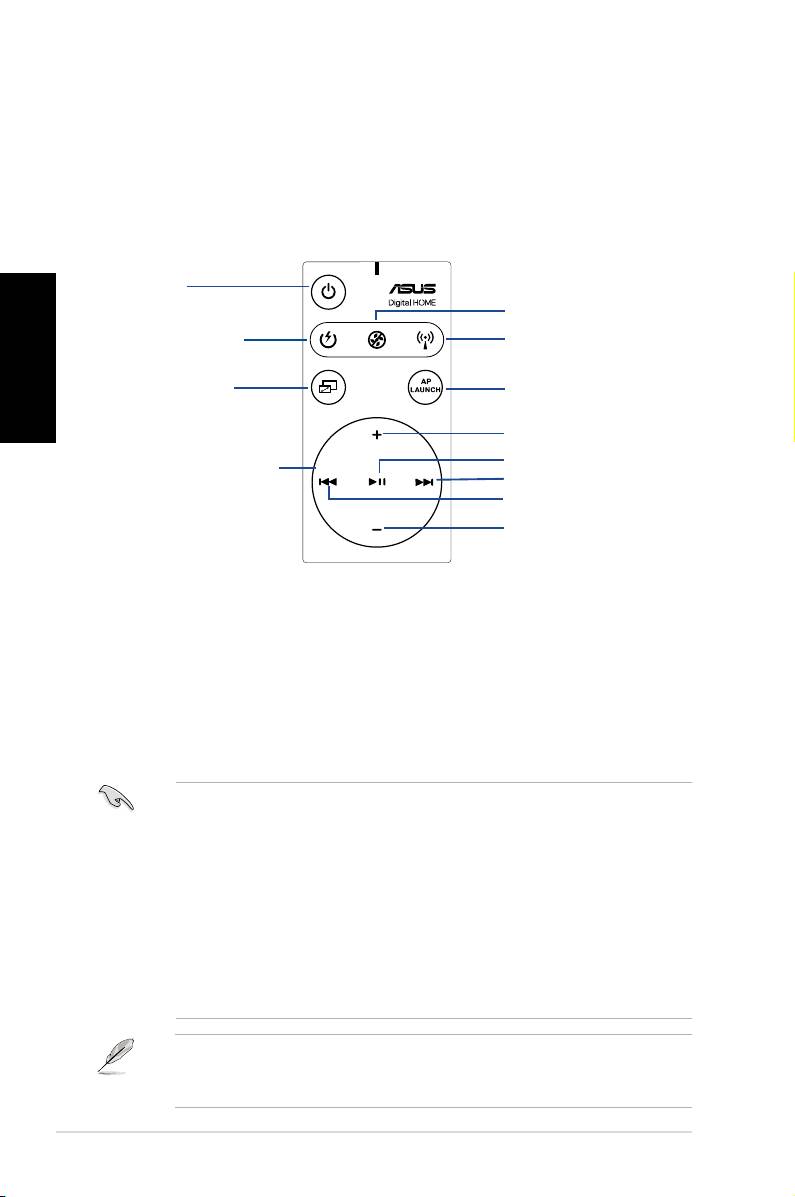
Vue d'ensemble de la télécommande
1. Alimentation
5. Réduction du bruit
Français
2. Veille
6. EZ WiFi
3. Plein écran
7. AP Launch
Augmentation du volume
Lecture/Pause
4. Zone de contrôle
Suivant
multimédia
Précédent
Baisse du volume
1. Alimentation: Démarre ou éteint l'ordinateur.
2. Veille: Bascule l'ordinateur en mode veille (S3).
3. Plein écran: Bascule l'application multimédia en mode plein écran.
4. Zone de contrôle multimédia: Contrôle l'application multimédia.
5. Réduction du bruit: Réduit les nuisances sonores émises par l'ordinateur.
6. EZ WiFi: Bascule l'ordinateur en mode veille tout en maintenant la fonction WiFi-
AP Solo™ active.
7. AP Launch: Exécute l'application multimédia
• Avant d’utiliser le mode veille, veuillez d’abord sauvegarder vos données.
• La fonction Réduction du bruit n’est applicable qu’aux opérations à faible
charge tel que le traitement de texte ou la navigation sur Internet, et permet
d’ajuster la vitesse du ventilateur selon la charge système.
• Différents composants système (carte graphique, alimentation, ventilateur du
châssis) réagiront lors de l’activation de la Réduction du bruit.
• *Lors de l’utilisation d’une carte graphique sans ventilateur ou supportant
le contrôle du ventilateur, veillez à connecter les câbles d’alimentation du
ventilateurs d’alimentation et châssis à leur connecteur de ventilation respectif
sur la carte mère pour de meilleurs résultats.
*Toutes les alimentations ne possèdent pas de connecteurs de ventilation, reportez-
vous au manuel de votre carte mère pour plus de détails.
L’utilisation de la fonction EZ-WiFi est très utile lorsque vous êtes absent mais
souhaitez tout de même continuer à télécharger des données ou utiliser des
applicationssansltelqu'untéléphoneSkype.RéappuyezsurleboutonEZ-WiFi
pour désactiver cette fonction.
2
DH Remote

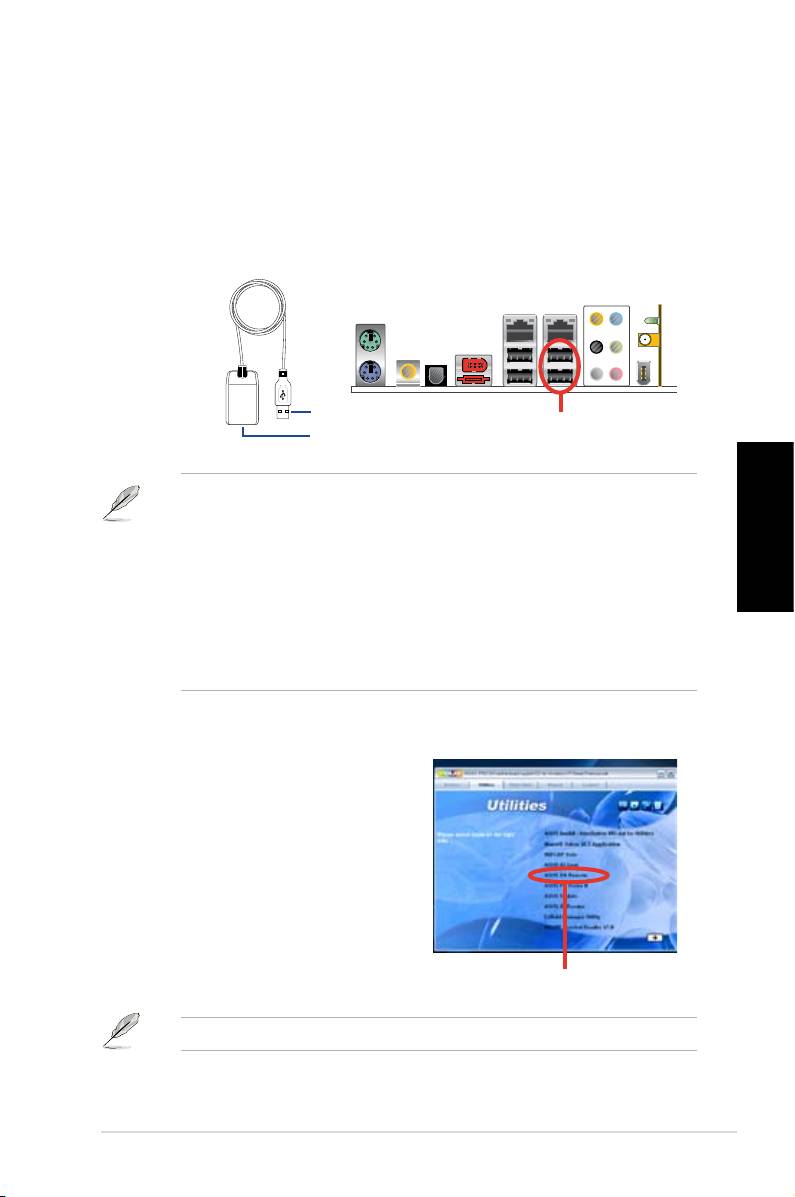
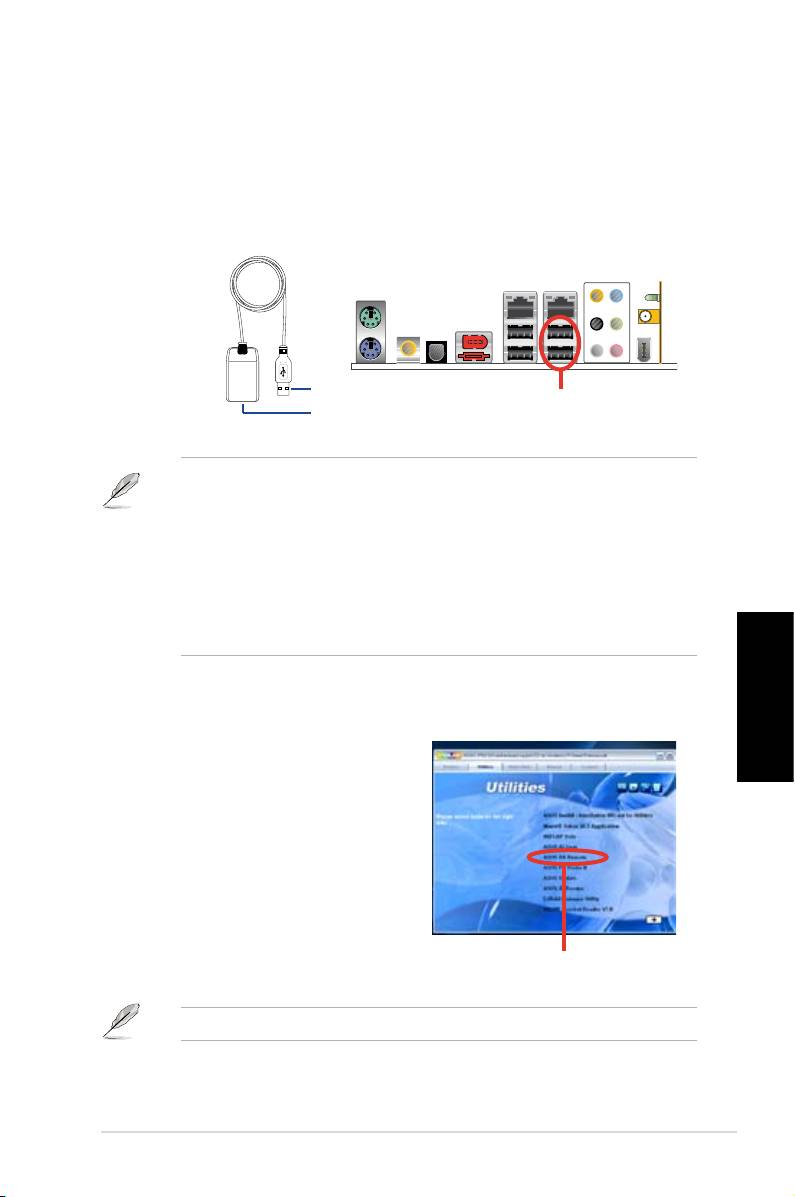
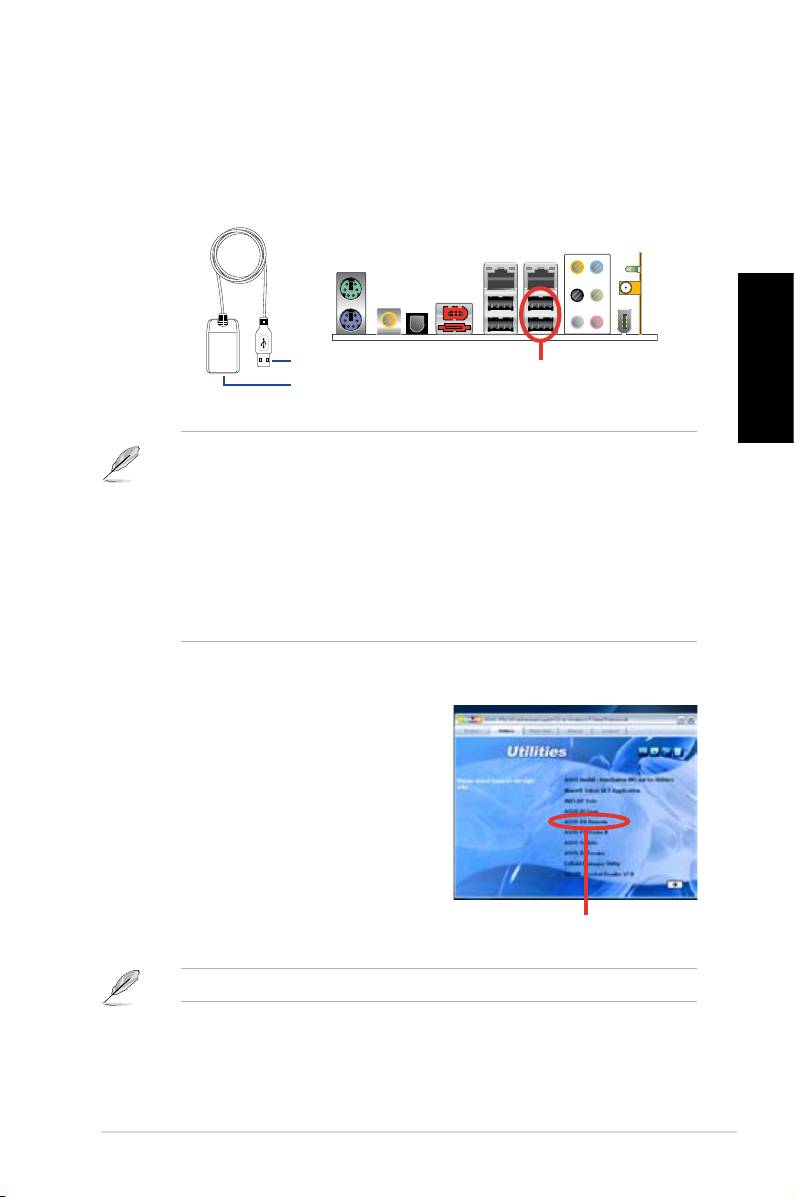
Installation du récepteur infrarouge (IR)
Récepteur IR USB
Votre carte mère est accompagnée d'un récepteur infrarouge (IR). Connectez
le connecteur USB du récepteur à un des ports USB de votre PC localisé sous
le port LAN2, et placez le récepteur infrarouge dans un endroit ne causant pas
d'interférences.
Français
• La portée du signal IR est d’environ 6 mètres selon l’environnement
d’opération. Il est recommandé de diriger la télécommande ASUS DH
Remote vers le récepteur infrarouge pour un meilleur fonctionnement.
• Les deux ports USB supportent la fonction de réveil via USB. Lorsque
l’ordinateur est en veille, retirer des périphériques USB, tel que le récepteur
infrarouge ASUS, démarrera le PC.
• Lacongurationdupanneaud’E/Speutvarierselonlemodèledecartemère.
• Systèmes d’exploitation supportés: Windows XP, 2003 server, XP (64-bits),
et 2003 server (64-bits).
Installation logicielle
Avant toute utilisation de la
télécommande ASUS DH Remote,
il est nécessaire d’installer l’utilitaire
ASUS DH Remote. Après avoir
infrarouge,
installé le récepteur
installezlechierASUS DH Remote
localisé dans le menu Utilities du CD
de support accompagnant votre carte
mère. Une fois l’utilitaire installé, celui-
ci sera automatiquement exécuté à
chaque démarrage de votre PC.
DH Remote
3
ASUS >>USB receiver
USB receiver
connecteur USB
Ports USB
Récepteur IR
ASUS DH Remote
L'écran
Utilites
peut varier selon le modèle de carte mère.
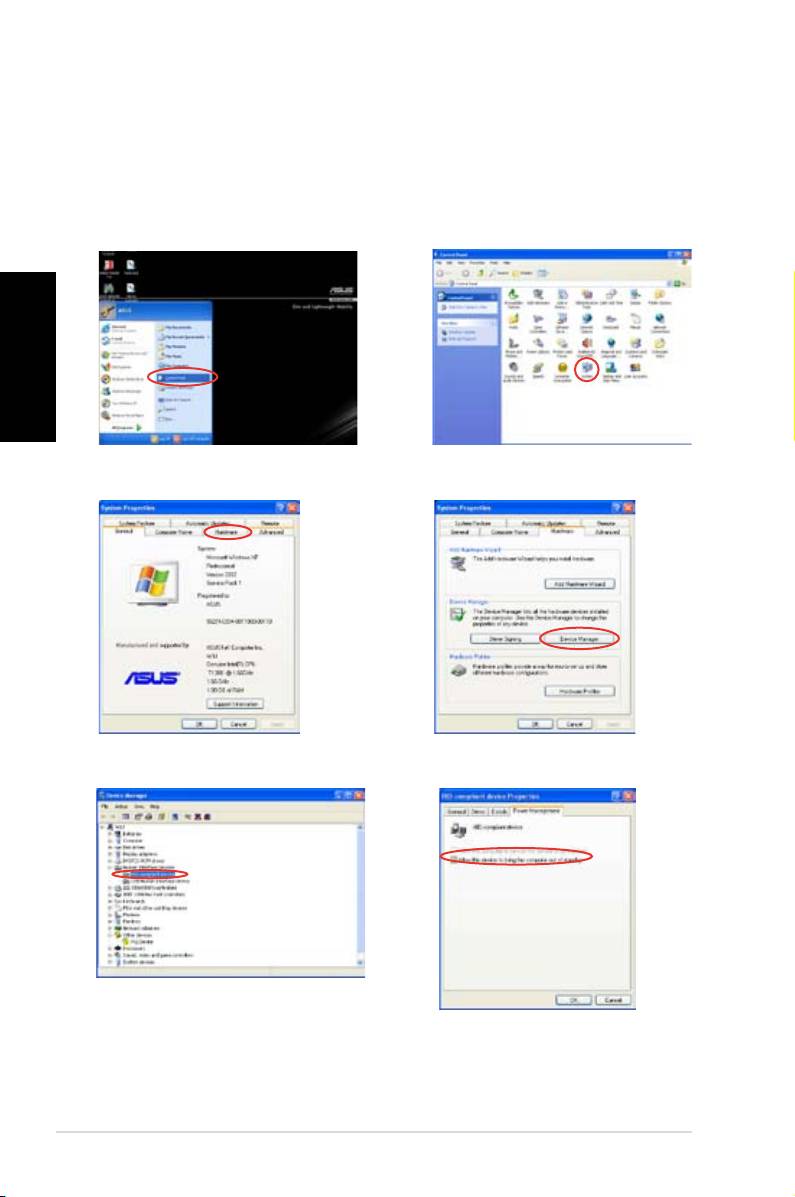
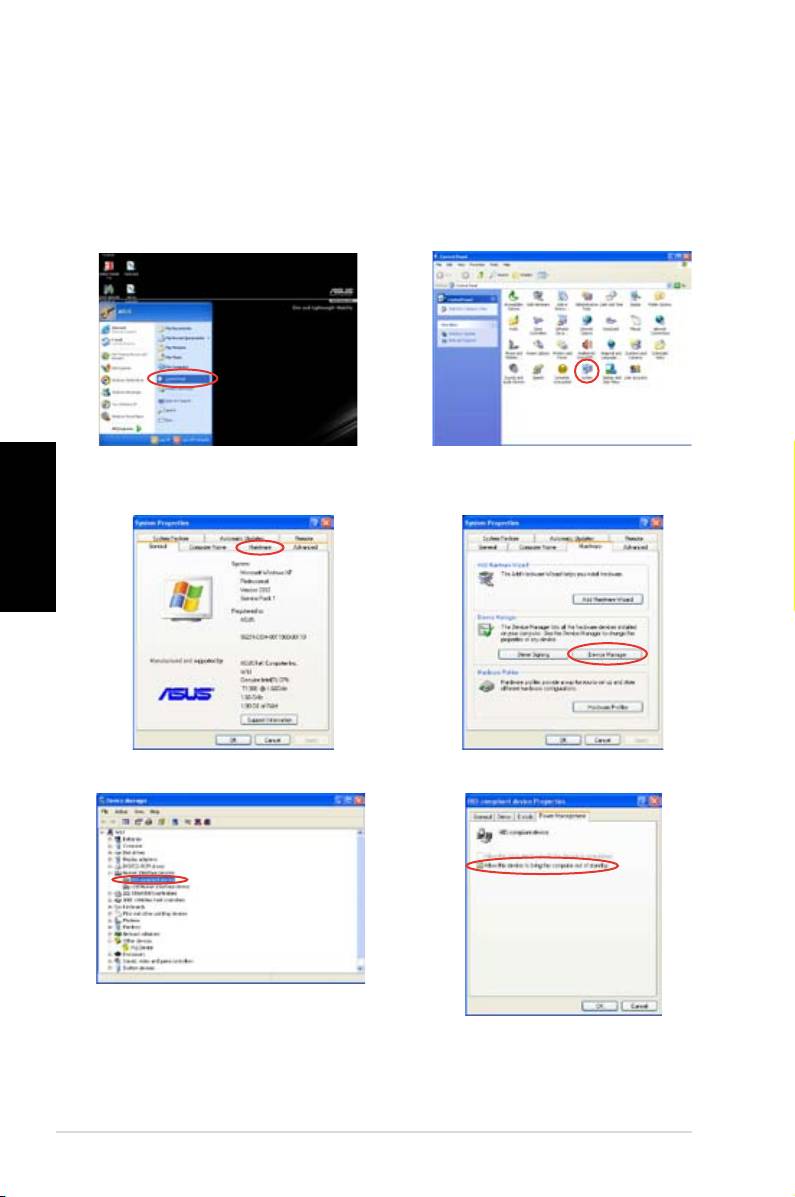
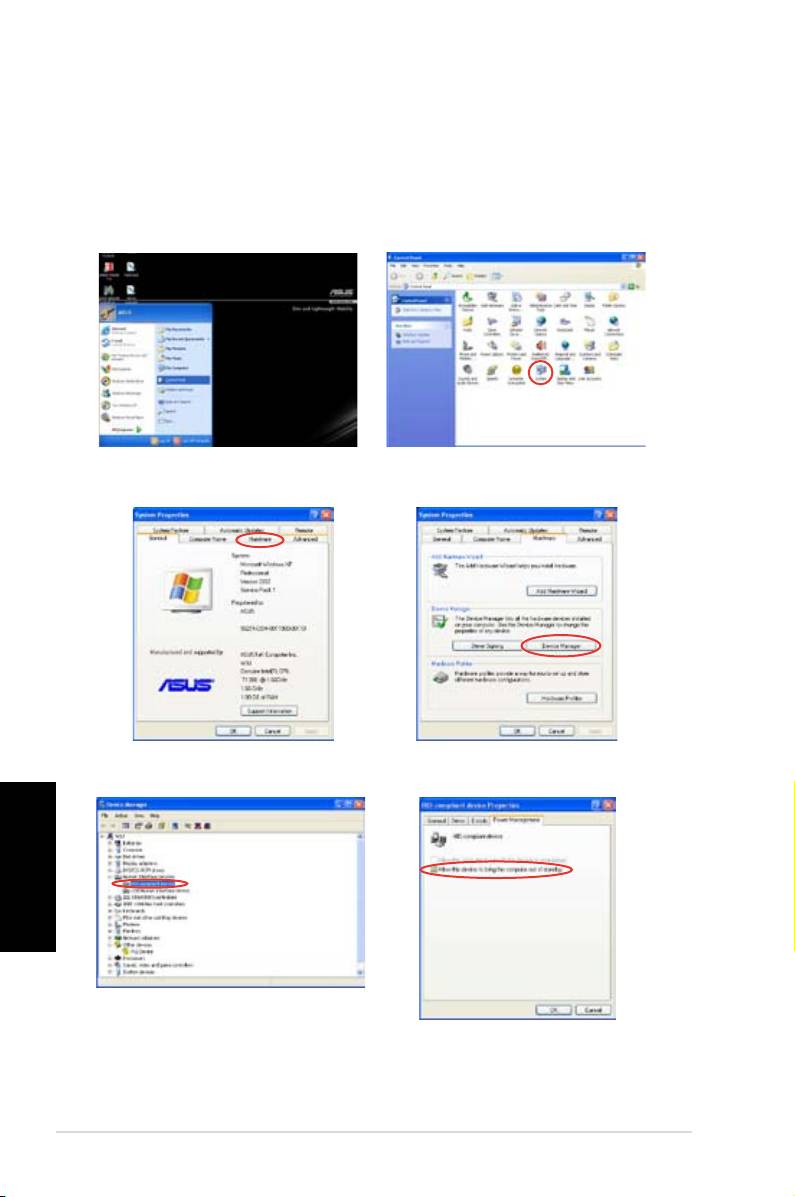
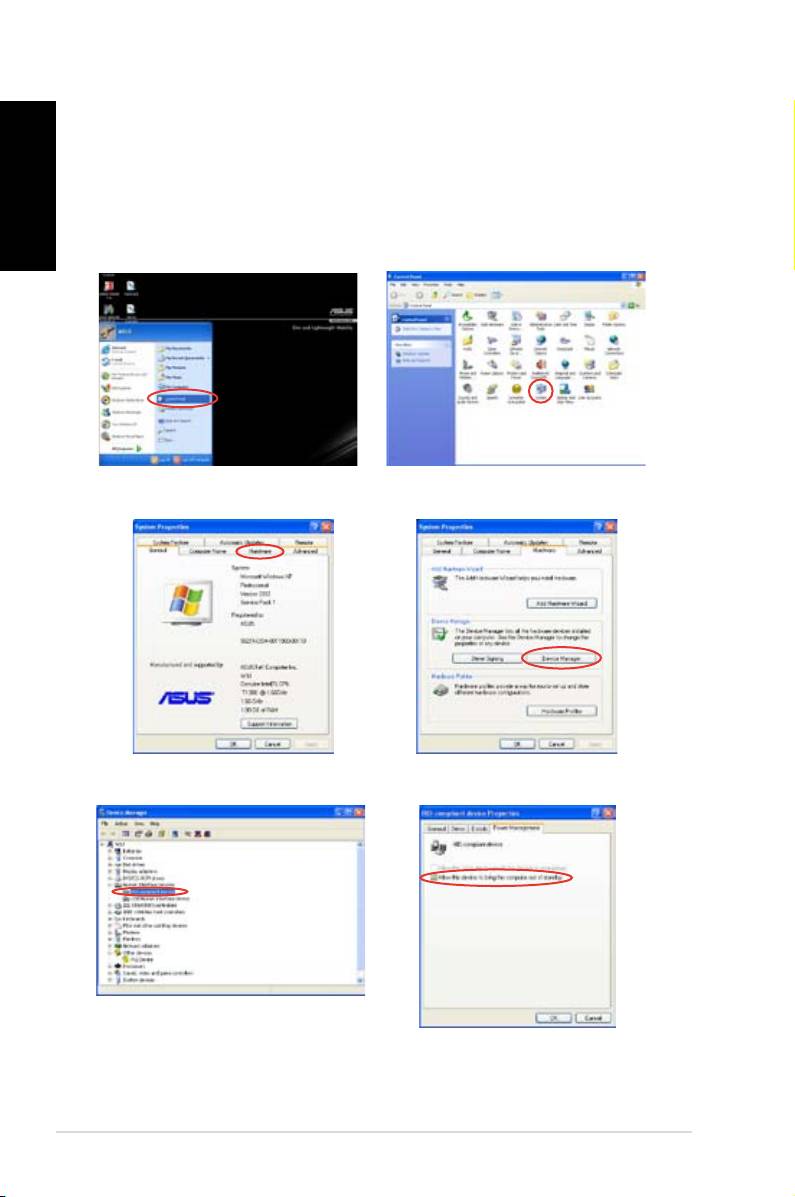
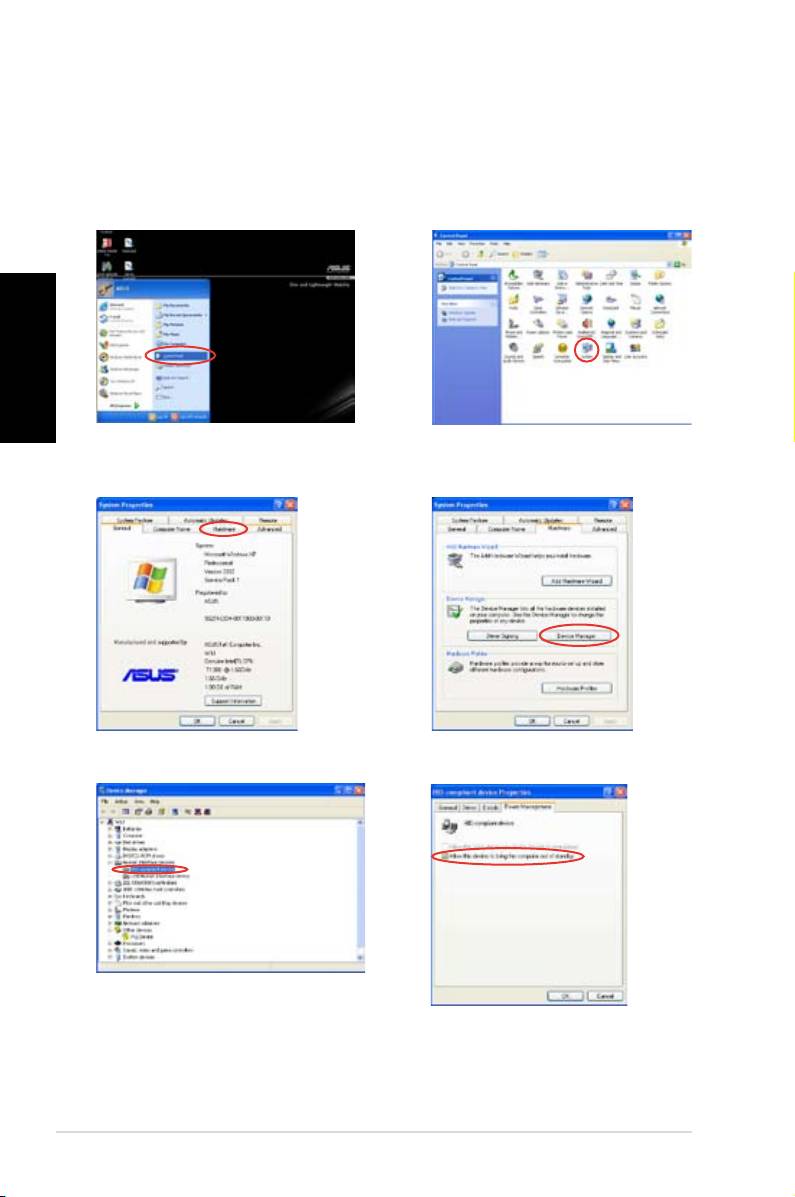
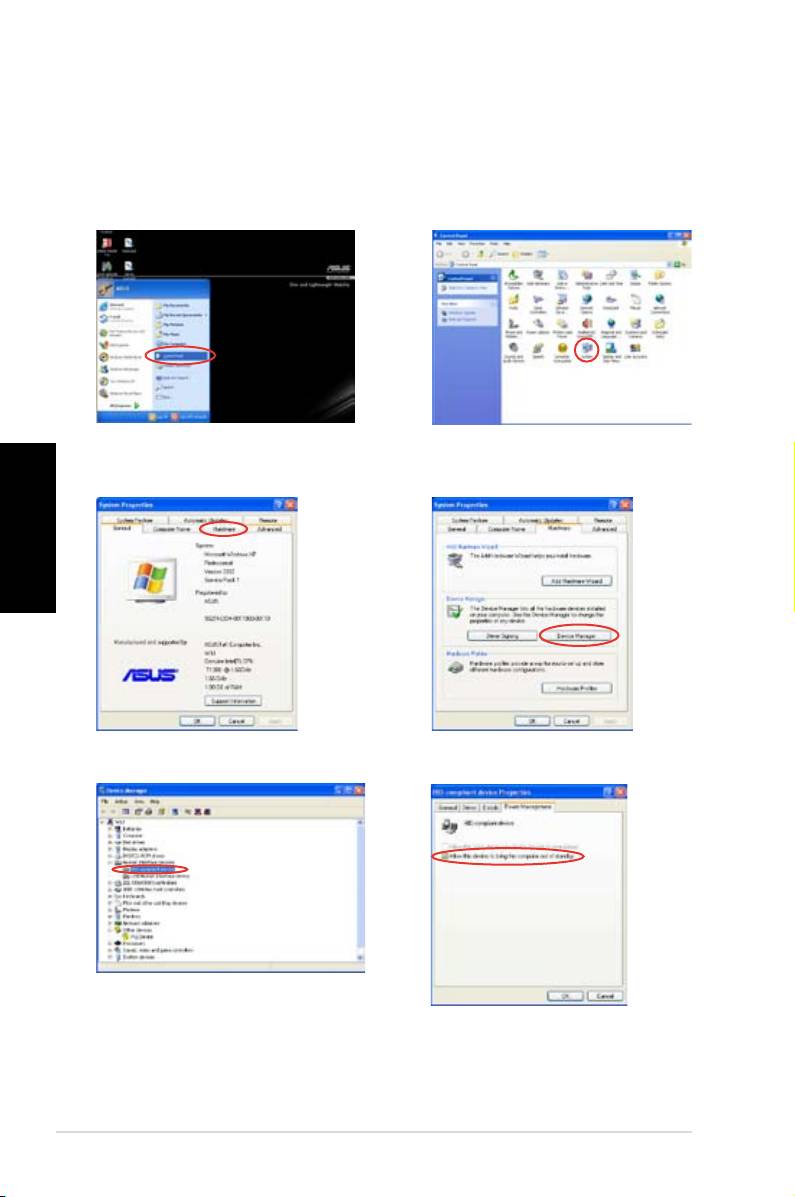
Activer les périphériques compatibles HID
En raison des limitations du système d’exploitation, si vous retirez le récepteur IR de son
port USB pour le réinstaller sur un port USB différent, le récepteur infrarouge ne pourra pas
fonctionner. Pour réactiver les périphériques compatibles HID, accédez au Gestionnaire
de périphériques et cochez l’option Allow this device to bring the computer out
of standby (Permettre à ce périphérique de sortir l’ordinateur du mode veille).
Français
1. Cliquez sur Démarrer et sélectionnez
2. Double-cliquez sur
Système
.
Panneau de conguration.
3. Cliquez sur l'onglet
Matériel
. 4. Cliquez sur
Gestionnaire de
périphériques
.
5. Sélectionnez
HID-compliant
6. Cochez l'option
Allow this
devices
(Périphériques
device to bring the computer
compatibles HID).
out of standby
(Permettre
à ce périphérique de sortir
l'ordinateur du mode veille).
4
DH Remote

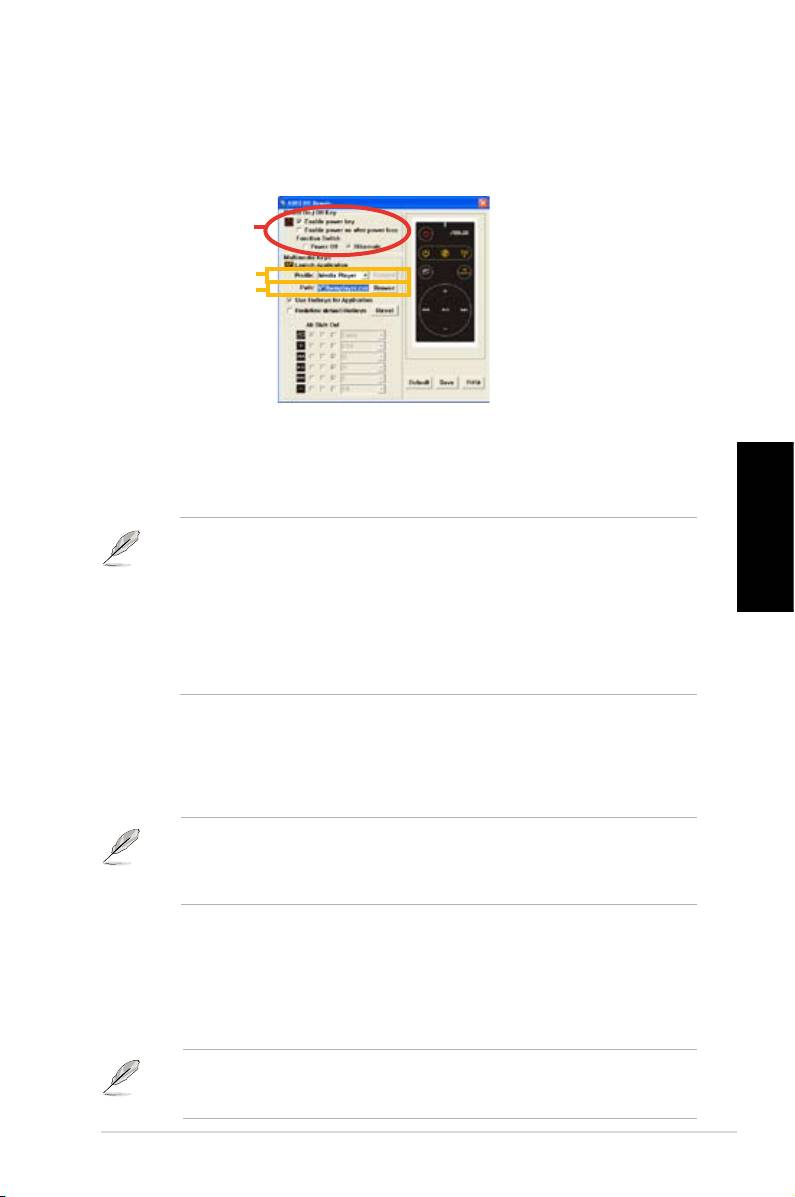
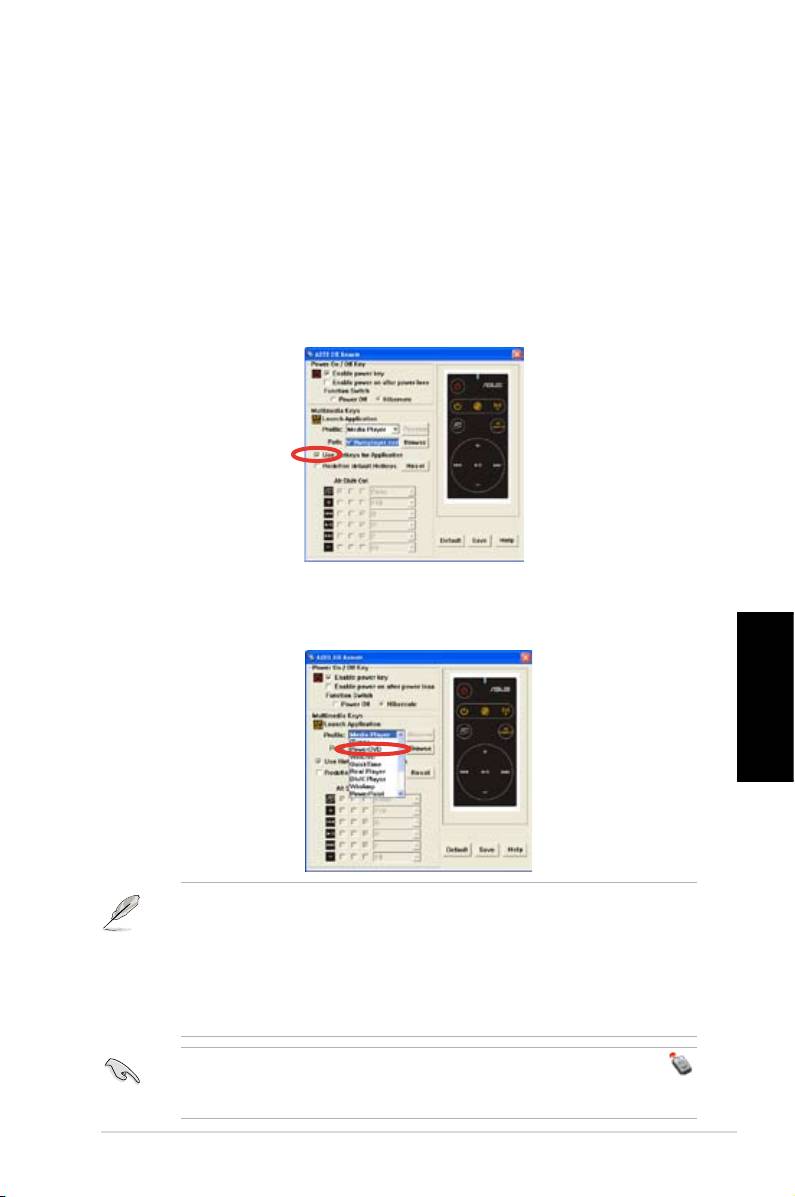
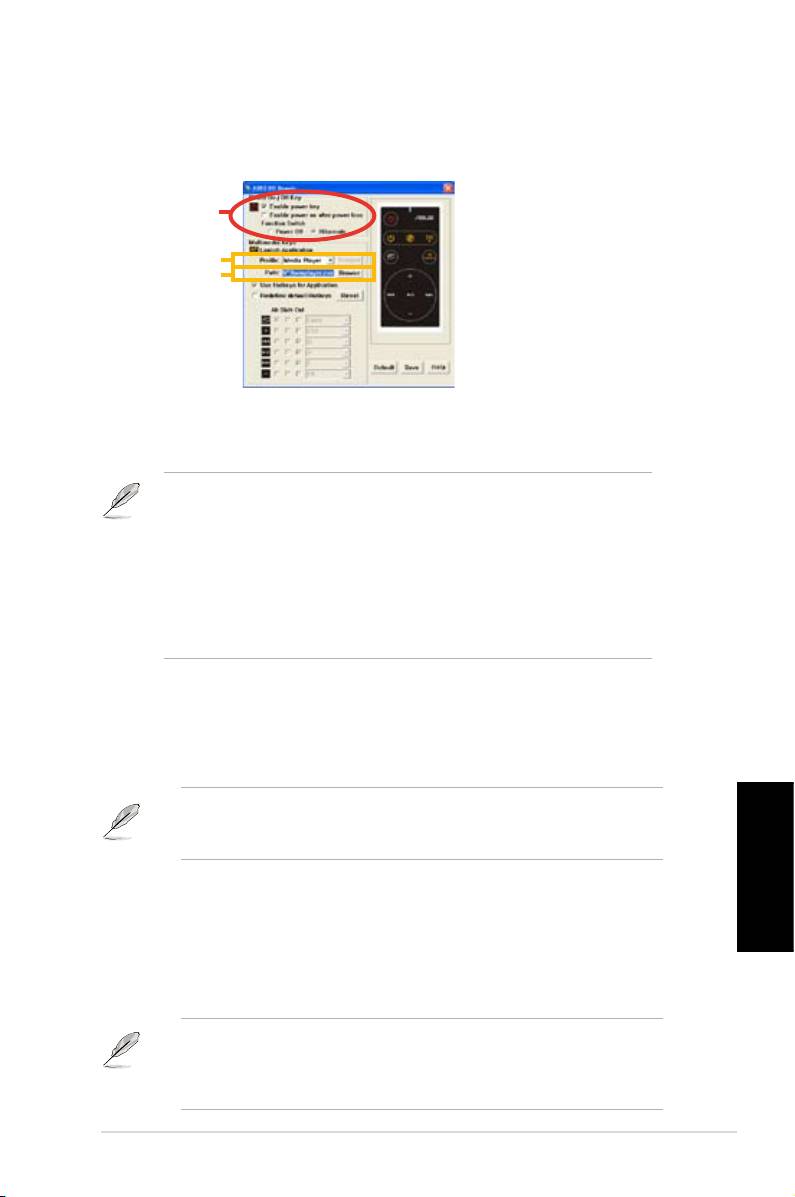
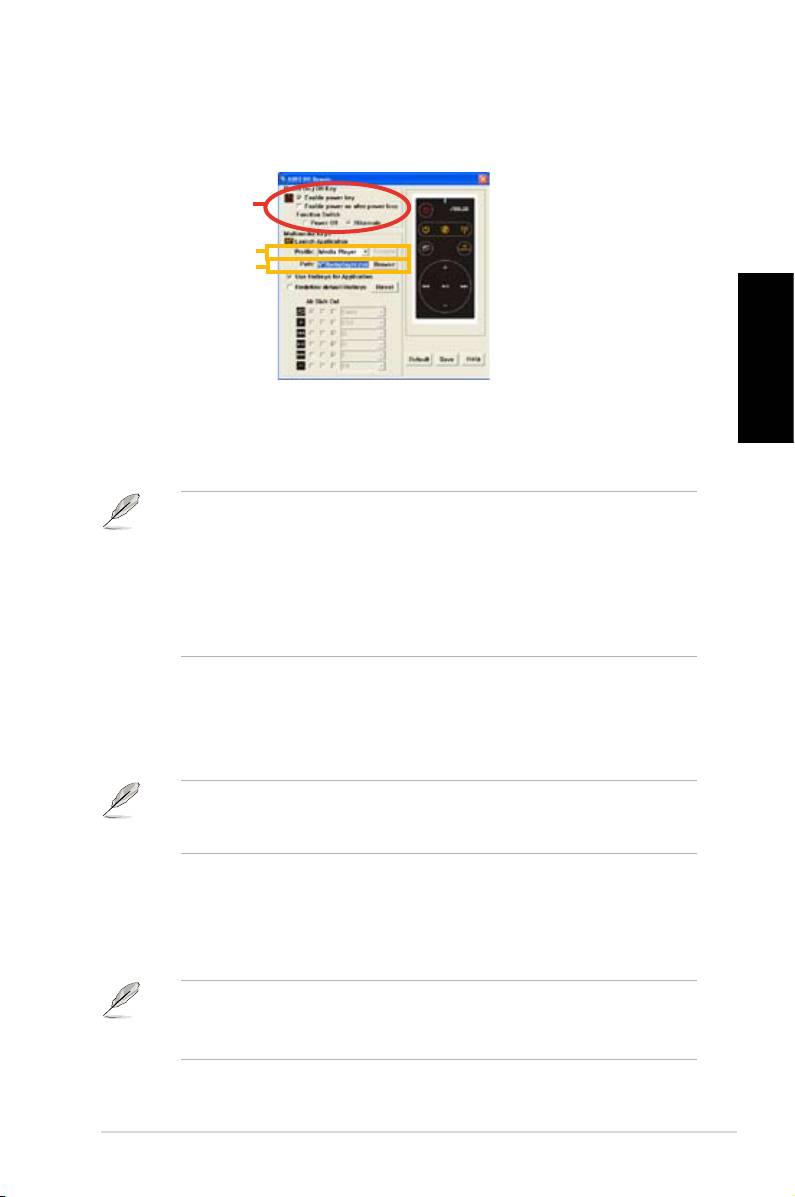
Paramètres ASUS DH Remote
Unefoisl’installationdulogicielASUSDHRemoteterminée,l’utilitaireafchera
unécrandecongurationsdesparamètresASUSDHRemote.Congurezles
touches de fonction par étapes.
1
2
3
Français
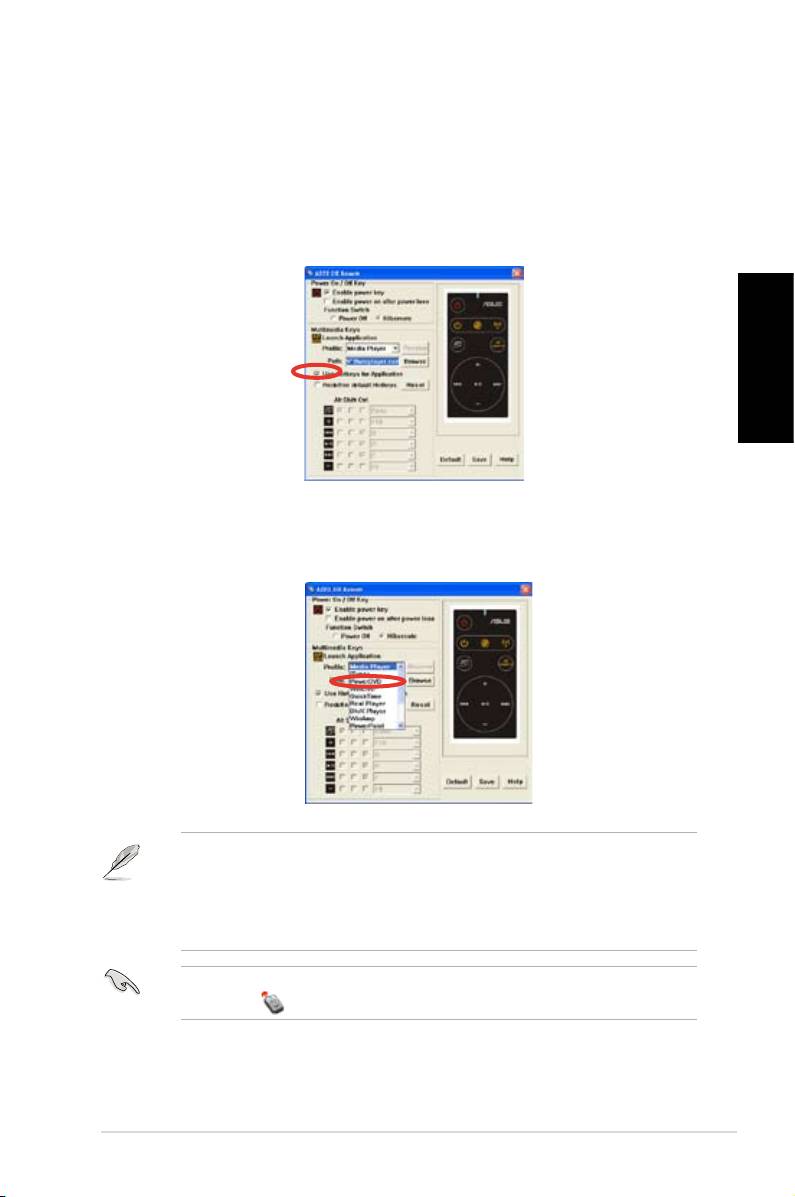
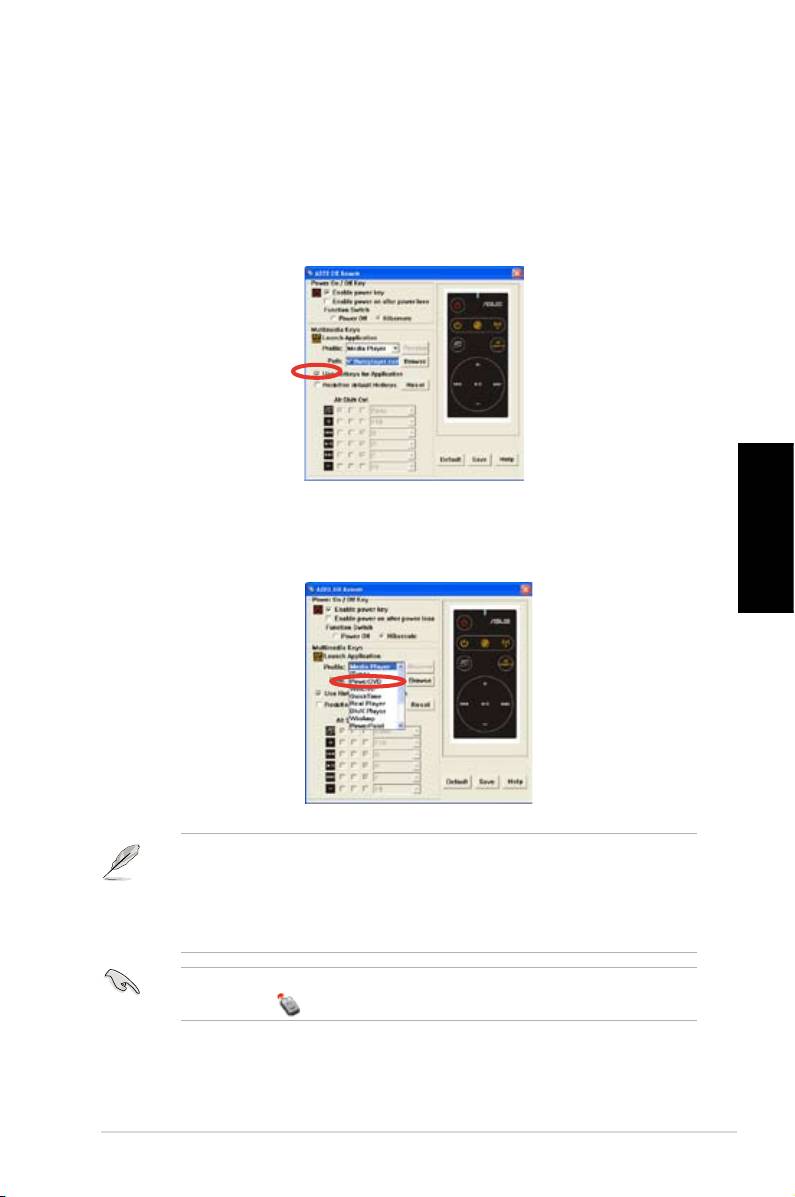
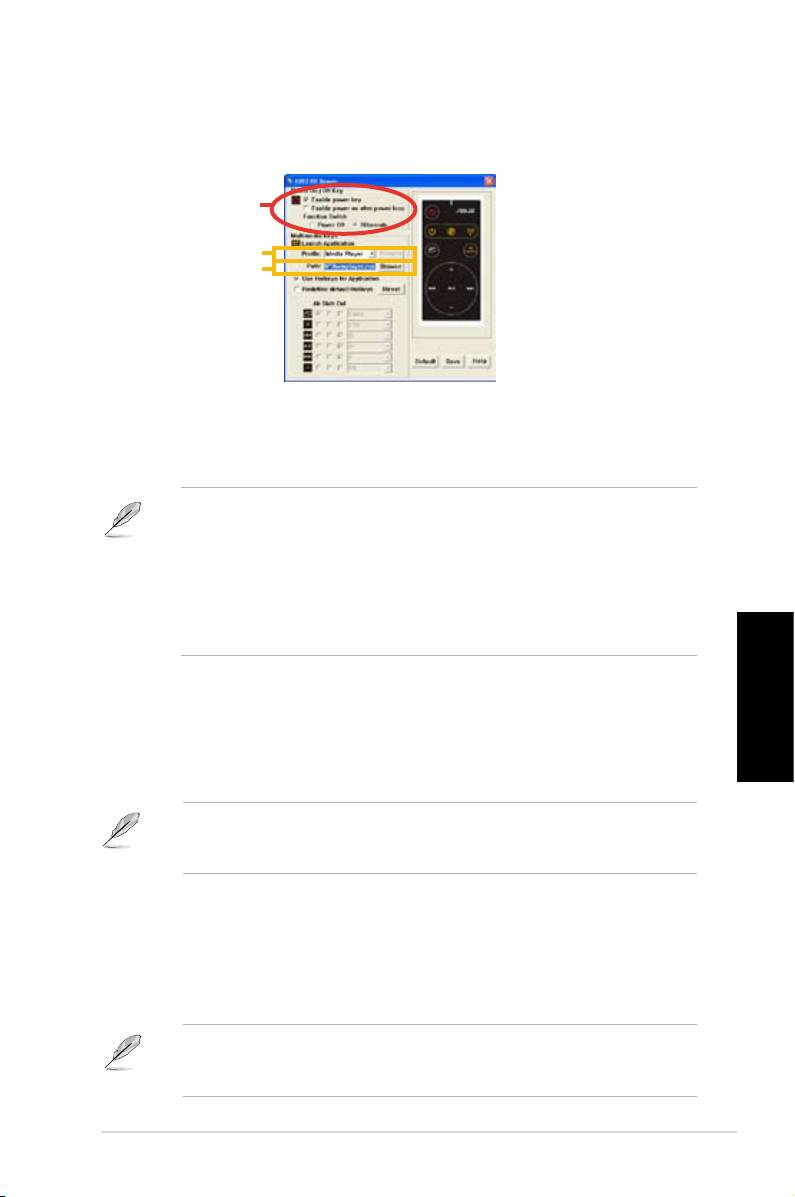
1. Power On / Off Key (bouton d’alimentation)
CongurercetélémentsurHibernate (Veille prolongée) permet de basculer votre
PC en mode Windows S4, autorisant ce dernier à entrer et sortir du mode veille
prolongée plus rapidement.
• Il est nécessaire de cocher l’option Enable Power Key (Activer le bouton
d’alimentation) avant de pouvoir utiliser votre télécommande ASUS DH
Remote pour activer/désactiver votre PC ou le basculer en veille prolongée.
Visitez www.microsoft.com pour plus de détails sur le mode de veille prolongée.
• Le bouton d’alimentation ne supporte pas le mode MS-DOS.
• Cochez l’option Enable power on after power loss Function Switch.
(Activer la mise sous tension après une perte d’alimentation). Lorsque
le cordon d’alimentation de votre PC est débranché ou lorsqu’une perte
d’alimentation se produit, votre PC redémarrera automatiquement puis
s’éteindra pendant quelques secondes pour réactiver la fonction de mise
sous tension de la télécommande une fois fois l’alimentation rétablie.
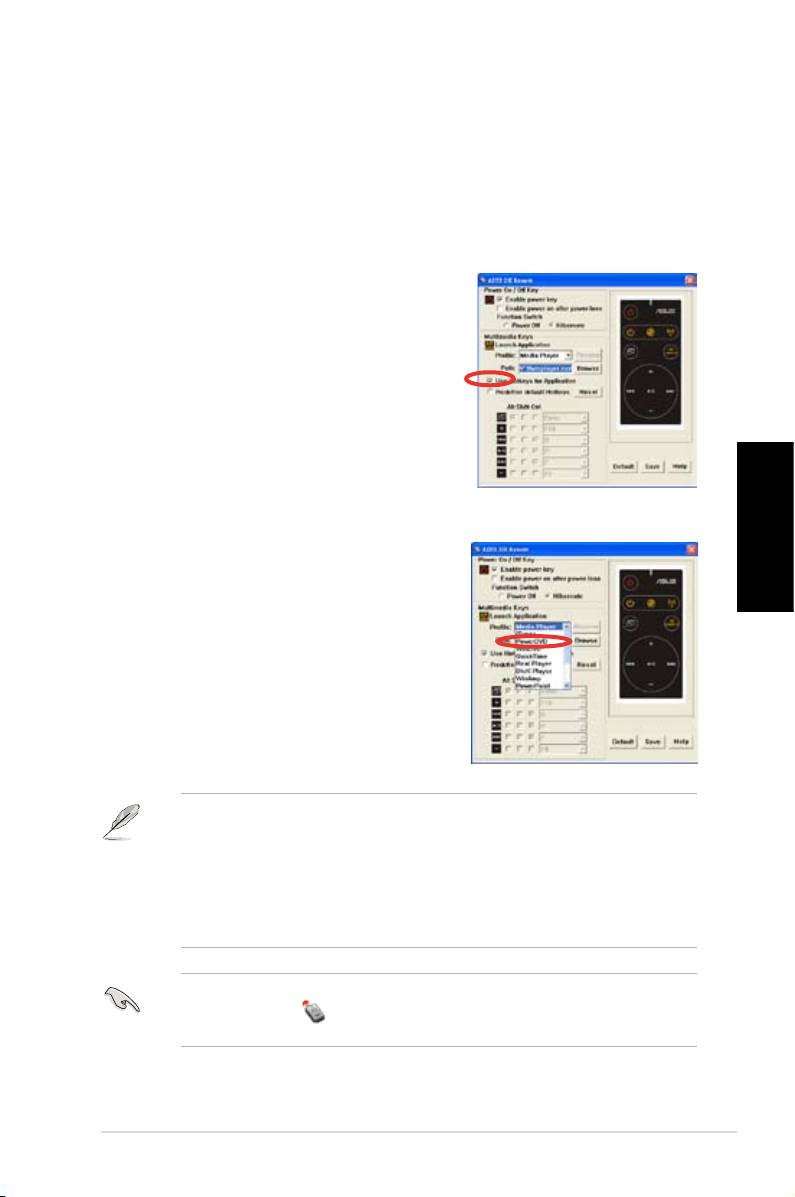
Multimedia Keys (touches multimédia)
2. Prole (prol)
Il existe neuf applications par défaut dans le menu déroulant Prole, plus cinq
autrescongurablesvial’optionUser Dene (Congurationutilisateur).
Les applications par défaut sont Media Player, iTunes, PowerDVD, WinDVD,
QuickTime, Real Player, DivX Player, WinAmp et Power Point. (Les applications
par défaut de l’utilitaire ASUS DH Remote peuvent changer sans avertissement.)
3. Path (emplacement)
L‘utilitairevousaideàlocaliserleschiersexécutables(.exe)desneufapplications
pardéfaut.Silechier.exen’estpaslocalisé,cliquezsurBrowse (Parcourir) pour
unelocalisationmanuelle.Leschiers.exedesapplicationsUser Dene doivent être
localisés manuellement.
• Sauvegardezvoschangementsunefoislechier.exelocalisé.
• Silechierexécutableestdéplacéousil’applicationestréinstallée,ilest
nécessairederelocaliserl’emplacementdeschiers.exe.
DH Remote
5
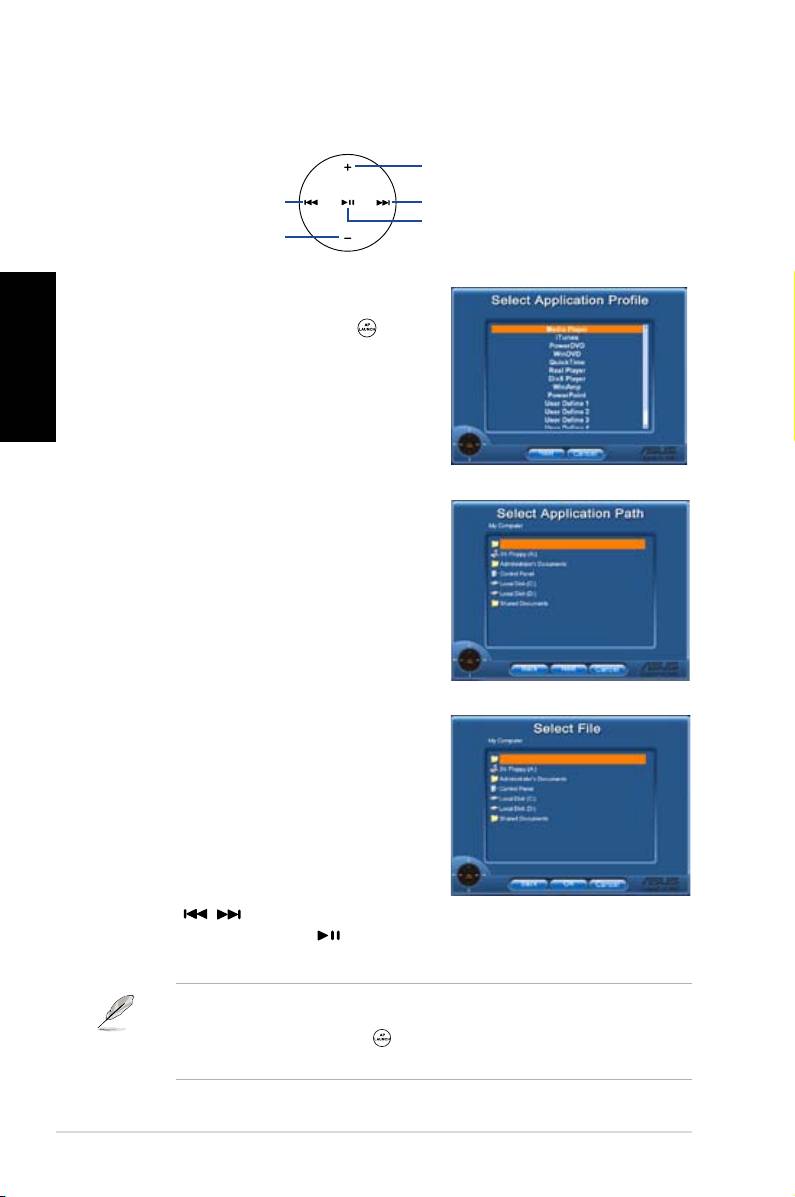
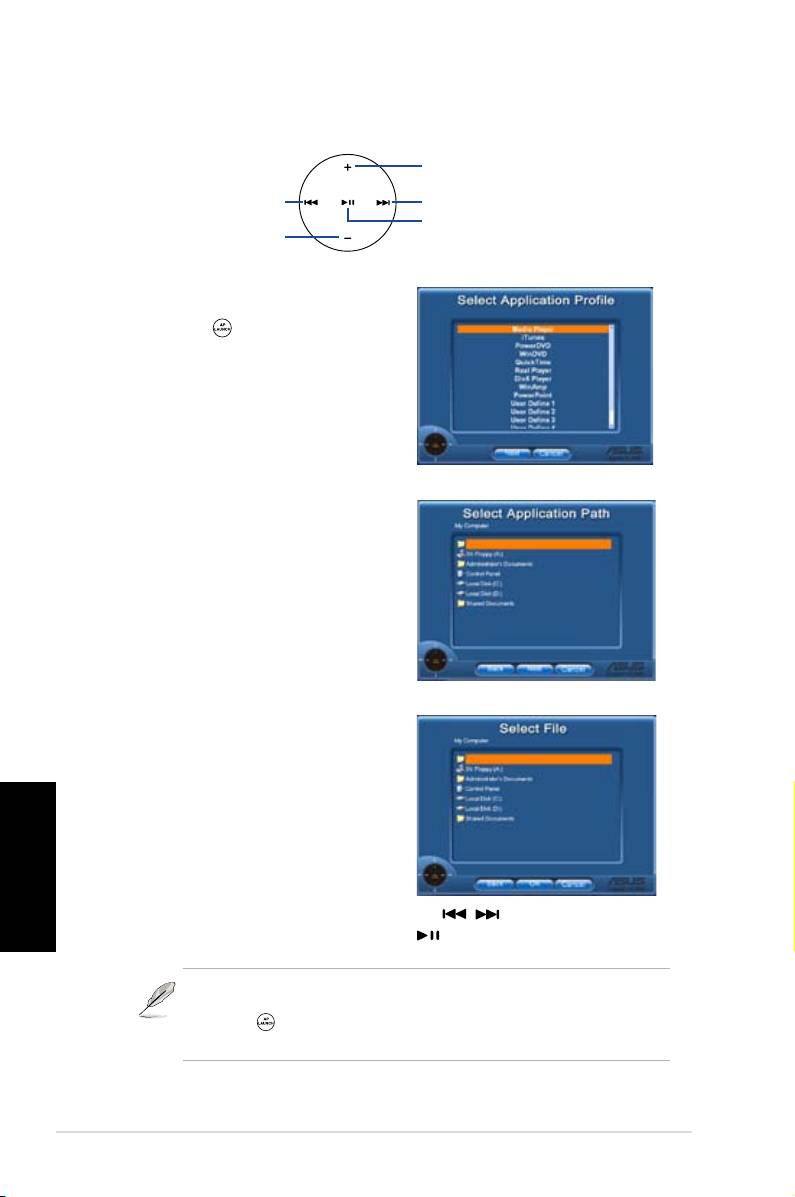
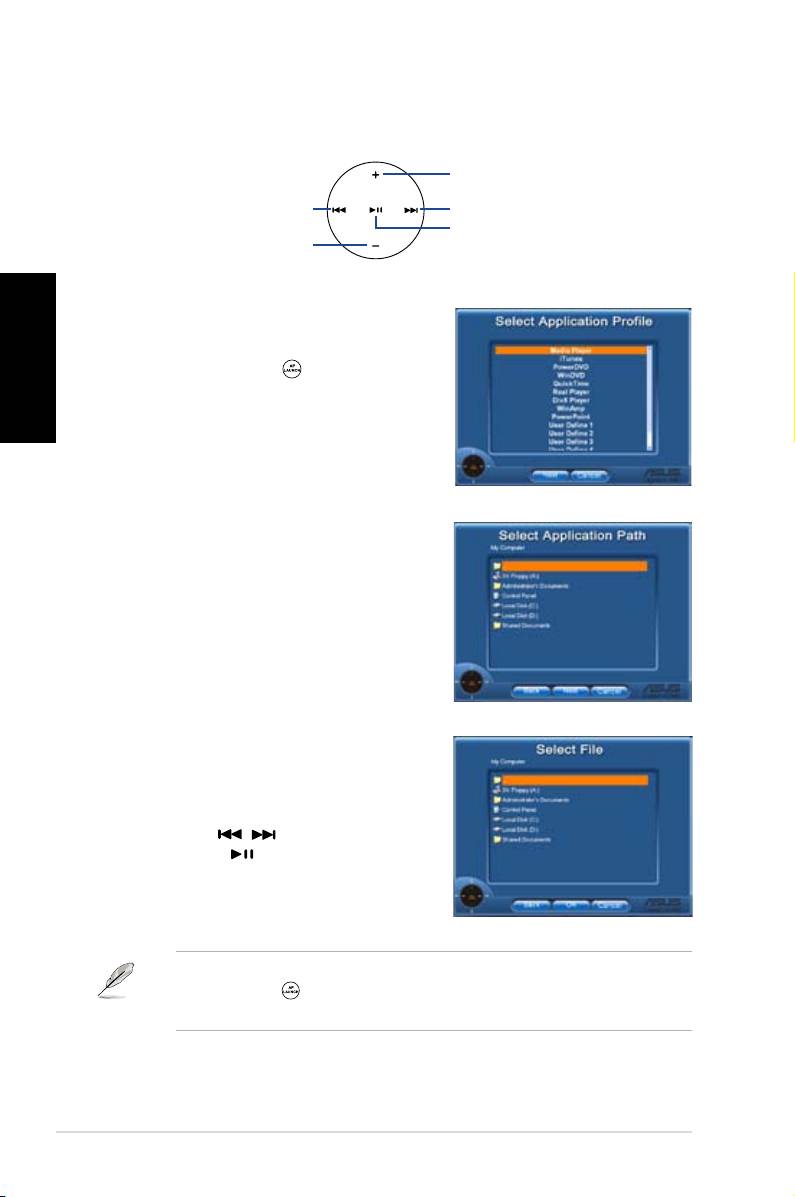
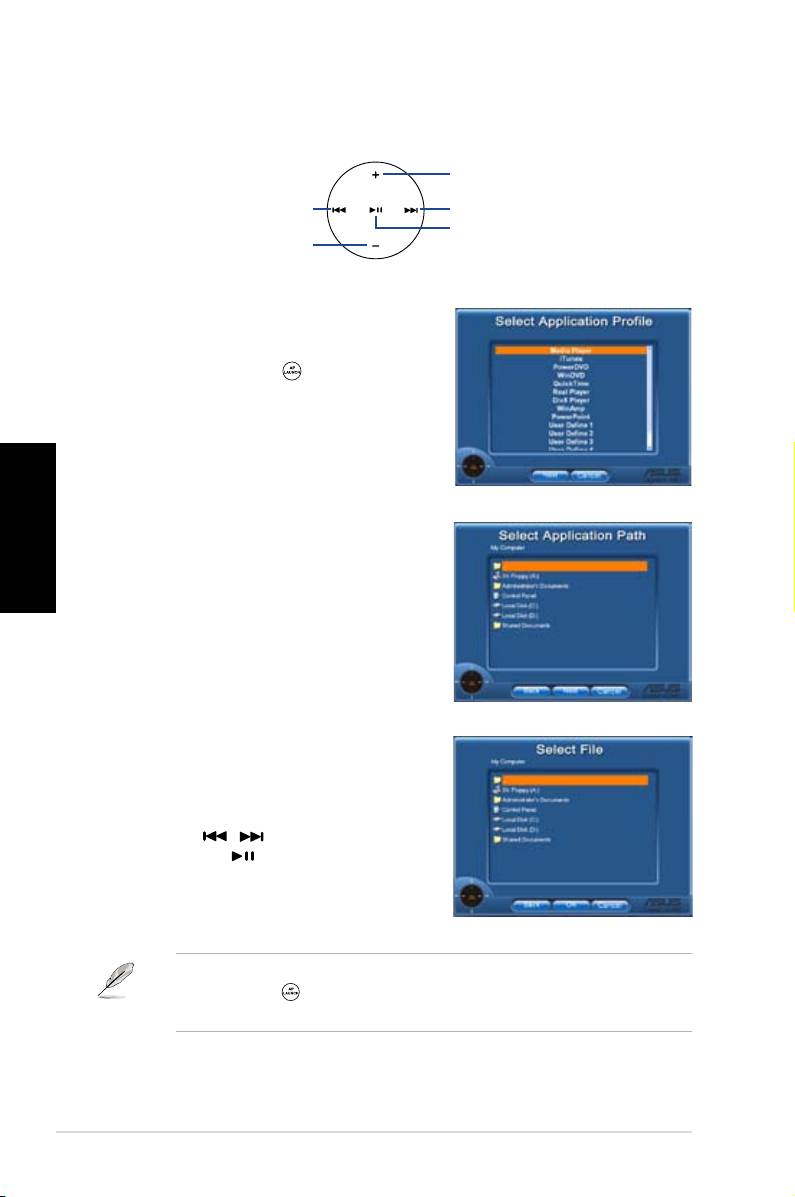
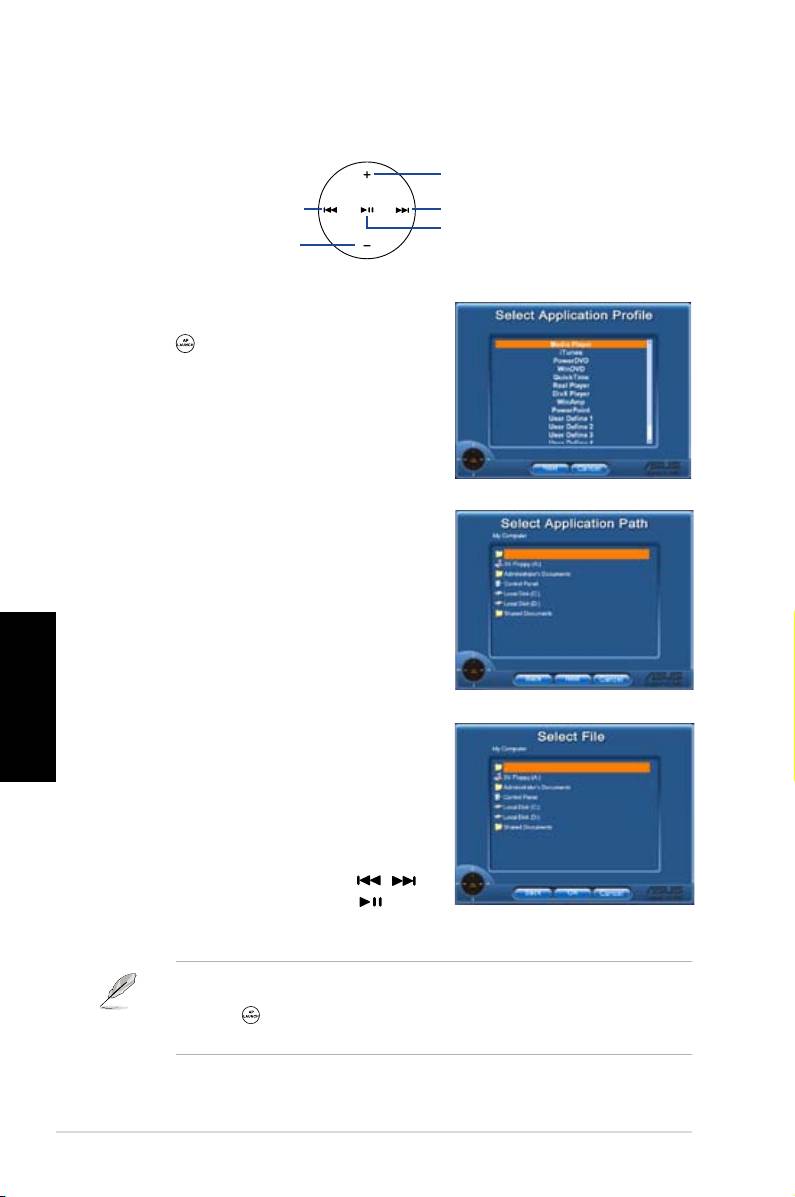
Bouton et menu AP Launch
Naviguez dans les menus via la zone de contrôle multimédia.
Haut
Gauche
Droite
Entrée
Bas
Sélectionner une application
Français
Lorsque vous pressez sur le bouton de
la télécommande, une liste d’applications
seraafchéeàl’écran.Utilisezla
télécommande pour naviguer et initier
l’application désirée.
Sélectionner un emplacement
d’application
Si l’utilitaire ne parvient pas à localiser le
chierexécutabledel’application,l’écran
Select Application Path apparaîtra.
Spéciezalorsl’emplacementcorrectede
l’application.
Sélectionner un chier
Une fois l’emplacement trouvé, sélectionnez
lechierexécutable(.exe)del’aplication.
Silalocalisationduchierexécutable,par
l’utilitaire ou manuellement, est réussie,
cet écran apparaîtra lorsque l’application
est choisie. Après avoir sélectionner le
chier,dossier,ouCD-ROMdésiré,utilisez
les boutons / pour choisir Back/
OK/Cancel, puis appuyez sur pour
conrmer.
• Pourl’écoutedechiersaudio,lacréationdelistesdelectureest
recommandée.
• Appuyez de nouveau sur pour fermer l’application et retourner au menu
principal.
6
DH Remote

Créer des raccoucis
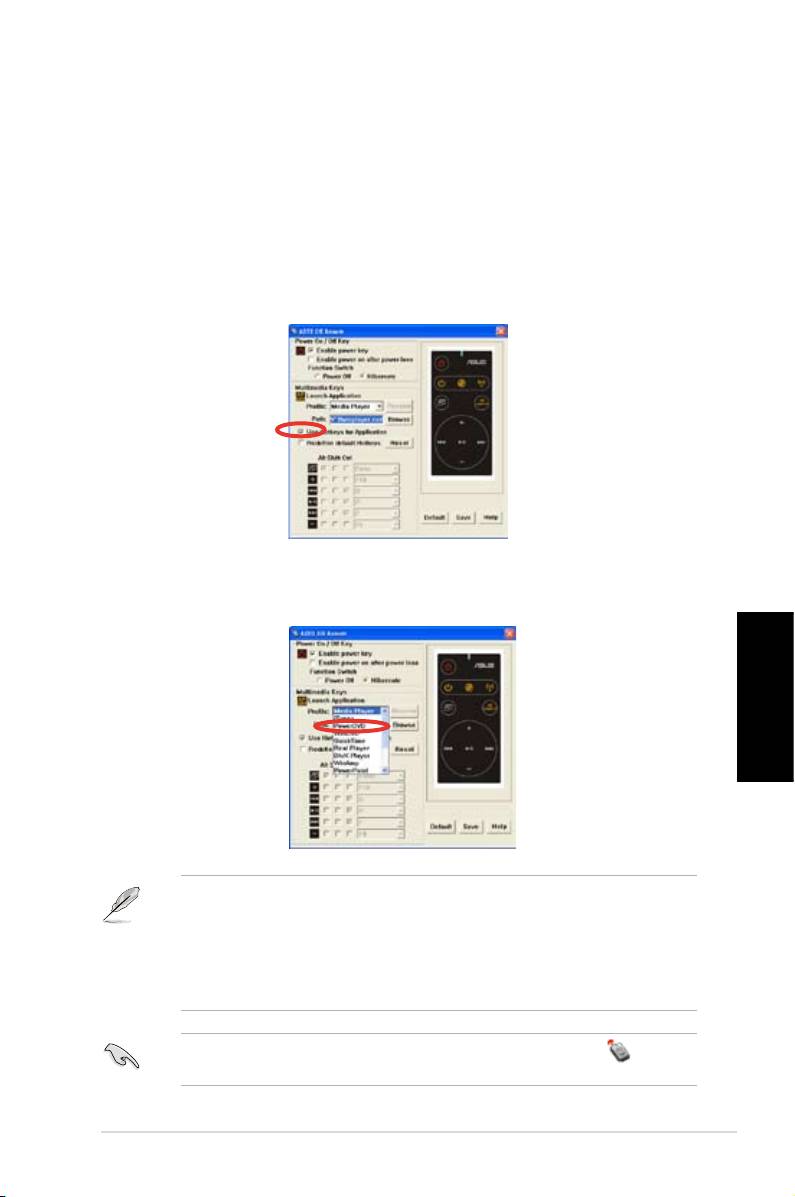
Si vous souhaitez utiliser la zone de contrôle multimédia pour contrôler une
application ne faisant pas partie de la liste des applications par défaut, tel que
ACDSee, sélectionnez User Denedepuislalistedesprolsdisponibleset
renommez-la en pressant le bouton Rename.
User Dene (Conguration utilisateur)
Après avoir coché l'option
Use Hotkeys for Application
(Utiliser les raccourcis
d'application), il est possible de définir des raccourcis pour les applications
conguréesparl'utilisateur.
Français
Sélectionnez User Dene 1~5 depuis le menu déroulant Prolepourdénir
des raccourcis. Appuyez sur Save (Sauvegarder) pour enregistrer la nouvelle
congurationousurleboutonDefault (Par défaut) pour annuler TOUS les
changements effectués et restaurer les paramètres par défaut.
• les boutons de la télécommande ne fonctionnent que si les raccourcis
assignés aux applications sont corrects.
• Ladénitiondesraccourcispeutvarierselonlaversiondel'utilitaire.Cochez
la case Redene default hotkeys(Redénirlesracourcispardéfaut)pour
redénir les raccourcis par défaut de l'utilitaire.Appuyez sur Save pour
enregistrer les changements ou sur Reset pour rétablir les réglages par défaut.
Aprèslacongurationinitialedel’utilitaireASUSDHRemote,l’icône apparaîtra
sur la barre des tâches de Windows. Cliquez sur cette icône et sélectionnez
Settings(Paramètres)pourafcherl’écrandel’utilitaire.
DH Remote
7
Appendice
Boutons de fonction et AP Prole
L'utilitaireASUSDH Remote vouspermetdecongurer la correspondance entre
les boutons de la télécommande et les raccourcis de neuf applications populaires
pluscinqautresapplicationsdéniesparl'utilisateur.
Media Player iTunes PowerDVD WinDVD QuickTime
Plein écran v v v v v
Français
Lect./Pause v v v/x v v
Vol+ v v v v v
Vol- v v v v v
Ch+ v v v v x
Ch- v v v v x
*NOTE
Pas de fonction
pause
Real Player DivX Player WinAmp Power Point User Defne
Plein écran v v x v
Lect./Pause v v v/x Plein écran
Vol+ v x v B
Vol- v x v Echap
Ch+ v x v Page Down
Ch- v x v Page Up
*NOTE
Pas de fonction
pause
Si vous souhaitez ajouter de nouvelles applications, en plus des neuf déjà
disponibles, vous pouvez utiliser l’option User Define et configurer cinq
applications additionelles.
8
DH Remote
™
DH Remote
Deutsch
Benutzerhandbuch
Copyright © 2006 ASUSTeK COMPUTER INC. Alle Rechte vorbehalten.

Willkommen
Sind Sie es leid, am PC festzusitzen und nur mit Tastatur und Maus zu hantieren?
Mit der ASUS DH Remote-Fernbedienung können Sie die Musikwiedergabe
starten, anhalten und die Lautstärke verändern, ohne von Ihrem Sofa aufstehen zu
müssen. Mit der DH Remote in der Hand beherrschen Sie Ihren PC aus der Ferne!
ASUS DH Remote - Übersicht
1. Ein/Aus
5. Lärmreduzierung
2. Quick Power
6. EZ WiFi
3. Vollbild
7. Anwendungsstart
Lautstärke auf
Play/Pause
4. Media Control Zone
Weiter
Deutsch
Zurück
Lautstärke ab
1. Ein/Aus: Schaltet den Computer Ein/Aus
2. Quick Power: Versetzt den Computer sofort in den S3-Ruhezustand
3. Vollbild: Wechselt in Media-Anwendungen zum Vollbildmodus
4. Media Control Zone: Steuert die Media-Anwendungen
5. Lärmreduzierung: Verringert die vom Computer erzeugten Geräusche
6. EZ WiFi: Versetzt den Computer schnell in den Ruhezustand, aber führt
weiterhin WiFi-AP Solo™ aus
7. Anwendungsstart: Öffnet Media-Anwendungen
• Speichern Sie Ihre Daten, bevor Sie Quick Power nutzen.
• Die Lärmreduzierung ist nur sinnvoll, wenn der Computer keine
leistungsfordernden Anwendungen ausführt. Die Lüftergeschwindigkeit wird
je nach Systemlast angepasst.
• Die jeweilige Systemausstattung (Anzahl der installierten Grakkarten,
Netzteile, Gehäuselüfter) wirkt sich auf die Lärmreduzierung aus.
• *Wenn Sie eine Grakkarte mit Lüftergeschwindigkeitskontrolle oder eine
lüfterlose Grafikkarte verwenden, verbinden Sie die Netzteillüfter- und
Gehäuselüfterkabel mit den Lüfteranschlüssen des Motherboards, um eine
bessere Lärmreduzierung zu erzielen.
*Nicht alle Netzteile verfügen über Lüfteranschlüsse. Details siehe Handbuch
des Motherboards.
Der EZ-WiFi-Modus ist besonders nützlich, wenn Sie sich vom PC entfernen, aber
trotzdem weiterhin Daten herunterladen oder Geräte wie Wireless-Anwendungen
oder Skype-Telefone nutzen wollen. Drücken Sie die EZ-WiFi-Funktionstaste erneut,
um die EZ-WiFi-Funktion zu deaktivieren.
2
DH Remote
Installation des Infrarot-Empfängers
USB IR-Empfänger
Ihrem Motherboard ist ein IR-Empfänger beigelegt. Verbinden Sie einfach das
USB-Ende mit einem der USB-Ports Ihres PCs unterhalb des LAN2-Anschlusses,
und positionieren Sie den IR-Empfänger an einer passenden Stelle ohne
Hindernisse.
• Die normale IR-Betriebsentfernung betragt bis zu sechs Meter, je nach
Umgebung. Es wird empfohlen, Ihren IR-Empfänger in Richtung der ASUS DH
Remote zu positionieren, um eine ungehinderte Nutzung zu garantieren.
• Die zwei USB-Ports unterstützen die USB-Weckfunktion. Daher kann das
Deutsch
Entfernen von USB-Geräten wie dem IR-Empfänger bei ausgeschaltetem
System dazu führen, dass der PC gestartet wird.
• Die Ein- und Ausgänge an der Rückseite unterscheiden sich je nach
Motherboard.
• Unterstützte Betriebsysteme: Windows XP, 2003 Server, XP (64-Bit), und
2003 Server (64-Bit).
Software-Installation
Bevor Sie die Bequemlichkeit der ASUS
DH Remote genießen können, müssen
Sie die Software nach der Installation
des Infrarot-Empfängers installieren.
Klicken Sie einfach auf die Datei
ASUS DH Remote im Utilities-Menü
der Motherboard Support-CD, und die
Software wird bei jedem Start Ihres PCs
automatisch ausgeführt.
DH Remote
3
ASUS >>USB receiver
USB receiver
IR-Empfänger
USB-Ende
USB-Ports
Infrarot-Ende
ASUS DH Remote
Das
Utilites
-Menü fällt in verschiedenen Motherboards unterschiedlich aus.
Aktivieren der HID-konformen Geräte
Aufgrund der Einschränkungen des Betriebssystems funktioniert der Infrarot-
Empfänger nicht, wenn Sie ihn von einem Port entfernen und an einem anderen
USB-Port anschließen. Um die HID-konformen Geräte erneut zu aktivieren, gehen
Sie zum Geräte-Manager und klicken Sie die Box Allow this device to bring the
computer out of standby an.
1. Klicken Sie auf Start und wählen
2. Doppelklicken Sie auf
System
.
Deutsch
Sie die Systemsteuerung.
3. Klicken Sie auf
Hardware
. 4. Wählen Sie
Geräte-Manager
.
5. Wählen Sie
HID-konforme
6. Wählen Sie
Allow this device
Geräte
.
to bring the computer out of
standby
.
4
DH Remote
ASUS DH Remote-Einstellungen
Nach der Installation der ASUS DH Remote-Software erscheint das Hilfsmenü, mit
dem Sie die ASUS DH Remote-Einstellungen vornehmen können. Stellen Sie die
Funktionstasten Schritt für Schritt ein.
1
2
3
1. On / Off Key (Ein- / Aus-Taste)
Stellen Sie dieses Element auf Hibernate (Ruhezustand), um Ihren PC in
den Windows S4-Modus zu versetzen. Damit kann Ihr PC viel schneller in den
Ruhezustand eintreten und wieder zur vollen Leistung zurückkehren.
• Wählen Sie Enable Power Key (Netzschalter aktivieren), bevor Sie mit der
ASUS DH Remote Ihren PC ein- und ausschalten oder in den Ruhezustand
Deutsch
versetzen.Details zumRuhezustand ndenSie unterwww.microsoft.com.
• Die Ein-/ Aus-Taste wird im MS-DOS-Modus nicht unterstützt.
• Wenn das Netzkabel Ihres PCs herausgezogen wird oder ein Stromausfall
eintritt und Sie Enable power on after power loss Function Switch gewählt
haben, wird Ihr PC innerhalb weniger Sekunden automatisch neu starten und
sich ausschalten, und kann dann mit der DH Remote wieder eingeschaltet
werden, sobald der PC wieder mit Strom versorgt wird.
Multimedia-Tasten
2. Prole (Prol)
In der Prole-ListendenSieneunStandardanwendungen,undfünffreiePlätze
zurBenutzerdenition(User Dene).
Die Standardanwendungen sind Media Player, iTunes, PowerDVD,
WinDVD, QuickTime, Real Player, DivX Player, WinAmp und Power Point.
(Standardanwendungen in der ASUS DH Remote-Software können ohne
Vorankündigung geändert werden.)
3. Path (Pfad)
DieSoftwarehilftIhnen,den.exe-PfadderneunStandardanwendungenzunden.
Falls die .exe-Datei nicht gefunden wird, klicken Sie auf Browse (Suchen) um
denrichtigenPfadausndigzumachen.Die.exe-DateiendervomBenutzer
festgelegten Anwendungen müssen manuell gefunden werden, bevor Sie sie mit
der ASUS DH Remote nutzen können.
• Speichern Sie, wenn der .exe-Dateipfad eingegeben ist.
• Wenn die Position der auszuführenden Datei verändert oder die
Anwendung neu installiert wurde, geben Sie den Pfad erneut ein.
DH Remote
5

AP Launch-Schaltäche und AP Launch-Menü
Navigation in der Media Control Zone.
Aufwärts
Links
Rechts
Eingabe
Abwärts
Anwendungsprol wählen
Wenn Sie auf der Fernbedienung drücken,
wirdeinAnwendungsprolangezeigt.MitHilfe
der Fernbedienung können Sie die gewünschte
Anwendungndenundausführen.
Deutsch
Anwendungspfad wählen
Falls die Software den Ausführpfad der
AnwendungbeidererstenNutzungnichtnden
kann, erscheint die Anzeige Select Application
Path (Anwendungspfad wählen). Geben Sie
den richtigen Pfad ein.
Datei auswählen
Nach der Wahl des richtigen Pfades sollten Sie
die .exe-Datei der Anwendung auswählen, um die
Anwendung auszuführen.
Wenn die .exe-Datei von der Software gefunden
wurde oder Sie den Pfad korrekt eingegeben
haben, erscheint diese Anzeige direkt, nachdem
die Anwendung gewählt wurde. Wählen Sie
nach Wunsch Datei, Ordner oder CD ROM,
wählen Sie mit den / -Tasten Back/OK/Cancel, und drücken Sie dann
zur Bestätigung .
• Es wird empfohlen, zunächst Wiedergabelisten zu erstellen, wenn Sie
Musik hören wollen.
• Drücken Sie erneut , um die Anwendung zu schließen, und noch einmal,
umdasProlmenüwiederzuöffnen.
6
DH Remote
Hotkeys denieren
Wenn Sie die Media Control Zone dazu nutzen wollen, Anwendungen wie
ACDSee, die nicht standardmäßig festgelegt sind, zu kontrollieren, wählen Sie
User Dene aus der Liste, und weisen Sie mit Rename einen neuen Namen zu.
Die ASUS DH Remote-Software hat bereits neun Anwendungen eingerichtet und
dieFunktionstastenfürSievordeniert.
User Dene (Benutzerdenition)
Nachdem Sie
Use Hotkeys for Application
(Hotkeys für Anwendungen verwenden)
angewählt haben, können Sie selbst die
FunktionderHotkeysdenieren.
Wählen Sie User Dene 1~5 aus der Prole-Liste
Deutsch
zur Denition der Hotkeys. Drücken Sie Save
(Speichern), um die neue Einstellung zu speichern,
oder drücken Sie die Default (Standard)-
Schaltfläche, um ALLE Benutzerdefinierten
Einstellungen zurückzusetzen.
• Die Tasten der Fernbedienung funktionieren nur, wenn die Hotkeys der
Anwendungenkorrektdeniertwurden.
• Die Hotkey-Definitionen variieren evtl. unter verschiedenen Software-
Versionen. Wählen Sie Redene default hotkeys (Standard-Hotkeys neu
denieren), umggf. neue Denitionenzu erstellen. KlickenSie auf Save
(Speichern)b,umdieneuenDenitionenzuspeichern,oderaufReset, um
diealtenHotkey-Denitionenwiederherzustellen.
Nach der ersten Einstellung wird in der Windows-Taskleiste das ASUS DH
Remote-Symbol angezeigt. Klicken Sie auf das Symbol und wählen Sie
Settings (Einstellungen), um das Fenster der Hilfsanwendungen zu öffnen.
DH Remote
7
Anhang
Die Funktionstasten und das AP-Prol
Mit der ASUS DH Remote-Software können Sie die Funktionstasten den Hotkeys
von neun beliebten Multimediaanwendungen zuweisen. Fünf freie Plätze stehen
zurDenitionderBenutzers(
User Dene
) zur Verfügung.
Media Player iTunes PowerDVD WinDVD QuickTime
Vollbild v v v v v
Play/Pause v v v/x v v
Vol+ v v v v v
Vol- v v v v v
Ch+ v v v v x
Ch- v v v v x
*HINWEIS
nur Play, keine
Pause
Deutsch
Real Player DivX Player WinAmp Power Point User Dene
Vollbild v v x v
Play/Pause v v v/x Vollbild
Vol+ v x v B
Vol- v x v ESC
Ch+ v x v Seite ab
Ch- v x v Seite auf
*HINWEIS
nur Play, keine
Pause
Wenn die neun Standardanwendungen nicht ausreichen und Sie andere
Anwendungen hinzufügen möchten, können Sie die fünf freien Plätze unter
User Dene dazu nutzen, Ihre bevorzugten Anwendungen und Einstellungen
einzurichten.
8
DH Remote

™
DH Remote
Italiano
Guida Utente
Copyright © 2006 ASUSTeK COMPUTER INC. Tutti i Diritti Riservati.
Benvenuti!
Stanchi di stare incollati al PC e di essere sempre alle prese con tastiera e
mouse? Grazie a ASUS DH Remote, e’ possibile ascoltare e interrompere musica,
o regolarne il volume, senza lasciare il proprio divano. Prendete ASUS DH Remote
e sfruttate al meglio le possibilita’ del vostro PC a distanza!
Descrizione di ASUS DH Remote
1. Accensione
5. Eliminazione Disturbi
2.Accensione Rapida
6. EZ WiFi
3. Schermo Intero
7.Lancio Applicazioni
Volume Su’
Play/Pausa
4.Zona Comando
Avanti
Multimediale
Indietro
Volume Giu'
1. Accensione: accende e spegne il computer
2. Accensione rapida: attiva rapidamente la modalita' sleep, rappresentata da S3
3. Schermo intero: visualizza a schermo intero le applicazioni multimediali
4. Zona Comando Multimediale: controlla le applicazioni multimediali
Italiano
5. Eliminazione disturbi: riduce il rumore di sottofondo proveniente dal computer
6. EZ WiFi: attiva rapidamente la modalita' sleep, lasciando operativo WiFi-AP Solo™.
7. Lancio Applicazioni : Lancia le applicazioni multimediali
• Prima di utilizzare la funzione Accensione Rapida, salvare i dati nel
computer.
• La modalita’ Eliminazione Disturbi e’ adatta soltanto per le operazioni a basso
caricamento come l’ elaborazione di un testo e l’ esplorazione di pagine web,
durante le quali la ventilazione e’ opportunamente regolata in funzione del
sistema che il computer sta caricando.
• Diverse attrezzature del sistema (il numero di VGA, PSU, la ventola del telaio)
agiscono in funzione dell’ eliminazione del rumore di fondo del computer.
• *Quando si utilizza una scheda VGA a controllo ventilazione o una scheda VGA
senza ventola, ricordarsi di collegare il cavo di alimentazione del ventilatore e
quello del ventilatore del telaio al connettore della ventola sulla scheda madre
per ottenere un effetto migliore.
*Non tutte le unita’ di alimentazione sono dotate di connettori per le ventole; per
ulteriori dettagli, riferirsi al manuale della scheda madre.
La modalita’ EZ-WiFi e' utile soprattutto per scaricare dati o utilizzare funzioni come
le applicazioni wireless e il telefono Skype,stando lontani dal PC. Per disattivare
la funzione EZ-WiFi, ripremere il pulsante EZ-WiFi.
2
DH Remote
Installazione di un Ricevitore a Infrarossi
Ricevitore IR USB
LaschedamadrehaindotazioneunricevitoreIR;e'sufcientecollegare
l'estremita' USB alle porte USB del PC situate sotto la porta LAN2 e collocare l'
estremita' del ricevitore IR in un posto adatto, senza interferenze.
• La distanza utile per la funzione IR e’ di ca 6m, a seconda dell’ ambiente.
Per garantire una facile riuscita delle operazioni, quando si utilizza ASUS
DH Remote, si consiglia di puntarlo verso il ricevitore IR.
• Queste due porte USB supportano la funzione USB wake-up. In questo
modo, quando il computer non e’ acceso, puo’ essere avviato rimuovendo i
dispositivi USB, come il ricevitore ASUS IR, da queste due porte.
• La funzione back I/O varia in funzione della scheda madre.
• Supporta i sistemi operativi: Windows XP, server 2003, XP (64-bit) e server
2003 (64-bit).
Installazione del Software
Italiano
Prima di godere della comodita’ derivante
da ASUS DH Remote, e dopo aver
installato il ricevitore a infrarossi, e’
necessario procedere con l’ installazione
del software. E’sufcientecliccare
einstallareperlaprimavoltaille
ASUS DH Remote dal menu’ delle
Utilita’ del CD di supporto contenuto nel
pacchetto della scheda madre, che sara’
automaticamente lanciato ogni qualvolta
si avviera’ il PC.
DH Remote
3
ASUS >>USB receiver
USB receiver
Ricevitore IR
Estremita' USB
Porte USB
Estremita' a infrarossi
ASUS DH Remote
La schermata
Utilites (Utilita')
varia in funzione della scheda madre.

Attivazione dei dispositivi compatibili con HID
A causa dei limiti del sistema operativo, il ricevitore IR non funziona se viene
rimosso dalla porta precedente per essere reinstallato nell’ altra porta USB.
Per riattivare i dispositivi compatibili con HID (HID-compliant devices), andare a
Gestione Risorse /Gestione Alimentazione e controllare la casella Allow this
device to bring the computer out of standby ( Abilita questo dispositivo a far
uscire il computer da standby).
1. Cliccare Avvio e scegliere
2. Eseguire Doppio clic su
Pannello di Controllo.
Sistema
.
Italiano
3. Cliccare
Hardware
. 4. Cliccare
Gestione Risorse
5. Selezionare
HID-compliant
6. Controllare la casella
Allow
devices
.
t h i s d e v i c e to b r i n g th e
computer out of standby
.
4
DH Remote

Impostazioni di ASUS DH Remote
Al termine dell’ installazione del software ASUS DH Remote, sara’ visualizzata la
schermatadell’utilita’checonsentedicongurareASUSDHRemote.Impostarei
tasti funzione uno dopo l’altro.
1
2
3
1. Tasto Power On / Off (Accensione / Spegnimento )
L’impostazione di questo tasto funzione su Hibernate (Ibernazione) consente
di porre il PC in modalita’ Windows S4, che permette al PC di entrare piu’
velocemente in “Ibernazione” e ritornare ancor piu’ rapidamente a pieno regime.
• Si deve controllare la casella di Enable Power Key ( tasto attiva
alimentazione) prima di utilizzare ASUS DH Remote per accendere e
spegnere il PC oppure per attivare l’ ibernazione. Visitare www.microsoft.
com per dettagli in proposito.
• Il tasto Power On / Off non supporta la modalita’MS-DOS.
• Controllare la casella del swich Enable power on after power loss
Function Switch (Riattiva dopo una interruzione di corrente). Ogni
qualvolta l’alimentatore del PC venga rimosso dalla presa o in caso di
mancanza di corrente, il PC si riavvia e si spegne automaticamente in
pochi secondi, per attivare la funzione di accensione di ASUS DH Remote,
al ripristino della fornitura di corrente elettrica.
Italiano
Tasti Multimediali
2. Prole (Prolo)
CisononoveapplicazionipredenitenelmenudiProle e cinque impostazioni di
User Dene.
LeapplicazionipredenitesonoMediaPlayer,iTunes,PowerDVD,WinDVD,QuickTime,
RealPlayer,DivXPlayer,WinAmpePowerPoint.(Leapplicazionipredenitenel
software di ASUS DH Remote sono soggette a variazioni senza preavviso.)
3. Path (Percorso)
Ilsoftwareserveaallocareilleeseguibile(.exe)dellenoveapplicazioni
predenite.Seille.exee’senzaun’allocazione,cliccareBrowse (Esplora) per
guidareversoilpercorsocorretto.Bisognaallocaremanualmenteile.exedelle
applicazioni User Dene, prima di far uso di ASUS DH Remote.
• Salvaredopoaverguidatoilpercorsodelle.exe
• Incasodiri-allocazionedelleeseguibileodire-installazionedell’
applicazione,sidevenuovamenteguidareilpercorsodelleperun
corretto funzionamento di ASUS DH Remote.
DH Remote
5
Pulsante e Menu per Lanciare AP
Navigare grazie al pulsante Zona Comando Multimediale.
verso l’alto
verso sinistra
verso destra
enter
verso il basso
Select Application Prole (Seleziona
ProloApplicazione)
Dopo aver premuto sul telecomando,sullo
schermosara’visualizzatoilprolodiuna
applicazione. Utilizzare il telecomando per
navigare e inizializzare un’ applicazione.
Select Application Path
(Seleziona Percorso Applicazione)
Se, la prima volta, il software non riesce a
allocareilleeseguibiledell’applicazione,
apparira’ la schermata Select Application
Path.Specicareilpercorsocorrettosulla
Italiano
schermata.
Select File (Seleziona File)
Dopo aver selezionato il percorso corretto,
e’consigliabilescegliereilcorrettole
eseguibile(.exe) dell’ applicazione, per
lanciare l’ applicazione stessa.
Seriescel’allocazionedelleeseguibile
da parte del software o se era gia’ stato
correttamente impostato, questa schermata
visualizzera’ direttamente l’ applicazione
scelta.Dopoaverselezionatoille,lacartellaoilCDROMdesiderato,
utilizzare / per scegliere Back/OK/Cancel (Indietro/OK/Annulla) e poi
premere per confermare.
• Per ascoltare musica, si consiglia di preparare in anticipo la lista delle
esecuzioni.
• Premere ancora per chiudere l’ applicazione e un’ altra volta per ri-
lanciareilmenuprole.
6
DH Remote
Denizione dei Tasti Rapidi per le Applicazioni
Desiderando utilizzare la Zona Comando Multimediale per controllare le
applicazioninonpredenite,comeACDSee,e'possibileselezionareUser Dene
(impostazioni da parte dell' Utente ) dal menu a scorrimento e ridare un nome
premendo Rename. Per facilitare l' utilizzo delle applicazioni, nel software ASUS
DH Remote sono correttamente impostate nove applicazioni comunemente in uso
edenitiipulsantifunzioni.
User Dene
Dopo aver cliccato la casella
Use Hotkeys for Application (Utilizzo dei Tasti di
Scelta Rapida per le Applicazioni),
sipossonoliberamentedenireitastirapidi
perleapplicazioniUserDene.
Selezionare User Dene 1~5 dal menu di Proleperladenizionedeitastirapidi.
Premere Save (Salva) per salvare le nuove impostazioni o il pulsante Default
(Predeniti) per cancellare TUTTE le impostazioni personalizzate e ristabilire le
denizionioriginarie.
Italiano
• I pulsanti per il comando a distanza funzionano soltanto quando le
denizionideitastirapidiperleapplicazionisonocorrette.
• Le modalita' di denizione dei tasti rapidi possono variare nelle diverse
versionisoftware.Senecessario,cliccarelacasellaRedenedefaulthotkeys
(ridenizionetastirapidipredeniti)perimpostarenuovecorrettedenizioni.
Premere il pulsante Save (salva) per salvare le ridenizioni o premere il
pulsante di Reset per ristabilire le denizioni dei tasti rapidi predenite.
Dopo l’ impostazione iniziale, sara’ visualizzata l’icona ASUS DH Remote
sulla barra dei task del sistema operativo Windows. Cliccare l’ icona e selezionare
Settings(Impostazioni) per lanciare la schermata utilita’.
DH Remote
7

Appendice
Pulsanti Funzione e AP Prole (Prolo AP)
Il software ASUS DH Remote serve per impostare la corrispondenza fra i pulsanti
funzione sul telecomando e i tasti di scelta rapida funzione delle nove applicazioni
preimpostate,comunemente in uso, lasciandone cinque per
User Dene
.
Media Player iTunes PowerDVD WinDVD QuickTime
Schermo
v v v v v
Intero
Play/Pausa v v v/x v v
Vol+ v v v v v
Vol- v v v v v
Ch+ v v v v x
Ch- v v v v x
*NOTA
solo play, no pausa
Real Player DivX Player WinAmp Power Point User Dene
Schermo
v v x v
Intero
Play/Pausa v v v/x Schermo
Intero
Vol+ v x v B
Italiano
Vol- v x v ESC
Ch+ v x v Pagina succ.
Ch- v x v Pagina prec.
*NOTA
solo play, no pausa
Nel caso in cui le 9 applicazioni predenite siano insufcienti e si desideri
aggiungerne altre, e’ possibile rinominare le 5 applicazioni User Dene e creare
le applicazioni (e relative impostazioni) preferite.
8
DH Remote
™
DH Remote
Español
Manual del Usuario
Copyright © 2006 ASUSTeK COMPUTER INC. Todos los Derechos Reservados.
Bienvenido/a
¿Cansado/a de tener que estar cerca de su teclado y ratón? Con ASUS DH
Remote puede controlar el encendido y apagado de su PC, el modo suspendido,
la reproducción de contenido multimedia, y otras aplicaciones sin dejar su sofá.
¡Tenga DH Remote a mano y haga más con su PC a distancia!.
Presentación de ASUS DH Remote
1. Encendido
5. Control de ruido
2. Encendido rápido
6. EZ WiFi
3. Pantalla completa
7. Ejecutar aplicación
Subir volumen
4. Zona de Control
Reproducir/Pausa
Multimedia
Siguiente
Anterior
Bajar volumen
1. Encendido: Enciende y apaga el PC
2. Encendido Rápido: Pone el PC en modo Suspendido (o S3).
3. Pantalla Completa: Pone la aplicación multimedia en pantalla completa.
4. Zona de Control Multimedia: Controla la aplicación multimedia.
5. Control de ruido: Reduce el nivel de ruido del PC.
6. EZ WiFi: Pone el PC rápidamente en modo Suspendido pero permitiendo la
operación de WiFi-AP Solo™.
7. Ejecutar aplicación: Ejecuta la aplicación multimedia.
• Guarde sus datos antes de utilizar el Encendido Rápido.
• El modo de Control de Ruido es apropiado solo si esta efectuando
operaciones para operaciones informáticas ligeras, como por ejemplo
Español
procesar texto o navegar por Internet. Este modo ajustará inteligentemente
la velocidad del ventilador según la carga del sistema.
• Diferentes elementos del sistema (número de tarjetas de vídeo, PSU,
ventilador del chasis) afectarán a los efectos del Control de Ruido.
• Cuandoutilicetarjetasgrácasconventiladoresdevelocidadcontrolable,
o tarjetas grácas de diseño sin ventiladores, recuerde conectar los
cables de alimentación del ventilador o el cable del ventilador del chasis
al conector para ventilador de la placa madre para un mejor uso de la
función de control de ruido*.
*No todas las fuentes de alimentación disponen de conectores para
ventiladores.Reérasealmanualdelaplacamadreparamásinformación.
El modo EZ-WiFi esta especialmente recomendado cuando se encuentre lejos de su PC
pero desee descargar datos o usar dispositivos con aplicaciones inalámbricas tales como
teléfonos Skype. Pulse de nuevo sobre el botón EZ-WiFi para desactivar esta función.
2
DH Remote

Español
DH Remote
3
ASUS >>USB receiver
USB receiver
In st al aci ón d el Re ce pt or de R ay os
Infrarrojos (IR)
Receptor IR USB
Su placa madre incluye un receptor IR. Simplemente ajuste el extremo USB
a uno de los puertos USB bajo el puerto LAN2 y coloque el extremo infrarrojo
en un lugar sin obstrucciones.
Receptor IR
Extremo USB
Puertos USB
Extremo Infrarrojo
• La distancia valida para una correcta recepción IR es de 6m dependiendo
del ambiente. Apunte al receptor IR cuando utilice el ASUS DH Remote
para asegurar una operación con éxito.
• Los dos puertos USB indicados soportan recuperaciones desde el modo
Suspendido. Por ello, si el PC no esta encendido, retirar los dispositivos
conectados a estos puertos USB (como por ejemplo el receptor ASUS IR)
reiniciarán éste.
• LospuertosdeI/Odierendependiendodelmodelodeplacamadre.
• Sistemas operativos soportados: Windows XP, 2003 server, XP (64-bit), y
2003 server (64-bit).
Instalación del Software
Antes de disfrutar de la conveniencia
de ASUS DH Remote, necesitará
instalar el software tras la instalación
del receptor IR. Simplemente, haga
clic para instalar ASUS DH Remote
desde el menú de utilidades del
CD de soporte. Este programa será
ejecutado automaticamente cada vez
que inicie su PC.
ASUS DH Remote
La pantalla de
Utilidades
dieredependiendodelaplacamadre.
Activando Dispositivos Compatibles con HID
Debido a limitaciones en el sistema operativo, si retiró previamente el receptor IR
de uno de los puertos USB y lo conecta a otro puerto USB, éste no funcionará.
Para reactivar de nuevo el dispositivo compatible con HID, vaya al Administrador
de Dispositivos/Opciones de Energía y seleccione la casilla para permitir que
el dispositivo se active desde el modo Suspendido.
1. Haga clic en Inicio y
2. Haga doble clic en
Sistema
.
seleccione Panel de Control.
3. Haga clic en
Hardware
. 4. Haga clic en el
Administrador
de Dispositivos
.
Español
5. Seleccione
HID-compliant
6. Seleccione la casilla que
devices
.
permite que el dispositivo
sea
activado tras entrar en modo
suspendido.
4
DH Remote
Conguración ASUS DH Remote
Una vez completada la instalación del software de ASUS DH Remote, la pantalla
deutilidadesapareceráparacongurarlasfuncionesdeASUSDHRemote.
1
2
3
1. Power On / Off Key (Botón de Encendido / Apagado)
Seleccionando el modo Hibernate conseguirá que su PC vaya y al modo Windows S4,
o hibernación, de una forma rápida. También regresará a modo normal rápidamente.
• Seleccione la casilla Enable Power Key (activar botón de encendido) antes
de usar ASUS DH Remote para encender y apagar su PC o ponerlo en modo
Hibernación. Visite www.microsoft.com para detalles sobre Hibernación.
• El botón de Encendido/Apagado no funciona en modo MS-DOS.
• Seleccione la casilla Enable power on after power loss Function Switch
(Selector de activación de Encendido tras una perdida de energía). Si el
cable de alimentación es extraído o hay un fallo de energía, el PC se reiniciará
y apagará automaticamente tras algunos segundos para activar la función
de encendido en DH Remote una vez que haya energía de nuevo.
Botones Multimedia
2. Prole (Perl)
Elmenúdesplegabledeperlesdisponedenueveaplicacionesycinco
gruposquepuedeserdenidosporelusuario.
Las aplicaciones por defecto son Media Player, iTunes, PowerDVD,
WinDVD, QuickTime, Real Player, DivX Player, WinAmp y Power Point. (Las
aplicaciones por defecto de ASUS DH pueden variar sin previo aviso.)
3. Path (Ruta)
Español
Esta aplicación le ayudará a localizar los archivos ejecutables (.exe) de las nueve
aplicaciones por defecto. Si el archivo .exe no puede ser localizado, haga clic en
Browse para encontrar la ruta correcta. Los archivos .exe de las aplicaciones de
User Dene necesitarán ser localizados manualmente antes de poder usarlas
en ASUS DH Remote.
• Haga clic en “Save” tras localizar la ruta del archivo ejecutable (.exe)
manualmente.
• Si el archivo ejecutable cambia de sitio o la aplicación es reinstalada,
podría necesitar redirigir la ruta en ASUS DH de nuevo.
DH Remote
5
Botón y menú de ejecución de aplicaciones
Navegando en la zona de control multimedia.
Arriba
Izquierda
Derecha
Entrar
Abajo
Selección de Perl de la Aplicación
Tras presionar en el mando a control
remoto, el perfil de aplicación aparecerá
en la pantalla. Utilice el mando a control
remoto para navegar e iniciar la aplicación
deseada.
Selección de ruta de la Aplicación
Si la aplicación no pudo ser localizada, la
pantalla Select Application Path aparecerá
paraespecicarlarutacorrecta.
Selección de Archivo
Tras seleccionar la ruta correcta, deberá
seleccionar el archivo ejecutable (.exe)
correcto para ejecutar la aplicación.
Español
Si el archivo ejecutable ha sido localizado
correctamente, o si ya estaba seleccionado
previamente, esta pantalla aparecerá cuando la
aplicación sea seleccionada. Tras seleccionar
el archivo, carpeta, o CD ROM adecuado, utilice / para seleccionar Back
(volver)/OK/Cancel (cancelar), presionando paraconrmar.
• Si desea escuchar música, se recomienda crear listas musicales de
antemano.
• Pulse para cerrar de aplicación, pulsando de nuevo para ejecutar el
menúdeperlesdenuevo.
6
DH Remote

Deniendo Accesos Directos a Aplicaciones
Si desea utilizar los botones de la Zona de Control Multimedia para controlar
aplicaciones que no predeterminadas, como por ejemplo ACDSee, podrá
seleccionar User Dene desde el menú desplegable y renombrarlo presionando
el botón Rename. ASUS DH Remote incluye nueve aplicaciones populares y
otrascongurablesparaunaoperaciónmásconveniente.
User Dene (Aplicaciones Denidas por Usuario)
Tras seleccionar la casilla
Use Hotkeys for Application
, podrá definir los
accesosdirectosdelasaplicacionesdenasporelusuario.
Seleccione User Dene 1~5 desde el menú desplegable Proleparadenirlos
accesos directos. Pulse Save para guardar los nuevos ajustes, o pulse Default para
borrartodoslosajustespersonalizadosyrestaurarlasdenicionesoriginales.
• Los botones del mando a control remoto solo funcionarán cuando los
accesosdirectosdelasdenicionesseancorrectos.
• Las deniciones de los accesos directos podrían variar según las
Español
versiones de software. Haga clic en la casilla Redene default hotkeys
pararedenirlosaccesosdirectosdenuevo,sifueranecesario.Pulse
el botón Saveparaguardarlasnuevasdeniciones,opulseReset para
restaurarladenicióndelosbotonesdeaccesodirecto.
Traslaconguracióninicial,podrávereliconodeASUSDHRemote en
la barra de tareas de Windows. Haga clic en este icono y seleccione Settings
para acceder a la ventana de utilidades.
DH Remote
7

Apéndice
Botones de Función y Perles de la Aplicación
ElsoftwareASUSDHRemoteleayudaráacongurarunacorrespondenciaentre
los botones de función en el mando a control remoto y los accesos directos a
nueveaplicacionespopulares,yotrascincodenidasporelusuario(
User Dene
).
Media Player iTunes PowerDVD WinDVD QuickTime
Pantalla
v v v v v
Completa
Reproducir/
v v v/x v v
Pausa
Vol+ v v v v v
Vol- v v v v v
Canal+ v v v v x
Canal- v v v v x
*NOTA
solo en reproducción,
pero no en pausa
Real Player DivX Player WinAmp Power Point User Defne
Pantalla
v v x v
Completa
Reproducir/
v v v/x Pantalla
Pausa
Completa
Vol+ v x v B
Vol- v x v ESC
Ch+ v x v Página abajo
Ch- v x v Página arriba
*NOTA
solo en reproducción,
pero no en pausa
Español
Silasnueveaplicacionespordefectosoninsucientesparacubrirsusnecesidades,
puederenombrarlascinco aplicacionescongurables(User Dene) y crear
accederasusaplicacionespreferidasconlaconguracióndeseada.
8
DH Remote
™
DH Remote
Руководство
пользователя
Русский
Copyright © 2006 ASUSTeK COMPUTER INC. Все права защищены.
Добро пожаловать
Устали сидеть около вашего ПК, упавляя мышью или клавиатурой? С помощью ASUS DH
Remote вы можете проигрывать, останавливать или регулировать громкость в любых песнях
не вставая с дивана. Управляйте вашим ПК удаленно с помощью пульта DH Remote!
Обзор ASUS DH Remote
1. Питание
5. Выключение шума
2. Спящий режим
6. EZ WiFi
3. Полный экран
7. Запуск приложений
Увеличить громкость
Воспроизведение/Пауза
4. Зона управления
Следущий
Предыдущий
Уменьшить громкость
1. Питание: Включение/отключение компьютера
2. Спящий режим: Перевод компьютера в спящий режим
3. Полный экран: Разворачивает приложение на весь экран
4. Зона управления: Управление медиаприложениями
5. Выключение шума: Уменьшение исходящего от компьютера шума
6. EZ WiFi: Быстро переводит компьютер в спящий режим, но оставляет работать WiFi-AP
Solo™
7. Запуск приложений: Запуск медиаприложений
• Перед выключением питания сохраните ваши данные.
• Режим выключения шума пригоден только для легких операций, например набора
текста или просмотра веб-страниц, он автоматически регулирует скорость вентилятора
в соответствии с загрузкой системы.
• На эффективность уменьшения шума воздействует различное системное оборудование
(количество VGA, PSU, вентилятор кормпуса).
• *При использовании видеокарты с управляемым вентилятором или видеокарты
без вентилятора, не забудьте подключить кабель от блока питания и корпусного
вентилятора к разъему на материнской плате для еффективного уменьшения шума.
*Не все блоки питания имеют разъемы вентилятора, подробности смотрите в руководстве
Русский
по материнской плате.
Режим EZ-WiFi подходит для тех ситуаций когда вы уходите от ПК, но хотите оставить
загрузку данных или использовать устройства беспроводные устройсва и телефон Skype.
Для отключения функции EZ-WiFi нажмите на кнопку EZ-WiFi.
2
DH Remote

Установка инфракрасного приемника
USB ИК-приемник
Ваша материнская плата поставляется с ИК-приемником, просто подключите USB разъем к
USB порту на ПК, находящимся под сетевым портом и поместите ИК-приемник на любую
поверхность без преград.
• ИК-связь функционирует на расстоянии 6м в зависимости от среды. Для гарантии
успешных операций при использовании ASUS DH Remote, ИК-приемник должен быть
в прямой видимости.
• Эти два USB порта поддерживают функцию пробуждения. Таким образом, когда
компьютер не включен, отключение USB устройства (например ASUS ИК-приемник)
от этих двух портов включит ПК.
• Задняя сторона может отличаться в зависимости от материнской платы.
• Поддерживаемые операционные системы: Windows XP, 2003 server, XP (64-бит), и
2003 server (64-бит).
Установка программного обеспечения
После установки ИК-приемника вам нужно
установить программное обеспечение. Просто
нажмите и установите файл ASUS DH Remote в
меню Utilities на компакт-диске от материнской
платы, и он будет запускаться автоматически
каждый раз при включении вашего ПК.
Русский
DH Remote
3
ASUS >>USB receiver
USB receiver
ИК-приемник
USB разъем
USB порты
ИК-приемник
ASUS DH Remote
Экран Utilites зависит от материнской платы.

Активация HID-совметимых устройств
Из-за ограничений операционной системы, если вы переставите ИК-приемник из одного
порта в другой, ИК-приемник не будет работать. Для активации HID-совместимого устройства
снова перейдите в Device Manager/Power Manager и установите галочку Allow this device to
bring the computer out of standby.
1. Нажмите Start и выберите Control
2. Дважды щелкните на System.
Panel.
3. Нажмите Hardware. 4. Нажмите Device Manager.
Русский
5. Выберите HID-compliant devices. 6. Установите галочку Allow this
device to bring the computer out of
standby.
4
DH Remote

Параметры ASUS DH Remote
После установки программного обеспечения ASUS DH Remote, появится экран утилиты и вы
можете настроить параметры ASUS DH Remote. Установите функциональные клавиши.
1
2
3
1. Кнопка включения/отключения питания
Установка этого пункта в Hibernate позволяет вам переключать ваш ПК в решим Windows
S4, который позволяет вашему ПК входить и выходить из hibernate более быстро.
• Вы должны установить галочку Enable Power Key перед использованием ASUS DH
Remote для включения или выключения вашего ПК или перевода его в hibernate. Для
подробной информации о Hibernate посетите www.microsoft.com.
• Кнопка включения/отключения питания не работает в режиме MS-DOS.
• Установите галочку Enable power on after power loss Function Switch. Когда
шнур питания вашего ПК отключен от розетки или произошел сбой питания, то при
возобновлении питания ваш ПК автоматически загрузится и выключится через
несколько секунд для включения функции Питание пульта ДУ.
Мультимедиа клавиши
2. Профиль
Имеется девять приложений по умолчанию в выпадающем меню Profile и пять наборов User
Define.
Приложения по умолчанию Media Player, iTunes, PowerDVD, WinDVD, QuickTime, Real
Player, DivX Player, WinAmp и Power Point. (Приложения по умолчанию могут быть
изменены без уведомления.)
3. Путь
Программное обеспечение поможет определить местоположение исполняемых (.exe)
файлов для девяти приложений по умолчанию. Если .exe файл не найден, нажмите Browse
для указания правильного пути. Exe-файлы приложений, определяемых пользователем
нужно указать вручную перед использованием ASUS DH Remote.
• Сохраните параметры после указания путей для .exe файлов.
• Если местоположение исполняемых файлов изменилось или приложение было
Русский
переустановлено, для корректной работы ASUS DH Remote вам нужно указать
правильные пути.
DH Remote
5
Кнопка запуска приложения и запуск меню
Навигация с помощью зоны управления медиа.
вверх
влево
вправо
ентер
вниз
Выбор приложения
После нажатия на пульте ДУ, на экране
появится список приложений. Используйте пульт ДУ
для выбора и запуска приложения
Выбор пути для приложения
Если программное обеспечение не нашло файл
приложения при первом использовании, появится
окно Select Application Path. Пожалуйста, укажите
правильный путь.
Выбор файла
После выбора правильного пути, вам следует
выбрать исполняемый файл (.exe) для запуска
приложения.
Если исполняемый файл находится в программном
обеспечении или вы уже установили его прежде,
этот экран появится непосредственно при выборе
приложения. После выбора желаемого файла, папки
или CD ROM, используйте / для выбора
кнопок Back/OK/Cancel, затем для подтверждения
нажмите .
Русский
• Для прослушивания музыки, рекомендуется сделать плейлисты заблаговременно.
• Нажмите снова для закрытия приложения и перезапуска меню.
6
DH Remote

Установка горячих клавиш для приложений
Если вы хотите использовать Media Control Zone для управления не по умолчанию, например
ACDSee, вы можете выбрать User Define в выпадающем меню и переименовать его,
нажав Rename. Программное обеспечение ASUS DH Remote установит девять популярных
приложений и определит кнопки для удобного управления.
Функциональные кнопки, определяемые пользователем
После установки галочки Use Hotkeys for Application, вы можете назначить клавиши для
запуска приложений, определяемых пользователем.
Для определения горячих клавиш выберите User Define 1~5 из выпадающего меню Profile.
Нажмите Save для сохранения новых параметров или нажмите кнопку Default для удаления
всех личных настроек и восстановления оригинальных значений.
• Кнопки пульта ДУ будут работать только при правильно установленных горячих
клавишах.
• Определение горячих клавиш может отличаться для разных версий программного
обеспечения. При необходимости установите галочку Redefine default hotkeys для
нового определения. Нажмите кнопку Save для сохранения настроек или Reset для
восстановления определений по умолчанию.
После начала установки вы найдете иконку ASUS DH Remote в панели задач Windows.
Щелкните на иконке и выберите Settings для запуска утилиты.
Русский
DH Remote
7
Приложение
Функциональные нопки и AP профиль
Программное обеспечение ASUS DH Remote поможет вам установить соответствие
между функциональными кнопками на пульте и горячими клавишами девяти популярных
приложений и пятью для User Define.
Media Player iTunes PowerDVD WinDVD QuickTime
Полный экран v v v v v
Воспроизв.
v v v/x v v
/Пауза
Громкость+ v v v v v
Громкость- v v v v v
Канал+ v v v v x
Канал- v v v v x
*Примечание
Только воспроизведение
, без паузы
Real Player DivX Player WinAmp Power Point User Defne
Полный экран v v x v
Воспроизв.
v v v/x Полный экран
/Пауза
Громкость+ v x v B
Громкость- v x v ESC
Канал+ v x v Страница вниз
Канал- v x v Страница вверх
*Примечание
Только воспроизведение
, без паузы
Если вам недостаточно 9 приложений по умолчанию и вы желаете добавить другие
приложения, вы можете переименовать 5 наборов User Define и выбрать другие
приложения.
Русский
8
DH Remote
Português
™
DH Remote
Guia do utilizador
Copyright © 2006 ASUSTeK COMPUTER INC. Todos os direitos reservados.
Bem-vindo
Está cansado de estar sentado em frente ao PC e de mexer no teclado e no
Português
rato? Com o controlo remoto DH da ASUS, pode reproduzir, fazer uma pausa
ou ajustar o volume de qualquer canção sem ter de se levantar do sofá.
Com o controlo remoto DH na mão pode fazer muito mais com o seu PC e à
distância!
Resumo do controlo remoto DH da ASUS
1. Botão de alimentação
5. Botão Noise Off
2. Botão Quick Power
6. Botão EZ WiFi
3. Botão Full Screen
7. Botão Application
Launch
Aumentar volume
Reproduzir/Pausa
4. Botão Media
Seguinte
Control Zone
Anterior
Diminuir volume
1. Botão de alimentação: Liga e desliga o computador
2. Botão Quick Power: Coloca rapidamente o computador no modo de
suspensão (modo S3)
3. Botão Full Screen: Permite-lhe ver a aplicação multimédia em ecrã inteiro
4. Botão Media Control Zone: Controla a aplicação multimédia
5. Botão Noise Off: Reduz o ruído gerado pelo computador
6. Botão EZ WiFi: Coloca rapidamente o computador no modo de suspensão
ao mesmo tempo que continua a permitir o funcionamento do WiFi-APSolo™
7. Botão Application Launch: Inicia a aplicação multimédia
• Para utilizar o botão Quick Power, guarde primeiro os seus dados.
• O modo Reduzir ruído é apropriado apenas para operações ligeiras como
o processamento de texto e a navegação pela web. Este modo ajusta
de forma inteligente a velocidade da ventoinha à carga do sistema.
• Os diferentes equipamentos do sistema (placas VGA, PSU, ventoinha
dochassis)terãoumfuncionamentodiferenteconformeadeniçãodo
modo Reduzir ruído.
• *Ao utilizar uma placa VGA com uma ventoinha de velocidade controlável
ou uma placa VGA sem ventoinha, não se esqueça de ligar a ventoinha
da fonte de alimentação e a ventoinha do chassis ao respectivo conector
existente na placa principal para obter melhores resultados em termos
da redução de ruído.
*Nem todas as fontes de alimentação incluem conectores para ventoinhas,
consulte o manual da placa principal para mais informações.
O modo EZ-WiFi é muito útil sobretudo quando não está perto do PC mas pretende
transferirdadosouutilizardispositivostaiscomoaplicaçõessemosouoserviço
telefónico Skype. Volte a premir o botão da função EZ-WiFi para a desactivar.
2
DH Remote
Português
DH Remote
3
ASUS >>USB receiver
USB receiver
Instalação do receptor por infravermelhos
Receptor USB por infravermelhos
Se a sua placa principal incluir um receptor por infravermelhos, basta ligar
a extremidade USB a uma das portas USB do seu PC com a designação
LAN2 e colocar o receptor por infravermelhos num local adequado e sem
obstáculos.
Receptor IV
Extremidade USB
Portas USB
Extremidade IV
• O receptor por infravermelhos funciona a uma distância de 6 metros
dependendo das condições existentes. Sugerimos-lhe que ao utilizar o
controlo remoto DH da ASUS o aponte ao receptor por infravermelhos
para garantir um funcionamento sem problemas.
• Estas duas portas USB suportam a função de reactivação por
USB. Assim, quando o computador não estiver ligado, a remoção
de dispositivos USB destas portas, como é o caso do receptor por
infravermelhos da ASUS, irá dar origem ao arranque do PC.
• As portas de entrada/saída existentes na parte de trás dependem das
placas principais.
• Sistemas operativos suportados: Windows XP, 2003 Server, XP (64 bits) e
2003 Server (64 bits).
Instalação do software
Antes de poder desfrutar do
controlo remoto DH da ASUS,
tem de instalar o software após
proceder à instalação do receptor
por infravermelhos. Basta clicar para
instalarocheiroASUS DH Remote
a partir do menu Utilitários que
encontra no CD de suporte da placa
principal, depois este software será
automaticamente iniciado sempre
que proceder ao arranque do PC.
Controlo remoto DH da ASUS
O ecrã Utilitários varia conforme as placas principais.
Activação de dispositivos compatíveis com HID
Português
Devido a limitações do sistema operativo, se remover o receptor por
infravermelhos da porta anterior e o reinstalar numa outra porta USB,
o receptor deixará de funcionar. Para voltar a activar os dispositivos
compatíveis com HID, vá até Gestor de dispositivos/Gestor de energia
eassinaleacaixadevericaçãoPermitir que este dispositivo reactive o
computador.
1. Clique em Iniciar e escolha
2. Faça um duplo clique sobre a
Painel de controlo.
pasta
Sistema
.
3. Clique em
Hardware
. 4. Clique em
Gestor de
dispositivos
.
5. Seleccione a opção
6. Assinaleacaixadevericação
Dispositivos compatíveis
Permitir que este dispositivo
com HID
.
reactive o computador
.
4
DH Remote

Denições do controlo remoto DH da ASUS
Após a instalação do controlo remoto DH da ASUS, é apresentado o ecrã do
utilitárioparaquepossacongurarasdeniçõesdocontroloremoto.Proceda
àconguraçãodasteclasdefunçãoetapaaetapa.
1
Português
2
3
1. Tecla de alimentação
AdeniçãodestateclaparaomodoHibernarpermite-lhedeniroseuPC
para entrar no modo S4 do Windows, ou seja, o seu PC poderá entrar no
modo de hibernação e voltar ao modo de funcionamento normal muito mais
rapidamente.
• TerádeassinalaracaixadevericaçãoActivar a tecla de
alimentação antes de poder utilizar o controlo remoto DH da ASUS
para ligar e desligar o PC ou para o colocar no modo de hibernação.
Visite o site www.microsoft.com para mais informações sobre o modo
de hibernação.
• A tecla de alimentação não suporta o modo MS-DOS.
• AssinaleacaixadevericaçãoActivar a tecla de alimentação após
perda de energia. Sempre que o cabo de alimentação do seu PC for
removido da tomada eléctrica ou sempre que houver uma falha no
fornecimento de energia, o PC arrancará e encerrará automaticamente
em poucos segundos de forma a activar a função de ligação do
controlo remoto DH após reposição da alimentação.
Teclas multimédia
2. Perl
ExistemnoveaplicaçõespredenidasnomenupendentePerl e cinco
conjuntos de opções Personalizar.
Asaplicaçõespredenidassão:MediaPlayer,iTunes,PowerDVD,
WinDVD, QuickTime, Real Player, DivX Player, WinAmp e Power Point.
(AsaplicaçõespredenidasnosoftwaredocontroloremotoDHdaASUS
podem ser alteradas sem aviso prévio.)
3. Caminho
Osoftwareajudá-lo-áalocalizarocheiroexecutável(.exe)dasnove
aplicaçõespredenidas.Casoocheiro.exenãosejalocalizado,cliqueem
Procurarparaprocurarocaminhocorrecto.Oscheiros.exedasaplicações
personalizadas pelo utilizador têm de ser procurados manualmente antes de
poder utilizar o controlo remoto DH da ASUS.
• Tomenotadocaminhodocheiro.exe.
• Casoocheiroexecutávelmudedesítioouaaplicaçãoseja
reinstalada,terádedenirocaminhodocheiroparaqueocontrolo
remoto DH da ASUS possa funcionar correctamente.
DH Remote
5
O botão AP Launch e o menu AP Launch
(Iniciar a aplicação)
Português
Navegação com o botão Media Control Zone.
para cima
para a esquerda
para a direita
conrmar
para baixo
Seleccionar o perl da aplicação
Após premir o botão no controlo remoto,
umperldeaplicaçãoseráapresentado
no ecrã. Utilize o controlo remoto para se
deslocar e iniciar a aplicação pretendida.
Seleccionar o caminho da
aplicação
Se o software não conseguir localizar o
cheiroexecutáveldaaplicaçãoaquando
da primeira utilização, o ecrã Seleccionar
o caminho da aplicação é apresentado.
Especiqueocaminhocorrectonesteecrã.
Seleccionar o cheiro
Após ter seleccionado o caminho correcto,
deveráseleccionarocheiroexecutável
(.exe) correcto para iniciar a respectiva
aplicação.
Casoocheiroexecutávelsejalocalizado
pelosoftwareoucasotenhajádenido
correctamente o caminho para o mesmo,
este ecrã será apresentado ao seleccionar
aaplicação.Apósseleccionarocheiro
pretendido, a pasta ou o CD ROM, utilize
os botões / para escolher as opções
Voltar/OK/Cancelar e depois prima o botão
paraconrmar.
• Para ouvir música, sugerimos-lhe que comece por criar listas
pessoais.
• Prima novamente o botão para fechar a aplicação e novamente
parareiniciaromenuPerl.
6
DH Remote

Denição das teclas de atalho para as
aplicações
Se quiser utilizar o botão Media Control Zone para controlar as aplicações não
predenidas,comooACDSee,podeseleccionaraopçãoPersonalizar no
menu pendente e mudar o nome premindo o botão Mudar o nome. O controlo
remoto DH da ASUS inclui já nove populares aplicações correctamente
conguradaseosbotõesdefunçãodevidamentedenidosparaumamais
Português
fácil utilização.
A opção Personalizar
Após assinalar a caixa de verificação
Utilizar teclas de atalho para as
aplicações
, pode definir as teclas de atalho que pretende utilizar com as
aplicaçõesdenidasnaopçãoPersonalizar.
Seleccione Personalizar 1~5 no menu pendente Perlparadenirasteclas
de atalho. Prima Guardarparaguardaranovaconguraçãoouprimaobotão
PredeniçãoparalimparTODASasconguraçõespersonalizadaserestaurar
asdeniçõesoriginais.
• Osbotõesdocontroloremotoapenasfuncionarãoquandoadenição
das teclas de atalho das aplicações for feita correctamente.
• A operação de denição das teclas de atalho pode variar conforme
as diferentes versões do software. Clique na caixa de verificação
Redenir as teclas de atalho predenidasparaalterarasdeniçõesse
necessário. Prima o botão Guardarparaguardarasnovasdeniçõesou
prima o botão Reporpararestaurarasteclasdeatalhopredenidas.
Apósaconguraçãoinicial,veráoíconedocontroloremotoDHdaASUS
na barra de tarefas do Windows. Clique neste ícone e seleccione a
opção Denições para aceder ao ecrã do utilitário.
DH Remote
7
Apêndice
Português
Os botões de função e o perl da aplicação
O software do controlo remoto DH da ASUS ajuda-o a configurar a
correspondência entre os botões de função existentes no controlo remoto e
as teclas de atalho das nove aplicações restando ainda cinco conjuntos de
opções
Personalizar
.
Media Player iTunes PowerDVD WinDVD QuickTime
Botão Full
v v v v v
Screen
Reproduzir/
v v v/x v v
Pausa
Vol+ v v v v v
Vol- v v v v v
Ch+ v v v v x
Ch- v v v v x
*NOTA
apenas reprodução,
sem pausa
Real Player DivX Player WinAmp Power Point Personalizar
Botão Full
v v x v
Screen
Reproduzir/
v v v/x Botão Full
Pausa
Screen
Vol+ v x v B
Vol- v x v ESC
Ch+ v x v Page Down
Ch- v x v Page Up
*NOTA
apenas reprodução,
sem pausa
Seacharque9aplicaçõespredenidassãoinsucientesequiseradicionar
outras aplicações, poderá mudar o nome dos 5 conjuntos de opções
Personalizar e criar teclas de atalho para as suas aplicações preferidas.
8
DH Remote
2
3
ASUS >>USB receiver
USB receiver
4
5
6
7
8


2
3
ASUS >>USB receiver
USB receiver
4

5
6
7
8
™
DH Remote
日本語
ユーザーガイド
Copyright © 2006 ASUSTeK COMPUTER INC. All Rights Reserved.
ようこそ
DH Remote は、離れた場所からパソコンを操作するためのリモコンです。ソファーでくつろ
ぎながらパソコンでお気に入りの音楽の再生、停止、ボリューム調整ができます。
ASUS DH Remote の概要
1. 電源
5. ノイズオフ
2. クイックパワー
6. EZ WiFi
3.フルスクリーン
7. アプリケーション 実行
音量(+)
プレー/ポーズ
4.
メディアコントロールゾーン
次へ
戻る
音量(ー)
1. 電源:コンピュータの電源のオン/オフを切り替えます。
2. クイックパワー:スリープモード(S3)にします。
3. フルスクリーン:メディアアプリケーションを全画面表示します。
日本語
4. メディアコントロールゾーン:メディアアプリケーションをコントロールします。
5. ノイズオフ:コンピュータから出るノイズを削減します。
6. EZ WiFi:WiFi-AP Solo™ を起動させたままコンピュータをスリープモードにします。
7. アプリケーション起動:メディアアプリケーションを起動します。
• クイックパワーをご利用になる前に、データを保存してください。
• ノイズオフモードは、文書処理やWebページの閲覧などの負荷の低い作業に適
しており、システムの負荷に応じてファン速度を調整します。
• システム内の装置状態 (VGA、PSU、ケースファンの数) がノイズオフ機能に影響
します。
• *ファン速度が調節可能な VGA カードまたはファンレス VGA カードをご使用の
場合は、より効果的なノイズオフのため電源ファンとケースファンケーブルをマ
ザーボードのファンコネクタに接続してください。
*全ての電源装置にファンコネクタが装備されている訳ではありません。詳細はマザーボードの
マニュアルをご覧ください。
EZ-WiFi モードは、パソコンから離れている状態で、データをダウンロードする
場合や、無線アプリケーションや Skype などのデバイスを利用する場合に便利で
す。EZ-WiFi ボタンを2回押すと EZ-WiFi 機能はオフになります。
2
DH Remote

赤外線 (IR) 受信機を取り付ける
USB IR 受信機
マザーボードに付属の IR 受信機の USB 側を LAN2 下の USB ポートに接続し、IR
受信機を障害物のない適切な場所に設置します。
• IR の有効範囲は環境によって異なりますが、約 6m です。ASUS DH Remote
は、IR 受信機に向けてご使用ください。
• この2基の USB ポートは USB ウェイクアップ機能に対応しています。コンピュ
ータの電源がオフの状態で ASUS IR 受信機などの USB デバイスを取り外すと
これらのポートから PC が起動されます。
• 後部の I/O はマザーボードによって異なります。
• OS サポート:Windows XP、2003 server、XP (64-bit)、2003 server (64-bit)
ソフトウェア
IR 受信機を取り付けたら、ASUS DH Remote
をご利用になる前に、ソフトウェアをインスト
日本語
ールしてください。サポート CD のユーティリ
ティメニューで、 ASUS DH Remote ファイル
をクリックするだけで簡単にインストールする
ことができます。ソフトウェアを 1 度インスト
ールすると、パソコンを立ち上げた際に自動
的に起動します。
DH Remote
3
ASUS >>USB receiver
USB receiver
IR受信機
USB
USB ポート
IR
ASUS DH Remote
Utilites 画面はマザーボードによって異なります。

HID 互換でバイスを使用する
OS による制限のため、一度 IR 受信機を取り外すと、その後他の USB ポートに取り付
けても IR 受信機は機能しません。HID互換デバイスをもう一度使用する場合は、以下
の設定を行ってください。
1. スタート → コントロールパネル
2. システムアイコンをダブルクリッ
の順にクリックします。
クします。
日本語
3. ハードウェアをクリックします。 4. デバイスマネージャをクリックし
ます。
5. HID-compliant devices を選択
6. 電源の管理タブの「このデバイス
します。
で、コンピュータのスタンバイ状
態を解除できるようにする」にチ
ェックを入れます。
4
DH Remote
ASUS DH Remote 設定
ASUS DH Remote ソフトウェアをインストールしたら、ユーティリティ画面で ASUS DH
Remote を設定します。ここでは、ファンクションキーのセットアップを行います。
1
2
3
1. Power On / O Key
Hibernate に設定し、コンピュータを Windows S4 モードに入る設定にすることで、簡
単にHibernate(休止状態)に入れ復旧も素早く行えます。
• ASUS DH Remote を使ってパソコンをオン/オフまたは休止状態にするには、
Enable Power Key のチェックボックスにチェックを入れてください。休止状態に
ついての詳細は、www.microsoft.com/japan/ をご覧ください。
• Power On/O ボタンは MS-DOS モードには対応していません。
• Enable power on after power loss Function Switch にチェックを入れてくだ
さい。パソコンの電源コードが外された場合や電源に異常があった場合、パソ
コンが自動的に起動し数秒でシャットダウンし、次に電源が戻った時のために
DH Remote の Power On Function を有効にします。
Multimedia Keys
日本語
2. Prole
Prole のドロップダウンメニューはデフォルトが 9つのアプリケーション、User Dene
(ユーザー設定)が5セットです。
デフォルトアプリケーションは Media Player、iTunes、PowerDVD、WinDVD、
QuickTime、Real Player、DivX Player、WinAmp、Power Point です。(デフォルトアプ
リケーションは予告なく変更される場合があります。)
3. Path
ソフトウェアで 9 つのデフォルトアプリケーションの実行ファイル (.exe) を検出し
ます。 実行ファイルが検出されない場合は、 Browse をクリックしてパスを指定し
てください。User Dene アプリケーションの実行ファイルは、 ASUS DH Remote
を使用する前に手動で検出してください。.
• 実行ファイル( .exe)を指定したら保存してください。
• 実行ファイルを移動させた場合やアプリケーションを再インストールした場合
は、パスを再度指定してください。
DH Remote
5
アプリケーション実行ボタンと 実行メニュー
メディアコントロールゾーンを利用する
上へ
左へ
右へ
決定
下へ
Select Application Prole
リモコンの を押すとアプリケーションプロフ
ァイルが画面に表示されます。リモコンを使って
アプリケーションの選択、実行が行えます。
Select Application Path
アプリケーションの実行ファイルが検出されな
かった場合、Select Application Path 画面が表
示されます。画面から正しいパスを特定してく
ださい。
日本語
Select File
パスを選択したら、実行ファイル (.exe) 選択し、
アプリケーションを実行します。
実行ファイルが自動検出された場合や既にセッ
トアップしてある場合は、アプリケーションを選
択すると右の画面が表示されます。ファイル、フ
ォルダまたはCD ROM を選択したら、 /
を使って Back/OK/Cancel を選択し、 を押
して確定します。
• 音楽を再生する場合は、あらかじめプレイリストを作成しておくことをお勧めし
ます。
• 再度 を押すとアプリケーションを終了し、もう一度押すとプロファイル
メニューが再実行されます。
6
DH Remote
アプリケーションにホットキーを指定する
ACDSee などのデフォルトにはないアプリケーションをメディアコントロールゾー
ンでコントロールする場合は、ドロップダウンメニューから User Dene を選択し、
Rename を押して名前を変更してください。9つのアプリケーションに関しては、ASUS
DH Remote ソフトウェアが自動的にセットアップを行いファンクションボタンが設定
されます。
User Dene
Use Hotkeys for Application にチェックを入れると、User Dene アプリケーションの
ホットキーを自由に設定できるようになります。
Prole のドロップダウンメニューから User Dene 1~5 を選択しホットキーを設定し
ます。Save を押して新しいセットアップを保存するか、Default を押して全てのユーザ
ー設定を削除しデフォルトをリストアします。
日本語
• リモコンボタンは、アプリケーションホットキーが正しく設定されている場合の
み機能します。
• ホットキーの設定はソフトウェアのバージョンによって異なります。必要であれ
ば Redene default hotkeys にチェックを入れ、新しく設定を行ってください。
新しい設定を保存する場合は Save ボタンを、デフォルトのホットキー設定をリ
ストアする場合は、Reset を押してください。
初期設定後、Windows OS タスクバーの ASUS DH Remote アイコン をクリック
し、Settings を設定しユーティリティ画面を起動させます。
DH Remote
7
Appendix
ファンクションボタンとアプリケーションプロファイル
まず始めに、ASUS DH Remote ソフトウェアで、リモコンのファンクションボタ
ンとデフォルトアプリケーションのホットキーを設定し、その後で User Dene の
設定を行います。
Media Player iTunes PowerDVD WinDVD QuickTime
フルスクリーン
v v v v v
プレー/ポーズ
v v v/x v v
Vol+ v v v v v
Vol- v v v v v
Ch+ v v v v x
Ch- v v v v x
*注
再生のみ,
ポーズなし
Real Player DivX Player WinAmp Power Point User Defne
フルスクリーン
v v x v
プレー/ポーズ
v v v/x
フルスクリーン
Vol+ v x v B
Vol- v x v ESC
日本語
Ch+ v x v
ページダウン
Ch- v x v
ページアップ
*注
再生のみ,
ポーズなし
9 つのアプリケーション以外のアプリケーションを追加する場合は、User Dene 5 セ
ットの名前を変更し、アプリケーションの作成、設定をします。
8
DH Remote

™
DH Remote
한국어
사용자 가이드
Copyright © 2006 ASUSTeK COMPUTER INC. All Rights Reserved.
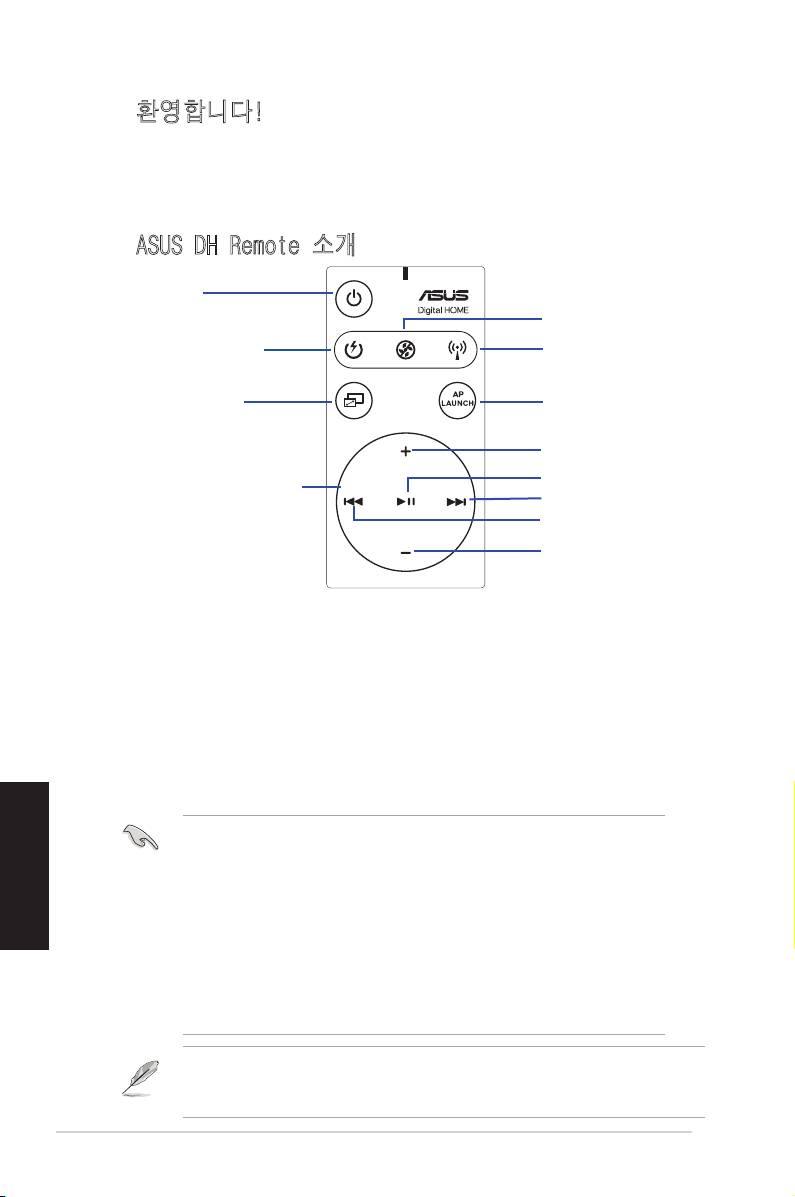
환영합니다!
사용하고 있는 키보드와 마우스가 바쁘고 힘들어 보이진 않나요? ASUS DH
Remote를 이용해 편안한 소파에 앉아 마음대로 음악을 켜고, 끄고 음량을 조
절할 수 있습니다. DH Remote가 여러분의 손 안에 있다면 더 이상 PC 앞에만
앉아 있을 필요가 없습니다!
ASUS DH Remote 소개
1. 전원
5. 잡음 제거
2. Quick 전원
6. EZ WiFi
3. 전체 화면
7. 어플리케이션 실행
소리 크게
재생/멈춤
4. 미디어 제어판
다음
이전
소리 작게
1. 전원: 컴퓨터를 켜고 끌 경우 사용합니다.
2. Quick 전원: 컴퓨터를 빠르게 슬립 모드(S3)로 전환할 경우 사용합니다.
3. 전체 화면: 미디어 어플리케이션을 전체화면으로 전환할 경우 사용합니다.
4. 미디어 제어판: 미디어 어플리케이션을 작동할 경우 사용합니다.
5. 잡음 제거: 컴퓨터로부터 발생하는 잡음을 제거합니다.
6. EZ WiFi: 컴퓨터를 빠르게 슬립 모드로 전환하지만, WiFi-AP Solo™는 작
동시켜 줍니다.
7. 어플리케이션 실행: 미디어 어플리케이션을 실행할 경우 사용합니다.
• Quick 전원을 사용할 경우, 데이터를 먼저 저장해 주십시오.
한국어
• 잡음 제거 모드는 워드 작업이나 인터넷 서핑과 같은 비교적 부하
가 적은 작업시 적합한 모드입니다. 이 모드는 시스템의 로딩 상태
에 따라 인공지능으로 팬의 속도를 조절해줍니다.
• 다른 시스템 장치(VGA의 수, PSU, 케이스 팬)은 잡음 제거 기능에
영향을 미칠 수 있습니다.
• *팬 속도 조절 VGA 카드나 팬이 없는 VGA 카드를 사용할 경우,전원
팬과 케이스 팬의 케이블을 마더보드에 있는 팬 커넥터에 연결해야
만, 잡음 제거 효과를 얻을 수 있습니다.
* 모든 파워 서플라이에 팬 커넥터가 탑재되어 있진 않습니다. 더 자세한 내용은
마더보드를 참조해 주십시오.
EZ-WiFi 모드는 PC에서 떨어져 있지만 데이터를 다운로드하고 싶거나 Skype와
같은 무선 어프리케이션 장치를 사용할 경우 적합합니다. EZ-WiFi 기능 사용
을 중지하려면, EZ-WiFi 버튼을 다시 한번 눌러 주십시오.
2
DH Remote

한국어
DH Remote
3
ASUS >>USB receiver
USB receiver
적외선 리시버 설치
USB IR 리시버
마더보드에는 IR 리시버가 기본으로 제공되어 USB 연결 잭을 사용 중인
PC USB 포트(LAN2 포트 아래)에 간편하게 연결할 수 있습니다. IR 리시버
수신부는 장애물이 없는 평평한 곳에 위치시켜 주십시오.
IR 리시버
USB 연결 잭
USB 포트
적외선 수신부
• IR 기능 사용 거리는 환경에 따라 다르지만 6m가 적합합니다. ASUS DH
Remote가 더 잘 작동하려면, IR 리시버를 향해 사용해 주시기 바랍니다.
• 2개의 USB 포트 모두 USB wake-up 기능을 지원합니다. 그러므로 컴퓨터
가 켜지지 않을 경우, 2개의 포트에서 ASUS IR 리시버와 같은 USB 장치
를 제거하면 PC가 켜집니다.
• 후면 I/O는 마더보드에 따라 다를 수 있습니다.
• 지원 운영 체제: Windows XP, 2003 서버, XP(64-bit), 2003 서버(64-
bit).
소프트웨어 설치
ASUS DH Remote 를 사용하기 전
에, 편리하게 사용하기 위해 적외선
리시버를 설치한 후, 소프트웨어를
설치해 주십시오. 마더 보드 지원 CD
패키지의 유틸리티 메뉴에서 간단하
게 클릭 몇번으로 ASUS DH Remote
파일을 설치하면, PC를 사용할 때마
다 자동으로 실행되게 됩니다.
ASUS DH Remote
유틸리티 화면은 마더보드마다 다를 수 있습니다.
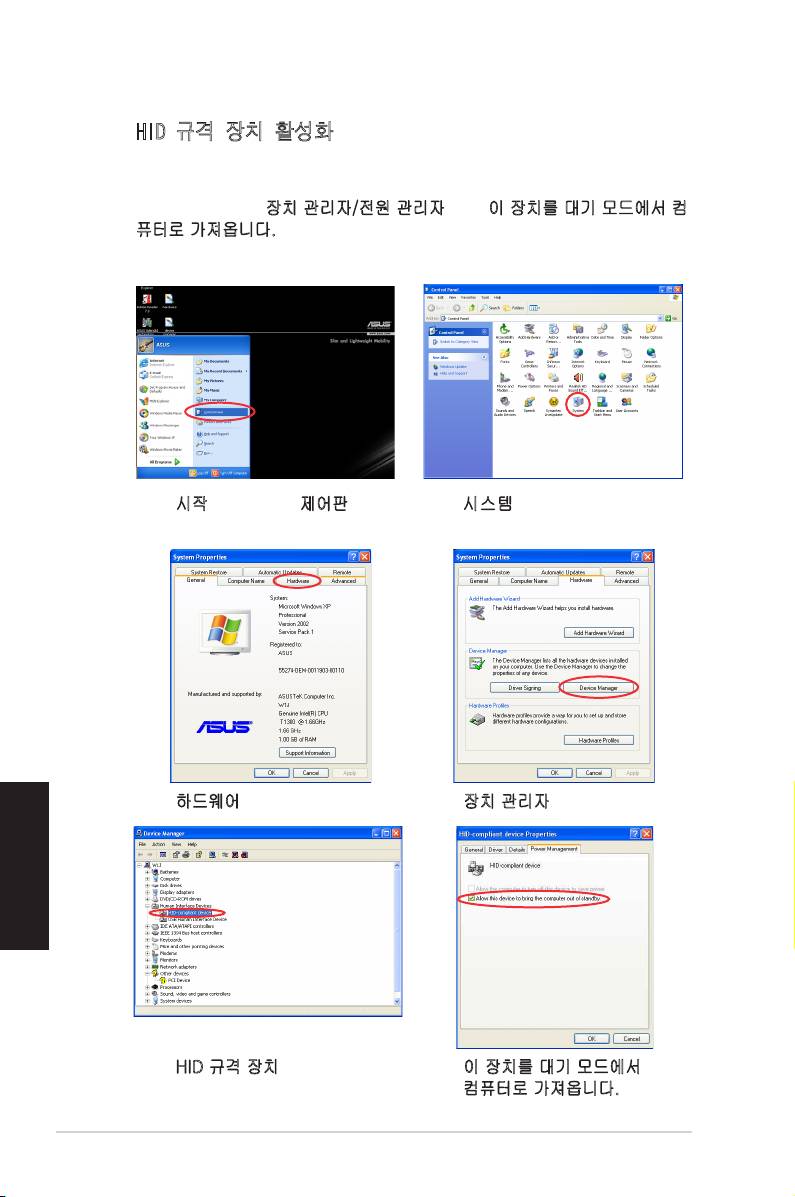
HID 규격 장치 활성화
운영 시스템의 제한으로 인해 IR 리시버를 기존 포트에서 제거하고 다른 USB
포트에 재설치할 경우, IR 리시버는 작동하지 않습니다. HID 규격 장치를 다시
활설화 시키려면, 장치 관리자/전원 관리자 에서 이 장치를 대기 모드에서 컴
퓨터로 가져옵니다. 항목의 체크박스를 표시해 주십시오.
1. 시작을 클릭하고 제어판을 선택
2. 시스템 아이콘을 더블 클릭해
해 주십시오.
주십시오.
3. 하드웨어 탭을 클릭해 주십시오. 4. 장치 관리자를 클릭해 주십시오.
한국어
5. HID 규격 장치를 클릭해
6. 이 장치를 대기 모드에서
주십시오.
컴퓨터로 가져옵니다. 항목의
체크박스를 표시해 주십시오.
4
DH Remote
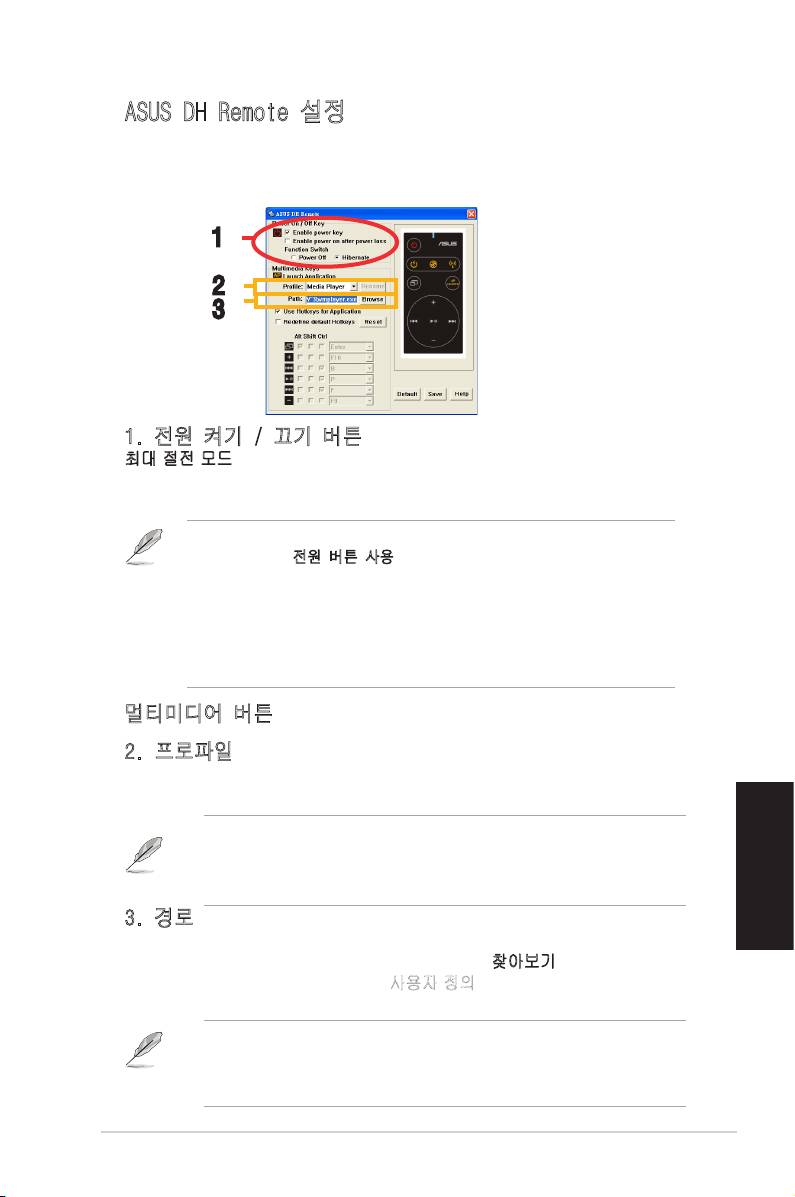
ASUS DH Remote 설정
ASUS DH Remote 소프트웨어를 설치한 후, 유틽리티 화면이 나타나고 ASUS
DH Remote 설정을 구성할 수 있는 유틸리티 화면이 나타납니다. 차례로 기
능 키를 설정해 주십시오.
1
2
3
1. 전원 켜기 / 끄기 버튼
최대 절전 모드로 이 항목을 설정할 경우, PC는 Windows S4 모드로 전환되
어 PC가 최대 절전 모드로 더 빠르게 전환 되고 더 빠르게 최대 전원 모드로
전환됩니다.
• ASUS DH Remote를 이용해 PC를 켜고 끄거나 최대 절전 모드로 전환
하기 전에 전원 버튼 사용 항목의 체크 박스를 표시해 주시기 바랍
니다.
• 전원 켜기 / 끄기 버튼은 MS-DOS 모드에서는 사용할 수 없습니다.
전원이 손실된 후, 전원 켜기 기능 사용의 체크 박스를 표시해 주십
시오. PC의 전원 코드가 전기 콘세트에서 빠지거나 PC에 전원이 들
어오지 않을때 마다, 전원이 다시 들어오면, 전원 켜기 기능이 작동
되어 PC는 자동 부팅되고 몇 초후에 종료됩니다.
멀티미디어 버튼
2. 프로파일
프로파일 내림창 메뉴에는 9개의 기본 어플리케이션과 사용자가 직접 설정할
수 있는 5개의 공간이 있습니다.
기본 어플리케이션에는 Media Player, iTunes, PowerDVD, WinDVD,
QuickTime, Real Player, DivX Player, WinAmp, Power Point가 있습니
다.(ASUS DH Remote 소프트웨어의 기본 어플리케이션은 사전 통보 없이
변경될 수 있습니다.)
한국어
3. 경로
소프트웨어를 이용해 9개의 기본 어플리케이션의 실행 파일(.exe)의 위치를
찾을 수 있습니다. .exe 파일을 찾을 수 없을 경우, 찾아보기 버튼을 클릭하
면 경로를 직접 설정할 수 있습니다. 사용자 정의 어플리케이션의 .exe 파일은
ASUS DH Remote를 사용하기 전에 수동으로 설정해 주십시오.
• .exe 파일 경로를 설정한 후에 저장해 주십시오.
• 실행 파일을 다시 찾거나 어플리케이션을 다시 설치한다면, ASUS
DH Remote를 올바로 작동시키려면, 파일 경로를 재 설정해 주십시
오.
DH Remote
5
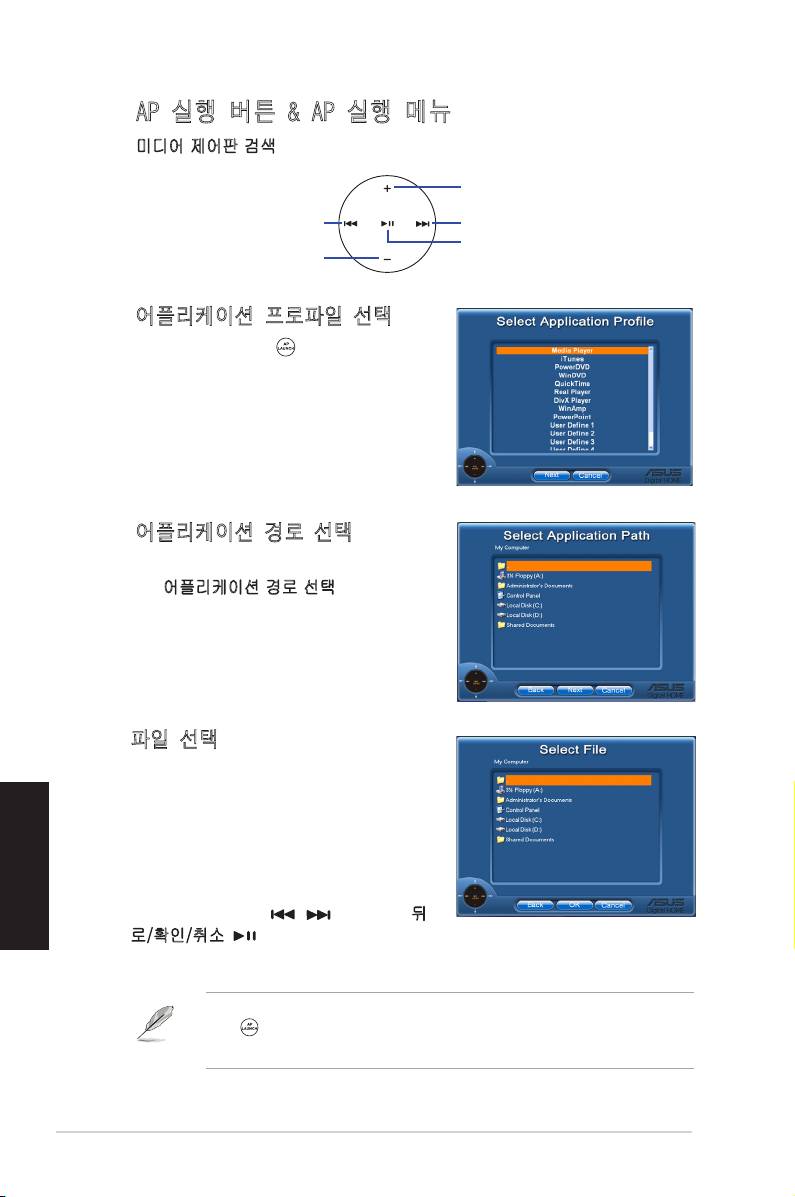
AP 실행 버튼 & AP 실행 메뉴
미디어 제어판 검색
위로
왼쪽으로
오른쪽으로
전체
아래로
어플리케이션 프로파일 선택
리모컨 제어판에서 를 누르면, 어플리케
이션 프로파일이 화면에 나타납니다. 제어
판을 이용해 원하시는 어플리케이션을 시작
하거나 검색할 수 있습니다.
어플리케이션 경로 선택
소프트웨어가 실행 파일을 찾을 수 없다
면, 어플리케이션 경로 선택 화면이 나타납
니다. 화면에서 올바른 경로를 설정해 주
십시오.
파일 선택
올바른 경로를 선택한 후, 어플리케이션 설
치를 위한 적합한 실행 파일(.exe)을 선택
해 주십시오.
한국어
실행파일을 찾았거나 이미 설치된 경우, 어
플리케이션을 선택하면, 자동으로 화면이
나타납니다. 사용할 파일을 선택한 후, 폴
더나 CD ROM에서 / 를 이용해 뒤
로/확인/취소 를 눌러 확인해 주십시오.
• 음악을 들으려면, 미리 재생 목록을 만들어 두는것이 좋습니다.
• 를 다시 한번 누르면 어플리케이션이 꺼지고, 또 다시 하번 누르
면 프로파일 메뉴가 다시 실행됩니다.
6
DH Remote

어플리케이션 핫키 설정
ACDSee와 같은 기본으로 설정되지 않은 어플리케이션을 미디어 제어판에서
사용하려면, 내림창 메뉴에서 사용자 정의를 선택하고 이름 바꾸기를 눌러 이
름을 바꾸어 주십시오. ASUS DH Remote에는 일반적으로 많이 사용되는 9개
의 어플리케이션이 설치되어 있으며 편리한 작동을 위해 기능 버튼 조합이 설
정되어 있습니다.
사용자 정의
어플리케이션 핫키 사용 항목의 체크박스를 표시 한 후, 사용자 정의 어플리케
이션에 핫키를 설정할 수 있습니다.
프로파일 내림창 메뉴에서 핫키 절정을 위해 사용자 정의 어플리케이션
1~5를 선택해 주십시오. 새로운 설정을 저장하려면, 저장 버튼을 누르고, 모
든 설정을 제거하고 원래 설정으로 복구하려면, 기본값 버튼을 눌러 주십시오.
한국어
• 리모컨 버튼은 어플리케이션 핫키의 설정이 올바르게 구성된경우에
만 작동합니다.
• 핫키 설정은 소프트웨어 버전에 따라 다양합니다. 기본 핫키 재 설정
항목의 체크 박스를 표시해 새로운 설정을 구성해 주십시오. 재설정
을 저장하려면 저장 버튼을 눌러 주시고 기본 핫키 설정을 복구하려
면, 리셋 버튼을 눌러 주십시오.
초기화 설정을 완료한 후, Windows 작업 표시줄에 ASUS DH Remote 아이
콘 이 생깁니다. 아이콘을 클릭하고 설정을 선택하면, 유틸리티 화
면이 나타납니다.
DH Remote
7
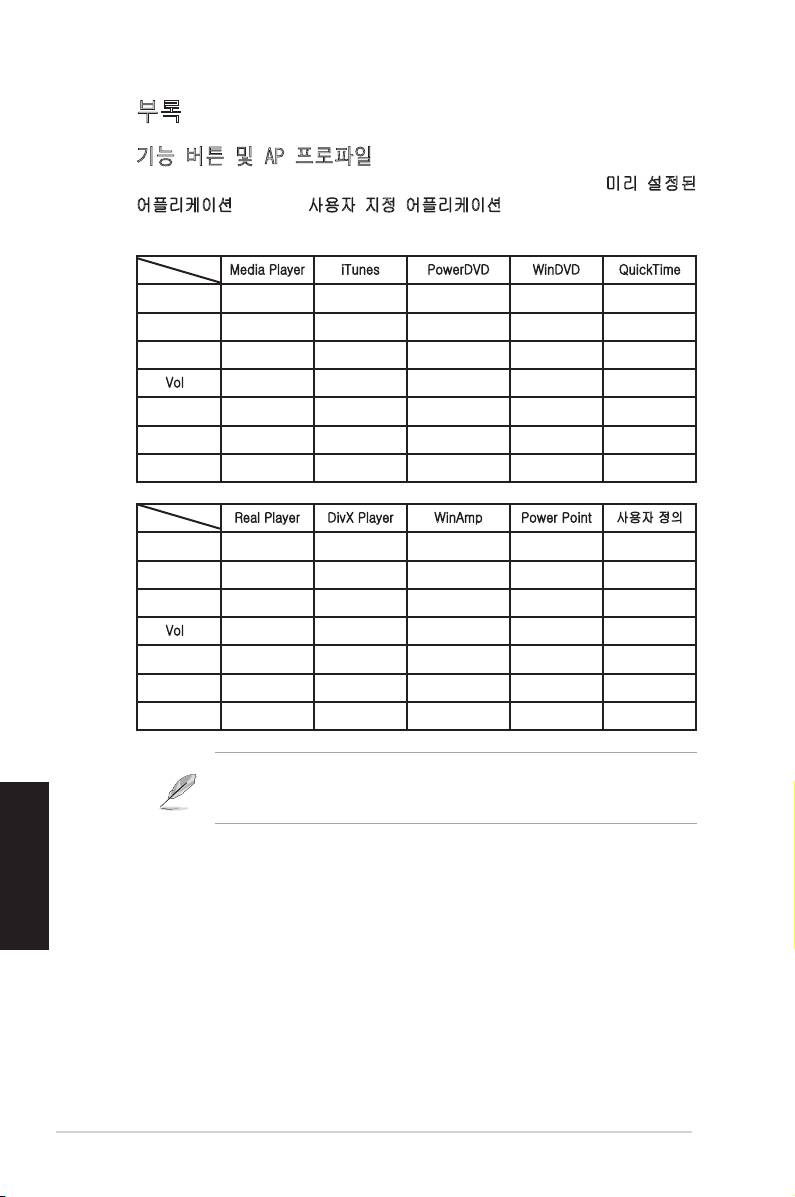
부록
기능 버튼 및 AP 프로파일
ASUS DH Remote 소프트웨어에서 리모컨의 버튼에 9개의 미리 설정된
어플리케이션과 5개의 사용자 지정 어플리케이션의 기능 핫키를 설정할 수
있습니다.
Media Player iTunes PowerDVD WinDVD QuickTime
전체화면 v v v v v
Play/Pause v v v/x v v
Vol+ v v v v v
Vol- v v v v v
Ch+ v v v v x
Ch- v v v v x
*참조
재생만 가능
Real Player DivX Player WinAmp Power Point 사용자 정의
전체화면 v v x v
Play/Pause v v v/x 전체화면
Vol+ v x v B
Vol- v x v ESC
Ch+ v x v Page Down
Ch- v x v Page Up
*참조
재생만 가능
9개의 기본 어플리케이션이 충분하지 않아 다른 어플리케이션을 추가했
다면, 5개의 사용자 정의 어플리케이션의 이름을 바꾸고 더 좋아하는 어
플리케이션을 만들거나 좋아하는 설정을 구성할 수도 있습니다.
한국어
8
DH Remote

™
DH Remote
Kullan›c› K›lavuzu
Türkçe
Telif hakk› © 2006 ASUSTeK COMPUTER INC. Tüm Haklar› Sakl›d›r.

Hoflgeldiniz
PC'nize ba¤›ml› olmaktan, klavye ve fareniz ile meflgul olmaktan yoruldunuz
mu? ASUS DH Remote ile kanepenizde otururken flark›lar› çalabilir, duraklatabilir
veya sesini ayarlayabilirsiniz. DH Remote'u elinize al›n ve PC'niz ile uzaktan daha
fazlas›n› yap›n!
ASUS DH Remote'a Genel Bak›fl
1. Güç
5. Gürültü Kapal›
2. H›zl› Güç
6. EZ WiFi
3. Tam Ekran
7. Uygulama Bafllatma
Ses Art›r
Çal / Duraklat
4. Medya Kontrol
‹leri
Bölgesi
Önceki
Ses Azalt
1. Güç: Bilgisayar› açar/kapat›r
2. H›zl› Güç: Bilgisayar› h›zl› bir flekilde S3 olarak adland›r›lan uyku moduna geçirir
3. Tam Ekran: Medya uygulamas›n› tam ekrana geçirir
4. Medya Kontrol Bölgesi: Medya uygulamas›n› kontrol eder
5. Gürültü Kapal›: Bilgisayardan gelen gürültüyü düflürür
TM
6. EZ WiFi: Bilgisayar› uyku moduna gecirir, fakat WiFi-APSolo
'in çal›flmaya devam
etmesine olanak sa¤lar
7. Uygulama Bafllatma: Medya uygulamas›n› bafllat›r
• H›zl› Güç'ü kullanmak için ilk olarak verilerinizi kaydedin.
• Gürültü Kapal› modu sadece kelime ifllemci veya web sayfas› taramas› gibi
bilgisayara afl›r› yüklenmeyen uygulamalar için uygundur ve fan h›z›n› sistem
yüküne göre ak›ll› bir flekilde ayarlayacakt›r.
• Farkl› sistem ekipmanlar› (VGA, PSU, kasa fan› say›s›) Gürültü Kapatma etkisi
üzerinde çal›flacakt›r.
• *Fan h›z› kontrol edilebilir VGA kart› veya fans›z VGA kart› kullan›rken, daha
iyi Gürültü Kapatma efekti elde etmek için güç fan›n› ve kasa fan kablosunu
anakarttaki fan konektörüne ba¤lamay› unutmay›n.
*Tüm güç besleme cihazlar›nda fan konektörleri bulunmamaktad›r, ayr›nt›lar için
anakart kullan›m k›lavuzuna bak›n›z.
Türkçe
EZ-WiFi modu özellikle PC'den uzakta oldu¤unuzda ve bu durumda iken veri
indirmek, kablosuz uygulamalar gibi ayg›tlar› ve Skype telefonunu kullanmak
istedi¤inizde kullan›labilir. EZ-WiFi ifllevini engellemek için EZ-WiFi ifllevi dü¤mesine
bas›n.
2
DH Remote

Türkçe
DH Remote
3
ASUS >>USB receiver
USB receiver
Enfraruj Al›c› Kurulumu
USB IR Al›c›s›
Anakart›n›z IR Al›c›n›z ile birlikte gelir, USB ucunu PC'nizin LAN2 giriflinin alt›ndaki
USB girifline tak›n ve IR al›c›s›n›n ucunu engellemeden uygun bir yere yerlefltirin.
IR Al›c›s›
USB ucu
USB Girifli
Enfraruj ucu
• Geçerli IR ifllevi mesafesi, çevreye ba¤l› olarak 6m'dir. Sorunsuz ve baflar›l›
bir çal›flma elde etmek için ASUS DH Remote'u kullan›rken IR al›c›s›na
yönlenmenizi öneririz.
• Bu iki USB girifli USB uyand›rma kapasitesini desteklemektedir. Dolay›s›yla
bilgisayar›n›z aç›ld›¤›nda, ASUS IR al›c›s› gibi USB ayg›tlar›n› bu iki giriflten
ç›kar›rken PC çal›flacakt›r.
• Arka I/O anakartlara ba¤l› olarak farkl›l›k gösterir.
• Destekledi¤i iflletim sistemi: Windows XP, 2003 server, XP (64-bit) ve 2003
server (64-bit).
Yaz›l›m Kurulumu
ASUS DH Remote'un size getirdi¤i
güvenilir çal›flma ortam› öncesinde enfraruj
al›c›s› kurulumu gerçeklefltirdikten sonra
yaz›l›m› kurman›z gerekmektedir. ‹lk önce
Anakart Destek CD paketinin Programlar
menüsündeki ASUS DH Remote'a t›klay›n
ve kurun ve PC'nizi her aç›fl›n›zda otomatik
olarak aç›lacakt›r.
ASUS DH Remote
Yard›mc› Programlar ekran› anakart›n›za ba¤l› olarak farkl›d›r.¤l› olarak farkl›d›r.l› olarak farkl›d›r.

HID ile Uyumlu Ayg›tlar›n Etkinlefltirilmesi
‹flletim sistemindeki k›s›tlar nedeniyle, IR al›c›s›n› önceki giriflten ç›kar›r ve di¤er
USB girifline kurarsan›z, IR al›c›s› çal›flmayacakt›r. HID ile uyumlu ayg›t› yeniden
etkinlefltirmek için, Ayg›t Yöneticisi/Güç Yöneticisi'ne gidin ve Bilgisayar›
beklemeden ç›karmak için bu ayg›ta izin ver kutusunu iflaretleyin.
1. Bafllat'a ve Kontrol'ü seçin.
2. Sstem Paneli'ne çift t›klay›n.
3. Donan›m'a t›klay›n.
4. Ayg›t Yöneticisi'ne t›klay›n.
Türkçe
5. HID ile uyumlu ayg›tlar'›
6. Bilgisayar› beklemeden
seçin.
ç›karmak için bu ayg›ta
izin ver kutusunu iflaretleyin.
4
DH Remote
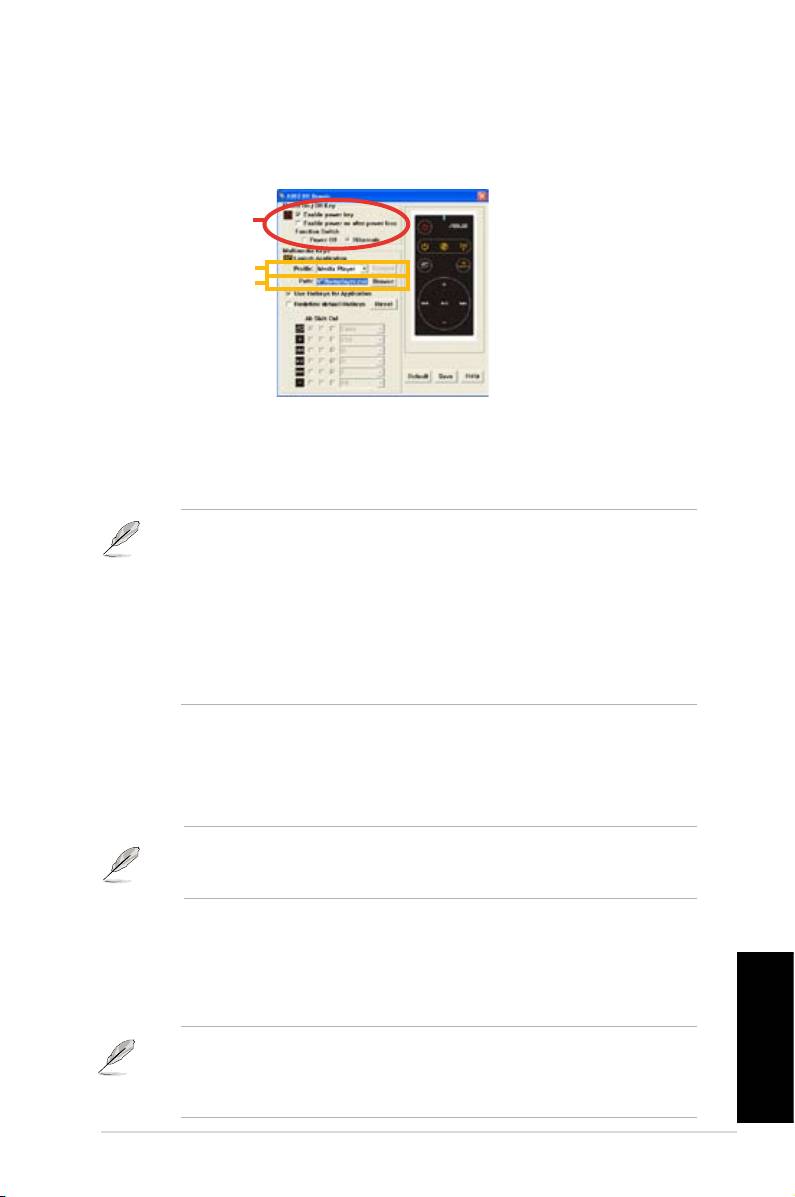
ASUS DH Remote Ayarlar›
ASUS DH Remote yaz›l›m›n› kurduktan sonra, yard›mc› program ekran› görünecek
ve ASUS DH Remote ayarlar›n› yapman›za olanak sa¤layacakt›r. ‹fllev anahtarlar›n›
ad›m ad›m gerçeklefltirin.
1
2
3
1. Güç Açma/Kapama Anahtar›
Bu ö¤enin Derin Uyku'ya ayarlanmas›, PC'nizin WindowsS4 moduna geçmesine
olanak sa¤lar, bu da PC'nizin Derin Uykuya daha h›zl› geçmesine olanak sa¤lar ve
tam güç moduna daha h›zl› flekilde döner.
• PC'nizi açmak ve kapatmak ya da derin uyku moduna geçirmek için ASUS
DH Remote'u kullanmadan önce Güç Anahtar›n› Etkinlefltir kutusunu
iflaretlemeniz gerekmektedir. Derin uyku hakk›nda bilgi almak için www.
microsoft.com adresini ziyaret edin.
• Güç Açma/Kapama dü¤mesi MS-DOS Modunu desteklemez.
• Güç kayb› ‹fllev Anahtar›n›n ard›ndan güç açmay› etkinlefltir
kutusunu iflaretleyin. PC'nizin güçkablosu ç›k›fltan ç›kar›ld›¤›nda veya
güç ar›zas› oldu¤unda, PC'niz otomatik olarak yeniden bafllayacak ve
güç beslemesi geri geldikten sonra DH Remote'un Güç Açma ifllevini
etkinlefltirmek için birkaç saniye içinde kapanacakt›r.
Multimedya Tufllar›
2. Prol
Prol indirmeli menüsünde dokuz varsay›lan uygulama ile birlikte befl User
Dene Kullan›c› Tan›ml› ayar› bulunmaktad›r.
Media Player, iTunes, PowerDVD, WinDVD, QuickTime, Real Player, DivX
Player, WinAmp ve Power Point varsay›lan uygulamalard›r. (ASUS DH Remote
yaz›l›m›ndaki varsay›lan uygulamalar önceden haber verilmeden de¤ifltirilebilir.)
3. Yol
Yaz›l›m, dokuz varsay›lan uygulaman›n yürütülebilir (.exe) dosyas›n› bulacakt›r.
.exe dosyas› bulunamazsa, do¤ru yolu bulmak için Gözat'a t›klay›n. Kullan›c›
Tan›ml› uygulamalar›n .exe dosyalar› ASUS DH Remote'u kullanmadan önce
manüel olarak bulunmal›d›r.
• .exe dosya yolu yönlendirildikten sonra kaydedin.
• Yürütülebilir dosya tekrar bulunduysa veya uygulama yeniden kurulduysa,
Türkçe
do¤ru ASUS DH Remote uygulamas› için dosya yolunu yeniden
yönlendirmeniz gerekir.
DH Remote
5
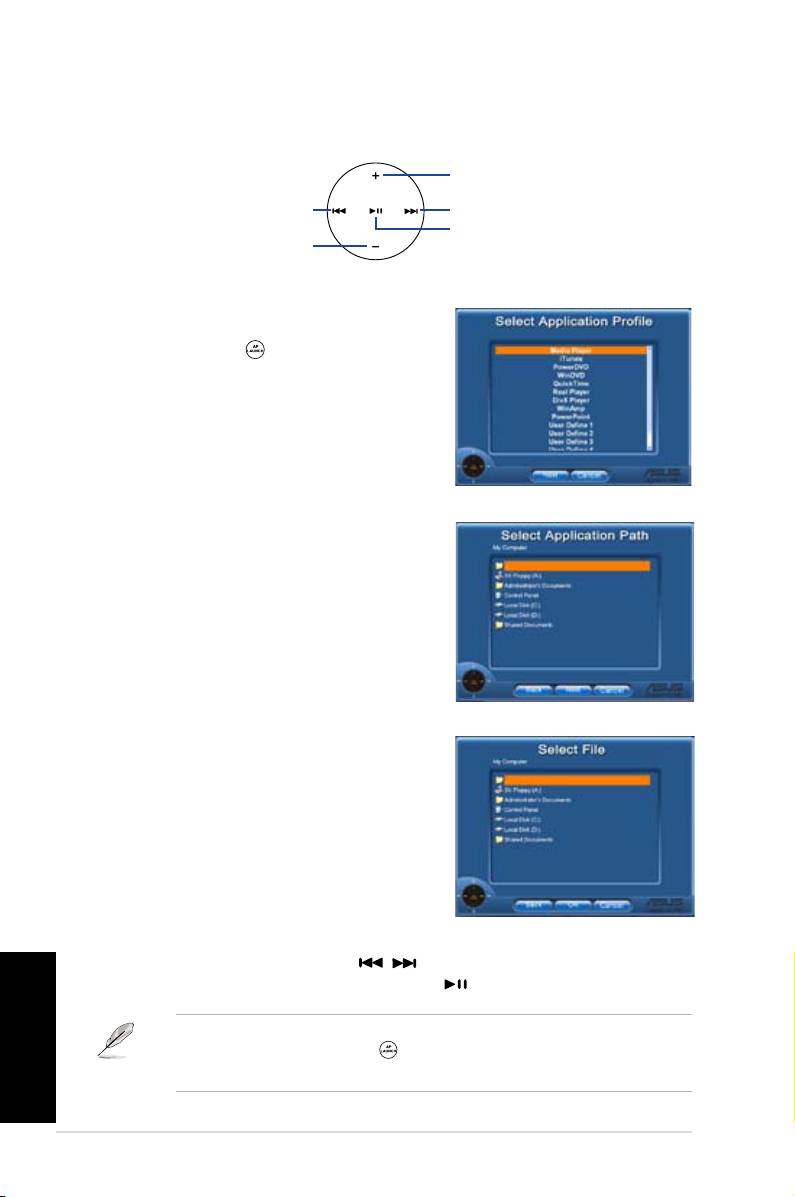
AP Bafllat Dü¤mesi ve AP Bafllat Menüsü
Medya kontrol bölgesi ile gezinti.
Yukar›ya
Sola
gir
Sa¤a
afla¤›ya
Uygulama proli seç
Uzaktan kumandada dü¤mesine bastıktan
sonra ekranda bir uygulama profili belirecektir. belirecektir.
Uygulama Yolu Seç
Yaz›l›m uygulaman›n yürütülebilir dosyas›n›
ilk kullan›mda bulamazsa, Uygulama Yolu
Seç ekran› belirecektir. Do¤ru yolu ekranda
belirleyin.
Dosya Seç
Do¤ru yolu seçtikten sonra, uygulamay›
bafllatmak için uygulaman›n do¤ru yürütülebilir
dosyas›n› (.exe) seçmeniz gerekmektedir.
Yürütülebilir dosya yaz›l›m taraf›ndan baflar›yla
bulunursa veya önceden do¤ru bir flekilde
kurarsan›z, uygulama seçildi¤inde do¤rudan
bu ekran görünecektir. ‹stedi¤iniz dosyay›,
klasörü veya CD ROM'u seçtikten sonra,
Geri / Tamam / ‹ptal seçmek için /
dü¤melerini kullan›n ve ard›ndan onaylamak için dü¤mesine bas›n
Türkçe
• Müzik dinlemek için önceden çalma listelerinin oluflturulmas› önerilir.
• Uygulamay› kapatmak için dü¤mesine tekrar bas›n ve¤mesine tekrar bas›n vemesine tekrar bas›n ve
profil
menüsünü
yeniden bafllatmak için ise bir daha bas›n.
6
DH Remote

Uygulama için H›zl› Eriflim Tufllar›n›n Tan›mlanmas›
Varsay›lanlar›n haricindeki uygulamalar› kontrol etmek için ACDSee gibi Medya
Kontrol Alan›n› kullanmak isterseniz, indirmeli menüden Kullan›c› Tan›ml›'y›
seçebilir ve Yeniden Adland›r'a basarak ad›n› de¤ifltirebilirsiniz. ASUS DH¤ifltirebilirsiniz. ASUS DHifltirebilirsiniz. ASUS DH
Remote yaz›l›m› dokuz s›k kullan›lan uygulamay› do¤ru flekilde kurmufl ve güvenilir¤ru flekilde kurmufl ve güvenilirru flekilde kurmufl ve güvenilir
çal›flma için ifllev dü¤melerini tan›mlam›flt›r.¤melerini tan›mlam›flt›r.melerini tan›mlam›flt›r.
Kullan›c› Tan›ml›
Uygulama için H›zl› Eriflim Tufllar›n› Kullan kutusuna t›klad›ktan sonra,
Kullan›c› Tan›ml› uygulamalar›n h›zl› eriflim tufllar›n› tan›mlamakta özgürsünüzdür.
H›zl› eriflim tan›m› için Prol indirmeli menüsünden Kullan›c› Tan›ml› 1~5'i
seçin. Yeni ayar› kaydetmek için Kaydet'e bas›n veya kiflisellefltirilen TÜM ayarlar›
temizlemek için Varsay›lan dü¤mesine bas›n ve orijinal tan›mlara geri yükleyin.
• Uzaktan kumanda dü¤meleri sadece uygulama h›zl› eriflim tufllar›n›n
tan›mlar› do¤ru oldu¤unda ifllevini yerine getirecektir.
• H›zl› eriflim tan›mlar› farkl› yaz›l›m sürümlerinde farkl› olabilir. Gerekti¤inde yeni
do¤ru tan›mlar› vermek için Varsay›lan h›zl› eriflim tufllar›n› yeniden
tan›mla kutusuna t›klay›n. Yenilenen tan›mlamalar› kaydetmek için Kaydet
dü¤mesine t›klay›n veya varsay›lan h›zl› eriflim tan›m›n› geri yüklemek için
S›f›rla dü¤mesine t›klay›n.
‹lk ayar sonras›, Windows ‹flletim Sistemi görev çubu¤unda ASUS DH Remote
Türkçe
simgesini bulacaks›n›z. Simgeye t›klay›n ve program ekran›n› bafllatmak için
Ayarlar'› seçin.
DH Remote
7
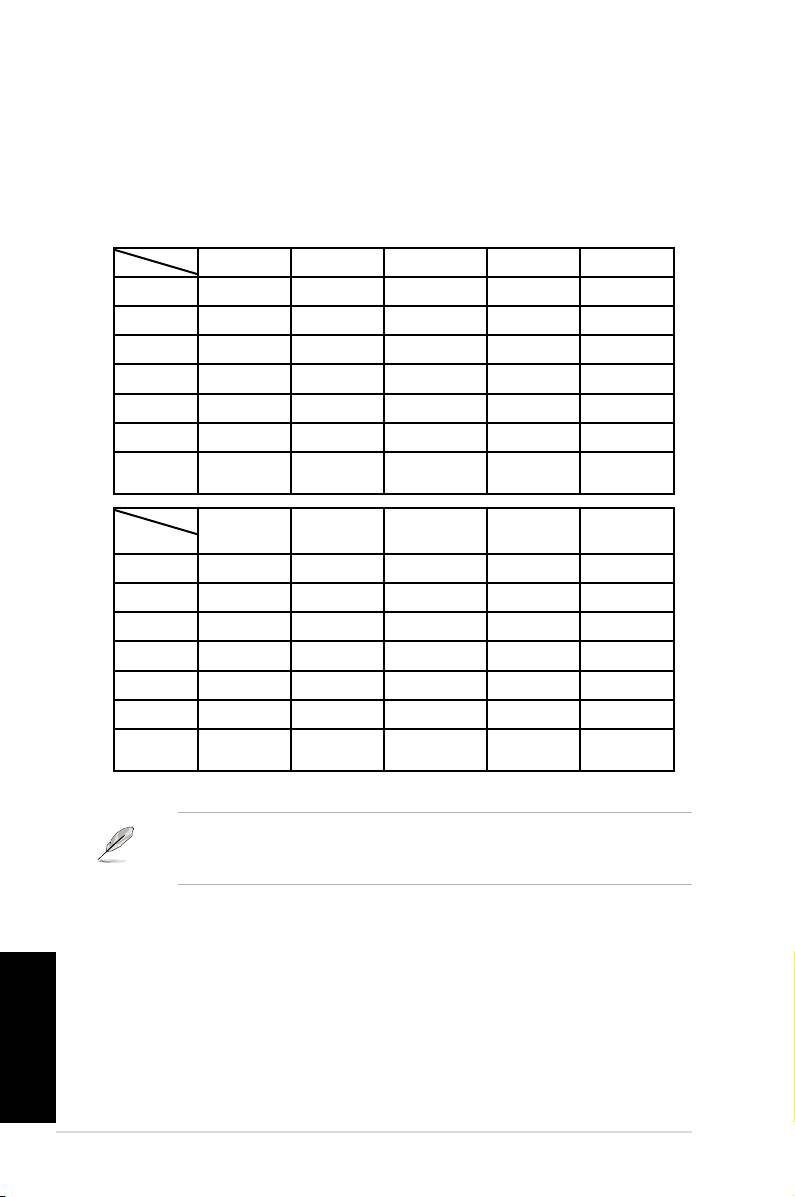
Ek
‹fllev Dü¤meleri ve AP Proli
ASUS DH Remote yaz›l›m› uzaktan kumandadaki ifllevler aras›ndaki iliflkileri dokuz s
›k kullan›lan uygulamadaki ifllev h›zl› eriflim tufluna önceden ayarlaman›za olanak sa
¤lar ve befl ayar›lar ve befl ayar› Kullan›c› Tan›ml›'ya b›rak›r.
Media Player iTunes PowerDVD WinDVD QuickTime
Tam Ekran v v v v v
Çal/Duraklat v v v/x v v
Ses+ v v v v v
Ses v v v v v
Knl+ v v v v x
Knl v v v v x
*NOT
Sadece çal,
duraklatma yok
Real Player DivX Player WinAmp Power Point Kullan›c› Tan›
ml›
Tam Ekran v v x v
Çal/Duraklat v v v/x Tam Ekran
Ses+ v x v B
Ses v x v ESC
Knl+ v x v Sayfa Afla¤›¤››
Knl v x v Sayfa Yukar›
*NOT
Sadece çal,
duraklatma yok
9 varsay›lan uygulamay› da yetersiz bulursan›z ve farkl› uygulamalar eklerseniz,
5 Kullan›c› Tan›ml› ayar› yeniden adland›rabilir ve tercih etti¤iniz uygulamalar›
ve s›k kulland›¤›n›z ayarlar› oluflturabilirsiniz.
Türkçe
8
DH Remote
