Yamaha A-S700: PLAYING AND RECORDING
PLAYING AND RECORDING: Yamaha A-S700
OPERATION
PLAYING AND RECORDING
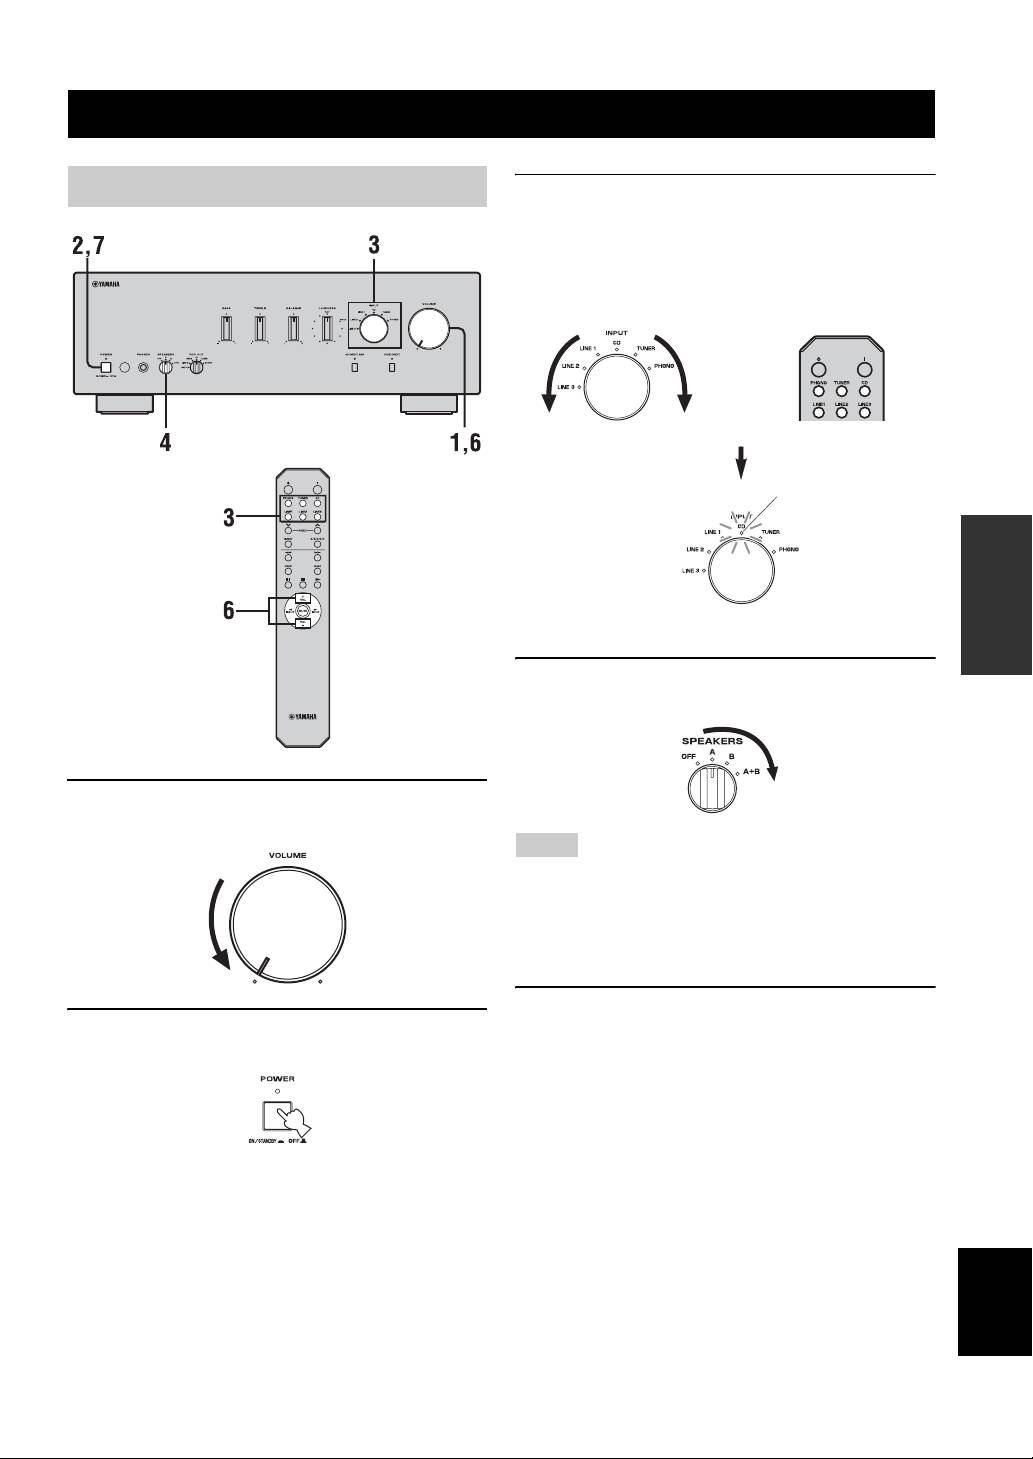
Playing a source
3 Rotate the INPUT selector on the front panel
(or press one of the input selector buttons on
the remote control) to select the input source
you want to listen to.
The indicator of the selected input source lights up.
or
Front panel Remote control
Lights up
OPERATION
4 Rotate the SPEAKERS selector on the front
panel to select SPEAKERS A, B or A+B.
1 Rotate VOLUME on the front panel to the
extreme counterclockwise position.
Notes
• Switch the SPEAKERS selector to the A+B position when
making bi-wire connections, or when using two sets of speakers
simultaneously (A and B).
• If you listen with headphones, rotate the selector to the OFF
position.
5 Play the source.
2 Press POWER on the front panel inward to
the ON position.
English
9 En
PLAYING AND RECORDING
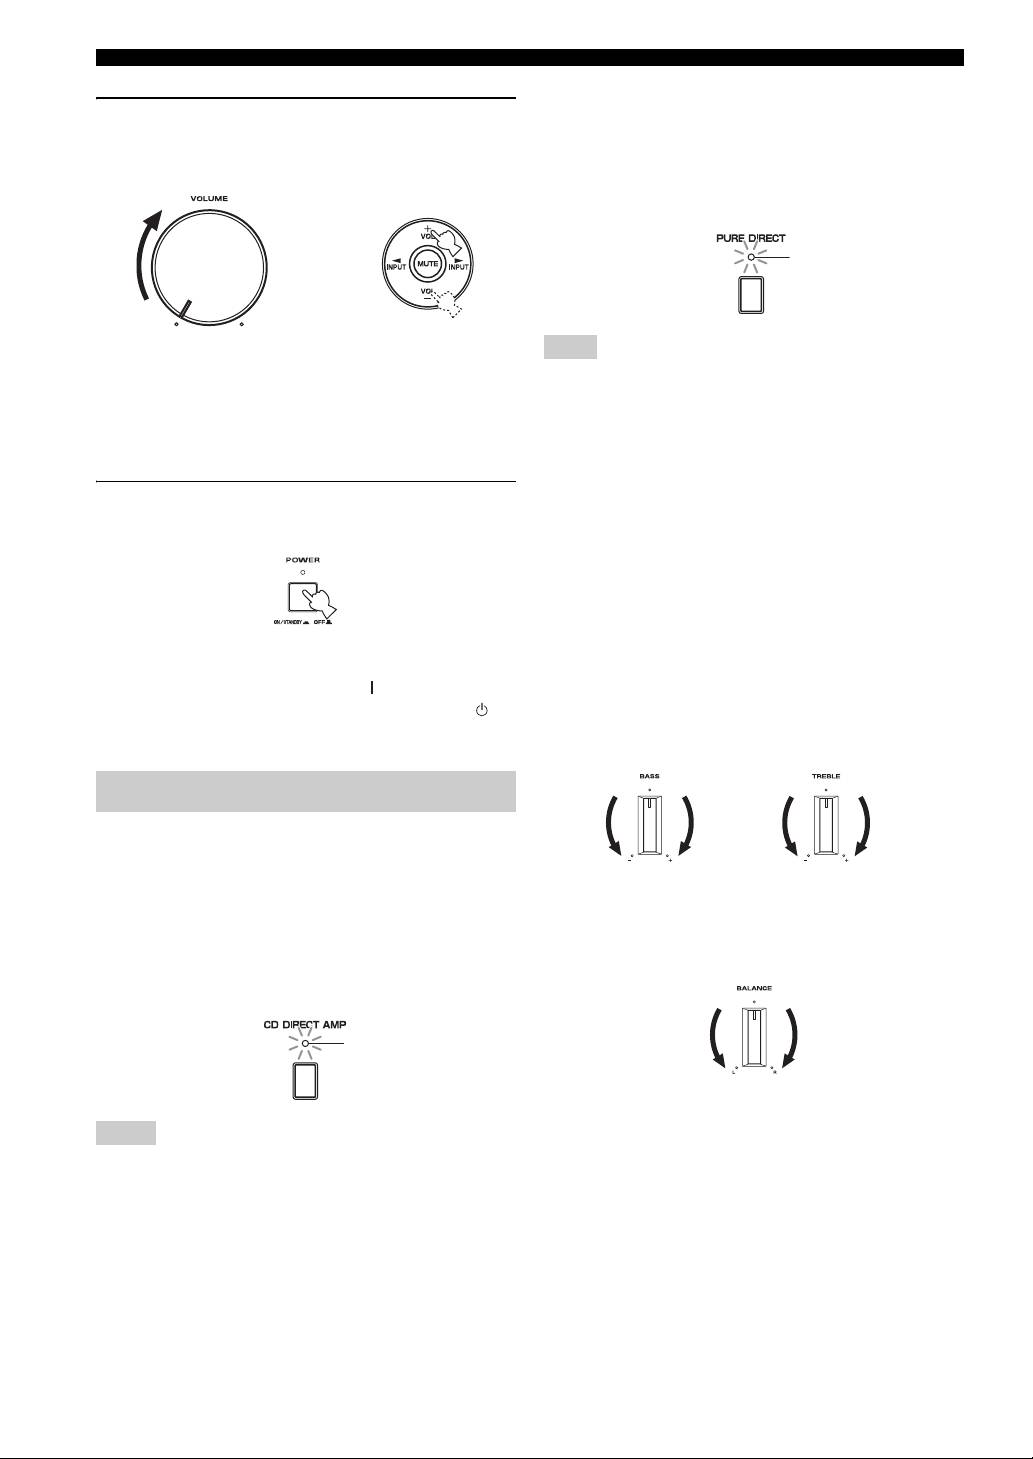
■ Using the PURE DIRECT switch
6 Rotate VOLUME on the front panel (or press
Routes input signals from your audio sources. As a result,
VOL +/– on the remote control) to adjust the
the input signals bypass the BASS, TREBLE, BALANCE
sound output level.
and LOUDNESS controls, thus eliminating any alterations
to the audio signals to produce more direct and high-grade
sound from all input sources.
Lights up
or
Remote controlFront panel
Note
The BASS, TREBLE, BALANCE and LOUDNESS controls do
y
not function while the PURE DIRECT switch is turned on.
You can adjust the tonal quality by using the BASS, TREBLE,
BALANCE and LOUDNESS controls, the CD DIRECT AMP
■ Adjusting the BASS and TREBLE
switch, or the PURE DIRECT switch on the front panel.
controls
Adjust the high and low frequency response.
7 After using, press POWER on the front panel
The center position produces a flat response.
to turn off the power.
BASS
When you feel a lack of bass sound, rotate clockwise to
boost. When you feel excessive bass sound, rotate
counterclockwise to suppress.
Control range: –10 dB to +10 dB (20 Hz)
y
TREBLE
You can turn on the power by pressing the button on the remote
When you feel a lack of treble sound, rotate clockwise to
control if you set this unit to standby mode by pressing the
boost. When you feel excessive treble sound, rotate
button on the remote control.
counterclockwise to suppress.
Control range: –10 dB to +10 dB (20 kHz)
Adjusting the tonal quality
■ Using the CD DIRECT AMP switch
Routes input signals directly to the power amplifier from
your CD player, regardless of the INPUT selector setting.
■ Adjusting the BALANCE control
As a result, the input signals bypass the INPUT selector
and the BASS, TREBLE, BALANCE and LOUDNESS
Adjust the sound output balance of the left and right
speakers to compensate for sound imbalance caused by
controls. The gain is also adjusted appropriately for CD so
that the purest possible sound is reproduced without any
speaker locations or listening room conditions.
alterations to the CD signals.
Lights up
Notes
• The BASS, TREBLE, BALANCE, LOUDNESS controls and
INPUT selector do not function while the CD DIRECT AMP
switch is turned on.
• Be sure to connect the CD player to the CD input jacks if you
use the CD DIRECT AMP switch.
10 En
PLAYING AND RECORDING
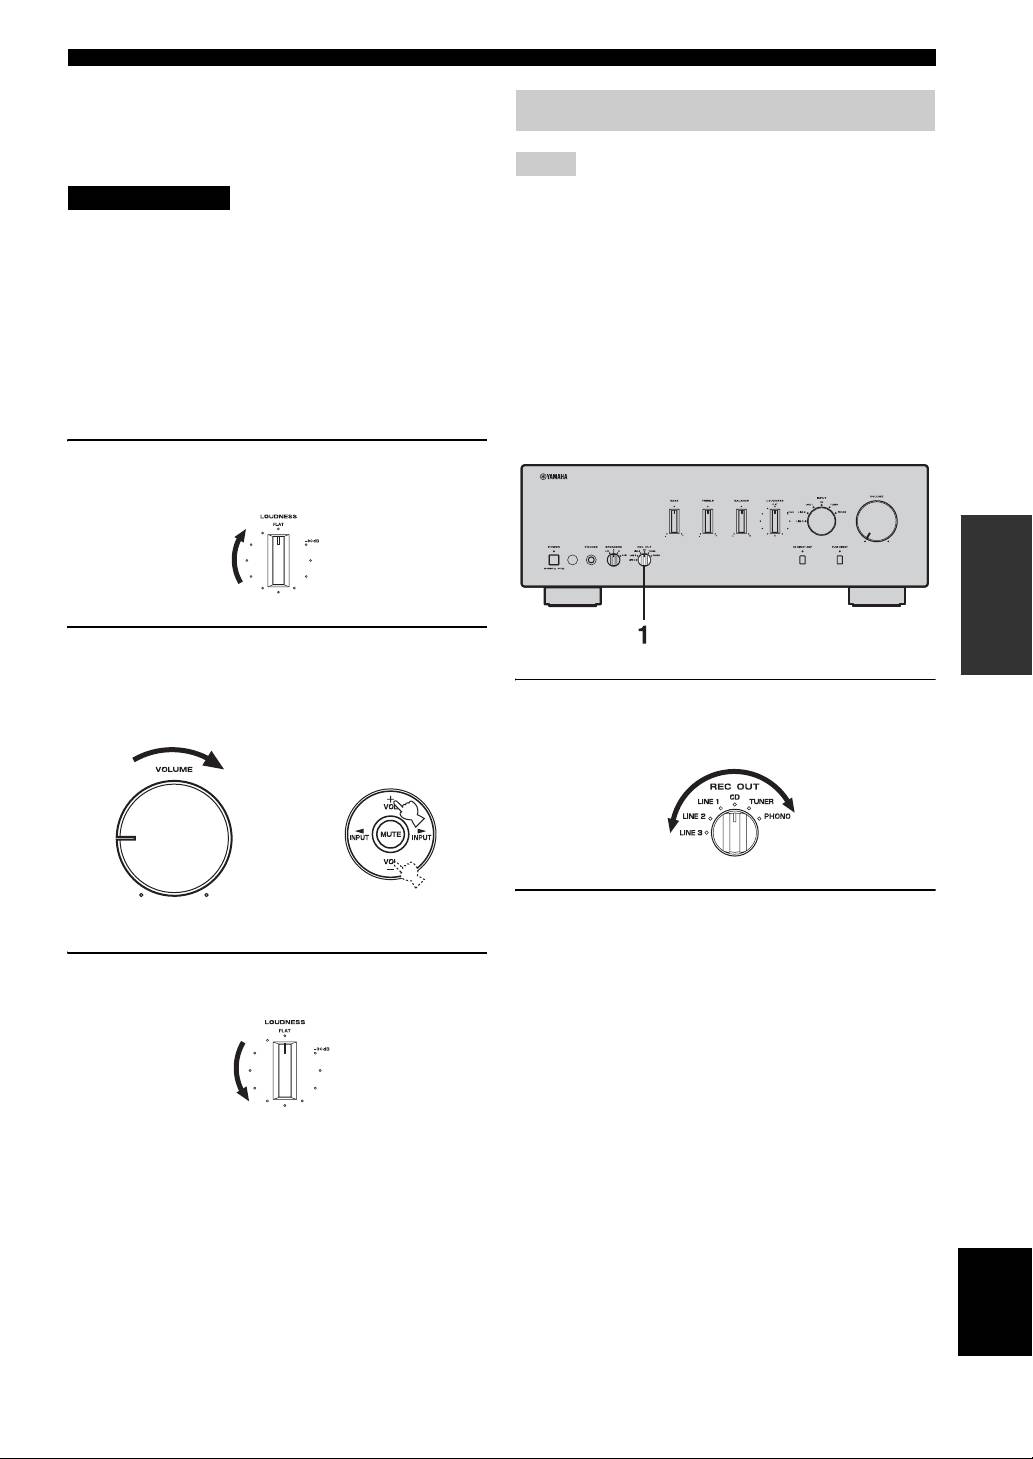
■ Adjusting the LOUDNESS control
Retain a full tonal range at any volume level, thus
Recording a source
compensating for the human ears’ loss of sensitivity to
high and low-frequency ranges at low volume.
Notes
CAUTION
• The audio signals are not output via the LINE 2 REC or LINE 3
REC output jacks when LINE 2 or LINE 3 is selected with the
If the CD DIRECT AMP switch (or the PURE DIRECT
REC OUT selector.
switch) is turned on with the LOUDNESS control set at a
The audio signals are output at both LINE 2 REC and LINE 3
certain level, the input signals bypass the loudness control,
REC output jacks if you select PHONO, TUNER, CD or LINE
resulting in a sudden increase in the sound output level. To
1.
• The VOLUME, BASS, TREBLE, BALANCE and
prevent your ears or the speakers from being damaged, be
LOUDNESS controls and the CD DIRECT AMP switch (and
sure to press the CD DIRECT AMP switch (or the PURE
the PURE DIRECT switch) have no effect on the source being
DIRECT switch) AFTER lowering the sound output level
recorded.
or AFTER checking that the LOUDNESS control is
• Check the copyright laws in your country to record from
properly set.
records, CDs, radio, etc. Recording copyright-protected
material may infringe on copyright laws.
1 Set the LOUDNESS control to the FLAT
position.
OPERATION
2 Rotate VOLUME on the front panel (or press
VOL +/– on the remote control) to set the
sound output level to the loudest listening
1 Rotate the REC OUT selector on the front
level that you would listen to.
panel to select the source you want to
record.
or
Remote controlFront panel
2 Play the source and begin recording on
recording device connected to the REC
output jacks (LINE 2 and/or LINE 3) on the
3 Rotate the LOUDNESS control until the
rear panel. See page 6.
desired volume is obtained.
y
• If you select the same source with the INPUT selector as you
select with the REC OUT selector, you can monitor the
recording.
• To listen to another input source without affecting the current
record out signal, select the source with the INPUT selector.
y
After setting the LOUDNESS control, enjoy listening to music at
your preferred volume level by controlling VOLUME. If the
effect of the loudness control is too strong or weak, readjust the
LOUDNESS control.
English
11 En
Оглавление
- CAUTION: READ THIS BEFORE OPERATING YOUR UNIT.
- CONTENTS
- CONTROLS AND FUNCTIONS
- CONNECTIONS
- PLAYING AND RECORDING
- TROUBLESHOOTING
- SPECIFICATIONS
- ATTENTION : VEUILLEZ LIRE CE QUI SUIT AVANT D’UTILISER L’APPAREIL.
- TABLE DES MATIÈRES
- COMMANDES ET FONCTIONS
- RACCORDEMENTS
- LECTURE ET ENREGISTREMENT
- GUIDE DE DÉPANNAGE
- CARACTÉRISTIQUES TECHNIQUES
- VORSICHT: VOR DER BEDIENUNG DIESES GERÄTES DURCHLESEN.
- INHALT
- BEDIENELEMENTE UND IHRE FUNKTIONEN
- ANSCHLÜSSE
- WIEDERGABE UND AUFNAHME
- STÖRUNGSBEHEBUNG
- TECHNISCHE DATEN
- OBSERVERA: LÄS DETTA INNAN ENHETEN TAS I BRUK.
- INNEHÅLL
- REGLAGE OCH FUNKTIONER
- ANSLUTNINGAR
- SPELA UPP OCH SPELA IN
- FELSÖKNING
- TEKNISKA DATA
- ATTENZIONE: PRIMA DI USARE QUEST’UNITÀ.
- INDICE
- COMANDI E FUNZIONI
- COLLEGAMENTI
- RIPRODUZIONE E REGISTRAZIONE
- RISOLUZIONE DEI PROBLEMI
- DATI TECNICI
- PRECAUCIÓN: LEA LAS INDICACIONES SIGUIENTES ANTES DE UTILIZAR ESTE APARATO.
- ÍNDICE
- CONTROLES Y FUNCIONES
- CONEXIONES
- REPRODUCCIÓN Y GRABACIÓN
- SOLUCIÓN DE PROBLEMAS
- ESPECIFICACIONES
- LET OP: LEES HET VOLGENDE VOOR U DIT TOESTEL IN GEBRUIK NEEMT.
- INHOUD
- REGELAARS EN HUN FUNCTIES
- AANSLUITINGEN
- AFSPELEN EN OPNEMEN
- PROBLEMEN OPLOSSEN
- TECHNISCHE GEGEVENS
- ПРЕДУПРЕЖДЕНИЕ: ВНИМАТЕЛЬНО ИЗУЧИТЕ ЭТО ПЕРЕД ИСПОЛЬЗОВАНИЕМ АППАРАТА.
- СОДЕРЖАНИЕ
- ОРГАНЫ УПРАВЛЕНИЯ И ФУНКЦИИ
- СОЕДИНЕНИЯ
- ВОСПРОИЗВЕДЕНИЕ И ЗАПИСЬ
- ВОЗМОЖНЫЕ НЕИСПРАВНОСТИ И СПОСОБЫ ИХ УСТРАНЕНИЯ
- ТЕХНИЧЕСКИЕ ХАРАКТЕРИСТИКИ
