Yamaha NS-F150 Black/Gloss: инструкция
Раздел: Видео Аудио Фото Оборудование
Тип: Напольная Колонка
Характеристики, спецификации
Инструкция к Напольной Колонке Yamaha NS-F150 Black/Gloss

G
English Français Deutsch Español Русский
Speaker
Enceinte
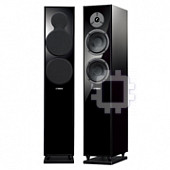
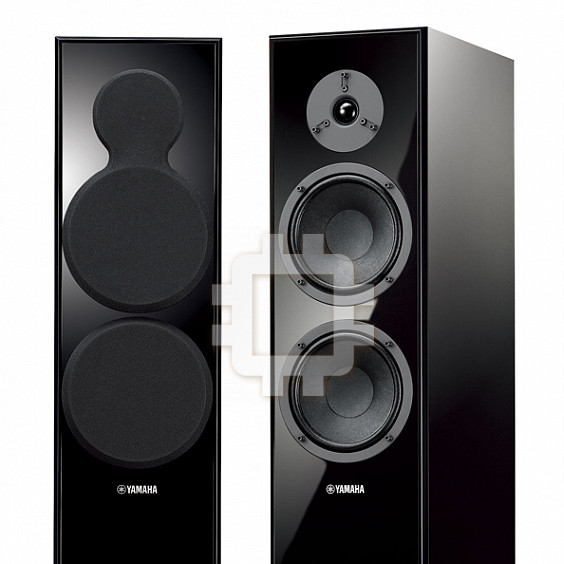
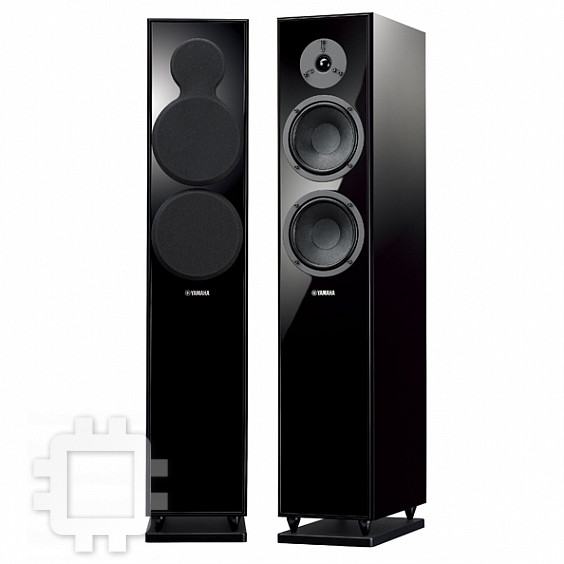
NS-F150 / NS-F140
Owner’s Manual
Mode d’emploi
Bedienungsanleitung
Manual De Instrucciones
Инструкция По Эксплуатации
Precautions
Please read the following operating precautions before use. Yamaha will not be held responsible for any damage and/or
injury caused by not following the cautions below.
F
1. To assure the finest performance, please read this
Information for Users on Collection and Disposal
manual carefully. Keep it in a safe place for future
of Old Equipment
reference.
2. Install the speakers in a cool, dry, clean place – away
This symbol on the products, packaging,
from windows, sources of heat, sources of excessive
and/or accompanying documents means
vibration, dust, moisture or cold. Avoid sources of
that used electrical and electronic
electrical humming (e.g., transformers and motors). To
products should not be mixed with
prevent fire or electric shock, do not expose the
general household waste.
speakers to rain or water.
3. To prevent the enclosure from warping or discoloring,
For proper treatment, recovery and
do not expose the speakers to direct sunlight or
recycling of old products, please take
excessive humidity.
them to applicable collection points, in
4. Avoid installing the speakers where foreign objects may
accordance with your national legislation
fall onto them and/or where they may be exposed to
and the Directives 2002/96/EC.
liquid dripping or splashing.
5. Do not place the following objects on top of the
By disposing of these products correctly,
speakers:
you will help to save valuable resources
– Other components, as they might damage or discolor
and prevent any potential negative effects
the surface of the speakers.
on human health and the environment
– Burning objects (e.g., candles), as they might cause
which could otherwise arise from
fire, damage to the speakers or personal injury.
inappropriate waste handling.
– Containers of liquid, as they might spill and cause
For more information about collection
electric shock to the user or damage to the speakers.
6. Do not place the speakers where they are liable to be
and recycling of old products, please
knocked over or struck by falling objects. Stable
contact your local municipality, your
placement will also ensure better sound performance.
waste disposal service or the point of sale
7. Placing the speakers on the same shelf or rack as the
where you purchased the items.
turntable can result in feedback.
[Information on Disposal in other
8. Do not insert a hand or object into the port or pick up
Countries outside the European Union]
the speaker by holding the port, as it may cause
personal injury or damage to the speaker.
This symbol is only valid in the European
9. Any time you note distortion, reduce the volume control
Union. If you wish to discard these items,
on your amplifier to lower setting. Never allow your
please contact your local authorities or
amplifier to be driven into “clipping”. Otherwise, the
dealer and ask for the correct method of
speakers may be damaged.
disposal.
10. When using an amplifier with a rated output power
higher than the nominal input power of the speakers,
care should be taken not to exceed the maximum input
of the speakers.
Taking care of the speaker
11. Do not attempt to clean the speakers with chemical
When you wipe this unit, do not use chemical solvents
solvents as this might damage the finish. Use a clean,
(e.g., alcohol or thinners, etc.): this might damage the
dry cloth.
finish. Use a clean, dry cloth. For difficult soils,
12. Do not attempt to modify or fix the speakers. Contact
dampen a soft cloth in water, wring it out, and then
qualified Yamaha service personnel when service is
wipe with the cloth.
needed. The cabinet should never be opened for any
reason.
(For polish-finished model) Bumping the surface of the
13. Secure placement or installation is the owner’s
instrument with metal, porcelain, or other hard objects
responsibility. Yamaha is not liable for accidents
can cause the finish to crack or peel.
caused by improper placement or installation of
speakers.
i En
English
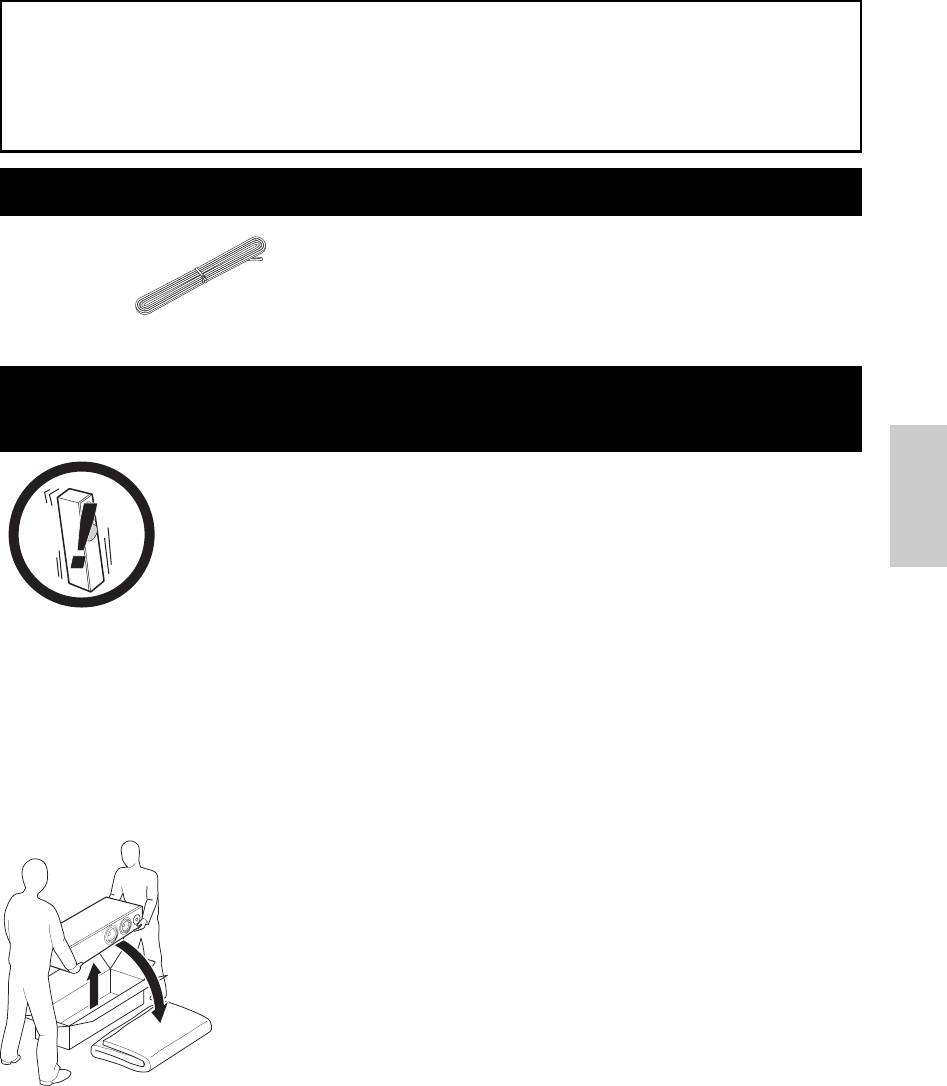
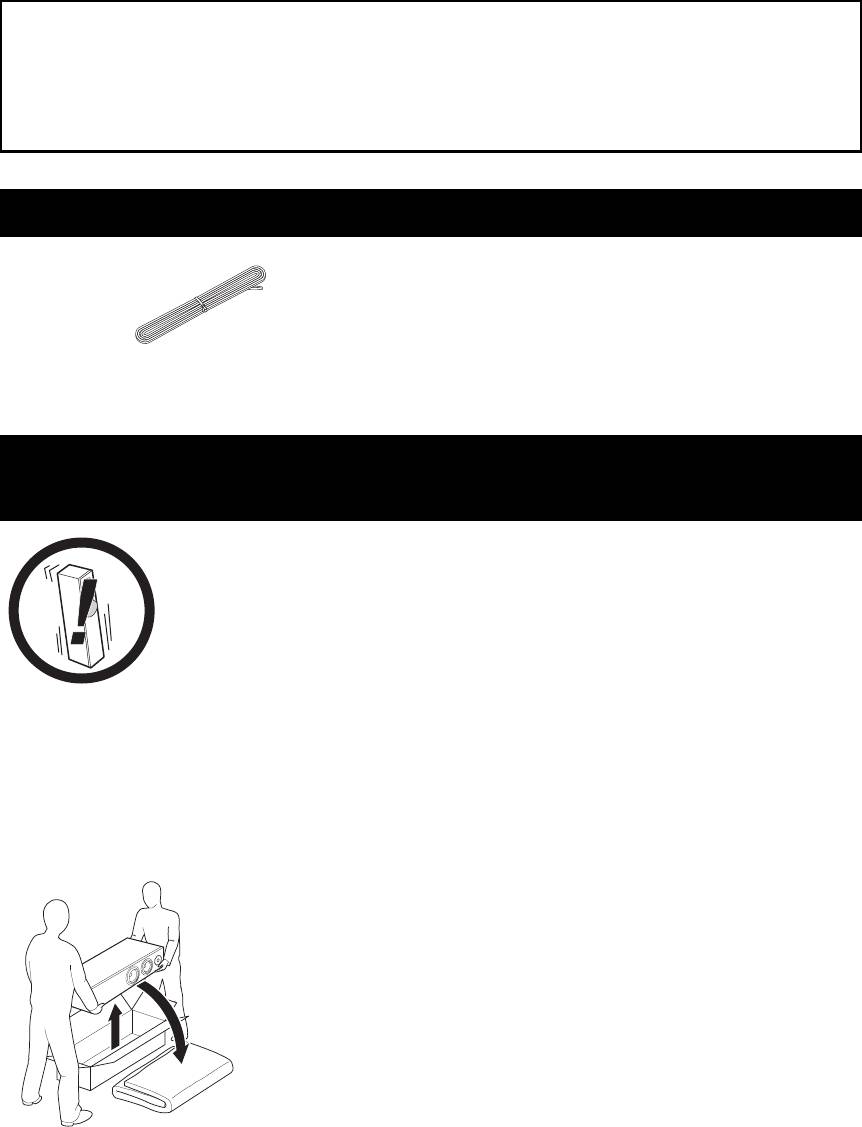
Make sure the package contains the item shown in the
illusration.
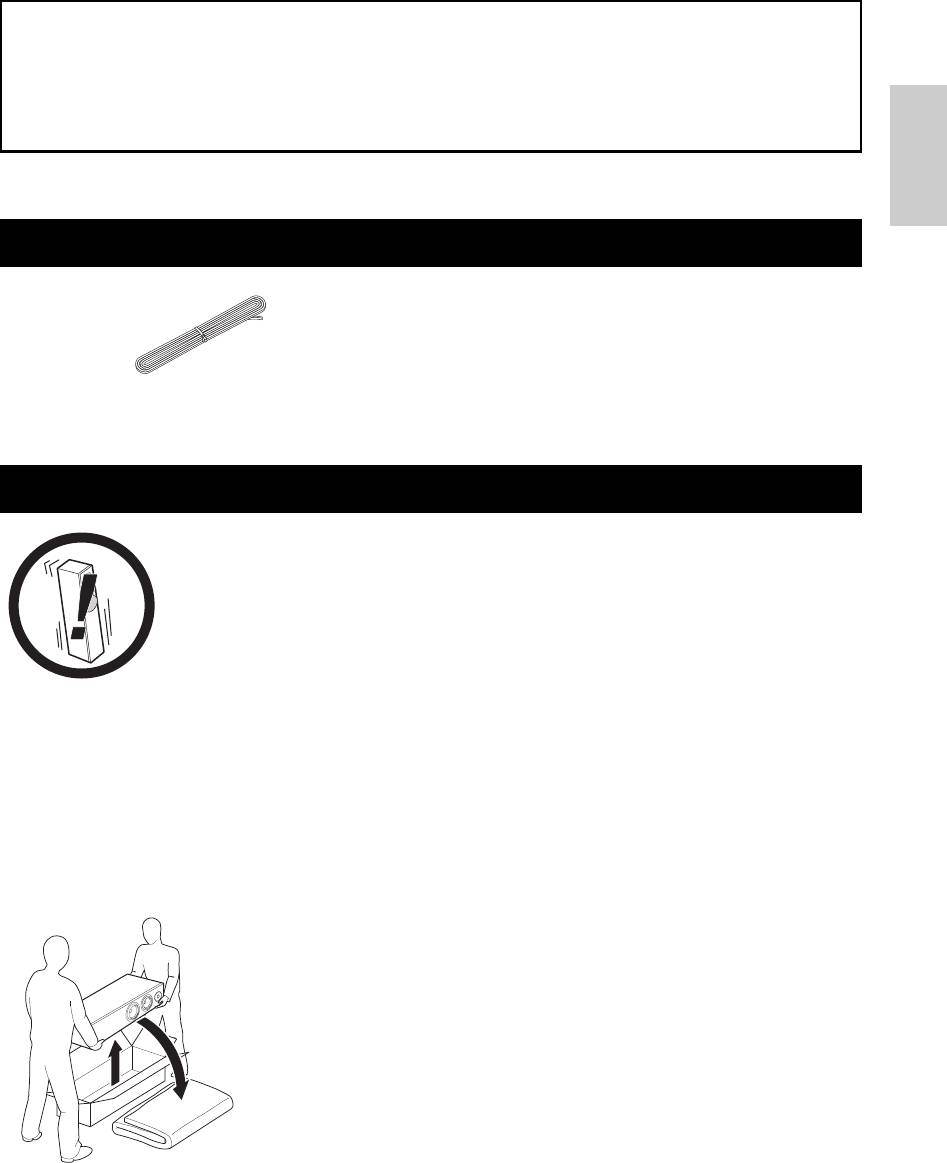
The speaker is constructed with the majority of the weight located in its upper portion, and
is thus susceptible to falling over if proper care is not taken to ensure its stability. If the
speaker tips over, the speaker or other personal property may be damaged or an individual
may be injured (possibly even fatally injured).
For safe and proper use of the speaker:
• Position the speaker in a location that is solid, level, smooth, and low (with respect to the floor).
• Do not push or apply pressure to the side of the speaker when moving, or lean objects against the side of the
speaker.
• Do not sit on or set objects on top of the speaker.
Vibrations or jolts associated with earthquakes and other phenomena or activities may cause the speaker to fall
over. For safety reasons, using commercially-available products that increase stability of the speaker is
recommended (metal fittings or chains, etc.).
Notes
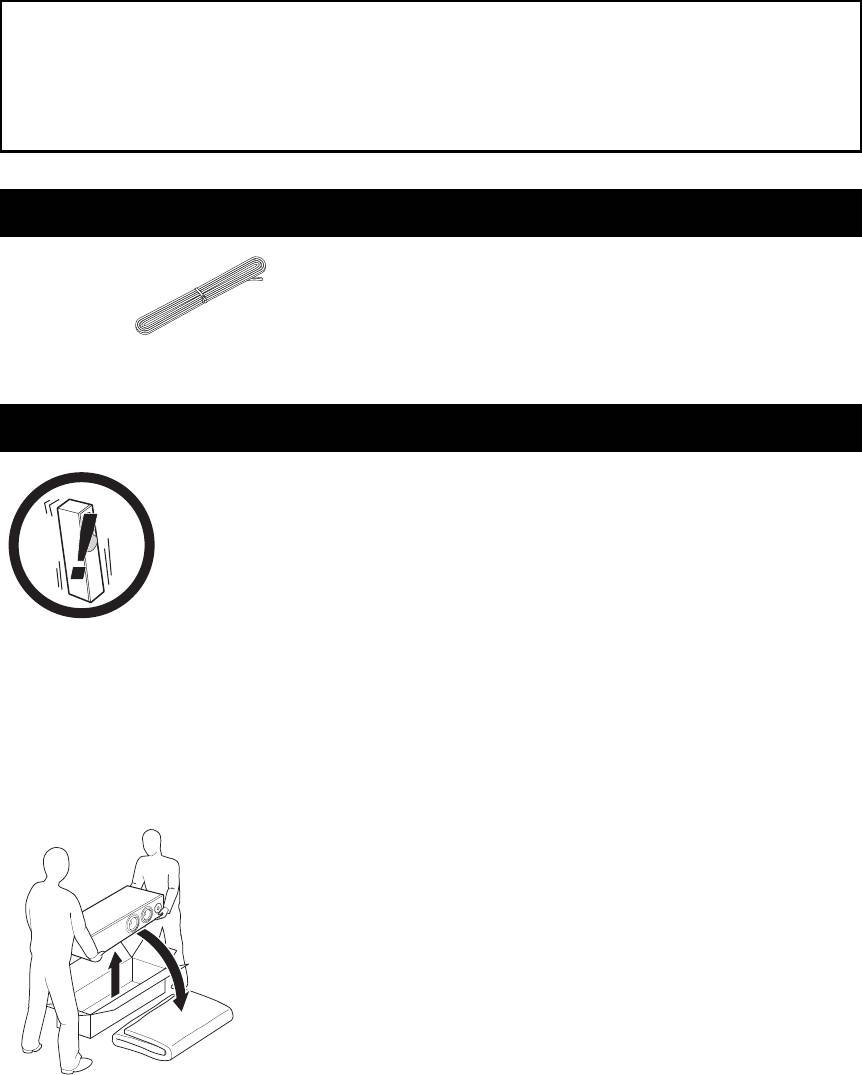
• Be sure to have another person support it.
• Pay extra attention to avoid scratching the speaker’s surface.
• Be careful not to apply force to the side of the speaker, otherwise the speaker
may fall causing damage to the speaker or personal injury.
• To avoid accidents resulting from tripping over loose speaker cables, affix
them to the floor.
• Placing this unit too close to a CRT TV set might impair picture color or
create a buzzing noise. In this case, move the speakers away from the TV. This
is not an issue with LCD and plasma TVs.
•
Only for NS-F140, you can install commercially available legs or spikes onto
the speaker to increase its stability and improve the sound quality.
Screw holes on the bottom of the speaker;
Diameter: 8 mm (1/3")
Hole depth: 18 mm (2/3")
For more information about how to install legs or spikes, refer to the
instruction manual that comes with it.
1 En
Contents
Supplied accessory.............................................1
Connecting to your amplifier........................... 3
Precautions when positioning the speakers ...1
Specifications...................................................... 4
Placing the speakers ..........................................2
Supplied accessory
Speaker cable 4 m (13.1 ft.) x1
Precautions when positioning the speakers
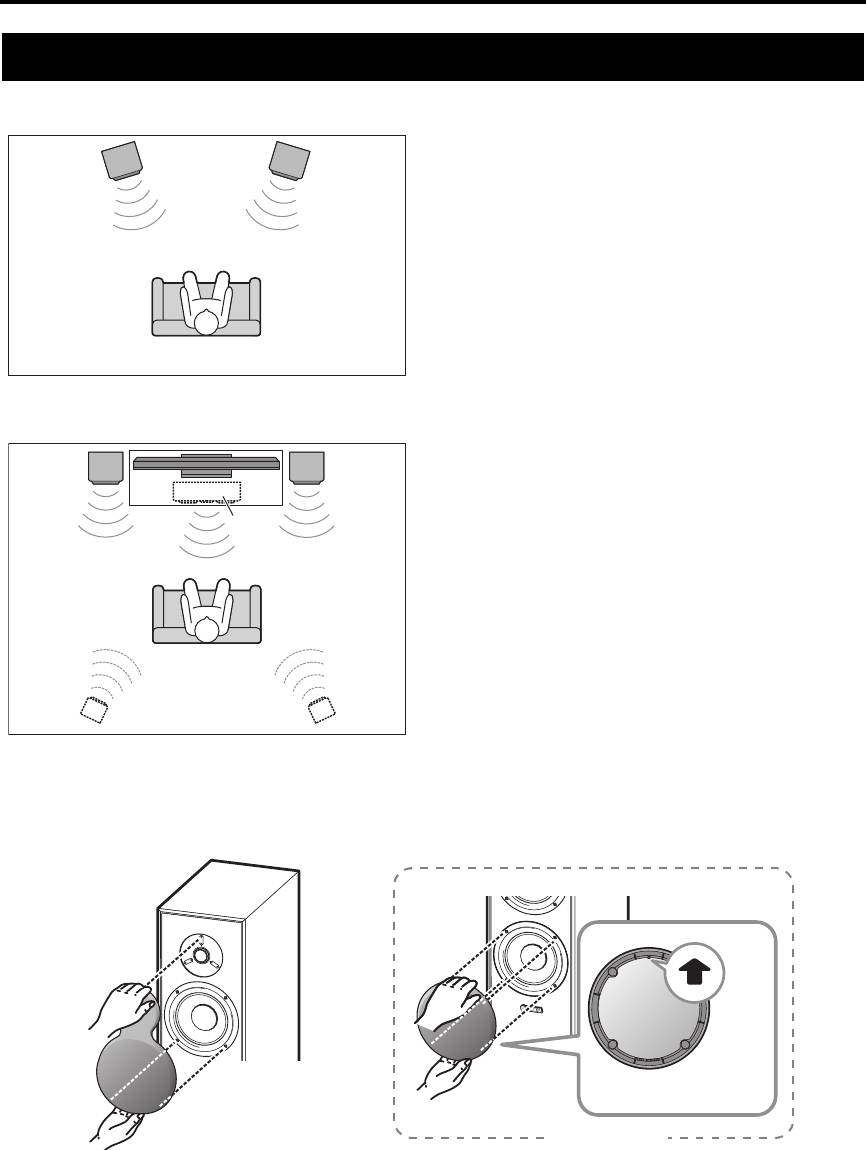
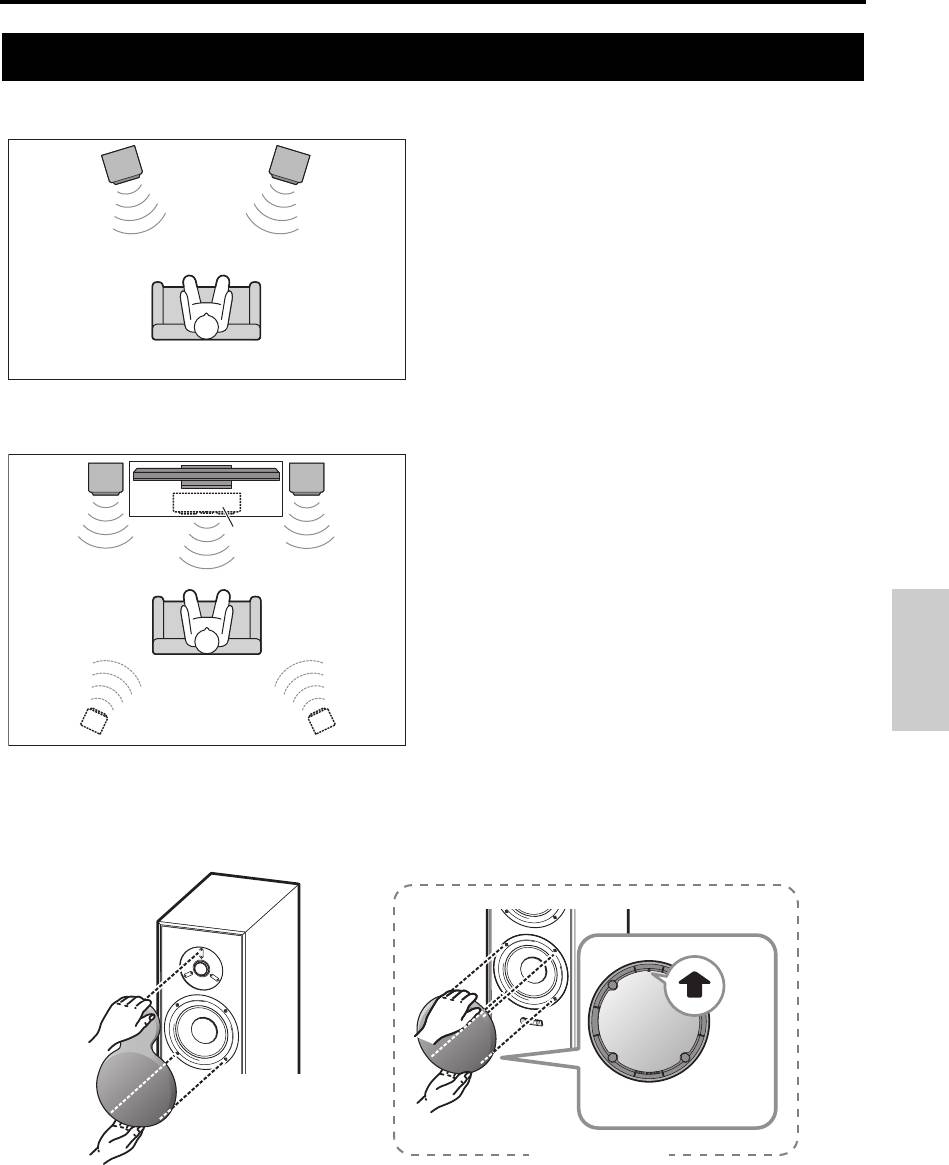
Placing the speakers
Placing the speakers
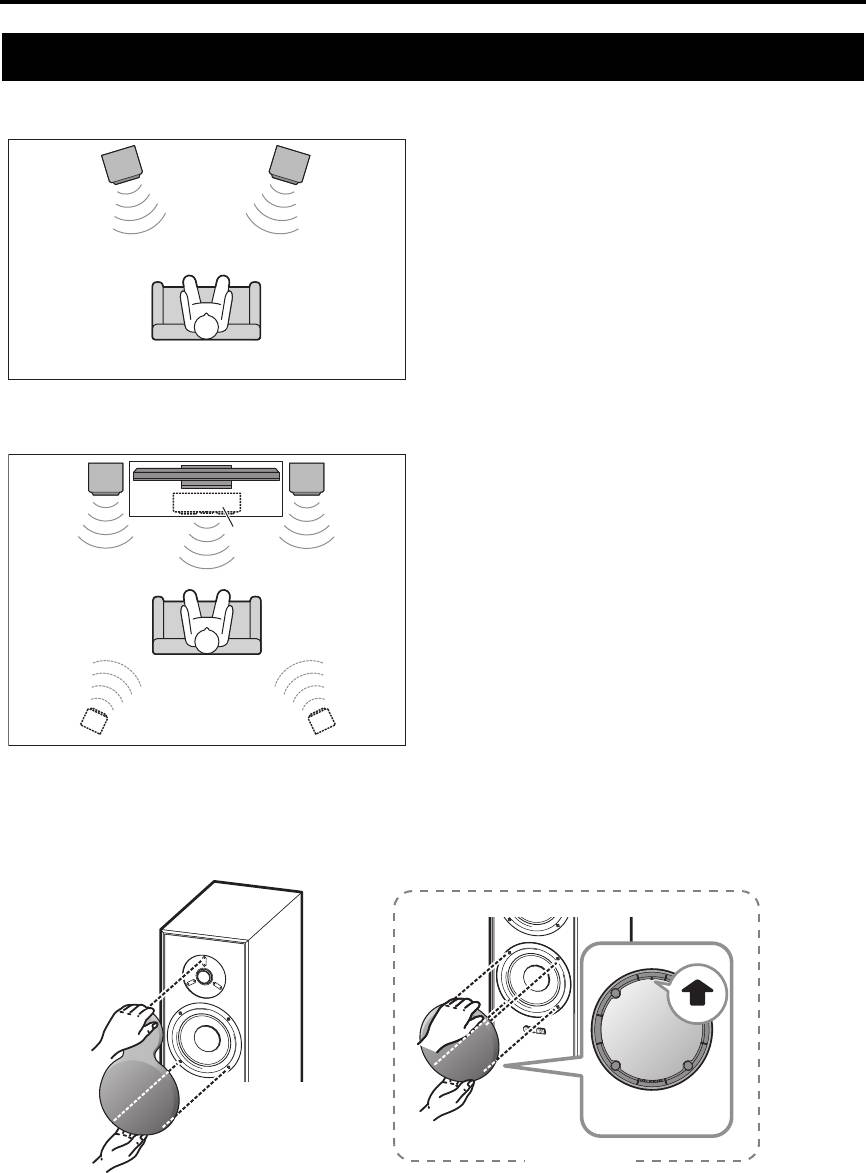
■ Using as 2ch stereo speakers
Better stereo images will be obtained when the
speakers are slightly angled in towards the listener.
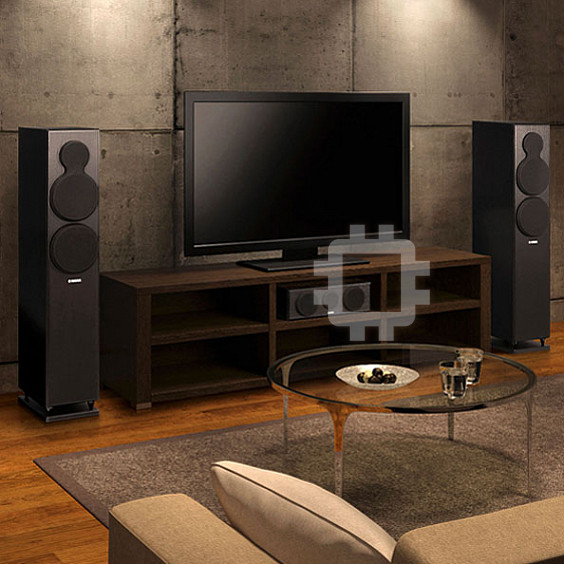
■ Using as front speakers in a multi-channel system
Position the speakers on both sides of the TV. The
positioning of speakers is important, since this
dictates the overall sound quality of the multi-channel
system. Set up the speakers on the basis of your
listening position by following the owner’s manual
supplied with your amplifier.
■ Removing / Attaching the grille
To remove the grille, gently pull the grille away from the speaker.
To attach the grille, line up the holes on the grille with the pegs on the speaker, and gently push the grille onto the
speaker
.
Notes
• When removing or attaching the grille, be careful not to touch the drive units, and not to exert excessive force
with any tools.
• Do not touch or apply impact to the speaker’s diaphragm. Otherwise, the speaker may malfunction.
• To avoid damaging the grille, never apply excessive force, and be sure to use its frame, never pull or push the
surface, for removing or attaching the grille.
2 En
NS-F150/
NS-F150/
NS-F140
NS-F140
Center
Surround
Surround
Top
Bottom
(Grille rear view)
NS-F150 only
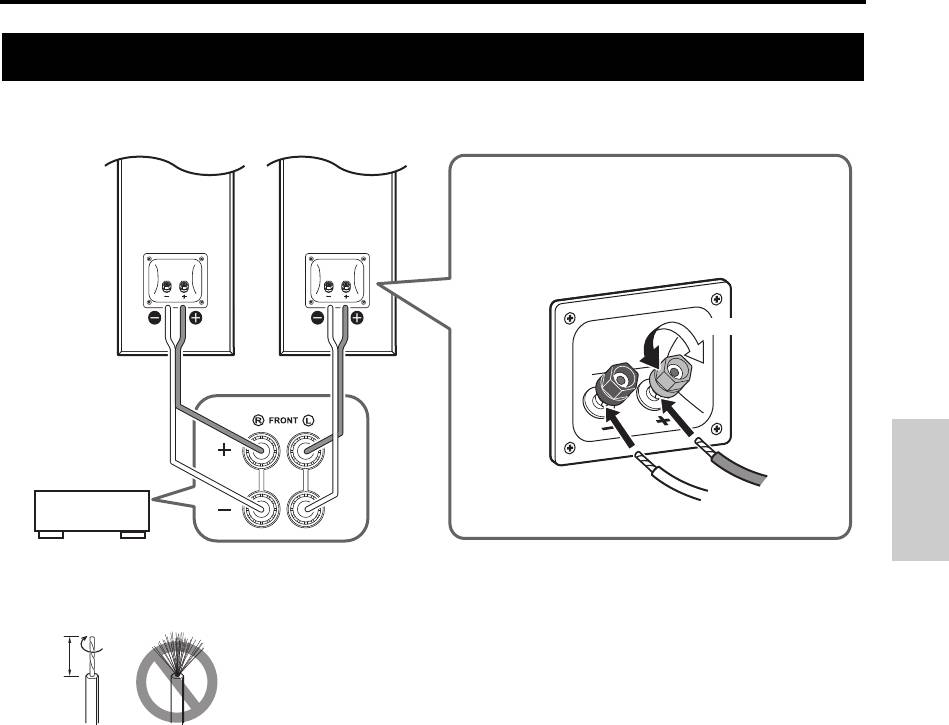
Connecting to your amplifier
Connecting to your amplifier
Before making connections, make sure that the amplifier is switched off.
English
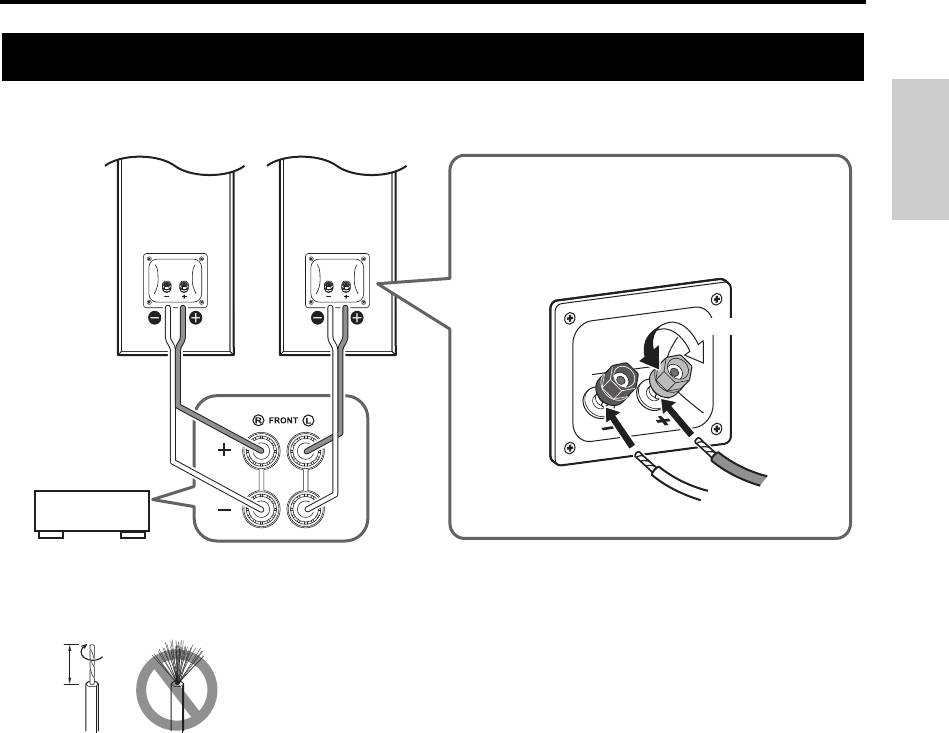
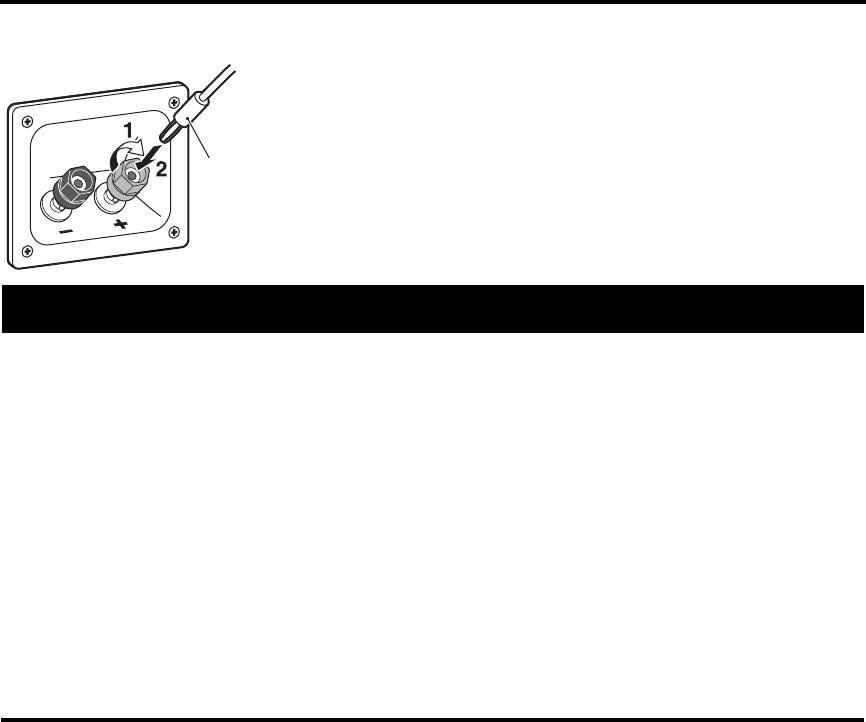
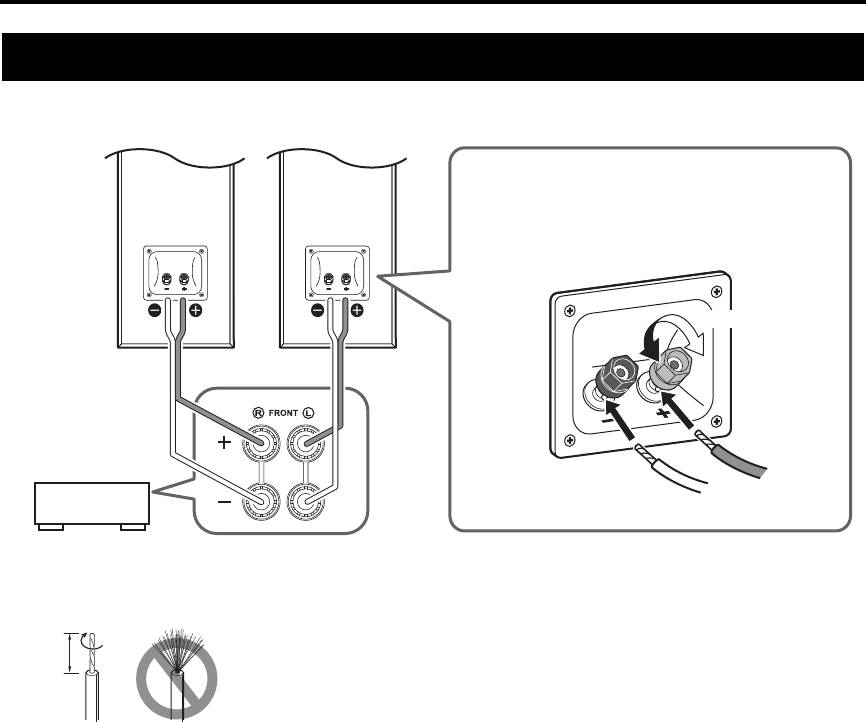
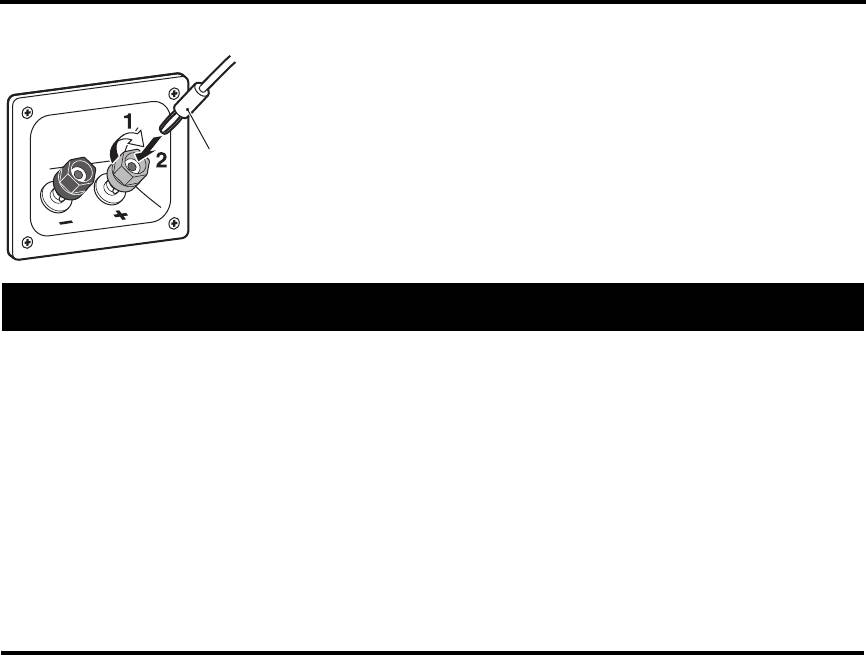
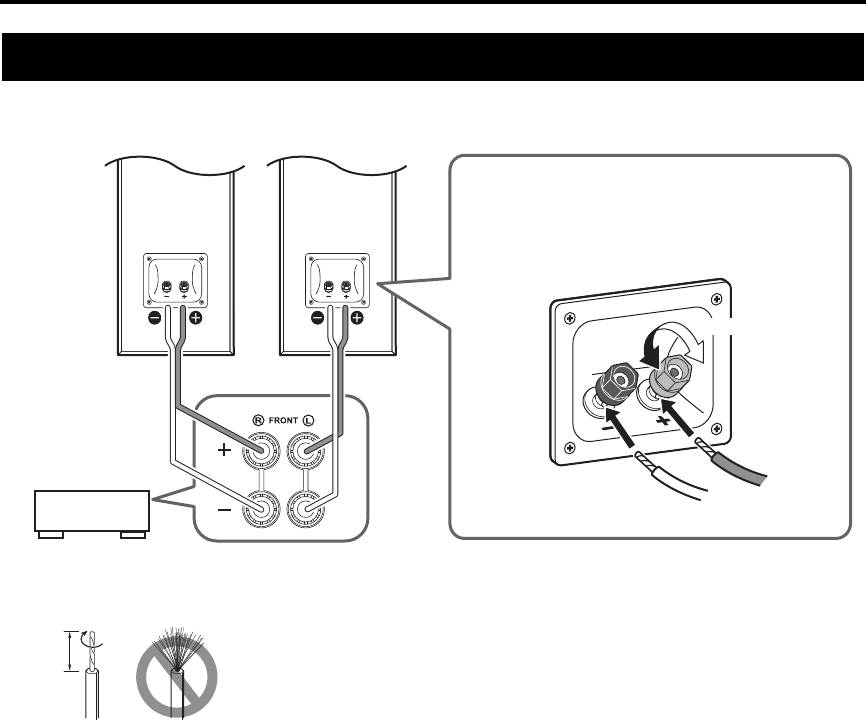
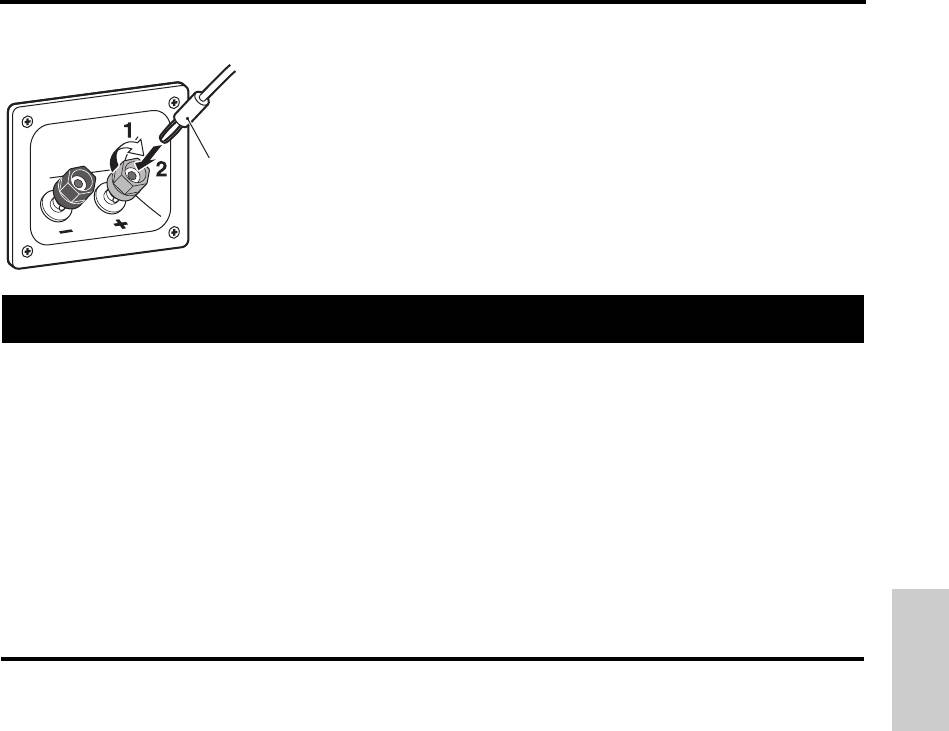
■ How to connect the speaker cables
1 Remove 15 mm (5/8") of insulation from each end of the cables, and
twist the exposed conductors together neatly and tightly, as shown left.
2 Loosen the terminal knob.
3 Insert the bare wire.
4 Tighten the knob and secure the cable.
5 Test the firmness of the connection by pulling lightly on the cable at the
terminal.
Notes
• Make sure the terminal is gripping the bare wire, not the insulation.
• Make sure the bare wires do not touch each other, as this could damage the speaker or amplifier.
• If the connections are faulty, you will hear no sound from the speakers.
■ Connecting to an amplifier or a receiver
Connect one speaker to the left (marked L) terminals of your amplifier or receiver, and another speaker to the right
(marked R) terminals. Please refer to the owner’s manual that came with your amplifier or receiver.
Notes
• Make sure you connect the speakers with the correct polarity—positive (+) terminals to positive (+) terminals,
and negative (–) terminals to negative (–) terminals. If you get them crossed over, the sound will be unnatural and
lack bass.
• The speaker may be damaged if certain sounds are continuously output at high volume level. For example, if sine
waves from a test disc, bass sounds from electronic instruments, etc., are continuously output, or when the stylus
of a turntable touches the surface of a disc, reduce the volume level to prevent the speaker from being damaged.
• Once you have connected all of the speakers, plug the amplifier and other AV components into suitable AC wall
outlets.
• When using an amplifier with a rated output power higher than the nominal input power of the speaker, care
should be taken never to exceed the speaker’s maximum input.
3 En
NS-F150/NS-F140
NS-F150/NS-F140
Note
Do not insert the insulation into the terminal.
If the connections are faulty, you will hear no
sound from the speaker.
Tighten
Loosen
LeftRight
Positive (+)
Amplifier
Negative (–)
or Receiver
Speakers output terminals
15 mm
(5/8")
Good No Good
Specifications
■ When using a banana plug
1 Tighten the terminal knob.
2 Simply insert the banana plug into the terminal.
■ NS-F150
■ NS-F140
Type..................................... 2-way Bass Reflex speaker system
Type..................................... 2-way Bass Reflex speaker system
Non-magnetic shielding type
Non-magnetic shielding type
Driver ........................... Woofer: 16 cm (6-1/2") cone type x 2
Driver ................................. Woofer: 16 cm (6-1/2") cone type
Tweeter: 3 cm (1") soft dome type
Tweeter: 3 cm (1") soft dome type
Nominal input power ....................................................... 50 W
Nominal input power ....................................................... 40 W
Maximum input power .................................................. 180 W
Maximum input power .................................................. 150 W
Impedance .............................................................Nominal 6 Ω
Impedance .............................................................Nominal 6 Ω
Frequency response .......................... 37 Hz–30 kHz (–10 dB)
Frequency response .......................... 37 Hz–30 kHz (–10 dB)
Sensitivity ......................................................88 dB/2.83 V, 1 m
Sensitivity ......................................................86 dB/2.83 V, 1 m
Dimensions (W x H x D)
Dimensions (W x H x D)
...................200 x 1030 x 362 mm (7-7/8" x 40-1/2" x 14-1/4")
.....................200 x 950 x 362 mm (7-7/8" x 37-3/8" x 14-1/4")
Wei ght .............................................................11.2 kg (24.7 lbs)
Wei ght ............................................................... 9.5 kg (20.9 lbs)
Specifications are subject to change without notice.
Limited Guarantee for European Economic Area (EEA) and Switzerland
Thank you for having chosen a Yamaha product. In the unlikely event that your Yamaha product needs guarantee service, please contact the dealer from
whom it was purchased. If you experience any difficulty, please contact Yamaha representative office in your country. You can find full details on our
website (http://www.yamaha-hifi.com/ or http://www.yamaha-uk.com/ for U.K. resident).
The product is guaranteed to be free from defects in workmanship or materials for a period of two years from the date of the original purchase. Yamaha
undertakes, subject to the conditions listed below, to have the faulty product or any part(s) repaired, or replaced at Yamaha’s discretion, without any
charge for parts or labour. Yamaha reserves the right to replace a product with that of a similar kind and/or value and condition, where a model has been
discontinued or is considered uneconomic to repair.
Conditions
1. The original invoice or sales receipt (showing date of purchase, product code and dealer’s name) MUST accompany the defective product, along with
a statement detailing the fault. In the absence of this clear proof of purchase, Yamaha reserves the right to refuse to provide free of charge service and
the product may be returned at the customer’s expense.
2. The product MUST have been purchased from an AUTHORISED Yamaha dealer within the European Economic Area (EEA) or Switzerland.
3. The product must not have been the subject of any modifications or alterations, unless authorised in writing by Yamaha.
4. The following are excluded from this guarantee:
a. Periodic maintenance and repair or replacement of parts due to normal wear and tear.
b. Damage resulting from:
(1) Repairs performed by the customer himself or by an unauthorised third party.
(2) Inadequate packaging or mishandling, when the product is in transit from the customer. Please note that it is the customer’s responsibility to
ensure the product is adequately packaged when returning the product for repair.
(3) Misuse, including but not limited to (a) failure to use the product for its normal purpose or in accordance with Yamaha’s instructions on the
proper use, maintenance and storage, and (b) installation or use of the product in a manner inconsistent with the technical or safety standards in
force in the country where it is used.
(4) Accidents, lightning, water, fire, improper ventilation, battery leakage or any cause beyond Yamaha’s control.
(5) Defects of the system into which this product is incorporated and/or incompatibility with third party products.
(6) Use of a product imported into the EEA and/or Switzerland, not by Yamaha, where that product does not conform to the technical or safety
standards of the country of use and/or to the standard specification of a product sold by Yamaha in the EEA and/or Switzerland.
5. Where the guarantee differs between the country of purchase and the country of use of the product, the guarantee of the country of use shall apply.
6. Yamaha may not be held responsible for any losses or damages, whether direct, consequential or otherwise, save for the repair or replacement of the
product.
7. Please backup any custom settings or data, as Yamaha may not be held responsible for any alteration or loss to such settings or data.
8. This guarantee does not affect the consumer’s statutory rights under applicable national laws in force or the consumer’s rights against the dealer
arising from their sales/purchase contract.
4 En
Banana plug
Specifications
Précautions
Lisez attentivement les précautions d’utilisation suivantes. Yamaha décline toute responsabilité en cas de dommages
et/ou de blessures découlant du non respect de ces consignes.
1. Pour profiter au mieux de votre acquisition, lisez
Information concernant la Collecte et le
attentivement ce mode d’emploi. Conservez-le
Traitement des déchets d’équipements électriques
soigneusement pour référence.
2. Installez les enceintes dans un endroit frais, sec, loin
et électroniques.
des fenêtres et des sources de chaleur et de vibration,
Le symbole sur les produits, l’emballage
des poussières, de l’humidité et du froid. Évitez les
et/ou les documents joints signifie que les
sources de ronflements électriques (transformateurs et
produits électriques ou électroniques
moteurs, par exemple). Pour éviter les risques
Français
d’incendie et de secousses électriques, n’exposez pas
usagés ne doivent pas être mélangés avec
les enceintes à la pluie ni à l’humidité.
les déchets domestiques habituels.
3. Pour éviter que la menuiserie des enceintes ne se
Pour un traitement, une récupération et
déforme ou ne se décolore, n’exposez pas les enceintes
un recyclage appropriés des déchets
à la lumière directe du soleil ni à une humidité
d’équipements électriques et
excessive.
électroniques, veuillez les déposer aux
4. Évitez d’installer les enceintes dans un endroit exposé à
points de collecte prévus à cet effet,
la chute d’objets ou encore à l’écoulement ou aux
éclaboussures de liquides.
conformément à la réglementation
5. Ne posez pas les objets suivants sur le dessus des
nationale et aux Directives 2002/96/EC.
enceintes:
En vous débarrassant correctement des
– D’autres appareils qui pourraient endommager ou
déchets d’équipements électriques et
décolorer la menuiserie des enceintes;
électroniques, vous contribuerez à la
– Des objets enflammés (par exemple, des bougies)
sauvegarde de précieuses ressources et à la
qui pourraient endommager les enceintes, provoquer
prévention de potentiels effets négatifs sur
une blessure, voire un incendie;
– Des récipients contenant des liquides qui pourraient
la santé humaine qui pourraient advenir lors
se renverser, endommager les enceintes ou être à
d’un traitement inapproprié des déchets.
l’origine d’une secousse électrique.
Pour plus d’informations à propos de la
6. Ne placez pas les enceintes dans un endroit où elles
collecte et du recyclage des déchets
peuvent être heurtées, directement ou par la chute
d’équipements électriques et
d’objets. Un emplacement stable garantit l’obtention de
électroniques, veuillez contacter votre
meilleures sonorités.
municipalité, votre service de traitement
7. Placer les enceintes sur des étagères ou dans un meuble
qui contient également la platine de lecture, peut
des déchets ou le point de vente où vous
entraîner un phénomène de bouclage.
avez acheté les produits.
8. Ne pas insérer une main ou un objet dans le port ou
[Information sur le traitement dans d’autres
porter l’enceinte en tenant le port, vu que cela pourrait
pays en dehors de l’Union Européenne]
causer des blessures corporelles ou endommager
l’enceinte.
Ce symbole est seulement valables dans
9. En cas de “saturation” , réduisez le niveau de sortie de
l’Union Européenne. Si vous souhaitez
l’amplificateur. N’excitez pas l’amplificateur au point
vous débarrasser de déchets d’équipements
qu’il écrête. Dans ce cas en effet, les enceintes
électriques et électroniques, veuillez
pourraient être endommagées.
contacter les autorités locales ou votre
10. Vous devez être très attentif, si l’amplificateur peut
fournisseur et demander la méthode de
délivrer une puissance supérieure à la puissance
traitement appropriée.
maximale admissible par les enceintes, à ce que cela ne
se produise pas.
11. Ne nettoyez pas la menuiserie des enceintes avec un
produit chimique qui peut endommager leur finition.
Entretien de l’enceinte
Utilisez un chiffon sec et propre.
Lorsque vous essuyez cet appareil, n’utilisez pas de
12. Ne tentez pas de modifier les enceintes ni de les réparer.
solvant chimique (l’alcool ou des diluants etc.) : cela
Consultez le service Yamaha compétent si une
pourrait endommager la finition. Utilisez un chiffon propre
réparation est nécessaire. Pour quelque raison que ce
et sec. Pour les taches difficiles, humectez un chiffon doux
soit, ne démontez pas la menuiserie des enceintes.
avec de l'eau, essorez et puis essuyez avec le chiffon.
13. La détermination d’un endroit convenable est de
votre responsabilité. Yamaha ne saurait être
(Pour le modèle en finition polie) Cogner la surface de
responsable des accidents provoqués par le choix
l'instrument avec du métal, de la porcelaine ou autres
d’un emplacement qui ne conviendrait pas, ni par
objets durs peut faire craquer ou écailler la finition.
l’installation incorrecte des enceintes.
i Fr
Assurez-vous que l’emballage contient l’élément
indiqué sur l’illustration.
Cette enceinte est conçue avec la majorité du poids situé dans la partie supérieure, et donc
susceptible de tomber si des précautions appropriées ne sont pas prises pour en assurer la
stabilité. Si l’enceinte se renverse, l’enceinte ou d’autres biens personnels peuvent être
endommagés ou quelqu’un peut être blessé (éventuellement grièvement blessé).
Pour une utilisation sûre et correcte de votre enceinte:
• Placez l’enceinte sur une surface solide, plane, lisse et basse (par rapport au sol).
• Veuillez ne pas appuyer exercer de pression sur le côté de l’enceinte en la bougeant ou n’y adossez pas d’objets.
• Veuillez ne pas vous asseoir ou poser d’objet sur l’enceinte.
Les Vibrations ou secousses associées à des tremblements de terre et d'autres phénomènes ou activités peuvent faire
tomber l’enceinte. Pour des raisons de sécurité, l’utilisation de produits disponibles sur le marché qui augmente la
stabilité de l’enceinte est recommandée (ferrures ou chaînes, etc.).
Remarques
• Assurez-vous d’être accompagné par une autre personne pour la soulever.
• Faîtes très attention à ne pas rayer l’extérieur de l’enceinte.
• Veillez à ne pas exercer de pression sur le coté de l’enceinte, sinon l’enceinte
pourrait tomber et être endommagée ou même causer des blessures
corporelles.
• Afin d’éviter des accidents causés par un trébuchage sur des câbles d’enceinte
éparpillés, fixez-les au sol.
• Placez ce haut-parleur trop près d’un téléviseur CRT pourrait affaiblir la
couleur de l’image et créer un bruit de bourdonnement. Dans ce cas, éloignez
les enceintes du téléviseur. Ce n’est pas un problème que vous rencontrerez
avec les téléviseurs plasma et LCD.
•
Seulement pour les modèles NS-F140, vous pouvez installer des pieds ou
pointes disponibles sur le marché pour augmenter sa stabilité et améliorer la
qualité sonore.
Faites des trous au bas de l’enceinte;
Diamètre: 8 mm
Profondeur du trou: 18 mm
Pour plus d’information sur l’installation des pieds et des pointes, référez-
vous au mode d’emploi qui l’accompagne.
1 Fr
Sommaire
Accessoires fournis...............................................1
Positionnement des enceintes .......................... 2
Précautions durant le positionnement
Raccordement à votre amplificateur................ 3
des enceintes...................................................1
Caractéristiques techniques .............................. 4
Accessoires fournis
Câble d’enceinte 4 m x1
Précautions durant le positionnement des enceintes

Positionnement des enceintes
Positionnement des enceintes
■ Utilisation comme enceintes stéréo 2 canaux
Les meilleures images stéréo seront obtenues quand
les enceintes sont légèrement orientées vers l'auditeur.
Français
■ Utilisation comme enceintes avant dans un système multi-canaux
Placez les enceintes des deux cotés du téléviseur. Le
positionnement des enceintes est important, puisque
cela va déterminer toute la qualité sonore du système
multi-canaux. Installez les enceintes selon votre
position d’écoute en suivant le mode d’emploi fourni
avec votre amplificateur.
■ Enlever / Mettre la grille
Pour enlever la grille, tirez doucement la grille de l’enceinte.
Pour mettre la grille, alignez les trous sur la grille aux fiches de l’enceinte, appuyez légèrement la grille sur l’enceinte
.
Remarques
• Quand vous enlevez ou mettez la grille, Faites attention à ne pas toucher les haut-parleurs, et n’exercer pas de
force excessive avec des outils.
• Ne pas toucher ou exercer de pression sur le diaphragme des haut-parleurs. Sinon, l’enceinte pourrait mal
fonctionner.
• Pour éviter d’endommager la grille, n’exercez jamais de force excessive, et assurez-vous d’utiliser le collier
d’enceinte, ne tirez ou n’appuyez jamais la surface, pour enlever ou mettre la grille.
2 Fr
NS-F150/
NS-F150/
NS-F140
NS-F140
Centre
Surround
Surround
Haut
Bas
(Vue arrière de la grille)
NS-F150 seulement
Raccordement à votre amplificateur
Raccordement à votre amplificateur
Avant de faire vos connexions, assurez-vous que l’amplificateur est éteint.
■ Comment raccorder les enceintes aux câbles
1 Dénudez 15 mm de gaine d’isolation de chaque extrémité de câbles, et
torsadez les extrémités dénudées de chaque conducteur ensemble
soigneusement et étroitement, comme illustré.
2 Dévissez le bouton.
3 Insérez l’extrémité dénudée.
4 Vissez le bouton et sécurisez le câble.
5 Vérifiez la solidité de la connexion en tirant légèrement sur le câble au
niveau de la borne.
Remarques
• Assurez-vous que le câble dénudé, et non la gaine d'isolaton, est inséré dans la borne.
• Ne jamais laisser les fils d’enceintes dénudés se toucher afin d’éviter d’endommager l’enceinte ou l’amplificateur.
• Si les raccordements sont incorrects, aucun son ne proviendra des enceintes.
■ Raccordement à un amplificateur ou récepteur
Connectez une enceinte aux bornes gauche (marquée L) de votre amplificateur ou récepteur, et une autre enceinte
aux bornes droites (marquées R). Veuillez vous référer au mode d’emploi fourni avec l’amplificateur ou le récepteur.
Remarques
• Assurez-vous de connecter les enceintes avec la polarité correcte— les bornes positives (+) aux bornes positives (+),
et les bornes négatives (–) aux bornes négatives (–). Si vous les alternez, le son ne sera pas naturel et manquera de
graves.
• L’enceinte peut être endommagée si certains sons sont continuellement émis à un niveau sonore élevé. Par
exemple, si des ondes sinusoïdales d’un disque d’essai, des sons de graves d’instruments électroniques, etc., sont
émis en continu, ou si la pointe de lecture d’une platine touche la surface d’un disque, réduisez le niveau de
volume pour éviter d’endommager cet appareil.
• Une fois que vous avez raccordé toutes les enceintes, branchez l’amplificateur et les autres composantes AV dans
les prises murales CA qui conviennent.
• Lorsque vous utilisez un amplificateur dont la puissance de sortie nominale est supérieure à la puissance d’entrée
nominale des enceintes, veillez à ne jamais dépasser l’entrée maximale de l’enceinte.
3 Fr
NS-F150/NS-F140
NS-F150/NS-F140
Remarque:
N’insérez pas la gaine d’isolation dans la borne.
Si les raccordements sont incorrects, aucun son
ne proviendra de l’enceinte.
Visser
Dévisser
GaucheDroite
Positif (+)
Amplificateur
Négatif (–)
ou Récepteur
Bornes de sortie d’enceintes
15 mm
Correct Incorrect

Caractéristiques techniques
■ Utilisation d’une fiche banane
1 Vissez le bouton.
2 Insérez simplement la fiche banane dans la borne.
Français
■ NS-F150
■ NS-F140
Type...................Système de haut-parleurs bass-reflex 2 voies
Type............................. Système d’enceintes bass-reflex 2 voies
Type à blindage amagnétique
Type à blindage amagnétique
Excitateur ...............Woofer: 16 cm de type cône de type 2 x
Excitateur ..................... Woofer: 16 cm de type cône de type
Haut-parleur d’aigus: dôme souple de 3 cm
Haut-parleur d’aigus: dôme souple de 3 cm
Puissance d’entrée nominale........................................... 50 W
Puissance d’entrée nominale........................................... 40 W
Puissance d’entrée maximale ........................................ 180 W
Puissance d’entrée maximale ........................................ 150 W
Impédance .........................................................Nominale 6 Ω
Impédance ......................................................... Nominale 6 Ω
Réponse en fréquence....................... 37 Hz–30 kHz (–10 dB)
Réponse en fréquence....................... 37 Hz–30 kHz (–10 dB)
Sensibilité ......................................................88 dB/2,83 V, 1 m
Sensibilité ......................................................86 dB/2,83 V, 1 m
Dimensions (L x P x H)........200 mm x 1030 mm x 362 mm
Dimensions (L x P x H).......... 200 mm x 950 mm x 362 mm
Poids ................................................................................. 11,2 kg
Poid ..................................................................................... 9,5 kg
Les spécifications peuvent être modifiées sans avis préalable.
Garantie Limitée pour l’Espace Économique Européenne et la Suisse
Merci d’avoir porté votre choix sur un produit Yamaha. Dans l’hypothèse où vous devriez recourir au service de notre garantie après-vente, veuillez
contacter votre revendeur Yamaha. Si vous rencontrez la moindre difficulté, n’hésitez pas à contacter directement Yamaha dans votre pays de résidence.
Vous pouvez trouver toutes informations complémentaires sur notre site Web (http://www.yamaha-hifi.com/ ou http://www.yamaha-uk.com/ pour les
résidents au Royaume-Uni).
Yamaha garantit votre produit contre tout défaut de fabrication, pièces et main d’oeuvre, pour une durée de 2 ans à compter de la première date de vente au
détail. Yamaha s’engage, dans les conditions décrites ci-après, à procéder à la réparation du produit défectueux (ou d’un quelconque de ses composants) ou
à son remplacement à l’appréciation de Yamaha en prenant à sa charge les coûts relatifs aux pièces détachées et à la main d’oeuvre. Yamaha se réserve le
droit de remplacer le produit par un modèle semblable, de par sa valeur et ses caractéristiques, dès lors que la commercialisation dudit produit a cessé ou
bien lorsque sa réparation s’avère économiquement injustifiée.
Conditions
1. La facture d’achat originelle ou un justificatif d’achat correspondant (indiquant la date d’achat, la référence du produit et le nom du revendeur) DOIT
accompagner le produit défectueux, ainsi qu’une description précise du dysfonctionnement constaté. En l’absence de cette preuve d’achat, Yamaha se
réserve le droit de refuser le service de la garantie et le produit peut être restitué aux frais du consommateur.
2. Le produit DOIT avoir été acheté par un distributeur agréé Yamaha au sein de l’Espace Economique Européen ou en Suisse.
3. Le produit doit n’avoir fait l’objet d’aucune modification ou altération, sauf accord écrit de Yamaha.
4. Les cas suivants font obstacle à l’application de la garantie:
a. Entretien périodique et réparation ou remplacement de pièces ayant subi une usure ou défaillance normale.
b. Dommages résulótant de:
(1) Réparation effectuée par le consommateur lui-même ou par un tiers non autorisé.
(2) Emballage ou manutention inadéquats lors du transport du produit pour réparation. Veuillez noter qu’il est de la responsabilité de l’expéditeur de
s’assurer que le produit est correctement emballé.
(3) Utilisation non-conforme du produit, correspondant aux cas non limitatifs (a) d’utilisation non-conforme à l’objet normal du produit ou
nonconforme aux instructions d’utilisation, de maintenance ou d’installation publiées par Yamaha, (b) ou d’utilisation du produit incompatible
avec les normes techniques ou de sécurité en vigueur au sein du pays d’utilisation.
(4) Accidents, foudre, dégât des eaux, incendie, ventilation incorrecte, fuite de pile ou toute autre cause échappant au contrôle de Yamaha.
(5) Les défauts de la configuration dans laquelle ce produit est incorporé et/ou l’incompatibilité avec des produits tiers.
(6) Produit importé au sein de l’EEE , et/ou en Suisse, par une autre entité que Yamaha, dès lors que ce produit n’est pas conforme aux normes
techniques ou de sécurité du pays d’utilisation et/ou aux normes des produits commercialisés par Yamaha au sein de l’EEE et/ou en Suisse.
5. Lorsque la garantie diffère entre le pays d’achat et le pays d’utilisation du produit, la garantie du pays d’utilisation est applicable.
6. Yamaha ne saurait être tenu pour responsable de quelconques pertes ou dommages, directs, consécutifs ou autres, sa responsabi
lité au titre de la
garantie étant strictement limitée à la réparation ou au remplacement du produit.
7. Nous vous invitons à sauvegarder toutes les données ou réglages personnalisés de votre produit, Yamaha ne pouvant être tenu responsable de leur
modification ou perte.
8. La présente garantie laisse intégralement subsister les droits que le consommateur peut détenir au titre de la garantie légale en vigueur ou au titre du
contrat de vente conclu avec son revendeur.
4 Fr
Fiche banane
Caractéristiques techniques
Vorsichtsmaßnahmen
Bitte lesen Sie sich die folgenden Sicherheitshinweise vor der Inbetriebnahme durch. Yamaha kann für etwaige Schäden
und/oder Verletzungen, die durch eine Nichtbeachtung der folgenden Sicherheitshinweise entstehen, nicht haftbar
gemacht werden.
1. Um optimales Leistungsvermögen sicherzustellen,
13. Sichere Anordnung oder Installation gehört zur
lesen Sie bitte diese Anleitung aufmerksam durch.
Verantwortung des Anwenders. Yamaha übernimmt
Bewahren Sie danach diese Anleitung für zukünftige
keine Haftung für Unfälle, die auf fehlerhafte Anordnung
Nachschlagzwecke an einem sicheren Ort auf.
oder Installation der Lautsprecher zurückzuführen sind..
2.
Installieren Sie die Lautsprecher an einem kühlen,
trockenen, sauberen Ort, entfernt von Fenstern,
Verbraucherinformation zur Sammlung und
Wärmequellen, übermäßigen Erschütterungen, Staub,
Entsorgung alter Elektrogeräteen
Feuchtigkeit und Kälte. Vermeiden Sie Quellen mit
elektrischen Brummgeräuschen (z.B. Transformatoren und
Befindet sich dieses Symbol auf den
Motoren). Um Feuer- und Stromschlaggefahr zu vermeiden,
Produkten, der Verpackung und/oder
setzen Sie die Lautsprecher niemals Wasser oder Regen aus.
beiliegenden Unterlagen, so sollten
3.
Um einer Verzug oder eine Verfärbung des Gehäuses zu
benutzte elektrische Geräte nicht mit dem
vermeiden, setzen Sie die Lautsprecher niemals direktem
normalen Haushaltsabfall entsorgt werden.
Sonnenlicht oder übermäßiger Feuchtigkeit aus.
In Übereinstimmung mit Ihren nationalen
4. Vermeiden Sie eine Installation dieser Lautsprecher an
Bestimmungen und den Richtlinien 2002/96/
Orten, an welchen Objekte auf diese fallen und/oder
diese Flüssigkeitstropfen oder Flüssigkeitsspritzern
EC, bringen Sie alte Geräte bitte zur
ausgesetzt werden können.
fachgerechten Entsorgung,
5. Stellen Sie niemals die folgenden Objekte auf den
Wiederaufbereitung und Wiederverwendung
Lautsprechern ab:
zu den entsprechenden Sammelstellen.
– Andere Komponenten, da diese zu Beschädigung
Durch die fachgerechte Entsorgung der
oder Verformung der Oberfläche der Lautsprecher
Elektrogeräte helfen Sie, wertvolle
führen können;
Ressourcen zu schützen und verhindern
– Brennende Objekte (wie zum Beispiel Kerzen), da
diese Feuer verursachen und die Lautsprecher
mögliche negative Auswirkungen auf die
beschädigen oder persönliche Verletzungen
menschliche Gesundheit und die Umwelt,
verursachen können.
die andernfalls durch unsachgerechte
–
Mit Flüssigkeit gefüllte Behälter, da diese verschüttet
Müllentsorgung auftreten könnten.
werden kann, wodurch es zu elektrischen Schlägen für
Für weitere Informationen zum Sammeln
den Anwender oder zu Beschädigung der Lautsprecher
und Wiederaufbereiten alter
kommen kann.
Elektrogeräte, kontaktieren Sie bitte Ihre
6.
Stellen Sie die Lautsprecher nicht so auf, dass sie umgeworfen
oder von herabfallenden Objekten getroffen werden können.
örtliche Stadt- oder Gemeindeverwaltung,
Stabile Anordnung stellt besseren Sound sicher.
Ihren Abfallentsorgungsdienst oder die
7.
Falls Sie die Lautsprecher auf dem gleichen Regal oder
Verkaufsstelle der Artikel.
Gestell (Rack) wie den Platenspieler anordnen, kann es zu
[Entsorgungsinformation für Länder
akustischer Rückkopplung (Heulgeräuschen) kommen.
außerhalb der Europäischen Union]
8.
Stecken Sie weder Ihrer Finger noch andere Gegenstände
in den Port. Greifen und tragen Sie diese Lautsprecher
Dieses Symbol gilt nur innerhalb der
nicht beim Port, da dies Verletzungen und / oder Schäden
Europäischen Union. Wenn Sie solche
an den Lautsprechern verursachen könnte.
Artikel ausrangieren möchten,
9. Falls Sie Verzerrungen feststellen, reduzieren Sie den
kontaktieren Sie bitte Ihre örtlichen
Lautstärkepegel mit dem Lautstärkeregler an Ihrem
Behörden oder Ihren Händler und fragen
Verstärker. Betreiben Sie Ihren Verstärker niemals bis
Sie nach der sachgerechten
zu einem Punkt, bei welchem es zu
Entsorgungsmethode.
„Begrenzungsverzerrung“ kommt. Anderenfalls können
die Lautsprecher beschädigt werden.
10. Falls Sie einen Verstärker mit einer
Pflege der Lautsprecher
Nennausgangsleistung verwenden, die höher als die
Wischen Sie dieses Gerät nicht mit chemischen
Nennbelastbarkeit der Lautsprecher ist, dann ist
Lösungsmitteln wie Alkohol, Verdünnern usw. ab, da
Vorsicht geboten, damit der maximal zulässige Eingang
Sie sonst die Gehäuseoberfläche beschädigen könnten.
der Lautsprecher nicht überschritten wird.
Verwenden Sie stattdessen ein sauberes, trockenes Tuch.
11. Reinigen Sie die Lautsprecher niemals mit chemischen
Befeuchten Sie bei stärkeren Verschmutzungen ein
Lösungsmittel, da sonst das Finish beschädigt werden
weiches Tuch mit Wasser und wischen Sie anschließend
kann. Verwenden Sie ein sauberes, trockenes Tuch.
das Gerät mit dem ausgewrungenen Tuch ab.
12.
Versuchen Sie niemals die Lautsprecher zu modifizieren oder
(Bei Modellen mit glänzendem) Oberflächenfinish
selbst zu reparieren. Wenden Sie sich an das qualifizierte
können Stöße mit Gegenständen aus Metall, Porzellan
Yamaha-Kundendienstpersonal, wenn Wartung erforderlich
oder anderen harten Materialien dazu führen, dass das
ist. Öffnen Sie unter keinen
Umständen das Gehäuse.
Finish der Gehäuseoberfläche einreißt oder abblättert.
i De
Überprüfen Sie zunächst, ob das in der Abbildung
dargestellte Zubehör im Lieferumfang enthalten ist.
Deutsch
Bei diesen Lautsprechern befindet sich der Großteil des Gewichts im oberen Geräteteil.
Dadurch können sie leicht umfallen, wenn beim Aufstellen nicht auf ausreichende Stabilität
geachtet wird. Kippt ein Lautsprecher um, kann das zur Beschädigung des Geräts sowie anderer
Gegenstände und / oder zu Verletzungen führen (u. U. mit schwerem bzw. tödlichem Verlauf).
Hinweise zur sicheren und sachgemäßen Benutzung der Lautsprecher:
• Stellen Sie die Lautsprecher an stabilen, ebenen und glatten Orten auf, die sich nach Möglichkeit nicht sonderlich hoch
über dem eigentlichen Fußboden befinden.
• Drücken Sie beim Bewegen der Lautsprecher nicht gegen deren Seitenwände und lehnen Sie keine Gegenstände
dagegen.
• Setzen Sie sich nicht auf die Lautsprecher und stellen Sie auch keine Gegenstände auf ihnen ab.
Erschütterungen oder Stöße, die durch Erdbeben und ähnliche Ereignisse bzw. menschliche Aktivitäten verursacht werden,
können dazu führen, dass die Lautsprecher umfallen. Aus Sicherheitsgründen wird daher die Verwendung handelsüblicher
Halteelemente oder -ketten aus Metall (oder ähnlicher Produkte) zum stabilen Aufstellen der Lautsprecher empfohlen.
Hinweise
• Stellen Sie sicher, dass Sie beim Auspacken und Aufstellen der Lautsprecher von
einer zweiten Person unterstützt werden.
• Achten Sie besonders darauf, dass die Gehäuseoberflächen der Lautsprecher
nicht zerkratzt werden.
• Sie sollten nicht seitlich gegen die Lautsprecher drücken, da sie sonst umfallen
könnten. Unter Umständen kann dies zu Schäden an den Lautsprechern und /
oder Verletzungen führen.
• Befestigen Sie lose auf dem Boden liegende Lautsprecherkabel, um Stolperunfälle
zu verhindern.
• Wird ein Lautsprecher zu nahe an einem Röhrenfernseher aufgestellt, kann dies zu
Bildstörungen (fehlerhafte Farbwiedergabe) oder Brummtönen führen. In diesem
Fall müssen die Lautsprecher weiter vom Fernsehgerät entfernt aufgestellt werden.
Bei Fernsehern mit LCD- oder Plasmabildschirm tritt dieses Problem nicht auf.
•
Beim System NS-F140 besteht die Möglichkeit, im Fachhandel erhältliche Beine
oder Spikes (Standfüße) an die Lautsprecher zu montieren, um die Stabilität und
die Klangqualität zu verbessern.
Bohren Sie dazu Löcher mit folgenden Abmessungen in die Bodenplatte der
Lautsprecher:
Bohrlochdurchmesser: 8 mm
Bohrlochtiefe: 18 mm
Weitere Informationen zum Montieren von Lautsprecherbeinen oder -Spikes
entnehmen Sie bitte den Gebrauchsanweisungen dieser Geräte.
1 De
Inhalt
Mitgeliefertes Zubehör........................................1
Positionierung der Lautsprecher ...................... 2
Sicherheitshinweise für das Aufstellen
Anschließen an den Verstärker.......................... 3
der Lautsprecher.............................................1
Technische Daten ................................................. 4
Mitgeliefertes Zubehör
1 x Lautsprecherkabel, 4 m
Sicherheitshinweise für das Aufstellen der
Lautsprecher
Positionierung der Lautsprecher
Positionierung der Lautsprecher
■ Verwendung als 2-Kanal-Stereolautsprecher
Einen besseren Stereoklang erreichen Sie, indem Sie
die Lautsprecher leicht angewinkelt zum Hörer
aufstellen.
■ Verwendung als Frontlautsprecher in einem Multikanalsystem
Stellen Sie die Lautsprecher auf beiden Seiten des
Fernsehers auf. Die Positionierung der Lautsprecher
ist sehr wichtig, da von ihr die Gesamtsoundqualität
des Multikanalsystems abhängt. Stellen Sie die
Lautsprecher entsprechend der Höhrposition auf und
folgen Sie dabei den Anweisungen im Handbuch Ihres
Verstärkers.
■ Abnehmen / Anbringen des Schutzgitters
Um das Schutzgitter abzunehmen, ziehen Sie es vorsichtig vom Lautsprecher weg.
Um das Schutzgitter wieder anzubringen, richten Sie die Löcher im Rand des Gitters auf die Haltestifte an den
Lautsprechern aus und drücken Sie dann das Schutzgitter vorsichtig auf den Lautsprecher.
Hinweise
• Beim Abnehmen und Anbringen des Schutzgitters sollten Sie weder die eigentlichen Lautsprechereinheiten (Treiber)
berühren noch übermäßig viel Kraft mit Werkzeugen auf das Gerät ausüben.
• Achten Sie darauf, die Lautsprechermembrane nicht mit den Fingern oder anderen Gegenständen zu berühren.
Andernfalls besteht die Gefahr, dass der Lautsprecher nicht mehr richtig funktioniert.
• Um Schäden am Schutzgitter zu vermeiden, sollten Sie niemals mit Gewalt oder übermäßigem Krafteinsatz vorgehen.
Des Weiteren sollten Sie beim Abnehmen / Anbringen des Schutzgitters immer nur den Rahmen anfassen, nicht aber
an seiner Oberfläche ziehen oder drücken.
2 De
NS-F150/
NS-F150/
NS-F140
NS-F140
Mitte
Surround
Surround
Oben
Unten
(Schutzgitter, Rückseite)
Nur bei NS-F150
Anschließen an den Verstärker
Anschließen an den Verstärker
Vor dem Anschließen der Lautsprecher müssen Sie sicherstellen, dass der Verstärker vom Netz getrennt ist.
Deutsch
■ Anschließen der Lautsprecherkabel
1 Entfernen Sie 15 mm des Kabelmantels an den Enden aller
Lautsprecherkabel. Verdrillen Sie die Adern so fest wie möglich, sodass
keine Drähtchen mehr überstehen (siehe Abb. links).
2 Lösen Sie den Klemmenknopf.
3 Stecken Sie den blanken Draht ein.
4 Ziehen Sie den Klemmenknopf wieder an, sodass das Kabelende fest
sitzt.
5 Ziehen Sie leicht am Kabel, um zu kontrollieren, ob es fest
angeschlossen ist.
Hinweise
• Die Klemme darf nur die bloßliegende Ader, nicht aber den Mantel greifen.
• Stellen Sie sicher, dass sich die blank liegenden Adern nicht berühren, da dies zu Schäden am Lautsprecher und / oder
am Verstärker führen kann.
• Bei unsachgemäßem Anschluss bleiben die Lautsprecher stumm.
■ Anschließen an einen Verstärker oder einen Receiver
Schließen Sie einen Lautsprecher an den mit „L“ markierten linken Lautsprecherklemmen Ihres Verstärkers oder
Receivers an und den anderen Lautsprecher an den mit „R“ markierten rechten Lautsprecherklemmen. Lesen Sie dazu
bitte in der Bedienungsanleitung Ihres Verstärkers oder Receivers nach.
Hinweise
• Vergewissern Sie sich, dass Sie die Lautsprecher mit richtiger Polarität anschließen: Positive (+) Klemmen der
Lautsprecher an positive (+) Klemmen des Verstärkers und negative (–) Klemmen des Lautsprechers an negative (–)
Klemmen des Verstärkers. Eine falsche Polarität führt zu einer unnatürlichen und bassarmen Wiedergabe.
• Die Lautsprecher können beschädigt werden, wenn bestimmte Töne kontinuierlich bei einem hoch eingestellten
Lautstärkepegel wiedergegeben werden. Wenn zum Beispiel Sinuswellen von einer Test-CD, Tiefbassfrequenzen von
elektronischen Instrumenten o. ä. kontinuierlich ausgegeben werden, sollte der Lautstärkepegel gesenkt werden, um
eine Beschädigung der Lautsprecher zu vermeiden. Das Gleiche gilt beim Aufsetzen der Nadel eines Plattenspielers auf
die Oberfläche einer Schallplatte.
• Wenn Sie alle Lautsprecher angeschlossen haben, können Sie die Netzkabel des Verstärkers und der AV-Geräte wieder
in die Steckdosen stecken.
• Wenn Sie einen Verstärker benutzen, dessen Nennausgangsleistung über der Nenneingangsleistung der Lautsprecher
liegt, sollten Sie vorsichtig vorgehen, damit die maximale Eingangsleistung der Lautsprecher nicht überschritten wird.
3 De
NS-F150/NS-F140
NS-F150/NS-F140
Hinweis
Stecken Sie nur die bloßliegenden Adern, nicht
aber die Kabelmäntel in die Klemmen.
Bei unsachgemäßem Anschluss bleiben die
Lautsprecher stumm.
Sichern
Lösen
LinksRechts
Pluspol (+)
Verstär ker
Minuspol (–)
bzw. Receiver
Lautsprecher-Ausgangsklemmen
15 mm
Richtig Falsch
Technische Daten
■ Kabel mit Bananenstecker
1 Ziehen Sie den Klemmenknopf fest.
2 Stecken Sie den Bananenstecker in den Klemmenknopf ein.
■ NS-F150
■ NS-F140
Typ............................. 2-Wege-Bassreflex-Lautsprechersystem
Typ............................. 2-Wege-Bassreflex-Lautsprechersystem
Ohne magnetische Abschirmung
Ohne magnetische Abschirmung
Treiber ..................Tieftöner: 16 cm, Konus-Bauform (2 Stk.)
Treiber ................................Tieftöner: 16 cm, Konus-Bauform
Hochtöner: 3 cm, Weichkalotten-Bauform
Hochtöner: 3 cm, Weichkalotten-Bauform
Nenneingangsleistung...................................................... 50 W
Nenneingangsleistung...................................................... 40 W
Max. Eingangsleistung ................................................... 180 W
Max. Eingangsleistung ................................................... 150 W
Impedanz ...............................................................Nominal 6 Ω
Impedanz ...............................................................Nominal 6 Ω
Frequenzgang..................................... 37 Hz–30 kHz (–10 dB)
Frequenzgang..................................... 37 Hz–30 kHz (–10 dB)
Empfindlichkeit..........................................88 dB / 2,83 V, 1 m
Empfindlichkeit..........................................86 dB / 2,83 V, 1 m
Abmessungen (B x H x T)................... 200 x 1,030 x 362 mm
Abmessungen (B x H x T).......................200 x 950 x 362 mm
Gewicht ............................................................................ 11,2 kg
Gewicht .............................................................................. 9,5 kg
Änderungen der technischen Daten ohne vorherige Ankündigung vorbehalten.
Begrenzte Garantie für den Europäischen Wirtschaftsraum (EWR) und die Schweiz
Herzlichen Dank, dass Sie sich für ein Yamaha Produkt entschieden haben. In dem unwahrscheinlichen Fall, dass die Garantie für das Yamaha-Produkt in
Anspruch genommen werden muss, wenden Sie sich bitte an den Händler, bei dem es gekauft wurde. Sollten Sie auf Schwierigkeiten stoßen, wenden Sie
sich bitte and die Yamaha Repräsentanz in Ihrem Land. Auf unserer Internetseite (http://www.yamaha-hifi.com/ oder http://www.yamaha-uk.com/ für
Einwohner Großbritanniens) finden Sie alle Einzelheiten.
Wir garantieren für einen Zeitraum von zwei Jahren ab ursprünglichem Kaufdatum, dass dieses Produkt frei von Verarbeitungs- oder Materialfehlern ist.
Yamaha verpflichtet sich, gemäß der nachstehend angeführten Bedingungen, ein fehlerhaftes Produkt (oder Teile desselben) kostenfrei (gilt für Teile und
Arbeit) zu reparieren oder auszutauschen. Diese Entscheidung obliegt ausschließlich Yamaha. Yamaha behält sich vor, das Produkt gegen ein in Art und/
oder Wert und Zustand ähnliches Produkt auszutauschen, wenn das entsprechende Modell nicht mehr erzeugt wird, oder die Reparatur als unrentabel
angesehen wird.
Bedingungen
1. Dem defekten Produkt MUSS die Originalrechnung oder der Originalkaufbeleg (der Beleg muss das Kaufdatum, den Produkt-Code und den Namen
des Händlers aufweisen) beigelegt werden, ebenso eine Fehlerbeschreibung. Bei Fehlen einer eindeutigen Kaufbestätigung behält sich Yamaha das
Recht vor, den kostenfreien Service abzulehnen und das Produkt auf Kosten des Kunden zu retournieren.
2. Das Produkt MUSS von einem AUTORISIERTEN Yamaha-Händler innerhalb des Europäischen Wirtschaftsraums (EWR) oder der Schweiz gekauft
worden sein.
3. Es wurden keine wie auch immer gearteten Änderungen am Produkt vorgenommen, außer diese wurden von Yamaha schriftlich genehmigt.
4. Folgendes ist von der Garantie ausgeschlossen:
a. Regelmäßige Wartung und Reparatur oder Austausch von Verschleißteilen.
b. Schaden durch:
(1) Vom Kunden selber oder von nichtbefugten Dritten ausgeführte Reparaturen.
(2) Unsachgemäße Verpackung oder Handhabung während des Transports vom Kunden. Beachten Sie bitte, dass die sachgerechte Verpackung des
zur Reparatur gebrachten Produkts in der Verantwortung des Retournierenden liegt.
(3) Unsachgemäße Verwendung, einschließlich der, jedoch nicht beschränkt auf, (a) die Verwendung des Produkts zu anderen als den normalen
Zwecken oder Behandlung entgegen die Anweisungen Yamahas zur korrekten Handhabung, Wartung oder Lagerung und (b) die Installierung
oder Verwendung des Produkts auf andere Weise als dies den technischen oder Sicherheitsstandards jenes Landes entspricht, in dem das Produkt
verwendet wird.
(4) Unfälle, Blitzschlag, Wasser, Feuer, ungeeignete Belüftung, Auslaufen der Batterie oder jedem anderen Grund, den Yamaha nicht beeinflussen kann.
(5) Defekte an jenem System, an welches dieses Produkt angeschlossen wird und/oder die Inkompatibilität mit Produkten anderer Hersteller.
(6) Die Verwendung eines nicht von Yamaha in den EWR und/oder die Schweiz importierten Produkts, wenn dieses Produkt nicht den technischen
oder Sicherheitsstandards jenes Landes, in dem es verwendet wird, und/oder der standardisierten Produktspezifikation für von Yamaha im EWR
und/oder der Schweiz vertriebene Produkte, entspricht.
5. Wenn es Unterschiede in den Garantiebedingungen zwischen jenem Land in dem das Produkt gekauft wurde, und jenem in dem das Produkt
verwendet wird, finden die Garantiebedingungen jenes Landes Anwendung, in dem das Produkt verwendet wird.
6. Yamaha kann für keinerlei Verluste oder Schäden, ob direkt, in Konsequenz oder anderweitig, verantwortlich gemacht werden, außer bezüglich der
Reparatur oder des Ersatzes eines Produkts.
7. Legen Sie bitte Kopien aller persönlichen Einstellungen und Daten an, da Yamaha weder für irgendwelche Änderungen noch für den Verlust solcher
Daten verantwortlich gemacht werden kann.
8. Diese Garantie beeinflusst nicht die gesetzlichen Verbraucherrechte unter dem geltenden nationalen Recht oder die Verbraucherrechte gegenüber dem
Händler, die durch einen Kaufvertrag entstehen.
4 De
Bananenstecker
Technische Daten
Precauciones
Lea las siguientes precauciones de funcionamiento antes de iniciar el uso del aparato. Yamaha no se responsabilizará de
cualquier daño o lesión causada por no seguir las precauciones que aparecen a continuación.
F
1. Para asegurar el mejor rendimiento posible, lea con
Información para Usuarios sobre Recolección y
atención este manual. Guárdelo en un lugar seguro para
Disposición de Equipamiento Viejo
consultarlo en el futuro.
2. Instale los altavoces en un lugar fresco, seco y limpio:
Este símbolo en los productos, embalaje,
alejados de ventanas, fuentes de calor, fuentes de
y/o documentación que se acompañe
vibraciones excesivas, polvo, humedad o frío. Evite
significa que los productos electrónicos y
fuentes de zumbido eléctrico (transformadores y
eléctricos usados no deben ser mezclados
motores por ejemplo). Para impedir incendios o
con desechos hogareños corrientes.
descargas eléctricas, no exponga los altavoces a la
lluvia o al agua.
Para el tratamiento, recuperación y
3. Para impedir que las cajas se deformen o pierdan color,
reciclado apropiado de los productos
no exponga los altavoces a la luz solar directa o a una
viejos, por favor llévelos a puntos de
humedad excesiva.
recolección aplicables, de acuerdo a su
4. Evite instalar los altavoces donde puedan caer sobre
legislación nacional y las directivas 2002/
ellos objetos extraños, y/o donde puedan estar
96/EC.
expuestos al goteo o salpicadura de líquidos.
5. No ponga los objetos siguientes encima de los
Al disponer de estos productos
altavoces:
correctamente, ayudará a ahorrar
– Otros componentes, porque pueden dañar o
recursos valiosos y a prevenir cualquier
descolorar la superficie de los altavoces.
potencial efecto negativo sobre la salud
– Objetos con fuego (velas por ejemplo) porque
humana y el medio ambiente, el cual
pueden causar un incendio, daños en los altavoces o
podría surgir de un inapropiado manejo
lesiones a las personas.
de los desechos.
– Recipientes de líquidos, porque pueden derramar su
Español
contenido y dar descargas eléctricas al usuario o
Para mayor información sobre
dañar los altavoces.
recolección y reciclado de productos
6. No ponga los altavoces donde puedan ser tirados o
viejos, por favor contacte a su municipio
golpeados por objetos que se caen. Los lugares estables
local, su servicio de gestión de residuos o
garantizan un mejor sonido.
el punto de venta en el cual usted adquirió
7. Poner los altavoces en la misma estantería que un
los artículos.
giradiscos puede causar realimentación.
8. No introduzca las manos ni ningún otro objeto en el
[Información sobre la Disposición en
puerto ni levante el altavoz sujetándolo por el puerto, ya
otros países fuera de la Unión Europea]
que podría causarle daños al altavoz o heridas al
Este símbolo sólo es válidos en la Unión
usuario.
Europea. Si desea deshacerse de estos
9. Si nota distorsión, reduzca el volumen en su
artículos, por favor contacte a sus
amplificador. No haga funcionar su amplificador al
autoridades locales y pregunte por el
límite de “amplitud”. De lo contrario, los altavoces
método correcto de disposición.
podrían dañarse.
10. Cuando utilice un amplificador con una potencia
nominal de salida superior a la potencia nominal de
entrada de los altavoces, deberá tenerse cuidado para no
Cuidados del altavoz
superar la entrada máxima de los altavoces.
Cuando limpie esta unidad, no utilice productos
11. No limpie los altavoces con disolventes químicos
químicos (como alcohol o disolventes): podrían dañar
porque podría dañar el acabado. Utilice un paño limpio
y seco.
el acabado. Utilice un paño limpio y seco para la
12. No intente modificar o arreglar los altavoces. Póngase
limpieza. Para las manchas más difíciles, humedezca
en contacto con el personal de servicio de Yamaha
un paño en detergente diluido con agua, frote la
cuando necesite hacer reparaciones. No abra la caja
mancha y seque la zona con el paño.
bajo ninguna circunstancia.
(Para los modelos con acabados pulidos) Golpear la
13. El propietario es el responsable de que la colocación
superficie del instrumento con metal, porcelana u otros
o la instalación sean seguras. Yamaha no se hace
objetos duros puede provocar que el acabado se agriete
responsable de los accidentes debidos a una mala
colocación o instalación de los altavoces.
o desconche.
i Es
Asegúrese de que el paquete contiene los elementos
que se muestran en la ilustración.
Los altavoces están construidos con gran parte del peso en la parte superior de los mismos
y, por lo tanto, pueden caer si no se tiene el cuidado adecuado para asegurar su estabilidad.
Si el altavoz cae, el altavoz y otras propiedades personales pueden dañarse o incluso pueden
dañar a una persona (pudiendo causar daños incluso fatales).
Para un uso seguro y correcto del altavoz:
• Coloque el altavoz sobre una superficie sólida, nivelada, suave y con poca altura (con respecto al suelo).
• No apriete ni presione el lateral del altavoz cuando lo transporte, ni apoye objetos sobre el lateral del altavoz.
• No se siente ni ponga objetos encima del altavoz.
Las vibraciones o sacudidas asociadas con los terremotos y otros fenómenos o actividades pueden causar que el
altavoz se caiga. Por razones de seguridad, se recomienda utilizar productos disponibles a la venta al público que
aumenten la estabilidad del altavoz (sujeciones de metal o cadenas, etc).
Notas
• Asegúrese de que haya otra persona que le ayude a sujetarlo cuando lo vaya a
instalar.
• Preste especial atención para evitar dañar la superficie del altavoz.
• Tenga cuidado de no aplicar fuerza sobre el lateral del altavoz, de lo contrario,
éste podría caer causando daños personales a los usuarios y pudiendo
dañarse el altavoz.
• Para evitar accidentes causados por tropiezos en los cables, fije los cables de
los altavoces al suelo para evitar tropiezos y accidentes.
• Colocar esta unidad demasiado cerca de un equipo TV CRT podría provocar
fallos en la imagen o ruido de zumbido. En este caso, separe los altavoces del
televisor. Esto no sucede con los televisores de plasma o LCD.
•
Solamente para NS-F140, puede instalar soportes o clavos en el altavoz para
aumentar su estabilidad y mejorar la calidad del sonido.
Haga los orificios en la parte inferior del altavoz,
Diámetro 8 mm
Profundidad del orificio: 18 mm
Para obtener más información sobre cómo colocar clavos o soportes,
consulte el manual de instrucciones proporcionado.
1 Es
Contenido
Accesorios suministrados....................................1
Colocación de los altavoces ............................... 2
Precauciones a tener en cuenta al colocar
Cómo conectar el amplificador ......................... 3
los altavoces ....................................................1
Especificaciones ................................................... 4
Accesorios suministrados
Cable del altavoz, 4 m x1
Precauciones a tener en cuenta al colocar los
altavoces
Colocación de los altavoces
Colocación de los altavoces
■ Utilización como altavoces estéreo de 2 canales
El mejor rendimiento estéreo se obtiene cuando los
altavoces están colocados ligeramente en ángulo hacia
el oyente.
■ Utilización como altavoces frontales en un sistema de múltiples canales
Coloque los altavoces a ambos lados del televisor. La
colocación de los altavoces es importante, ya que de
ello dependerá la calidad de sonido general del sistema
de canales múltiples. Coloque los altavoces en base a la
posición del oyente siguiendo el manual del
propietario proporcionado con su amplificador.
Español
■ Cómo colocar/quitar la rejilla
Para quitar la rejilla, tire suavemente de la rejilla para quitarla del altavoz.
Para colocar la rejilla, alinee los huecos en la rejilla con las clavijas en el altavoz y presione suavemente hasta que la rejilla
encaje en el altavoz
.
Notas
• Cuando coloque o quite la rejilla, tenga cuidado de no tocar las unidades de control y no aplique excesiva fuerza
con ninguna herramienta.
• No toque ni golpee el diafragma del altavoz. De lo contrario, el altavoz podría funcionar mal.
• Para evitar daños en la rejilla, no aplique fuerza excesiva, asegúrese de sujetarlo por la estructura sin empujar ni
tirar de la superficie cuando ponga o quite la rejilla.
2 Es
NS-F150/
NS-F150/
NS-F140
NS-F140
Central
Surround
Surround
Parte superior
Parte inferior
(Vista trasera de la rejilla)
NS-F150 solamente
Cómo conectar el amplificador
Cómo conectar el amplificador
Antes de realizar las conexiones, asegúrese de que el amplificador esté apagado.
■ Cómo conectar los cables del altavoz
1 Quite el aislante de 15 mm de cada extremo de los cables y retuerza los
conductores juntos cuidadosamente y con firmeza, como se muestra a
la izquierda.
2 Afloje la perilla del terminal.
3 Inserte el cable pelado.
4 Apriete la perilla y asegure el cable.
5 Tire ligeramente de los cables en el terminal para verificar que están
firmemente conectados.
Notas
• Compruebe que el terminal sujete los cables pelados y no la parte aislada.
• Compruebe que los cables pelados no se toquen entre ellos, de lo contrario podrían dañar el altavoz o el
amplificador.
• Si las conexiones no son correctas, los altavoces no emitirán sonido.
■ Cómo conectarlos a un amplificador o a un receptor
Conecte un altavoz a los terminales izquierdos (marcados con una L) de su amplificador o receptor, y el otro altavoz
a los terminales derechos (marcados con una R). Por favor, consulte el manual del usuario que venía con su
amplificador o receptor.
Notas
• Cerciórese de conectar los altavoces con la polaridad correcta - los terminales positivos (+) a los terminales
positivos (+), y los terminales negativos (–) a los terminales negativos (–). Si los cruza, el sonido no será natural
y se reproducirá sin graves.
• La unidad podría averiarse si se escucharan continuamente ciertos sonidos en el nivel alto de volumen. Por
ejemplo, si se escuchan ondas sinusoidales con el disco de prueba, sonidos graves de instrumentos electrónicos,
etc.; o cuando la aguja del tocadiscos toque la superficie de un disco, reduzca el nivel de volumen para evitar que
se dañe el equipo.
• Una vez haya conectado todos los altavoces, enchufe el amplificador y los demás componentes AV en tomas de
corriente CA adecuadas.
• Cuando utilice un amplificador con una potencia de salida superior a la potencia nominal de entrada de los
altavoces, tenga cuidado de no superar la entrada máxima de los altavoces.
3 Es
NS-F150/NS-F140
NS-F150/NS-F140
Nota
No introduzca el aislante en el terminal.
Si las conexiones no están correctamente
realizadas, no escuchará ningún sonido por los
altavoces.
Apretar
Aflojar
IzquierdaDerecha
Positivo (+)
Amplificador
Negativo (–)
o Receptor
Terminales de salida de los altavoces
15 mm
Bien Mal
Especificaciones
■ Al utilizar una clavija banana
1 Apriete la perilla del terminal.
2 Inserte la clavija banana en el terminal.
■ NS-F150
■ NS-F140
Tipo. Sistema de altavoces de dos vías de reflexión de graves
Tipo. Sistema de altavoces de dos vías de reflexión de graves
Tipo blindado no magnéticamente
Tipo blindado no magnéticamente
Controlador.............Woofer: 2 Altavoces con cono de 16 cm
Controlador................... Woofer: Altavoz con cono de 16 cm
Tweeter: Altavoz con cúpula suave de 3 cm
Tweeter: Altavoz con cúpula suave de 3 cm
Potencia nominal ............................................................. 50 W
Potencia nominal ............................................................. 40 W
Potencia nominal de entrada máxima ........................ 180 W
Potencia nominal de entrada máxima ........................ 150 W
Impedancia.............................................................nominal 6 Ω
Impedancia.............................................................nominal 6 Ω
Respuesta de frecuencia....................37 Hz-30 kHz (–10 dB)
Respuesta de frecuencia....................37 Hz-30 kHz (–10 dB)
Sensibilidad...................................................88 dB/2,83 V, 1 m
Sensibilidad...................................................86 dB/2,83 V, 1 m
Dimensiones (An x Al x Pr) ................ 200 x 1030 x 362 mm
Dimensiones (An x Al x Pr) ...................200 x 950 x 362 mm
Peso ................................................................................... 11,2 kg
Peso ..................................................................................... 9,5 kg
Las especificaciones están sujetas a cambio sin previo aviso.
Español
Garantía limitada para el Área Económica Europea (AEE) y Suiza
Gracias por haber elegido un producto Yamaha. En el caso poco probable de que su producto Yamaha necesite el servicio que concede la garantía, póngase
en contacto por favor con el concesionario a quien adquirió el producto. Si usted tiene alguna dificultad, póngase en contacto por favor con la oficina
representativa de Yamaha en su país. Podrá encontrar todos los detalles necesarios en nuestros sitios Web (http://www.yamaha-hifi.com/ o
http://www.yamaha-uk.com/ para los residentes del Reino Unido).
El producto tiene una garantía de dos años, a partir de la fecha de la compra original, que cubre las reparaciones de las averías que pueda tener debido a
defectos en la mano de obra o en los materiales empleados en su fabricación. Yamaha se compromete, sujeto a las condiciones listadas más abajo, a reparar
el producto o cualquier pieza (o piezas) que tenga defectos, o a sustituirlo, a discreción de Yamaha, sin cobrar ningún honorario por las piezas o la mano de
obra. Yamaha se reserva el derecho de reemplazar un producto por otro de clase y/o precio y condiciones similares, en el caso de que éste no se fabrique
más o se considere que las reparaciones resultan poco económicas.
Condiciones de la garantía
1. El producto defectuoso DEBERÁ ir acompañado de la factura o recibo de venta original (que muestre la fecha de la compra, el código del producto y
el nombre del concesionario), junto con una explicación que describa detalladamente la avería. Si falta esta prueba clara de la compra, Yamaha se
reserva el derecho a no proveer el servicio de reparaciones gratis, y el producto podrá ser devuelto al cliente corriendo éste con todos los gastos
relacionados con el envío.
2. El producto DEBERÁ haber sido adquirido en el establecimiento de un concesionario Yamaha AUTORIZADO dentro del Área Económica Europea
(AEE) o Suiza.
3. El producto no deberá haber sido sometido a ninguna modificación ni alteración, a menos que ésta haya sido autorizada por escrito por Yamaha.
4. De esta garantía se excluye lo siguiente:
a. El mantenimiento periódico y la reparación o sustitución de piezas debidos al desgaste natural.
b. Los daños debidos a:
(1) Reparaciones realizadas por el propio cliente o por un tercero que no cuente con ninguna autorización.
(2) Embalaje inadecuado o maltrato, cuando el producto está siendo transportado desde el lugar de residencia del cliente. Tenga en cuenta que el
cliente es el responsable de embalar el producto adecuadamente cuando éste es devuelto para ser reparado.
(3) Mal uso, incluyendo, pero sin limitarse a: (a) no usar el producto de forma normal o no seguir las instrucciones de uso, mantenimiento y
almacenamiento apropiadas indicadas por Yamaha, y (b) instalación o uso del producto de forma inconsistente con las normas técnicas o de
seguridad vigentes en el país donde éste se utiliza.
(4) Accidentes, rayos, agua, fuego, ventilación inadecuada, fuga de pilas o cualquier otra causa fuera del control de Yamaha.
(5) Defectos del sistema en el que se incorpora este producto e/o incompatibilidad con productos de terceros.
(6) Uso de un producto importado en la EEA y/o Suiza, no por Yamaha, donde ese producto no cumple con las normas técnicas o de seguridad del
país donde se usa y/o con la especificación estándar de un producto vendido por Yamaha en la EEA y/o en Suiza.
5. Cuando las garantías del país donde se compra el producto y del país donde éste se usa son diferentes se aplicará la garantía del país donde se usa el
producto.
6. Yamaha no se hará responsable de ninguna pérdida o daño directo, emergente o de cualquier otro tipo; sólo se hará responsable de la reparación o
sustitución del producto.
7. Haga una copia de seguridad de cualquier configuración o datos personalizados, ya que Yamaha no se hará responsable de ninguna alteración o
pérdida que tal configuración o datos puedan sufrir.
8. Esta garantía no afecta a los derechos legales del consumidor bajo las leyes nacionales aplicables vigentes, ni a los derechos del consumidor contra el
concesionario surgidos de su contrato de venta/compra.
4 Es
Clavija banana
Especificaciones
Меры предосторожности
Прочитайте описание следующих мер предосторожности перед использованием аппарата. Yamaha не
несет ответственность за любые повреждения и (или) травмы, вызванные несоблюдением приведенных
ниже мер предосторожности.
F
1.
Для обеспечения наилучшего результата, пожалуйста,
Информация для пользователей по сбору и
внимательно изучите данную инструкцию. Храните ее
утилизации старой аппаратуры
в безопасном месте для дальнейшего использования.
2. Данные колонки устанавливайте в прохладном,
Этот знак на аппаратуре, упаковках и в
сухом, чистом месте – подальше от окон,
источников тепла, источников чрезмерной
сопроводительных документах
вибрации; избегайте пыльных, влажных и
указывают на то, что подержанные
холодных мест. Избегайте установки возле
электрические и электронные
источников электрического шума (например,
приборы не должны выбрасываться
трансформаторов и моторов). Для предотвращения
вместе с обычным домашним мусором.
пожара или поражения электрическим током не
подвергайте колонки воздействию дождя или воды.
Для правильной обработки,
3. Для предотвращения деформирования или
хранения и утилизации старой
обесцвечивания корпуса не подвергайте колонки
аппаратуры, пожалуйста сдавайте
воздействию прямых солнечных лучей или
чрезмерной влажности.
их в соответствующие сборные
4. Не устанавливайте колонки в местах, где есть риск
пункты, согласно вашему
падения на них посторонних предметов и (или) где
национальному законодательству и
они могут быть незащищены от капающих или
директив 2002/96/EC.
разбрызгиваемых жидкостей.
5. Не располагайте сверху на колонках следующие
При правильном отделении этих
предметы:
товаров, вы помогаете сохранять
– Прочие компоненты, так как это может
ценные ресурсы и предотвращать
привести к повреждению или
вредное влияние на здоровье людей и
обесцвечиванию поверхности колонок.
– Горящие предметы (например, свечи), так как
окружающую среду, которое может
это может привести к пожару, повреждению
возникнуть из-за несоответствующего
колонок или стать причиной травмы.
обращения с отходами.
– Емкости с жидкостью, так как она может
За более подробной информацией о
пролиться и стать причиной поражения
пользователя электрическим током или
сборе и утилизации старых товаров
повреждения колонок.
пожалуйста обращайтесь в вашу
6.
Не устанавливайте колонки в местах, где они могут
локальную администрацию, в ваш
быть опрокинуты или повреждены упавшими
приёмный пункт или в магазин где
предметами. Лучшее качество звучания также будет
вы приобрели эти товары.
обеспечено при размещении на устойчивой поверхности.
7. Размещение колонок на одной и той же полке или
[Информация по утилизации в
на подставке проигрывателя дисков может
других странах за пределами
привести к появлению эффекта обратной связи.
Европейского Союза]
8.
Не вставляйте в отверстие колонок посторонние
объекты и не беритесь за отверстие руками
Этот знак действителен только на
(например, поднимая колонку). Это может привести к
территории Европейского Союза.
травме и/или повреждению оборудования.
Если вы хотите избавиться от этих
9. Если Вы услышите искажение звука, необходимо
уменьшить громкость с помощью регулятора
предметов, пожалуйста обратитесь
громкости на усилителе. Не позволяйте усилителю
в вашу локальную администрацию
работать в режиме “клиппинга”. В противном
или продавцу и спросите о
случае колонки могут быть повреждены.
правильном способе утилизации.
10. При использовании усилителя, номинальная
выходная мощность которого выше, чем
номинальная входная мощность колонок, будьте
Уход за колонкой
внимательны, чтобы не допустить превышения
Для чистки колонок не применяйте химические
максимальной входной мощности колонок.
составы (например, спирт, растворители и т. д.), так
11.
Не применяйте химические растворители для очистки
как они могут повредить отделочное покрытие.
колонок, так как это может привести к разрушению
покрывающего слоя. Используйте чистую сухую ткань.
Используйте сухую чистую ткань. Чтобы устранить
12. Не пытайтесь модифицировать или ремонтировать
сильное загрязнение, смочите мягкую ткань в воде,
колонки. При необходимости обратитесь в
отожмите воду и протрите тканью место
сервисный центр Yamaha. Ни в коем случае не
загрязнения.
открывайте корпус колонок.
Для моделей с полированным покрытием: удар по
13. Владелец аппарата несет ответственность за его
поверхности устройства металлическим,
размещение и надежную установку. Yamaha не
керамическим или другим твердым предметом
несет ответственность за любые несчастные
случаи, вызванные неправильным размещением
может привести к возникновению трещины или к
или установкой акустической системы.
отслаиванию отделочного покрытия.
i Ru
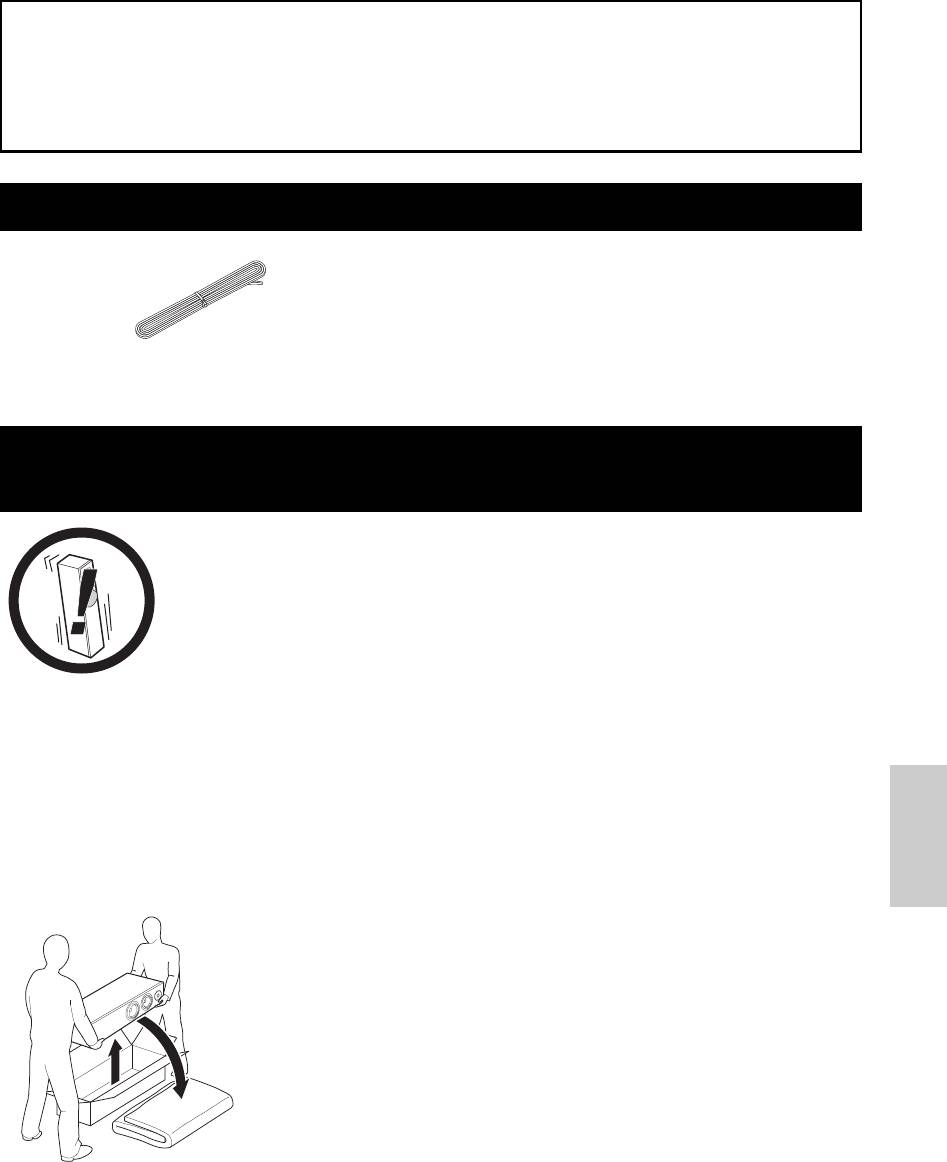
Убедитесь, что в состав комплекта входят изделия,
изображенные на иллюстрации.
Верхняя часть колонки более тяжелая, чем нижняя, поэтому колонка может
опрокинуться, если не предпринять мер по обеспечению ее устойчивости.
Опрокидывание колонки может привести к повреждению колонки или другого
имущества пользователя, а также к физическим травмам (в некоторых случаях —
смертельным).
Чтобы обеспечить безопасное и надлежащее использование колонки, необходимо:
• установить колонку на твердой, ровной и гладкой поверхности, на небольшой (по отношению к поверхности
пола) высоте;
• во время перемещения колонки не давить на ее боковые части и не толкать ее сбоку, а также не прислонять к
ее боковым частям другие предметы;
Русский
• не садиться на колонки и не класть на них какие-либо предметы.
Вибрации или толчки, вызванные землетрясениями или другими явлениями или действиями, могут
привести к падению колонки. Из соображений безопасности рекомендуется использовать
дополнительные средства обеспечения устойчивости колонок, доступные в магазинах (металлические
крепежные элементы или цепи и т.д.).
Примечания
• Не поднимайте устройство в одиночку.
• Будьте предельно осторожны и следите за тем, чтобы не поцарапать
поверхность колонки.
• Не прикладывайте усилие к боковой части колонки. В противном случае
можно опрокинуть колонку и повредить оборудование или получить травмы.
• Зафиксируйте кабели на полу, так как незакрепленные кабели мешают
ходить и могут стать причиной несчастного случая.
• Размещение колонок слишком близко к телевизору с электронно-лучевой
трубкой может привести к ухудшению качества изображения или к
появлению шумовых помех. В этом случае отодвиньте колонки от
телевизора. Данная проблема не характерна для плазменных и ЖК-
телевизоров.
•
Модель NS-F140 позволяет использовать для монтажа имеющиеся в
продаже ножки или шпильки, с помощью которых можно повысить
устойчивость колонок и качество звука.
В основании колонок есть отверстия для винтов, предназначенные для
установки ножек или шпилек. Размеры отверстий:
диаметр: 8 мм
глубина: 18 мм
Более подробная информация по установке ножек или шпилек
приведена в прилагаемом к ним руководстве.
1 Ru
Содержание
Прилагаемые принадлежности ......................1
Расположение колонок .................................... 2
Меры предосторожности при выборе
Подключение колонок к усилителю ............. 3
места установки колонок ...........................1
Технические характеристики ......................... 4
Прилагаемые принадлежности
Кабель колонок 4 м (13,1 фута) x1
Меры предосторожности при выборе места
установки колонок
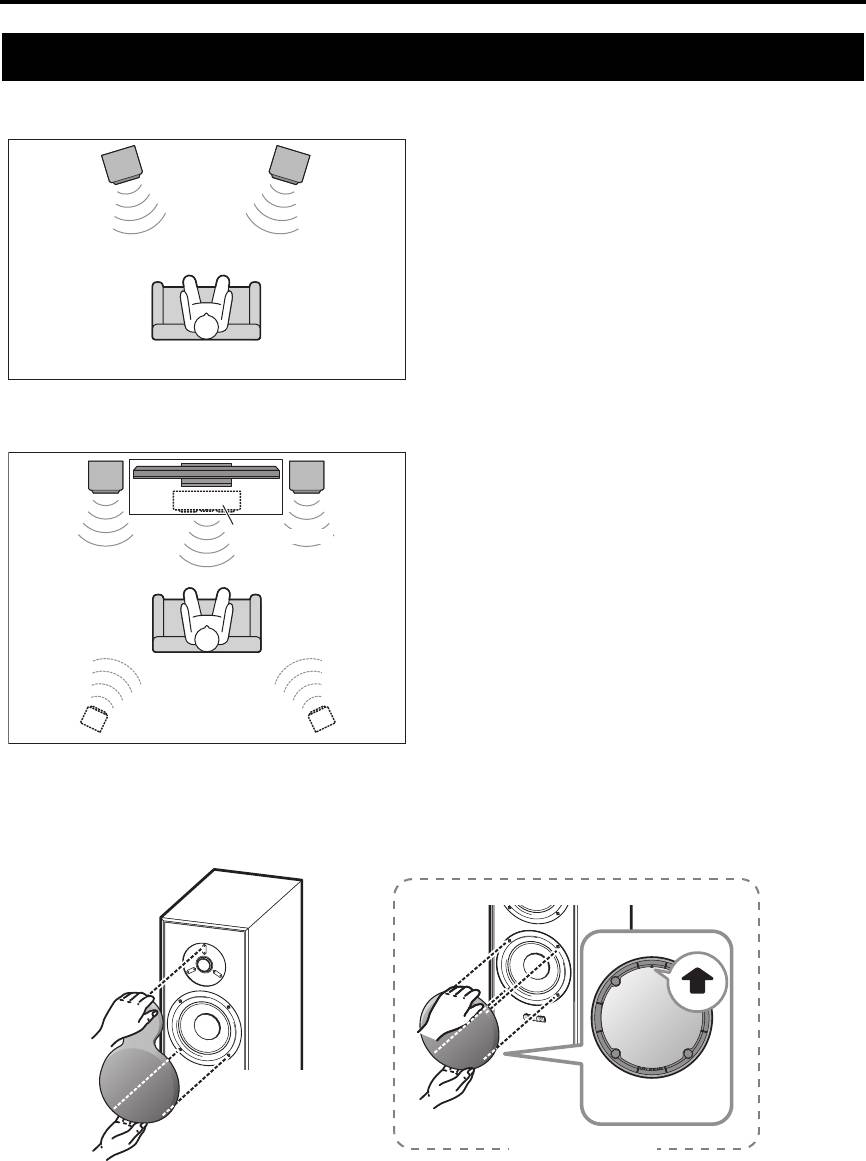
Расположение колонок
Расположение колонок
■ 2-х канальные стереоколонки
Чтобы добиться оптимального стереоэффекта,
колонки располагают под небольшим углом к
слушателю.
■ Использование в качестве фронтальных колонок в мультиканальной системе
Установите колонки с обеих сторон телевизора.
Общее качество звучания мультиканальной системы
сильно зависит от пространственного расположения
колонок. Настройте колонки в соответствии с
положением слушателя, следуя инструкциям,
приведенным в руководстве по использованию
усилителя.
■ Снятие и установка сетки
Чтобы снять сетку, осторожно потяните за нее.
Установка сетки производится следующим образом: расположите сетку так, чтобы отверстия на ней совпадали
со штифтами на колонке. Легким нажатием наденьте сетку на колонку
.
Примечания
• Снимая и устанавливая сетку не прикасайтесь к головкам излучателя, а также не используйте инструменты с
целью увеличения прилагаемого усилия.
• Не прикасайтесь к диафрагме динамика и не нажимайте на нее. Это может привести к неправильной работе
колонки.
• Чтобы не повредить сетку при ее установке или снятии, не прилагайте слишком большое усилие и давите на
каркас, а не на поверхность сетки.
2 Ru
NS-F150/
NS-F150/
NS-F140
NS-F140
Центральная
Колонка
Колонка
объемног
объемного
о звучания
звучания
Верх
Низ
(сетка, вид сзади)
Только для NS-F150
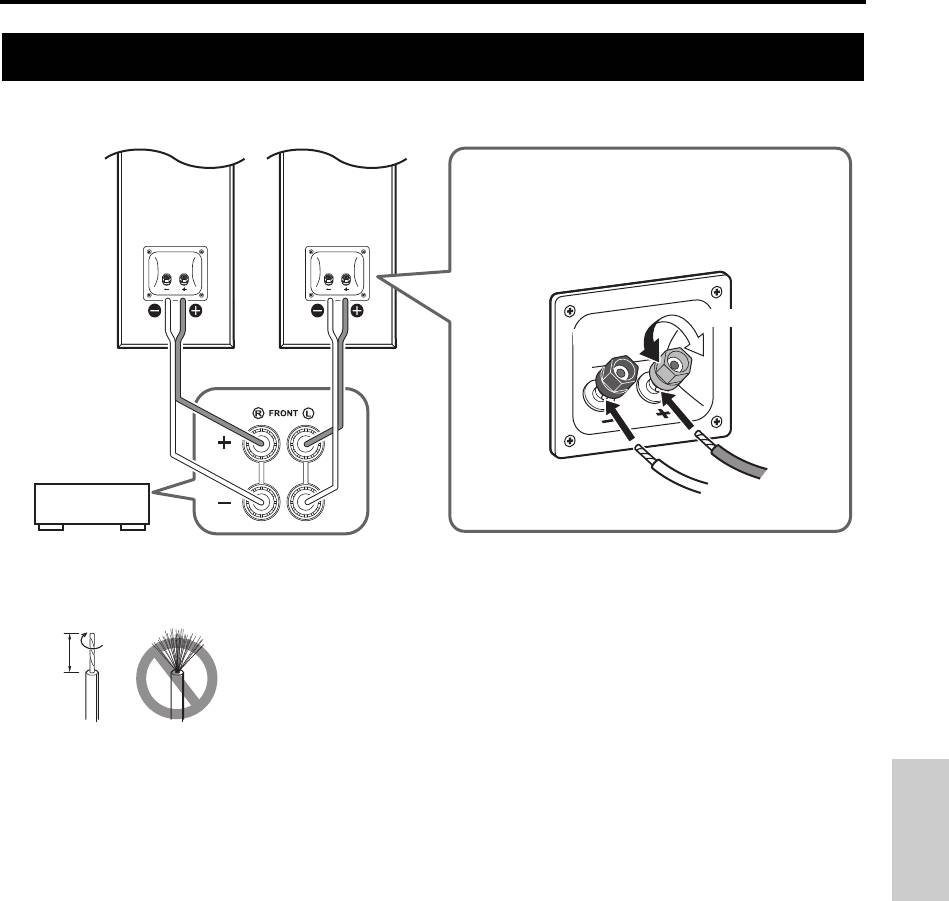
Подключение колонок к усилителю
Подключение колонок к усилителю
Перед подключением убедитесь, что усилитель выключен.
■ Как подключить кабели колонки
1 С конца каждого кабеля удалите 15 мм изоляции. Аккуратно и туго
скрутите проводники кабеля вместе, как изображено на
иллюстрации слева.
2 Ослабьте головку клеммы.
3 Вставьте оголенный конец кабеля в клемму.
4 Зафиксируйте кабель, затянув головку клеммы.
Русский
5 Проверьте надежность соединения, слегка потянув за кабель в
области клеммы.
Примечания
• Убедитесь в том, что в клемме зажата оголенная часть провода, без изоляции.
• Убедитесь в том, что оголенные части проводов не соприкасаются: контакт оголенных проводов может
привести к поломке колонок или усилителя.
• Колонки не воспроизводят звук, если подключение выполнено неправильно.
■ Подключение к усилителю или ресиверу
Подключите одну колонку к клеммам подключения левой колонки на усилителе или ресивере (отмечены
буквой L), а вторую колонку — к клеммам подключения правой колонки (отмечены буквой R). Более
подробная информация приведена в руководстве по эксплуатации усилителя или ресивера.
Примечания
• Убедитесь в том, что при подключении колонок была соблюдена правильная полярность:
положительные (+) клеммы соединены с положительными (+) клеммами, а отрицательные (–) клеммы
— с отрицательными (–). Если перепутать клеммы, колонки будут издавать неестественный звук и плохо
передавать низкие частоты.
• Длительное воспроизведение определенных звуков на большой громкости может повредить колонки.
Например, при длительном воспроизведении синусоидального сигнала с тестового диска, низких частот
электронных инструментов и т. д., а также при касании иглы проигрывателя поверхности пластинки
понижайте уровень громкости во избежание повреждения динамиков.
• После завершения подключения колонок включите усилитель и другие аудио- и видеоустройства в
подходящие настенные розетки сети переменного тока.
• Усилители, номинальная выходная мощность которых превышает номинальную входную мощность
колонок, следует использовать с осторожностью, не допуская превышения максимальной входной
мощности колонок.
3 Ru
NS-F150/NS-F140
NS-F150/NS-F140
Примечание
Изоляция кабелей не должна попадать в
клеммы.
Колонки не воспроизводят звук, если
подключение выполнено неправильно.
Завинтить
Ослабить
ЛеваяПравая
Положитель
ный (+)
Усилитель
Отрицательный (–)
или ресивер
Клеммы выхода на колонки
15 мм
Правильно Неправильно
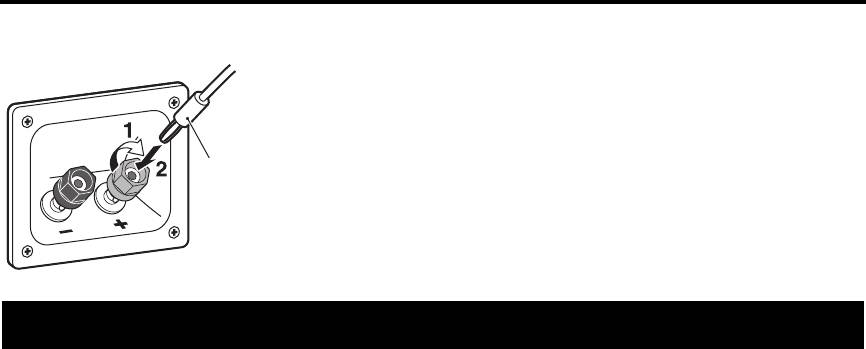
Технические характеристики
■ Использование штекера с продольными подпружиненными контактами
1 Затяните головку клеммы.
2 Просто вставьте штекер с продольными
подпружиненными контактами в клемму.
■ NS-F150
■ NS-F140
Тип.......................... Двухполосная акустическая система с
Тип.......................... Двухполосная акустическая система с
отражением басов
отражением басов
С магнитным экранированием
С магнитным экранированием
Головка...................................... Низкочастотный динамик:
Головка...................................... Низкочастотный динамик:
16-см конический динамик x 2
16-см конический динамик
Высокочастотный динамик: 3-см сбалансированный
Высокочастотный динамик: 3-см сбалансированный
купольный динамик
купольный динамик
Номинальная входная мощность ..............................50 Вт
Номинальная входная мощность .............................. 40 Вт
Максимальная входная мощность ..........................180 Вт
Максимальная входная мощность ..........................150 Вт
Номинальный импеданс.................................................. 6 Ω
Номинальный импеданс.................................................. 6 Ω
Частотная характеристика............. 37 Гц-30 кГц (–10 дБ)
Частотная характеристика............. 37 Гц-30 кГц (–10 дБ)
Чувствительность .......................................88 дБ/2,83 В, 1 м
Чувствительность .......................................86 дБ/2,83 В, 1 м
Габаритные размеры (Ш x В x Г)......200 x 1030 x 362 мм
Габаритные размеры (Ш x В x Г)........ 200 x 950 x 362 мм
Масса.................................................................................11,2 кг
Масса...................................................................................9,5 кг
Технические характеристики могут изменяться без уведомления.
4 Ru
Штекер с
продольными
подпружиненны
ми контактами
Технические характеристики

© 2011 Yamaha Corporation
Printed in Indonesia WY43620


