Olympus DS-7000: Menu items
Menu items: Olympus DS-7000

5 Press the
+
or
–
button to change
the setting.
• Pressing the 0 button without
pressing the OK/MENU button
will cancel the settings and return
you to the previous screen.
6 Press the
OK/MENU
button to
complete the setting.
• You will be informed that the
settings have been established
via the screen.
7 Press the
F3 (EXIT)
button to close
the menu screen.
2 Press the 9 or 0 button to
move to the tab that contains the
item you want to set.
Menu items
• You can change the menu display
by moving the settings tab cursor.
File Menu
EN CS DA DE ES FR NL PL RU SV
Priority:
By default, the F2 button is
programmed with the Priority
function. The setting can also be
performed from the menu.
You can set a priority level on each
file recorded. You can select “High” or
“Normal”. The default is Normal level.
[ Set ]:
High level.
3 Press the
+
or
−
button to move to
[ Cancel ]:
the item you want to set.
Normal level.
• Move to the menu item you want
• Each time the F2 ( PRIORITY ) button
to set.
is pressed the Priority level will
change (High/Normal).
Pending:
When you set [ Pending ] to the file,
the file becomes “Pending file”. If
How to use the menu
“Download file” is set to “Finished file”
Items in menus are categorized by
by ODMS software, the [ Pending ] file
tabs, so select a tab first and move to
is not transferred and only [ Finished ]
a desired item to quickly set it. You
file (edited file) will be transferred
can set each menu item as follows.
to your PC.
[ Pending ]:
4 Press the
OK/MENU
button.
Sets to a file of “Editing” and [
]
• Move to the setting of the
will appear on the display.
selected item.
[ Finished ]:
Sets to a file of “already edited”.
File Lock:
The File lock function allows you to
prevent important files from being
accidentally erased.
[ On ]:
Locks the file and prevents it from
being erased.
[
] will appear on the display.
[ Off ]:
Unlocks the file and allows it to be
erased.
12
7
7
1,4,6
1, 4 , 6
2
2
3, 5
3, 5
1 While the recorder is in stop mode,
press the
OK/MENU
button.
• The menu will appear on the
display.
Locating an index mark
2 While playing back a file, press and
hold the 9 or 0 button.
• The recorder stops for 1 second
when it reaches the index mark.
Clearing an index mark
1 Select a file in which index marks
you want to erase are contained.
2 Press the 9 or 0 button to
select the index mark to erase.
3 While the index number appears
for approximately 2 seconds on the
display, press the
ERASE
button.
• The index mark is erased.
Notes:
• Up to 32 index marks can be set
within a file.
• When a file is locked or set to read-
only, or when the SD card is locked,
index mark cannot be erased.
• If the recorder has been set to DSS
Classic mode, index marks are
limited to a maximum of 16 for each
file.
Work Type:
1 Select [
On
].
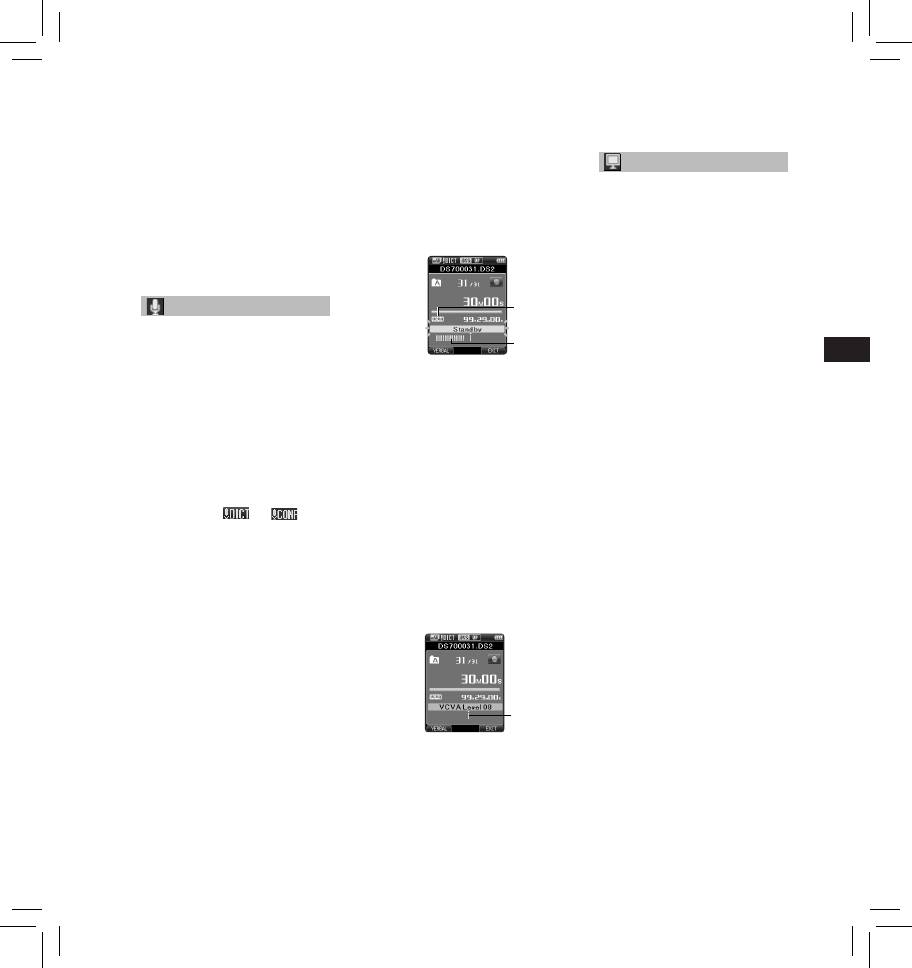
• To ensure successful recordings, prior
The Work Type information of the
testing and adjustment of the start/
2 Move the slide switch to the
recorded or uploaded files can be
stop actuation level is recommended.
REC
( s ) position to start recording.
edited with the menu settings of the
• When the sound volume is lower
recorder.
than the preset actuation sound
• For further details, a complete
LCD/Sound Menu
level, recording automatically
advanced version of the manual *
stops after 1 second
(PDF format) is available for
Backlight:
approximately, and [ Standby ]
download at the OLYMPUS website.
flashes on the display. The record
By default, the display will remain lit
* Available in English, French or
indicator light turns on when
for about 10 seconds when a button
German.
recording starts and flashes when
on the recorder is pressed.
Information:
recording pauses.
1 Select [
Lighting Time
], [
Dim
The recorder can display a variety of
Light Time
] or [
Brightness
].
information related to the current file.
2 Select the options.
When [Lighting Time] is selected:
[ 5seconds ] [ 10seconds ] [ 30seconds ]
Rec Menu
a
[ 1minute ]:
Set the backlight duration.
Mic Sense:
When [Dim Light Time] is
EN CS DA DE ES FR NL PL RU SV
You can switch between two
b
selected:
microphone sensitivities to meet
[ 30seconds ] [ 1minute ] [ 2minutes ]
recording needs: [ Dictation ] for oral
a VCVA indicator
[ 5minutes ]
dictation and [ Conference ] which
b Level meter (varies according
[ Always On ]:
is suited for situations like meetings
to the sound volume being
Set the time after which the
and conferences with a small number
recorded)
backlight dims.
of people.
When [Brightness] is selected:
[ Conference ]:
Adjust the start/stop actuation
[ 01 ] [ 02 ] [ 03 ]:
High-sensitivity mode that records
level:
sounds in all directions.
Sets the brightness of the
While the recorder is in recording
[ Dictation ]:
backlight when lit.
Low-sensitivity mode suited for
mode, press the 9 or 0 button
LED:
dictation.
to adjust the actuation level.
• The setting status will appear on
You can set it so the record indicator
• The VCVA level can be set to any of
the display as [
] or [ ].
light does not turn on.
15 different values.
[ On ]:
• The higher the value is, the more
Rec Mode:
LED light will be set.
sensitive the recorder can react to
The recording mode can be set to
[ Off ]:
sounds. At the highest value, even
[ DSS Pro QP ] (Quality Playback) or
LED light will be canceled.
the faintest sound will activate
[ DSS Pro SP ] (Standard Playback).
recording.
Beep:
• You cannot select the [ DSS Pro QP ]
• The VCVA actuation level can be
When the Beep is set to [ On ], the
mode when setting the recorder to
adjusted according to the ambient
recorder will beep in case of error.
the DSS Classic mode.
(background) noise.
[ On ]:
For details, see “ Recording ” in the
Beep is enabled.
“ Customizing the recorder ”.
[ Off ]:
VCVA:
Beep is disabled.
The VCVA feature extends recording
Language (Lang):
time and conserves memory by
You can set the language for the
stopping recording during silent
recorder’s user interface.
periods, which helps the playback
[ Čeština ] [ Dansk ] [ Deutsch ]
to be more efficient. When the
c
[ English ] [ Español ] [ Français ]
microphone senses that sounds
[ Nederlands ] [ Polski ] [ Русский ]
have reached a preset threshold
[ Svenska ]:
volume level, the built-in Variable
C Start level (moves to the right/
• The languages available may vary
Control Voice Actuator (VCVA) starts
left according to the set level)
depending on the country/region
recording automatically, and stops
• The start/stop actuation level also
where the product is purchased.
when the volume drops below the
varies depending on the selected
threshold level.
microphone sensitivity mode.
13
connected via USB in [ Composite ],
2 Press the
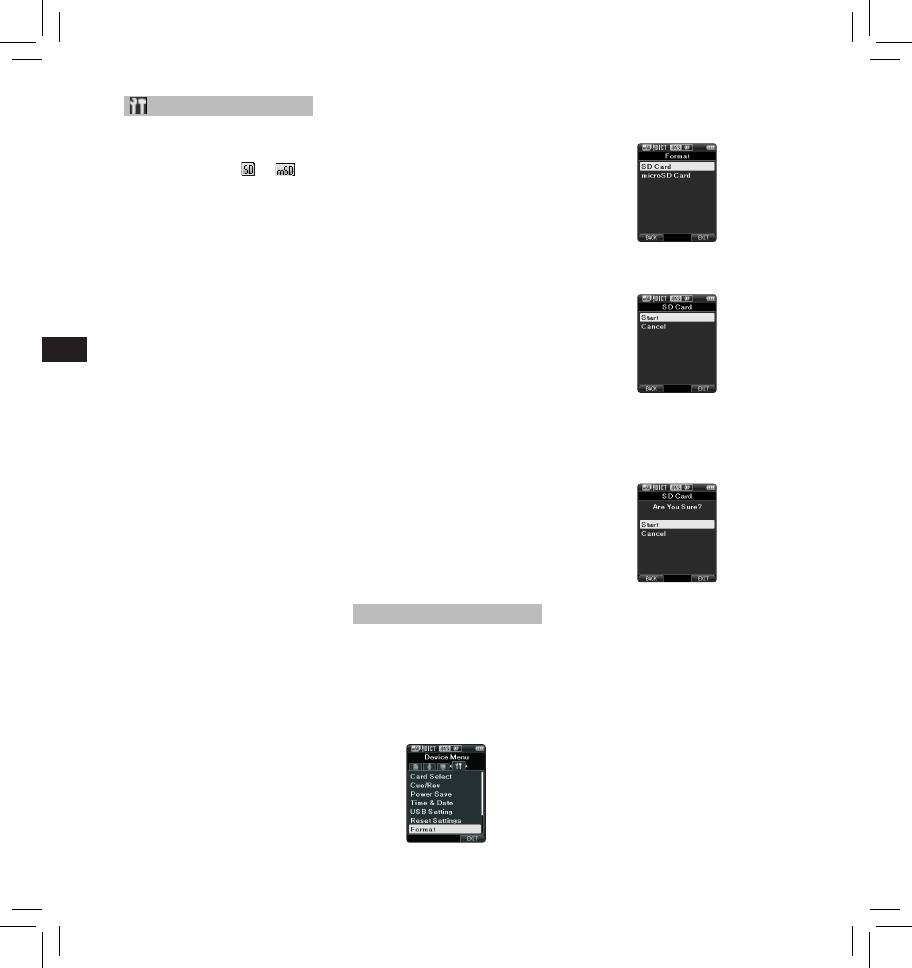
+
or
–
button to select
Device Menu
the recorder can be used as the USB
[
SD Card
] or [
microSD Card
],
speaker and the USB microphone in
Card Select:
then press the
OK/MENU
button.
addition to storage class.
By default, the recording media is set
[ Storage Class ]:
to [ SD Card ] by the manufacturer.
USB connection is possible in only
• The recording media ([
] or [ ])
storage class.
will appear on the display.
Reset Settings:
Cue/Rev:
To reset the menu settings to their
The playback sound of Cue and
default values use [ Reset Settings ]
Review operation and Cue and
under [ Device Menu ], or use the
Review speed can be set.
ODMS and DSS Player software.
1 Select [
Sound
] or [
Speed
].
Format:
3 Press the
+
or
–
button to select
[ Sound ]:
Cards that have been used in non-
Set the playback sound of Cue
[
Start
] option.
Olympus devices, or cards that are
and Review to On or Off.
not recognized by the recorder, must
[ Speed ]:
be formatted before they can be used
Set the Cue and Review speed.
with the recorder.
2 Select the options.
EN CS DA DE ES FR NL PL RU SV
• Formatting the card will erase all
When [Sound] is selected:
the stored data, including locked
[ On ]:
files.
Activate the playback sound of
For details, see “ Formatting the card
Cue and Review.
[Format] ”.
[ Off ]:
Card Information:
Disables this function.
Memory card capacity and remaining
4 Press the
OK/MENU
button to
When [Speed] is selected:
card space for the cards in use will be
confirm [
Start
] selection.
You can adjust the Cue and
displayed on the recorder.
Review speed level from
5 Press the
+
or
–
button again to
[ Speed 1 ] to [ Speed 5 ].
System Information:
select [
Start
] option.
• Cue and Review speed level
System information about the
becomes faster as the numerical
recorder like the [ Model ], [ Version ]
value becomes larger.
and [ Serial No. ] can be displayed.
Power Save:
• For further details, a complete
advanced version of the manual *
By default, the recorder will enter
(PDF format) is available for
into Power Save mode if not used for
download at the OLYMPUS website.
more than 10 minutes.
* Available in English, French or
[ 5minutes ] [ 10minutes ] [ 30minutes ]
German.
[ 1hour ]:
Set the length of time before the
recorder will enter into Power Save
6 Press the
OK/MENU
button again
mode.
Formatting the card [Format]
to initiate the formatting process.
[ Off ]: Disables this function.
Cards that have been used in non-
• If any button is pressed, time count
• [ Format Done ] displays when
Olympus devices, or cards that are
will restart.
formatting ends.
not recognized by the recorder, must
be formatted before they can be used
Notes:
Time & Date:
with the recorder.
• The time required to format a card
Setting the time and date beforehand
varies according to the capacity of
enables easier file management.
1 Select [
Format
] at the [
Device
the card to be formatted.
For details, see “ Setting time and
Menu
] screen, then press the
Do not interrupt the formatting
date [Time & Date] ”.
OK/MENU
button.
process with the following actions.
USB Class:
Doing so may damage the data or
the card.
You can set the USB class of this
- Remove the card.
recorder with a USB connection to
- Remove the battery.
[ Composite ] or [ Storage Class ].
• Formatting the card will erase all
[ Composite ]:
the stored data, including locked
In the 3 classes of Storage, USB
files.
audio and human interface device,
USB connection is possible. While
• When an unformatted card is
inserted, the format menu will be
displayed automatically.
14

• Locked SD cards cannot be
− The lower part of the screen can
Enabled:
initialized.
be used to display information
• Change the number of usable
• Memory cards will be formatted
on the file actually selected, like
folders.
using quick format. Formatting
Author ID, Work Type and Option
the card will reset the information
Item.
Folder name:
in file management, but the data
− The right part of the screen can
• Change the folder name.
inside the card may not be deleted
be used to display the Slide
Worktype:
completely. Be careful of data
Switch Guide indicators.
leakage when disposing or handing
• Set the folder's work type.
❏ Device Security
of the card. We recommend that
You can customize / adjust / set /
AutoLock:
you physically destroy the card
configure various settings related to
• Set the Auto Lock on a file to On/Off.
when disposing of it.
the recorder’s device lock function.
Encryption:
PIN code:
Customizing the recorder
• Select a folder’s Encryption level.
• Password setting.
It is possible to set the Encryption
You can customize various settings
Device Lock:
level to [ High ] (256 bit), [ Standard ]
of the recorder using the ODMS
(128 bit) or [ No ] (deactivates the
software.
• Device lock function On/Off.
function).
For more details, refer to the online
• Settings related to the timing for
help for ODMS software.
setting the device lock.
Password:
• Changing the number of allowable
EN CS DA DE ES FR NL PL RU SV
Common settings:
• Set the folder's Encryption Password.
input errors (mismatches) for the
You can set the default values for
password.
❏ Recording
You can customize / adjust / set /
each of the recorder’s Menu items.
❏ Author List
configure various settings related to
You can customize / adjust / set /
Administrative settings:
the recorder’s Dictation files.
configure settings related to the
❏ General
Author.
DSS Format:
Accessibility:
Author List:
• Select the recording format (DSS
Pro/DSS Classic).
• You can customize / adjust / set /
• Register multiple Author IDs (up to
configure various settings related
max. 10 items).
Record function:
to user authorization, such as
• Set the priority level for each Author
• Select the recording mode
prohibiting both file erasure and
ID.
(Overwrite/Append/Insert).
Menu settings.
• Select the Author ID you want to be
used by default.
File download:
Splash Message:
• Select the files you want to be
• You can set the contents that appear
Author Selection:
transferred to the PC (All file/Finished
in the message which is displayed
• Choose to activate/deactivate the
file).
during start-up.
Author ID selection at the recorder
❏ Programmable Buttons
start-up.
Slide Switch Guide:
You can change the allocated
❏ Work Type List
• You can set the Slide Switch Guide,
functions for the Programmable
You can customize / adjust / set /
which indicates the position of the
Smart Buttons ( F1 , F2 , F3 buttons),
configure settings related to the
Slide Switch on the display, to either
the NEW button, and the Slide
Work Type.
enabled or disabled.
Switch.
Work Type List:
Alarm:
New and Slide Switch functions:
• Register Work Types (up to max. 20
• You can set occasions for the
• Select a combination of functions.
items).
recorder’s alarm or beep noise to
• Set the option items for each Work
Programmable Buttons:
sound.
Type (up to max.10 options).
• Select the function to associate to
❏ Display
• Select the Work Type you want to be
the Programmable buttons ( F1 , F2 ,
• You can select a default pattern for
used by default.
F3 buttons) for each mode (New,
display from 4 patterns.
Stop, Recording, Playback mode).
• The way information is displayed on
Worktype Selection:
❏ Hands Free
the LCD display can be customized
• Choose to activate/deactivate the
You can customize / adjust / set /
for three different areas.
Work Type selection when the
configure settings related to the
– The upper part of the screen
recorder is iv New mode.
Hands-Free operation with the Foot
displays the recorder's basic
❏ Device Folders
Switch (optional).
functions.
You can customize / adjust / set /
configure various settings related to
the recorder’s folders.
15
Оглавление
- Introduction
- Getting started
- Basic operations
- Advanced operations
- Menu items
- Managing files on your PC
- Other information
- Technical assistance and support
- Úvod
- Začínáme
- Základní obsluha
- Pokročilá obsluha
- Položky nabídky
- Správa souborů v počítači
- Další informace
- Technická pomoc a podpora
- Introduktion
- Kom godt i gang
- Grundlæggende betjening
- Avanceret betjening
- Menupunkter
- Filhåndtering på din pc
- Øvrige oplysninger
- Teknisk hjælp og support
- Einführung
- Allgemeines
- Grundlegende Bedienung
- Erweiterte Anleitung
- Menüpunkte
- Verwalten von Dateien
- Zusätzliche Informationen
- Technische Hilfe und Support
- Introducción
- Para empezar
- Operaciones Básicas
- Funciones avanzadas
- Elementos del menú
- Administración de
- Otra información
- Asistencia y ayuda técnica
- Introduction
- Préparatifs
- Opérations de base
- Opérations avancées
- Eléments de menu
- Gestion des fichiers sur
- Autres informations
- Assistance technique et soutien
- Inleiding
- Aan de slag
- Basisbewerkingen
- Geavanceerde bewerkingen
- Menuopties
- Bestanden beheren op uw PC
- Overige informatie
- Technische bijstand en ondersteuning
- Wprowadzenie
- Pierwsze kroki
- Podstawowe operacje
- Zaawansowane operacje
- Pozycje menu
- Zarządzanie plikami na
- Inne informacje
- Wsparcie techniczne
- Введение
- Начало работы
- Основные операции
- Расширенные операции
- Пункты меню
- Управление файлами в
- Прочая информация
- Техническая помощь и обслуживание
- Introduktion
- Komma igång
- Grundläggande funktioner
- Avancerade funktioner
- Menyalternativ
- Hantera filer på din PC
- Övrig information
- Teknisk hjälp och support
- Olympus Service Department


