Olympus FL-300R: инструкция
Раздел: Бытовая, кухонная техника, электроника и оборудование
Тип: Фотоаппарат
Инструкция к Фотоаппарату Olympus FL-300R

7 - EN
INSTRUCTIONS
87 - HU
HASZNÁLATI ÚTMUTATÓ
17 - CS
NÁVOD K POUŽITÍ
97 - IT
ISTRUZIONI
27 - DE
BEDIENUNGSANLEITUNG
107 - NL
AANWIJZINGEN
37 - DA
BETJENINGSVEJLEDNING
117 - PL
INSTRUKCJA
47 - ET
JUHISED
127 - RU
ИНСТРУКЦИЯ
Electronic Flash
57 - ES
INSTRUCCIONES
137 - SL
NAVODILA
FL
-
300R
67 - FI
KÄYTTÖOHJEET
147 - SK
NÁVOD NA POUŽITIE
77 - FR
MODE D’EMPLOI
VR516401
© 2011
Printed in China
R2190Ecover.indd1R2190Ecover.indd1 2011/03/2114:17:462011/03/2114:17:46
MEMO
F
no.
ISO
1.4 2 2.8 4 5.6 8 11 16 22
1
100
1.3~14 0.9~10 0.6~7 0.6~5 0.6~3.5 0.6~2.5 0.6~1.7 0.6~1.3 0.6~0.9
200
1.8~20 1.3~14 0.9~10 0.6~7 0.6~5 0.6~3.5 0.6~2.5 0.6~1.7 0.6~1.3
7
400
2.5~28 1.8~20 1.3~14 0.9~10 0.6~7 0.6~5 0.6~3.5 0.6~2.5 0.6~1.7
800
3.6~40 2.5~28 1.8~20 1.3~14 0.9~10 0.6~7 0.6~5 0.6~3.5 0.6~2.5
5
1600
5.1~56 3.6~40 2.5~28 1.8~20 1.3~14 0.9~10 0.6~7 0.6~5 0.6~3.5
3200
7.1~80 5.1~56 3.6~40 2.5~28 1.8~20 1.3~14 0.9~10 0.6~7 0.6~5
6
6400
9.9~112
7.1~80 5.1~56 3.6~40 2.5~28 1.8~20 1.3~14 0.9~10 0.6~7
4
100
0.8~8.5 0.5~6 0.5~4.3 0.5~3 0.5~2.1 0.5~1.5 0.5~1.1 0.5~0.8 0.5
9
8
200
1.1~10 0.8~8.5 0.5~6 0.5~4.3 0.5~3 0.5~2.1 0.5~1.5 0.5~1.1 0.5~0.8
400
1.6~17 1.1~10 0.8~8.5 0.5~6 0.5~4.3 0.5~3 0.5~2.1 0.5~1.5 0.5~1.1
800
2.1~24 1.6~17 1.1~10 0.8~8.5 0.5~6 0.5~4.3 0.5~3 0.5~2.1 0.5~1.5
1600
3~34 2.1~24 1.6~17 1.1~10 0.8~8.5 0.5~6 0.5~4.3 0.5~3 0.5~2.1
2
3200
4.3~48 3~34 2.1~24 1.6~17 1.1~10 0.8~8.5 0.5~6 0.5~4.3 0.5~3
6400
6~69
4.3~48 3~34 2.1~24 1.6~17 1.1~10 0.8~8.5 0.5~6 0.5~4.3
3
(m)
3 4
R2190Ecover.indd2R2190Ecover.indd2 2011/03/2114:17:462011/03/2114:17:46

Information for Your Safety
IMPORTANT SAFETY
INSTRUCTIONS
When using your photographic equipment, basic safety precautions
should always be followed, including the following:
y
Read and understand all instructions before using.
y
Close supervision is necessary when any fl ash is used by or near
children. Do not leave fl ash unattended while in use.
y
Care must be taken as burns can occur from touching hot parts.
5
bookR2190Unified.indb5bookR2190Unified.indb5 2011/03/2111:24:582011/03/2111:24:58
y
Do not operate if the fl ash has been dropped or damaged - until it has
been examined by qualifi ed service personnel.
y
Let fl ash cool completely before putting away.
y
To reduce the risk of electric shock, do not immerse this fl ash in
water or other liquids.
y
To reduce the risk of electric shock, do not disassemble this fl ash,
but take it to qualifi ed service personnel when service or repair
work is required. Incorrect reassembly can cause electric shock
when the fl ash is used subsequently.
y
The use of an accessory attachment not recommended by the
manufacturer may cause a risk of fi re, electric shock, or injury to
persons.
SAVE THESE INSTRUCTIONS
6
bookR2190Unified.indb6bookR2190Unified.indb6 2011/03/2111:24:582011/03/2111:24:58
Thank you for purchasing this Olympus product. To ensure your safety, please read this
instruction manual before use, and keep it handy for future reference.
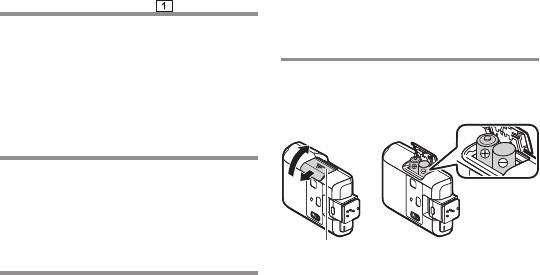
Names of parts (Fig. Names of parts (Fig. p. 3) p. 3)
x
Notes
1
Light-emitting area
5 AUTO CHECK
AAA (R03) manganese batteries cannot be used.
2 Lock release
lamp
Loading batteriesLoading batteries
button
6 ON/OFF button
3 Lock pin
7 W knob
1
Open the battery compartment cover.
4 TEST button/
8 RC switch
2
Insert the batteries with correct
CHARGE lamp
9 Remote sensor
+/– polarity.
Continuous fi ringContinuous fi ring
The fl ash may become hot when fi red many
times in succession, resulting in damage
or malfunction. The fl ash should be fi red
no more than 10 times in succession at
intervals of 6 seconds, after which it should
be left unused for at least 10 minutes.
Preparing a battery Preparing a battery
(sold separately)(sold separately)
Battery compartment
Battery compartment
Choose from the below batteries:
cover
cover
•
AAA (R03) alkaline batteries (x 2)
3
Close the battery compartment cover.
•
AAA (R03) NiMH batteries (x 2)
EN 7
bookR2190Unified.indb7bookR2190Unified.indb7 2011/03/2111:24:582011/03/2111:24:58

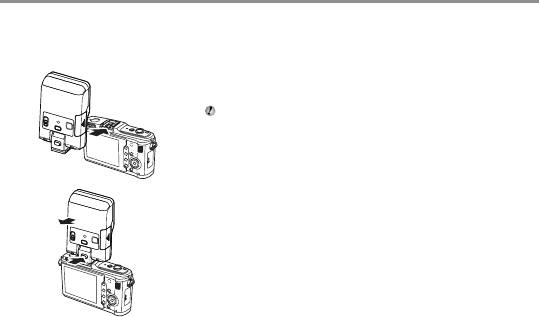
Attaching to the cameraAttaching to the camera
x
Notes
Confi rm that both the camera and electronic fl ash are off. Attaching or removing the electronic
fl ash while either the fl ash or the camera is on may result in malfunction.
1
Remove the camera hot shoe cover and slide the
fl ash securely into the hot shoe until it clicks into
place (
1
).
Do not attach this fl ash with the built-in fl ash raised, or
the built-in fl ash may get broken.
1
•
Remove the fl ash while pressing the lock release button
(
2
).
If the camera has an external fl ash connector, a fl ash bracket
and bracket cable (sold separately) can be attached.
2
8 EN
bookR2190Unified.indb8bookR2190Unified.indb8 2011/03/2111:25:002011/03/2111:25:00

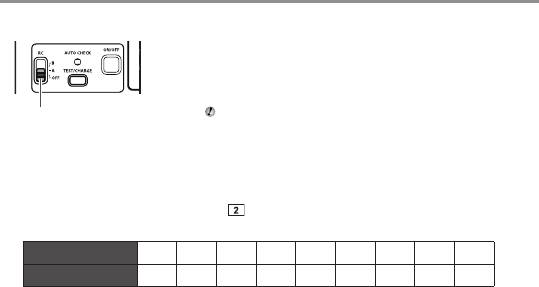
Turning on the electronic fl ashTurning on the electronic fl ash
Attach an electronic fl ash to the camera, and then turn the camera on.
1
Press and hold the ON/OFF button until any lamp lights.
•
Press the ON/OFF button again to turn the power off.
•
Press the TEST button to fi re a test fl ash when the
CHARGE lamp lights.
TEST button/
ON/OFF
CHARGE lamp
button
•
Replace the batteries if the CHARGE lamp does not light after:
30 seconds (Alkaline batteries)
10 seconds (NiMH batteries)
•
If the CHARGE lamp and AUTO CHECK lamp blink simultaneously, batteries are running
low. Replace the batteries.
•
If no operations are performed for about 15 minutes, the fl ash will enter sleep mode to
save power. The fl ash will also enter sleep mode whenever the camera enters sleep mode.
If no operations are performed for approximately 60 minutes more, the fl ash will turn off
automatically. Press the ON/OFF button to turn it on.
EN 9
bookR2190Unified.indb9bookR2190Unified.indb9 2011/03/2111:25:002011/03/2111:25:00

ShootingShooting
According to the fl ash mode setting of the camera, shooting in TTL-AUTO mode or MANUAL
mode is available with this fl ash.
1
Set the RC switch to “OFF”.
2
In accordance with the intended use, set the fl ash mode
of the camera.
For details, refer to the instruction manual of the camera.
RC switch
MANUAL mode is not available for some cameras.
•
In TTL-AUTO mode: When fl ash activation has been performed correctly, the AUTO
CHECK lamp blinks for about 5 seconds after the shooting.
•
In MANUAL mode: Adjust camera settings (ISO sensitivity and aperture value) based on the
distance to subject and then shoot.
Shooting distance (m) = Guide No. (ISO100) x ISO sensitivity coeffi cient ÷ Aperture value
Available shooting range (Table P.4)
ISO sensitivity coeffi cient
ISO
25 50 100 200 400 800 1600 3200 6400
sensitivity
Coeffi cient
0.5 0.71 1.0 1.4 2.0 2.8 4.0 5.6 8.0
•
When using a fl ash, fl ash light may be blocked by the lens body, lens hood, etc.
•
When the shooting distance is closer to 1m, using the wide panel is recommended not to control the fl ash volume too much.
10 EN
bookR2190Unified.indb10bookR2190Unified.indb10 2011/03/2111:25:012011/03/2111:25:01

Wide angleWide angle
Use the wide panel for shooting when the lens focal length is
wider than 9 mm to 14 mm.
1
Slide the W knob to the W side.
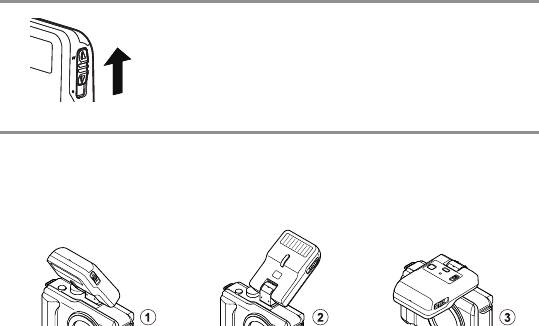
FoldingFolding
This fl ash can be bent approx. 30 degrees in front (
1
) and 60 degrees in rear (
2
).
It also can be folded in front to make it easier to carry the camera with the fl ash attached (
3
).
The fl ash does not fi re when folded in front.
Approx. 30 degrees in front: Used for macro shooting.
Approx. 60 degrees in rear: Used for bounce shooting.
EN 11
bookR2190Unified.indb11bookR2190Unified.indb11 2011/03/2111:25:012011/03/2111:25:01

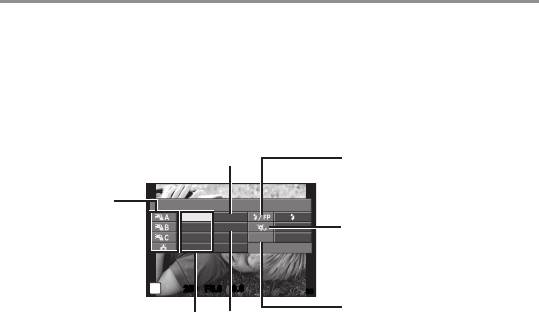
Wireless remote control fl ash photographyWireless remote control fl ash photography
1
Set the RC switch to A or B.
•
A and B are the group settings. Set the fl ash control mode, etc. to each groups and
control them wirelessly.
2
Set [# RC Mode] to [On] in the menu of the camera to make the fl ash on the
camera ready to fi re.
3
Set the fl ash control mode, etc. in each of the groups A and B on the camera.
Flash intensity value
Normal fl ash/Super FP fl ash
Group
Super FP fl ash is not compliant.•
•
Select the fl ash
control mode and
adjust the fl ash
A Mode
intensity individually.
Communication light level
TTL
+5.0
For MANUAL, select
M
1/8
LO
•
Set the communication light level to
the fl ash intensity.
Off
–
Ch
1
[HI], [MID], or [LO].
TTL +3.0
P
250250 F5.6
0.0
0.0
3838
Channel
•
Be sure to set the channel
Flash control
Flash
to [1].
mode
intensity
12 EN
bookR2190Unified.indb12bookR2190Unified.indb12 2011/03/2111:25:022011/03/2111:25:02
PositioningPositioning
Since the communication is performed with the fl ash emission of the camera, the fl ash positioning
range varies with camera.
1
Attach the stand provided.
•
Slide the fl ash securely into the stand until
it clicks into place (
1
). Press the shoe lock
1
1
release button to remove the fl ash.
When using it for bounce, be careful not to drop
off the stand (
2
).
2
2
2
Position the fl ash facing the desired direction.
•
Instead of using the stand, you can also shoot simply holding the fl ash.
x
Notes
•
The built-in fl ash can not be used as a light source in RC mode.
•
We recommend using a single group of up to three remote fl ash units.
•
Flash may not fi re due to the angle or distance between the camera and the object.
Take a test shot after positioning.
EN 13
bookR2190Unified.indb13bookR2190Unified.indb13 2011/03/2111:25:022011/03/2111:25:02

Safety precautionsSafety precautions
Read WARNINGS and CAUTIONS thoroughly to ensure safe usage. These safety
precautions protect the users and others and prevent property damage.
Failure to observe the precautions indicated by this symbol may result in
WARNING
injury or death.
•
Do not use product or fl ash or just omit in places where it may be exposed to fl ammable or
explosive gas. Otherwise, fi re ignition or explosion may result.
•
Do not directly solder the product or modify, remodel, or disassemble.
•
Do not cover the light emitting area of the fl ash with your hand, and do not touch the light
emitting area after continuous fi ring. It may burn your skin.
•
Water and foreign matter inside of the device may cause fi re or electric shock. If the device
is immersed in or exposed to water or foreign matter is found inside of the device, turn off
the power immediately and remove batteries with care. Contact your dealer or consult an
Olympus Authorized Service Station.
•
To prevent a traffi c accident, do not direct the fl ash at a person operating a motor vehicle.
•
Do not use a fl ash close to the subject's eyes; particular care should be observed when
photographing infants. Do not leave the fl ash within the reach of children. The fl ash light
may cause vision disability.
•
Do not use batteries that are not specifi ed for use.
•
Do not mix old and new batteries, or batteries made by different manufacturers.
•
Do not connect substances such as metal to the (+) or (–) of batteries.
14 EN
bookR2190Unified.indb14bookR2190Unified.indb14 2011/03/2111:25:022011/03/2111:25:02
Failure to observe the precautions indicated by this symbol may result in
CAUTION
injury or property damage.
•
If you notice any abnormalities such as odor, noise, or smoke, stop using this device.
Otherwise a fi re or burn may result. Remove the batteries carefully to avoid burning
yourself, and contact your dealer or consult an Olympus Authorized Service Station.
•
Do not operate with wet hands. This may cause malfunction or electric shock.
European technical Customer SupportEuropean technical Customer Support
Please visit our homepage http://www.olympus-europa.com
or call: Tel. 00800 - 67 10 83 00 (Toll-free)
+49 180 5 - 67 10 83 or +49 40 - 237 73 4899 (Charged)
For customers in EuropeFor customers in Europe
The “CE” mark indicates that this product complies with the European requirements
for safety, health, environment and customer protection. CE-mark products are for
sale in Europe.
This symbol [crossed-out wheeled bin WEEE Annex IV] indicates separate collection
of waste electrical and electronic equipment in the EU countries.
Please do not throw the equipment into the domestic refuse.
Please use the return and collection systems available in your country for the
disposal of this product.
EN 15
bookR2190Unified.indb15bookR2190Unified.indb15 2011/03/2111:25:022011/03/2111:25:02

Specifi cationsSpecifi cations
MODEL NO. : FL-300R
Product type : External electronic fl ash for digital still camera
Guide number : 20 (ISO 100), 12 (ISO100, using the wide panel)
Firing angle : Covering the fi eld angle of 14mm lens (equivalent to 28mm on a 135mm)
Covering the fi eld angle of 9mm lens (equivalent to 18mm on a 135mm) :
Using the wide panel
Flash modes : TTL-AUTO, MANUAL, RC
Flash emission period : Approx. 1/20000 to 1/500 seconds
Flash emission count
: Approx. 80 times (using AAA (R03) alkaline batteries)
(at full activation)*
Approx. 130 times (using AAA (R03) NiMH batteries)
Recharge time : Approx. 5.5 seconds (using AAA (R03) alkaline batteries)
Approx. 4.5 seconds (using AAA (R03) NiMH batteries)
(from full activation to CHARGE lamp lighting)*
Operating environment : Temperature: –10 to 42°C (14 to 108°F)
Humidity: 20 to 90%
Dimensions :
56.4 (W) × 89.2 (H) × 26.9 (D) mm (2.2 × 3.5 × 1.1 in.) (excluding protrusions)
Weight : 97 g (3.4 oz.) (excluding batteries)
* Measurements obtained from in-house tests at Olympus. Actual fi gures may vary depending on
shooting conditions.
Specifi cations are subject to change without any notice or obligation on the part of the manufacturer.
16 EN
bookR2190Unified.indb16bookR2190Unified.indb16 2011/03/2111:25:032011/03/2111:25:03
Děkujeme vám za nákup výrobku značky Olympus. Pro zajištění své bezpečnosti si prosím
před použitím přečtěte tento návod k obsluze a uchovávejte jej po ruce pro pozdější nahlédnutí.
Názvy součástí Názvy součástí (obr. (obr. str. 3) str. 3)
x
Poznámky
1 Refl ektor
5 Kontrolka AUTO
AAA (R03) manganové články nelze použít.
2 Tlačítko uvolnění
CHECK
Vložení bateriíVložení baterií
aretace
6 Tlačítko ON/OFF
3 Pojistný kolíček
7 Přepínač W
1
Otevřete kryt bateriového prostoru.
4 Tlačítko TEST/
8 Přepínač RC
Kontrolka
Vložte baterie s dodržením polarity
9
Senzor dálkového
2
CHARGE
+/–.
ovládání
Kontinuální odpalování bleskuKontinuální odpalování blesku
Při odpalování několikrát za sebou se může
blesk zahřát, což může způsobit poškození
nebo chybnou funkci. Blesk by se neměl
odpalovat více než 10 krát za sebou
v intervalech 6 sekund, poté by neměl být
nejméně 10 minut používán.
Kryt bateriového prostoruKryt bateriového prostoru
Příprava baterie Příprava baterie (k dostání zvlášť)(k dostání zvlášť)
Používejte baterie následujícího výběru.
3
Zavřete kryt bateriového prostoru.
•
AAA (R03) alkalické baterie (× 2)
•
AAA (R03) NiMH baterie (× 2)
CS 17
bookR2190Unified.indb17bookR2190Unified.indb17 2011/03/2111:25:032011/03/2111:25:03
Připevnění k fotoaparátuPřipevnění k fotoaparátu
x
Poznámky
Ověřte, zda je elektronický blesk i fotoaparát vypnut. Montáž nebo demontáž elektronického
blesku při zapnutém elektronickém blesku nebo fotoaparátu může způsobit poruchu.
1
Sejměte kryt „sáněk“ fotoaparátu a nasunujte blesk,
dokud nezacvakne na místo (
1
).
Nepřipojujte blesk, když je vysunut vestavěný blesk,
aby nedošlo k jeho poškození.
•
Držte tlačítko uvolnění aretace stisknuté a odpojte blesk
1
(
2
).
Pokud má fotoaparát konektor pro externí blesk, lze připojit
držák a kablík (k dostání zvlášť).
2
18 CS
bookR2190Unified.indb18bookR2190Unified.indb18 2011/03/2111:25:032011/03/2111:25:03

Zapnutí elektronického bleskuZapnutí elektronického blesku
Připojte elektronický blesk k fotoaparátu a poté zapněte fotoaparát s bleskem.
1
Stiskněte a držte tlačítko ON/OFF, dokud se kontrolka
nerozsvítí.
•
Opětovným stiskem tlačítka ON/OFF blesk vypnete.
•
Po rozsvícení indikátoru CHARGE můžete provést test
Tlačítko TEST/
Tlačítko
blesku stisknutím tlačítka TEST.
Kontrolka CHARGE
ON/OFF
•
Vyměňte baterie, jestliže se kontrolka CHARGE nerozsvítí po:
30 sekundách (alkalické baterie)
10 sekundách (NiMH baterie)
•
Bliká-li současně kontrolka CHARGE a kontrolka AUTO CHECK, jsou baterie slabé.
Vyměňte baterie.
•
Není-li po dobu přibližně 15 minut provedena žádná operace, přejde blesk do režimu
spánku pro úsporu energie. Blesk také přejde do režimu spánku pokaždé, když do něj
přejde fotoaparát. Není-li po dobu dalších přibližně 60 minut provedena žádná operace,
blesk se automaticky vypne. Pro zapnutí stiskněte tlačítko ON/OFF.
CS 19
bookR2190Unified.indb19bookR2190Unified.indb19 2011/03/2111:25:042011/03/2111:25:04
SnímáníSnímání
Podle režimu blesku, který je nastaven ve fotoaparátu, umožňuje blesk snímání v režimu
TTL-AUTO (automatický) nebo MANUAL (manuální).
1
Nastavte přepínač RC do polohy „OFF“.
2
Podle zamýšleného použití nastavte režim blesku ve
fotoaparátu.
Podrobnosti naleznete v návodu k použití fotoaparátu.
Přepínač RC
Režim MANUAL není u některých fotoaparátů k dispozici.
•
V režimu TTL-AUTO: Pokud byl blesk správně aktivován, rozbliká se po stisknutí spouště
na přibližně 5 sekund kontrolka AUTO CHECK.
•
V režimu MANUAL: Upravte nastavení fotoaparátu (citlivost ISO a hodnota clony) podle
vzdálenosti k objektu a poté pořiďte snímek.
Vzdálenost objektu (m) = směrné č. (ISO100) x koefi cient citlivosti ISO ÷ hodnota clony
Dostupná vzdálenost snímání (Tabulka
str. 4)
Citlivost ISO a její koefi cienty
Citlivost ISO 25 50 100 200 400 800 1600 3200 6400
Koefi cient 0,5 0,71 1,0 1,4 2,0 2,8 4,0 5,6 8,0
•
Při použití blesku může být jeho světlo zastíněno objektivem, sluneční clonou, atd.
•
Pokud je vzdálenost objektu menší než 1 m, doporučuje se používat širokoúhlý panel, aby
nebyla příliš ovlivněna intenzita blesku.
20 CS
bookR2190Unified.indb20bookR2190Unified.indb20 2011/03/2111:25:042011/03/2111:25:04
Širokoúhlý záběrŠirokoúhlý záběr
Pokud je ohnisková vzdálenost objektivu větší než 9 mm až
14 mm, použijte při focení širokoúhlý panel.
1
Posuňte přepínač W ve směru W.
SkládáníSkládání
Tento blesk lze sklopit o přibližně 30 stupňů dopředu (
1
) a 60 stupňů dozadu (
2
).
Také jej lze sklopit dopředu tak, aby bylo snadné fotoaparát s připojeným bleskem přenášet
(
3
). Když je blesk sklopený zcela dopředu, nelze jej odpálit.
Přibližně 30 stupňů dopředu: pro snímání v režimu makro.
Přibližně 60 stupňů dozadu: pro snímání s odraženým bleskem.
CS 21
bookR2190Unified.indb21bookR2190Unified.indb21 2011/03/2111:25:042011/03/2111:25:04
Fotografování s bleskem pomocí bezdrátového ovládáníFotografování s bleskem pomocí bezdrátového ovládání
1
Nastavte přepínač RC do polohy A nebo B.
•
A a B jsou skupinová nastavení. Pro obě skupiny můžete nastavit režim řízení blesku
apod. a ovládat je dálkově.
2
V nabídce fotoaparátu nastavte položku [# Blesk Režim] (Bezdrátový blesk) na
možnost [Zap], aby byl blesk na fotoaparátu připraven k použití.
3
Pro každou ze skupin A a B můžete ve fotoaparátu nastavit režim řízení blesku
apod.
Hodnota intenzity blesku
Normální blesk / Super FP blesk
Skupina (Group)
Blesk Super FP není kompatibilní.•
•
Individuálně vyberte
režim blesku a
nastavte intenzitu
A Mode
blesku. V režimu
Úroveň světla pro komunikační signály
TTL
+5.0
MANUAL vyberte
M
1/8
LO
•
Úroveň komunikačního světla
intenzitu blesku.
Off
–
Ch
1
nastavte na hodnotu [HI], [MID]
TTL +3.0
nebo [LO].
P
250250 F5.6
0.0
0.0
3838
Kanál (Channel)
•
Nastavte kanál na možnost
Intenzita bleskuRežim řízení
[1].
blesku
22 CS
bookR2190Unified.indb22bookR2190Unified.indb22 2011/03/2111:25:052011/03/2111:25:05
