Olympus DS-7000: Basic operations
Basic operations: Olympus DS-7000
• You can select the order of the
Record function
3 Move the slide switch to the
“ Month ”, “ Day ” and “ Ye a r ” by
Before starting recording over a
STOP
( 4 ) position to stop
pressing the F2 ( D/M/Y ) button
previously recorded file, the RECORD
recording.
while setting them.
function can be set to the following:
• If you want to append additional
3 Press the
OK/MENU
button to
• Append: Attaches the new
recordings to the same file, move
complete the setting.
recording to the end of the
the slide switch to the REC ( s )
previously recorded file.
Note:
position again.
• Overwrite (default): Overwrites
• You can set the time and date from
and deletes part of the previously
your PC using ODMS and DSS Player
recorded file starting from the
software.
chosen position.
Changing the time and date:
• Insert: The recorded file will be
inserted in the middle of the
If the current time and date is not
previously recorded file, starting
correct, set it using the procedure
from the chosen recording position.
below.
The original file will be kept.
1 While the recorder is in stop mode,
By default, the RECORD function
press the
OK/MENU
button.
is configured to record using the
Notes:
2 Press the 9 or 0 button to
overwrite option.
• During recording, a beep will sound
EN CS DA DE ES FR NL PL RU SV
Recording will start from the current
select [
Device Menu
] tab.
whenever the remaining recording
position of the existing file.
• You can change the menu display
time reaches 60, 30, and 10 seconds.
by moving the settings tab cursor.
• When the remaining recording
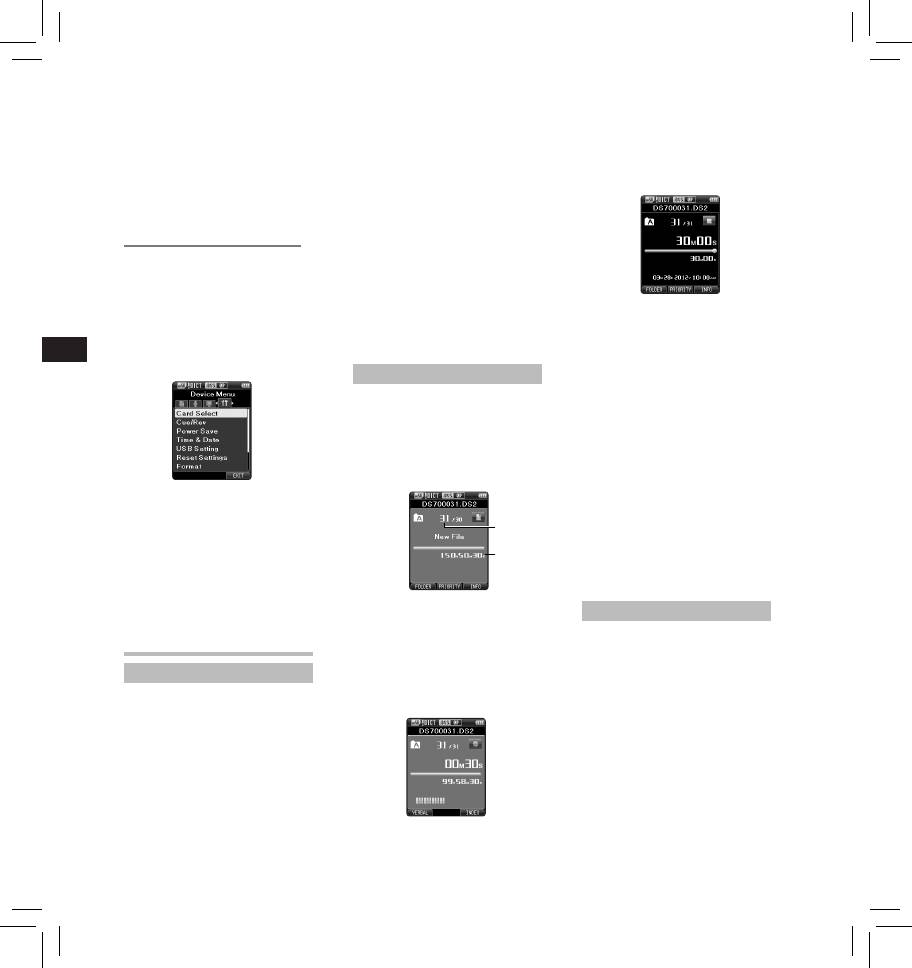
New recording
time is less than 30 minutes, the
color of the remaining memory bar
Create a new file to record in.
indicator will change.
1 Press the
NEW
button to create a
• When the remaining recording
new file.
time reaches 60 seconds, the record
• It is possible to select the Work
indicator light will start flashing.
Type from the work type list
The light will flash faster when the
uploaded using the ODMS
remaining recording time decreases
software.
from 30 to 10 seconds.
• [ Memory Full ] or [ Folder Full ] will
3 Press the
+
or
−
button to select
be displayed when the memory or
folder capacity is full.
[
Time & Date
].
a
− Delete unnecessary files before
4 Press the
OK/MENU
button.
recording any further or transfer
• The following steps are the
dictation files to your PC.
same as Step 1 through Step
b
− Change the recording media at
3 of “ Setting time and date
[ Card Select ] setting or change
[Time & Date] ”.
to a card with free space.
5 Press the
F3
(
EXIT
) button to close
the menu screen.
a New file number
Overwrite recording
b Remaining recording time
You can overwrite a previously
2 Move the slide switch to the
recorded file starting from any
Basic operations
REC
( s ) position to start recording.
point within the file. When using
• The record indicator light turns
overwriting, the overwritten part will
Recording
on. Turn the microphone in the
be erased.
By default, the recorder has five
direction of the source to be
1 Select and play the file you want to
folders, [ A ], [ B ], [ C ], [ D ], [ E ]
recorded.
overwrite.
and you can select a folder by
• Stop the playback at the point
pressing the F1 ( FOLDER ) button.
you want to start overwriting.
These five folders can be selectively
used to distinguish the kind of
recording. Up to 200 messages can be
recorded per folder.
Also, by default, the Recording Mode
is [ DSS Pro QP ].
8
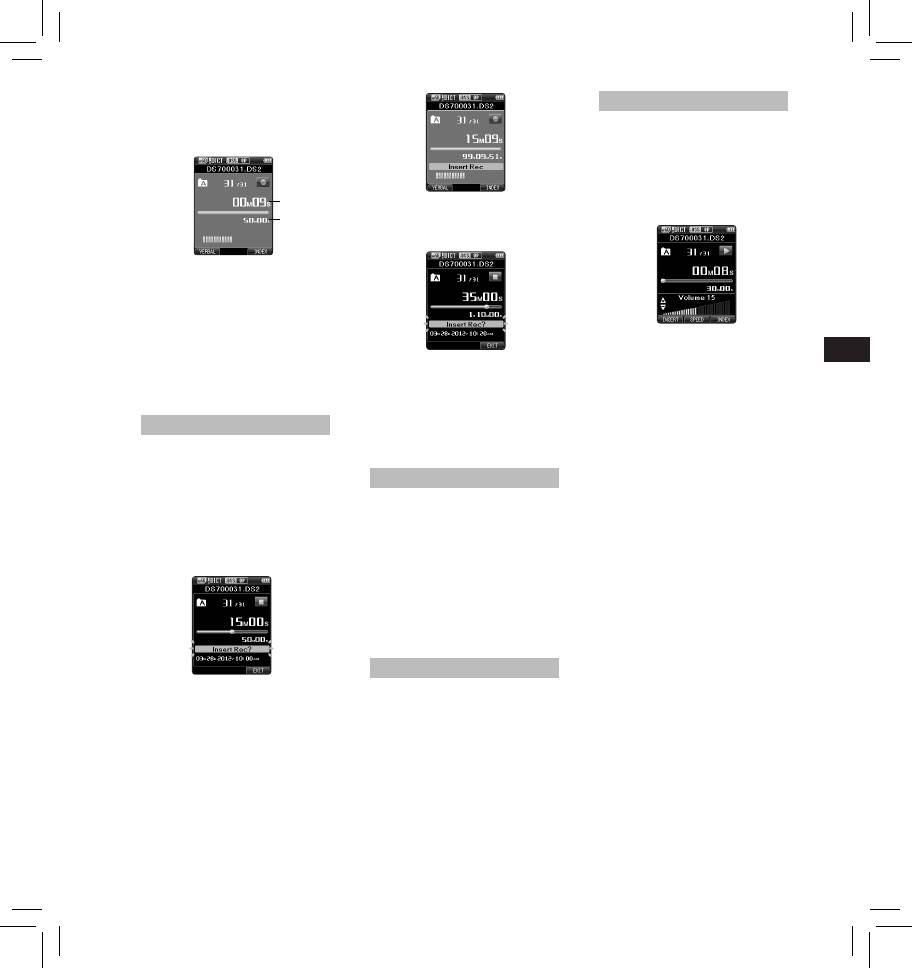
2 Move the slide switch to the
Playback
REC
( s ) position to start
1 Select the file, then move the slide
overwriting.
switch to the
PLAY
( ` ) position to
• The record indicator light turns on.
start playback.
2 Press the
+
or
–
button to adjust
the volume.
• The volume can be adjusted
a
4 Move the slide switch to the
within a range from [ 00 ] to [ 30 ].
b
STOP
( 4 ) position to stop inserting
the additional recording.
a Recording elapsed time
b Total recording time of the
selected file
3 Move the slide switch to the
STOP
( 4 ) position to stop
EN CS DA DE ES FR NL PL RU SV
overwriting.
3 Move the slide switch to the
Note:
STOP
( 4 ) position at any point you
• You cannot select a recording mode
Notes:
want to stop the playback.
different from the one set onto the
• The recording’s time and date will
Fast Forward (FF):
original file.
be updated to the one of the latest
• Press the 9 button once while in
recording inserted.
stop mode.
• You cannot select a recording mode
Insert recording
Rewind (REW):
different from the one set onto the
• Press the 0 button once while in
Additional recording can be inserted
original file.
stop mode.
into previously recorded file.
How to cancel: Move the slide switch
1 Select and play the file you want to
to a position other than the STOP ( 4 )
Hands-free recording
insert an additional recording into.
position.
2 While playing the file, press the
The recorder can be used as a hands-
• The recorder starts the operation
free recording device. To set up the
of the set position.
F1
(
INSERT
) button to insert an
recorder for hands-free operation,
Press the OK/MENU button.
additional recording.
connect the optional Olympus Foot
Cue (Cue):
• [ Insert Rec? ] will appear on the
Switch to the back of the docking
• Press and hold the 9 button while
display.
station and place the recorder in the
in stop or playback mode.
docking station.
How to cancel: Release the button.
• For further details, a complete
Review (Rev):
advanced version of the manual *
• Press and hold the 0 button while
(PDF format) is available for
in stop or playback mode.
download at the OLYMPUS website.
How to cancel: Release the button.
* Available in English, French or
• Move the slide switch to the REV
German.
( 7 ) position.
How to cancel: Release the slide
Recording monitor
switch.
Playback Speed
It is possible to monitor your
• Press the F2 ( SPEED ) button during
3 Move the slide switch to the
recording by listening to it even
playback.
REC
( s ) position to start inserting
while the recording is in progress. In
• The playback speed will change
the additional recording.
order to do so, insert the earphone
at each press of the F2 ( SPEED )
• The record indicator light
plug into the earphone jack and use
button.
turns on. [ Insert Rec] and the
the
+
or
–
buttons to control the
Play (playback):
remaining recording time will
volume level.
Playback at normal speed.
alternate on the display.
Slow Play (slow playback):
Playback speed slows down
(-50%), and “Slow play” will be
displayed.
9
Fast Play (fast playback):
4 Press the
OK/MENU
button.
Playback will continue until the
Playback speed becomes faster
end of the file or until the partial
(+50%), and “Fast play” will be
erase ending point is confirmed.
displayed.
Notes:
• If you press the 9 button once
while fast-forwarding or twice while
in stop mode, the recorder will stop
at the end of the file (F.Skip).
• If you press the 0 button once
while rewinding or twice while in
stop mode, the recorder will stop at
5 Press the
+
button to select
the beginning of the file (B.Skip). If
the 0 button is pressed within 2
[
Start
], then press the
OK/MENU
3 In the position you want to end
seconds, the recorder skips to the
button.
partial erase, press the
ERASE
beginning of the previous file.
• The display changes to [ Erase ! ]
button again.
• If you press and hold the 9
and erasing will start.
• The erase starting point (time)
button while fast forwarding (FF),
set in step 2 and the ending
the recorder will continue to skip
point (time) set in this step will
forward.
EN CS DA DE ES FR NL PL RU SV
be displayed alternatively for 8
• If you press and hold the 0
seconds.
button while rewinding (REW),
• If you let the playback continue
the recorder will continue to skip
until the end of the file, or in
backward.
case of a Verbal comment before
• The Cue and Review speed can be
it, that will be considered the
set from [ Speed1 ] to [ Speed5 ]. Cue
ending point of the partial erase.
and Review playback sound can be
set to [ On ] or [ Off ].
• [ Erase Done ] is displayed when
the file is erased. File numbers
will be reassigned automatically.
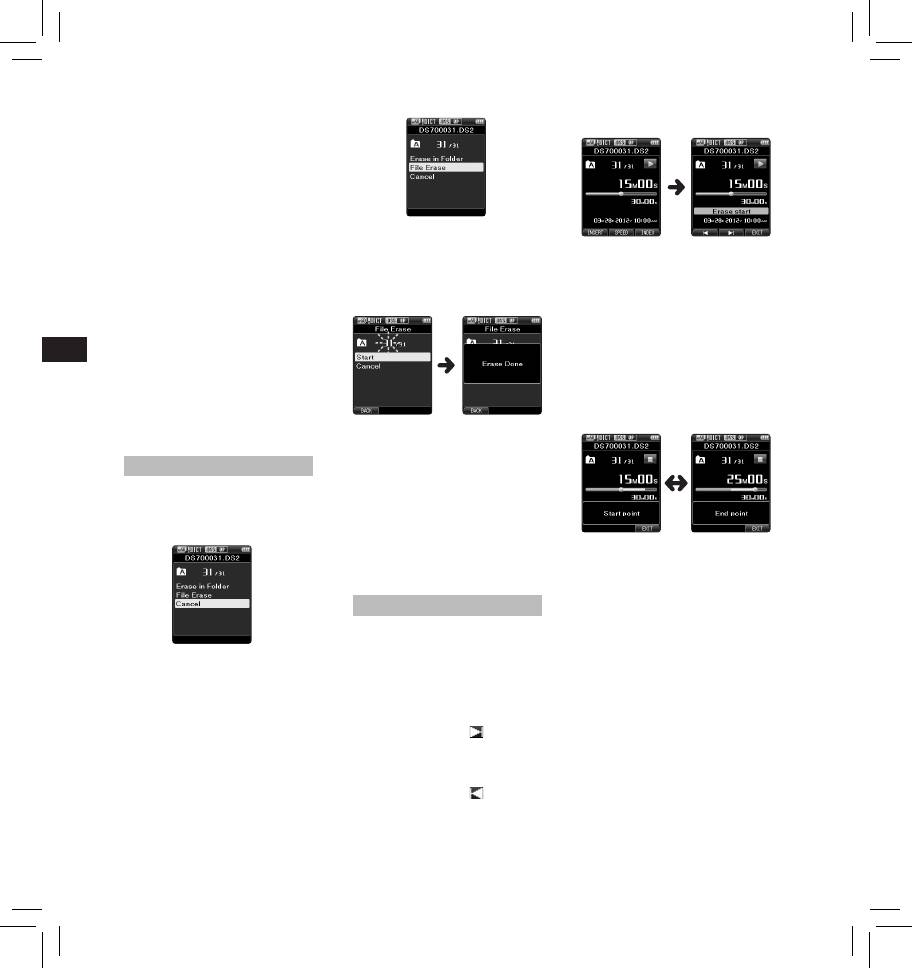
Erasing
Notes:
Erasing files:
• An erased file cannot be restored.
• The erasing process may take up to
1 Select the file you want to erase.
10 seconds. Do not interrupt this
2 Press the
ERASE
button.
process or data may be damaged.
• Files cannot be erased in the
following cases.
4 Press the
ERASE
button to confirm
- Files are locked.
the erasure.
- Files stored on a locked SD card.
• The display changes to [ Partial
erasing ! ] and erasing will start.
Partially erasing a file
• When [ Partial erase completed. ]
Any unnecessary part of a file can
appears on the display, partial
be erased.
erase is complete.
1 Playback the file you would like to
Notes
3 Press the
+
button to select
partially erase.
• If the ERASE button is not
pressed within 8 seconds after the
[
Erase in Folder
] or [
File
2 Press the
ERASE
button at the
[ Start point ] and [ End point ] are
Erase
].
point you want to start erasing.
alternately displayed, the recorder
[ Erase in Folder ]:
• While playback continues, [ Erase
will revert to stop status.
All files in a folder can be erased
Start ] will appear on the display.
• An erased file cannot be restored.
simultaneously.
• If you press the F2 (
) button,
• The erasing process may take up to
[ File Erase ]:
playback will skip (F.Skip) to the
10 seconds. Do not interrupt this
Erase one file.
end of the file and then stop. That
process or data may be damaged.
will be set automatically as the
ending point of the partial erase.
• If you press the F1 ( ) button,
playback will skip back (B. Skip)
and restart from the partial erase
starting point.
10
Оглавление
- Introduction
- Getting started
- Basic operations
- Advanced operations
- Menu items
- Managing files on your PC
- Other information
- Technical assistance and support
- Úvod
- Začínáme
- Základní obsluha
- Pokročilá obsluha
- Položky nabídky
- Správa souborů v počítači
- Další informace
- Technická pomoc a podpora
- Introduktion
- Kom godt i gang
- Grundlæggende betjening
- Avanceret betjening
- Menupunkter
- Filhåndtering på din pc
- Øvrige oplysninger
- Teknisk hjælp og support
- Einführung
- Allgemeines
- Grundlegende Bedienung
- Erweiterte Anleitung
- Menüpunkte
- Verwalten von Dateien
- Zusätzliche Informationen
- Technische Hilfe und Support
- Introducción
- Para empezar
- Operaciones Básicas
- Funciones avanzadas
- Elementos del menú
- Administración de
- Otra información
- Asistencia y ayuda técnica
- Introduction
- Préparatifs
- Opérations de base
- Opérations avancées
- Eléments de menu
- Gestion des fichiers sur
- Autres informations
- Assistance technique et soutien
- Inleiding
- Aan de slag
- Basisbewerkingen
- Geavanceerde bewerkingen
- Menuopties
- Bestanden beheren op uw PC
- Overige informatie
- Technische bijstand en ondersteuning
- Wprowadzenie
- Pierwsze kroki
- Podstawowe operacje
- Zaawansowane operacje
- Pozycje menu
- Zarządzanie plikami na
- Inne informacje
- Wsparcie techniczne
- Введение
- Начало работы
- Основные операции
- Расширенные операции
- Пункты меню
- Управление файлами в
- Прочая информация
- Техническая помощь и обслуживание
- Introduktion
- Komma igång
- Grundläggande funktioner
- Avancerade funktioner
- Menyalternativ
- Hantera filer på din PC
- Övrig information
- Teknisk hjälp och support
- Olympus Service Department


