Olympus DS-7000: Getting started
Getting started: Olympus DS-7000
f Caution:
• ... you notice anything unusual
Getting started
• Unplug the AC adapter or power
when using the AC adapter such as
cord from the docking station
abnormal noise, heat, smoke, or a
burning odor:
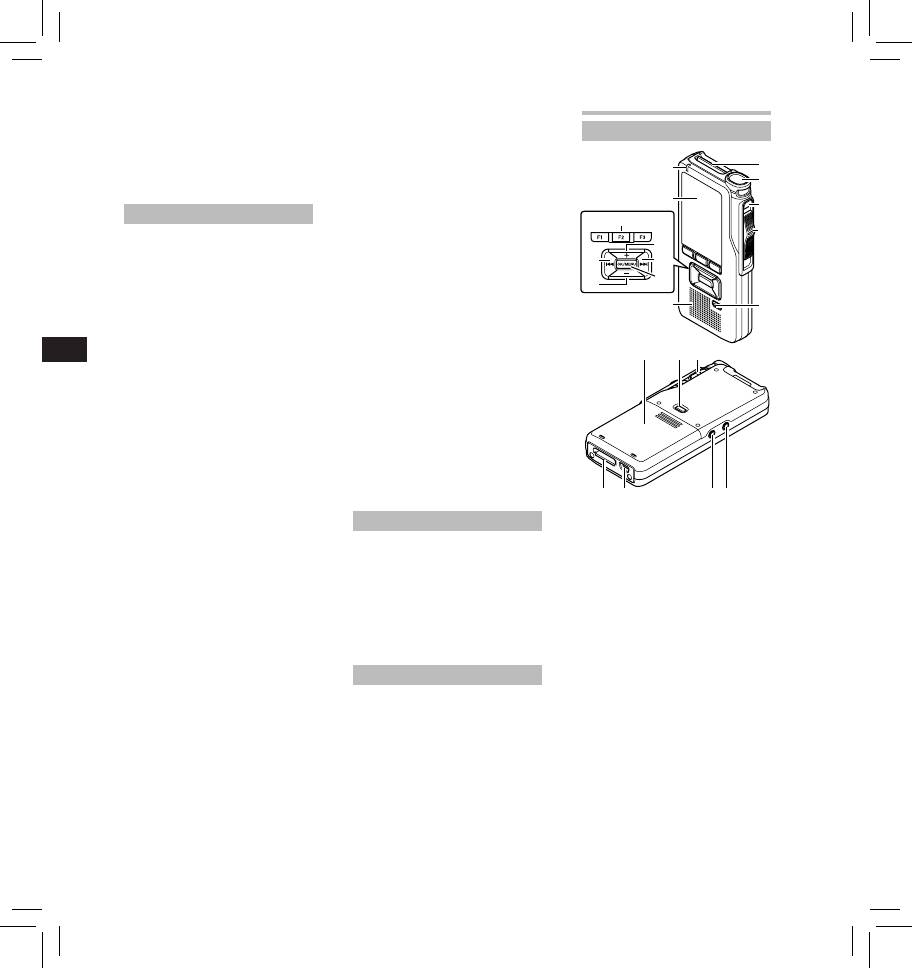
Identification of parts
and AC outlet when not using for
extended periods of time. If this
1 do not touch any of the exposed
precaution is not followed and the
parts;
1
docking station is damaged then
2 immediately disconnect the
6
2
fire may occur.
power supply plug from the
power outlet, and;
7
3 call your dealer or local Olympus
3
AC adapter
representative for servicing.
!
Continued use of the AC adapter
4
f Danger:
under these circumstances could
8
• Be sure to use the AC adapter with
result in electric shock, fire or
@
9
the proper voltage (AC 100 - 240
injury.
V). Using it with other voltage
0
levels may cause fire, explosion,
f Caution:
#
overheating, electric shock or injury.
• Do not use the AC adapter if the
$
5
• For safety, be sure to unplug
power plug is damaged or the
the AC adapter from the outlet
plug is not completely connected
EN CS DA DE ES FR NL PL RU SV
before performing maintenance
to the outlet. This may cause fire,
or cleaning. Also, never plug in or
overheating, electric shock, short
^%
&
disconnect the power plug with a
circuit or damage.
wet hand. This may cause electric
• Unplug the AC Adapter from
shock or injury.
AC outlet when not using. If this
precaution is not followed, fire,
f Warning:
overheating or electric shock may
• Do not attempt to disassemble,
occur.
repair or modify the AC adapter in
• Make sure to hold the plug when
any way.
removing the power plug from
• Keep foreign objects including
the outlet. Do not bend the cord
water, metal, or flammable
excessively or put heavy objects on
substances from getting inside the
it. This may cause fire, overheating,
product.
electric shock or damage.
-
)
(*
• Do not moisten the AC adapter or
touch it with a wet hand.
LCD monitor
• Do not use the AC adapter in the
vicinity of flammable gas (including
• The LCD used for the monitor
1 SD card slot
gasoline, benzine and lacquer
is made with high-precision
2 Built-in microphone
thinner).
technology. However, black spots
3
NEW
button
• Always stop recording before
or bright spots of light may appear
on the LCD Monitor. Due to its
4 Slide (
REC
/
STOP
/
PLAY
/
REV
)
connecting or disconnecting the
power supply plug.
characteristics or the angle at which
switch
• When the AC adapter is not in use,
you are viewing the monitor,
5
ERASE
button
disconnect the power supply plug
the spot may not be uniform in
6 Record indicator light
from the power outlet.
color and brightness. This is not a
7 Display (LCD panel)
• Use only power supply of the
malfunction.
correct voltage, as indicated on the
8
+
(Volume) button
adapter.
Memory Card
9 Fast Forward ( 9 ) button
In case:
0
OK/MENU
button
• ... the internal parts of the AC
f Warning:
! Programmable smart
adapter are exposed because it
• Do not touch the card contacts. This
has been dropped or otherwise
(
F1
,
F2
,
F3
) buttons
may damage the card.
damaged:
@ Rewind ( 0 ) button
• Do not place the card in locations
• ... the AC adapter is dropped in
#
–
(Volume) button
with static electricity.
water, or if water, metal flammable
• Store the card in a location that is
$ Built-in speaker
substances or other foreign objects
out of the reach of children. In case
% Battery cover
get inside it:
of accidental ingestion, consult a
^ Battery cover release
physician immediately.
button
4
&
POWER
(
ON
/
OFF
) switch
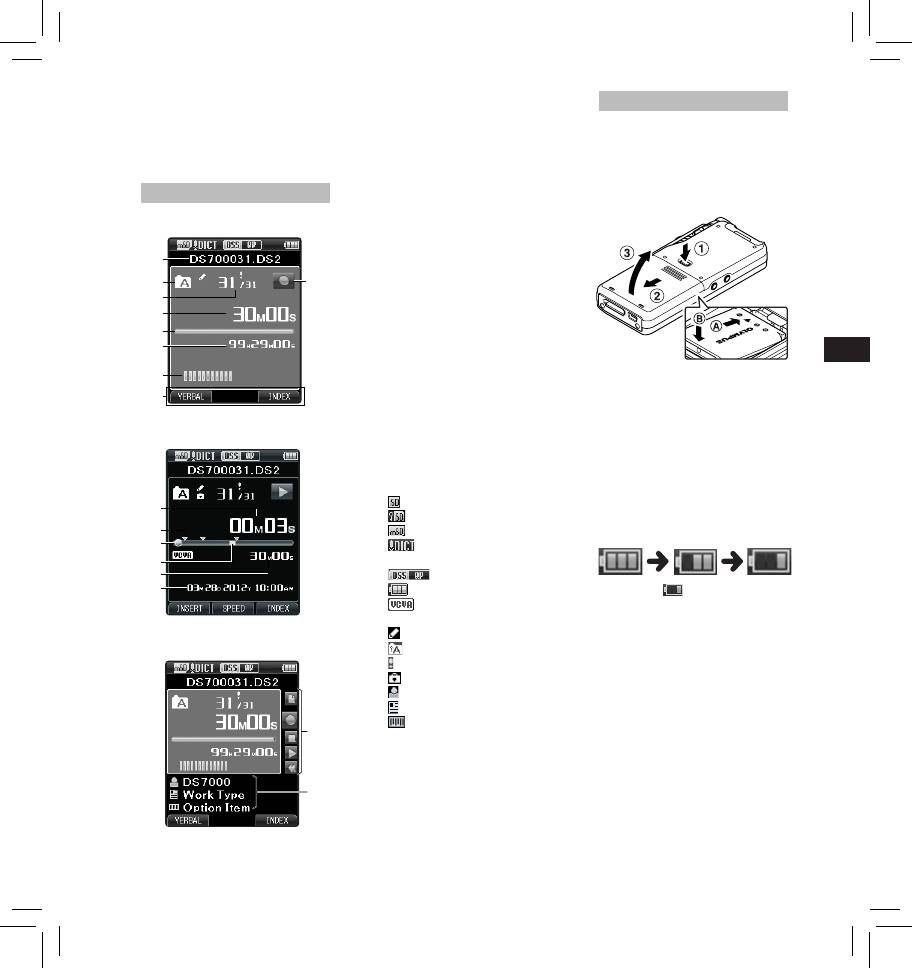
1 Current file name
Inserting the battery
*
EAR
(Earphone) jack
2 Current folder
This recorder uses a lithium ion
(
MIC
(Microphone) jack
3
Current file number/ Total
battery specified by Olympus (LI-42B).
) USB connector
number of recorded files in
Do not use any other type of battery.
1 Lightly press down on the battery
- Docking station connector
the folder
cover release button, then open
4 Recording elapsed time
the battery cover, as shown in the
Display status indicators (LCD panel)
5 Remaining memory bar
illustration below.
indicator
Display in the recording mode
6 Remaining recording time
7 Level meter indicator
8 Button guide display
1
9 Recorder status indicator
0 Current playback time
2
9
! Index mark indicator
3
@ Playback position bar
4
indicator
5
# Verbal comment indicator
EN CS DA DE ES FR NL PL RU SV
6
$ File length
% Recording date and time
7
^ Slide switch guide
2 Insert the battery observing the
8
You can display the slide switch
correct polarity as shown in the
guide by using “ Slide switch
guide ” of the customize functions
illustration, then close the battery
Display in the playback mode
of ODMS software.
cover.
& File information area
• Insert the battery by sliding in
direction A while pushing down
Current file’s information can be
in direction B .
displayed by using the “ Display ”
function in the ODMS software.
Battery indicator:
[ ]: SD card
The battery indicator on the display
0
[ ]: SD Card lock
will decrease as the battery loses
!
[ ]: microSD card
power.
@
[ ]: Microphone
#
sensitivity
$
[ ]: Recording mode
%
[ ]: Battery
• When this [
] indicator appears
[ ]: VCVA (Variable
on the display, charge the battery
as soon as possible. When the
Control Voice Actuator)
battery is too weak, [
s
] and
Display in the recording mode
[ ]: Pending
[ Battery Low ] will appear on the
[ ]: Encryption
display and the recorder will shut
[ ]: Priority
down.
[ ]: File lock
Notes:
[ ]: Author ID
• Turn off the recorder before
removing the battery. Removing
[ ]: Work Type
the battery while the recorder is still
[ ]: Option Item
in use may cause malfunctions, file
^
corruption or file loss.
• Remove the battery if you are not
going to use the recorder for an
extended period of time.
&
• After removing the battery, it may
become necessary to re-set the
time and date if you leave the
battery out of the recorder for more
than 15 minutes or if you remove
the battery right after loading it into
the recorder.
5
Charging the battery
• Charging the battery via the USB
• If battery is not fully discharged,
cable connection may not be
protect it against short-circuiting
Fully charge the battery (approx. 2
successful depending on the power
(e.g. by taping the contacts) before
hours 30 minutes) before use.
capacity of the USB port in your PC.
disposal.
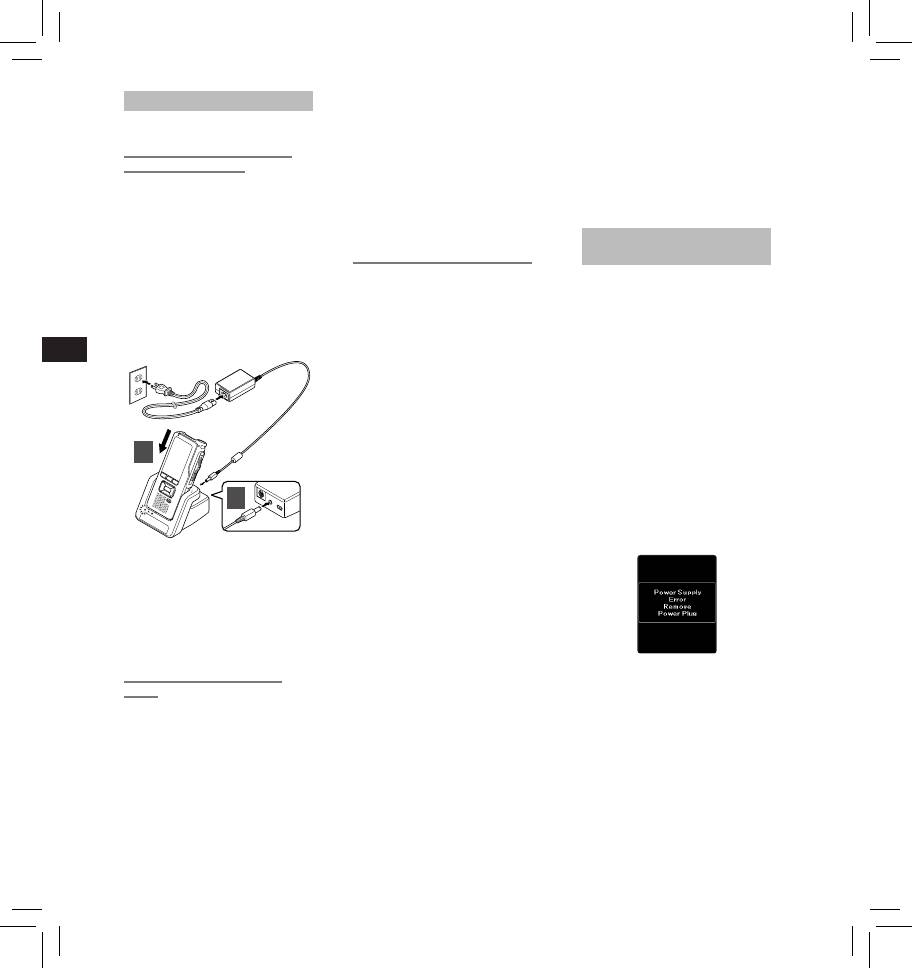
Charging the battery using
Use the AC adapter instead.
For customers in Germany:
• Do not set or remove the recorder
the docking station
from the docking station while
Olympus has a contract with the GRS
The "Standard" version of the
operating.
(Joint Battery Disposal Association) in
DS-7000 does not include the
• Do not charge the recorder through
Germany to ensure environmentally
docking station and the AC adapter
a USB hub.
friendly disposal.
(optional).
• Do not attach or remove the battery
Charging using docking station
if the USB cable is connected.
Power supply from AC adapter or
and AC adapter:
Using the lithium ion battery
USB cable
1 Connect the AC adapter to the
The included battery is exclusively for
Use the AC adapter or USB cable
docking station.
use with the Olympus voice recorder
when recording for extended period
2 Firmly press the recorder all the way
DS-7000. Do not use in combination
of time.
into the docking station as shown in
with other electronic equipment.
The "Standard" version of the DS-
7000 does not include the docking
the illustration.
Cautions concerning the battery:
station and the AC adapter (optional).
EN CS DA DE ES FR NL PL RU SV
Read the following instructions
carefully when you use the battery.
Using the AC adapter:
Plug the AC adapter into a household
Discharging:
power outlet and connect the power
Rechargeable batteries self-discharge
plug to the recorder via the docking
while not in use. Charge it regularly
station. Always turn off the recorder
before use.
before you connect power.
Battery life:
Detecting abnormal voltage:
Over time, the rechargeable battery
If the recorder detects a DC power
2
may gradually wear down. When
voltage outside the allowed voltage
the operating time becomes shorter
range (4.4-5.5V), then [ Power
even if the rechargeable battery is
Supply Error Remove Power Plug ]
fully charged under the specified
1
will appear on the display, and all
condition, replace it with a new one.
operation will stop. The recorder will
Operating temperature:
not be operable if abnormal voltage
is detected. Use the AC adapter.
Rechargeable batteries are chemical
products. Battery efficiency may vary
• The CHARGE indicator light turns
even when operating within the
on when charging starts, and turns
recommended temperature range.
off when charging is complete.
This is an inherent nature of these
products.
Charging using docking station
Recommended temperature range
and USB cable:
of use:
Connect the USB cable to the
During operation:
docking station.
0°C - 42°C
Charging:
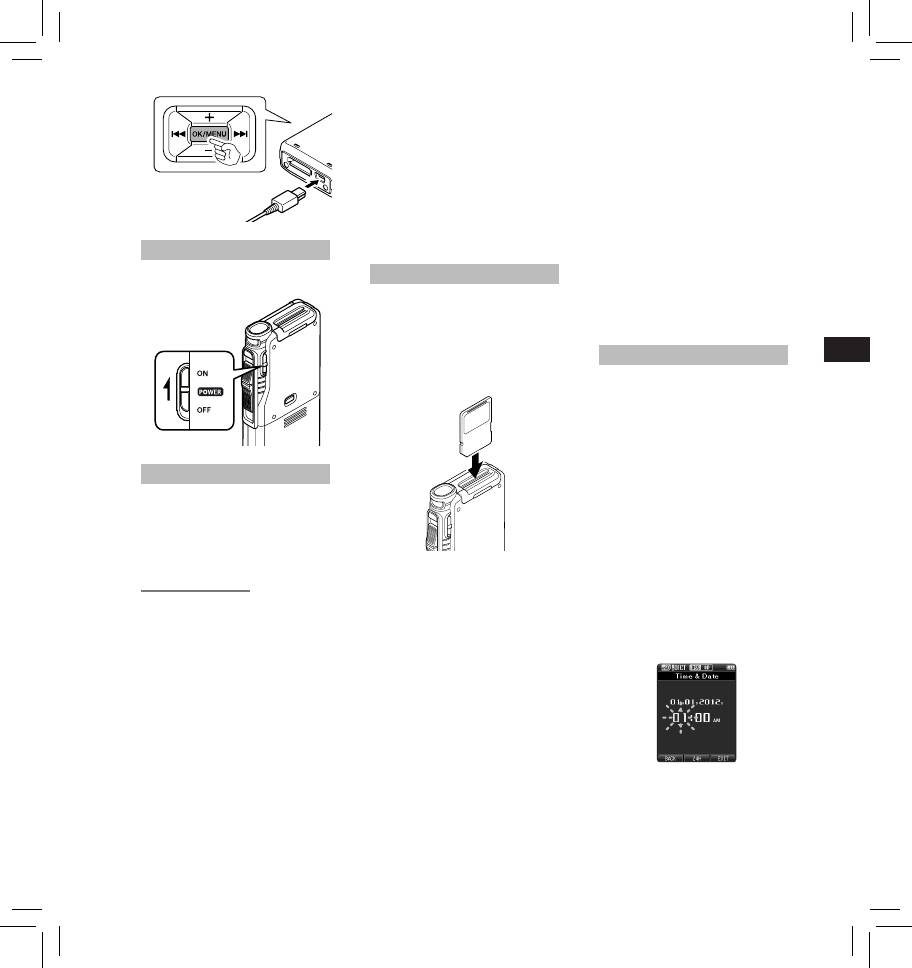
Charging directly via USB
Using the USB cable:
5°C - 35°C
cable
1 Verify that the recorder is in stop
Storage for a long period:
After loading the battery into the
mode.
–20°C - 60°C
recorder, you can charge it by
Using the battery outside the above
2 Connect the USB cable to the
connecting the USB cable to the
temperature range may result in
recorder while pressing the
recorder.
declining efficiency and shorter
OK/MENU
button.
Notes:
battery life.
• Charge the battery frequently
Notes:
during the first period of use. The
• When disposing the batteries,
battery will perform better after
always observe the local laws and
several charge/discharge cycles.
regulations. Contact your local
• Models of batteries which are
recycling center for proper disposal
different from the included one may
methods.
not be charged.
6
• The card has a service life. When
• Use only cards formatted with the
reaching the end of its life, writing
recorder.
or erasing data on the card will be
• Never remove the card while the
disabled. In this case, replace the
recorder is operating, as this may
card.
damage the data.
• If you use a PC card adapter
• After pushing the card inward to
compatible with the card to save
eject it, releasing your finger too
or delete some data on the card,
quickly may cause the card to be
the maximum recording time on
ejected unexpectedly.
the card may be decreased. To
• This recorder uses a microSD card as
recover the original recording time,
internal memory. The microSD card
initialize/format the card in the
has been preloaded.
recorder.
Turning on the recorder
• The recorder may not properly
recognize the card even when that
Move the POWER switch to [ ON]
Inserting and ejecting a SD card
card is compatible with it.
position to activate the recorder.
• The processing performance
Inserting a SD card
reduces in a card when you repeat
writing and deleting. In this case,
Insert the SD card fully into the card
format the card.
slot with the card facing the direction
EN CS DA DE ES FR NL PL RU SV
shown in the illustration below, until
Setting time and date [Time & Date]
it clicks into place.
• Insert the card keeping it straight.
If you set the time and date
beforehand, the information when
the file is recorded is automatically
stored for each file. Setting the time
and date beforehand enables easier
file management.
When you use the recorder for the
first time after purchasing it, or
when the battery has been inserted
Memory card
without the device being used for
This recorder uses two types of
a long time, the [
Set Time & Date
]
memory cards: a microSD card
will appear.
as internal memory, and an SD
• For further details, a complete
card as additional memory.
advanced version of the manual *
You can remove the content recorded
(PDF format) is available for
in both the cards safely in case of
download at the OLYMPUS website.
malfunction of the recorder.
* Available in English, French or
Card recognition
German.
Compatible cards
After inserting SD card, the message
1 Press the 9 or 0 button to
The recorder supports memory card
[ Please Wait ] will flash on the display
select the item to set.
capacity from 512 MB up to 32 GB.
while the recorder recognizes the
Select the item from the “ hour ”,
SD card.
Cards compatibility
“ minute ”, “ year ”, “ month ” and “ day ”
For a list of card compatible with the
Ejecting a SD card
with a flashing point.
recorder, please visit the product
Push the SD card inward to unlock it
homepage at the Olympus website
and let it come out of the slot.
applicable to your region or contact
• Hold the card straight and pull it
your Olympus reseller where you
out.
purchased the product.
Notes:
Notes
• When initializing (formatting) a
• Inserting the card the wrong way
card, confirm that no necessary
or at an angle could damage the
data is stored on the memory
contact area or cause the card to
card beforehand. Initialization
jam.
completely erases the existing
• If the card is not inserted all the
2 Press the
+
or
−
button to set.
data on the card.
way into the slot, data may not be
You can select between 12 and
• Cards formatted (initialized) by
written properly.
24 hour display by pressing the
another device, like a computer,
• When an unformatted card is
F2 ( 24H ) button while setting the
may not be recognized. Be sure
inserted into the card slot, the
hour and minute.
to format them with this recorder
recorder will automatically display
before use.
the format menu options.
7
Оглавление
- Introduction
- Getting started
- Basic operations
- Advanced operations
- Menu items
- Managing files on your PC
- Other information
- Technical assistance and support
- Úvod
- Začínáme
- Základní obsluha
- Pokročilá obsluha
- Položky nabídky
- Správa souborů v počítači
- Další informace
- Technická pomoc a podpora
- Introduktion
- Kom godt i gang
- Grundlæggende betjening
- Avanceret betjening
- Menupunkter
- Filhåndtering på din pc
- Øvrige oplysninger
- Teknisk hjælp og support
- Einführung
- Allgemeines
- Grundlegende Bedienung
- Erweiterte Anleitung
- Menüpunkte
- Verwalten von Dateien
- Zusätzliche Informationen
- Technische Hilfe und Support
- Introducción
- Para empezar
- Operaciones Básicas
- Funciones avanzadas
- Elementos del menú
- Administración de
- Otra información
- Asistencia y ayuda técnica
- Introduction
- Préparatifs
- Opérations de base
- Opérations avancées
- Eléments de menu
- Gestion des fichiers sur
- Autres informations
- Assistance technique et soutien
- Inleiding
- Aan de slag
- Basisbewerkingen
- Geavanceerde bewerkingen
- Menuopties
- Bestanden beheren op uw PC
- Overige informatie
- Technische bijstand en ondersteuning
- Wprowadzenie
- Pierwsze kroki
- Podstawowe operacje
- Zaawansowane operacje
- Pozycje menu
- Zarządzanie plikami na
- Inne informacje
- Wsparcie techniczne
- Введение
- Начало работы
- Основные операции
- Расширенные операции
- Пункты меню
- Управление файлами в
- Прочая информация
- Техническая помощь и обслуживание
- Introduktion
- Komma igång
- Grundläggande funktioner
- Avancerade funktioner
- Menyalternativ
- Hantera filer på din PC
- Övrig information
- Teknisk hjälp och support
- Olympus Service Department


