Zanussi FA 523: Installation
Installation: Zanussi FA 523
Installation
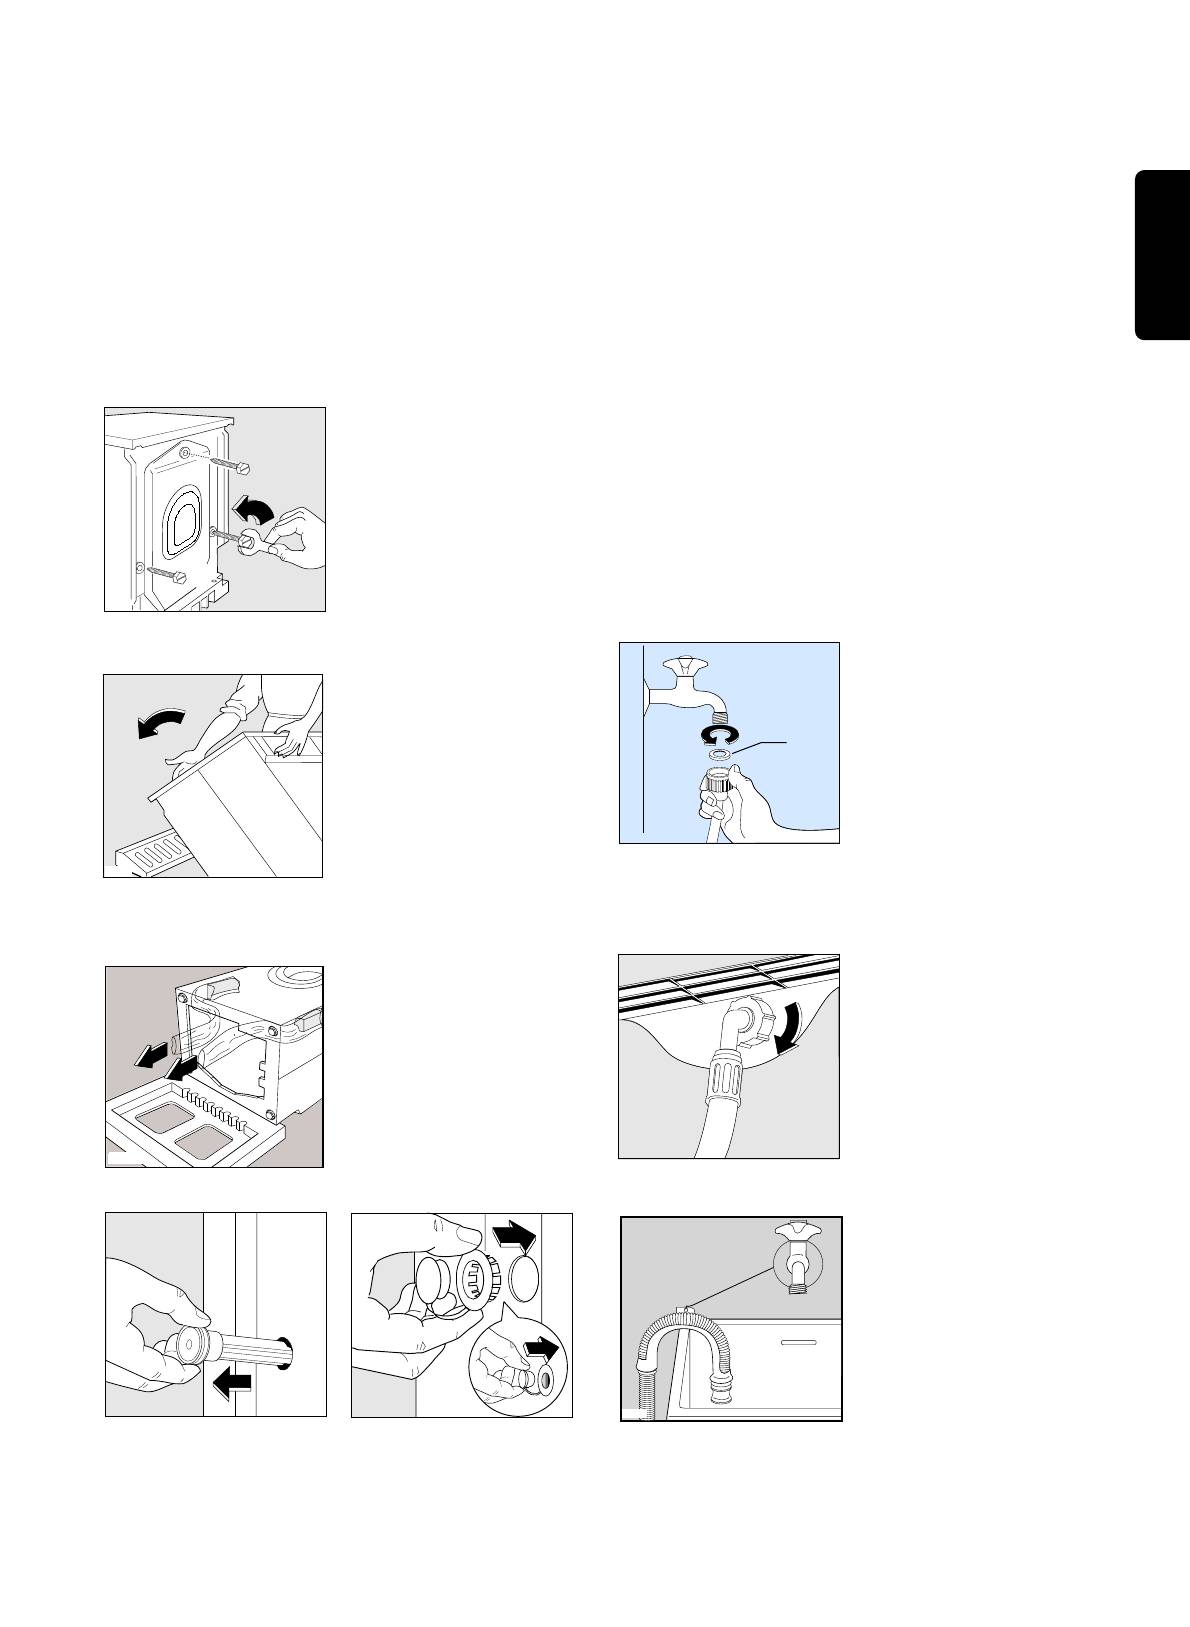
Transit security bars
Hydraulic connection
Before starting the machine up, the transport
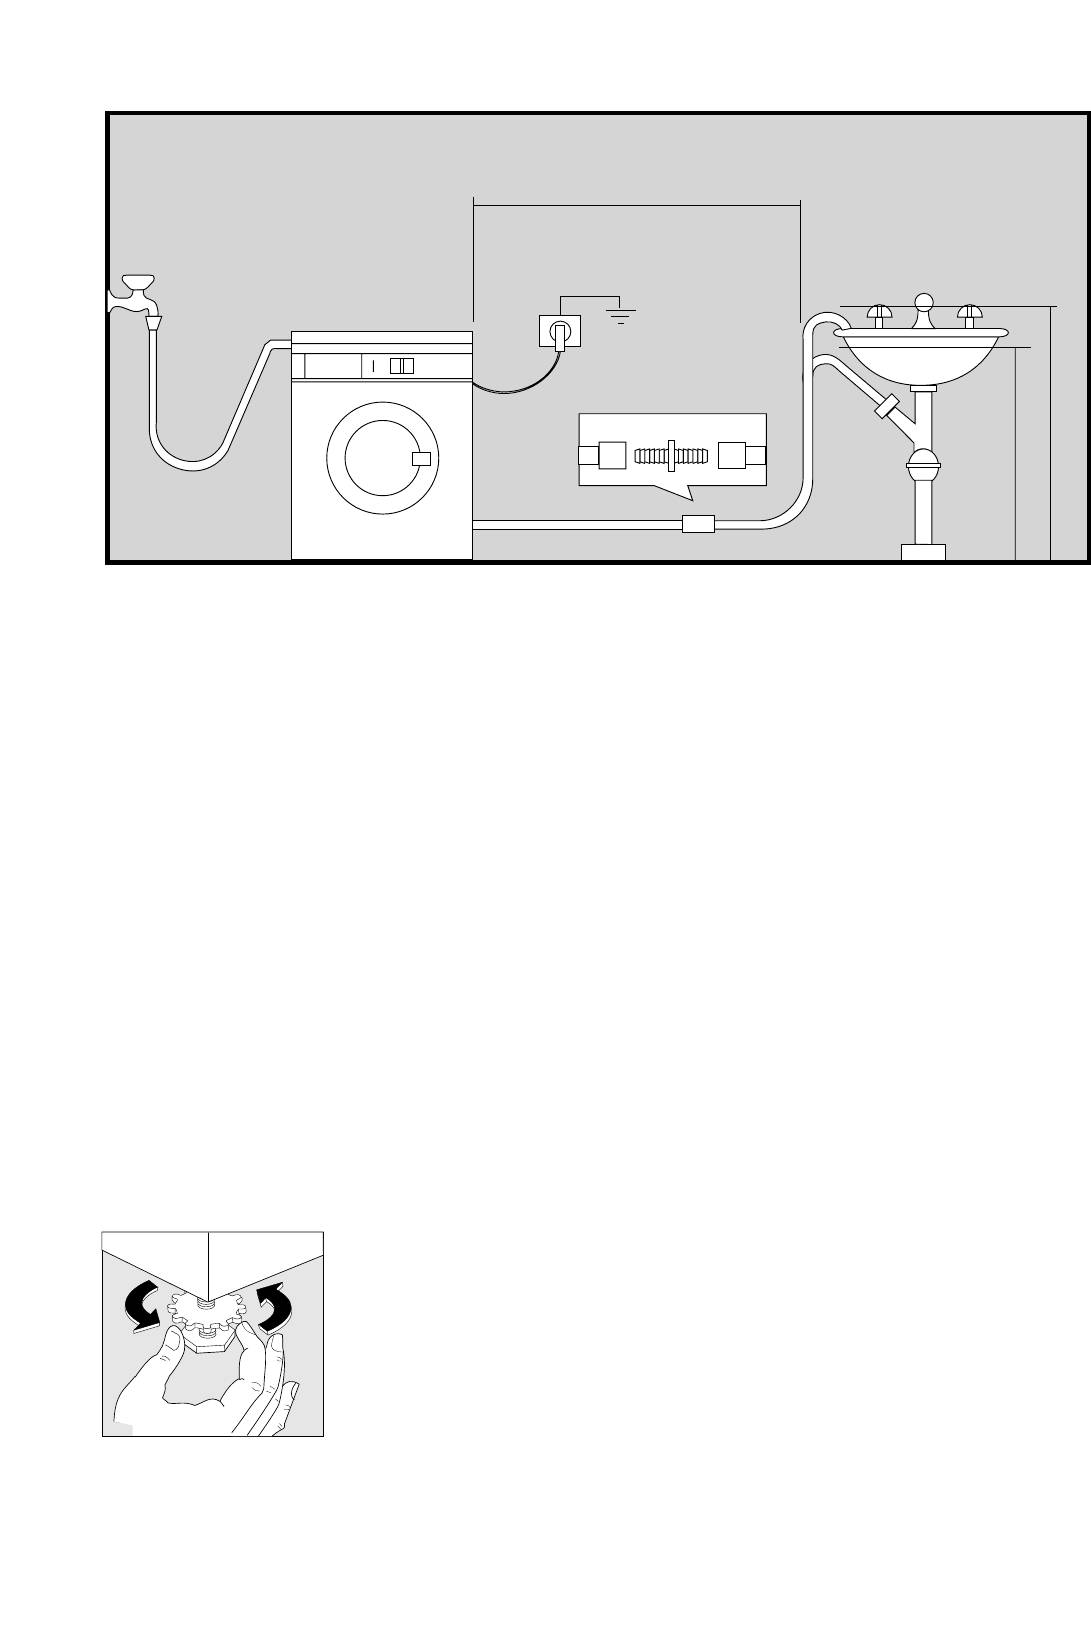
There should be a COLD WATER tap near the
security bars must be removed as follows:
ENGLISH
washing machine with a screwing on connection
You are advised to keep all the transport security
3
pipe of
⁄
4
” gas for the water supply, a sink, a wash
bars in case the appliance has to be transported
basin or a drainage system in the wall.
again.
Previously check if:
1. Unscrew and remove
— it is not a hot water tap.
the three rear screws
by means of a key.
— the running water is clean. If not, run off a
reasonable amount of water to flush out any
debris that may have collected in the pipes.
Have the permanent drainage system in the wall
checked by a plumber.controlar su buen estado por
un fontanero.
A) Place the enclosed
rubber joint, delivered in
2. Lean the appliance
a plastic bag together
back on the rear and
with the appliance (A)
fit one of the
Fig.6), at the very end of
polystyrene angles
the inlet hose and
between the appliance
carefully screw the pipe
and the floor.
to the tap taking care not
to damage the
Make sure the hoses
screwdrive and fix the
are not squashed.
nut well on to the end in
order to avoid leaking.
B) If necessary turn the
3. Carefully remove the
hose adequately by
plastic bags on the
unscrewing the nut at the
right and the left,
rear of the appliance.
pulling them to the
centre of the appliance
C) Now tighten the nut
anew to avoid leaks.
(Open the tap and asure
that it does not leak and
close it again.)
D) Place the discharging
hose in a washbasin or
sink with the aid of the
bent piece delivered
separately. The bent
piece has to be entered
into the tube’s mouth in
order to assure the
support. Aforesaid piece
allows the hose to be
4. Place the machine in an upright position and
fixed to the wall by means
remove the three plastic bolts.
of an opening on the
5. Plug the 3 holes with the plastic plugs which you
upper part and that way
can find in the envelope containing the instruction
the hose does not move
booklet.
and its falling is avoided.
7
P0287
P0018
1
2
AL009
P0001
P0002
A
AL013
P0021
P0022
8
1,5 m. Max.
60 cm. Min.
90 cm. Max.
IMPORTANT: The distance from the floor to the
Electrical connections
highest part of the hose should be between 60 to
Before plugging the appliance make sure that:
90 cm. (It is advised to be between 60 and 70 cm).
The hose must not be bent nor twisted to avoid
1º. the mains of your installation is the same as on
clogging. Should a prolongation of the discharging
the rating plate of your appliance (the plate is
hose be unavoidable this must never surpass 1.5 m
sticked to the rear of the appliance).
and must be of the same diameter as the original
2º. The meter, the fuses, the wiring and the socket
hose.
outlet can support the max. power absorbed stated
Make sure the hoses are not too tense.
on the rating plate.
3º. The socket base and the plug must fit in
adequately without any reducing interposition,
Levelling
multiple outlets or adapters. If necessary replace
Level the appliance by loosening or tightening the
the socket outlet by an adequate one.
feet. Once in the right position fix the feet by
pushing the nuts against the base of the case.
The applicable rules for electrical security
Accurate levelling will prevent vibration, noise and
require an adequate earthing. The plug of the
displacement of the appliance during operation.
appliance is provided with such a device.
Some vibration is inevitable, especially if placed on
Make sure your socket outlet is provided with
a wooden floor. Wooden floors are particularly
an adquate earthing too.
susceptible to vibrations. For advice, consult a
builder. If posible always place the appliance on a
The manufacturer declines any liability in case
solid floor.
of accidents or incicents should these safety
measures not be observed.
P0254
Оглавление
- WASHING MACHINE ЫЕШКФДЦТФÅ ЬФfiШТФ FA 523
- Contents
- Warnings
- Disposal
- Technical specifications
- Installation
- Your new washing machine
- Use
- Programme table
- Maintenance
- Something not working?
- ëÓ‰eʇÌËe
- LJÊÌ˚e Ò‚e‰eÌËfl ÔÓ ·eÁÓÔ‡ÒÌÓÒÚË
- ìÚËÎËÁ‡ˆËfl
- íeıÌ˘eÒÍËe ı‡‡ÍÚeËÒÚËÍË
- ìÒÚ‡Ìӂ͇
- LJ¯‡ ÌÓ‚‡fl ÒÚˇθ̇fl χ¯Ë̇
- ùÍÒÔÎÛ‡Ú‡ˆËfl
- 퇷Îˈ‡ ÔÓ„‡ÏÏ
- ìıÓ‰
- óÚÓ-ÚÓ ÌeËÒÔ‡‚ÌÓ?


