Asus WL-320gE: 2) Back panel LABEL Description 3) Wall mount option
2) Back panel LABEL Description 3) Wall mount option: Asus WL-320gE
Table of contents
- Content 1. English ............................................................................... 1
- Manufacturer Contact Information
- 1. Package contents 2. Getting to know the Wireless Access Point
- Operation Mode AP/Repeater/Bridge/Gateway Client
- 2) Back panel LABEL Description 3) Wall mount option
- 3. Conguring the Wireless Access Point 1) Wired connection 2) Wireless Connection 3) Setting IP address for wired or wireless client
- 4) ASUS WLAN Utilities
- Launching the ASUS WLAN Utilities
- ASUS WLAN Device Discovery 5) Accessing the web page
- User Name and Password Home Page
- 6) Quick Setup in Access Point mode
- 7) Quick Setup in Gateway mode System Setup -> Operation Mode -> Home Gateway. Cable User
- PPPoE User PPTP User Static IP User
- 8) Operation Modes 1) Bridge Mode (WDS)
- 2) Client Mode (Station) 3) Repeater Mode (URE) 9) Wireless 1) Site Survey(AP SCAN)
- 2) Access Control Adding a MAC Address
- 3) Multi-SSID and VLAN
- 10) System Setup 1) Global Settings 2) SNMP
WL-320gE Access Point Quick Start Guide
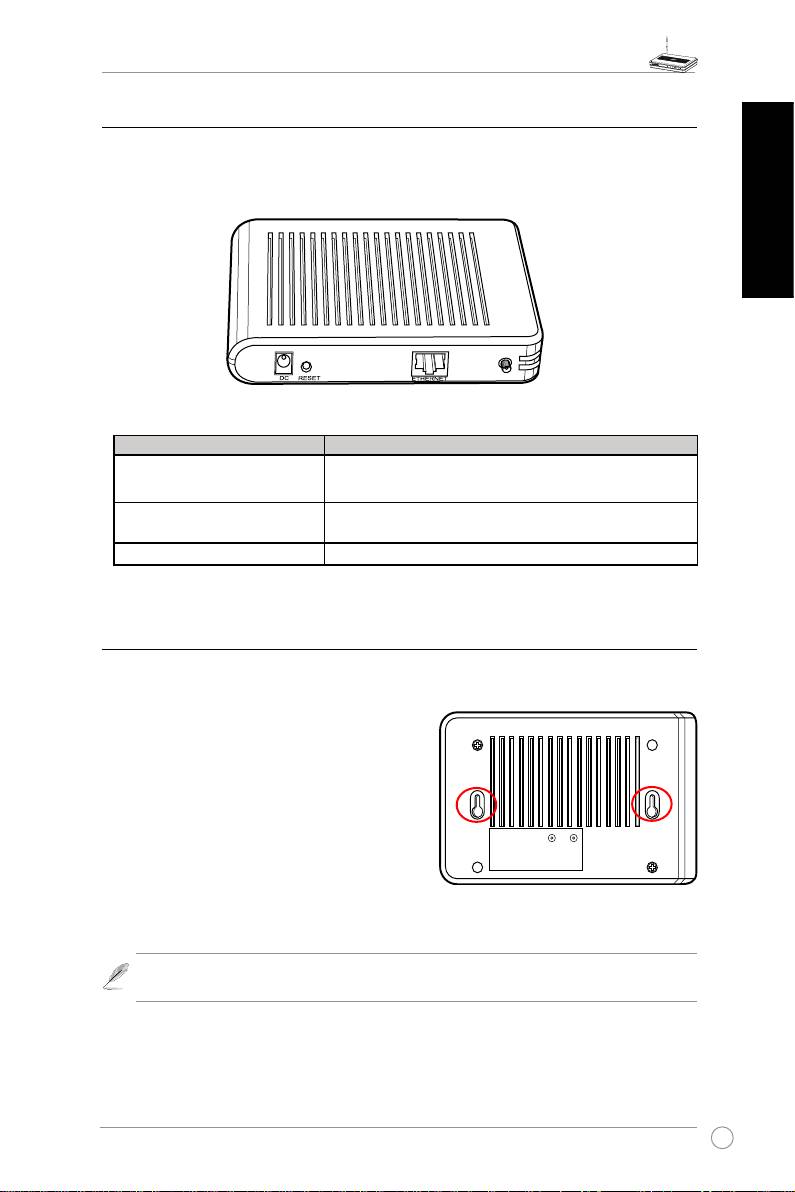
2) Back panel
TherearpanelcontainstheEthernet,theDCport,andtheResetbutton.
English
LABEL Description
ETHERNET
TheEthernetportconnectstoanEthernetdevice,such
astoaswitchorarouter.
RESET
Press the Reset button to restore to factory default
settings.
DC
TheDCportconnectstheAccessPointpoweradapter.
3) Wall mount option
TheASUS WL-320gEAccessPoint is designedto sit ona a raisedat surfacelike a le
cabinetorbookshelf.Theunitmayalsobeconvertedformountingtoawallorceiling.
Follow these stepsto mounttheASUS Wireless
AccessPointtoawall:
1. Look onthe undersideforthe two mounting
hooks.
2.Markupperholesinaatsurface.
3.Tightentwoscrewsuntilonly1/4''isshowing.
4. Latchthe hooks of theASUSAccessPoint
ontothescrews
.
Note:
Re-adjustthescrewsifyoucannotlatchtheASUSWirelessAccessPointonto
thescrewsorifitistooloose.
5
