Kenwood MG470: Recording CD onto TAPE (TAPE O.T.E.)
Recording CD onto TAPE (TAPE O.T.E.): Kenwood MG470
(
2
)
(
1
), (
3
)
EN
22
CD/MD HIGH SPEED DUBBING SYSTEM
Recording CD onto TAPE (TAPE O.T.E.)
The TAPE O.T.E. (One-Touch Edit) function makes it possible to record all tracks in a CD on a
tape with a one-touch operation (All-track recording). It is also capable of recording the cur-
rently played CD track on a tape with a one-touch operation (Single-track recording).
APE T
1
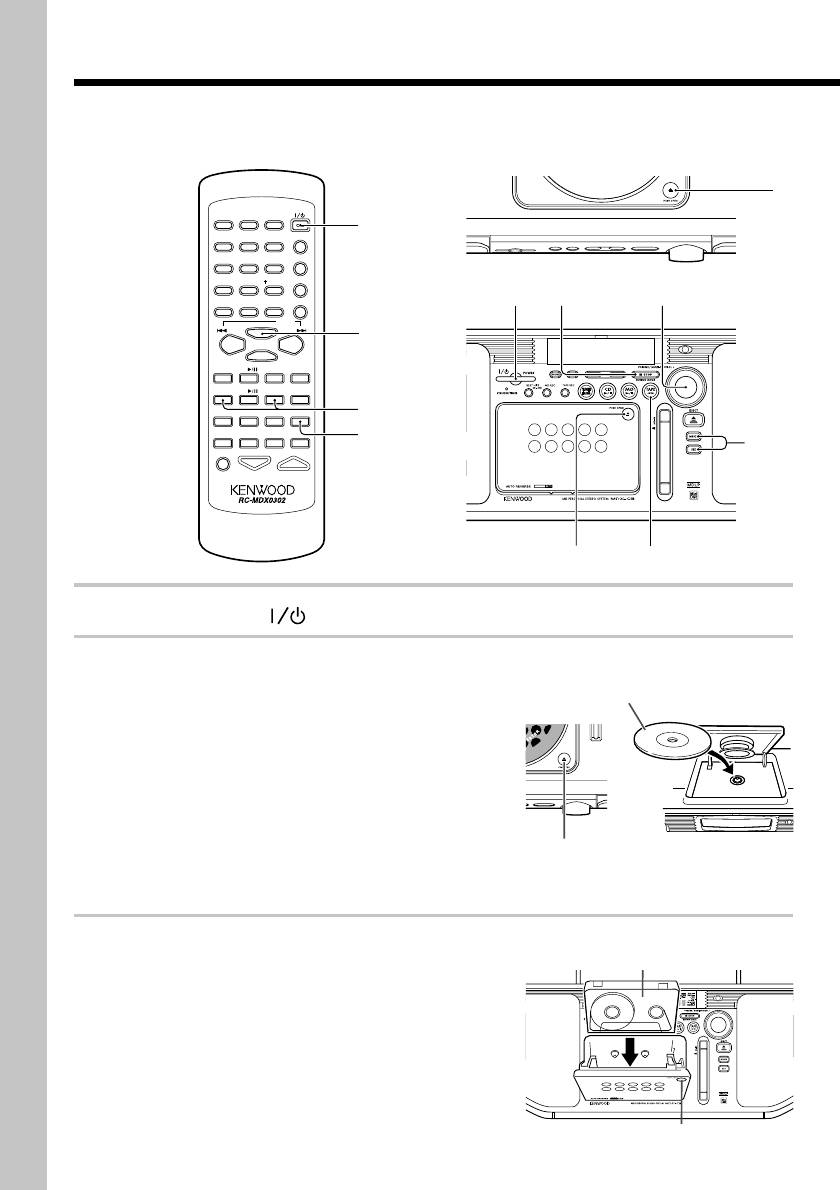
Press the POWER key to turn power on.
2
Insert a CD.
The label side
The CD should be placed horizontally on the tray.
must be on top
To prevent malfunction, do not place it obliquely.
(1) Open the CD door by pressing the area
marked 0PUSH OPEN of the CD door.
(2) Place a CD.
(3) Close the CD door by pressing the area
marked 0PUSH OPEN of the CD door.
If the CD is already playing, press the 7STOP
key to stop playback.
Insert with the side to be recorded
3
Insert a recordable tape so that the side
facing the front.
where you want to start recording faces
the front.
(1) Press the area marked 0PUSH OPEN on
the cassette holder to open it, and insert a
cassette tape.
(2) Press the area marked 0PUSH OPEN to
close the cassette holder.
CD/MD HIGH SPE ED DUBBING SYSTEM
1
B
I
E
R
T
D
U
A
L
D
A
C
O
N
V
E
R
T
/
2
POWER
カ
サ
1
ア
2
ABC
3
DEF
タ
ナ
ハ
1
4
GHI
5
JKL
6
MNO
TITLE INPUT
マ
ヤ
ラ
7
PRS
8
TUV
9
WXY
TRACK EDIT
RANDOM
ワオン
0
QZ
10
記号
PGM
REPEAT
SPACE
CHARAC.
CLEAR/DELETE
1
4
56
,
SET
P.CALL
56
,
ENTER
TUNING
TUNING
DOWN
UP
1
FM/AMCD
1
7
MDSTOP
TAPE
2
3
TAPE EQ.
AUTO/MANU
M D O.T. E.
DISPLAY
TIME DISPLAY
TAPE O.T.E .
4
SOUND TONE TIMER
SLEEP
6
56
,
MUTE
VOLUME
34
A
APE T
(1), (2)
Basic section
4
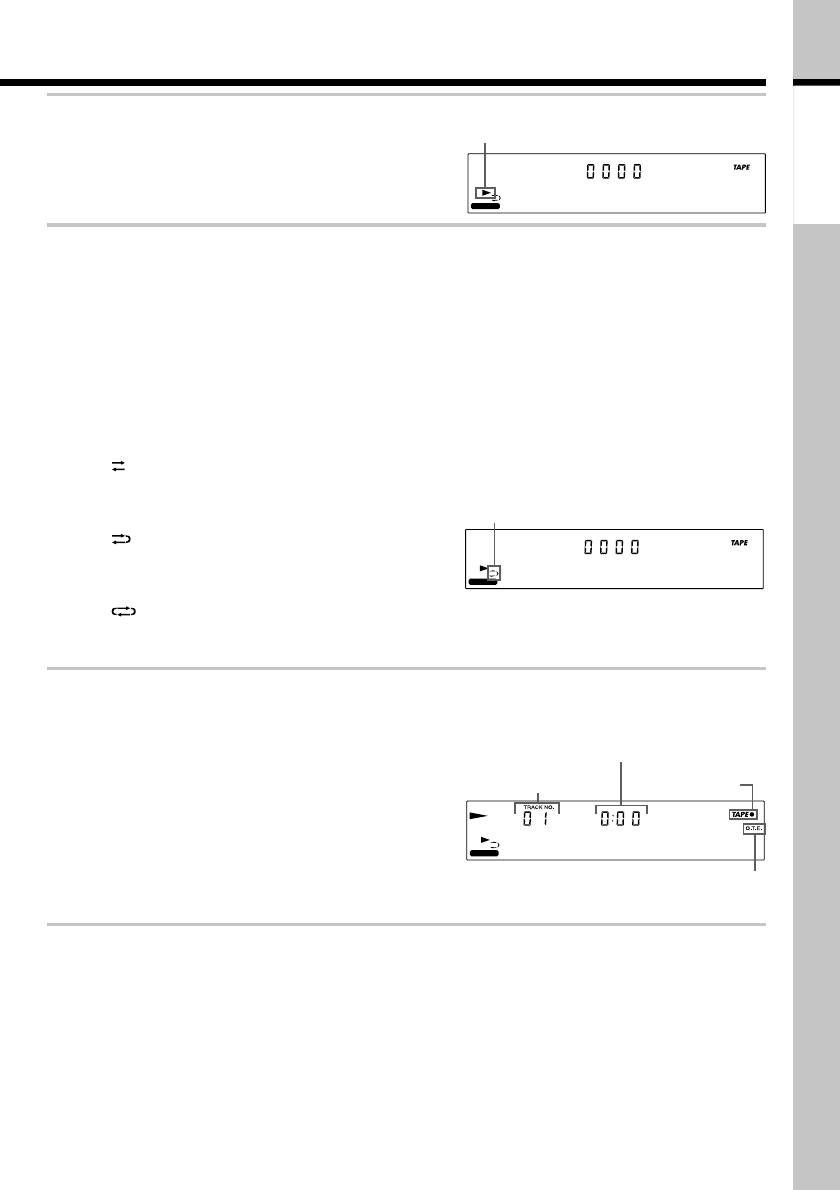
Press the TAPE
`
key so that "
3
" is lit,
Tape transport direction
then press the
7
STOP key.
If "2" is lit, recording will start with the side
EX. BASS
TAPE STOP
which is not facing the front.
5
Select the desired tape reverse mode.
(1) Press the MENU key.
(2) Rotate the VOLUME/MULTI-CONTROL knob
so that "TAPE RVS.?" is displayed, then press
the SET key.
(3) Rotate the VOLUME/MULTI-CONTROL knob
so that the desired reverse mode is dis-
played.
"
" : ONE-WAY Tape will stop after a sin-
gle side has been re-
corded.
Reverse mode
"
" : REVERSE Tape will stop after both
sides have been re-
corded.
EX. BASS
REVERSE
"
" : ENDLESS Tape will stop after both
sides have been re-
corded.
6
Press the TAPE O.T.E. key on the remote.
If you are operating the main unit :
Elapsed time of CD track
being played
(1) Press the MENU key.
Tape recording
CD track No.
(2) Rotate the VOLUME/MULTI-CONTROL knob
indicator
so that "REC OPTIONS" is displayed, then
press the SET key.
EX. BASS
CD
(3) Rotate the VOLUME/MULTI-CONTROL knob
so that "CD=TAPE" is displayed, then press
“O.T.E.”lit
the SET key.
Continued on next page
\
EN
23
Recording CD onto TAPE (continued)
Recording the CD track being played (Single-track recording)
(1) Play the CD track to be recorded.
(2) Press the TAPE O.T.E. key on the remote.
When you are operating the main unit, see step 6 (page 23).
Recording starts after returning to the beginning of the current track.
To stop recording in the middle :
Press the 7STOP key.
÷ The cassette deck of the system is capable of recording only the normal (TYPE I) tapes. High
(TYPE II) and metal (TYPE IV) position tapes cannot be used.
÷ For the recordable tape types, see "Notes on cassette tape" (page 63).
÷ Do not open the cassette holder during recording. Otherwise, malfunction may occur. Be sure to
stop tape before taking it out.
÷ The TAPE O.T.E. recording is not available if the CD is played in the random mode. Cancel the
random mode before proceeding to recording. (page 31)
EN
24

Basic section
EN
25
Оглавление
- Before applying power
- Contents
- System connection
- Adjusting the present time
- Presetting radio stations
- Playback of CD
- Playback of MD
- Playback of TAPE
- Receiving broadcast stations
- Playing audio input from AUX component
- Recording CD onto MD (MD O.T.E.)
- Recording CD onto TAPE (TAPE O.T.E.)
- Displayed information
- Adjusting the tone
- Adjusting the AUX input Muting the audio tempo- level rarily (MUTE)
- Playing CD or MD tracks
- Repeating a CD or MD Playing a CD or MD in a (REPEAT) random (RANDOM)
- Stereo LP modes
- Setting the recording mode
- High-speed recording of
- Recording onto MD
- Recording onto TAPE
- Recording CD tracks onto
- Recording MD tracks onto
- Recording only the first
- Editing the MD titles
- Moving one track
- Moving several tracks at a time
- Combining tracks
- Dividing a track
- Erasing a track
- Erasing several tracks at
- Canceling editing
- Waking up to the timer
- Program timer
- Sleep timer (SLEEP) Auto power save (A.P.S.)
- Important items
- In case of difficulty
- Display message list
- Specifications
- Controls and indicators
