Asus CM6340 – page 2
Manual for Asus CM6340
ENGLISH
ENGLISH
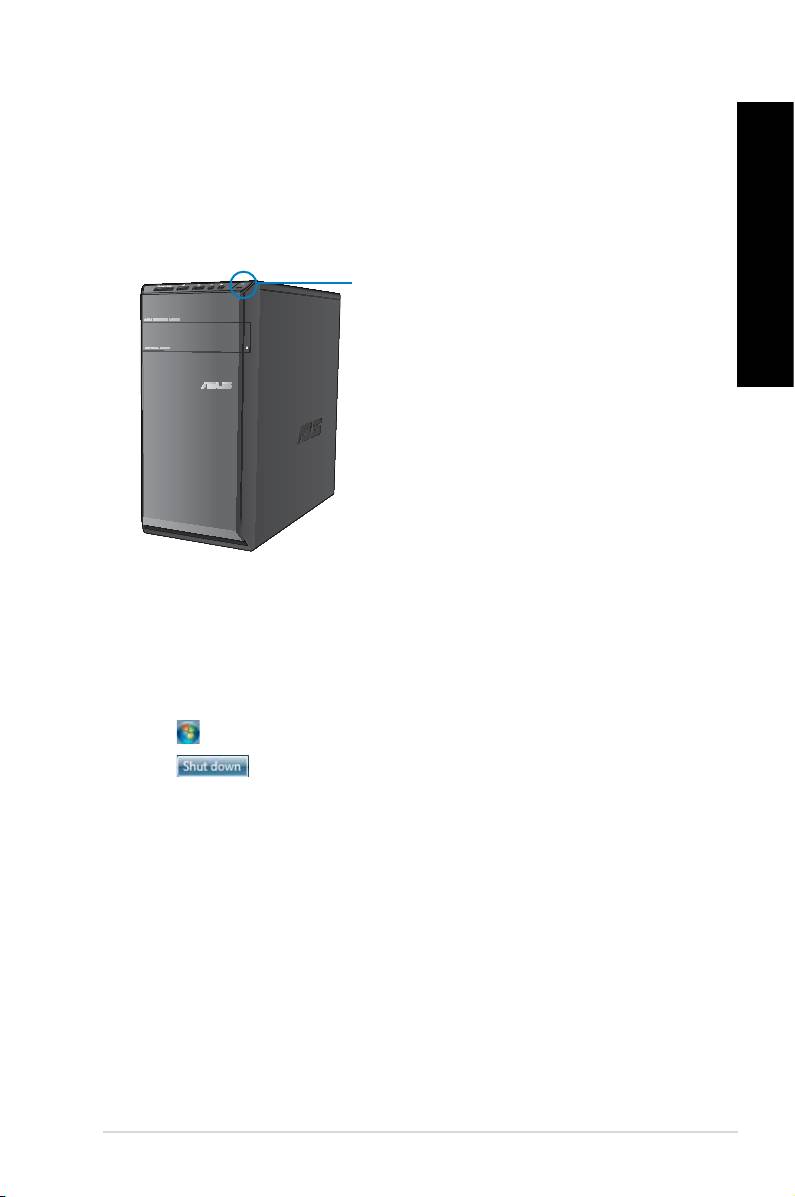
Turning your computer ON/OFF
This section describes how to turn on/off your computer after setting up your computer.
ENGLISH
Turning your computer ON
To turn your computer ON:
1. Turn your monitor ON.
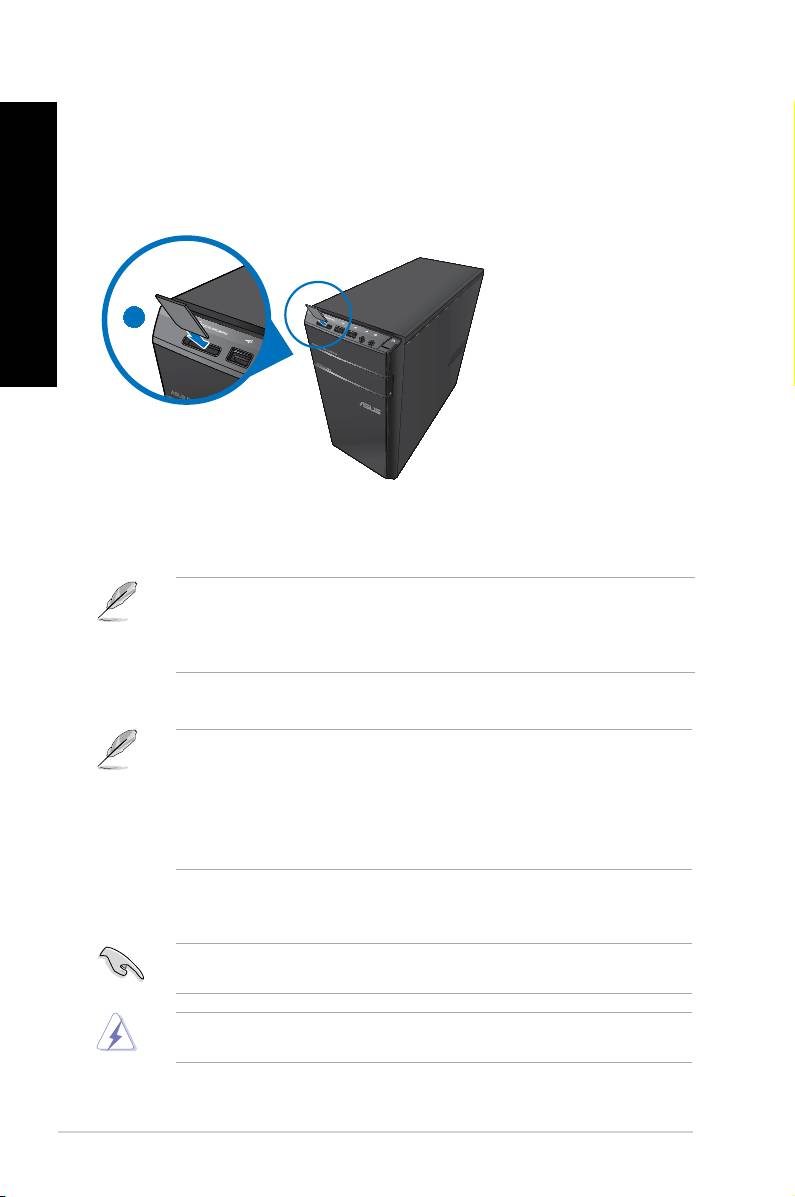
2. Press the power button on your computer.
ENGLISH
Power button
3. Wait until the operating system loads automatically.
Turning your computer OFF
To turn your computer OFF:
1. Close all running applications.
®
2. Click
on the Windows
desktop.
3. Click
to shut down the operating system.
ASUS CM6340 19

ENGLISH
ENGLISH
20 Chapter 1: Getting started

ENGLISH
Chapter 2
®
Using Windows
7
ENGLISH
Starting for the rst time
When you start your computer for the rst time, a series of screens appear to guide you in
®
conguring the basic settings of your Windows
7 operating system.
To start for the rst time:
1. Turn your computer on. Wait for a few minutes until the
Set Up Windows screen
appears.
2. From dropdown list, select your language, then click
Next.
3. From the dropdown lists, select your
Country or region, Time and currency, and
Keyboard layout, then click Next.
4. Key in uniques names for the
user name and computer name, then click Next.
5. Key in the necessary information to set up your password, then click
Next. You may
also click Next to skip this step without entering any information.
If you want to set up a password for your account later, refer to the section Setting up a
user account and password in this chapter.
6. Carefully read the license terms. Tick I accept the license terms and click Next.
7. Select
Use recommended settings or Install important updates only to set up the
security settings for your computer. To skip this step, select Ask me later.
8. Review your date and time settings. Click
Next. The system loads the new settings and
restarts. You may now start using your computer.
ASUS CM6340 21
ENGLISH
ENGLISH
®
22 Chapter 2: Using Windows
7
ENGLISH
ENGLISH
®
Using Windows
7 desktop
®
Click the Start icon > Help and Support to obtain more information about Windows
7.
Using the Start menu
The Start menu gives you access to programs, utilities, and other useful items on your
computer. It also provides you with more information about Windows 7 through its Help and
Support feature.
Launching items from the Start menu
To launch items from the Start menu:
®
1. From the Windows
taskbar, click the Start icon .
2. From the Start menu, select the item that you want to launch.
You may pin programs that you want constantly displayed on the Start menu. For more
details, refer to the section Pinning programs on the Start menu or taskbar on this
chapter.
Using the Getting Started item
The Getting Started item on the Start menu contains information about some basic tasks
®
such as personalizing Windows
, adding new users, and transferring les to help you to
®
familiarize yourself with using Windows
7.
To use the Getting Started item:
®
1. From the Windows
taskbar, click the Start icon to launch the Start menu.
2. Select
Getting Started. The list of available tasks appears.
3. Select the task that you want to do.
Using the taskbar
The taskbar allows you to launch and manage programs or items installed on your computer.
Launching a program from the taskbar
To launch a program from the taskbar:
®
• From the Windows
taskbar, click an icon to launch it. Click the icon again to hide the
program.
You may pin programs that you want constantly displayed on the taskbar. For more details,
refer to the section Pinning programs on the Start menu or taskbar on this chapter.

ENGLISH
ENGLISH
Pinning items on the jumplists
ENGLISH
When you right-click an icon on the taskbar, a jumplist launches to provide you with quick-
access to the program’s or item’s related links.You may pin items on the jumplist such as
favorite websites, often-visited folders or drives, or recently played media les.
To pin items to the jumplist:
1. From the taskbar, right-click an icon.
ENGLISH
2. From the jumplist, right-click the item that you want to pin, then select
Pin to this list.
Unpinning items from the jumplist
To unpin items from the jumplist:
1. From the taskbar, right-click an icon.
2. From the jumplist, right-click the item that you want to remove from the jumplist, then
select Unpin from this list.
Pinning programs on the Start menu or taskbar
To pin programs on the Start menu or taskbar:
®
1. From the Windows
taskbar, click the Start icon to launch the Start menu.
2. Right-click the item that you want to pin on the Start menu or taskbar.
3. Select
Pin to Taskbar or Pin to Start menu.
You may also right-click on the icon of a running program on the taskbar, then select Pin
this program to taskbar.
Unpinning programs from the Start menu
To unpin programs from the Start menu:
®
1. From the Windows
taskbar, click the Start icon to launch the Start menu.
2. From the Start menu, right-click the program that you want to unpin, then select
Remove from this list.
Unpinning programs from the taskbar
To unpin programs from the taskbar:
1. From the taskbar, right-click the program that you want to remove from the taskbar,
then select Unpin this program from taskbar.
ASUS CM6340 23
ENGLISH
ENGLISH
®
24 Chapter 2: Using Windows
7
ENGLISH
ENGLISH
Using the notication area
By default, the notication area shows these three icons:
Action Center notication
®
Click this icon to display all the alert messages/notications and launch the Windows
Action Center.
Network connection
This icon displays the connection status and signal strength of the wired or wireless network
connection.
Volume
Click this icon to adjust the volume.
Displaying an alert notication
To display an alert notication:
• Click the Notication icon
, then click the message to open it.
®
For more details, refer to the section Using Windows
Action Center in this chapter.
Customizing icons and notications
You may choose to display or hide the icons and notications on the taskbar or on the
notication area.
To customize icons and notications:
1. From the notication area, click on the arrow icon
.
2. Click
Customize.
3. From the dropdown list, select the behaviors for the icons or items that you want to
customize.
Managing your les and folders
®
Using Windows
Explorer
®
Windows
Explorer allows you to view, manage, and organize your les and folders.
®
Launching Windows
Explorer
To launch Windows Explorer:
®
1. From the Windows
taskbar, click the Start icon to launch the Start menu.
2. Click
Computer to launch Windows Explorer.

ENGLISH
ENGLISH
Exploring les and folders
ENGLISH
To explore les and folders:
®
1. Launch Windows
Explorer.
2. From the navigation or view pane, browse for the location of your data.
3. From the breadcrumb bar, click the arrow to display the contents of the drive or folder.
ENGLISH
Customizing the le/folder view
To customize the le/folder view:
1. Launch Windows Explorer.
2. From the navigation pane, select the location of your data.
3. From the toolbar, click the View icon
.
4. From the View menu, move the slider to select how you want to view the le/folder.
You may also right-click anywhere on the View pane, click View, and select the view type
that you want.
Arranging your les
To arrange your les:
1. Launch Windows Explorer.
2. From the
Arrange by eld, click to display the dropdown list.
3. Select your preferred arrangement type.
Sorting your les
To sort your les:
1. Launch Windows Explorer.
2. Right-click anywhere on the View pane.
3. From the menu that appears, select
Sort by, then select your preferred sorting type.
Grouping your les
To group your les:
1. Launch Windows Explorer.
2. Right-click anywhere on the View pane.
3. From the menu that appears, select
Group by, then select your preferred grouping
type.
ASUS CM6340 25
ENGLISH
ENGLISH
®
26 Chapter 2: Using Windows
7
ENGLISH
ENGLISH
Adding a new folder
To add a new folder:
1. Launch Windows Explorer.
2. From the toolbar, click
New folder.
3. Key in a name for the new folder.
You may also right-click anywhere on the View pane, click New > Folder.
Backing up your les
Setting up a backup
To set up a backup:
1. Click
> All Programs > Maintenance > Backup and Restore.
2. Click
Set up backup. Click Next.
3. Select your backup destination. Click
Next.
4. Select
Let Windows choose (recommended) or Let me choose as your backup
mode.
If you select Let Windows choose, Windows will not back up your programs, FAT-
formatted les, Recycle Bin les, or temporary les that are 1GB or more.
5. Follow the onscreen instructions to nish the process.
Restoring your system settings
®
The Windows
System Restore feature creates a restore point where the computer’s system
settings are stored at certain time and date. It allows you to restore or undo changes to your
computer’s system settings without affecting your personal data.
To restore your system:
1. Close all running applications.
2. Click
> All Programs > Accessories > System Tools > System Restore.
3. Follow the onscreen instructions to complete the process.

ENGLISH
ENGLISH
Protecting your computer
ENGLISH
®
Using Windows
7 Action Center
®
Windows
7 Action Center provides you with alert notications, security information, system
maintenance information, and the option to automatically troubleshoot and x some common
computer problems.
You may customize the notications. For more details, refer to the previous section
ENGLISH
Customizing icons and notications in this chapter.
®
Launching Windows
7 Action Center
®
To launch Windows
7 Action Center:
1. To launch Windows 7 Action Center, click the Notication icon
, then click Open
Action Center.
2. From Windows 7 Action Center, click the task that you want to do.
®
Using Windows
Update
Windows Update allows you to check and install the latest updates to enhance the security
and performance of your computer.
®
Launching Windows
Update
®
To launch Windows
Update:
®
1. From the Windows
taskbar, click the Start icon to launch the Start menu.
2. Select
All Programs > Windows Update.
3. From the Windows Update screen, click the task that you want to do.
Setting up a user account and password
You may create user accounts and passwords for people who will use your computer.
Setting up a user account
To set up a user account:
®
1. From the Windows
taskbar, click > Getting Started > Add new users.
2. Select
Manage another account.
3. Select
Create a new account.
4. Key in the name of the new user.
5. Select either
Standard user or Administrator as the user type.
6. When done, click
Create Account.
ASUS CM6340 27

Setting up a user’s password
ENGLISH
To set up a user’s password:
1. Select the user that you would like to set a password.
2. Select
Create a password.
3. Key in a password and conrm it. Key in your password’s hint.
4. When done, click
Create password.
ENGLISH
Activating the anti-virus software
Trend Micro Internet Security is pre-installed on your computer. It is a third-party anti-virus
software protecting your computer from virus. It is purchased separately. You have a 30-day
trial period after activating it.
To activate Trend Micro Internet Security:
1. Run the Trend Micro Internet Security application.
2. Carefully read the license terms. Click
Agree & Activate.
3. Input your e-mail address and select your location. Click
Next.
4. Click Finish to complete the activation.
®
Getting Windows
Help and Support
®
Windows
Help and Support provides you with guides and answers in using the applications
®
in Windows
7 platform.
®
To launch Windows
Help and Support, click > Help and Support.
®
Ensure that you are connected to the Internet to obtain the latest Windows
online help.
®
28 Chapter 2: Using Windows
7
ENGLISH
Chapter 3
Connecting devices to your computer
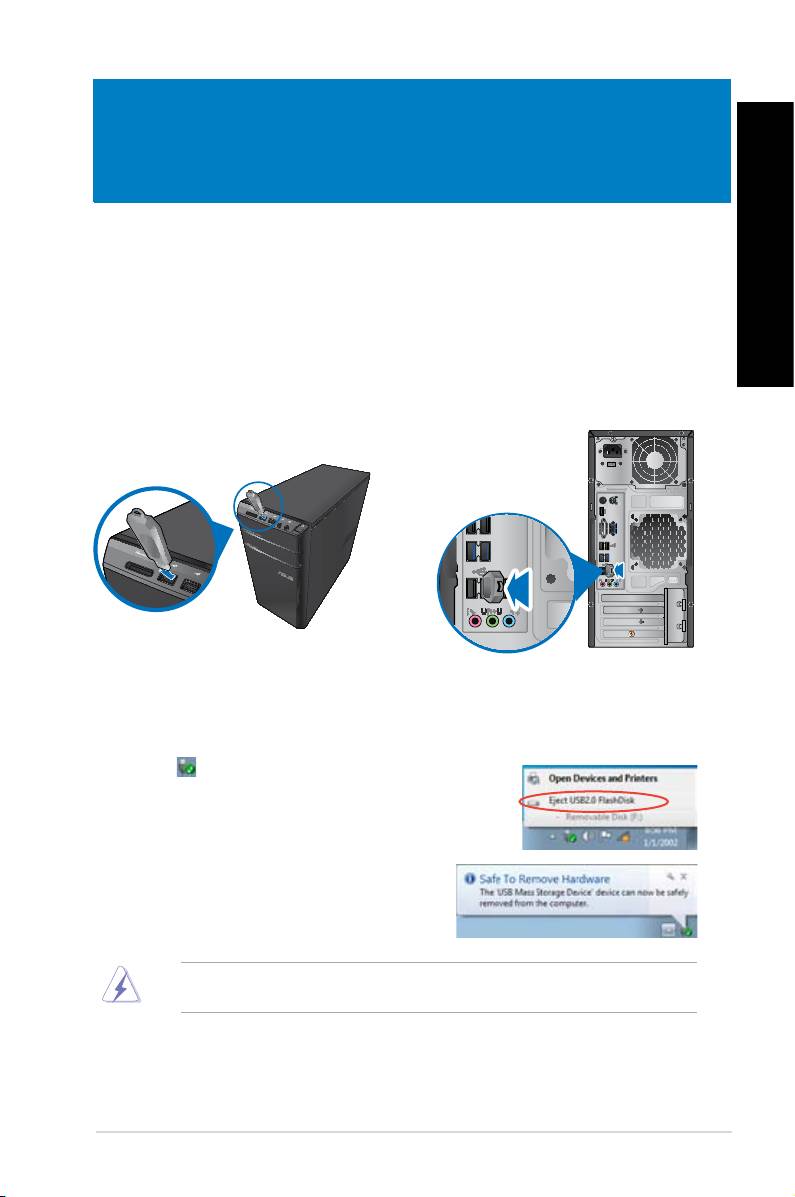
Connecting a USB storage device
ENGLISH
This desktop PC provides USB 2.0/1.1 ports on both the front and rear panels and USB3.0
ports on the rear panel. The USB ports allow you to connect USB devices such as storage
devices.
To connect a USB storage device:
• Insert the USB storage device to your computer.
Front panel
Rear panel
To remove a USB storage device:
1. Click
from the Windows notication area on your
computer, then click Eject USB2.0 FlashDisk.
2. When the
Safe to Remove Hardware message
pops up, remove the USB storage device from
your computer.
DO NOT remove a USB storage device when data transfer is in progress. Doing so may
cause data loss or damage the USB storage device.
ASUS CM6340 29
ENGLISH
ENGLISH
30 Chapter 3: Connecting devices to your computer
ENGLISH
ENGLISH
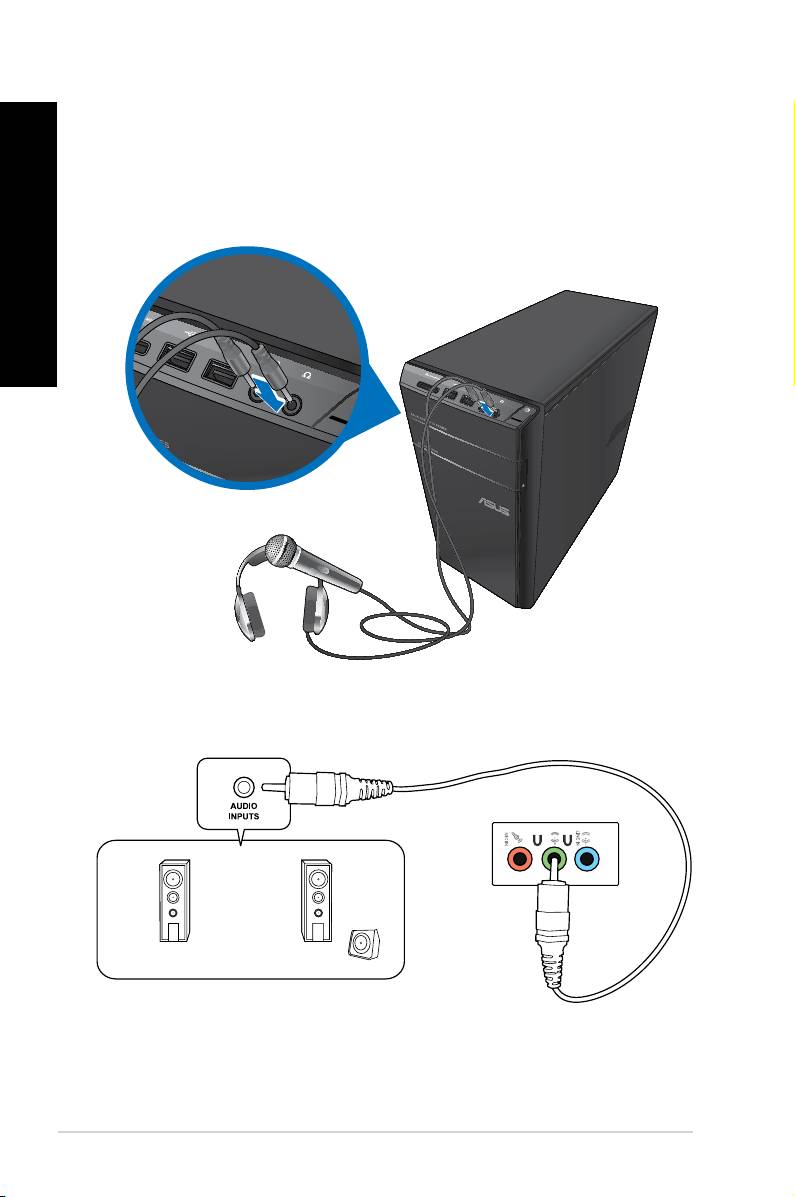
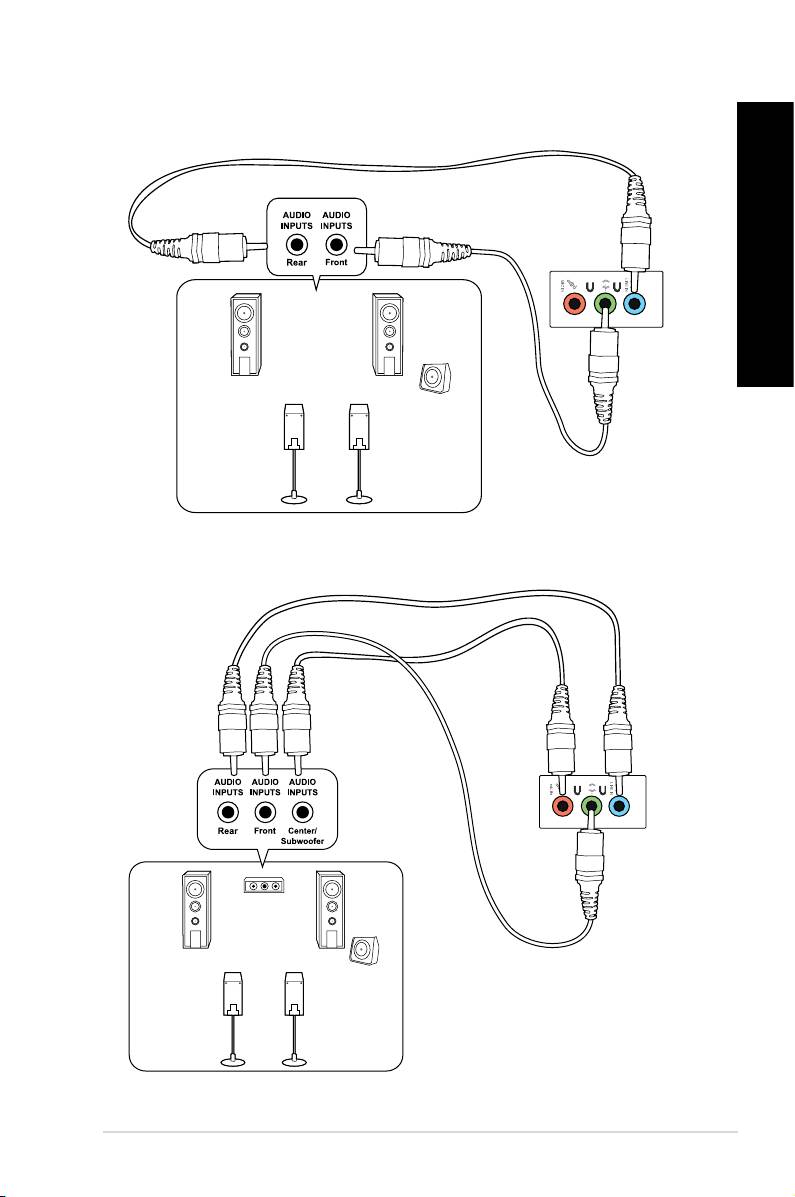
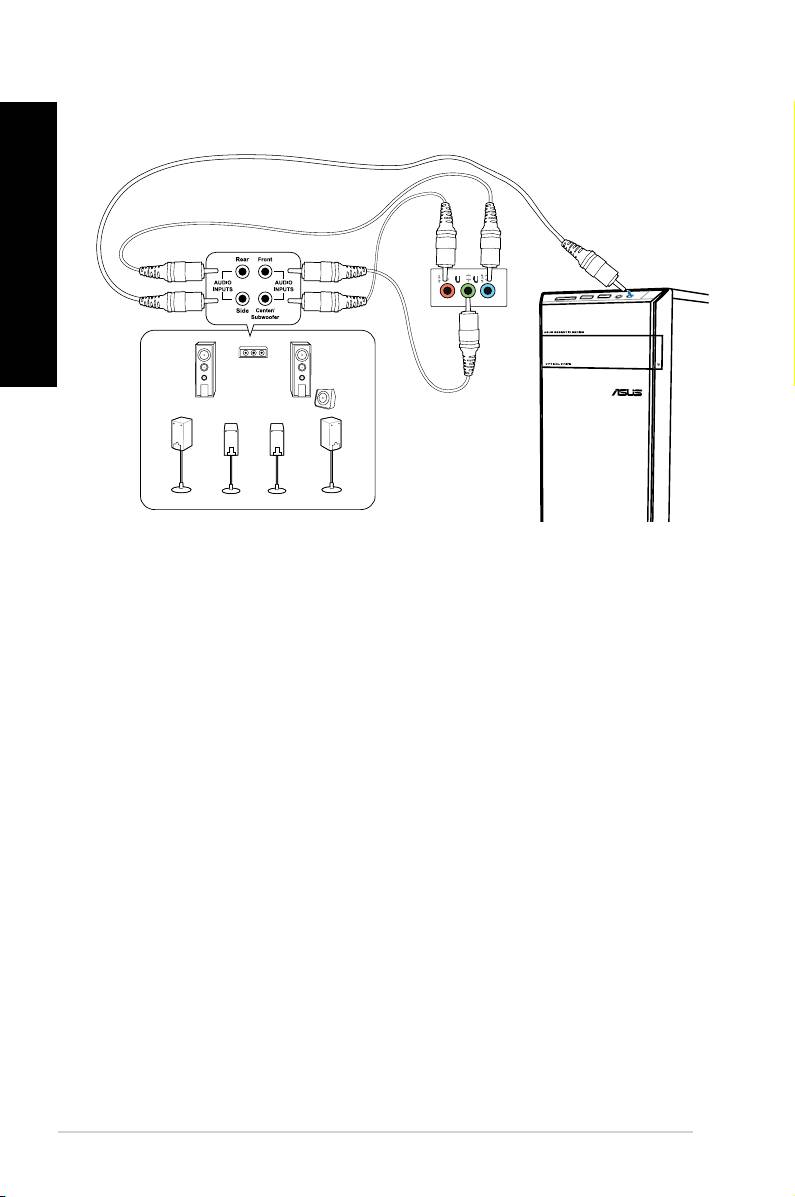
Connecting microphone and speakers
This desktop PC comes with microphone ports and speaker ports on both the front and
rear panels. The audio I/O ports located on the rear panel allow you to connect 2-channel,
4-channel, 6-channel, and 8-channel stereo speakers.
Connecting Headphone and Mic
Connecting 2-channel Speakers
LINE OUT
ENGLISH
ENGLISH
Connecting 4-channel Speakers
ENGLISH
ENGLISH
Connecting 6-channel Speakers
ASUS CM6340 31
LINE OUT
LINE OUT
ENGLISH
ENGLISH
32 Chapter 3: Connecting devices to your computer
ENGLISH
ENGLISH
Connecting 8-channel Speakers
LINE OUT
ENGLISH
ENGLISH
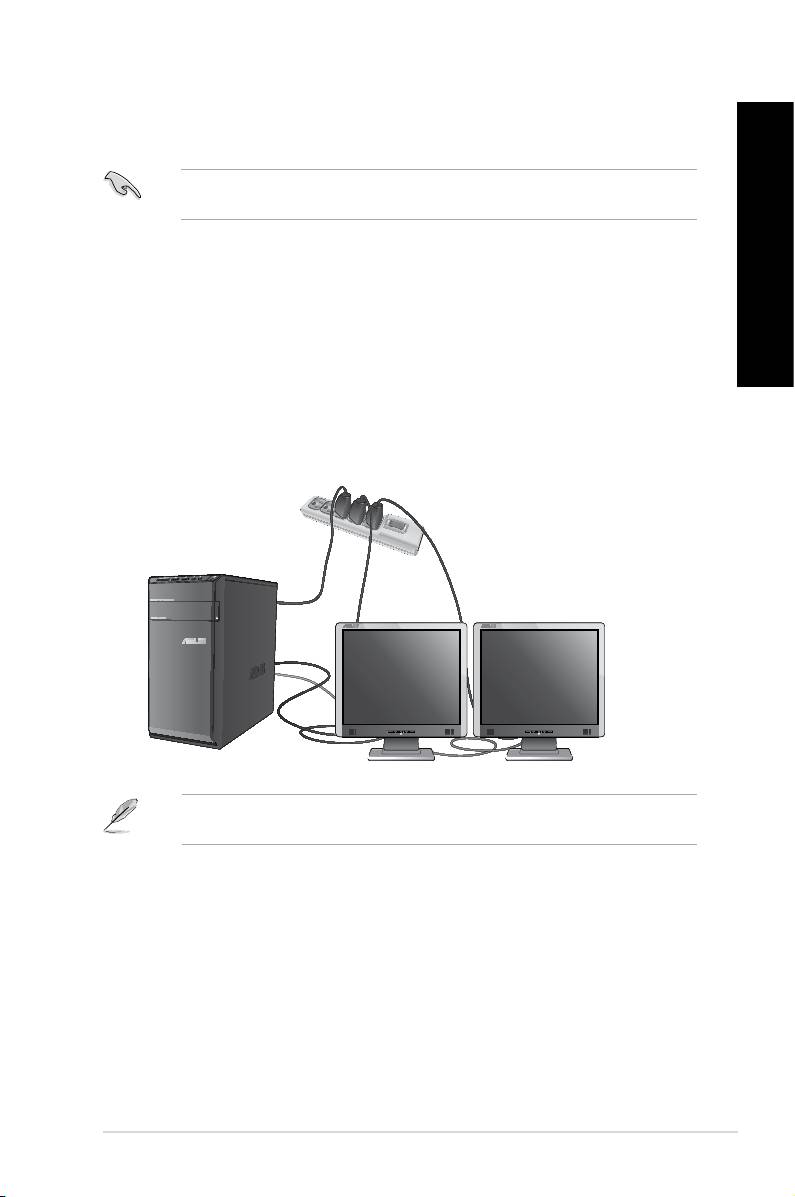
Connecting multiple external displays
Your desktop PC may come with VGA, HDMI, or DVI ports and allows you to connect multiple
ENGLISH
external displays.
When a graphics card is installed in your computer, connect the monitors on the output
ports of the graphics card.
Setting up multiple displays
ENGLISH
When using multiple monitors, you are allowed to set display modes. You can use the
additional monitor as a duplicate of your main display, or as an extension to enlarge your
Windows desktop.
To set up multiple displays:
1. Turn off your computer.
2. Connect the two monitors to your computer and connect the power cords to the
monitors. Refer to Setting up your computer section in Chapter 1 for details on how
to connect a monitor to your computer.
For some graphic cards, only the monitor that is set to be the primary display has display
during POST. The dual display function works only under Windows.
ASUS CM6340 33

ENGLISH
ENGLISH
34 Chapter 3: Connecting devices to your computer
ENGLISH
ENGLISH
3. Turn on your computer.
4. Do any of the following to open the
Screen Resolution setting screen:
• Click
> Control Panel > Appearance and Personalization > Display >
Change display settings.
• Right click anywhere on your Windows desktop. When the pop-up menu appears,
click Personalize > Display > Change display settings.
5. Select the display mode from the Multiple displays: drop-down list.
•
Duplicate these displays: Select this option to use the additional monitor as a
duplicate of your main display.
•
Extend these displays: Select this option to use the additional monitor as an
extension display. This increases your desktop space.
•
Show desktop only on 1 / 2: Select this option to show desktop only on monitor
1 or monitor 2.
•
Remove this display: Select this options to remove the selected display.
6. Click
Apply or OK. Then click Keep Changes on the conrmation message.
ENGLISH
ENGLISH
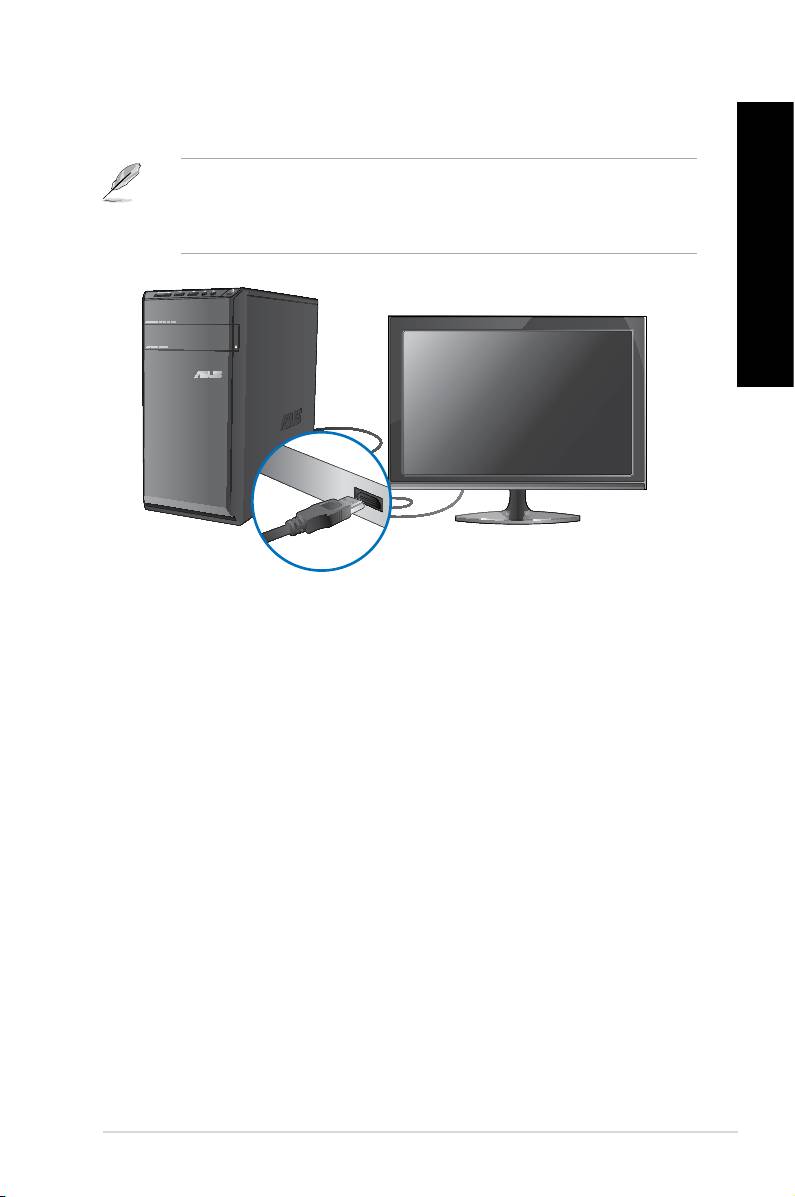
Connecting an HDTV
Connect a High Denition TV (HDTV) to the HDMI port of your computer.
ENGLISH
• You need an HDMI cable to connect the HDTV and the computer. The HDMI cable is
purchased separately.
• To get the best display performance, ensure that your HDMI cable is less than 15
meters.
ENGLISH
ASUS CM6340 35

ENGLISH
ENGLISH
36 Chapter 3: Connecting devices to your computer
ENGLISH
Chapter 4
Using your computer
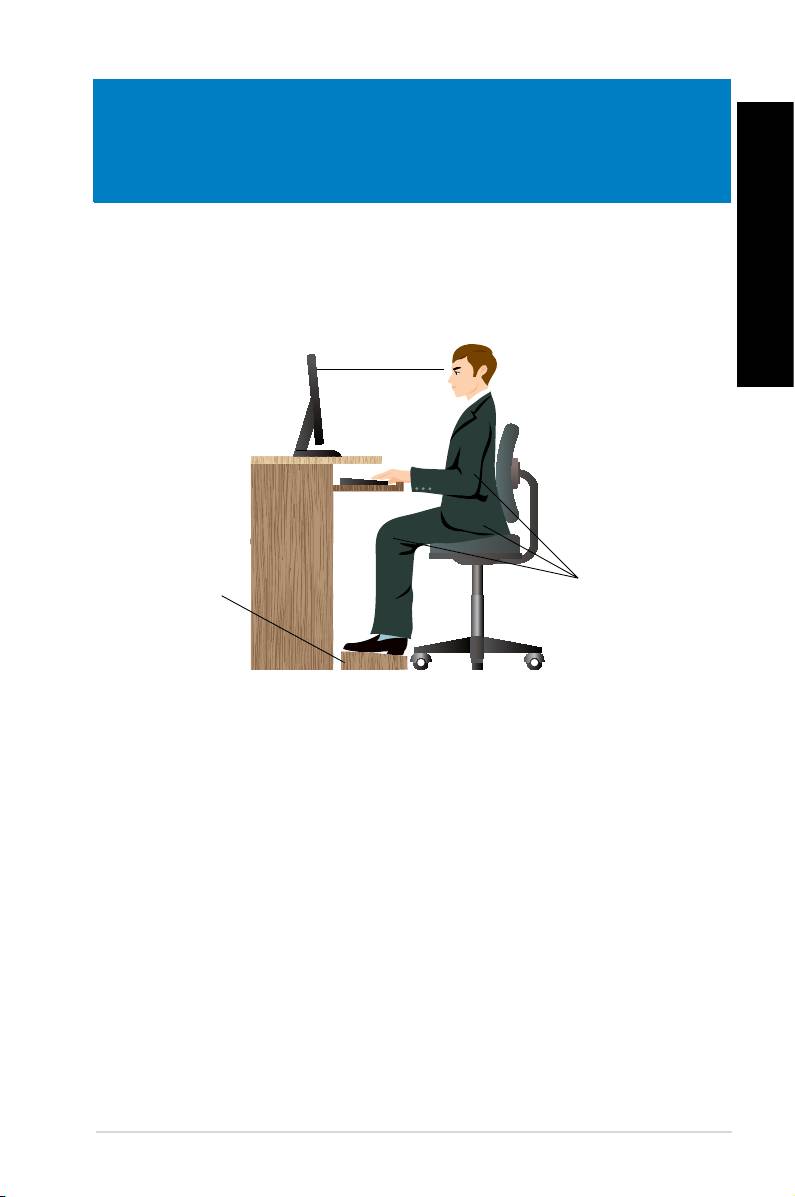
Proper posture when using your Desktop PC
ENGLISH
When using your Desktop PC, maintaining the proper posture is necessary to prevent strain to
your wrists, hands, and other joints or muscles. This section provides you with tips on avoiding
physical discomfort and possible injury while using and fully enjoying your Desktop PC.
ASUS CM6340 37
Eye level to the top of
the monitor screen
Foot rest 90˚ angles
To maintain the proper posture:
• Position your computer chair to make sure that your elbows are at or slightly above the
keyboard to get a comfortable typing position.
• Adjust the height of your chair to make sure that your knees are slightly higher than
your hips to relax the backs of your thighs. If necessary, use a footrest to raise the level
of your knees.
• Adjust the back of your chair so that the base of your spine is rmly supported and
angled slightly backward.
• Sit upright with your knees, elbows and hips at an approximately 90º angle when you
are at the PC.
• Place the monitor directly in front of you, and turn the top of the monitor screen even
with your eye level so that your eyes look slightly downward.
• Keep the mouse close to the keyboard, and if necessary, use a wrist rest for support to
reduce the pressure on your wrists while typing.
• Use your Desktop PC in a comfortably-lit area, and keep it away from sources of glare
such as windows and straight sunlight.
• Take regular mini-breaks from using your Desktop PC.
ENGLISH
ENGLISH
38 Chapter 4: Using your computer
ENGLISH
ENGLISH
Using the memory card reader
Digital cameras and other digital imaging devices use memory cards to store digital picture or
media les. The built-in memory card reader on the front panel of your system allows you to
read from and write to different memory card drives.
1
To use the memory card:
1. Insert the memory card into the card slot.
• A memory card is keyed so that it ts in only one direction. DO NOT force a card into a
slot to avoid damaging the card.
• You can place media in one or more of the card slots and use each media independently.
Place only one memory card in a slot at one time.
2. Select a program from the AutoPlay window to access your les.
®
• If AutoPlay is NOT enabled in your computer, click Windows
7 Start button on the
taskbar, click Computer, and then double-click the memory card icon to access the data
on it.
• Each card slot has its own drive icon which is displayed on the
Computer screen.
• The memory card reader LED lights up and blinks when data is being read from or
written to the memory card.
3. When nished, right-click the memory card drive icon on the Computer screen, click
Eject, and then remove the card.
Never remove cards while or immediately after reading, copying, formatting, or deleting
data on the card or else data loss may occur.
To prevent data loss, use “Safely Remove Hardware and Eject Media” in the Windows
notication area before removing the memory card.
