Supra STV-LC42T910FL: инструкция
Раздел: Бытовая, кухонная техника, электроника и оборудование
Тип: Телевизор

Характеристики, спецификации
Инструкция к Телевизору Supra STV-LC42T910FL

Table of Contents
Table of C o n t e nts............. . . . . ................ . . . . ................ . . . ................ . . . . ................ . . . . ...1
Safety Instruction......... . . . . . . . . . . . . . . . . . . . . . . . . . . . . . . . . . . . . . . . . . .................................................2
Overview (Controls and Connections)
.........................................................................6
Base assembly instruction..................................................................................................8
Remo t e Control. . .......... . .......... . .......... . .......... . . .......... . .......... . .......... . .......... . .......... . 12
Channel Se l e c t i o n . . . . . . . . . . . . . . . . ......................................................... . . . . . . . . . . . . . . . . . . . . ....15
Channel Retur n . . . . . . . . . . . . . . . . . . . . . . . . . . . . .........................................................................16
Power on/off........ . . .............. . . . ............. . . . ............. . . . .............. . . .............. . . . ............. . 1 7
Sel e ct Vi ewing S o urce.... . ........ ........ . ........ ........ . ........ ........ . ........ ........ . ........ ........ . .17
PICTURE Menu ................................................................................................................18
SOUND
Menu...................................................................................................................19
APPLICATIONS Menu...........................................................................................................21
PREFERENCES
Menu...........................................................................................................24
SET U P Me nu...... ........ . ....... . ....... . ....... . ....... . ....... . ........ ........ ........ ........ ........ ........ ....25
MEDIA Options .............................................................................................................26
Tr o u bleshootin g ......... . .......... . .......... . .......... . .......... . ......... . . ......... . .......... . .......... . .....31
Specifica t i o n s . .......... . . . . . . .......... . . . . . . .......... . . . . . . .......... . . . . . .......... . . . . . . .......... . . . . . . .......32
1

CAUTION
·Danger of explosion if incorrectly replaced.
batteries are
·Replace with only equivalent type of battery.
·Do not expose battery to direct sunlight or any other source of heat.
·Ensure proper disposal of used batteries.
·Where the MAINS plug or an appliance coupler is used as the disconnect device, the disconnect
device shall remain readily operable.
·To reduce the risk of electric shock, do not perform any servicing other than what is mentioned in
the operating manual.
·There are no user-serviceable parts inside the TV; do not open the TV casing.
LED SCREEN
Although the LED screen is made with high precision technology and 99.99% or more of the pixels are
effective, black dots may appear or bright points of light(red,blue or green) may appear constantly on
the LED screen. This is a structural property of the LED screen and is not a malfunction. If the surface of
the LED panel cracks, do not touch it until you have unplugged the AC power cord. Otherwise electric
shock may result. Do not throw anything at the TV set. The LED panel may break from the impact and
cause serious injury.
2
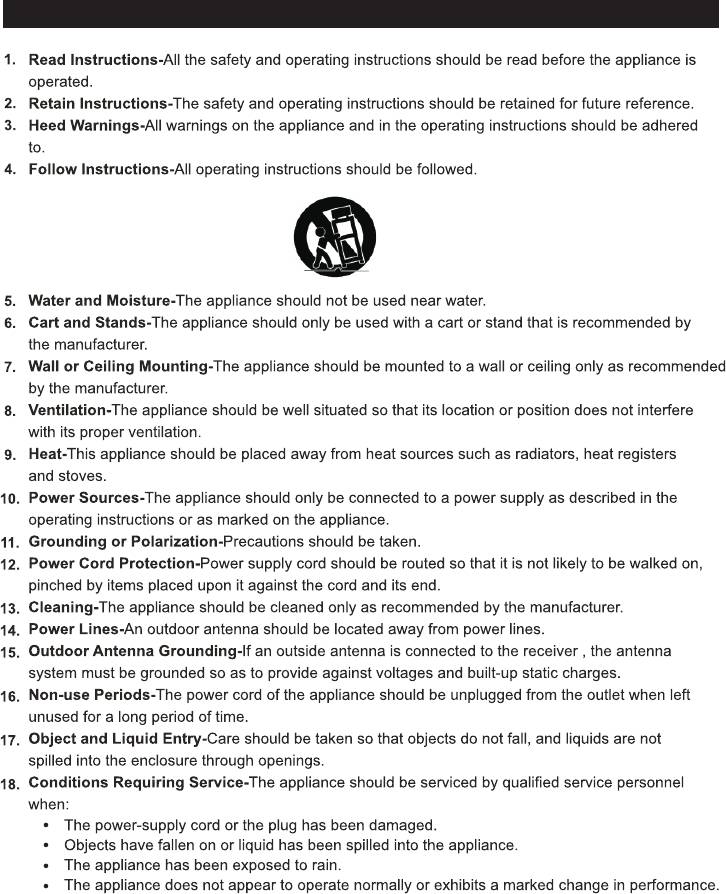
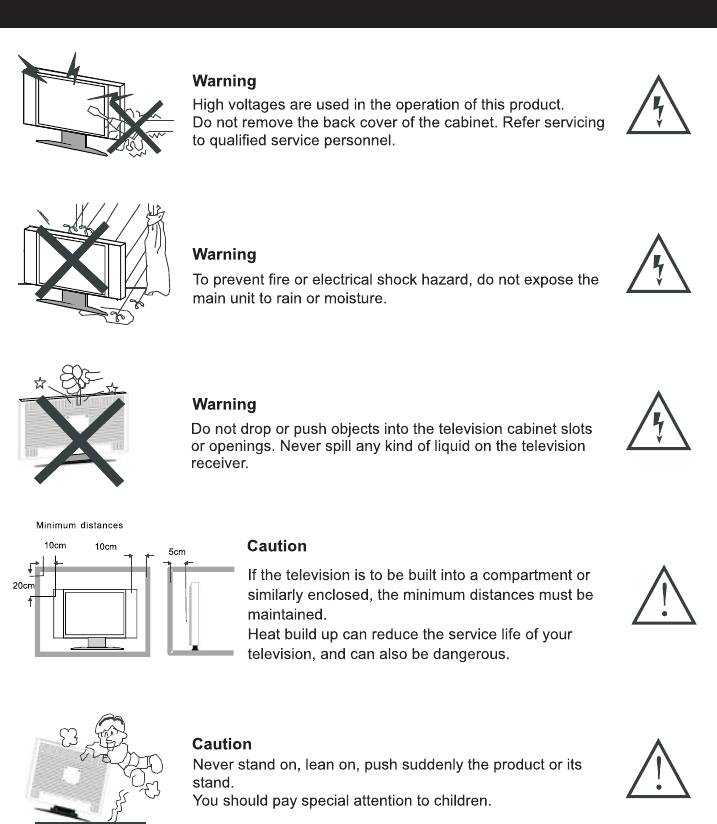
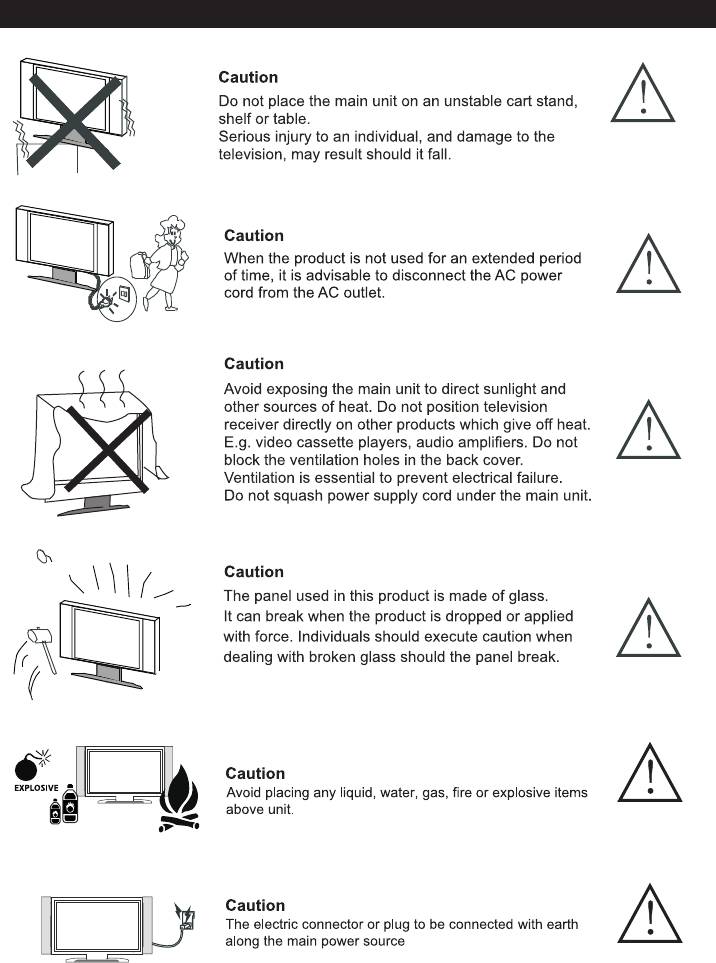
Safety Instruction
19. The ventilation should not be impeded by covering the ventilation opening with items, such as
newspapers, table-cloths,curtains,etc.
No naked flame sources, such as lighted candles, should be placed on the apparatus.
The apparatus shall be connected to mains socket outlet with a protective earthing connection.
The appliance coupler regard as disconnection device, the disconnect device shall remain readily
operable.
3
Safety Instruction
4
Safety Instruction
5
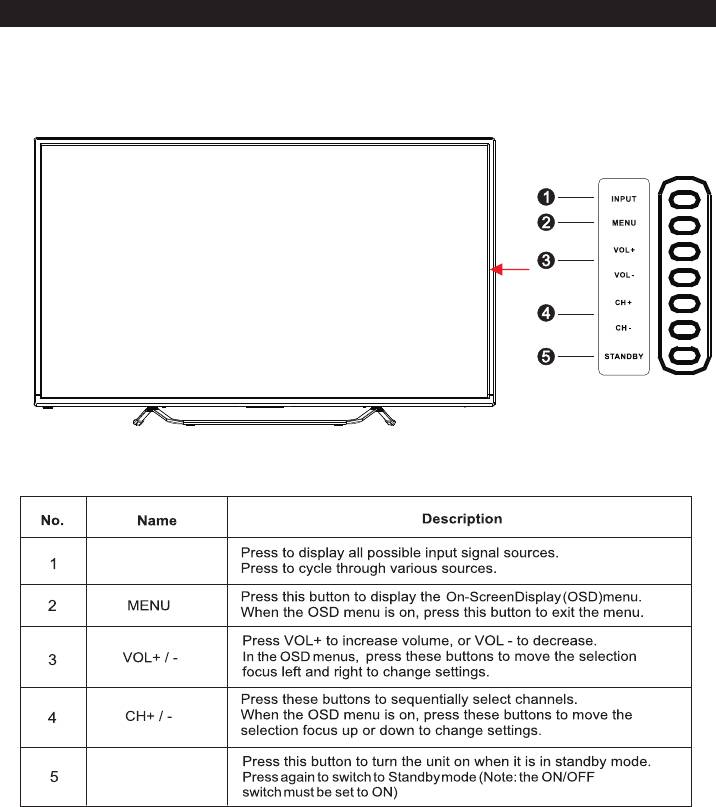
Overview (Controls and Connections)
INPUT
STANDBY
6
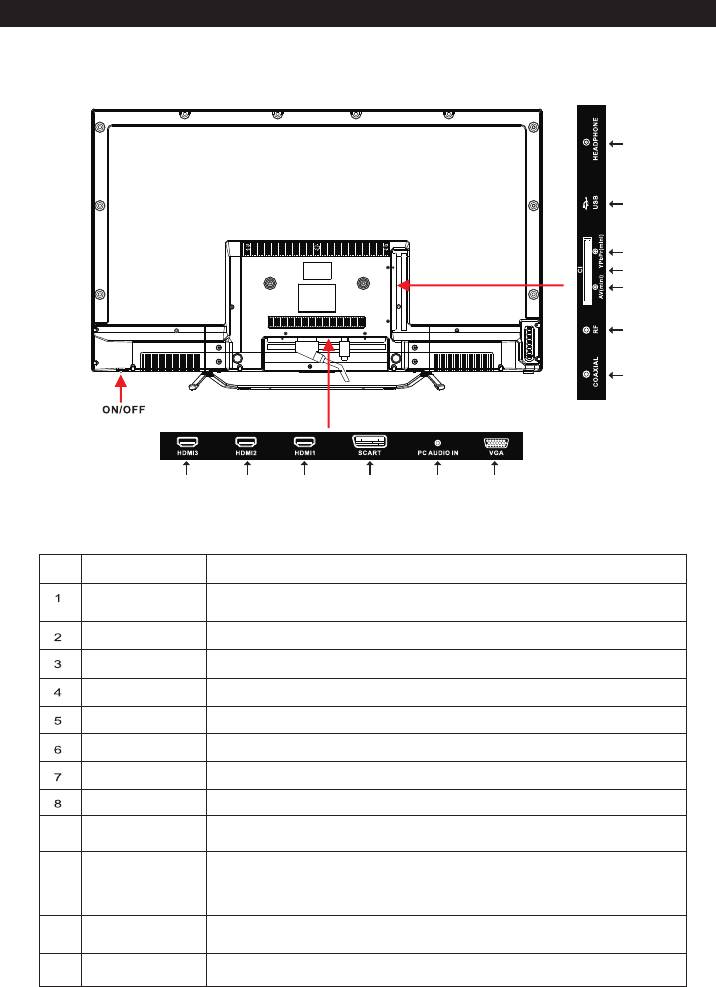
Overview (Controls and Connections)
Rear Panel
8 9 10 11
6 7
5
12
1 1
3
421
NameNo.
Description
High Definition Multimedia Interface for digital video and audio
HDMI
connection to HDMI enabled devices.
SCART
Connecting for SCART signal.
PC AUDIO IN
Connect PC audio output of your personal computer.
VGA
Connect the PC VGA signal output of your personal computer.
COAXIAL
Connect the SPDIF receiver.
RF
Connect to antenna or to wall plate antenna connection.
AV IN
Audio/video input interface.
CI
Used to insert the CI card.
9
YPbPr
Connect composite Video output of your AV devices here.
The Multi-Media files will be played, when the memory storage
10
USB
is connected to the USB slot on the rear side of the TV.
(Supports only PHOTO&MUSIC&MOVE file formats)
11
HEADPHONE
Audio output to headphones.
12
ON/OFF
Turn on or off TV set.
7
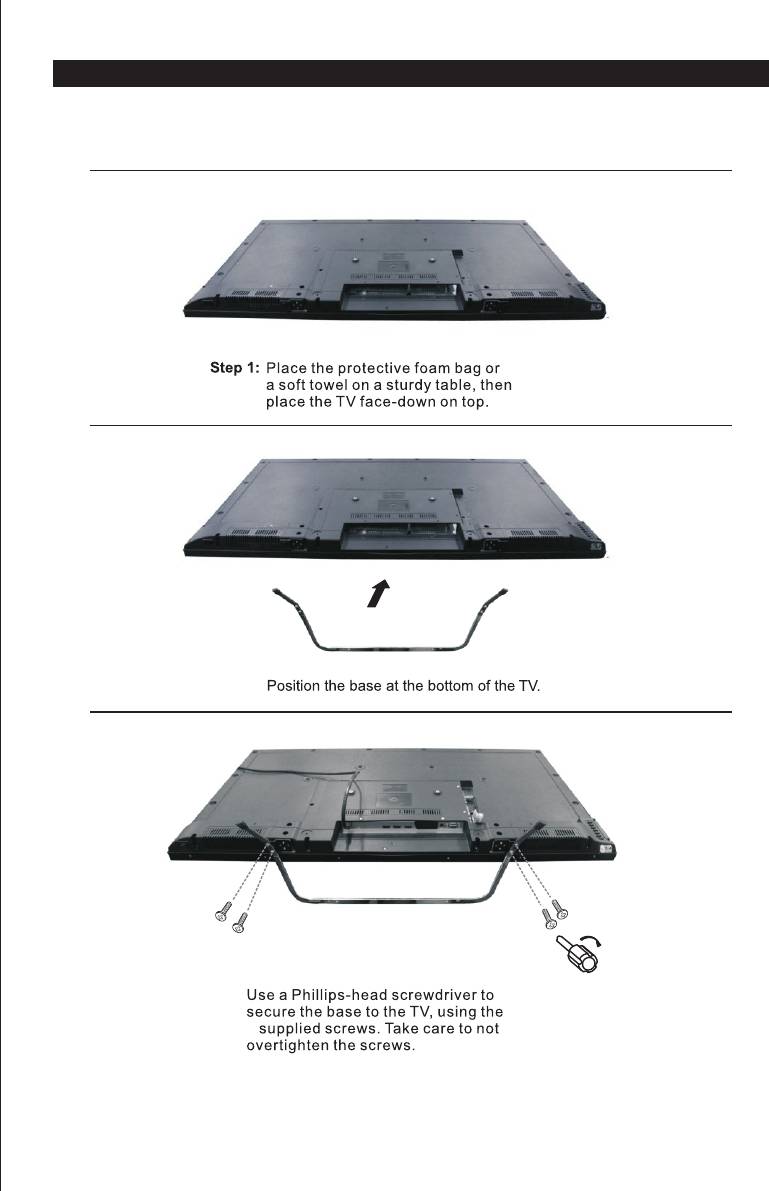
Base Assembly Instruction
NOTE: You will need a Phillips head (crosshead) screwdriver and a sturdy bench or table area
assembly of the base.(to complete the two person assembly )
Step 2:
Step 3:
4
Note: The screws will be in accessories bag in the carton box.
8
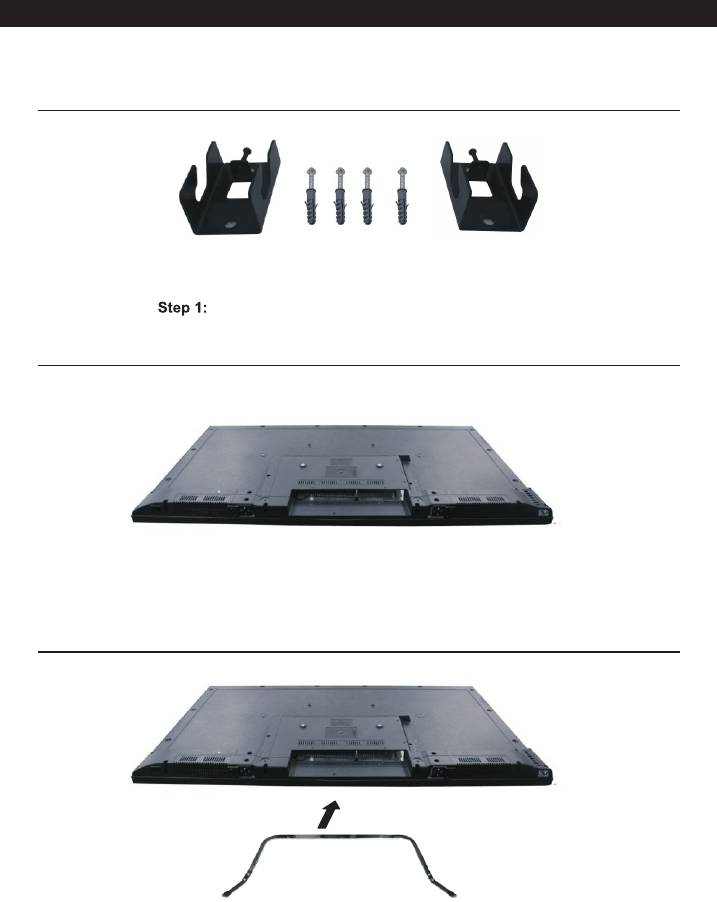
Base Assembly Instruction
Wall mount assembly manual:
As picture show, setup 4pcs screw with metal on the wall.
Step 2:
Use TV on the flatwise
Step 3:
Use wall mount to setup with screw as picture show
9
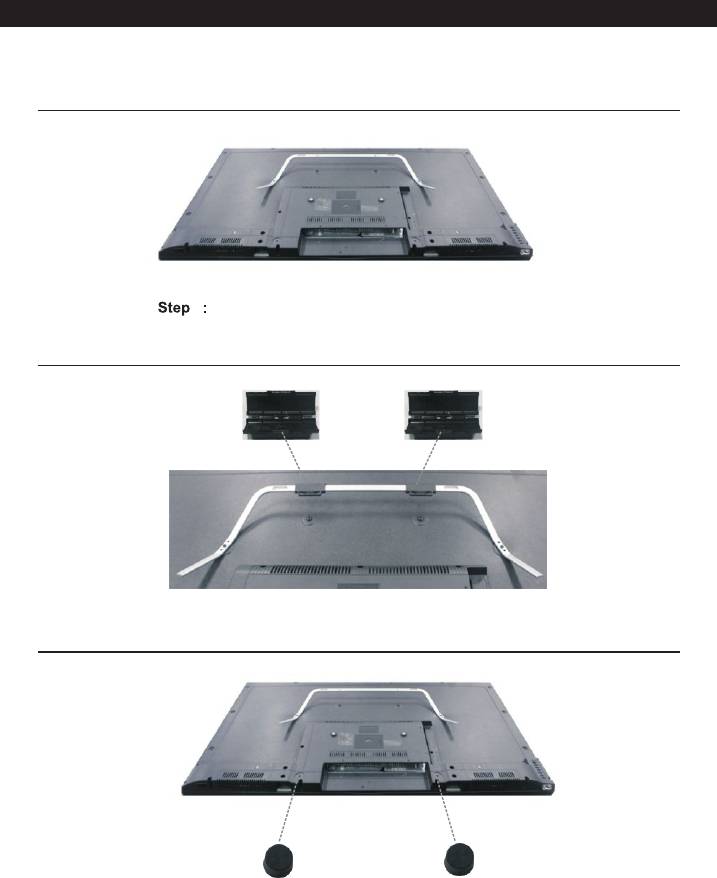
Base Assembly Instruction
4
Hold that 2pcs screw on TV
Step 5:
Use 2 parts as picture show
Step 6:
Use mat as picture show
10
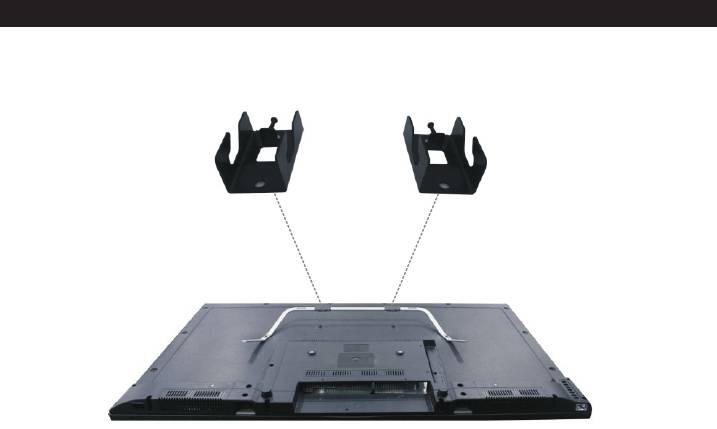
Base Assembly Instruction
Step7:
Use metal as picture show
11
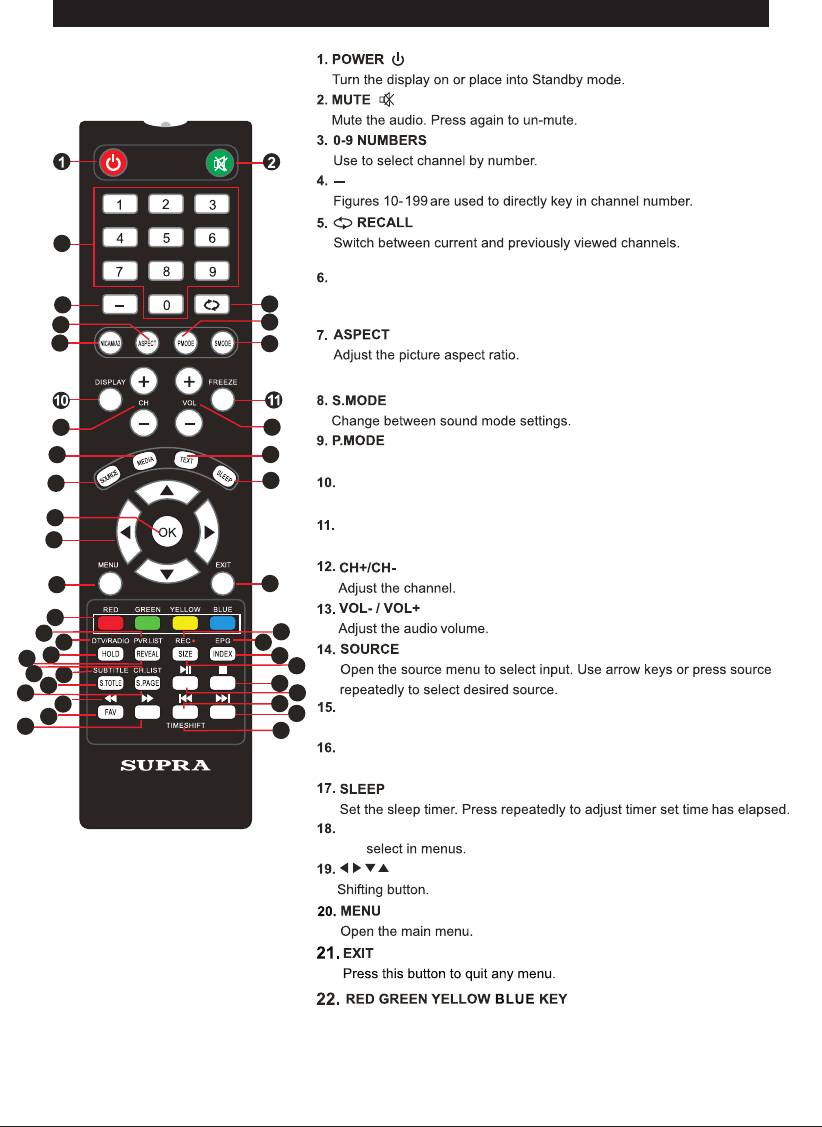
Remote Control
3
Press repeatedly to toggle between the two channels.
NICAM /A2
Switch between NICAM audio modes in Analog TV mode ,
4
5
and DTV Audio Language.
7
9
6
8
Press repeatedly to toggle between options.
12
13
15 16
Change between picture mode settings.
14
17
DISPLAY
Displays the system state information set by the active user.
18
FREEZE
19
Static frame the projected image function.
20
21
22
25
29
24
28
26
23
27
30
33
31
32
35
34
36
37
40
41
MEDIA
38
39
42
View media content of the connected USB device.
TEXT
Open or close the text display.
OK
OK
Use the coloured buttons to select the options shown on screen.
12
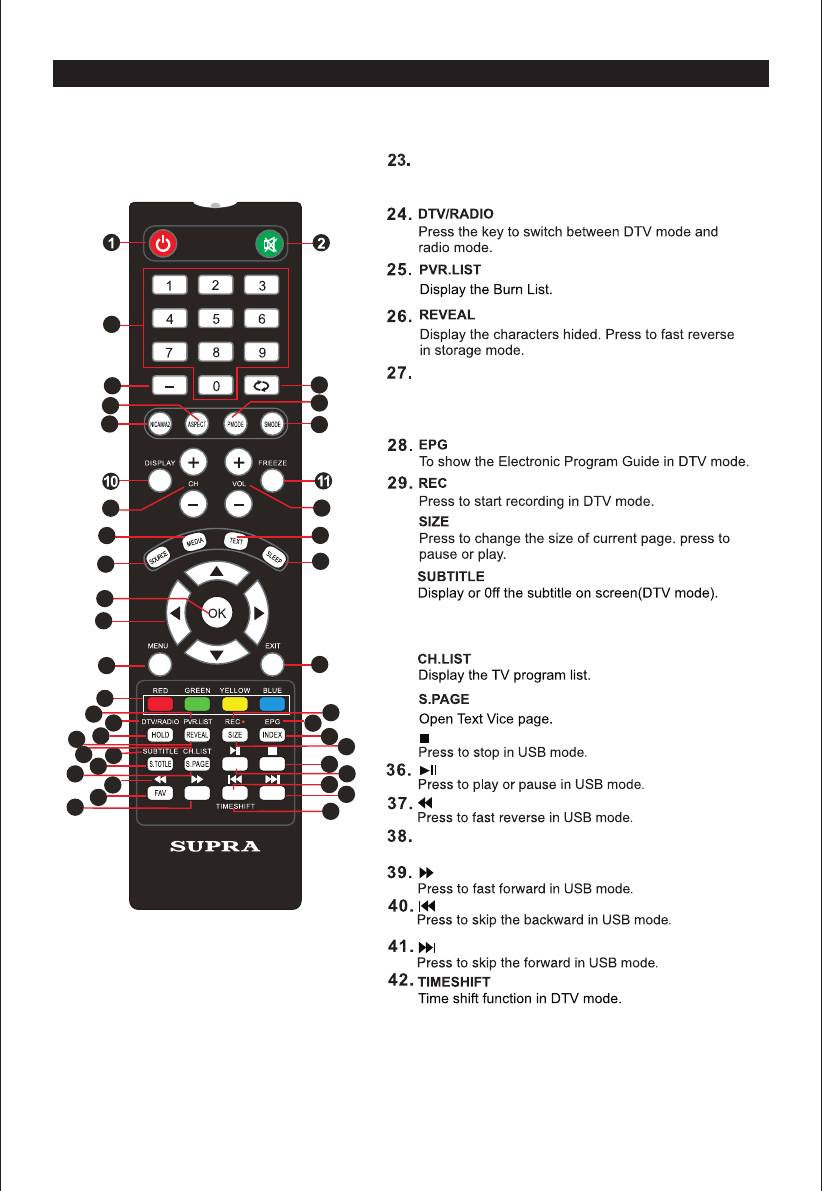
Remote Control
HOLD
Hold the current page and prevent against being
updated. Press to fast forward in storage mode.
3
INDEX
4
5
Press to skip the backward in storage mode and also
7
9
press this key to ask for the list of main TV letter
6
8
broadcast page number..
12
13
30.
15 16
14
17
31.
18
19
32.
S.TITLE
Open teletext subtitle.
33.
20
21
22
34.
25
29
24
28
26
23
27
35.
30
33
31
32
35
34
36
37
40
38
41
39
42
FAV
Open storage channel
13
Remote Control
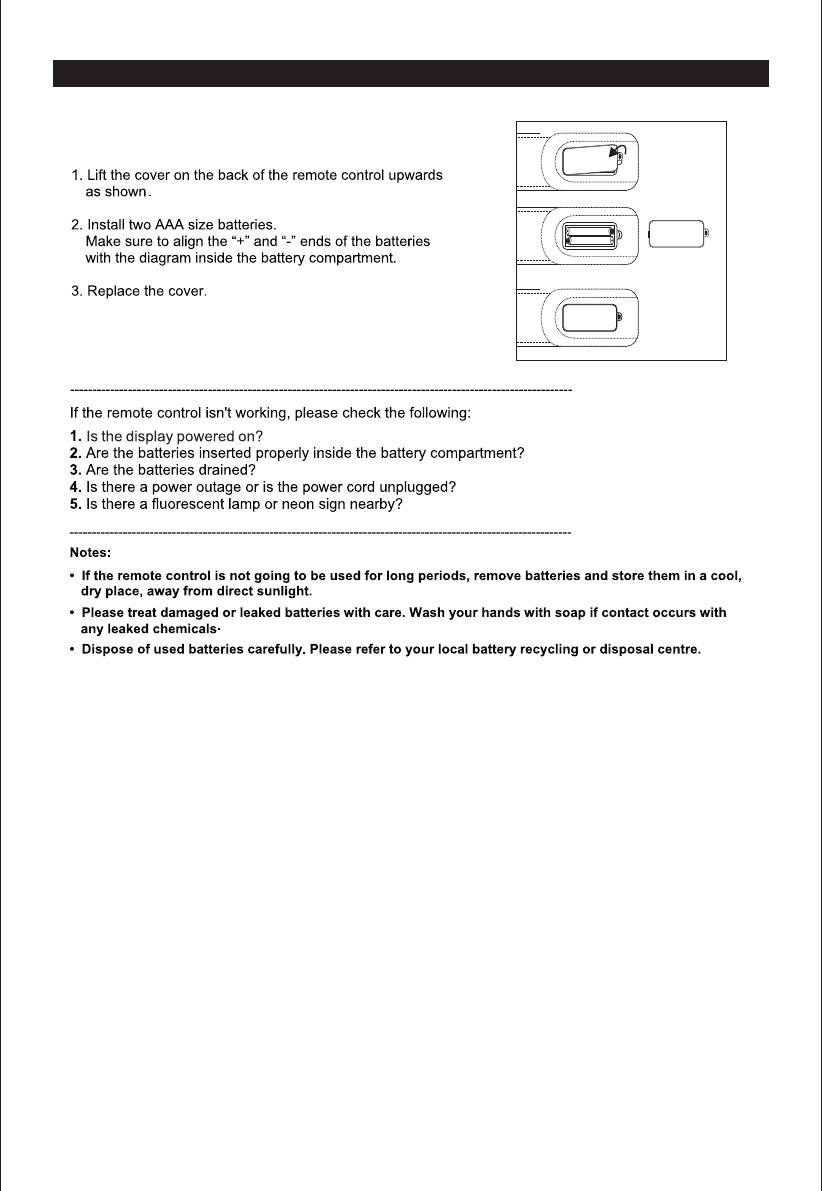
Remote Control Battery Replacement
1
+
AAA
-
2
-
AAA
+
3
14

Channel Selection
Watching television programs
Connect the power cord, press button to power on the television, then press
the SOURCE button to select TV channel mode to watch television programs.
1
1. For program numbers 0-9:
Press the program's number.
2.If you want to select program number
12
10-199 from:Press ”-” button first,
and input the channel number, e.g.
select channel 12.
Scrolling through channels
Use the "CH+/CH-" buttons on the TV or on the remote control to
scroll through channels in sequence.
15
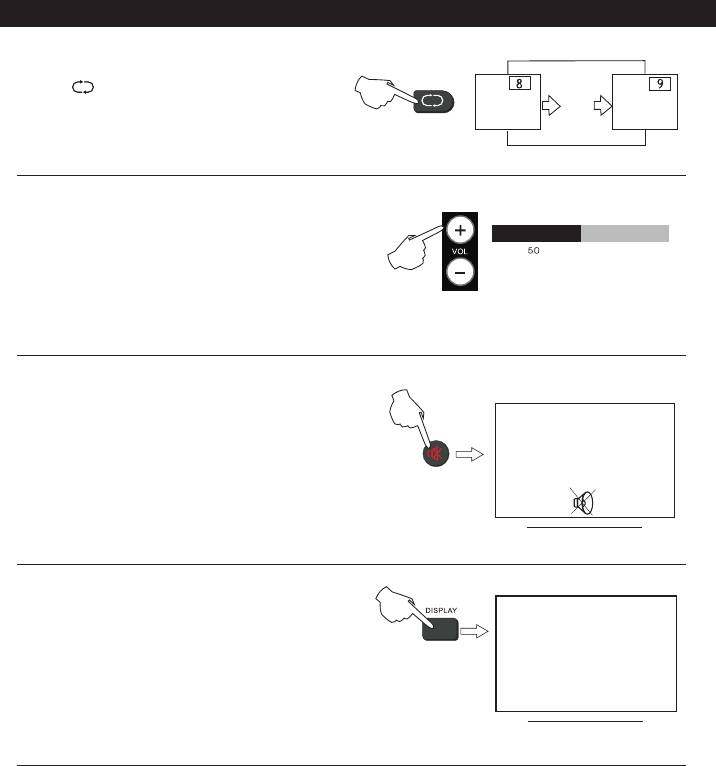
Channel Return
Channel return
Press" " button to return to the
previously selected program.
Volume control
Use the "VOL+/VOL-" buttons on the TV or on
the remote control to adjust the volume.
MUTE function
Press MUTE button to turn off the sound.
Press the button again or press the volume
control button of the television panel or the
remote control for audio recovery.
Information display
13
Press DISPLAY button of the remote control,
then it will display the current program number,
current input mode and other relevant information.
16
Power On/Off
1. Connect the TV to power source using power cord.
When the power indicator is red , the TV is in standby mode. Now press the button on
remote Control or button on front panel to turn on the TV. The power indicator should
turn green.
3. To switch the TV back to standby mode, just press POWER button on the remote control
or the POWER button on front panel. Now the indicator will be red.
4. If unused for a long time in standby mode, please disconnect the power cord from the
wall outlet.
Note: The TV set can turn off automatically after 10 minutes while there is no signal input.
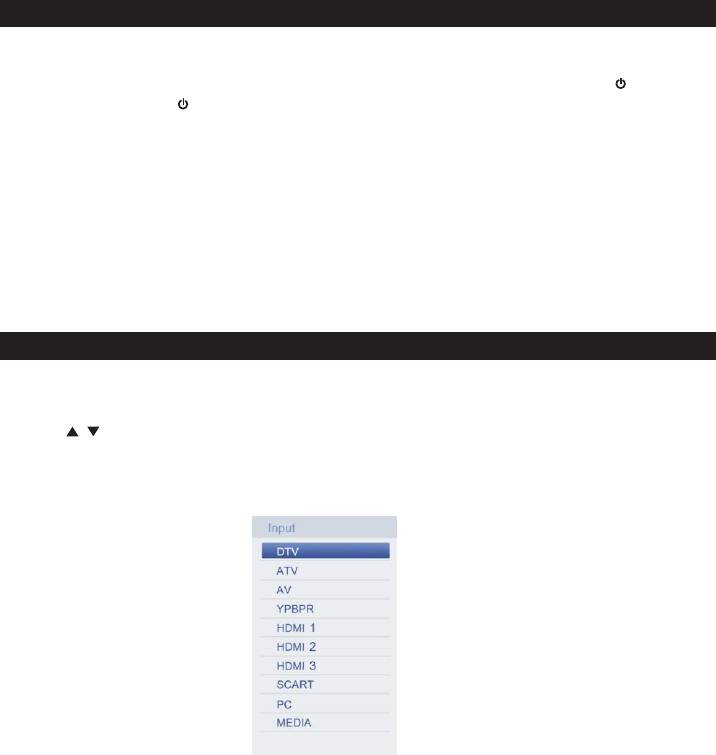
Select Viewing Source
Press SOURCE button to display the input source list.
Press / to highlight the input source and press OK button to confirm.
Press EXIT button to hide the On-Screen menu, or it will disappear after seconds.
Note:Please make sure the connection for your choice is available
17
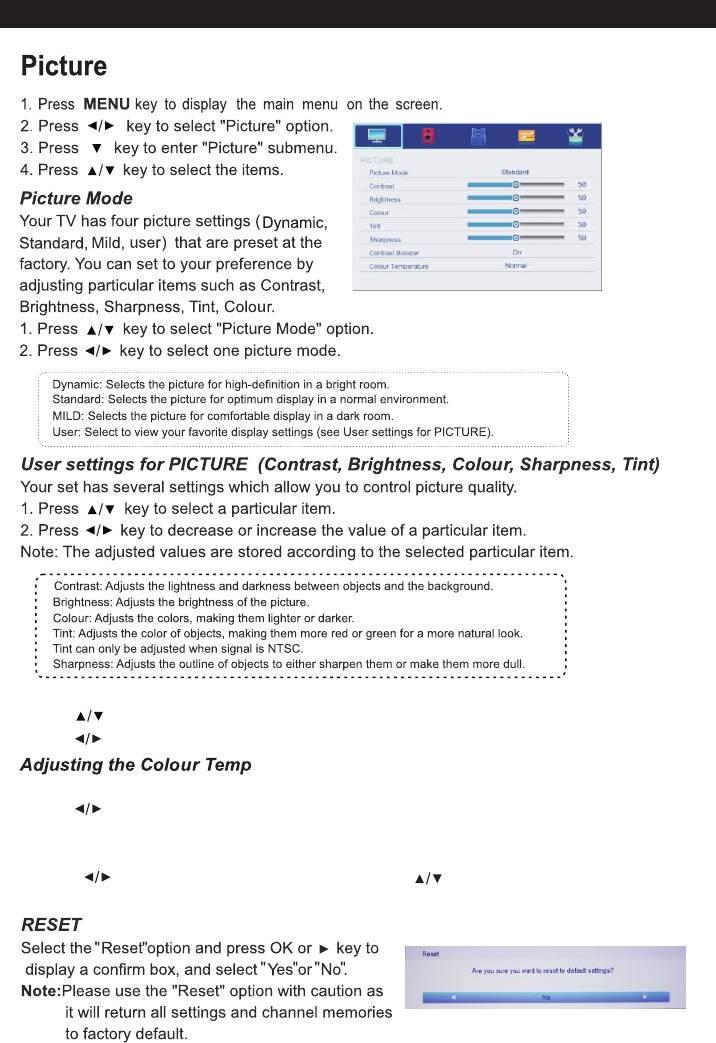
PICTURE Menu
“ ”
“ ”
“ ”
“ ”
“ ”
“ ”
“ ”
Contrast Booster
Press button to select Contrast Booster.
“ ”
Press button to select Off and On.
“ ”
Press OK button to enter the Colour Temperature menu..
“ ”
Press button to select, Cool, Normal, Warm.
“ ”
Press MENU button to return to the previous menu.
“ ”
Adjusting the DNR
Press button to OK the menu and press button to select among: Off,
“ ”
“ ”
Low, Middle and High.
18
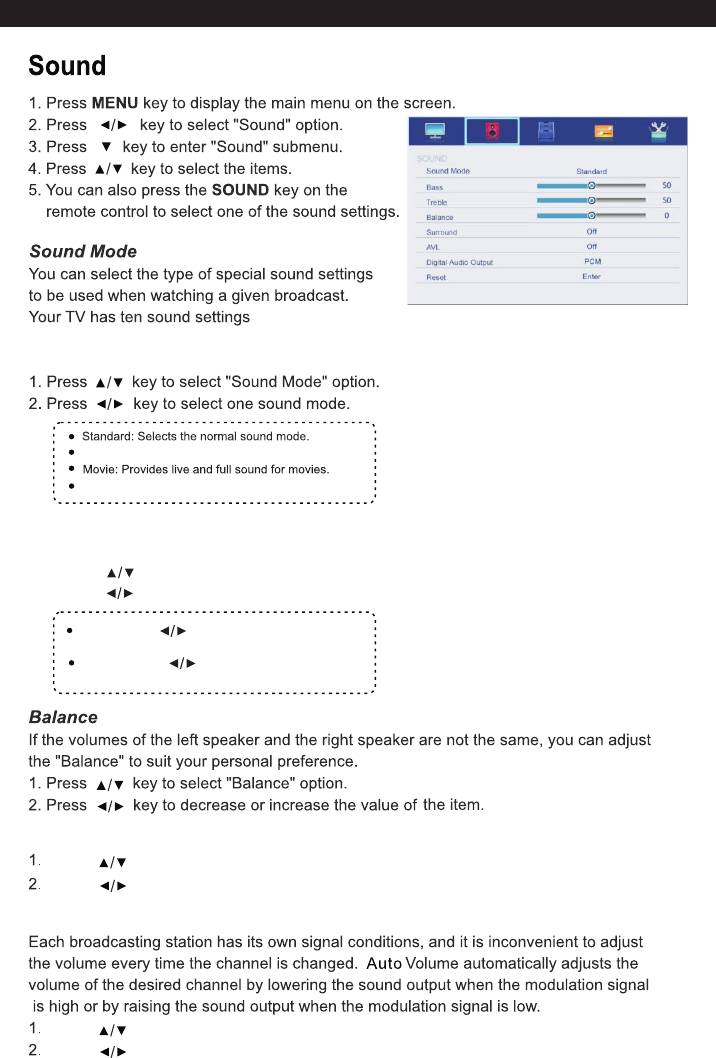
SOUND Menu
“ ”
“ ”
“ ”
(“Standard”,“Music”,
“ “
Movie”, User”)that are preset at the
factory.
“ ”
“ ”
Music: Emphasizes music over voices.
User: User defined.
User settings for SOUND( Treble)Bass,
Your set has several setting which allow you to control SOUND quality.
1, Press key to select a sound item.
“ ”
2, Press key to decrease of increase the value of a sound item.
“ ”
Bass: Press button to adjust the
“ ”
balance of TV.
Treble: Press button to adjust the
“ ”
treble of TV.
“ ”
“ ”
Surround
Press key to select “Surround”.
“ ”
Press key to select “On”or“Off”.
“ ”
AVL
Press key to select “Auto Volume”option.
“ ”
Press key to select “On”or“Off”.
“ ”
19

SOUND Menu
Digital Audio Output
Press “ ” button to select among PCM, Auto, Off.
Reset
Recall the default setting.
20
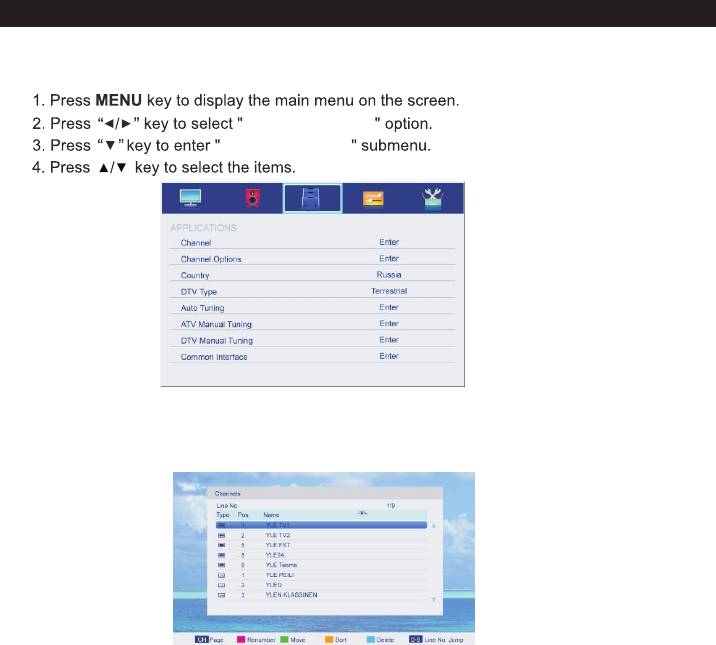
APPLICATIONS Menu
APPLICATIONS
APPLICATIONS
APPLICATIONS
“ ”
Channel
Press ▲/▼ button to select Channel, and then press ENTER button to play
the channel selected. The menu will appear as follows:
Key Description:
CH button: Press CH+ or CH- to turn the page.
RED button: Press this button to modify the channel number.
GREEN button: Press this button to move down the channel.
YELLOW button: Press this button to the order to restore the default channel.
GREEN button: Press this button to delete the channel selected.
0-9 button: Press these buttons to jump to the appropriate channel by inputting
different channel number.
21
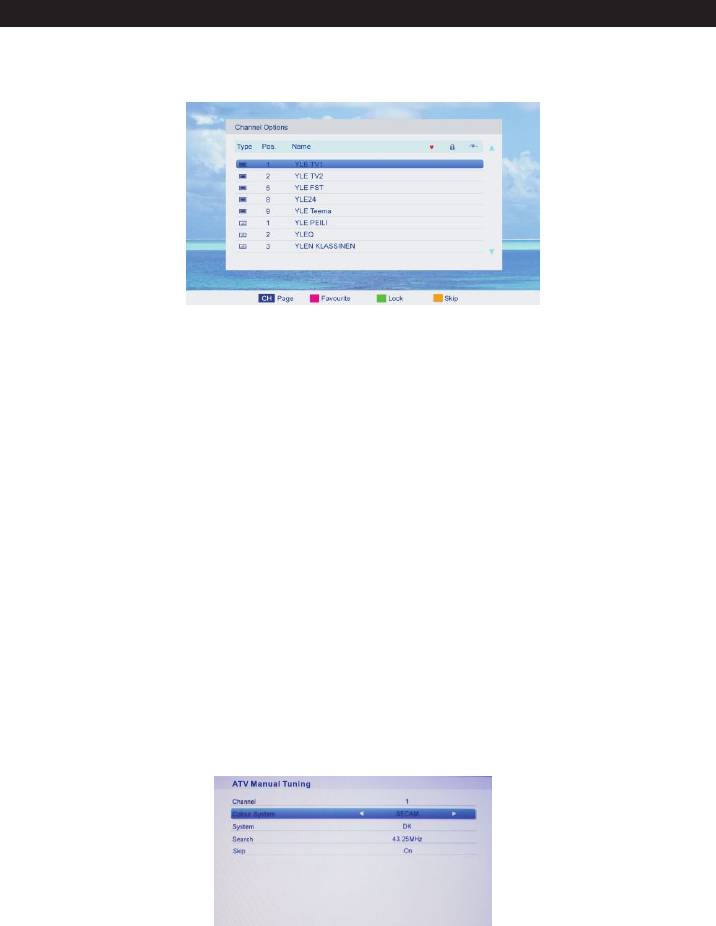
APPLICATIONS Menu
Press ▲/▼ button to select Channel Options, and then press ENTER button to the
channel List menu. The menu will appear as follows:
Key Description:
CH button: Press CH+ or CH- to turn the page.
RED button: Press this button to set the favorites channels.
GREEN button: Press this button to lock the channel.
YELLOW button: Press this button to skip the channel, if the channels already skipped,
press YELLOW button again will cancel skip.
Country
Press ▲/▼ button to select Country, and then press ◄/►button to select which area
you stay.
DTV Type
Press ▲/▼ button to select DTV Type, then press ◄/► button to select.
(Available DTV Type: Cable, Terrestrial)
Auto Tuning
Press ▲/▼ button to select Auto Tuning, and then press ENTER button to enter
(When the System Lock is on, please input the PIN code to unlock).
Select to open the auto searching page, and press Enter button to start the scan.
Note: Only channels with sufficient signal strength willtuned in; check your antenna
if channels are missingafter Auto Tuning.
ATV Manual Tuning
Press ▲/▼ button to select ATV Manual Tuning, and then press ENTER button to start
the scan.
DTV Manual Tuning
Press ▲/▼ button to select DTV Manual Tuning, and then press ENTER button to start
the scan.
Common Interface
Press ▲/▼ button to select Common Interface, and then press ENTER button to
display the CI slot Information.
22
APPLICATIONS Menu
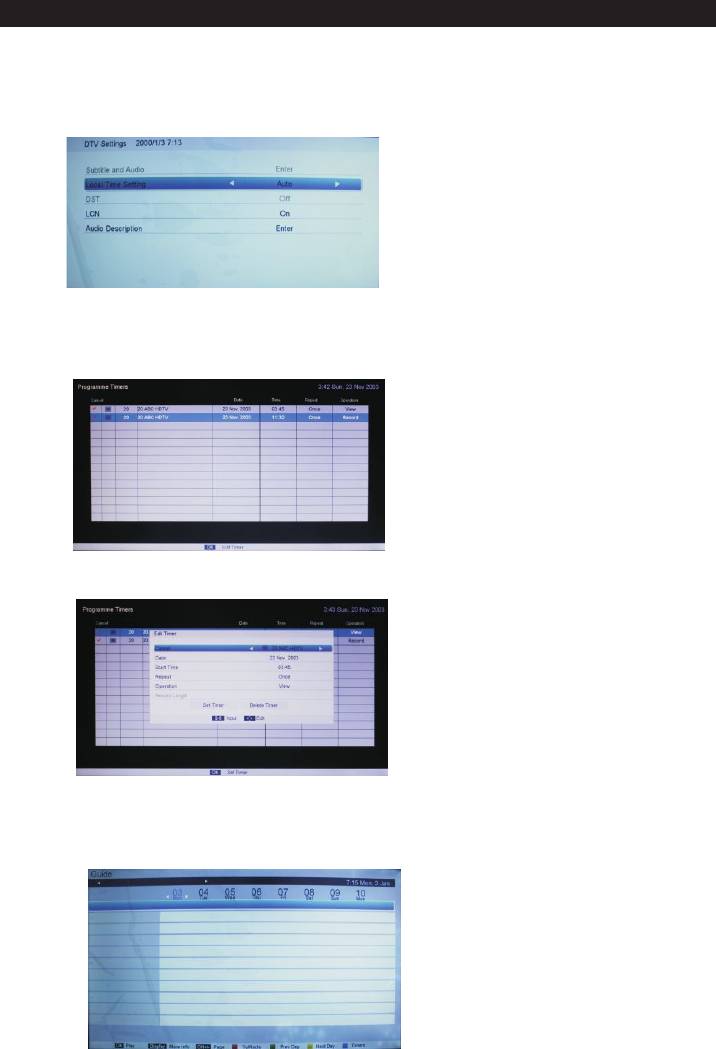
DTV Settings
Press ▲/▼ button to select DTV Settings, and then press ENTER button to enter.
Then will appear as follows :
Programme Timers
Press ▲/▼ button to select Programme ,and then press ENTER button to enter.
Then will appear as follows :
Press the OK key to enter the reservation recording / viewing time setting
Guide
Press ▲/▼ button to select Guide, and then press ENTER button to enter.
Then will appear as follows :
23
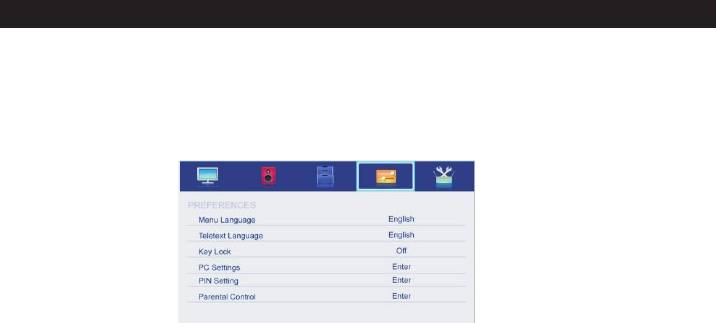
PREFERENCES Menu
PREFERENCES
The picture is for a reference only; the actual item is the standard.
Press MENU button to display the main menu.
Press ▲/▼ button to select PREFERENCES in the main menu, and then press ENTER
or ► to enter.
1.Press ▲/▼ button to select the option that you want to adjust in the PREFERENCES
menu, then press ENTER to enter.
2.Press ◄/►button to adjust or press ▲/▼button to select.
3.After finishing your adjustment, press MENU button to save and return back to the
previous menu and press EXIT button to exit the entire menu.
Menu Language
Press ▲/▼ button to select Menu Language, then press ENTER or ► button to enter the
sub menu, then press ▲/▼ button to select, then press ENTER or ► button to confirm.
Teletext Language
Press ▲/▼ button to select Teletext Language, then press ENTER or ► button to enter
the sub menu, then press ▲/▼ button to select, then press ENTER or ► button to confirm.
Key Lock
Press ▲/▼ button to select Key Lock, then press ENTER button to enter and press ◄/►
button to select ON or OFF.
PC Settings
Press ▲/▼ button to select PC Settings, then press ENTER to enter the sub menu, Then
Press ► to enter, then press ENTER or ► to confirm. (When the PC signal is connected).
PIN Setting
Press ▲/▼ button to select PIN Setting, then press ENTER button to enter the sub menu,
and than you can set a password.
Parental Control
Press ▲/▼ button to select Parental Control, then press ENTER or ► button to enter
the sub menu. Then press ▲/▼ button to select Rate (From4-17, or None). Then press
ENTER or ► button to confirm.
24


