Pioneer X-CM56: Connecting antennas
Connecting antennas: Pioneer X-CM56
Table of contents
- VENTILATION CAUTION POWER-CORD CAUTION
- Information for users on collection and disposal of old equipment and used batteries
- Contents
- Chapter 1: Before you start What’s in the box Loading the batteries in the remote control
- Chapter 2: Part names and functions Remote control
- Part names and functions 02
- Front panel
- Speaker system
- Chapter 3: Connections Speaker connection
- Connecting antennas
- Plugging in
- Chapter 4: Getting started To turn the power on General control Setting the clock
- Sound controls Setting the wake-up timer
- Using Headphones Using the sleep timer
- Chapter 5: Disc playback Playing discs or files
- Basic operations Advanced CD or MP3 disc playback
- Programmed play (CD) Switch the display contents About downloading MP3
- Chapter 6: USB playback Playing USB storage devices
- Chapter 7: Using the tuner Listening to FM (X-CM56D)/ Listening to FM or AM (X-CM56)
- Using the Radio Data System (RDS) (for European models only)
- Using the Auto Station program Memory (ASPM)
- Listening to the DAB+ (X-CM56D only)
- Changing the information display DAB Frequency table (BAND III) Memorising a station
- Chapter 8: Other connections Connecting auxiliary components
- Chapter 9: Bluetooth Audio playback Music playback using Bluetooth Remote control operation wireless technology Pairing with the unit (Initial registration)
- BT STANDBY Listen to music on the unit from a Bluetooth capable device
- Pairing and connection using NFC Radio wave caution
- Scope of operation Radio wave reflections Precautions regarding connections to products supported by this unit
- Chapter 10: Additional information Troubleshooting General problem Problem Check Remedy
- When a USB storage device is connected Problem Check Remedy
- When the Bluetooth wireless technology device is connected or operated Problem Remedy Playable discs and formats
- Cautions on use
- Handling discs Auto power off setting Restoring all the settings to the defaults
- Specifications
Connections 03
Using external antennas
English
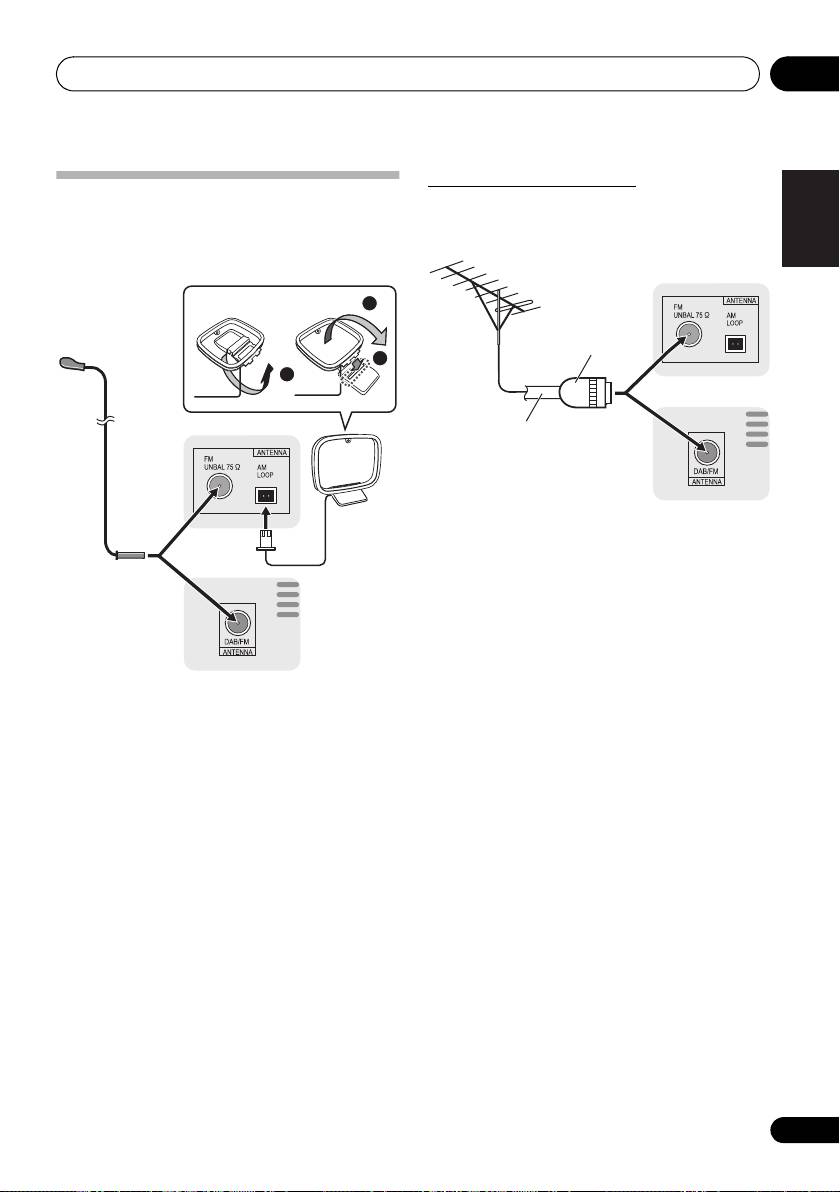
Connecting antennas
To improve FM reception
• Connect the AM loop antenna and the FM (DAB/FM)
Use a PAL connector (not supplied) to connect an external
wire antenna as shown below.
FM (DAB/FM) antenna.
• To improve reception and sound quality, connect
external antennas (see Using external antennas).
Français Español
1 Connect the AM antenna wires.
Holding the connector to connect.
2 Fix the AM loop antenna to the attached
stand.
Set up as illustrated above.
3 Place the AM antenna on a flat surface and
in a direction giving the best reception.
• Place the antenna near a window, etc. for the best
reception.
• Do not place the antenna near a computer or TV. It may
result in noise.
4 Connect the FM (DAB/FM) wire antenna into
the FM antenna socket.
For best results, extend the FM (DAB/FM) antenna fully and
fix to a wall or door frame. Don’t drape loosely or leave coiled
up.
11
En
2
3
1
X-CM56
2
3
4
1
X-CM56D
X-CM56
X-CM56D
One-touch PAL
connector
75 Ω coaxial
cable
SN29402593_X-CM56&56D_En.book 11 ページ 2016年5月27日 金曜日 午後3時47分
