Pioneer X-CM56: Changing the information display DAB Frequency table (BAND III) Memorising a station
Changing the information display DAB Frequency table (BAND III) Memorising a station: Pioneer X-CM56
Table of contents
- VENTILATION CAUTION POWER-CORD CAUTION
- Information for users on collection and disposal of old equipment and used batteries
- Contents
- Chapter 1: Before you start What’s in the box Loading the batteries in the remote control
- Chapter 2: Part names and functions Remote control
- Part names and functions 02
- Front panel
- Speaker system
- Chapter 3: Connections Speaker connection
- Connecting antennas
- Plugging in
- Chapter 4: Getting started To turn the power on General control Setting the clock
- Sound controls Setting the wake-up timer
- Using Headphones Using the sleep timer
- Chapter 5: Disc playback Playing discs or files
- Basic operations Advanced CD or MP3 disc playback
- Programmed play (CD) Switch the display contents About downloading MP3
- Chapter 6: USB playback Playing USB storage devices
- Chapter 7: Using the tuner Listening to FM (X-CM56D)/ Listening to FM or AM (X-CM56)
- Using the Radio Data System (RDS) (for European models only)
- Using the Auto Station program Memory (ASPM)
- Listening to the DAB+ (X-CM56D only)
- Changing the information display DAB Frequency table (BAND III) Memorising a station
- Chapter 8: Other connections Connecting auxiliary components
- Chapter 9: Bluetooth Audio playback Music playback using Bluetooth Remote control operation wireless technology Pairing with the unit (Initial registration)
- BT STANDBY Listen to music on the unit from a Bluetooth capable device
- Pairing and connection using NFC Radio wave caution
- Scope of operation Radio wave reflections Precautions regarding connections to products supported by this unit
- Chapter 10: Additional information Troubleshooting General problem Problem Check Remedy
- When a USB storage device is connected Problem Check Remedy
- When the Bluetooth wireless technology device is connected or operated Problem Remedy Playable discs and formats
- Cautions on use
- Handling discs Auto power off setting Restoring all the settings to the defaults
- Specifications
SN29402593_X-CM56&56D_En.book 24 ページ 2016年5月27日 金曜日 午後3時47分
Using the tuner07
Changing the information display
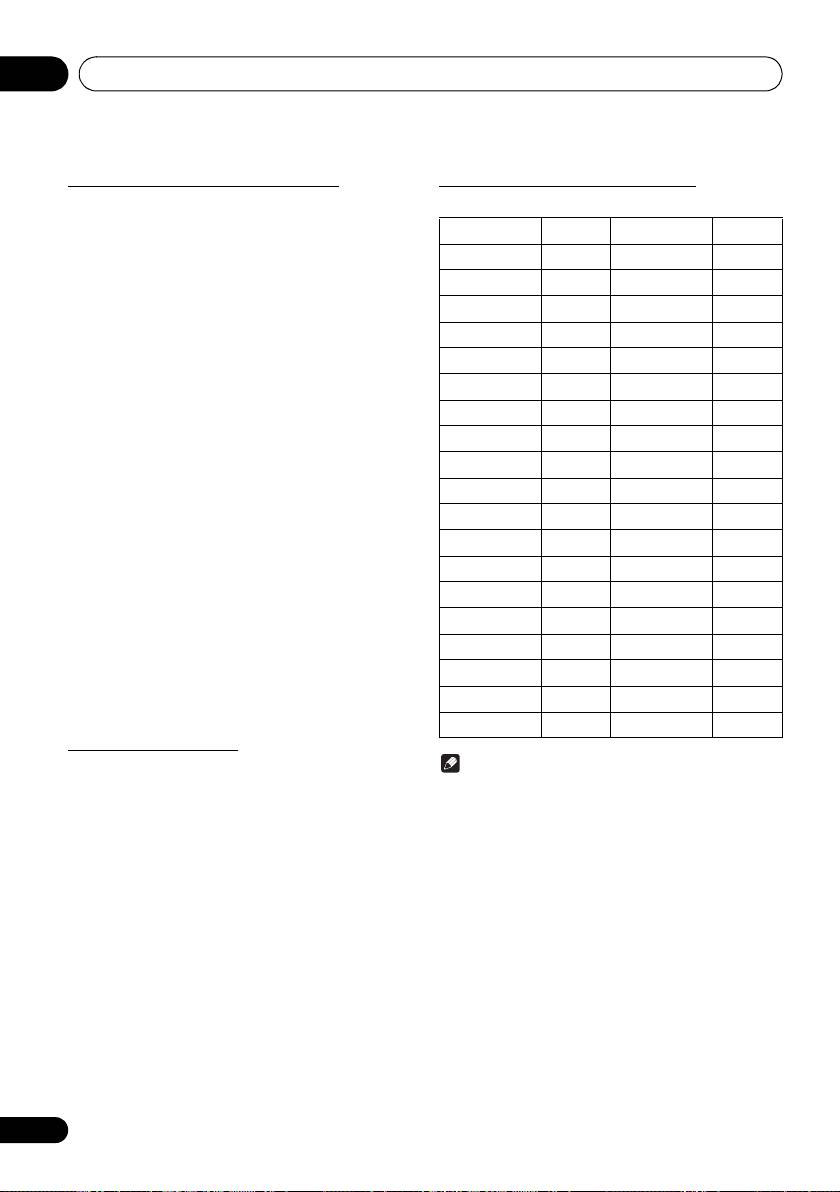
DAB Frequency table (BAND III)
You can switch DAB+ display information.
Press the DISPLAYbutton.
Frequency Label Frequency Label
Each time the button is pressed, the information display
changes in the following order.
174.928 MHz 5A 208.064 MHz 9D
When “NO SIGNAL” appears, the DISPLAY button does not
allow you to change the display.
176.640 MHz 5B 209.936 MHz 10A
178.352 MHz 5C 211.648 MHz 10B
[Programme Name]
Station name is displayed. (set by default)
180.064 MHz 5D 213.360 MHz 10C
[Scrolling text]
181.936 MHz 6A 215.072 MHz 10D
Information scrolls across the display when sent from the
183.648 MHz 6B 216.928 MHz 11A
station.
185.360 MHz 6C 218.640 MHz 11B
[Programe type]
A description of the type of content being broadcast by the
187.072 MHz 6D 220.352 MHz 11C
station.
188.928 MHz 7A 222.064 MHz 11D
[Multiplex name]
190.640 MHz 7B 223.936 MHz 12A
The name of the multiplex (ensemble) which provides the
current service.
192.352 MHz 7C 225.648 MHz 12B
[Frequency]
194.064 MHz 7D 227.360 MHz 12C
The DAB+ frequency for the station.
195.936 MHz 8A 229.072 MHz 12D
[Stereo mode]
197.648 MHz 8B 230.784 MHz 13A
Display stereo mode.
199.360 MHz 8C 232.496 MHz 13B
[Transfer speed]
The data transfer speed.
201.072 MHz 8D 234.208 MHz 13C
[Signal quality]
202.928 MHz 9A 235.776 MHz 13D
The signal quality is displayed as a number (0 - 100).
204.640 MHz 9B 237.488 MHz 13E
[85-100: Good, 70-84: Fair, 0-69: Poor]
206.352 MHz 9C 239.200 MHz 13F
Memorising a station
You can store 10 DAB stations in memory and recall them at
Note
the push of a button. (Preset tuning)
• Label is not displayed on the main display. Will
1 Tune to the desired DAB station.
displayed only frequency.
2 Press the PGM/MEMORY.
The preset number will flash.
3 Within 10 seconds, press the PRESET +/–
to select the preset channel number.
Store the stations in memory, in order, starting with preset
channel 1.
4 Within 10 seconds, press the PGM/
MEMORY to store that station in memory.
If the preset number indicators disappear before the station
is memorised, repeat the operation from step 2.
5 Repeat steps 1 - 4 to set other stations, or
to change a preset station.
When a new station is stored in the memory, the station
previously memorised for that preset channel number will be
erased.
24
En
