Pioneer VSX-519V-K: Connecting the speakers
Connecting the speakers: Pioneer VSX-519V-K
Table of contents
- IMPORTANT
- Information for users on collection and disposal of old equipment and used batteries
- Contents
- Chapter 1: Before you start
- Chapter 2: 5 minute guide
- Chapter 3: Connecting up
- Connecting up03 Analog audio cables Component video cables Digital audio cables About video outputs connection Video cables
- Connecting a TV and Blu-ray Disc player or DVD player
- Connecting the multichannel analog outputs
- Connecting a satellite receiver or other digital set-top box
- Connecting other audio components Connecting to the front panel audio mini jack
- Connecting other video components
- Using the component video jacks
- Connecting antennas
- Connecting the speakers
- Connecting up 03 Hints on speaker placement Speaker placement diagrams
- Connecting an IR receiver Plugging in the receiver
- Chapter 4: Controls and displays Front panel
- Operating range of remote control unit
- Display
- Controls and displays04
- Remote control
- Controls and displays04
- Controls and displays 04
- Chapter 5: Listening to your system Listening in surround sound Auto playback
- Listening in stereo
- Using Front Stage Surround Advance Using the Sound Retriever Using Stream Direct
- Using Phase Control
- Setting the Audio options Setting What it does Option(s)
- Setting What it does Option(s)
- Playing other sources Selecting the multichannel analog inputs Choosing the input signal Using the headphone
- Chapter 6: The System Setup menu Using the System Setup menu Manual speaker setup
- The System Setup menu06 Channel level Crossover network
- Speaker Distance The Input Assign menu
- Chapter 7: Using the MULTI-ZONE feature MULTI-ZONE listening
- Using the MULTI-ZONE feature 07 Using the MULTI-ZONE controls MULTI-ZONE remote controls
- Chapter 8 Using the tuner Listening to the radio Saving station presets
- Using the tuner 08 Naming preset stations
- An introduction to RDS Searching for RDS programs
- Displaying RDS information
- Chapter 9: Making recordings Making an audio or a video recording
- Chapter 10: Additional information Troubleshooting Problem Remedy
- Problem Remedy
- HDMI Symptom Remedy Important information regarding the HDMI connection
- Resetting the main unit Specifications
- Cleaning the unit
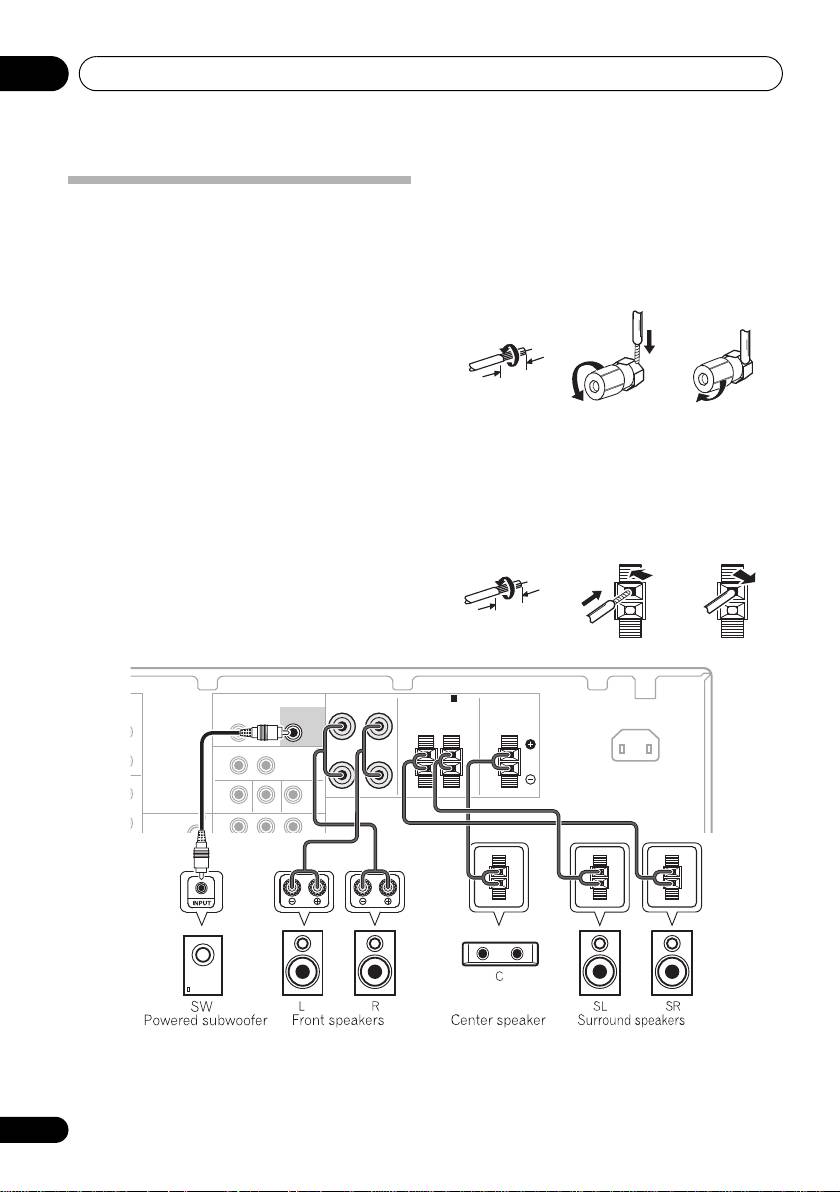
Connecting up03
Bare wire connections
Front speaker terminals:
Connecting the speakers
A complete setup of six speakers (including the
1 Twist exposed wire strands together.
subwoofer) is shown below, but everyone’s
2 Loosen terminal and insert exposed wire.
home setup will vary.
Simply connect the
speakers you have in the manner shown below.
3 Tighten terminal.
The receiver will work with just two stereo
speakers (the front speakers in the diagram)
123
but using at least three speakers is
recommended, and a complete setup is best for
10 mm
surround sound.
If you’re not using a
subwoofer, change the front speaker setting
(see Speaker setting on page 33) to LARGE.
Center and surround speaker terminals:
Make sure you connect the speaker on the
1 Twist exposed wire strands together.
right to the right terminal and the speaker on
2 Push open the tabs and insert exposed
the left to the left terminal. Also make sure the
wire.
positive and negative (+/–) terminals on the
receiver match those on the speakers.
3 Release the tabs.
Be sure to complete all connections before
12
3
connecting this unit to the AC power source.
10 mm
AUDIO
FRONT
SPEAKERS A
ZONE2 OUT
SUBWOOFER
RL
L R
PRE OUT
SURROUND CENTER
L
MONITOR OUT BD/DVD IN TV/SAT IN
ANTENNA
P
R
B
YP
R
FM
OUT
16
En
T
VSX_519V_MY.book 16 ページ 2009年1月16日 金曜日 午後7時32分
FRONT
SPEAKERS A
SUBWOOFER
RL
IN
PRE OUT
SURROUND CENTER
AC IN
RL
RL
L
OUT
DVR/VCR VIDEO
IN
R
IN
