Pioneer VSX-519V-K – page 2
Manual for Pioneer VSX-519V-K
Table of contents
- IMPORTANT
- Information for users on collection and disposal of old equipment and used batteries
- Contents
- Chapter 1: Before you start
- Chapter 2: 5 minute guide
- Chapter 3: Connecting up
- Connecting up03 Analog audio cables Component video cables Digital audio cables About video outputs connection Video cables
- Connecting a TV and Blu-ray Disc player or DVD player
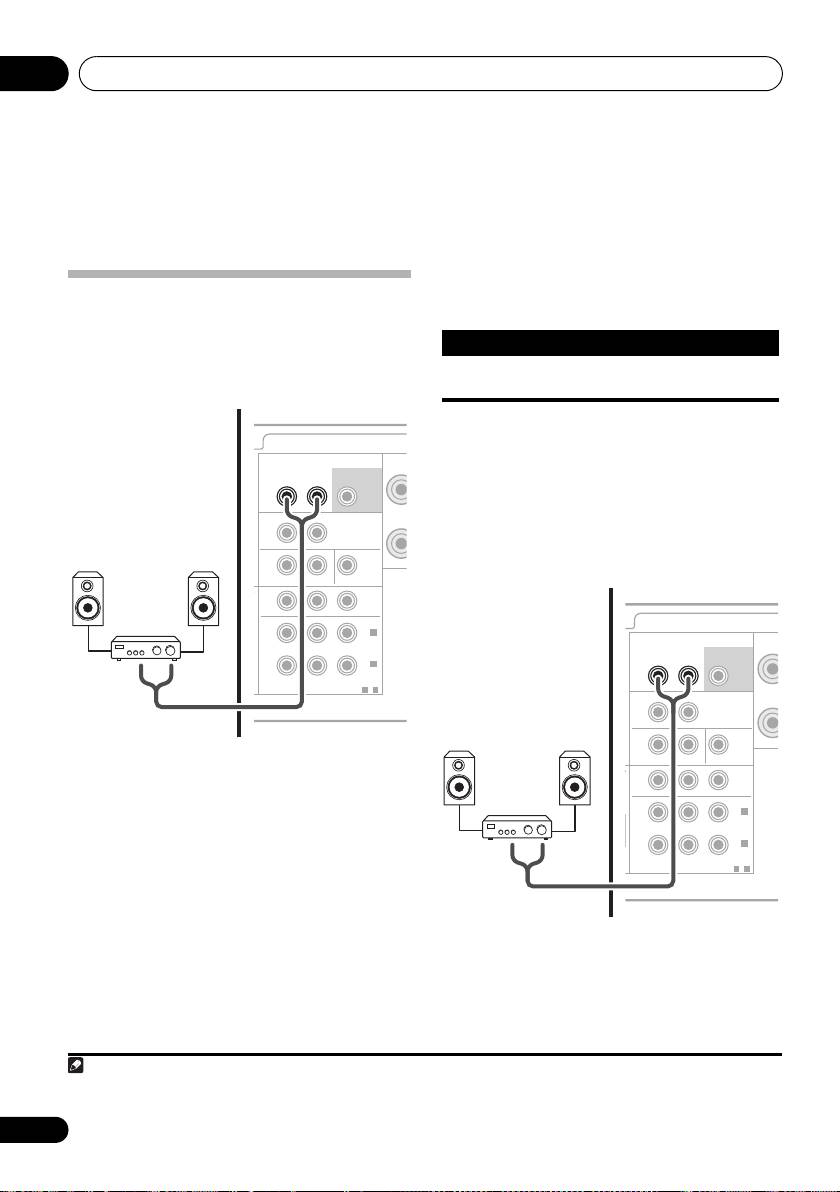
- Connecting the multichannel analog outputs
- Connecting a satellite receiver or other digital set-top box
- Connecting other audio components Connecting to the front panel audio mini jack
- Connecting other video components
- Using the component video jacks
- Connecting antennas
- Connecting the speakers
- Connecting up 03 Hints on speaker placement Speaker placement diagrams
- Connecting an IR receiver Plugging in the receiver
- Chapter 4: Controls and displays Front panel
- Operating range of remote control unit
- Display
- Controls and displays04
- Remote control
- Controls and displays04
- Controls and displays 04
- Chapter 5: Listening to your system Listening in surround sound Auto playback
- Listening in stereo
- Using Front Stage Surround Advance Using the Sound Retriever Using Stream Direct
- Using Phase Control
- Setting the Audio options Setting What it does Option(s)
- Setting What it does Option(s)
- Playing other sources Selecting the multichannel analog inputs Choosing the input signal Using the headphone
- Chapter 6: The System Setup menu Using the System Setup menu Manual speaker setup
- The System Setup menu06 Channel level Crossover network
- Speaker Distance The Input Assign menu
- Chapter 7: Using the MULTI-ZONE feature MULTI-ZONE listening
- Using the MULTI-ZONE feature 07 Using the MULTI-ZONE controls MULTI-ZONE remote controls
- Chapter 8 Using the tuner Listening to the radio Saving station presets
- Using the tuner 08 Naming preset stations
- An introduction to RDS Searching for RDS programs
- Displaying RDS information
- Chapter 9: Making recordings Making an audio or a video recording
- Chapter 10: Additional information Troubleshooting Problem Remedy
- Problem Remedy
- HDMI Symptom Remedy Important information regarding the HDMI connection
- Resetting the main unit Specifications
- Cleaning the unit
VSX_519V_MY.book 21 ページ 2009年1月16日 金曜日 午後7時32分
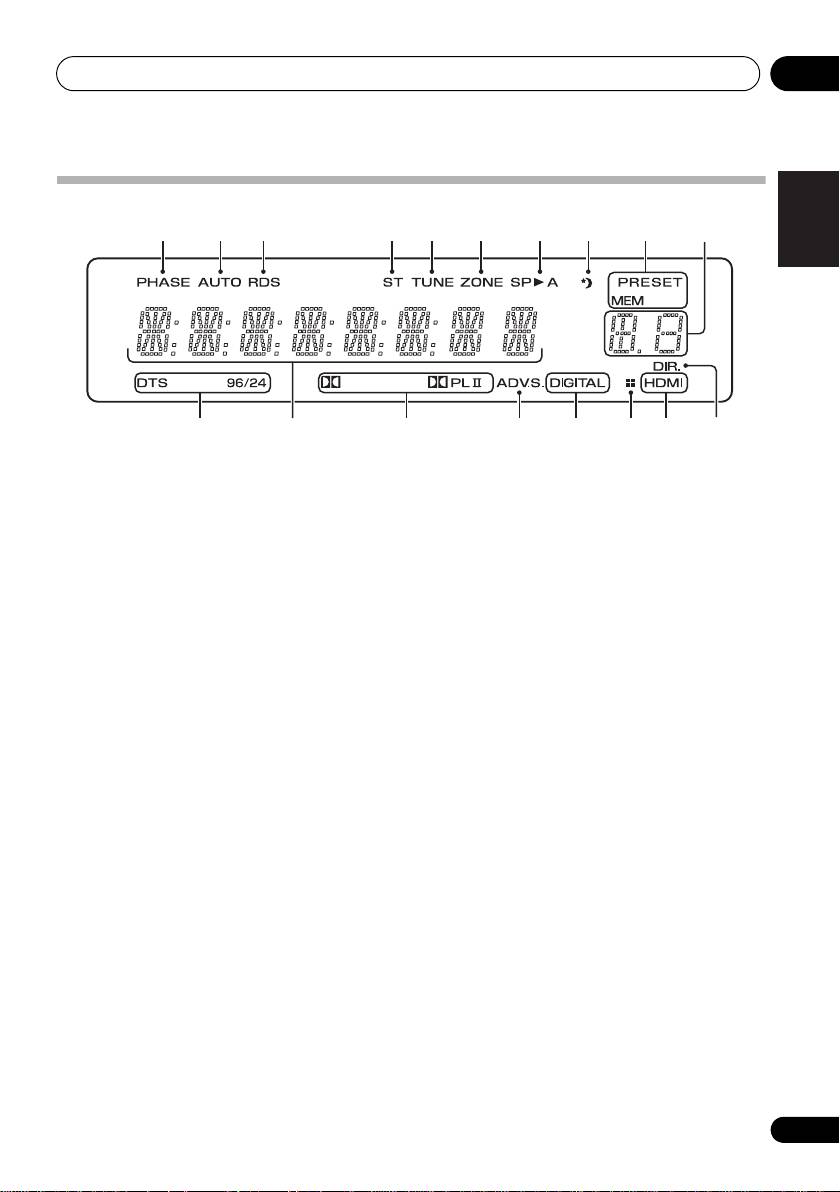
Controls and displays 04
English
Display
1 2 3 4 5 6 7 8 910
Français
11 1312 14 15 15 1716
1PHASE
9 Tuner preset indicators
Lights when the Phase Control is switched on
PRESET
(page 29).
Shows when a preset radio station is
Italiano
2AUTO
registered or called.
Lights when the Auto Surround feature is
MEM
switched on (See Auto playback on page 26).
Blinks when a radio station is registered.
3RDS
10 PRESET information or input signal
Lights when an RDS broadcast is received
Nederlands
indicator
(page 40).
Shows the preset number of the tuner or the
4ST
input signal type, etc.
Lights when a stereo FM broadcast is being
11 DTS indicators
received in auto stereo mode.
DTS
5TUNE
Español
Lights when a source with DTS encoded
Lights when a broadcast is being received.
audio signals is detected.
6ZONE
96/24
Lights when the MULTI-ZONE feature is active
Lights when a source with DTS 96/24
(page 36).
encoded audio signals is detected.
Deutsch
7 Speaker indicator
12 Character display
Shows if the speaker system is on or not
Displays various system information.
(page 32).
SP
A means the speakers are switched on.
13 Dolby Digital indicators
SP
means the speakers are switched off and
2
sound is output from the headphone jack.
Lights when a Dolby Digital encoded signal
is detected.
8 Sleep timer indicator
Lights when the receiver is in sleep mode
2PLll
(page 25).
Lights to indicate Pro Logic II decoding
(see Listening in surround sound on
page 26 for more on this).
21
En

VSX_519V_MY.book 22 ページ 2009年1月16日 金曜日 午後7時32分
Controls and displays04
14 ADV.S.
Lights when one of the Advanced Surround
modes has been selected (See Using the
Advanced surround effects on page 27 for more
on this).
15 SIGNAL SELECT indicators
DIGITAL
Lights when a digital audio signal is
selected.
Blinks when a digital audio signal is not
selected.
HDMI
Lights when an HDMI signal is selected.
Blinks when an HDMI signal is not
selected.
16 DIMMER indicator
Shows when the display is set to turn off as the
DIMMER setting.
17 DIR.
Lights when the DIRECT or PURE DIRECT
mode is switched on (page 28).
22
En
VSX_519V_MY.book 23 ページ 2009年1月16日 金曜日 午後7時32分
Controls and displays 04
1 INPUT SELECT
English
Use to select the input source.
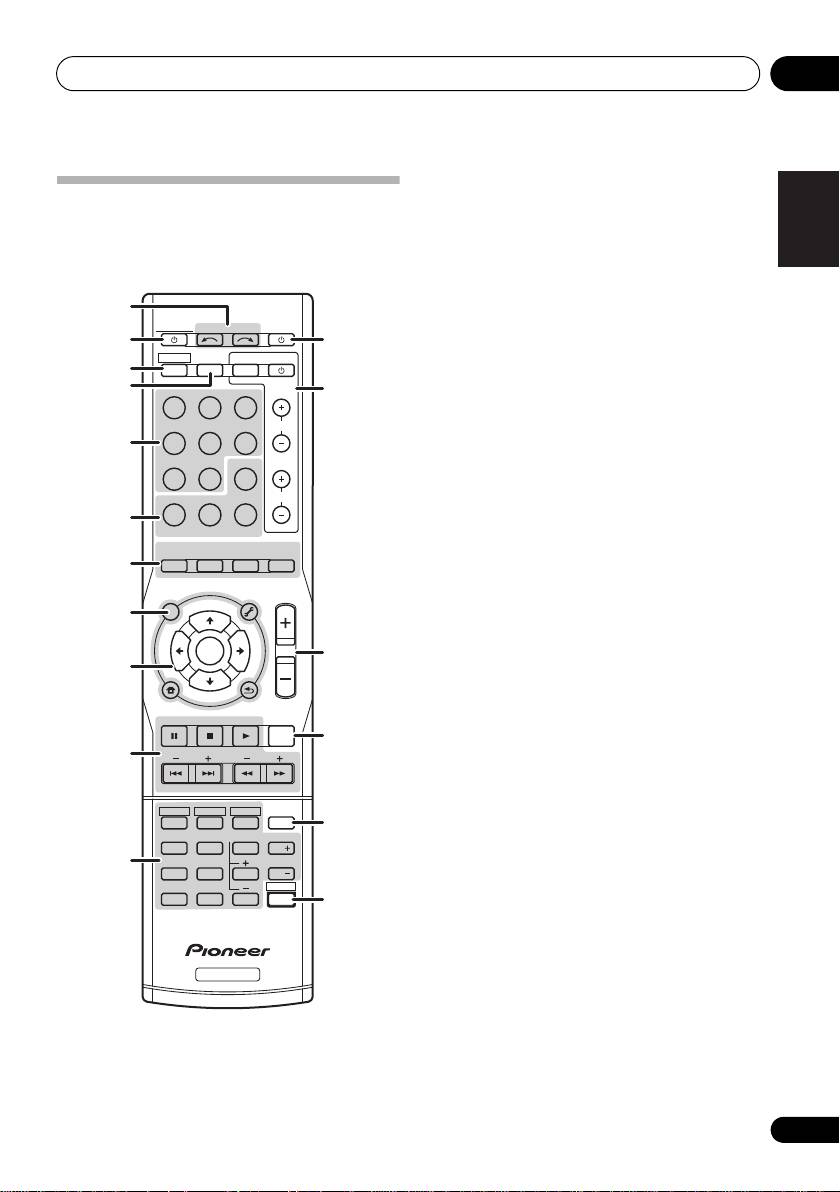
Remote control
As for operating other devices, the remote
2
RECEIVER
control codes for the Pioneer products are
Switches the receiver between standby and
preset. The settings cannot be changed.
on.
Français
3RECEIVER
1
Switches the remote to control the receiver
RECEIVER
INPUT SELECT
SOURCE
212
(used to select the white commands above
ZONE 2
RECEIVER
ON/OFF
TV CONTROL
the number buttons (TEST TONE, etc)). Also
3
INPUT
use this button to set up surround sound
4
BD TV
DVR
13
(page 33) or Audio parameters (page 30).
CD CD-R
TUNER
CH
4 ZONE 2 ON/OFF
5
Switches zone 2 of the multi-zone function
PORTABLE MULTI IN SIGNAL SEL
between on and off.
MIDNIGHT
PHASE
S.RETRIEVER
VOL
5 MULTI CONTROL buttons
6
Press to select control of other components.
Italiano
BD MENU
AUTO/
STEREO/
6
Receiver control
buttons
DIRECT
A.L.C.
STANDARD
ADV SURR
7
SIGNAL SEL
AUDIO
TUNER EDIT
MASTER
PARAMETER
TOOLS
VOLUME
Use to select an input signal (page 32).
TOP
T
U
N
E
MENU
8
MENU
Nederlands
MIDNIGHT
T
P
E
R
S
E
E
ENTER
S
R
E
Switches to Midnight or Loudness
14
P
T
9
listening (p age 30).
HOME
MENU
BAND
T
U
N
E
SETUP
RETURN
PHASE
PTY SEARCH
DTV/TV
Press to switch on/off Phase Control
MUTE
15
(page 29).
Español
10
BASS
TRE
S.RETRIEVER
Press to restore CD quality sound to
HDD
DVD
VCR
DISPLAY
compressed audio sources (page 28).
1
2
3
16
TEST TONE
CH SELECT
SLEEP
Press BD first to access:
4
5
6
CH
Deutsch
11
SPEAKERS
DIMMER
BD MENU
7
8
9
CH
SHIFT
Displays the disc menu of Blu-ray Discs.
0
ENTERCLR
17
7
Listening mode buttons
AUTO/DIRECT
Switches between Auto surround mode
RECEIVER
(Auto playback on page 26) and Stream
Direct playback. Stream Direct playback
bypasses the tone controls for the most
accurate reproduction of a source
(page 28).
23
En

Controls and displays04
STEREO/A.L.C.
BAND
Switches between stereo playback, Auto
Switches between AM, FM ST (stereo) and
level control stereo mode (page 27) and
FM MONO radio bands (page 38).
Front Stage Surround Advance modes
PTY SEARCH
(page 28).
Use to search for RDS program types
STANDARD
(page 40).
Press for Standard decoding and to switch
9
(
TUNE /
,
PRESET /
),
between 2 Pro Logic II options (page 26).
ENTER
ADV SURR
Use the arrow buttons when setting up your
Switches between the various surround
surround sound system (page 33). Also used to
modes (page 27).
control BD/DVD menus/options.
Use the TUNE / buttons can be used to
8 System Setup and Component control
find radio frequencies (page 38) and the
buttons
PRESET / buttons can be used to select
The following button controls can be accessed
preset radio stations (page 39).
after you have selected the corresponding
10 Component control buttons
MULTI CONTROL button (BD, TV, etc.).
The main buttons (
, , etc.) are used to
Press RECEIVER first to access:
control a component after you have selected it
using the input source buttons.
AUDIO PARAMETER
Use to access the Audio options (page 30).
The controls above these buttons can be
accessed after you have have selected the
SETUP
corresponding input source button (for
Press to access the System Setup menu
example BD, DVR or TV). These buttons also
(page 33).
function as described below.
Press RECEIVER first to access:
RETURN
BASS –/+
Confirm and exit the current menu screen.
1
Use to adjust Bass
Press BD or DVR first to access:
TRE –/+
1
Use to adjust Treble
TOP MENU
Displays the disc ‘top’ menu of a BD/DVD.
Press TV first to access:
DTV/TV
HOME MENU
Switches between the DTV and analog TV
Displays the HOME MENU screen.
input modes for Pioneer flat screen TVs.
RETURN
11 Number buttons and other component
Confirm and exit the current menu screen.
controls
Use the number buttons to directly select the
MENU
tracks on a CD, DVD, etc. There are other
Displays the TOOLS menu of Blu-ray Disc
buttons that can be accessed after the
player.
RECEIVER button is pressed. (For example
Press TUNER first to access:
TEST TONE, etc.)
TUNER EDIT
Memorizes/names stations for recall
(page 38, 39).
24
En
Note
04_controls_displays.fm 24 ページ 2009年1月20日 火曜日 午後3時27分
1 The tone controls are disabled when the listening mode is set to DIRECT or PURE DIRECT.

VSX_519V_MY.book 25 ページ 2009年1月16日 金曜日 午後7時32分
Controls and displays 04
HDD*, DVD*, VCR*
VOL +/–
English
These buttons switch between the har d
Use to adjust the volume on your TV.
disk, DVD and VCR controls for HDD/DVD/
14 MASTER VOLUME +/–
VCR recorders.
Use to set the listening volume.
TEST TONE
15 MUTE
Outputs the test tones on each channel.
Français
Mutes/unmutes the sound.
Use the / buttons to select the channel
and use the / buttons to adjust the
16 DISPLAY
level on each channel. Pressing TEST
Switches the display of this unit. The input
TONE again exits the test tone mode.
name, listening mode or sound volume can be
CH SELECT
checked by selecting an input source.
Press repeatedly to select a channel, then
17
SHIFT
use +/– to adjust the level (page 34).
Press to access the ‘boxed’ commands (above
CH SELECT +/–
the buttons) on the remote. These buttons are
Use to adjust the channel levels.
marked with an asterisk (* ) in this section.
This button is also used for operating ZONE 2
SPEAKERS
Italiano
(page 37).
Use to change the speaker system on or off
(page 32).
SLEEP
Press to change the amount of time
beforethe receiver switches into standby
Nederlands
(30 min – 60 min – 90 min – Off). You can
check the remaining sleep time at any time
by pressing SLEEP once.
DIMMER
Dims or brightens the display. The
Español
brightness can be controlled in four steps.
12 SOUR
CE
Turns on
or off the power of the Pioneer DVD/
DVR units when BD or DVR is selected using
the MULTI CONTROL buttons.
Deutsch
13 TV CONTROL buttons
These buttons can control only be used with
Pioneer flat screen TVs.
Use to turn on/off the power of the TV.
INPUT
Use to select the TV input signal.
CH +/–
Use to select channels.
25
En
Listening to your system05
Chapter 5:
Listening to your system
Important
Listening in surround sound
• The listening modes and many features
Using this receiver, you can listen to any
described in this section may not be
source in surround sound. However, the
available depending on the current source,
options available will depend on your speaker
settings and status of the receiver.
setup and the type of source you’re listening to.
Auto playback
The simplest, most direct listening option is the
Auto Surround feature. With this, the receiver
• While listening to a source, press
automatically detects what kind of source
STANDARD
.
you’re playing and selects multichannel or
If the source is Dolby Digital, DTS, or Dolby
1
stereo playback as necessary.
Surround encoded, the proper decoding
format will automatically be selected and
shows in the display.
With two channel sources, press STANDARD
repeatedly to select from:
• While listening to a source, press
• DOLBY PLII MOVIE – Up to 5.1 channel
2
AUTO/DIRECT
for auto playback of a
sound, especially suited to movie sources
source.
3
Press repeatedly until AUTO SURROUND
• DOLBY PLII MUSIC
– Up to 5.1 channel
shows briefly in the display (it will then show
sound, especially suited to music sources
the decoding or playback format). Check the
• DOLBY PLII GAME – Up to 5.1 channel
digital format indicators in the display to see
sound, especially suited for video games
how the source is being processed.
• DOLBY PRO LOGIC – 4.1 channel
surround sound
26
En
Note
1Stereo surround (matrix) formats are decoded accordingly using DOLBY PLII MOVIE (see Listening in surround sound above
for more on these decoding formats).
2For more options using this button, see Using Stream Direct on page 28.
AUTO/
AUTO/
STEREO/
DIRECT
DIRECT
A.L.C.
STANDARD
ADV SURR
AUDIO
TUNER EDIT
MASTER
3 When listening to 2-channel sources in DOLBY PLII MUSIC mode, there are three further parameters you can adjust:
C.WIDTH, DIMEN., and PNRM.. See Setting the Audio options on page 30 to adjust them.
AUTO/
STEREO/
DIRECT
A.L.C.
STANDARD
STANDARD
ADV SURR
AUDIO
TUNER EDIT
MASTER
VSX_519V_MY.book 26 ページ 2009年1月16日 金曜日 午後7時32分

Listening to your system 05
Using the Advanced surround effects
English
The Advanced surround feature creates a
Listening in stereo
variety of surround effects. Try different modes
When you select STEREO you will hear the
with various soundtracks to see which you like.
source through just the front left and right
speakers (and possibly your subwoofer
depending on your speaker settings). Dolby
Français
Digital or DTS multichannel sources are
downmixed to stereo.
• Press
ADV SURR
repeatedly to select a
In the Auto level control stereo mode (A.L.C.),
listening mode.
this unit equalizes playback sound levels if
• ACTION – Designed for action movies with
each sound level varies with the music source
dynamic soundtracks.
recorded in a portable audio player.
• DRAMA – Designed for movies with lots of
dialog.
• ENT.SHOW – Suitable for musical sources.
• ADVANCED GAME – Suitable for video
• While listening to a source, press
Italiano
games.
STEREO/A.L.C.
for stereo playback.
• SPORTS – Suitable for sports programs.
Press repeatedly to switch between:
• CLASSICAL – Gives a large concert hall-
• STEREO – The audio is heard with your
type sound.
surround settings and you can still use the
• ROCK/POP – Creates a live concert sound
Midnight, Loudness, Phase Control,
Nederlands
for rock and/or pop music.
Sound Retriever and Tone functions.
• UNPLUGGED – Suitable for acoustic
• A.L.C. – Listening in Auto level control
music sources.
stereo mode.
• EXT.STEREO – Gives multichannel sound
• F.S.S.ADVANCE – See Using Front Stage
to a stereo source, using all of your
Surround Advance on page 28 for more on
Español
speakers.
this.
Deutsch
27
En
AUTO/
STEREO/
DIRECT
A.L.C.
STANDARD
ADV SURR
ADV SURR
AUDIO
TUNER EDIT
MASTER
AUTO/
STEREO/
STEREO/
DIRECT
A.L.C.
A.L.C.
STANDARD
ADV SURR
AUDIO
TUNER EDIT
MASTER
VSX_519V_MY.book 27 ページ 2009年1月16日 金曜日 午後7時32分
Listening to your system05
• While listening to a source, press
AUTO/
DIRECT
to select Stream Direct mode.
Using Front Stage Surround
• AUTO SURROUND – See Auto playback on
Advance
page 26.
The Front Stage Surround Advance function
• DIRECT – Sources are heard according to
allows you to create natural surround sound
the settings made in the Surround Setup
effects using just the front speakers and the
(speaker setting, channel level, speaker
subwoofer.
distance), as well as with dual mono
1
settings.
You will hear sources according
to the number of channels in the signal.
• PURE DIRECT – Analog and PCM sources
2
• While listening to a source, press
STEREO/
are heard without any digital processing.
A.L.C.
to select Front Stage Surround Advance
modes.
• STEREO – See Listening in stereo on
Using the Sound Retriever
page 27 for more on this.
When audio data is removed during the
• A.L.C. – See Listening in stereo on page 27
compression process, sound quality often
for more on this.
suffers from an uneven sound image. The
• F.S.S.ADVANCE – Use to provide a rich
Sound Retriever feature employs new DSP
surround sound effect directed to the
technology that helps bring CD quality sound
center of wher e the front left and right
back to compressed 2-channel audio by
speakers sound projection area converges.
restoring sound pressure and smoothing
3
jagged artifacts left over after compression.
• Press
S.RETRIEVER to switch the sound
retriever on or off.
Using Stream Direct
Use the Stream Direct modes when you want
to hear the truest possible reproduction of a
source. All unnecessary signal processing is
bypassed.
28
En
AUTO/
STEREO/
STEREO/
DIRECT
A.L.C.
A.L.C.
STANDARD
ADV SURR
AUDIO
TUNER EDIT
MASTER
F.S.S.ADVANCE position.
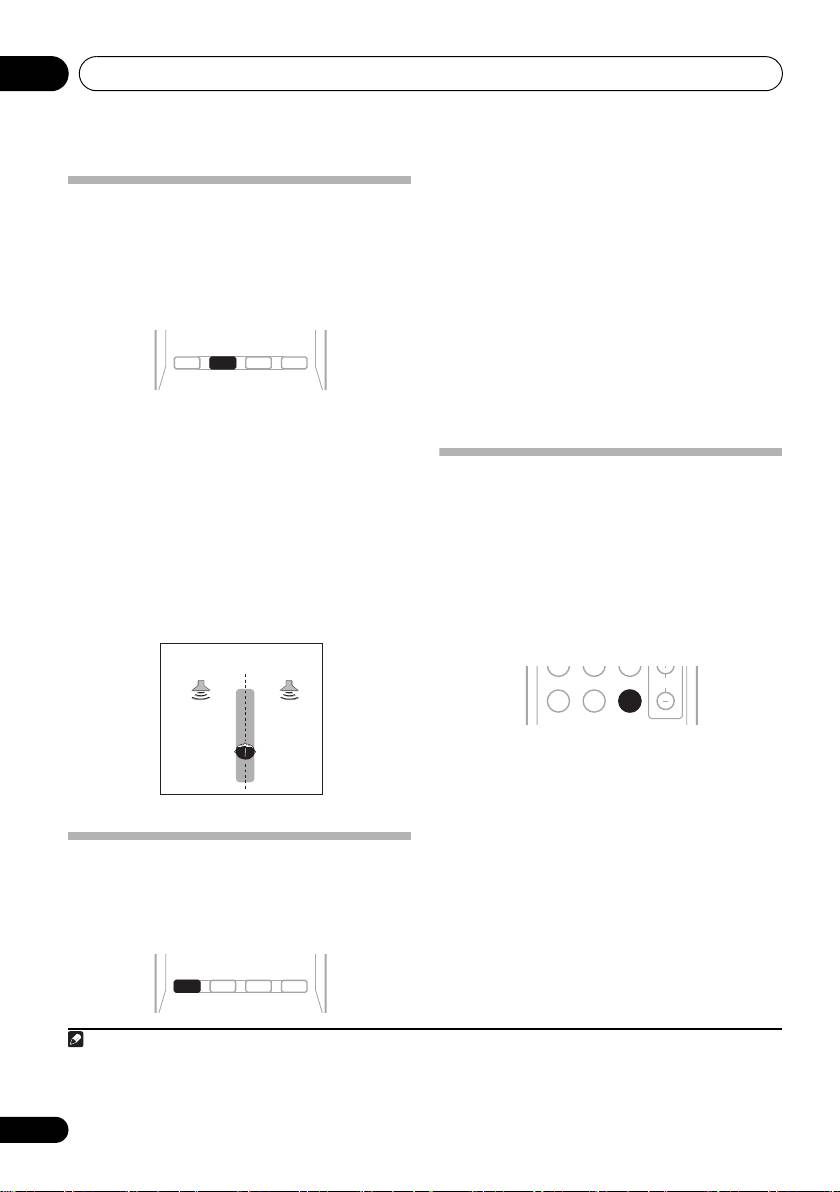
Front left
Front right
speaker
speaker
AUTO/
STEREO/
DIRECT
A.L.C.
STANDARD
ADV SURR
AUDIO
TUNER EDIT
MASTER
AUTO/
DIRECT
Note
1In the DIRECT mode, Phase Control, Sound Delay, LFE Attenuate and Auto Delay functions are available.
2There are cases where a brief noise is heard before playback of sources other than PCM. Please select AUTO SURROUND or
DIRECT if this is a problem.
3 The Sound Retriever is only applicable to 2-channel sources.
MIDNIGHT
PHASE
S.RETRIEVER
S.RETRIEVER
VOL
BD MENU
VSX_519V_MY.book 28 ページ 2009年1月16日 金曜日 午後7時32分

Listening to your system 05
English
Using Phase Control
This receiver’s Phase Control feature uses
phase correction measures to make sure your
sound source arrives at the listening position in
phase, preventing unwanted distortion and/or
Français
coloring of the sound (see illustration below).
During multichannel playback, LFE (Low-
Frequency Effects) signals as well as low-
frequency signals in each channel are
assigned to the subwoofer or other the
subwoofer and the most appropriate speaker.
At least in theory, however, this type of
processing involves a group delay that varies
with frequency, resulting in phase distortion
where the low-frequency sound is delayed or
muffled by the conflict with other ch
annels.
Wi
th the Phase Control mode switched on, this
Phase Control technology provides coherent
Italiano
receiver can reproduce powerful bass sound
sound reproduction through the use of phase
without deteriorating the quality of the original
1
matching
for an optimal sound image at your
sound (see illustration below).
listening position. The default setting is on
and we recommend leaving Phase Control
switched on for all sound sources.
Nederlands
•Press
PHASE
to switch on phase
correction.
Español
Deutsch
29
En
Note
P
H
Front speaker
Listening
A
S
position
E
C
?
O
N
T
R
O
L
O
Sound
F
F
source
Subwoofer
Front speaker
Listening
P
H
position
A
S
E
C
O
N
T
R
O
L
Sound
O
source
Subwoofer
N
1 Phase matching is a very important factor in achieving proper sound reproduction. If two waveforms are ‘in phase’, they crest
and trough together, resulting in increased amplitude, clarity and presence of the sound signal. If a crest of a wave meets a
trough (as shown in the upper section of the diagram above) then the sound will be ‘out of phase’ and an unreliable sound
image will be produced.
• If your subwoofer has a phase control switch, set it to the plus (+) sign (or 0°). However, the effect you can actually feel when
PHASE CONTROL is set to ON on this receiver depends on the type of your subwoofer. Set your subwoofer to maximize the effect.
It is also recommended you try changing the orientation or the place of
your subwoofer.
• Set
the built-in lowpass filter switch of your subwoofer to OFF. If this cannot be done on your subwoofer, set the cutoff
frequency to a higher value.
• If the speaker distance is not properly set, you may not have a maximized PHASE CONTROL effect.
• The PHASE CONTROL mode cannot be set to ON in the following cases:
– When the PURE DIRECT mode is switched on.
– When the MULTI IN input is selected.
MIDNIGHT
PHASE
PHASE
S.RETRIEVER
VOL
BD MENU
VSX_519V_MY.book 29 ページ 2009年1月16日 金曜日 午後7時32分
VSX_519V_MY.book 30 ページ 2009年1月16日 金曜日 午後7時32分
Listening to your system05
AUDIO
AUDIO
TUNER EDIT
MASTER
RECEIVER
INPUT SELECT
SOURCE
PARAMETER
PARAMETER
TOOLS
VOLUME
TOP
T
U
N
E
MENU
Setting the Audio options
MENU
ZONE 2
RECEIVER
ON/OFF
TV CONTROL
INPUT
T
P
E
R
There are a number of additional sound
E
E
S
ENTER
S
E
BD TV
DVR
P
R
T
settings you can make using the AUDIO
HOME
PARAMETER menu. The defaults, if not stated,
CD CD-R
TUNER
CH
MENU
T
U
N
E
BAND
SETUP
RETURN
RETURN
are listed in bold.
1 Press
RECEIVER
on the remote control,
Important
then press
AUDIO PARAMETER
button.
•The AUDIO PARAMETER menu is not
2Use
/
to select the setting you want to
available with MULTI IN input (see
adjust.
Selecting the multichannel analog inputs
Depending on the current status/mode of the
on page 32).
receiver, certain options may not be able to be
selected. Check the table below for notes on
• Note that if a setting doesn’t appear in the
this.
AUDIO PARAMETER menu, it is
unavailable due to the current source,
3Use
/
to set it as necessary.
settings and status of the receiver.
See the table below for the options available for
each setting.
4 Press
RETURN
to confirm and exit the
menu.
Setting What it does Option(s)
S.DELAY
Some monitors have a slight delay when showing video, so
0.0 to 9.0 (frames)
(Sound Delay)
the soundtrack will be slightly out of sync with the picture.
1 second = 25 frames
By adding a bit of delay, you can adjust the sound to match
(PAL)
the presentation of the video.
Default: 0.0
a
Allows you to hear effective surround sound of movies at
M/L OFF
MIDNIGHT
low volumes.
MIDNIGHT
a
Used to get good bass and treble from music sources at
LOUDNESS
low volumes.
LOUDNESS
b
When audio data is removed during the compression
OFF
S.RTV
process, sound quality often suffers from an uneven sound
(Sound Retriever)
ON
image. The Sound Retriever feature employs new DSP
technology that helps bring CD quality sound back to
compressed 2-channel audio by restoring sound pressure
and smoothing jagged artifacts left over after
compression.
c
Specifies how dual mono encoded Dolby Digital
CH1 –
DUAL MONO
soundtracks should be played.
Channel 1 is heard only
CH2 –
Channel 2 is heard only
CH1 CH2 –
Both channels heard
from front speakers
30
En

VSX_519V_MY.book 31 ページ 2009年1月16日 金曜日 午後7時32分
Listening to your system 05
Setting What it does Option(s)
English
DRC
Adjusts the level of dynamic range for movie soundtracks
OFF
(Dynamic Range
optimized for Dolby Digital and DTS (you may need to use
MAX
this feature when listening to surround sound at low
Control)
volumes).
MID
LFE ATT
Some Dolby Digital and DTS audio sources include ultra-
LFEATT 0 (0 dB)
Français
(LFE Attenuate)
low bass to
nes. Set the LFE attenuator as necessary to
LFEATT 10 (–10 dB)/
prevent the ultra-low bass tones from distorting the sound
LFEATT ** (OFF)
from the speakers.
The LFE is not limited when set to 0 dB, which is the
recommended value. When set to –10 dB, the LFE is
limited by the respective degree. When OFF is selected, no
sound is output from the LFE channel.
Specifies the routing of the HDMI audio signal out of this
AMP
HDMI
(HDMI Audio)
receiver (amp) or through to a TV or flat screen TV. When
THRU
THRU is selected, no sound is output from this receiver.
A.DLY
This feature automatically corrects the audio-to-video delay
OFF
(Auto Delay)
between components connected with an HDMI cable. The
Italiano
ON
audio delay time is set depending on the operational status
of the display connected with an HDMI cable. The video
delay time is automatically adjusted according to the audio
d
delay time.
e
Spreads the center channel between the front right and left
0 to 7
C.WIDTH
Nederlands
speakers, making it sound wider (higher settings) or
Default: 3
(Center Width)
narrower (lower settings).
(Applicable only when
using a center speaker)
e
Adjusts the surround sound balance from front to back,
–3 to +3
DIMEN.
making the sound more distant (minus settings), or more
(Dimension)
Default: 0
forward (positive settings).
Español
e
Extends the front stereo image to include surround
OFF
PNRM.
speakers for a ‘wraparound’ effect.
(Panorama)
ON
a. You can change the MIDNIGHT/LOUDNESS options at any time by using MIDNIGHT button.
b. You can change the Sound Retriever feature at any time by using S.RETRIEVER button.
c. This setting works only with dual mono encoded Dolby Digital and DTS soundtracks.
Deutsch
d. This feature is only available when the connected display supports the automatic audio/video
synchronizing capability (‘lip-sync’) for HDMI. If you find the automatically set delay time unsuitable, set
A.DLY to OFF and adjust the delay time manually. For more details about the lip-sync feature of your
display, contact the manufacturer directly.
e. Only available with 2-channel sources in DOLBY PLII MUSIC mode.
31
En

Listening to your system05
When set to DIGITAL or HDMI, 2 lights when
a Dolby Digital signal is input, and DTS lights
Playing other sources
when a DTS signal is input.
1 Turn on the power of the playback
When the HDMI is selected, the A and
component.
DIGITAL indicators are off (see page 21).
2 Turn on the power of the receiver.
3 Select the source you want to playback.
Selecting the multichannel
Use the MULTI CONTROL buttons (INPUT
analog inputs
SELECTOR).
If you have connected a decoder or a BD/DVD
4 Start playback of the component you
player with multichannel analog outputs to this
selected in step 1.
receiver (page 10), you must select the analog
3
multichannel inputs for surround sound.
• Press MULTI IN on the remote control.
Choosing the input signal
To cancel playback from the multichannel
On this receiver, it is possible to switch the
inputs, switches to the other input signal.
input signals for the different inputs as
1
described below.
1 Press SIGNAL SEL to select the input signal
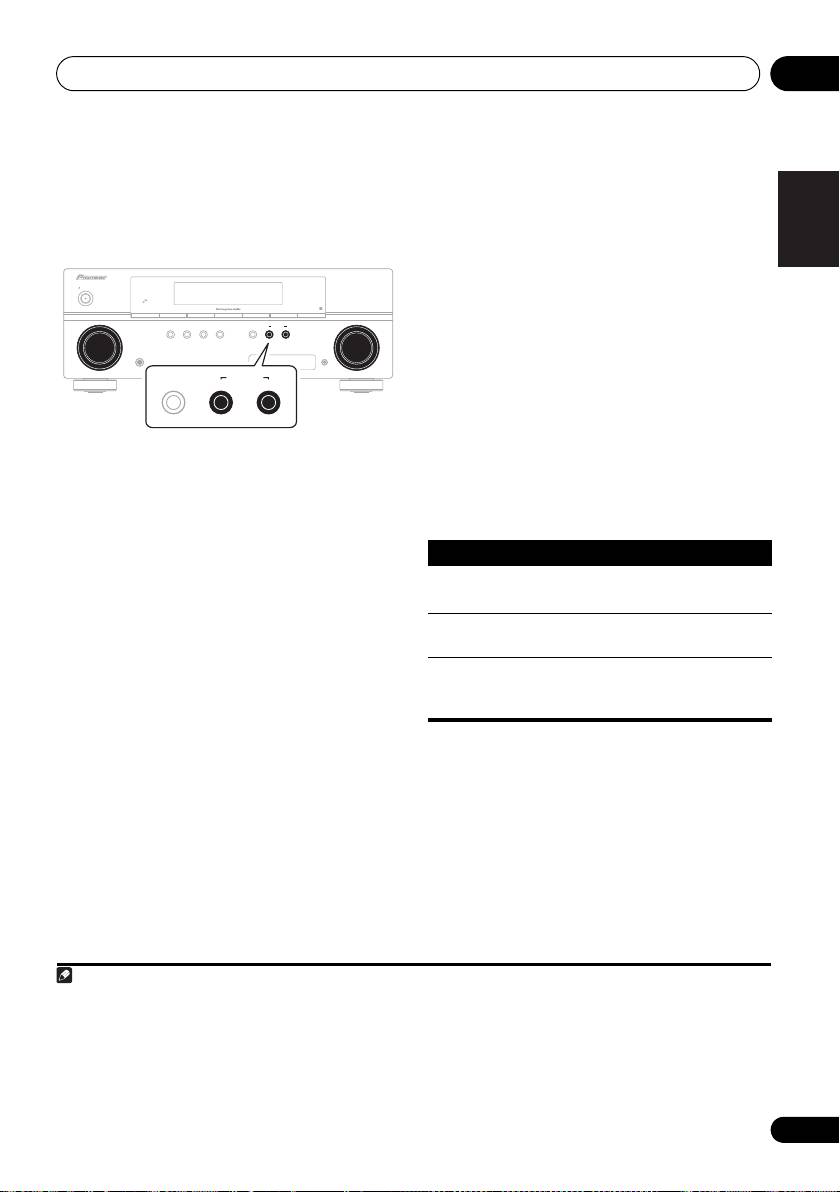
Using the headphone
corresponding to the source component.
When DIGITAL (C1/O1/O2) or HDMI (H) is
1 Insert the headphone into the PHONE
selected and the selected audio input is not
jack.
provided, A (analog) is automatically selected.
2 Press
RECEIVER
then press the SPEAKERS
Each press cycles through the following:
button to select SP OFF.
• A – Selects the analog inputs.
The sound is heard from the headphone and no
• DIGITAL – Selects the digital inp ut. The
sound is heard from the speakers connected to
coaxial 1 input is selected for C1, and the
this receiver.
optical 1 or 2 audio input is selected for
The listening mode when the sound is heard
O1 or O2.
from the headphone can be selected only from
• HDMI – Selects an HDMI signal. H can be
STEREO or A.L.C..
selected for BD/DVD or TV/SAT input. For
2
other inputs, HDMI cannot be selected.
32
En
Note
VSX_519V_MY.book 32 ページ 2009年1月16日 金曜日 午後7時32分
1 • This receiver can only play back Dolby Digital, PCM (32 kHz to 96 kHz) and DTS (including DTS 96 kHz / 24 bit) digital signal
formats. The compatible signals via the HDMI terminals are: Dolby Digital, DTS, SACD (DSD 2 ch), DVD Audio (including 192
kHz), PCM (32 kHz to 192 kHz sampling frequencies). With other digital signal formats, set to A (analog) (the MULTI IN or
TUNER).
• You may get digital noise when a LD or CD player compatible with DTS is playing an analog signal. To prevent noise, make
the proper digital connections (page 9) and set the signal input to C1/O1/O2 (DIGITAL).
• Some DVD players don’t output DTS signals. For more details, refer to the instruction manual supplied with your DVD player.
2 • When the HDMI option in Setting the Audio options on page 30 is set to THRU, t
he sound will be heard t
hrough your TV, not
from this receiver.
3• During playback from the multichannel inputs, you can’t use any of the sound features/modes and only the volume and
channel levels can be set.
• Change the output settings of the systems with multichannel analog outputs according to the number of the speakers
connected to the receiver.
The System Setup menu 06
Chapter 6:
English
The System Setup menu
1 Select SP SETUP from the System Setup
menu.
Français
Using the System Setup menu
The following section shows you how to make
2Use
/
to select the setting you want
detailed settings to specify how you’re using
to adjust then press
ENTER
.
the receiver. It also explains how to fine-tune
•
SP SET
– Specify size / number of speakers
individual speaker system settings.
connected (see
Speaker setting
below).
• X.OVER – Specify which frequencies will
be sent to the subwoofer (see Crossover
network on page 34).
• CH LEVEL – Adjust overall balance of your
speaker system (see Channel level on
page 34).
Italiano
• SP DISTN – Specify the distance of your
1 Press
RECEIVER
on the remote control,
speakers from the listening position (see
then press the
SETUP
button.
Speaker Distance on page 35).
2Use
/
to select the setting you want to
3Press
RETURN
after making the
adjust then press
ENTER
.
adjustments necessary for each setting.
Nederlands
• SP SETUP – Specify the size, number,
distance and overall balance of the
Speaker setting
speakers you’ve connected (see Manual
Use this setting to specify your speaker
speaker setup below).
configuration (size, number of speakers).
• IN ASSIG – Specify what you’ve connected
to the component video inputs (see The
1 Select
SP SET
from the SP SETUP menu.
Español
Input Assign menu on page 35).
2Use
/
to choose the speaker(s) that
you want to set then select a speaker size.
Use / to select the size (and number) of
Manual speaker setup
each of the following speakers:
These setting optimize surround sound
• Front (F) – Select LARGE if your front
Deutsch
performance. You only need to make these
speakers reproduce bass frequencies
settings once (unless you change the
effectively, or if you didn’t connect a
placement of your current speaker system or
subwoofer. Select SMALL to send the
add new speakers).
1
bass frequencies to the subwoofer.
33
En
RECEIVER
INPUT SELECT
SOURCE
ZONE 2
ON/OFF
TV CONTROL
INPUT
BD TV
DVR
CD CD-R
TUNER
CH
AUDIO
TUNER EDIT
MASTER
PARAMETER
TOOLS
VOLUME
TOP
T
U
N
E
MENU
MENU
P
R
E
E
S
E
T
ENTER
S
E
P
R
T
HOME
MENU
T
U
N
E
BAND
SETUP
RETURN
RECEIVER
ENTER
HOME
MENU
RETURN
Note
VSX_519V_MY.book 33 ページ 2009年1月16日 金曜日 午後7時32分
1 If you select SMALL for the front speakers the subwoofer is fixed to YES. Also, the center and surround speakers can’t be set
to LARGE if the front speakers are set to SMALL. In this case, all bass frequencies are sent to the subwoofer.

The System Setup menu06
• Center (C) – Select LARGE if your center
1 Select ‘X.OVER’ from the SP SETUP menu.
speaker reproduces bass frequencies
2Use / to choose the frequency
effectively, or select SMALL to send bass
cutoff point.
frequencies to the other speakers or
Frequencies below the cutoff point will be sent
subwoofer. If you didn’t connect a center
to the subwoofer (or LARGE speakers).
speaker, choose NO (the center channel is
sent to the other speakers).
Channel level
• Surround (S) – Select LARGE if your
Using these settings, you can adjust the overall
surround speakers reproduce bass
balance of your speaker system.
frequencies effectively. Select SMALL to
send bass frequencies to the other
1 Select CH LEVEL from the SP SETUP menu.
speakers or subwoofer. If you didn’t
2Use
/
to select a setup option.
connect surround spea
kers choose NO
• T. TONE M – Move the test tone manually
(the sound
of the surround channels is
from speaker to speaker and adjust
sent to the other speakers).
individual channel levels.
• Subwoofer (SW) – LFE signals and bass
• T. TONE A – Adjust channel levels as the
frequencies of channels set to SMALL are
test tone moves from speaker to speaker
output from the subwoofer when YES is
automatically.
1
selected.
Choose the PLUS setting if you
want the subwoofer to output bass sound
3 Confirm your selected setup option.
3
continuously or you want deeper bass (the
The test tones will start after you press ENTER.
bass frequencies that would normally
4 Adjust the level of each channel using
come out the front and center speakers are
/.
also routed to the subwoofer). If you did not
If you selected T. TONE M, use / to switch
connect a subwoofer choose NO (the bass
speakers.
is output from other speakers).
The T. TONE A setup outputs test tones in the
following order (depends on speaker settings):
Crossover network
L C R SR SL SW
• Default setting: 100Hz
Adjust the level of each speaker as the test tone
This setting decides the cutoff between bass
4
is emitted.
sounds playing back from the speakers
selected as LARGE, or the subwoofer, and bass
sounds playing back from those selected as
2
SMALL.
It also decides where the cutoff will
be for bass sounds in the LFE channel.
34
En
Note
VSX_519V_MY.book 34 ページ 2009年1月16日 金曜日 午後7時32分
1 If you can’t get good bass results, listen to the bass response with the subwoofer set to PLUS and YES or the front speakers
set to LARGE and SMALL alternatively and let your ears judge which sounds best. If you’re having problems, the easiest option
is to route all the bass sounds to the subwoofer by selecting SMALL for the front speakers.
2For more on selecting the speaker sizes, see Speaker setting on page 33.
3After the volume increases to the reference level, test tones will be output.
4• If you are using a Sound Pressure Level (SPL) meter, take the readings from your main listening position and adjust the level
of each speaker to 75 dB SPL (C-weighting/slow reading).
• T
he subwo
ofer test tone is output at low volumes. You may need to adjust the level after testing with an actual soundtrack.
• You can change the channel levels at any time by pressing RECEIVER first and then starting the following operations:
CH SELECT and CH SELECT +/– on the remote control. You can also change the channel levels by pressing RECEIVER first and
then TEST TONE. In this case, use the / buttons to select the channel and use the / buttons to adjust the level.

VSX_519V_MY.book 35 ページ 2009年1月16日 金曜日 午後7時32分
The System Setup menu 06
Speaker Distance
4 Select the component that corresponds
English
with the one you connected to that input.
For good sound depth and separation from
•Use the / buttons and ENTER to
your system, you need to specify the distance
select BD, TV, DVR, MCI (MULTI CH IN) or
of your speakers from the listening position.
OFF.
The receiver can then add the proper delay
needed for effective surround sound.
• If you assign a component input to a
Français
certain function, any component inputs
1 Select ‘SP DISTN.’ from the SP SETUP menu.
previously assigned to that function will
2Use
/
to choose the speaker that you
automatically be switched off.
want then set the distance.
•Make sure you have connected the audio
Use / to adjust the distance of each
from the component to the corresponding
speaker (in 0.1 m increments).
inputs on the rear of the receiver.
• If you connect any source component to
the receiver using a component video
The Input Assign menu
input, you should also have your TV
You only need to make settings in the Input
connected to this receiver’s
Assign menu if you didn’t hook up your
COMPONENT VIDEO OUT jacks.
Italiano
equipment according to the default settings for
the component video inputs.
• Default settings:
COMP 1 – BD
COMP 2 – TV
Nederlands
If you didn’t make component video
connections according to the defaults above,
you must assign the numbered input to the
component you’ve connected (or else you may
see the video signal of a different component).
Español
For more on this, see Using the component
video jacks on page 14.
1 Select ‘IN ASSIG’ from the System Setup
menu.
2 Select ‘COMP. IN’ from the ‘IN ASSIG’
Deutsch
menu.
3Use
/
to select the number of the
component video input to which you’ve
connected your video component.
The numbers match the numbers beside the
inputs on the rear of the receiver.
35
En
Using the MULTI-ZONE feature07
Chapter 7:
Using the MULTI-ZONE feature
MULTI-ZONE listening options
The following table shows what you can listen
MULTI-ZONE listening
to in the sub zone:
This receiver can power up to two independent
systems in separate rooms after you have
made the proper MULTI-ZONE connections. An
example MULTI-ZONE setup is shown below.
Basic MULTI-ZONE setup (
ZONE 2
)
• Connect a separate amplifier to the
ZONE
2 AUDIO OUT
jacks on the rear of this
receiver.
You should have a pair of speakers attached to
the sub zone amplifier as shown in the
following illustration.
Different sources can be playing in two zones
at the same time or, depending on your needs,
the same source can also be used. The main
and sub zones have independent power (the
main zone power can be off while the sub zone
is on) and the sub zone can be controlled by
the remote or front panel controls.
Making MULTI-ZONE connections
It is possible to make these connections if you
have a separate speakers for your sub zone
1
(ZONE 2).
You will also need a separate
amplifier for your sub zone.
36
En
Note
AUDIO
COMPONENT VIDEO
1 You can’t use sound controls (such as the bass/treble controls or Midnight listening) or any surround modes with a separate
amplifier in the sub zone. You can, however, use the features available with your sub zone amplifier.
A
Sub Zone Input sources available
ZONE 2 The built-in tuner and other analog
audio sources.
ZONE2 OUT
ZONE2 OUT
SUBWOOFER
R
L R
L R
PRE OUT
OUT
DVR/VCR VIDEO
IN
MONITOR OUT BD/DVD IN TV/SAT IN
P
R
B
YP
OUT
IN 2
(TV/SAT)
IN 1
(BD/DVD)
AUDIO IN
ASSIGNABLE
1
-
2
AUDIO
ZONE2 OUT
SUBWOOFER
R
L R
PRE OUT
OUT
DVR/VCR VIDEO
IN
MONITOR OUT BD/DVD IN TV/SAT IN
A
P
R
B
YP
OUT
IN 2
(TV/SAT)
IN 1
(BD/DVD)
ASSIGNABLE
COMPONENT VIDEO
1
-
2
ZONE2 OUT
L R
AUDIO IN
VSX_519V_MY.book 36 ページ 2009年1月16日 金曜日 午後7時32分
Using the MULTI-ZONE feature 07
Using the MULTI-ZONE controls
•If you select TUNER, you can use the tuner
English
controls to select a preset station (see
The following steps use the front panel controls
Saving station presets on page 38 if you’re
to select sources. See MULTI-ZONE remote
2
controls below.
unsure how to do this).
4 When you’re finished, press
CONTROL
again to return to the main zone controls.
Français
You can also press the MULTI-ZONE ON/OFF
button on the front panel to switch off all
3
output to the sub zone.
MULTI-ZONE remote controls
Press the RECEIVER button on the remote
control, then with the SHIFT button pressed,
press the buttons below to operate the
1 Press the
MULTI-ZONE ON/OFF
button
corresponding zone.
on the front panel.
Each press selects a MULTI-ZONE option:
The following table shows the possible MULTI-
Italiano
ZONE remote controls:
• ZONE 2 ON – Switches the MULTI-ZONE
feature on
• ZONE 2 OFF – Switches the MULTI-ZONE
feature off
The ZONE indicator lights when the MULTI-
Nederlands
ZONE control has been switched ON.
2 Press
CONTROL
.
1
• When the receiver is on,
make sure that
any operations for the sub zone are done
while ZONE 2 shows in the display. If this is
a. Without pressing the SHIFT button, you can
Español
not showing, the front panel controls affect
switch power on/off in the sub zone.
the main zone only.
b. In ZONE 2, you cannot select MULTI IN inputs.
3Use the
INPUT SELECTOR
dial to select
the source for the zone you have selected.
For example, Z2: CDR sends the source
Deutsch
connected to the CDR inputs to the sub room
(ZONE 2).
37
En
Note
1If the receiver is in standby, the display is dimmed, and ZONE2 ON continues to show in the display.
AUDIO/ VIDEO MULTI-CHANNEL RECEIVER VSX
–
519V
STANDBY/ON
CONTROL
PHASE
BAND
TUNE
–
TUNE
+
TUNER EDIT ENTER
PRESET
–
PRESET
+
INPUT
SELECTOR
AUTO SURROUND/
STREAM DIRECT
STEREO/
A.L.C.
ADVANCED
SURROUND
STANDARD
SURROUND
SPEAKERS
CONTROL
CONTROL
MULTI-ZONE
MULTI-ZONE
ON/OFF
ON/OFF
MASTER
VOLUME
PHONES
PORTABLE
SPEAKERS
MULTI-ZONE
CONTROL
ON/OFF
VSX_519V_MY.book 37 ページ 2009年1月16日 金曜日 午後7時32分
Button What it does
ZONE 2
Switches on/off power in the sub zone.
a
ON/OFF
INPUT
Use to select the input source in the
SELECT
sub zone.
MULTI
Use to select the input source directly
b
CONTROL
in the sub zone.
buttons
2 The tuner cannot be tuned to more than one station at a time. Therefore, changing the station in one zone also changes the
station in the other zone. Please be careful not to change stations when recording a radio broadcast.
3 • You won’t be able to switch the main zone off completely unless you’ve switched off the MULTI-ZONE control first.
• If you don’t plan to use the MULTI-ZONE feature for a while, turn off the power in both the sub and main rooms so that this
receiver is in standby.
• Volume level cannot be adjusted with this receiver. Use the separate amplifier connected to the ZONE2 OUT to adjust the
volume.
Using the tuner08
Chapter
8
:
Using the tuner
High sp
eed tuning
Press and hold TUNE / for high speed
Listening to the radio
tuning. Release the button at the frequency
The following steps show you how to tune in to
you want.
FM and AM radio broadcasts using the
automatic (search) and manual (step) tuning
Improving FM stereo sound
functions. Once you are tuned to a station you
If the TUNE or ST indicators don’t light when
can memorize the frequency for recall later—
tuning to an FM station because the signal is
see Saving station presets below for more on
weak, press the BAND button to select FM
how to do this.
MONO and set the receiver to the mono
BD TV DVR
AUDIO
TUNER EDIT
MASTER
reception mode. This should improve the
PARAMETER
TOOLS
VOLUME
TOP
T
T
U
U
N
N
E
E
MENU
MENU
sound quality and allow you to enjoy the
CD CD-R
TUNER
TUNER
CH
T
P
broadcast.
R
E
S
E
E
ENTER
S
P
R
E
T
PORTABLE MULTI IN SIGNAL SEL
HOME
VOL
MENU
T
T
U
U
N
N
E
E
BAND
MIDNIGHT
PHASE
S.RETRIEVER
SETUP
RETURN
Saving station presets
If you often listen to a particular radio station,
1 Press TUNER to select the tuner.
it’s convenient to have the receiver store the
2 Use BAND to change the BAND (FM or
frequency for easy recall whenever you want to
AM), if necessary.
listen to that station. This saves the effort of
Each press switches the band between FM
manually tuning in each time. This unit can
(stereo or mono) and AM.
1
memorize up to 30 stations.
3 Tune to a station.
There are thr ee ways to do this:
Automatic tuning
To search for stations in the currently
selected band, press and hold TUNE /
for about a second. The receiver will start
searching for the next station, stopping
when it has found one. Repeat to search for
other stations.
Manual tuning
To change the frequency one step at a
ti
me, press TUNE /.
38
En
Note
1If the receiver is left disconnected from the AC power outlet for over a month, the station memories will be lost and will have
to be reprogrammed.
RECEIVER
INPUT SELECT
SOURCE
ZONE 2
ON/OFF
TV CONTROL
INPUT
BD TV
DVR
CD CD-R
TUNER
CH
PORTABLE MULTI IN SIGNAL SEL
MIDNIGHT
PHASE
S.RETRIEVER
VOL
BD MENU
AUTO/
STEREO/
DIRECT
ALC
STANDARD
ADV SURR
RECEIVER
AUDIO
TUNER EDIT
MASTER
PARAMETER
TOOLS
VOLUME
TOP
T
U
N
E
MENU
MENU
T
P
E
R
S
E
E
ENTER
S
P
R
T
E
HOME
MENU
T
U
N
E
BAND
SETUP
RETURN
PTY SEARCH
DTV/TV
MUTE
BASS
TRE
HDD
DVD
VCR
DISPLAY
1
2
3
TUNER EDIT
T
P
E
R
S
E
E
E
S
R
P
T
TUNER
DISPLAY
VSX_519V_MY.book 38 ページ 2009年1月16日 金曜日 午後7時32分

VSX_519V_MY.book 39 ページ 2009年1月16日 金曜日 午後7時32分
Using the tuner 08
1 Tune to a station you want to memorize.
Tip
See Listening to the radio on page 38 for more
English
on this.
•To erase a station name, follow steps 1 and
2, and press ENTER while the display is
2 Press TUNER EDIT.
blank. Press TUNER EDIT while the display
The display shows PRESET, then a blinking
is blank, to keep the previous name.
MEM and station preset.
• Once you have named a station preset,
Français
3 Press PRESET / to select the station
Pres
s DISPLAY to show the na
me. When
preset you want.
you want to return to the frequency display,
You can also use the number buttons.
press DISPLAY several times to show the
frequency.
4 Press ENTER.
After pressing ENTER, the preset number stop
blinking and the receiver stores the station.
Listening to station presets
You will need to have some presets stored to do
this. See Saving station presets on page 38 if
Italiano
you haven’t done this already.
1 Press PRESET / to select the station
preset you want.
• You can also use the number buttons on
the remote control to recall the station
Nederlands
preset.
Naming preset stations
For easier identification, you can name all of
your preset stations.
Español
1 Choose the station preset you want to
name.
See Listening to station presets above for how
to do this.
2 Press TUNER EDIT twice.
Deutsch
The cursor at the first character position is
blinking on the display.
3 Input the name you want.
Choose a name up to eight characters long.
•Use the PRESET / buttons to select
character position.
•Use the TUNE / buttones to select
characters.
• The name is stored when ENTER is
pressed.
39
En
Using the tuner08
An introduction to RDS
Radio Data System (RDS) is a system used by
most FM radio stations to provide listeners with
various kinds of information—the name of the
station and the kind of show they’re
broadcasting, for example.
One feature of RDS is that you can search by
type of program. For example, you can search
for a station that’s broadcasting a show with
the program type, JAZZ.
1
You can search the following program types:
NEWS – News
FINANCE – Stock market
Searching for RDS programs
AFFAIRS – Current Affairs
reports, commerce,
INFO – General
trading, etc.
You can search for a program type listed above.
Information
CHILDREN – Programs for
SPORT – Sport
1 Press
TUNER
then press
chil
dren
BAND
to select
2
EDUCATE – Educational
SOCIAL – Soci
al affairs
the FM band.
DRAMA – Radio plays, etc.
RELIGION – Programs
CULTURE – National or
concerning religion
2 Press
PTY SEARCH
.
regional culture, theater,
PHONE IN – Public
SEARCH shows in the display.
etc.
expressing their views by
SCIENCE – Science and
phone
3 Press
PRESET /
to select the program
technology
TRAVEL – Holiday-type
type you want to hear.
VARIED – Usually talk-
travel rather than traffic
based material, such as
announcements
4 Press
ENTER
to search for the program
quiz shows or interviews.
LEISURE – Leisure interests
type.
POP M – Pop music
and hobbies
The system starts searching through the
ROCK M – Rock music
JAZZ – Jazz
station presets for a match. When it finds one,
EASY M – Easy listening
COUNTRY – Country
the search stops and the station plays for five
LIGHT M – ‘Light’ classical
music
music
NATION M – Popular
seconds.
CLASSICS – ‘Serious’
music in a language other
5 If you want to keep listening to the
classical music
than English
OTHER M – Music not
OLDIES – Popular music
station, press ENTER within the five seconds.
fitting above categories
from the ’50s and ’60s
If you don’t press ENTER, searching resumes.
WEATHER – Weather
FOLK M – Folk music
If NO PTY is displayed it means the tuner
reports
DOCUMENT –
Documentary
couldn’t find that program type at the time of
3
the search.
40
En
Note
VSX_519V_MY.book 40 ページ 2009年1月16日 金曜日 午後7時32分
AUDIO
TUNER EDIT
MASTER
RECEIVER
PARAMETER
TOOLS
VOLUME
INPUT SELECT
SOURCE
TOP
T
U
N
E
MENU
MENU
ZONE 2
RECEIVER
ON/OFF
TV CONTROL
P
P
INPUT
S
E
T
S
E
T
R
R
E
E
E
ENTER
S
E
R
R
E
S
P
P
T
E
T
BD TV
DVR
HOME
MENU
CH
T
U
N
E
BAND
CD CD-R
TUNER
TUNER
SETUP
RETURN
PTY SEARCH
PTY SEARCH
DTV/TV
PORTABLE MULTI IN SIGNAL SEL
MUTE
BASS
TRE
MIDNIGHT
PHASE
S.RETRIEVER
VOL
BD MENU
HDD
DVD
VCR
DISPLAY
DISPLAY
AUTO/
STEREO/
1
2
3
DIRECT
A.L.C.
STANDARD
ADV SURR
TEST TONE
CH SELECT
SLEEP
4
5
6
CH
1 In addition, there are three other program types, ALARMTST, ALARM, and NO TYPE. ALARM and ALARMTST are used for
emergency announcements. NO TYPE appears when a program type cannot be found.
2 RDS is only possible in the FM band.
3RDS searches station presets only. If no stations have been preset, or if the program type could not be found among the station
presets NO PTY is displayed. FINISH means the search is complete.
