Asus CP1420: Contents
Contents: Asus CP1420
Table of contents
- Contents

Contents
Notices ....................................................................................................4
Safety information ..............................................................................6
English
Notes for this manual ........................................................................7
Welcome ................................................................. 8
Package contents ................................................................................8
Knowing your Desktop PC .................................... 9
Front / Rear panel features ..............................................................9
Setting up your Desktop PC ................................ 12
Connecting devices .........................................................................12
Connecting the power ...................................................................13
Pressing the power button to turn on the system ...............13
Using the Media Center remote (optional) .............................14
Recovering your system ...................................... 16
Using the recovery DVD ................................................................16
Troubleshooting .................................................. 18
ASUS CP Series Desktop PC 3

Notices
English
Federal Communications Commission Statement
This device complies with Part 15 of the FCC Rules. Operation is
subject to the following two conditions:
• This device may not cause harmful interference, and
• This device must accept any interference received including
interference that may cause undesired operation.
This equipment has been tested and found to comply with the
limits for a Class B digital device, pursuant to Part 15 of the FCC
Rules. These limits are designed to provide reasonable
protection against harmful interference in a residential
installation. This equipment generates, uses and can radiate radio
frequency energy and, if not installed and used in accordance
with manufacturer’s instructions, may cause harmful
interference to radio communications. However, there is no
guarantee that interference will not occur in a particular
installation. If this equipment does cause harmful interference to
radio or television reception, which can be determined by
turning the equipment off and on, the user is encouraged to
try to correct the interference by one or more of the following
measures:
• Reorient or relocate the receiving antenna.
• Increase the separation between the equipment and receiver.
• Connect the equipment to an outlet on a circuit different from
that to which the receiver is connected.
• Consult the dealer or an experienced radio/TV technician for
help.
The use of shielded cables for connection of the monitor to
the graphics card is required to assure compliance with FCC
regulations. Changes or modifications to this unit not expressly
approved by the party responsible for compliance could void
the user’s authority to operate this equipment.
4 ASUS CP Series Desktop PC

Canadian Department of Communications
Statement
This digital apparatus does not exceed the Class B limits for radio
English
noise emissions from digital apparatus set out in the Radio
Interference Regulations of the Canadian Department of
Communications.
This class B digital apparatus complies with Canadian ICES-003.
Macrovision Corporation Product Notice
This product incorporates copyright protection technology that
is protected by method claims of certain U.S. patents and other
intellectual property rights owned by Macrovision Corporation
and other rights owners. Use of this copyright protection
technology must be authorized by Macrovision Corporation, and
is intended for home and other limited viewing uses only unless
otherwise authorized by Macrovision Corporation. Reverse
engineering or disassembly is prohibited.
ASUS CP Series Desktop PC 5

Safety information
English
Your ASUS Desktop PC is designed and tested to meet the latest
standards of safety for information technology equipment.
However, to ensure your safety, it is important that you read the
following safety instructions.
Setting up your system
• Read and follow all instructions in the documentation before
you operate your system.
• Do not use this product near water or a heated source such as
a radiator.
• Set up the system on a stable surface.
• Openings on the chassis are for ventilation. Do not block or
cover these openings. Make sure you leave plenty of space
around the system for ventilation. Never insert objects of any
kind into the ventilation openings.
• Use this product in environments with ambient temperatures
between 0˚C and 35˚C.
• If you use an extension cord, make sure that the total ampere
rating of the devices plugged into the extension cord does
not exceed its ampere rating.
Care during use
• Do not walk on the power cord or allow anything to rest on it.
• Do not spill water or any other liquids on your system.
• When the system is turned off, a small amount of
electrical current still flows. Always unplug all power, modem,
and network cables from the power outlets before cleaning
the system.
• If you encounter the following technical problems with the
product, unplug the power cord and contact a qualified
service technician or your retailer.
• The power cord or plug is damaged.
• Liquid has been spilled into the system.
6 ASUS CP Series Desktop PC
• The system does not function properly even if you follow
the operating instructions.
• The system was dropped or the cabinet is damaged.
English
• The system performance changes.
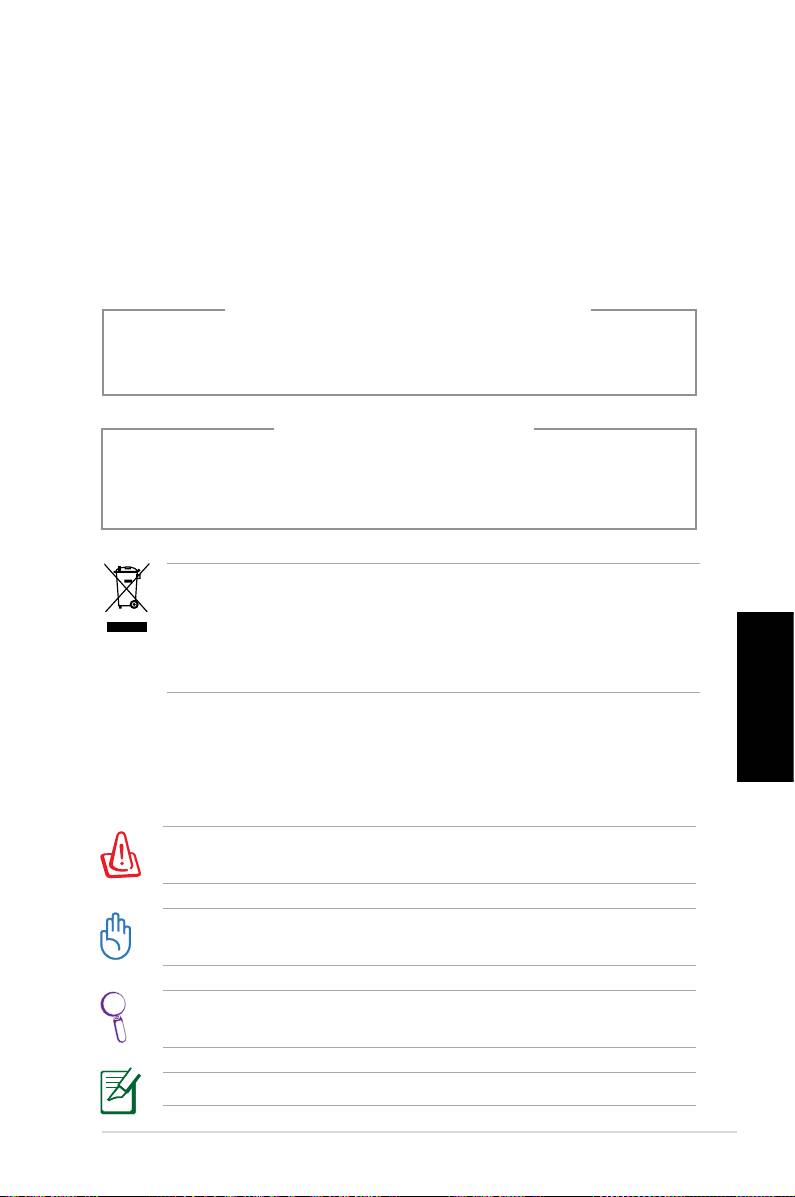
LASER PRODUCT WARNING
CLASS 1 LASER PRODUCT
NO DISASSEMBLY
The warranty does not apply to the products that
have been disassembled by users
This symbol of the crossed out wheeled bin indicates that
the product (electrical, electronic equipment, and mercury-
containing button cell battery) should not be placed in
municipal waste. Check local regulations for disposal of
electronic products.
Notes for this manual
To make sure that you perform certain tasks properly, take note
of the following symbols used throughout this manual.
WARNING: Vital information that you MUST follow to prevent
injury to yourself.
IMPORTANT: Instructions that you MUST follow to complete a
task.
TIP: Tips and useful information that help you complete a task.
NOTE: Additional information for special situations.
ASUS CP Series Desktop PC 7

Welcome
Congratulations on your purchase of the ASUS Desktop PC. The
English
package contents of your new Desktop PC are listed below but
may vary with models. ASUS reserves the right to replace
components or accessories to provide optimum serviceability.
Contact your retailer if any item is damaged or missing.
Package contents
• ASUS Desktop PC x1
• Keyboard x1
• Mouse x1
• Power cord x1
• Support DVD x1
• Recovery DVD x1
• Installation Guide x1
• Warranty card x1
• Remote control (optional) x1
Visit the ASUS website at http://support.asus.com for any
updates.
8 ASUS CP Series Desktop PC
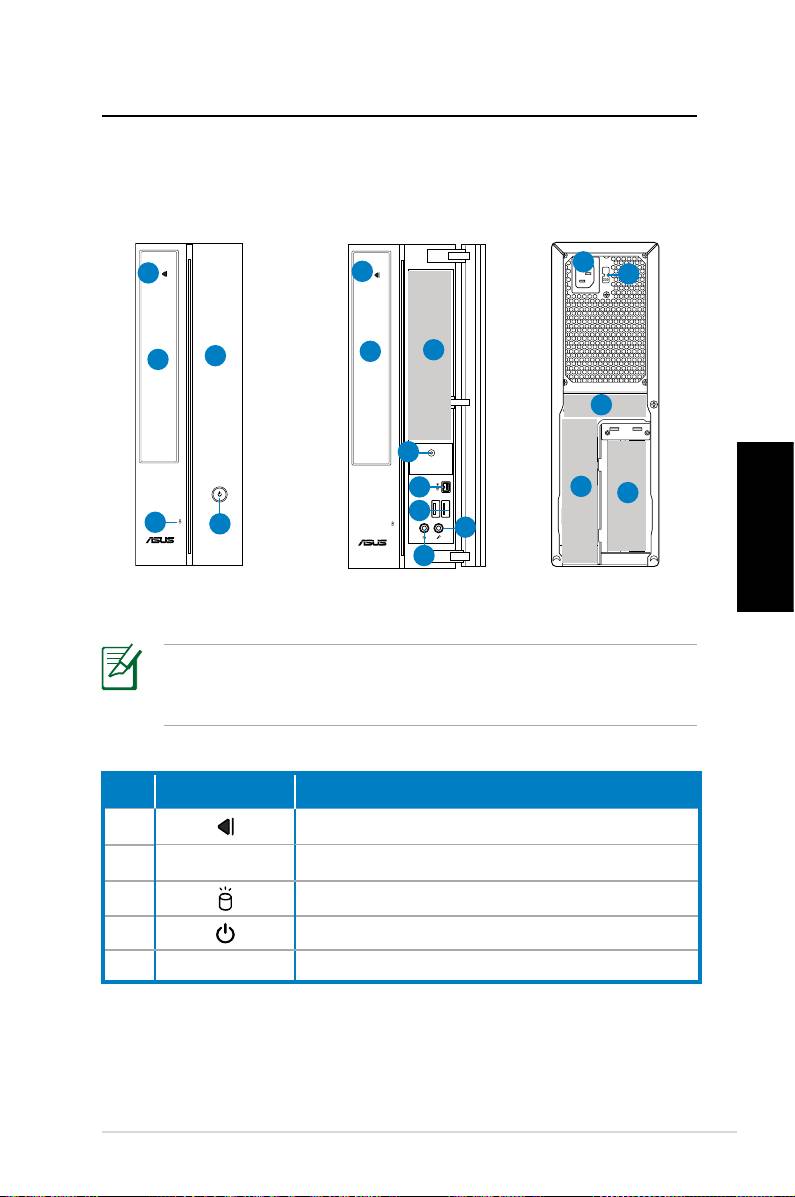
Knowing your Desktop PC
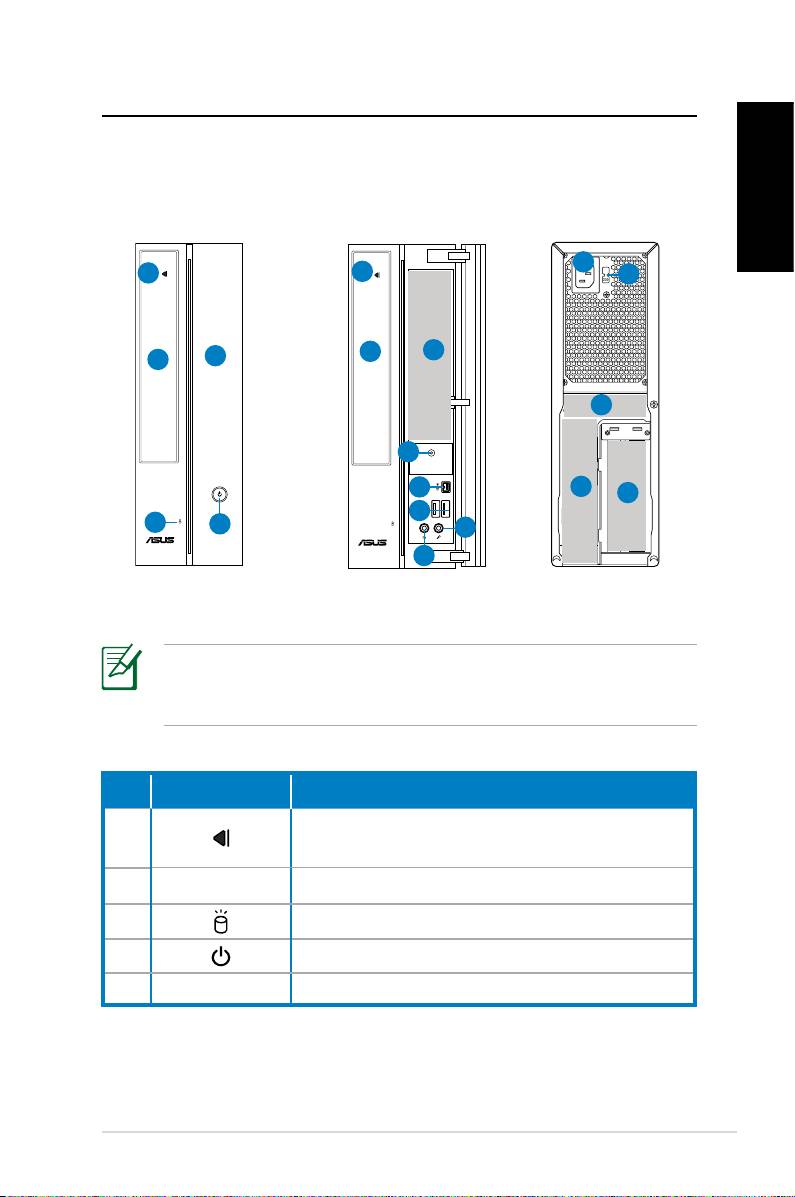
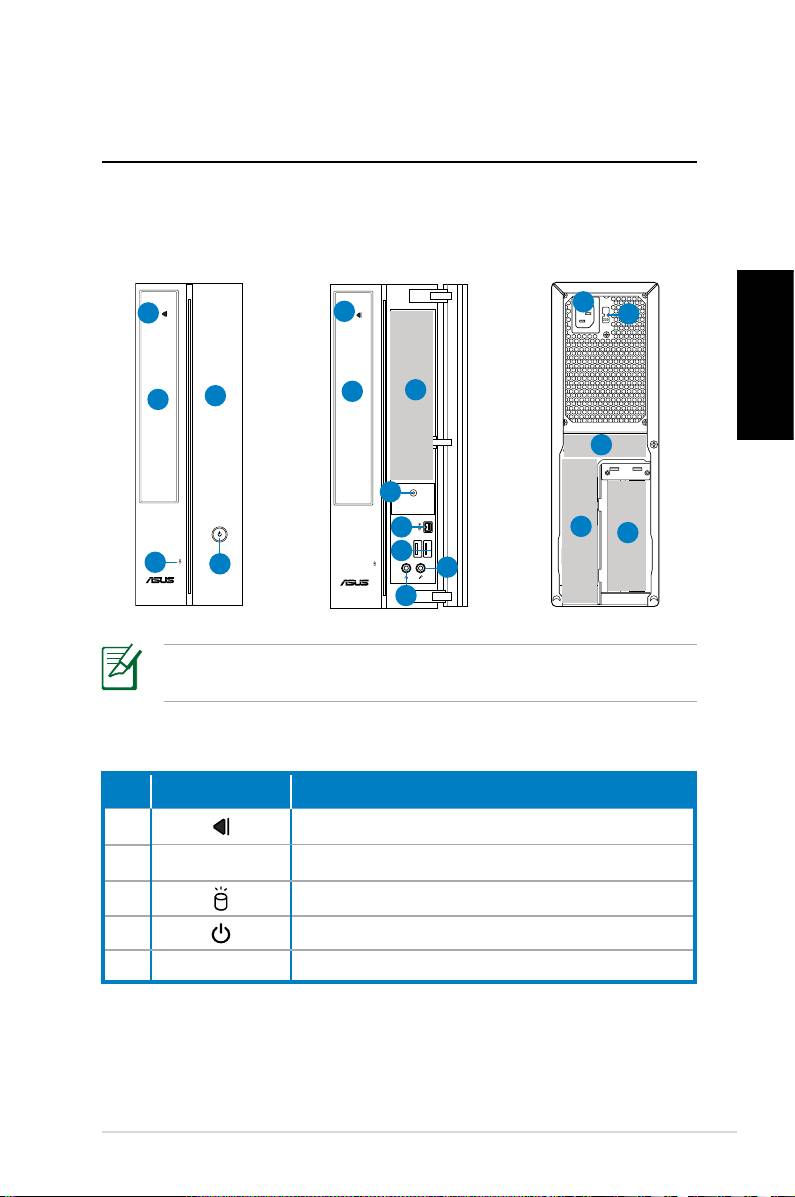
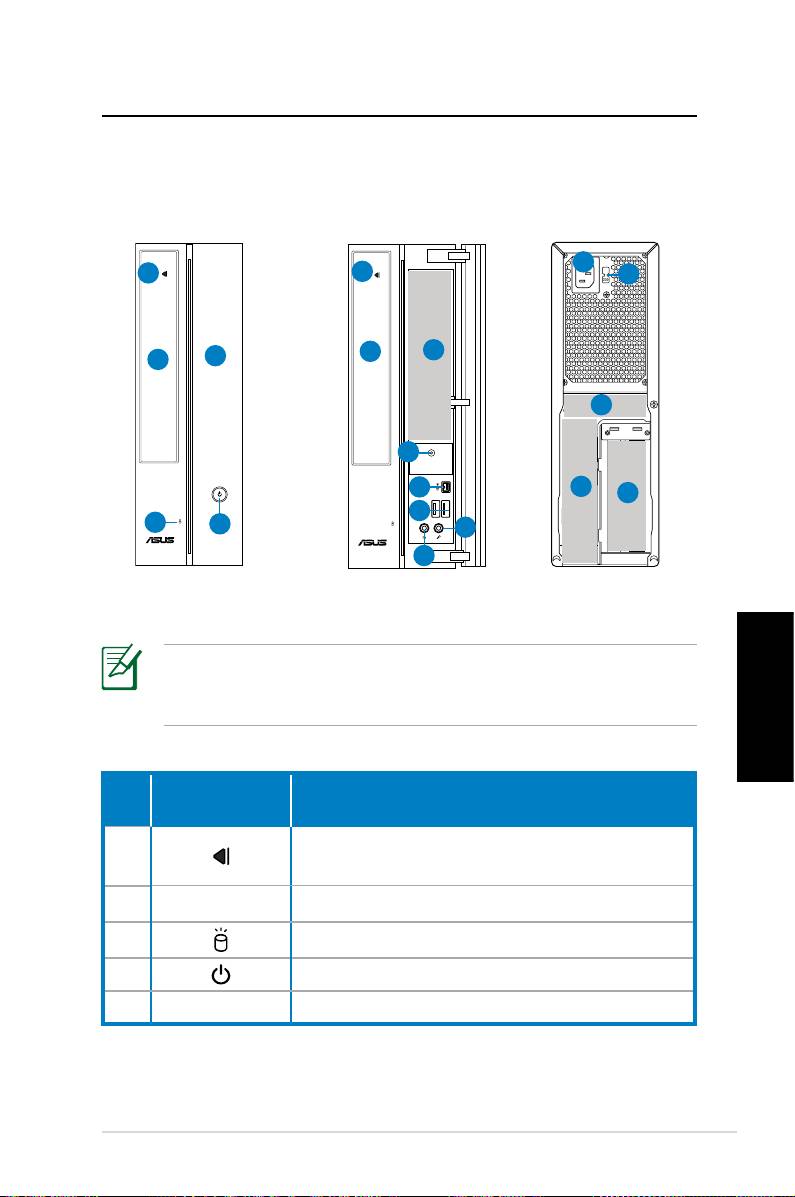
Front / Rear panel features
Front (close)
Front (open)
Rear
English
11
1
1
12
2
6
5
2
13
4
7
14
15
8
3
4
10
9
*The gray areas contain front/rear panel ports. These ports
and their locations may vary, depending on the model of your
system.
No. Button/LED Description
Press to eject a disk from the optical drive
1.
bay.
2. Optical drive bay cover.
3. Hard disk drive LED.
4. Power button.
5. Front panel cover.
continued on the next page
ASUS CP Series Desktop PC 9
English
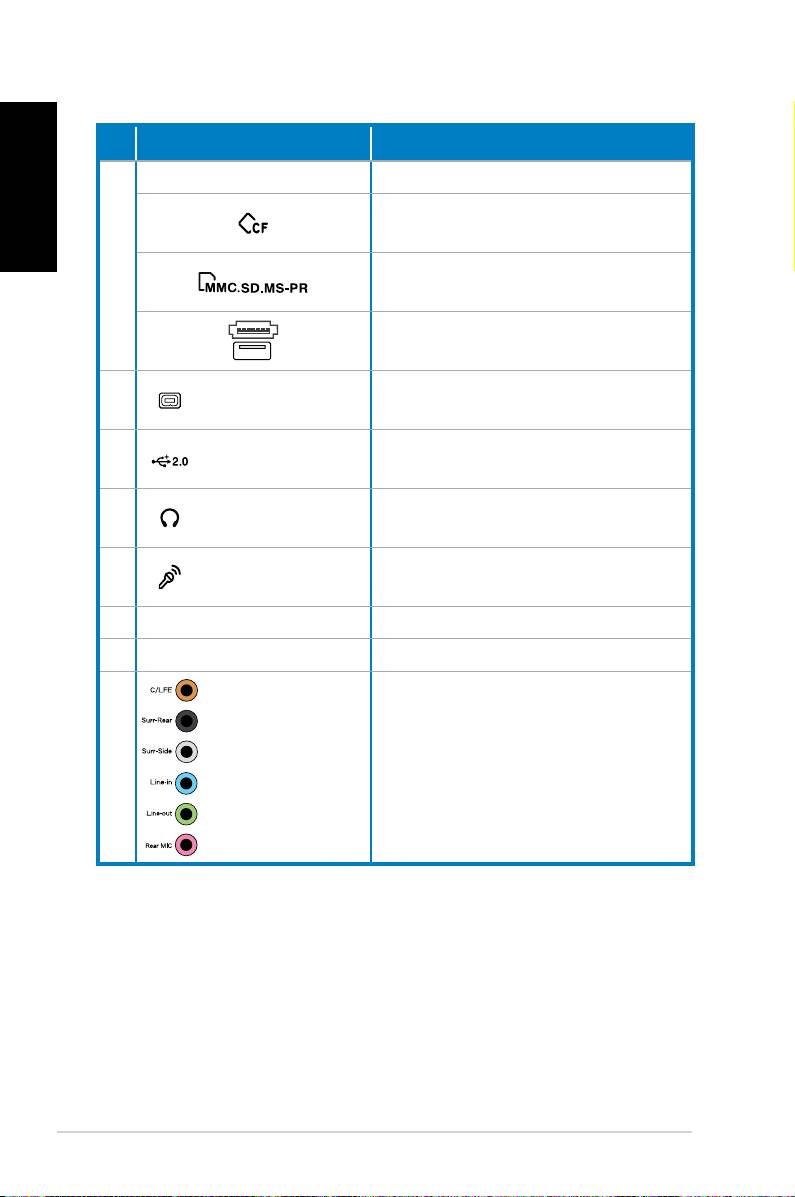
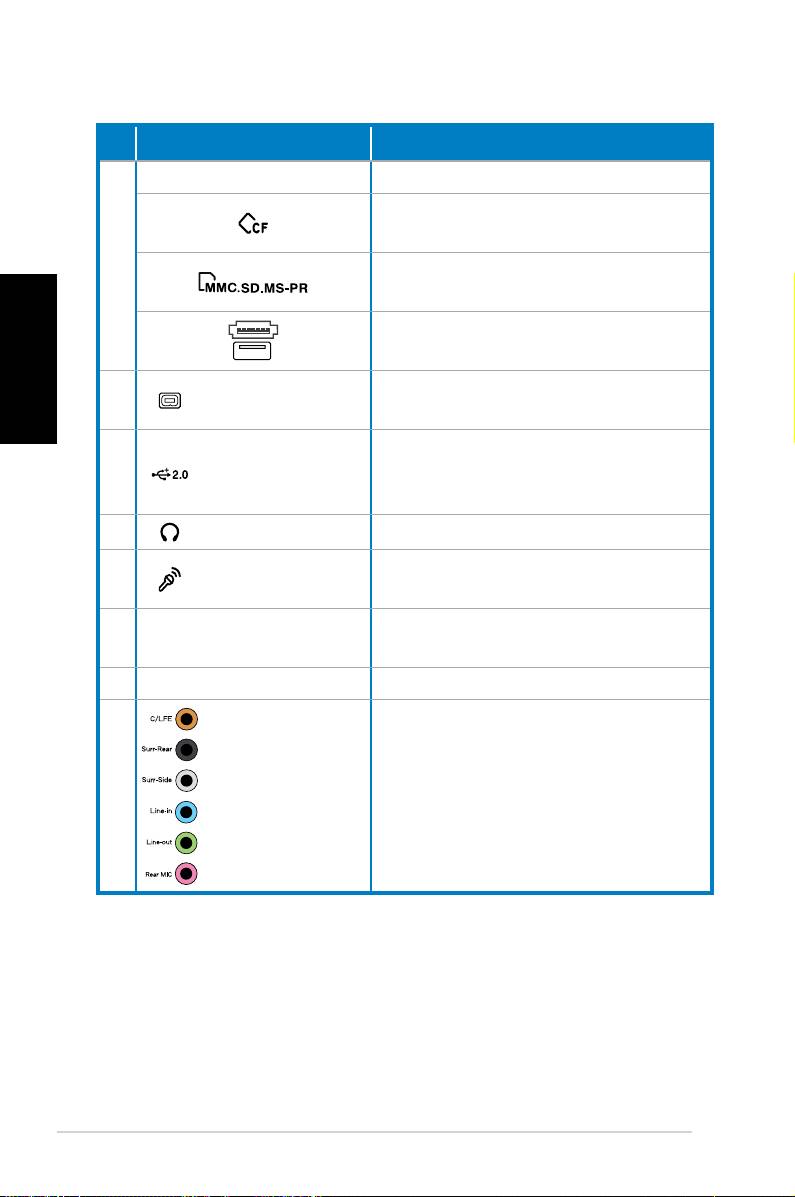
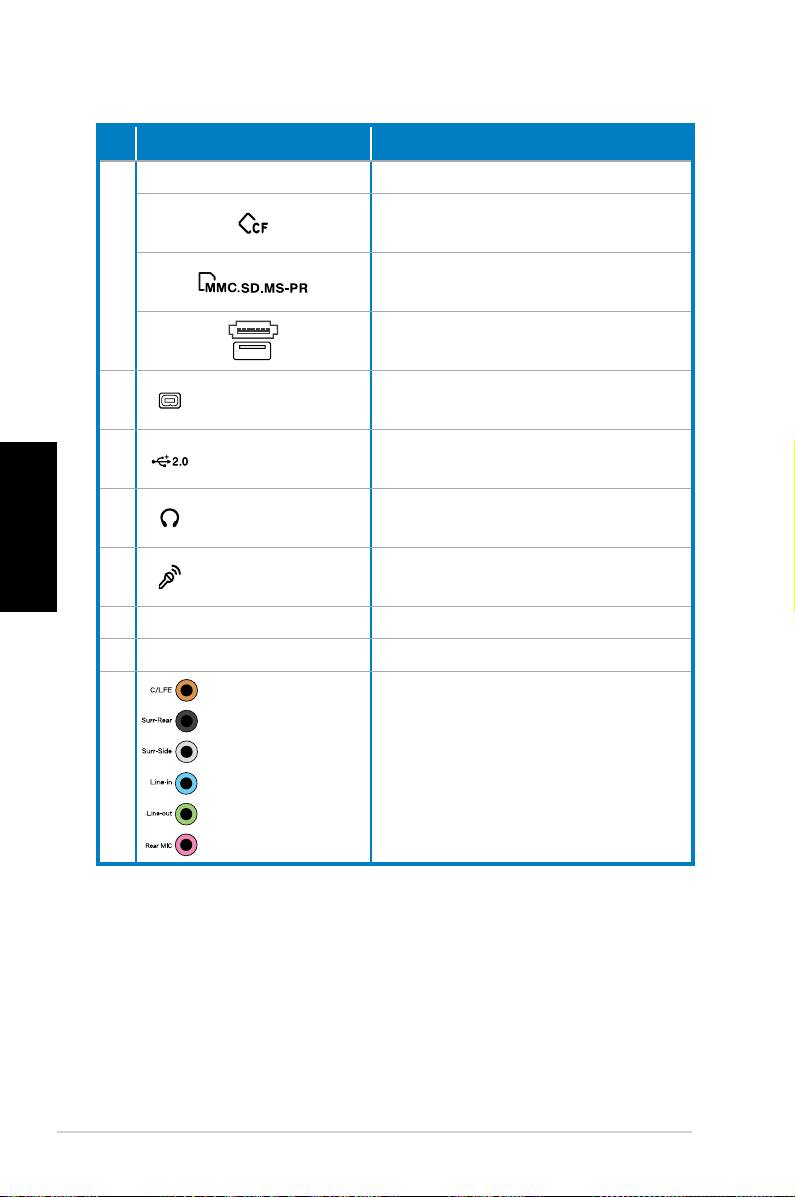
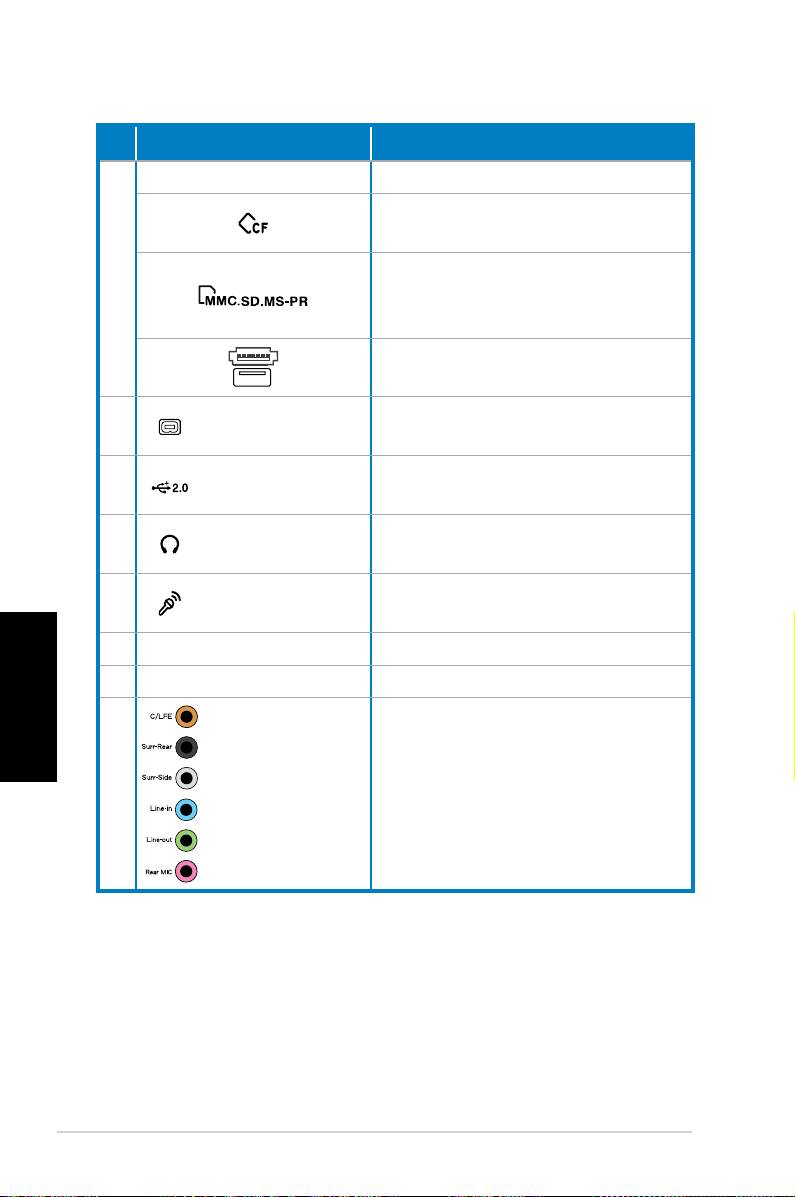
No.
Slot/Port Description
Infrared (optional).
CompactFlash®/Microdrive™
card slot.
6
MultiMediaCard/Secure Digital™/
Memory Stick Pro™ card slot.
USB+E-SATA port.
4-pin IEEE 1394a
Connects to an IEEE 1394 device
7.
port
such as a digital camrecorder.
Connect to USB devices such as a
8. USB 2.0 ports
mouse, keyboard, or camera.
Plug a stereo or headphones into
9.
Headphone jack
this jack.
Microphone
10.
Plug a microphone into this jack.
jack
11. Power connector Connects power cable.
12.
Voltage selector Selects input voltage.
7.1(8)-channel
Connect to a 7.1(8)-channel
13.
audio ports
speaker system.
continued on the next page
10 ASUS CP Series Desktop PC
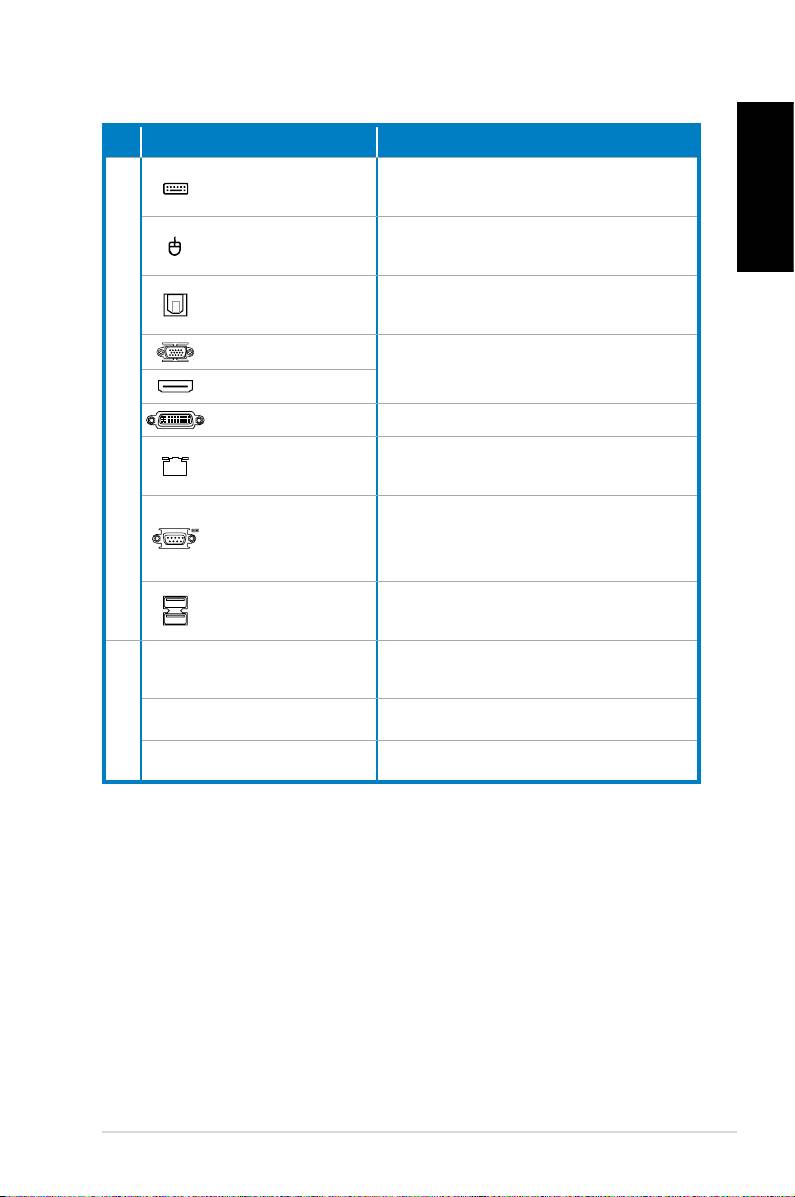
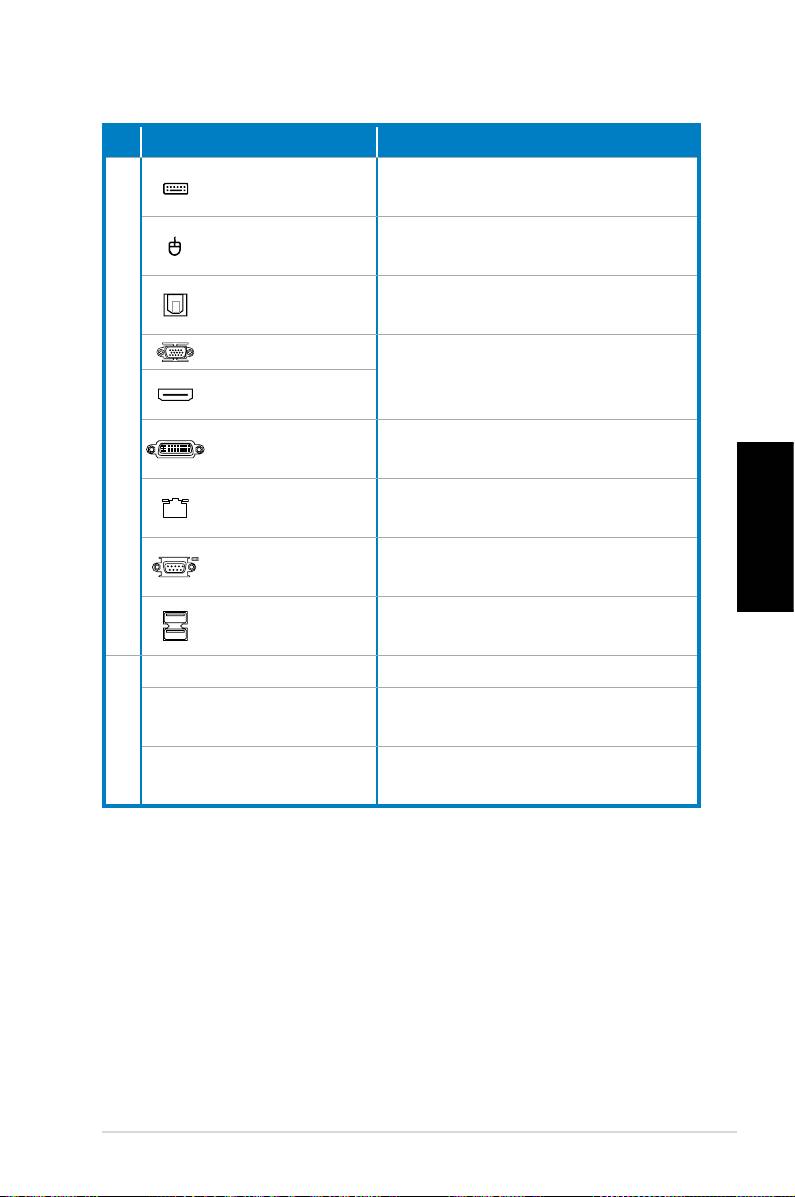
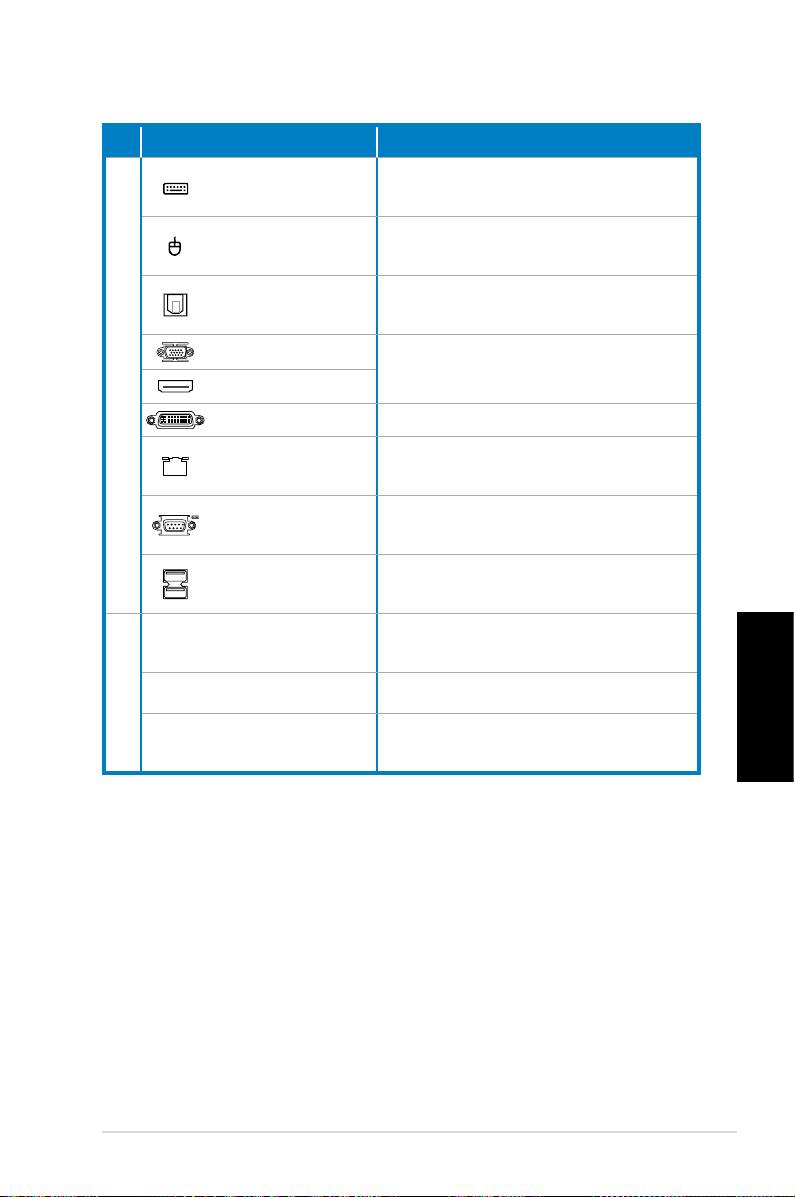
No. Slot/Port Description
PS/2 Keyboard
Connects to a PS/2 keyboard.
port
English
PS/2 mouse
Connects to a PS/2 mouse.
port
Optical S/PDIF
Connects to an amplifier for
Out port
digital audio output.
VGA port
Connects to a TV or monitor with
different video output.
HDMI port
14.
DVI port Connects to a TV or monitor.
Plug a network cable into this
LAN (RJ-45) port
port.
Connects to devices that
COM port
conforms with serial specifica-
tion.
Connect to USB devices such as a
USB 2.0 ports
mouse, keyboard, or camera.
Use the slots when installing
Expansion slots
expansion cards.
15.
DVI/S-Video/VGA port VGA card (optional)
FM/RF/IR/S-Video port TV Tuner card (optional)
ASUS CP Series Desktop PC 11
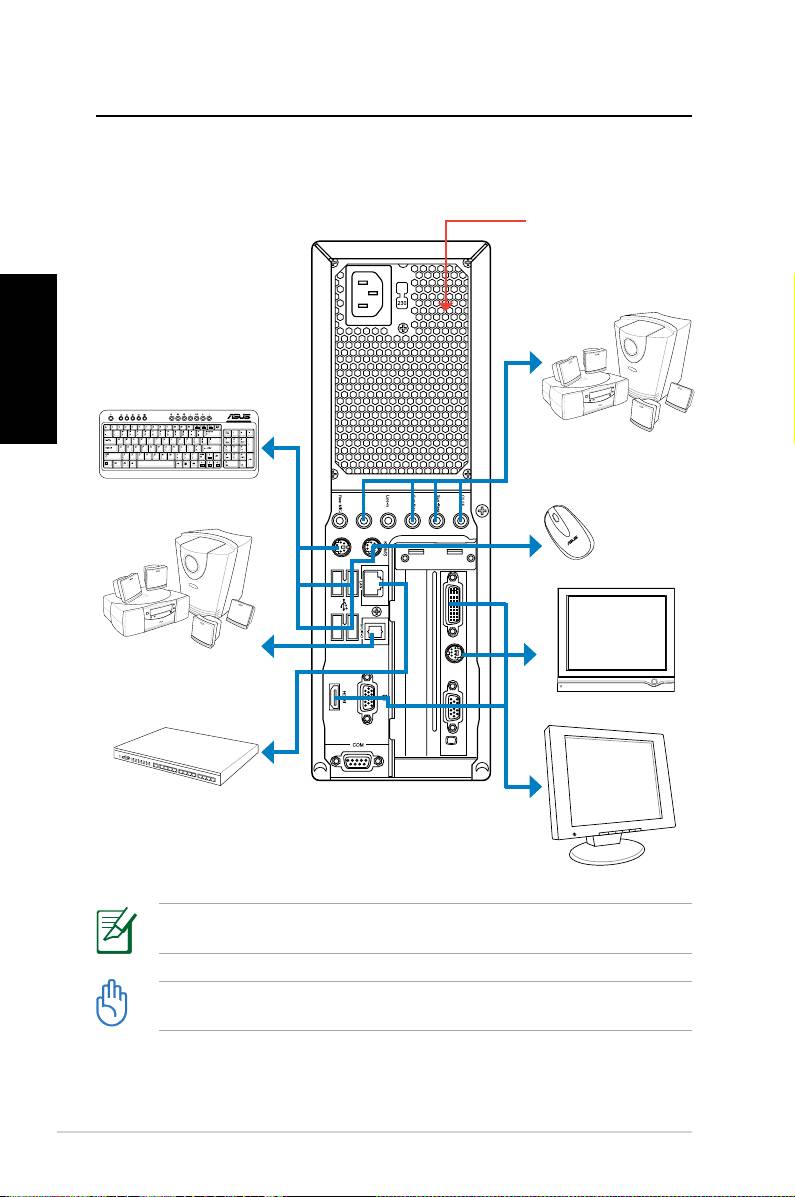
Setting up your Desktop PC
English
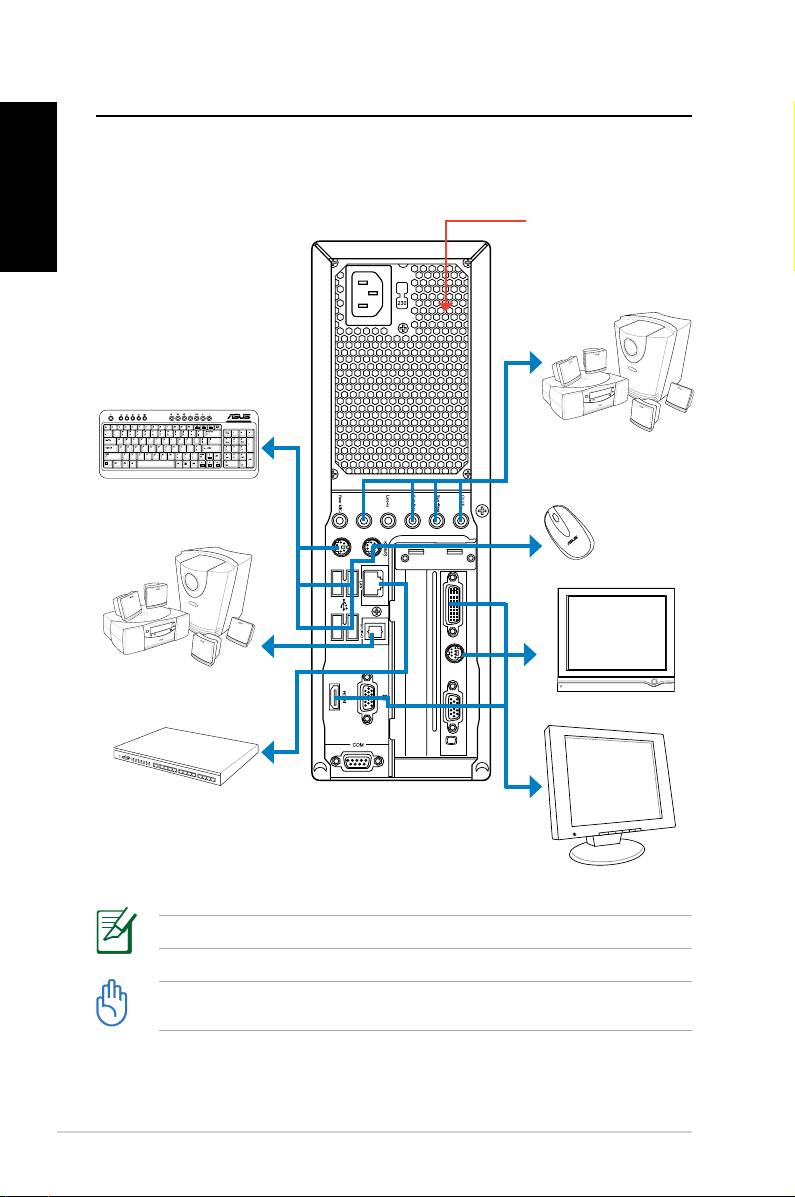
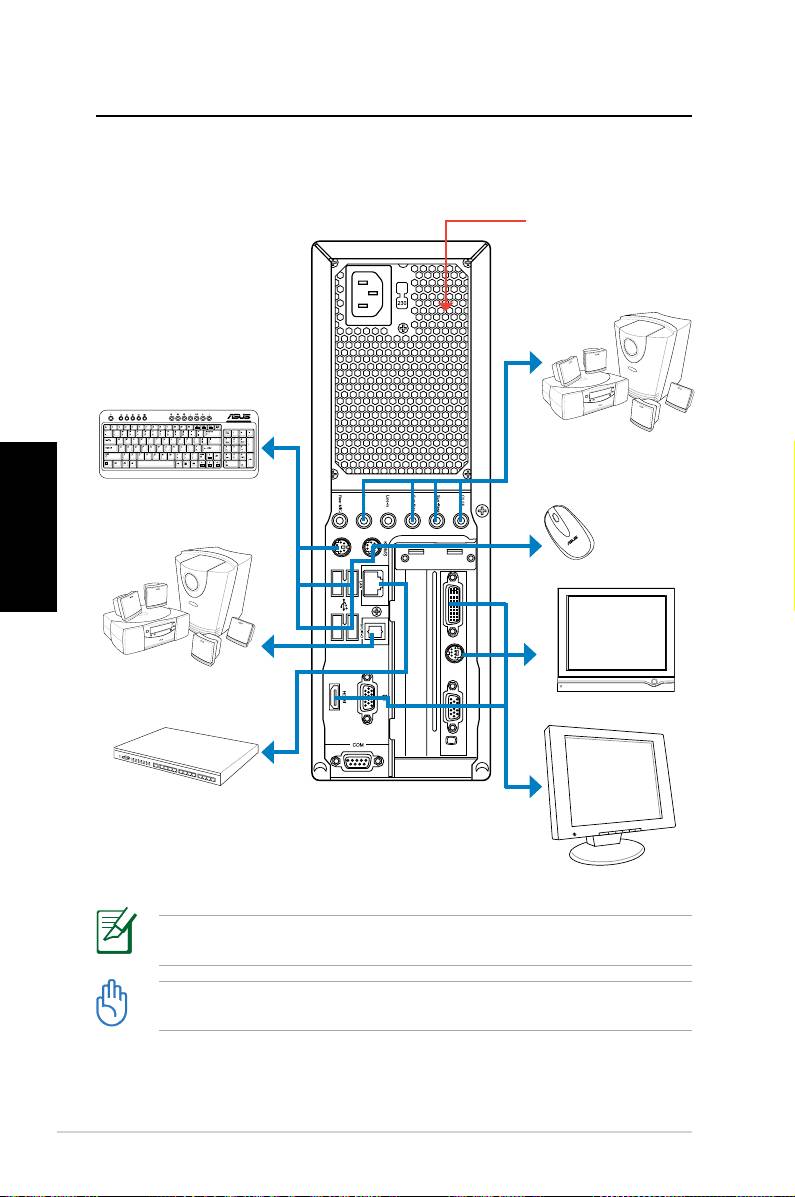
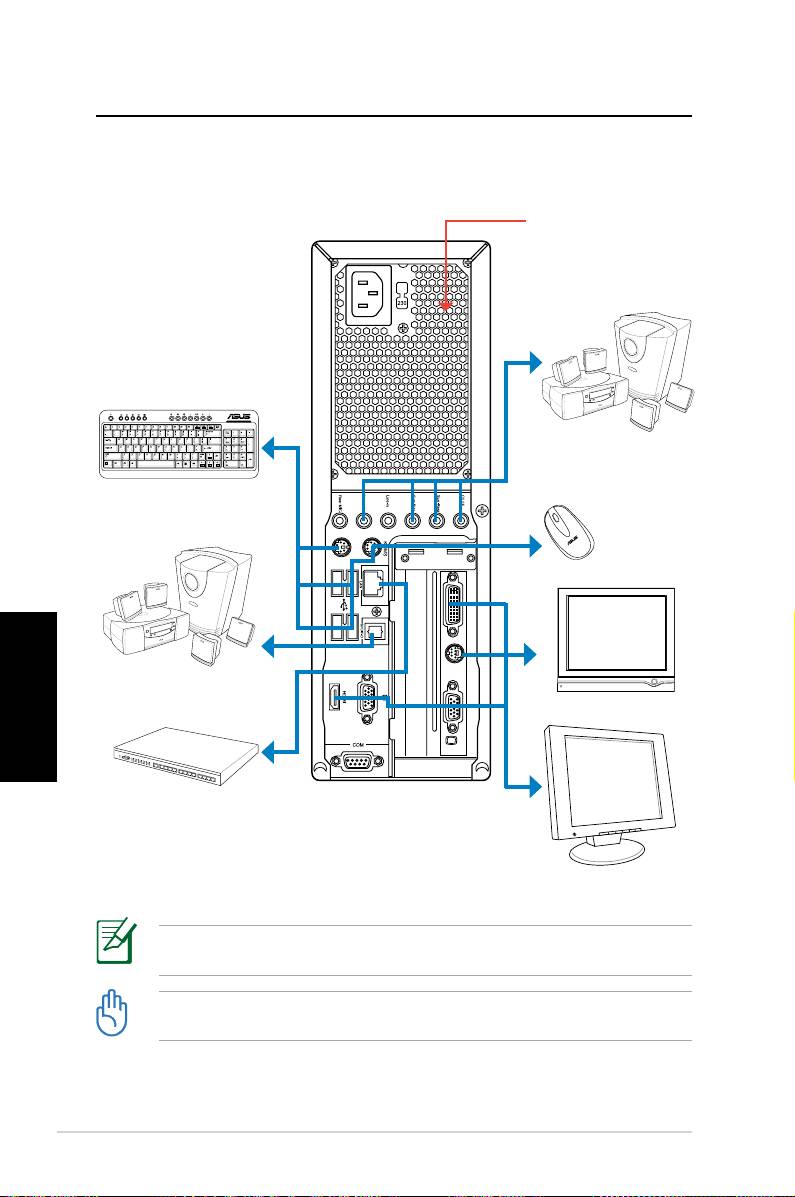
Connecting devices
Do not block or cover
these openings.
7.1(8)-channel
speaker system
Keyboard
Mouse
7.1(8)-channel
speaker system
TV
Network hub/
switch
Display
Illustrations are for reference only. Actual product specifications may vary.
• Use this product in ambient temperature below 35˚C.
• Do not block or cover these vents.
12 ASUS CP Series Desktop PC

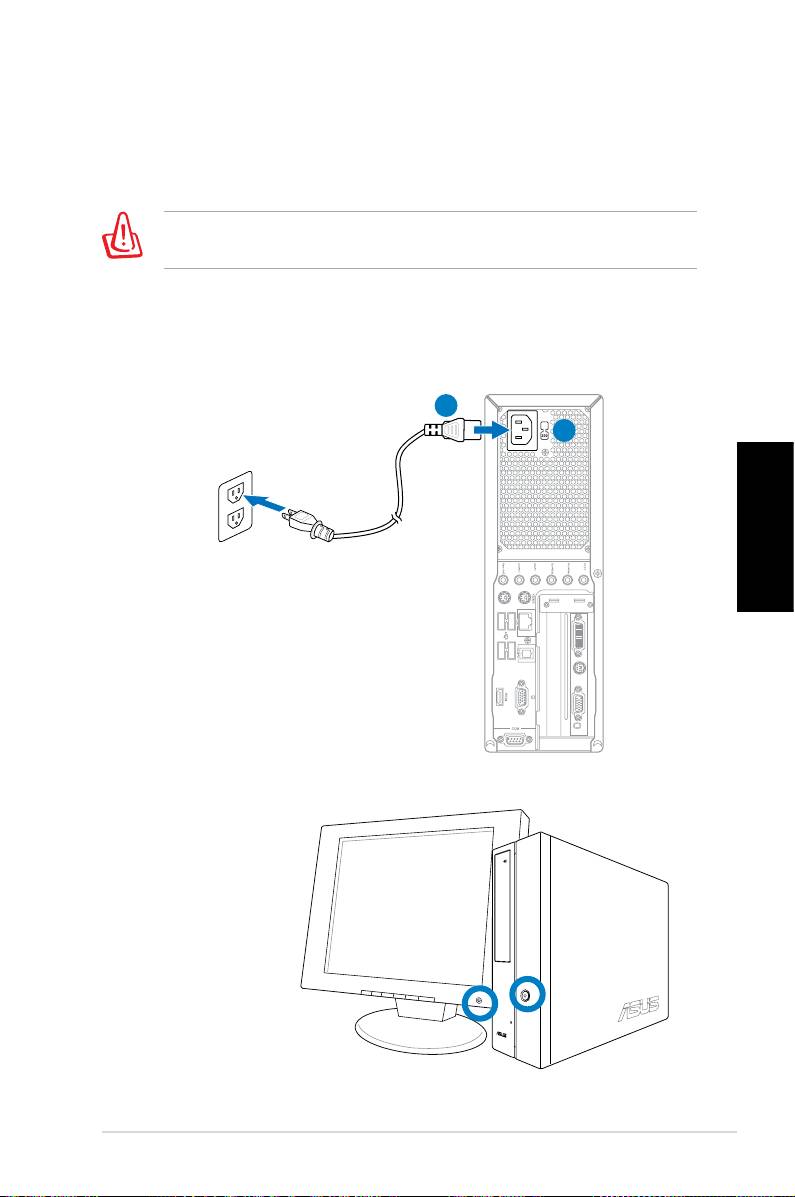
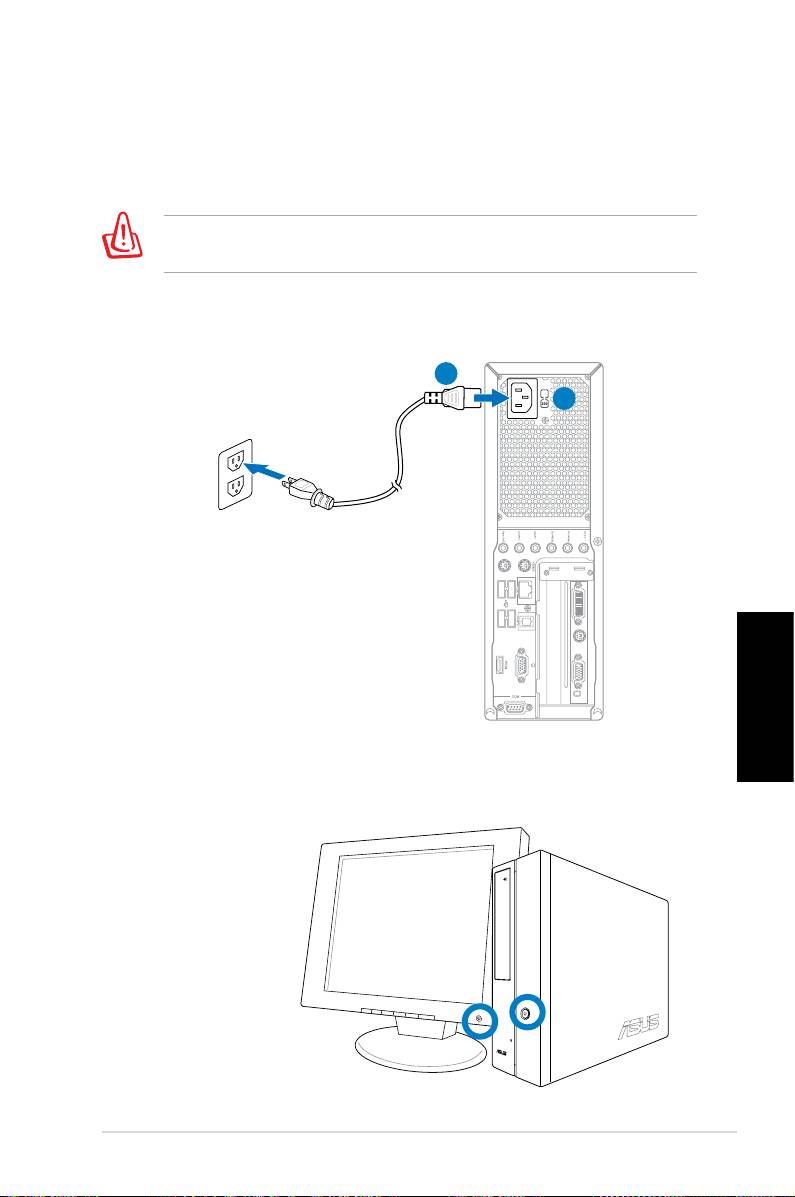
Connecting the power
1. Switch the Voltage selector to select the appropriate input
voltage according to the voltage supply in your area.
English
Setting the voltage selector to 115V in a 230V area will damage
your system!
2. Connect the power cord to the power connector and plug it
into the wall socket.
2
1
Pressing the power button to turn
on the system
ASUS CP Series Desktop PC 13
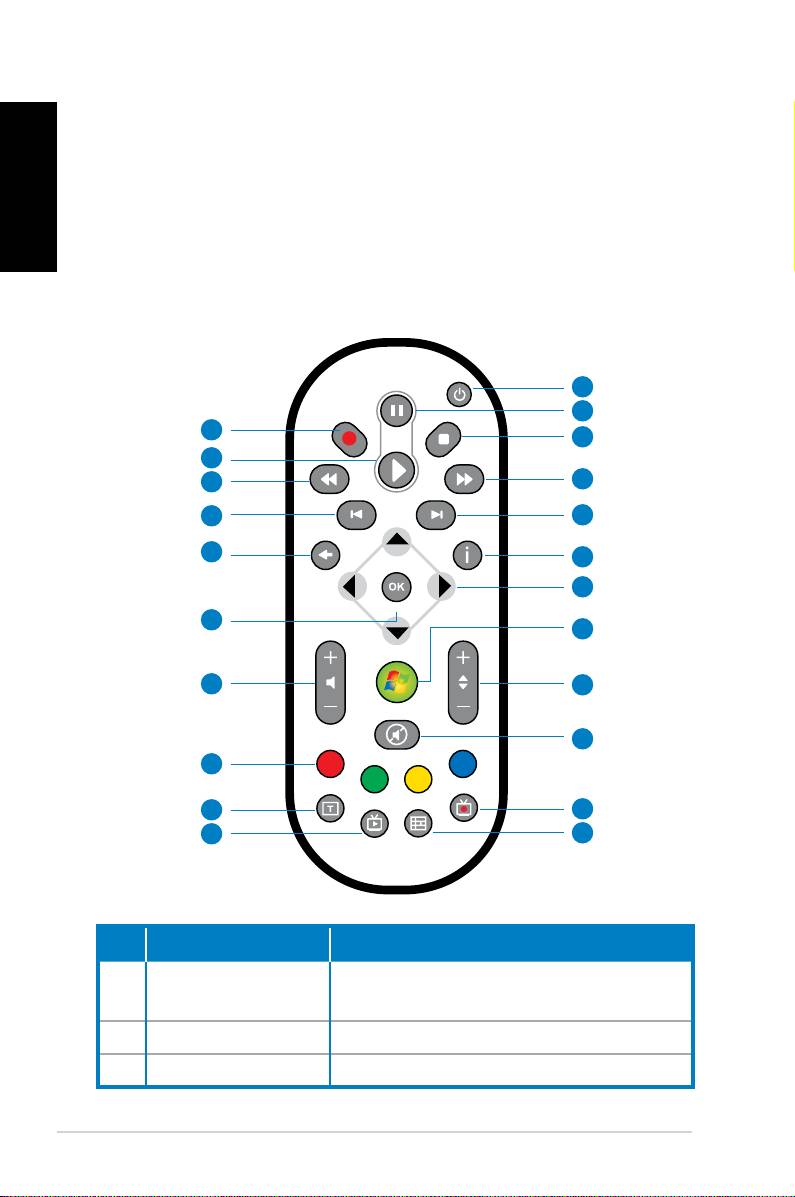
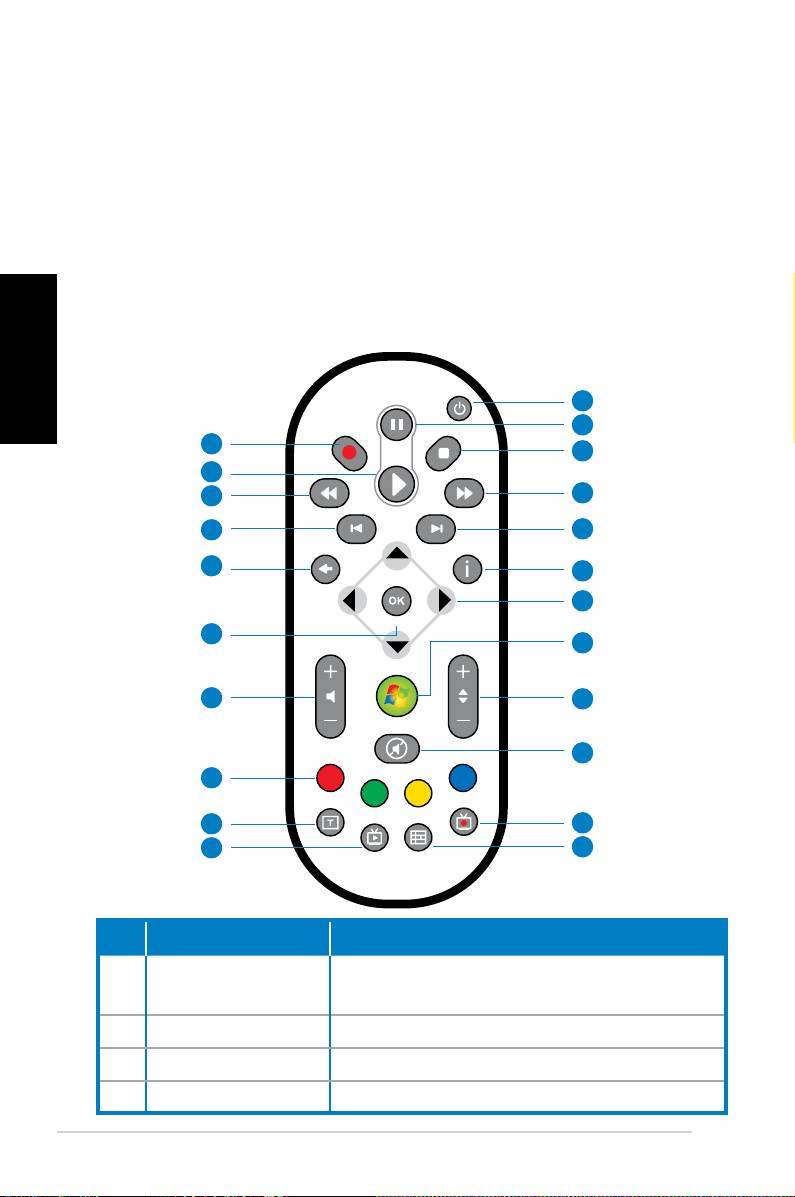
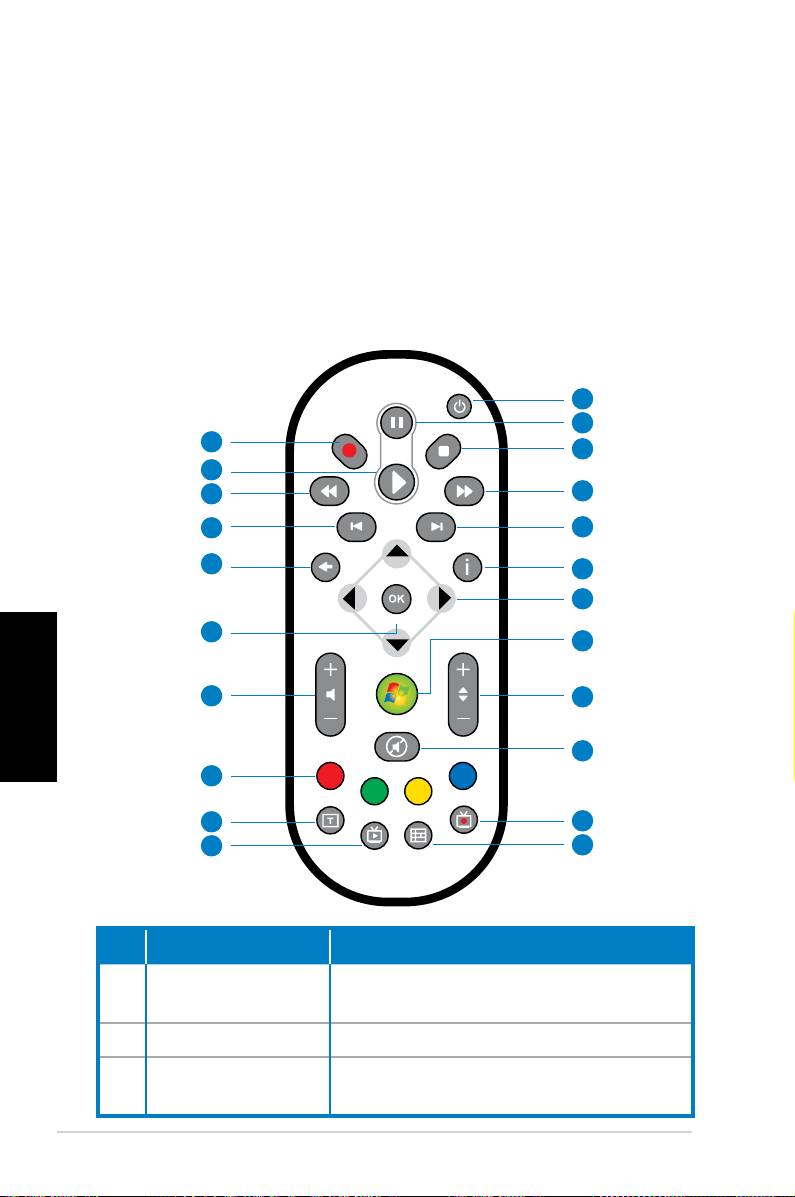
Using the Media Center remote
English
(optional)
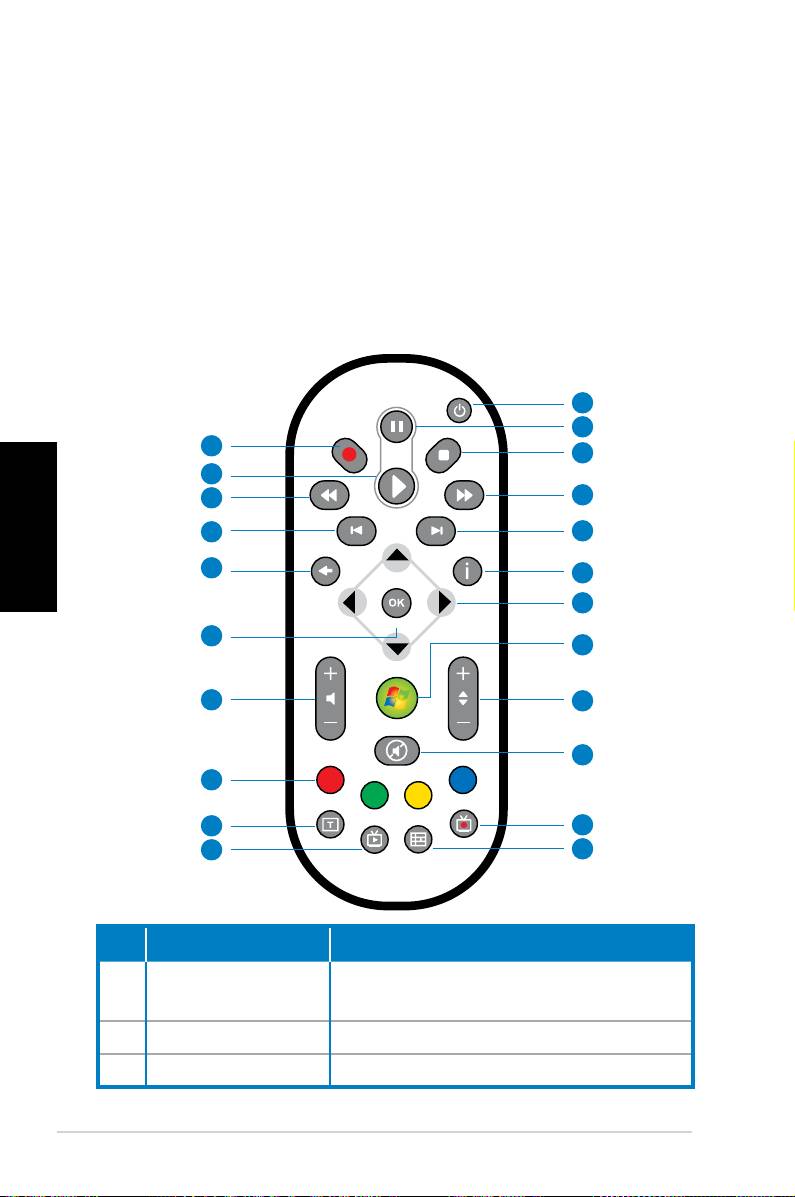
Use the remote to launch the Media Center program to play
media files such as music and movies. You can also install an
external TV box to watch TV and record TV programs.
Refer to the table below to familiarize yourself with the functions
of the remote control buttons.
1
2
22
3
21
20
4
19
5
18
6
7
17
8
16
9
10
15
14
11
13
12
No. Button Description
Press to turn on/off the power of the
1. Power
screen and the speakers.
2. Pause Press to pause a playback.
3. Stop Press to stop playing a media file.
14 ASUS CP Series Desktop PC
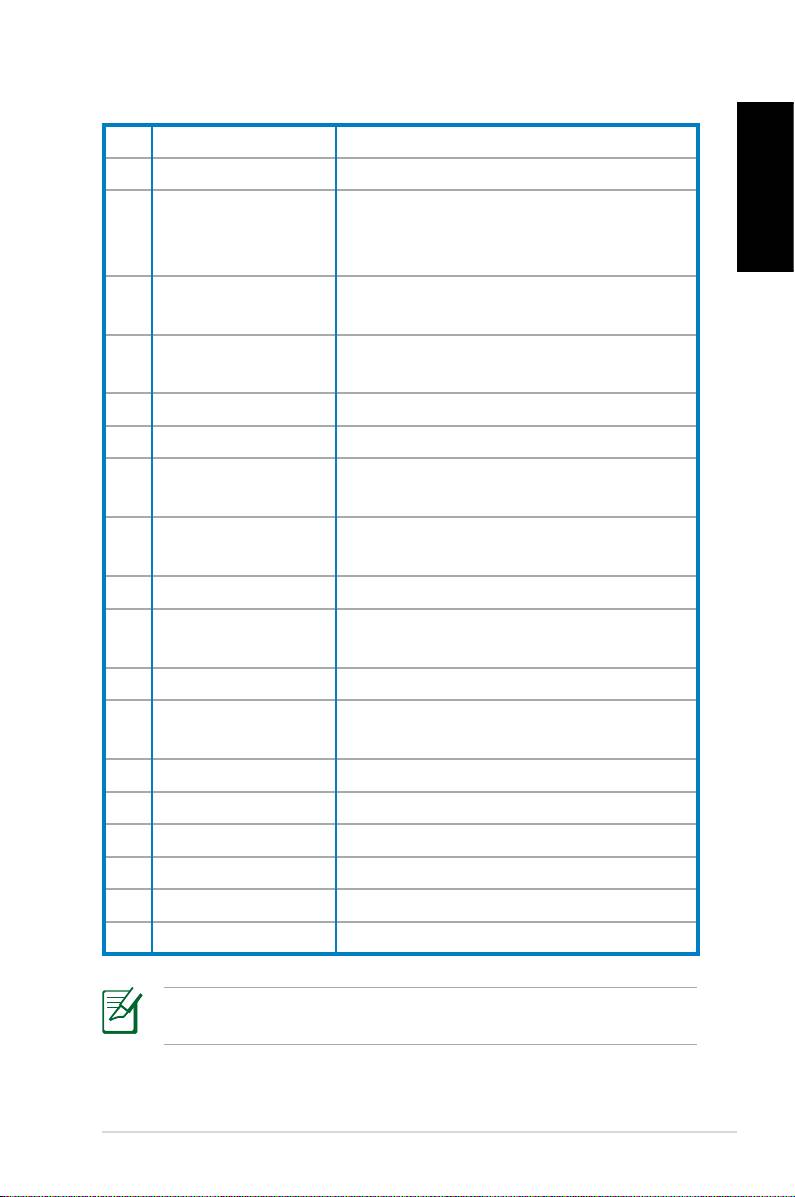
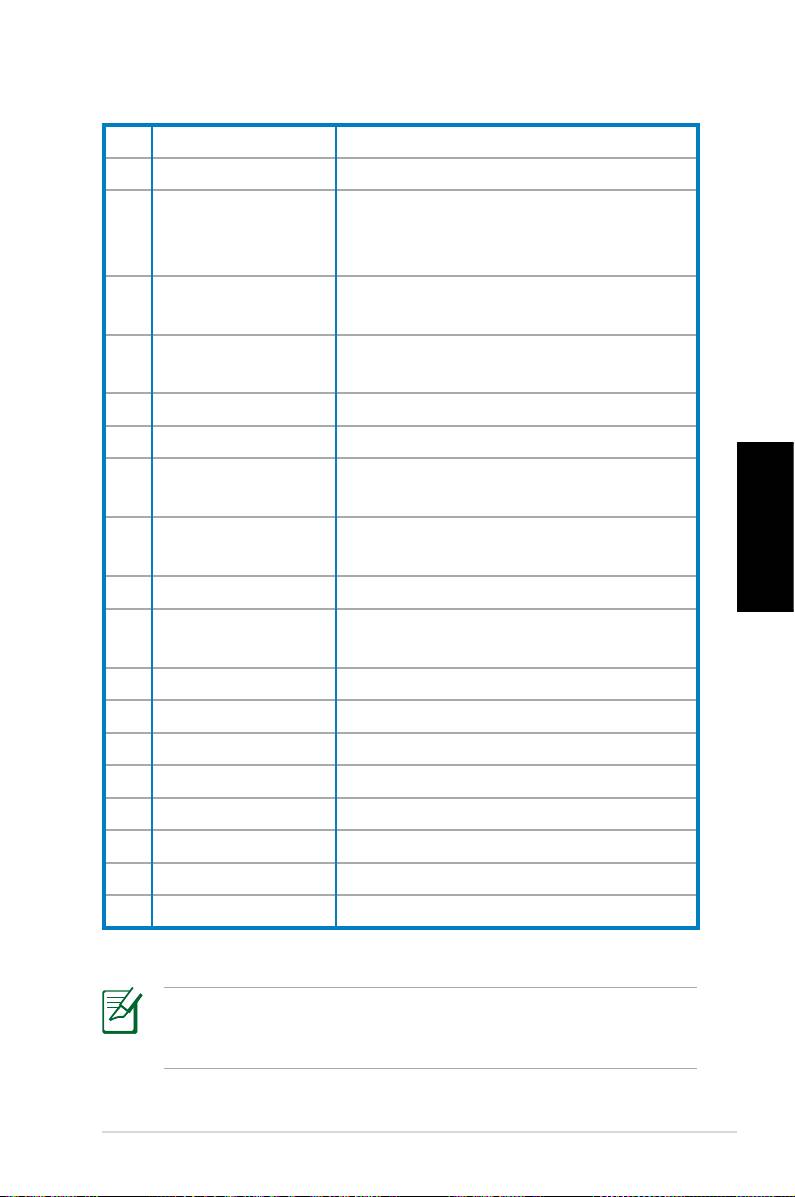
4. Fast-foward Press to fast-forward a media file.
5. Next track Press to go to the next track.
Press to display program information
English
6. Information
under Media Center or other menu
options.
Four-way
Press to scroll through on-screen
7.
navigation keys
display menus.
Windows® Media
Press to launch the Media Center
8.
Center
program.
9. Channel up/down Press to change TV channels.*
10. Mute Press to disable audio output.
Press to display a list of your recorded
11. Recorded TV
TV programs.*
EPG (Electronic
Press to display the electronic
12.
Program Guide)
program guide screen.*
13. Live TV button Press to watch live TV programs. *
Toggles between numerical and
14. Shift
alphabetical input.
15. Teletext buttons Available on European models only.
Press to increase/decrease the
16 Volume up/down
volume.
17. OK Press to confirm an action.
18. Return Press to return to the previous page.
19. Previous track Press to go back to the previous track.
20. Rewind Press to rewind a media file.
21. Play Press to play a media file
22 Record Press to start recording TV.
*The system does not come with built-in TV tuner. To use the TV
function, purchase an external TV box first.
ASUS CP Series Desktop PC 15

Recovering your system
English
Using the recovery DVD
The recovery DVD includes an image of the operating system
installed on your system at the factory. The recovery DVD,
working with the support DVD, provides a comprehensive
recovery solution that quickly restores your system to its original
working state, provided that your hard disk drive is in good
working order. Before using the recovery DVD, copy your data
files (such as Outlook PST files) to a USB device or to a network
drive and make note of any customized configuration settings
(such as network settings).
1. Turn on your ASUS Desktop PC and the ASUS logo appears.
Press F8 to enter the Please select boot device menu.
2. Insert the recovery DVD into the optical drive and select the
optical drive (“CDROM:XXX”) as the boot device. Press Enter
and then press any key to continue.
3. The
Windows Boot Manager window appears. Select
Windows Setup [EMS Enabled] and press Enter. Wait when
the Windows is loading files message appears.
4. Select where to install a new system. Options are:
Recover system to a partition
This option will delete only the partition you select from
below, allowing you to keep other partitions, and create a
new system partition as drive “C.” Select a partition and click
NEXT.
Recover system to entire HD
This option will delete all partitions from your hard disk drive
and create a new system partition as drive “C.” Select and
click Yes.
5. Follow the on-screen instructions to complete the recovery
process.
You will lose all your data during the system recovery. Make
sure that you make a backup of it before recovering the system.
16 ASUS CP Series Desktop PC

6. After the system recovery is completed, you will be asked to
insert the support DVD into the optical drive. Click OK and
the system reboots.
English
7. After the system reboots, Windows® Vista™ will begin
system configurations. Follow the on-screen instructions to
complete the process, and then restart the computer.
This recovery DVD is for ASUS Desktop PC only. DO NOT use it
on other computers. Visit the ASUS website www.asus.com for
any updates.
ASUS CP Series Desktop PC 17
Troubleshooting
Read the following Q&As for troubleshooting guide. If these do
English
not give you answers, you may contact us directly at the contact
information provided in the support DVD.
What can I do if my Desktop PC cannot be powered on?
Check if the power LED on the front panel lights up. It does not
light up if no power is supplied to the system.
• Find out if the power cord is plugged in.
• When you use an extension cord or a voltage regulator,
ensure that you have plugged it into the wall socket and
switched it on.
What can I do if my Desktop PC cannot enter the operating
system?
• Make sure that you use memory modules that the system
supports and that you install them properly on the sockets.
• Check if your peripheral devices are compatible with the
system. Some USB storage devices, for example, are with
different disk drive structure and enter sleep mode easily.
If the above steps do not solve the problem, contact your retailer
or perform system recovery using the supplied recovery DVD.
You will lose all your data during the system recovery. Make
sure that you make a backup of it before recovering the system.
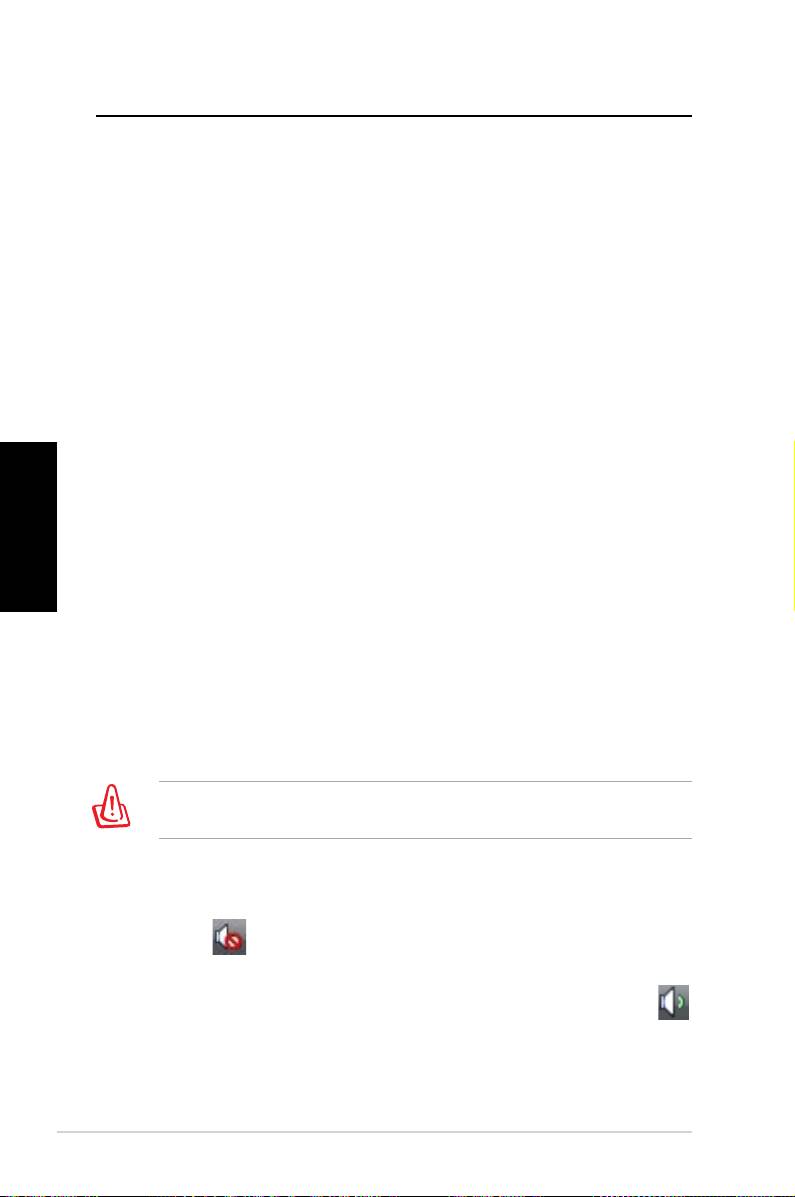
Why is it that I cannot hear anything from my speakers/
headphones?
Check the volume icon on the Windows® taskbar to see if it is set
to mute . If so, double-click this icon to display the volume bar,
and then click the mute icon under the bar to cancel the muted
mode .
18 ASUS CP Series Desktop PC

Why is it that a CD/DVD cannot be read from or written to?
• Make sure that you use a disc compatible with the optical
drive.
English
• Check if you insert the disc properly or if there is any scratch
on the disc.
• Find out if the disc is with write protection.
ASUS CP Series Desktop PC 19

English
20 ASUS CP Series Desktop PC

Ordinateur de bureau
Français
ASUS CP Series
Manuel d’utilisation

F3995
Première édition
Juillet 2008
Français
Copyright © 2008 ASUSTeK COMPUTER INC. Tous droits réservés.
Aucun extrait de ce manuel, incluant les produits et logiciels qui y sont décrits,
ne peut être reproduit, transmis, transcrit, stocké dans un système de restitution,
ou traduit dans quelque langue que ce soit sous quelque forme ou quelque
moyen que ce soit, à l’exception de la documentation conservée par l’acheteur
dans un but de sauvegarde, sans la permission écrite expresse de ASUSTeK
COMPUTER, INC. (“ASUS”).
Les produits et noms de sociétés qui apparaissent dans ce manuel ne sont utili-
sés que dans un but d’identification ou d’explication dans l’intérêt du proprié-
taire, sans intention de contrefaçon. Toutes les marques mentionnées dans ce
manuel sont la propriété de leur propriétaires respectifs.
Des efforts particuliers ont été faits pour garantir que le contenu de ce manuel
soit correct et à jour. Cependant, le fabricant n’offre aucune garantie sur l’exacti-
tude de son contenu et se réserve le droit d’effectuer tout changement, et ce, à
tout moment et sans avertissement.

Table des matières
Notes ........................................................................................................4
Consignes de sécurité .......................................................................6
Notes pour ce manuel .......................................................................7
Bienvenue .............................................................. 8
Contenu de la boîte ............................................................................8
Faire connaissance avec votre PC de bureau ....... 9
Caractéristiques avants/arrières ....................................................9
Français
Configurer votre PC de bureau ........................... 12
Connecter des périphériques ......................................................12
Connecter l’adaptateur d’alimentation ...................................13
Appuyer sur le bouton d’alimentation pour allumer le
système ................................................................................................13
Utiliser la télécommande Media Center (optionnel) ...........14
Restaurer le système ........................................... 16
Utiliser le DVD de restauration ....................................................16
Dépannage ........................................................... 18
Ordinateur de bureau - ASUS CP Series 3

Notes
Rapport de la Commission Fédérale des Communications
Ce dispositif est conforme à l’alinéa 15 des règles établies par la
FCC. L'opération est sujette aux 2 conditions suivantes:
• Ce dispositif ne peut causer d'interférence nuisible, et
• Ce dispositif se doit d'accepter toute interférence reçue, incluant
Français
toute interférence pouvant causer des résultats indésirés.
Cet équipement a été testé et s'est avéré être conforme aux
limites établies pour un dispositif numérique de classe B,
conformément à l'alinéa 15 des règles de la FCC. Ces limites
sont conçues pour assurer une protection raisonnable contre
l’interférence nuisible à une installation réseau. Cet équipement
génère, utilise et peut irradier de l'énergie à fréquence radio
et, si non installé et utilisé selon les instructions du fabricant,
peut causer une interférence nocive aux communications radio.
Cependant, il n'est pas exclu qu'une interférence se produise
lors d'une installation particulière. Si cet équipement cause une
interférence nuisible au signal radio ou télévisé, ce qui peut-être
déterminé par l'arrêt puis le réamorçage de celui-ci, l'utilisateur
est encouragé à essayer de corriger l'interférence en s'aidant
d'une ou plusieurs des mesures suivantes:
• Réorientez ou replacez l'antenne de réception.
• Augmentez l'espace de séparation entre l'équipement et le
récepteur.
• Reliez l’équipement à une sortie sur un circuit différent de
celui auquel le récepteur est relié.
• Consultez le revendeur ou un technicien expérimenté radio/
TV pour de l’aide.
L’utilisation de câbles protégés pour le raccordement du
moniteur à la carte de graphique est exigée pour assurer la
conformité aux règlements de la FCC. Les changements ou les
modifications apportés à cette unité n'étant pas expressément
approuvés par la partie responsable de la conformité pourraient
annuler l’autorité de l’utilisateur à manipuler cet équipement.
4 Ordinateur de bureau - ASUS CP Series

Rapport du Département Canadien des Communications
Cet appareil numérique ne dépasse pas les limites de classe B
en terme d'émissions de nuisances sonore, par radio, par des
appareils numériques, et ce conformément aux régulations
d’interférence par radio établies par le département canadien
des communications.
(Cet appareil numérique de la classe B est conforme à la norme
ICES-003 du Canada.)
Français
Note relative aux produits de Macrovision
Corporation
Ce produit comprend une technologie de protection de
copyright protégée par certains brevets déposés aux U.S.A.
et autres droits de propriété intellectuelle appartenant à
Macrovision Corporation et autres détenteurs de droits.
L’usage de cette technologie doit être autorisé par Macrovision
Corporation, et n’est destiné qu’à un usage familial ou autres
usages limités de même sorte à moins d’une autorisation par
Macrovision Corporation. Rétro-ingénierie et démontage sont
interdits.
Ordinateur de bureau - ASUS CP Series 5

Consignes de sécurité
Votre ordinateur de bureau ASUS a été conçu et testé pour
satisfaire aux standards de sécurité les plus récents en matière
d’équipements informatiques. Toutefois, afin de garantir une
utilisation sans risque de ce produit, il est important que vous
respectiez les consignes de sécurité présentées dans ce manuel.
Français
Configurer votre système
• Avant d’utiliser votre système, lisez et suivez les instructions
de la documentation.
• N’utilisez pas ce produit à proximité de liquides ou d’une
source de chaleur, tel qu’un radiateur.
• Positionnez le système sur une surface stable.
• Les ouvertures situées sur le boîtier de l’ordinateur sont
destinées à la ventilation. Veillez à ne pas les bloquer ou les
recouvrir. N’insérez jamais d’objet dans les ouvertures de
ventilation
•
Utilisez ce produit dans un environnement avec une
température ambiante comprise entre 0˚C et 35˚C.
• Si vous utilisez une rallonge pour connecter votre PC
Multimédia, vérifiez que la somme des intensités nominales
des équipements connectés à la rallonge ne dépasse pas celle
supportée par cette dernière.
Précautions à suivre lors de l’utilisation
• Ne pas marcher ni poser d’objets sur le cordon d’alimentation.
•
Ne pas renverser d’eau ou tout autre liquide sur votre système.
•
Lorsque le système est éteint, une certaine quantité de courant
résiduel continue à circuler dans le système. Débranchez
systématiquement tous les câbles d’alimentation, de modems
et de réseau, des prises murales avant de nettoyer le système.
•
Déconnecter le système du secteur, et demander conseil à
votre revendeur ou à un technicien qualifié si :
•
La prise ou le câble d’alimentation est endommagé.
• Du liquide a été renversé sur le système.
6 Ordinateur de bureau - ASUS CP Series
• Le système ne fonctionne pas correctement alors que les
consignes ont été respectées.
• Le système est tombé ou le boîtier est endommagé.
• Les performances système s’altèrent.
Avertissement de sécurité relatif au lecteur de CD-ROM
PRODUIT LASER DE CLASSE 1
Français
PAS DE DÉMONTAGE
La garantie ne couvre pas les appareils ayant été
désassemblés par les utilisateurs
Le symbole représentant une benne à roue barrée, indique que
le produit (équipement électrique et électronique contenant
une pile au mercure) ne doit pas être placé dans un conteneur à
ordures ménagères. Veuillez consulter les réglementations locales
en matière de recyclage de produits électriques.
Notes pour ce manuel
Pour être certains que vous effectuiez certaines tâches
correctement, veuillez prendre notes des symboles suivants. Ces
symboles possèdent différents degrés d’importance:
AVERTISSEMENT: Ces informations vous permettront d’éviter
de vous blesser lors de la réalisation d’une tâche.
IMPORTANT: Instructions que vous devez suivre pour terminer
une tâche.
ASTUCE: Trucs et informations additionnelles pour vous aider à
mener une tâche à bien.
NOTE: Informations additionnelles destinées à certaines
situations spécifiques..
Ordinateur de bureau - ASUS CP Series 7

Bienvenue
Félicitations pour votre achat d’un ordinateur de bureau ASUS.
Le contenu de la boîte de votre ordinateur de bureau est listé
ci-dessous mais peut varier selon les modèles. ASUS se réserve
le droit de remplacer les composants ou accessoires pour une
meilleure qualité de service.
Si l’un des éléments ci-dessous était manquant ou endommagé,
contactez votre revendeur.
Français
Contenu de la boîte
• Ordinateur de bureau ASUS x1
• Clavier x1
• Souris x1
• Cordon d’alimentation x1
• DVD de support x1
• DVD de restauration x1
• Guide d’installation x1
• Carte de garantie x1
• Télécommande (optionnel) x1
Visitez le site Web d’ASUS sur http://support.asus.com pour les
mises à jour.
8 Ordinateur de bureau - ASUS CP Series
Faire connaissance avec
votre PC de bureau
Caractéristiques avants/arrières
Avant (fermé)
Avant (ouvert)
Arrière
11
1
1
12
2
6
Français
5
2
13
4
7
14
15
8
3
4
10
9
*Les parties grisées contiennent les ports avants et arrières. Ces
ports et leur emplacement peuvent varier selon les modèles.
N° Bouton/LED Description
1. Bouton d’éjection du lecteur optique.
2. Couvercle de la baie pour lecteur optique.
3. LED d’activité du disque dur.
4. Bouton d’alimentation
5. Couvercle du panneau avant.
continue à la page suivante
Ordinateur de bureau - ASUS CP Series 9
N°
Slot/Port Description
Infrarouge (optionnel).
Slot pour carte CompactFlash®/
Microdrive™.
6
Slot pour carte MultiMediaCard/Se-
cure Digital™/ Memory Stick Pro™.
Français
Port USB+E-SATA.
Port IEEE 1394a
Se connecte à un périphérique IEEE
7.
4 broches
1394 (ex: caméscope numérique).
Se connecte à des périphériques
8. Ports USB 2.0
USB (souris, clavier, ou appareil
photo).
9. Port casque Se connecte à des écouteurs stéréo.
Port
10.
Se connecte à microphone.
microphone
Se connecte au cordon d’alimenta-
11. Port d’alimentation
tion.
12. Sélecteur de tension Sélectionne un type de voltage.
Se connectent à un système de
Ports audio
13.
haut-parleurs 5.1(6) ou 7.1(8)
7.1(8) canaux
canaux.
continue à la page suivante
10 Ordinateur de bureau - ASUS CP Series

N° Slot/Port Description
Port clavier PS/2 Se connecte à un clavier PS/2.
Port souris PS/2 Se connecte à une souris PS/2.
Port de sortie
Se connecte à un amplificateur
S/PDIF optique
pour une sortie audio numérique.
Port VGA
Se connecte à une TV ou un moni-
teur.
Port HDMI
14.
Port DVI Connects to a TV or monitor.
Français
Branchez un câble réseau sur ce
Port LAN (RJ-45)
port.
Se connecte à un périphérique
Port COM
supportant la norme série.
Se connecte à des périphériques
Ports USB 2.0
USB (souris, clavier, ou appareil
photo).
Utilisez ces slots lors de l’installa-
Slots d’extension
tion de cartes d’extension.
Destiné à la connexion d’une carte
15.
Port DVI/S-Video/VGA
graphique (optionnel)
Destiné à la connexion d’une carte
Port FM/RF/IR/S-Video
tuner TV (optionnel)
Ordinateur de bureau - ASUS CP Series 11
Congurer votre PC de bureau
Connecter des périphériques
Ne pas bloquer ou
couvrir ces ouvertures.
Français
Système de haut-
parleurs à 7.1(8)
canaux
Clavier
Souris
Système de haut-
parleurs à 7.1(8)
canaux
TV
Hub/switch réseau
Écran
Les illustrations sont seulement données à titre indicatif. Les spécifications du produit
peuvent varier selon les modèles
• Utilisez ce produit dans une température ambiante inférieure à 35˚C.
• Ne pas bloquer ni couvrir les trous d’aération.
12 Ordinateur de bureau - ASUS CP Series

Connecter le cordon d’alimentation
1. Utilisez le sélecteur de tension pour choisir le voltage appro-
prié selon votre région.
Le réglage du sélecteur de tension sur 115V dans une région de
230V endommagera le système !
2. Connectez une extrémité du cordon d’alimentation au
connecteur d’alimentation et l’autre extrémité à une prise
électrique.
Français
2
1
Appuyer sur le bouton d’alimentation
pour allumer le système
Ordinateur de bureau - ASUS CP Series 13
Utiliser la télécommande Media
Center (optionnel)
Utilisez la télécommande pour lancer le programme Media
Center pour lire des fichiers multimédia comme de la musique
ou des films. Vous pouvez aussi installer un décodeur TV externe
pour regarder et enregistrer vos émissions TV favorites.
Référez-vous à l’illustration ci-dessous pour vous familiariser avec
Français
les fonctions de chacun des boutons de la télécommande.
1
2
22
3
21
20
4
19
5
18
6
7
17
8
16
9
10
15
14
11
13
12
N° Bouton Description
Pressez pour éteindre l’écran et les haut-
1. Alimentation
parleurs.
2. Pause Pressez pour mettre en pause la lecture.
3. Arrêt Pressez pour arrêter la lecture.
4. Avance rapide Pressez pour effectuer une avance rapide.
14 Ordinateur de bureau - ASUS CP Series

5. Piste suivante Pressez pour aller à la piste suivante.
Pressez pour afficher les informations
6. Informations
des programmes ou les options d’autres
menus.
Touches quadri-
Pressez pour naviguer dans les menus à
7.
directionnelles
l’écran.
Windows® Media
Pressez pour lancer le programme
8.
Center
Windows Media Center.
9. Chaîne suiv/préc Pressez pour changer de chaîne.*
Français
10. Muet Pressez pour désactiver le son.
Programmes TV
Pressez pour afficher la liste des
11.
enregistrés
programmes TV enregistrés.
Guide des
Pressez pour afficher le guide des
12.
programmes TV
programmes TV.
Pressez pour regarder des programmes
13. Live TV
TV en direct.*
Bascule entre une saisie numérique et
14. Shift
alphabétique.
15. Télétexte Uniquement disponible en Europe.
Aug/dim le
Pressez pour augmenter ou diminuer le
16
volume
volume.
17. OK Pressez pour confirmer une action.
18. Retour Pressez pour retourner à la page précédente.
Pressez pour revenir à la piste précé-
19. Piste précédente
dente.
Pressez pour faire un retour arrière ra-
20. Retour rapide
pide.
21. Lecture Pressez pour lire un fichier multimédia.
Pressez pour démarrer l’enregistrement
22 Enregistrer
d’un programme TV.
*Le système n’intègre pas de tuner TV. Pour utiliser la fonction
TV, veuillez faire l’achat d’un décodeur TV.
Ordinateur de bureau - ASUS CP Series 15

Restaurer le système
Utiliser le DVD de restauration
Le DVD de restauration contient une image du système
d'exploitation installé sur votre système en usine. Le DVD de
restauration, en plus du DVD de support, offre une solution de
restauration complète permettant de restaurer rapidement votre
système dans son état de fonctionnement d'origine, à condition
Français
que votre disque dur soit en bon état. Avant d'utiliser le DVD de
restauration, copiez vos données sur une disquette ou un lecteur
réseau et prenez note de tous vos paramètres de configuration
personnalisés (tels que vos paramètres réseau).
1.
Allumez votre ordinateur ASUS et à l’apparition du logo
ASUS appuyez sur F8 pour accéder au menu de sélection du
périphérique de démarrage:
2.
Insérez le DVD de restauration dans le lecteur optique
et sélectionnez le lecteur optique (normalement identifié
“DVDROM:XXXX”) comme périphérique de boot primaire.
Appuyez sur <Entrée> puis appuyez sur une touche
quelconque pour continuer:
3. La fenêtre
Windows Boot Manager apparaît. Sélectionnez
Windows Setup [EMS Enabled] et appuyez sur Entrée.
Patientez lorsque le message Windows is loading files
apparaît.
4. Sélectionnez l’emplacement d’installation. Options
de
partitionnage :
Recover system to a partition.
(Restaurer le système sur une partition)
Cette option ne supprimera que la partition sélectionnée,
vous permettant ainsi de conserver d’autres partitions et de
créer une nouvelle partition système nommée Lecteur (C:).
Sélectionnez une partition et cliquez sur NEXT.
Recover system to entire HD.
(Restaurer la totalité du disque dur)
Cette option supprimera toutes les partitions de votre disque
dur pour créer une nouvelle partition système nommée
Lecteur (C:). Sélectionnez cette option et cliquez sur Yes.
16 Ordinateur de bureau - ASUS CP Series
5. Suivez les instructions apparaissant à l’écran pour terminer
le processus de restauration.
Toutes vos données seront perdues lors du processus de
restauration. Assurez-vous d'avoir fait une copie de sauvegarde
de vos données avant de restaurer le système.
6. Une fois le processus de restauration terminé, insérez le
DVD de support dans le lecteur optique. Cliquez sur OK. Le
système redémarre.
7.
Au redémarrage du système, Windows® Vista™ lancera le
Français
processus de configuration du système. Suivez les instruc-
tions apparaissant à l’écran pour terminer le processus, puis
redémarrez l’ordinateur.
Le DVD de restauration est réservé aux ordinateurs de bureau
ASUS. Ne l’utilisez pas sur d’autres ordinateurs. Visitez le site
Web d’ASUS (www.asus.com) pour toute mise à jour.
Ordinateur de bureau - ASUS CP Series 17

Dépannage
Lisez attentivement les questions/réponses suivantes si vous
rencontrez un problème lors de l’utilisation du PC de bureau
ASUS. Si cette section ne possède pas la réponse à votre problème,
contactez directement le service après-vente par le biais des
informations de contact contenues dans le DVD de support.
Que faire lorsque mon PC de bureau ne démarre pas ?
Français
Vérifiez que la LED d’alimentation est allumée. Celle-ci ne
s’allume pas si aucun courant électrique n’est fourni au système.
• Assurez-vous que le cordon d’alimentation est bien raccordé.
• Lors de l’utilisation d’une rallonge ou d’un régulateur de
voltage, vérifiez leur connexion à une prise électrique murale.
Que faire lorsque mon PC de bureau ne peut pas accéder au
système d’exploitation ?
• Assurez-vous d’utiliser des modules mémoire supportés par le
système et que ceux-ci sont correctement installés.
• Vérifiez si vos périphériques externes sont compatibles avec
le système. Certains périphériques de stockage USB peuvent
rapidement basculer en mode veille.
Si les suggestions suivantes ne résolvent pas votre problème,
contactez votre revendeur ou restaurez le système grâce au DVD
de restauration accompagnant votre ordinateur.
Toutes vos données seront perdues lors du processus de
restauration. Assurez-vous d'avoir fait une copie de sauvegarde
de vos données avant de restaurer le système.
Pourquoi aucun son ne sort des haut-parleurs ou du casque ?
Vérifiez que l’icône de volume de la zone de notification de
Windows® ne soit pas en mode muet . Si c’est le cas, double-
cliquez sur cette icône pour afficher la barre de volume, et
cliquez sur l’icône pour annuler le mode muet .
18 Ordinateur de bureau - ASUS CP Series

Pourquoi le lecteur optique ne parvient-il pas à lire le CD/DVD
inséré ?
• Assurez-vous que le format du disque est compatible avec le
lecteur optique.
• Vérifiez que le disque est correctement inséré ou que celui-ci
n’est pas rayé.
• Vérifiez que le disque n’est pas protégé en écriture.
Français
Ordinateur de bureau - ASUS CP Series 19

Français
20 Ordinateur de bureau - ASUS CP Series

ASUS CP Series Desktop-PC
Benutzerhandbuch
Deutsch

G3995
Erste Ausgabe V1
August 2008
Deutsch
Copyright © 2008 ASUSTeK COMPUTER INC. Alle Rechte vorbehalten.
Kein Teil dieses Handbuchs, einschließlich der darin beschriebenen Produkte
und Software, darf ohne ausdrückliche, schriftliche Genehmigung von ASUSTeK
COMPUTER INC. (“ASUS”) in irgendeiner Form, ganz gleich auf welche Weise,
vervielfältigt, übertragen, abgeschrieben, in einem Wiedergewinnungssystem
gespeichert oder in eine andere Sprache übersetzt werden.
In diesem Handbuch angegebene Produkt- und Firmennamen können u.U.
eingetragene Warenzeichen oder Urheberrechte der entsprechenden Firmen
sein und dienen nur der Identifizierung oder Erklärung zu Gunsten des
Eigentümers, ohne Rechte verletzen zu wollen.
Es wurden keine Mühen gescheut, den Inhalt dieses Handbuchs korrekt
und aktuell zu gestalten. Dennoch kann für die Richtigkeit des Inhalts keine
Haftbarkeit übernommen werden. Der Hersteller behält sich das Recht vor,
jederzeit ohne Vorankündigung Änderungen am Handbuch vorzunehmen.

Inhalt
Erklärungen ...........................................................................................4
Sicherheitsinformationen ................................................................6
Hinweise zu diesem Handbuch .....................................................7
Willkommen ........................................................... 8
Paketinhalt .............................................................................................8
Kennenlernen Ihres Desktop-PCs ........................ 9
Funktionen der Vorder-/Rückseite ................................................9
Einrichten Ihres Desktop-PCs ............................. 12
Anschluss der Geräte ......................................................................12
Anschluss der Stromversorgung ................................................13
Einschalten über den Netzschalter ............................................13
Verwenden der Media Center-Fernbedienung
(optional) .............................................................................................14
Deutsch
Wiederherstellen des Systems ........................... 16
Benutzen der Wiederstellungs-DVD .........................................16
Fehlerbehebung .................................................. 18
ASUS CP Serie Desktop-PC 3

Erklärungen
Erklärung der Federal Communications Commission
Dieses Gerät entspricht den FCC-Vorschriften, Teil 15. Sein Betrieb
unterliegt den folgenden zwei Bedingungen:
• Dieses Gerät darf keine schädigenden Interferenzen erzeugen,
und
• Dieses Gerät muss alle empfangenen Interferenzen
aufnehmen, einschließlich derjenigen, die einen
unerwünschten Betrieb erzeugen.
Dieses Gerät ist auf Grund von Tests für Übereinstimmung mit
den Einschränkungen eines Digitalgeräts der Klasse B, gemäß
Teil 15 der FCC-Vorschriften, zugelassen. Diese Einschränkungen
sollen bei Installation des Geräts in einer Wohnumgebung auf
Deutsch
angemessene Weise gegen schädigende Interferenzen schützen.
Dieses Gerät erzeugt und verwendet Hochfrequenzenergie und
kann, wenn es nicht gemäß den Anweisungen des Herstellers
installiert und bedient wird, den Radio- und Fernsehempfang
empfindlich stören. Es wird jedoch nicht garantiert, dass bei einer
bestimmten Installation keine Interferenzen auftreten. Wenn
das Gerät den Radio- oder Fernsehempfang empfindlich stört,
was sich durch Aus- und Einschalten des Geräts feststellen lässt,
ist der Benutzer ersucht, die Interferenzen mittels einer oder
mehrerer der folgenden Maßnahmen zu beheben:
• Empfangsantenne neu ausrichten oder an einem anderen Ort
aufstellen.
• Den Abstand zwischen Gerät und Empfänger vergrößern.
• Das Gerät an die Steckdose eines Stromkreises anschließen,
an die nicht auch der Empfänger angeschlossen ist.
• Den Händler oder einen erfahrenen Radio-/Fernsehtechniker
um Hilfe bitten.
Um Übereinstimmung mit den FCC-Vorschriften zu
gewährleisten, müssen abgeschirmte Kabel für den
Anschluss des Monitors an die Grafikkarte verwendet werden.
Änderungen oder Modifizierungen dieses Geräts, die nicht
ausdrücklich von der für Übereinstimmung verantwortlichen
Partei genehmigt sind, können das Recht des Benutzers, dieses
Gerät zu betreiben, annullieren.
4 ASUS CP Serie Desktop-PC

Erklärung des kanadischen Ministeriums für
Telekommunikation
Dieses Digitalgerät überschreitet keine Grenzwerte für
Funkrauschemissionen der Klasse B, die vom kanadischen
Ministeriums für Telekommunikation in den Funkstörvorschriften
festgelegt sind.
Dieses Digitalgerät der Klasse B stimmt mit dem kanadischen
ICES-003 überein.
Macrovision Corporation-Produktanmerkung
Dieses Produkt verfügt über Kopierschutztechnologie, die durch
methodische Anforderungen bestimmter U.S.A.-Patente und
anderer geistiger Eigentumsrechte der Macrovision Corporation
und anderer Parteien geschützt sind. Die Verwendung dieser
Kopierschutztechnologie muss von Macrovision Corporation
Deutsch
genehmigt werden und ist, wenn nicht anderweitig von der
Macrovision Corporation genehmigt, nur für private oder
eingeschränkte Vorführungszwecke vorgesehen. Reverse-
ASUS CP Serie Desktop-PC 5

Sicherheitsinformationen
Ihr ASUS Desktop-PC wurde auf die neuesten
Sicherheitsstandards für Informationstechnologie geprüft und
für gut befunden. Um allerdings die sichere Handhabung des
Produkts zu gewährleisten, sollten Sie den Anweisungen in
diesem Dokument unbedingt Folge leisten.
Einstellen des Systems
• Lesen und befolgen Sie alle Anweisungen des Handbuchs,
bevor Sie das Gerät in Betrieb nehmen.
• Benutzen Sie das Produkt nicht in der Nähe von Wasser oder
Hitzequellen, z.B. Heizungen.
• Platzieren Sie das System auf einer stabilen Oberfläche.
• Die Öffnungen am Computergehäuse dienen der Belüftung
Deutsch
und sollten keinesfalls versperrt oder abgedeckt werden.
Vergewissern Sie sich, dass rund um den Computer genügend
Abstand (mind. 15 cm) zur optimalen Belüftung vorhanden
ist. Stecken Sie keine Gegenstände in die Luftschlitze.
• Benutzen Sie dieses Produkt in einer Umgebung, deren
Temperatur zwischen 0˚C und 35˚C liegt.
• Wenn Sie ein Verlängerungskabel mit mehreren Steckdosen
für das Gerät verwenden, vergewissern Sie sich, dass die
zulässige Stromstärke insgesamt nicht überschritten wird.
Vorsicht bei der Benutzung
• Treten Sie nicht auf das Stromkabel und stellen Sie nichts
darauf ab.
• Halten Sie das Gerät von Wasser und anderen Flüssigkeiten
fern.
• Wenn das System ausgeschaltet ist, fließen immer noch
geringe Mengen an Strom. Ziehen Sie immer alle Stecker von
Strom- und Modemkabeln ab, bevor Sie das System reinigen.
• Ziehen Sie den Stromstecker ab und geben Sie den PC zur
Reparatur an qualifiziertes Personal, wenn:
• das Stromkabel oder der Stromstecker beschädigt wurden
• Flüssigkeit im System verschüttet wurde
• das System nicht ordnungsgemäß funktioniert, auch
wenn alle Betriebsanleitungen befolgt werden
6 ASUS CP Serie Desktop-PC
• der PC fallen gelassen wurde oder das Gehäuse
beschädigt ist
• sich die Systemleistung drastisch verändert
LASER-PRODUKTWARNUNG
LASER-PRODUKT DER KLASSE 1
NICHT AUSEINANDERNEHMEN
Die Garantie verfällt, wenn das Produkt vom
Benutzer auseinandergenommen wurde
Das durchgestrichene Symbol der Mülltonne zeigt an, dass
das Produkt (elektrisches und elektronisches Zubehör) nicht
im normalen Hausmüll entsorgt werden darf. Bitte erkundigen
Deutsch
Sie sich nach lokalen Regelungen zur Entsorgung von
Elektroschrott.
Hinweise für dieses Handbuch
Um sicherzustellen, dass Sie bestimmte Aufgaben richtig
ausführen, beachten Sie bitte die folgenden Symbole, die in
diesem Handbuch verwendet werden.
GEFAHR/WARNUNG: Informationen zum Vermeiden von
Verletzungen beim Ausführen einer Aufgabe.
WICHTIG: Anweisungen, die Sie beim Ausführen einer Aufgabe
befolgen müssen.
TIPP: Tipps und nützliche Informationen zur Durchführung
einer Aufgabe.
ANMERKUNG: Tipps und nützliche Informationen für
besondere Umstände.
ASUS CP Serie Desktop-PC 7

Willkommen
Herzlichen Glückwunsch zu Ihrem Kauf eines ASUS Desktop-PCs.
Der Inhalt des Produktpakets ist im Folgenden aufgeführt und
kann je nach Modell unterschiedlich ausfallen. ASUS behält sich
das Recht vor, Komponenten und Zubehör ggf. zu ersetzen, um
optimale Betriebsfähigkeit zu ermöglichen.
Sollten folgende Artikel beschädigt oder nicht vorhanden sein,
wenden Sie sich bitte an Ihren Händler.
Paketinhalt
• ASUS Desktop-PC
• Tastatur
• Maus
Deutsch
• Netzkabel
• Support-DVD
• Wiederherstellungs-DVD
• Installationsanweisung
• Garantiekarte
• Fernbedienung (optional)
Aktuelle Informationen finden Sie auf der ASUS-Webseite unter
http://support.asus.com.
8 ASUS CP Serie Desktop-PC
Kennenlernen Ihres Desktop-PCs
Funktionen der Vorder-/Rückseite
Vorderseite
Vorderseite
Rückseite
(geschlossen)
(offen)
11
1
1
12
2
6
5
2
13
4
7
14
15
8
3
4
10
9
Deutsch
*In den grauen Bereichen befinden sich die Anschlüsse der
Vorder- und Rückseite. Die Position dieser Anschlüsse kann je
nach Modell variieren.
Nr.. Taste/LED Beschreibung
1. Auswurftaste optisches Laufwerk
2. Abdeckung optisches Laufwerk
3. Festplatten-LED
4. Netzschalter
5. Fronttafelabdeckung
Fortsetzung auf der nächsten Seite
ASUS CP Serie Desktop-PC 9
Nr.
Steckplatz/Anschluss Beschreibung
Infrarot (optional).
CompactFlash®/Microdrive™-
Kartensteckplatz
6
Secure Digital™/MultimediaCard/
Memory Stick Pro™-Steckplatz.
USB+E-SATA-Anschluss.
4-pin IEEE 1394a
Für IEEE 1394-Geräte wie z.B.
7.
port
digitale Camcorder
Anschluss für USB-Geräte wie
8. USB 2.0 ports
Maus, Tastatur oder Kamera
Deutsch
Für Stereo-Kopfhörer oder
9.
Headphone jack
Stereoanlage
Microphone
10.
Für Mikrofone
jack
11. Netzanschluss Nimmt das Netzkabel auf
12.
Spannungsauswahl Wählt die Eingangsspannung
7.1(8)-channel
Für ein 7.1(8)-Kanal-
13.
audio ports
Lautsprechersystem
Fortsetzung auf der nächsten Seite
10 ASUS CP Serie Desktop-PC
Nr. Steckplatz/Anschluss Beschreibung
PS/2 Keyboard
Für eine PS/2-Tastatur
port
PS/2 mouse
Für eine PS/2-Maus
port
Optischer S/
Für Verstärker bei digitaler Audio-
PDIF-Ausgang
Ausgabe
VGA-Ausgang
Für Geräte mit anderer Video-
Ausgabe (z.B. Fernseher oder
HDMI-Ausgang
14.
Monitor)
Für ein TV-Gerät oder einen
DVI-Ausgang
Monitor
LAN (RJ-45)-
Für Netzwerkkabel
Anschluss
Für Geräte, die den seriellen
Deutsch
COM-Anschluss
Spezifikationen entsprechen.
Anschluss für USB-Geräte wie
USB 2.0 ports
Maus, Tastatur oder Kamera
Erweiterungssteckplätze Für Erweiterungskarten
DVI/S-Video/VGA-
VGA-Karte (optional)
15.
Anschluss
FM/RF/IR/S-Video-
TV-Tuner-Karte (optional)
Anschluss
ASUS CP Serie Desktop-PC 11
Einrichten Ihres Desktop-PCs
Anschluss der Geräte
Decken Sie diese
Öffnungen NICHT ab
7.1(8)-Kanal
Lautsprechersystem
Deutsch
Tastatur
Maus
7.1(8)-Kanal
Lautsprechersystem
TV
Netzwerk-Hub/
Switch
Monitor
Die Abbildungen sind nur zur Referenz gedacht. Die tatsächlichen technischen Daten des
Produkts können unterschiedlich ausfallen.
• Benutzen Sie dieses Produkt in einer Umgebungstemperatur von 0 bis 35˚C.
• Verdecken Sie auf keinen Fall die Belüftungsschlitze.
12 ASUS CP Serie Desktop-PC
Anschluss der Stromversorgung
1. Geben Sie die richtige Spannung Ihrer Region über die
Spannungsauswahl ein.
Die Auswahl einer Spannung von 115V in einer Umgebung mit
230V kann das System beschädigen!
2. Stecken Sie das Netzkabel in den Netzanschluss und
verbinden Sie es mit einer Steckdose.
3. Drücken Sie den Netzschalter.
2
1
Deutsch
Einschalten über den Netzschalter
ASUS CP Serie Desktop-PC 13
Verwenden der Media Center-
Fernbedienung (optional)
Mit dieser Fernbedienung können Sie das Media Center-
Programm bedienen, um Mediendateien wie Musik und Filme
abzuspielen. Sie können auch eine externe TV-Box installieren,
um TV-Sendungen aufzuzeichnen und anzusehen.
Die Tastenfunktionen der Fernbedienung werden in der
folgenden Tabelle beschrieben.
1
2
22
3
21
Deutsch
20
4
19
5
18
6
7
17
8
16
9
10
15
14
11
13
12
Nr. Taste Beschreibung
Schaltet Bildschirm und Lautsprecher
1. Ein/Aus
ein/aus
2. Pause Hält die Wiedergabe an
3. Stop Beendet die Wiedergabe
14 ASUS CP Serie Desktop-PC
4. Schneller Vorlauf Startet den schnellen Vorlauf
5. Nächster Titel Übergang zum nächsten Titel
Zeigt Programm-Informationen im
6. Informationen
Media Center oder andere Menü-
Optionen an
Richtungs-
7.
Zur Navigation in Menüs
Navigationstasten
Windows® Media
8.
Startet das Media Center-Programm
Center
9. Kanal auf/ ab Wechselt den TV-Kanal*
10. Stummschaltung Schaltet die Audioausgabe ab
Aufgenommene
Zeigt eine Liste aufgenommener TV-
11.
Sendungen
Sendungen*
EPG (Electronic
Zeigt die elektronische Programm-
12.
Program Guide)
vorschau*
Deutsch
13. Live TV-Taste Gibt TV-Sendungen live wieder*
Wechselt zwischen Zahlen- und
14. Umschalt-Taste
Buchstabentasten
15. Videotext-Tasten Nur in europäischen Modellen
16 Lautstärke auf/ab Steigert/senkt die Lautstärke
17. OK Bestätigt eine Aktion
18. Zurück Übergang zur letzten Seite
19. Vorheriger Titel Übergang zum vorherigen Titel
20. Rücklauf Startet den Rücklauf
21. Wiedergabe Gibt eine Mediendatei wieder
22 Aufnahme Startet die TV-Aufnahme.
*Dieses System verfügt nicht über einen integrierten TV-Tuner.
Um die TV-Funktionen nutzen zu können, muss zuerst eine
externe TV-Box erworben werden.
ASUS CP Serie Desktop-PC 15

Wiederherstellen des Systems
Benutzen der Wiederherstellungs-DVD
Die Wiederherstellungs-DVD beinhaltet ein Image des
Betriebssystems, das am Werk auf Ihrem System installiert
wurde. Die Wiederherstellungs-DVD bietet eine umfassende
Wiederherstellungslösung zur schnellen Wiederherstellung
in den originalen Arbeitszustand, sofern sich Ihre Festplatte in
einem guten Zustand befindet. Bevor Sie die Wiederherstellungs-
DVD verwenden, sollten Sie Ihre Dateien (z.B. Outlook PST-
Dateien) auf Disketten oder einem Netzwerklaufwerk speichern
und sich persönlich eingestellte Systemkonfigurationen (z.B.
Netzwerkeinstellungen) notieren.
1. Schalten Sie Ihren ASUS Desktop-PC ein und das ASUS-Logo
wird angezeigt. Drücken Sie F8, um das Menü Please select
Deutsch
boot device zu öffnen.
2. Legen Sie die Wiederherstellungs-DVD in das optische
Laufwerk und wählen Sie das optische Laufwerk (“CDROM:
XXX”) als Boot-Laufwerk. Drücken Sie Enter und dann eine
beliebige Taste, um fortzufahren.
3. Der
Windows Boot Manager wird angezeigt. Wählen Sie
Windows Setup [EMS Enabled] und drücken Sie Enter. Warten
Sie, bis die Nachricht “Windows is loading files“ erscheint.
4. Wählen Sie, wo das neue System installiert werden soll. Die
folgenden Optionen stehen zur Auswahl:
Auf einer Partition wiederherstellen
Diese Option löscht nur die von Ihnen gewählte Partition,
andere können beibehalten werden. Sie können eine
neue Partition als Laufwerk “C:” einrichten. Wählen Sie eine
Partition und klicken Sie auf NEXT (Weiter).
Auf gesamter Festplatte wiederherstellen
Diese Option lösche alle Partitionen und erstellt eine neue als
Laufwerk “C:”. Wählen Sie diese Option und klicken Sie auf Yes.
5. Folgen Sie den Anweisungen, um den Prozess fertigzustellen.
Bei einer Systemwiederherstellung werden alle Daten gelöscht.
Vergessen Sie nicht, die wichtigsten Daten vorher zu sichern.
16 ASUS CP Serie Desktop-PC

6. Wenn die Wiederherstellung beendet ist, werden Sie dazu
aufgefordert, die Support-DVD ins optische Laufwerk zu
legen. Klicken Sie auf OK und das System wird neu gestartet.
7. Nach dem Neustart beginnt Windows® Vista™ sofort mit
der Systemkonfiguration. Folgen Sie den Anweisungen
auf Ihrem Bildschirm, um den Vorgang fertigzustellen, und
starten Sie dann den Computer neu.
Diese Wiederherstellungs-DVD ist nur für den ASUS Desktop-
PC gedacht. Benutzen Sie sie NICHT auf anderen Computern.
Aktuelle Informationen finden Sie auf der ASUS-Webseite unter
www.asus.com.
Deutsch
ASUS CP Serie Desktop-PC 17
Fehlerbehebung
Lesen Sie die folgenden Fragen und Antworten zur
Fehlerbehebung. Falls diese Ihr Problem nicht lösen, wenden Sie
sich über die auf der Support-DVD enthaltenen Kontaktdaten an
ASUS.
Was ist zu tun, wenn sich der Desktop-PC nicht einschalten lässt?
Prüfen Sie, ob die Strom-LED an der Vorderseite leuchtet. Falls
nicht, wird dem System kein Strom zugeführt.
• Prüfen Sie, ob der Netzstecker richtig eingesteckt ist.
• Falls Sie eine Verlängerungsschnur oder einen
Spannungsregler benutzen, vergewissern Sie sich, dass diese
an die Steckdose angeschlossen und eingeschaltet sind.
Deutsch
Was ist zu tun, wenn das Betriebssystem nicht hochfährt?
• Vergewissern Sie sich, dass die installierten Speichermodule
vom System unterstützt werden und richtig eingesteckt sind.
• Prüfen Sie, ob die Peripheriegeräte mit dem System
kompatibel sind. Einige USB-Speichergeräte verfügen über
eine andere Laufwerksstruktur und werden einfacher in den
Schlafmodus versetzt.
Falls die oben genannten Schritte das Problem nicht lösen,
wenden Sie sich an den Hersteller oder stellen Sie mit der
Wiederherstellungs-DVD das System wieder her.
Bei einer Systemwiederherstellung werden alle Daten gelöscht.
Vergessen Sie nicht, die wichtigsten Daten vorher zu sichern.
Warum ist nichts von den Lautsprechern/Kopfhörern zu hören?
Prüfen Sie, ob das Lautstärkesymbol in der Windows®-Taskleiste
auf „stumm“ steht. Falls dies der Fall ist, doppelklicken Sie auf
das Symbol, um die Lautstärkeregelung zu öffnen, und klicken Sie
dann auf das „stumm“-Symbol, um diesen Zustand aufzuheben .
18 ASUS CP Serie Desktop-PC

Warum kann eine CD/DVD nicht gelesen oder beschrieben
werden?
• Vergewissern Sie sich, dass der verwendete Datenträger mit
dem optischen Laufwerk kompatibel ist.
• Prüfen Sie, ob der Datenträger richtig eingelegt wurde oder
beschädigt ist.
• Finden Sie heraus, ob sich auf dem Datenträger ein
Schreibschutz befindet.
Deutsch
ASUS CP Serie Desktop-PC 19

Deutsch
20 ASUS CP Serie Desktop-PC

ASUS CP Series Desktop PC
Manuale Utente
Italiano

I3995
Prima Edizione V1
Agosto 2008
Italiano
Copyright © 2008 ASUSTeK COMPUTER INC. Tutti i Diritti Riservati.
Alcuna parte di questo manuale, compresi i prodotti e i software in esso descritti,
può essere riprodotta,trasmessa, trascritta, archiviata in un sistema di recupero o
tradotta in alcuna lingua, in alcuna forma e in alcun modo, fatta eccezione per la
documentazione conservata dall’ acquirente, a scopi di backup, senza l’ espressa
autorizzazione scritta di ASUSTeK COMPUTER INC. (“ASUS”).
I prodotti e nomi delle aziende che compaiono in questo manuale possono o
meno essere marchi registrati o diritti d’ autore delle rispettive aziende, e sono
usati solo a scopo identificativo. Tutti i marchi sono di proprietà dei rispettivi
proprietari.
E’ stato compiuto ogni sforzo per assicurare la correttezza e l’ aggiornamento dei
contenuti di questo manuale. Tuttavia, il produttore non offre alcuna garanzia in
merito all’ accuratezza di tali contenuti e si riserva il diritto di modificarli senza
preavviso.

Condizioni e Limiti di Copertura
della Garanzia sul Prodotto
Le condizioni di garanzia variano a seconda del tipo di prodotto e sono
specificatamente indicate nel Certificato di Garanzia allegato, cui si fa espresso
rinvio.
Inoltre la presente garanzia non è valida in caso di danni o difetti dovuti ai seguenti
fattori: (a) uso non idoneo, funzionamento o manutenzione improprio, incluso
senza limitazioni l’ utilizzo del prodotto con una finalità diversa da quella conforme
alle istruzioni di ASUSTeK COMPUTER INC. in merito all’ idoneità di utilizzo e alla
manutenzione; (b) installazione o utilizzo del prodotto in modo non conforme aglli
standard tecnici o di sicurezza vigenti nell’ Area Economica Europea e in Svizzera;
(c) collegamento a rete di alimentazione con tensione non corretta; (d) utilizzo
del prodotto con accessori di terzi, prodotti o dispositivi ausiliari o periferiche; (e)
tentativo di riparazione effettuato da una qualunque terza parte diversa dai centri
di assistenza ASUSTeK COMPUTER INC. autorizzati; (f) incidenti,fulmini,acqua,
incendio o qualsiasi altra causa il cui controllo non dipende da ASUSTeK COMPUTER
INC.; abuso, negligenza o uso commerciale.
La presente Garanzia non è valida per l’ assistenza tecnica o il supporto per l’
utilizzo del prodotto, compreso l’ utilizzo dell’ hardware o del software. L’ assistenza
e il supporto disponibili (se previsti), nonchè le spese e gli altri termini relativi all’
assistenza e al supporto (se previsti) verranno specificati nella documentazione
destinata al cliente fornita a corredo con il Prodotto.
E’ responsabilità dell’ utente, prima ancora di richiedere l’ assistenza, effettuare il
backup dei contenuti presenti sul Prodotto, inclusi i dati archiviati o il software
installato nel prodotto. ASUSTeK COMPUTER INC. non è in alcun modo responsabile
per qualsiasi danno, perdita di programmi, dati o altre informazioni archiviate su
qualsiasi supporto o parte del prodotto per il quale viene richiesta l’ assistenza;
Italiano
ASUSTeK COMPUTER INC.non è in alcun modo responsabile delle conseguenze
di tali danni o perdite, incluse quelle di attività, in caso di malfunzionamento di
sistema, errori di programmi o perdita di dati.
E’ responsabilità dell’ utente, prima ancora di richiedere l’ assistenza, eliminare
eventuali funzioni, componenti, opzioni, modifiche e allegati non coperti dalla
presente Garanzia, prima di far pervenire il prodotto a un centro servizi ASUSTeK
COMPUTER INC. ASUSTeK COMPUTER INC. non è in alcun modo responsabile di
qualsiasi perdita o danno ai componenti sopra descritti.
ASUSTeK COMPUTER INC. non è in alcun modo responsabile di eliminazioni,
modifiche o alterazioni ai contenuti presenti sul Prodotto compresi eventuali dati
o applicazioni prodottesi durante le procedure di riparazione del Prodotto stesso.
Il Prodotto verrà restituito all’ utente con la configurazione originale di vendita, in
base alle disponibilità di software a magazzino.
ASUS CP Series Desktop PC 3

Licenza Software
I prodotti ASUS possono essere corredati da software, secondo la tipologia del
prodotto. I software, abbinati ai prodotti, sono in versione “OEM”: il software OEM
viene concesso in licenza all’ utente finale, come parte integrante del prodotto;
ciò significa che non può essere trasferito ad altri sistemi hardware e che, in caso
di rottura, di furto o in ogni altra situazione che lo renda inutilizzabile, anche la
possibilità di utilizzare il prodotto OEM viene compromessa.
Chiunque acquisti, unitamente al prodotto, un software OEM, è tenuto ad
osservare i termini e le condizioni del contratto di licenza tra il proprietario del
software e l’ utente finale, denominato “EULA” (End User Licence Agreement),
visualizzato a video, durante la fase di installazione del software stesso. Si avvisa
che l’ accettazione, da parte dell’ utente, delle condizioni dell’ EULA, ha luogo al
momento dell’ installazione del software stesso.
Italiano
4 ASUS CP Series Desktop PC

Sommario
Comunicazioni .....................................................................................4
Informazioni in materia di Sicurezza ............................................6
Note sul Manuale ................................................................................7
Benvenuti ............................................................... 8
Contenuto della Confezione ...........................................................8
Descrizione Desktop PC ........................................ 9
Caratteristiche Fronte / Retro .........................................................9
Installazione Desktop PC .................................... 12
Collegare le Periferiche ..................................................................12
Connecting the power ...................................................................13
Premere il pulsante di accensione e attivare il sistema ......13
Telecomando Media Center (Opzionale) .................................14
Ripristino del Sistema ......................................... 16
Tramite DVD di Ripristino ..............................................................16
Risoluzione dei Problemi .................................... 18
Italiano
ASUS CP Series Desktop PC 5

Comunicazioni
Federal Communications Commission Statement
This device complies with Part 15 of the FCC Rules. Operation is
subject to the following two conditions:
• This device may not cause harmful interference, and
• This device must accept any interference received including
interference that may cause undesired operation.
This equipment has been tested and found to comply with
the limits for a Class B digital device, pursuant to Part 15 of the
FCC Rules. These limits are designed to provide reasonable
protection against harmful interference in a residential
installation. This equipment generates, uses and can radi-
ate radio frequency energy and, if not installed and used in ac-
cordance with manufacturer’s instructions, may cause harmful
interference to radio communications. However, there is no
guarantee that interference will not occur in a particular
installation. If this equipment does cause harmful interference
to radio or television reception, which can be determined by
Italiano
turning the equipment off and on, the user is encouraged to try
to correct the interference by one or more of the following mea-
sures:
• Reorient or relocate the receiving antenna.
• Increase the separation between the equipment and receiver.
• Connect the equipment to an outlet on a circuit different from
that to which the receiver is connected.
• Consult the dealer or an experienced radio/TV technician for
help.
The use of shielded cables for connection of the monitor to
the graphics card is required to assure compliance with FCC
regulations. Changes or modifications to this unit not expressly
approved by the party responsible for compliance could void the
user’s authority to operate this equipment.
6 ASUS CP Series Desktop PC

Canadian Department of Communications
Statement
This digital apparatus does not exceed the Class B limits for
radio noise emissions from digital apparatus set out in the Radio
Interference Regulations of the Canadian Department of
Communications.
This class B digital apparatus complies with Canadian ICES-003.
Macrovision Corporation Product Notice
This product incorporates copyright protection technology that
is protected by method claims of certain U.S. patents and other
intellectual property rights owned by Macrovision Corporation
and other rights owners. Use of this copyright protection
technology must be authorized by Macrovision Corporation, and
is intended for home and other limited viewing uses only unless
otherwise authorized by Macrovision Corporation. Reverse
engineering or disassembly is prohibited.
Italiano
ASUS CP Series Desktop PC 7

Informazioni in materia di Sicurezza
Il Desktop PC ASUS è stato realizzato e testato per soddisfare i
nuovissimi standard di sicurezza per apparecchiature IT . Tuttavia,
per garantirne l’ osservanza, è importante leggere le seguenti
norme di sicurezza.
Installazione del Sistema
• Prima di utilizzare l’ apparecchio, leggere e seguire tutte le
istruzioni contenute nella documentazione.
• Non utilizzare questo prodotto in prossimità di acqua o di
sorgenti di calore, come un radiatore.
• Installare il sistema su una superficie stabile.
• I fori e le scanalature sul telaio servono per la ventilazione. Non
ostruire o coprire tali aperture. Assicurarsi di lasciare un ampio
spazio intorno al sistema. Mai inserire oggetti di alcun tipo sulle
scanalature/fori destinati alla ventilazione.
• Utilizzare il prodotto in ambienti con temperatura comprese
fra 0˚C e 35˚C.
• IIn caso di impiego di un cavo di estensione, assicurarsi che l’
Italiano
amperaggio totale dei dispositivi inseriti nel cavo non superi
quello del Desktop PC.
Precauzioni d’ Uso
• Non camminare sul cavo di alimentazione e non lasciare alcun
oggetto su di esso.
• Non versare acqua o altri liquidi sul sistema.
• Quando il sistema è spento, continua a circolare un
seppur minimo quantitativo di corrente elettrica.
Prima di pulire il sistema, disinserire sempre tutti i cavi
(alimentazione, modem e di rete) dalle prese elettriche.
• Se si verificano i seguenti problemi tecnici, disinserire il cavo di
alimentazione e contattare un tecnico qualificato o il proprio
rivenditore.
• La spina o il cavo di alimentazione sono danneggiati.
8 ASUS CP Series Desktop PC
• Un liquido è stato rovesciato nel sistema.
• Il sistema non funziona correttamente, pur attenendosi
alle istruzioni operative.
• Il sistema è caduto o il cabinet è stato danneggiato.
• Le prestazioni del sistema hanno subito variazioni.
AVVERTENZA PRODOTTO LASER
PRODOTTO LASER DI CLASSE 1
NON DISASSEMBLARE
La garanzia non si applica a prodotti
disassemblati dall’ utente
Il simbolo del bidone sbarraro, con le ruote, come da figura, indica
che il prodotto (apparecchio elettrico o elettronico e batterie a
bottone contenenti mercurio) non deve essere gettato nei rifiuti
comunali. Controllare le normative locali in materia di smaltimento
dei prodotti elettronici.
Note sul Manuale
Italiano
Per essere sicuri di eseguire correttamente determinate operazioni,
ricordare la seguente simbologia ricorrente nel manuale:
AVVERTENZA: Istruzioni da osservare OBBLIGATORIAMENTE per
evitare di farsi male.
IMPORTANTE: Istruzioni da seguire OBBLIGATORIAMENTE per il
completamento di un’ operazione.
SUGGERIMENTO: Suggerimenti e informazioni utili per il
completamento di un ‘ operazione.
NOTA: Informazioni aggiuntive per situazioni particolari.
ASUS CP Series Desktop PC 9

Benvenuti
Complimenti per l’ acquisto di ASUS Desktop Il contenuto della
confezione del nuovo Desktop PC è indicato di seguito, ma può
variare in base al modello. ASUS si riserva il diritto di sostituire i
componenti i accessori per fornire un servizio di ottima qualità.
Contattare il rivenditore, in caso di articoli danneggiati o
mancanti.
Contenuto della Confezione
• ASUS Desktop PC x1
• Tastiera x1
• Mouse x1
• Cavo di alimentazione x1
• DVD di Supporto x1
• DVD di Ripristino x1
• Guida al’ Installazione x1
• Certificato di Garanzia x1
• Telecomando (opzionale) x1
Italiano
Visitare il sito web ASUS http://support.asus.com per gli
aggiornamenti.
10 ASUS CP Series Desktop PC
Descrizione di Desktop PC
Caratteristiche Fronte / Retro
Fronte (Chiuso)
Fronte (Aperto)
Retro
11
1
1
12
2
6
5
2
13
4
7
14
15
8
3
4
10
9
*Nelle aree grigie sono contenute le porte del pannello frontale /
posteriore. Tali porte e la rispettiva posizione potrebbero variare,
in base al modello del sistema.
Italiano
Pulsante/
No.
Descrizione
LED
Premere per l’ espulsione di un disco dal
1.
vano dell’ unità ottica.
2. Copertura vano unità ottica.
3.
LED HDD.
4.
Pulsante di accensione
5. Copertura del pannello frontale.
continua alla pagina seguente
ASUS CP Series Desktop PC 11
No.
Slot/Porta Descrizione
Infrarossi (opzionale).
Slot per schede CompactFlash®/
Microdrive™.
Slot per schede MultiMediaCard/
6
Secure Digital™/ Memory Stick
Pro™.
Porta USB+E-SATA.
Porta IEEE 1394a
Collega a un dispositivo IEEE 1394
7.
a 4-pin
come un camrecorder digitale.
Collegano a dispositivi USB, quali
8. Porte USB 2.0
mouse, tastiera o fotocamera.
Connettore per l’inserimento di
9. Jack Cuffie
cuffie o stereo.
Connettore per l’inserimento di
10. Jack Microfono
un microfono.
Italiano
11. Conn. Alimentazione Connettore x cavo alimentazione
12. Selettore di voltaggio Seleziona la tensione in ingresso.
Porte audio da
Collega ad un sistema di
13.
7.1(8) canali
altoparlanti da 7.1(8) canali.
continua alla pagina seguente
12 ASUS CP Series Desktop PC
No. Slot/Porta Descrizione
Porta Tastiera
Collega ad una tastiera PS/2.
PS/2
Porta mouse
Collega ad un mouse PS/2.
PS/2
Porta S/PDIF
Collega ad un amplificatore per
Out ottica
uscita audio digitale.
Porta VGA
Collega a TV o monitor con
differenti uscite video.
14.
Porta HDMI
Porta DVI Collega a TV o monitor.
Porta LAN (RJ-
Porta per l’ inserimento di un
45)
cavo di rete.
Collega a dispositivi comformi
Porta COM
alle specifiche seriali.
Collegano a dispositivi USB, quali
Porte USB 2.0
mouse, tastiera o fotocamera.
Slot per l’ installazione di schede
Slot di espansione
di espansione.
15.
Porta DVI/S-Video/VGA Scheda VGA (opzionale)
Scheda di sintonizzazione TV
Italiano
Porta FM/RF/IR/S-Video
(opzionale)
ASUS CP Series Desktop PC 13
Installazione Desktop PC
Collegare le Periferiche
Non ostruire o coprire
i fori di aerazione
Sistema di altoparlanti
da 7.1(8) canali
Tastiera
Mouse
Italiano
Sistema di altoparlanti
da 7.1(8) canali
TV
Hub/
switch di rete
Schermo
Le illustrazioni sono solo a scopo esemplificativo. Le specifiche del prodotto potrebbero
essere diverse.
• Utilizare questo prodotto a temperatura ambiente inferiore ai 35˚C.
• Non ostruire o coprire i fori di aerazione.
14 ASUS CP Series Desktop PC
Collegare l’ Alimentazione
1. Mediante il selettore di voltaggio, impostare la corretta
tensione di ingresso, in base al voltaggio del proprio paese.
Impostare il selettore di voltaggio su 115V in una zona con 230V
danneggerà il sistema!
2. Collegare il cavo di alimentazione al connettore di
alimentazione e inserirlo nella presa a muro.
2
1
Italiano
Premere il pulsante di accensione e
attivare il sistema
ASUS CP Series Desktop PC 15
Telecomando Media Center
(Opzionale)
Utilizzare il telecomando per avviare il programma Media Center e
riprodurre file multimediali, quali musica e film. E’ inoltre possibile
installare un TV box esterno per guardare la TV e registrare i
programmi televisivi.
Riferirsi alle pagine seguenti per familiarizzare con le funzioni dei
pulsanti del telecomando.
1
2
22
3
21
20
4
19
5
18
6
7
17
8
Italiano
16
9
10
15
14
11
13
12
No. Pulsante Descrizione
Pulsante per accendere/spegnere lo
1. Accensione
schermo e gli altoparlanti
2. Pausa Mette in pausa una riproduzione
Termina la riproduzione di un file
3. Stop
multimediale.
16 ASUS CP Series Desktop PC
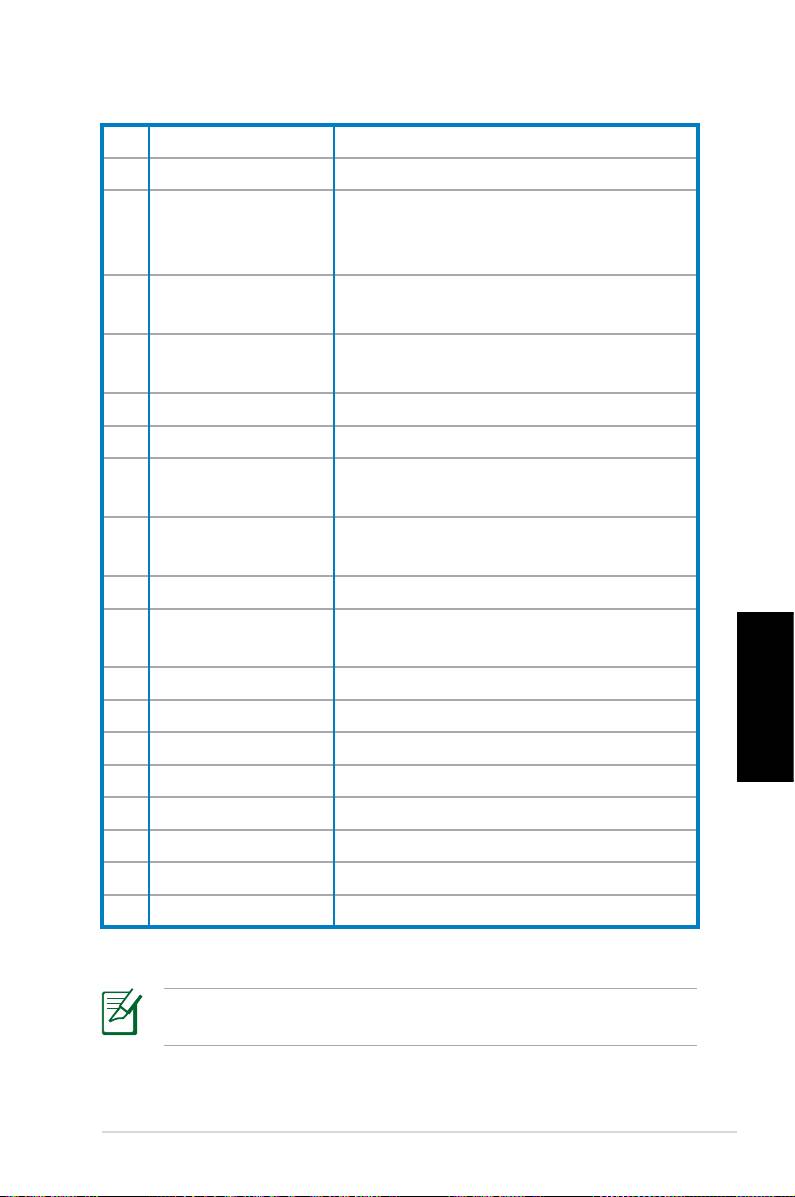
4. Avanti rapido Scorre rapidamente un file multimediale.
5. Traccia successiva Passa alla traccia successiva.
Visualizza le informazioni sui
6. Informazioni
programmi con Media Center o altre
opzioni menu.
Tasto navigazione
Scorre attraverso i menu OSD (on-
7.
a 4 direzioni
screen display).
Windows® Media
8.
Avvia il programma Media Center.
Center
9. Canale su/giù Pulsante per il cambio dei canali TV.*
10. Silenzio Disattiva l’ uscita audio.
Visualizza l’ elenco delle registrazioni
11. Registrazioni TV
TV.*
EPG (Electronic
12.
Visualizza la schermata EPG.*
Program Guide)
13. Pulsante Live TV Pulsante per guardare i programmi TV*.
Consente il passaggio fra immissione
14.
Shift
numerica e alfabetica.
15. Pulsanti Teletesto Disponibili soltanto nei modelli Europei.
16 Volume su/giù Aumenta/riduce l' audio.
Italiano
17. OK Pulsante per confermare un’azione.
18. Indietro Torna alla pagina precedente.
19. Traccia Prec. Riporta alla traccia precedente
20. Indietro veloce Riavvolge un file multimediale.
21. Play Riproduce un file multimediale
22 Registrazione Avvia una registrazione TV.
*Il sistema non è dotato di sintonizzatore TV integrato. Per
utilizzare la funzione TV, acquistare un TV box esterno.
ASUS CP Series Desktop PC 17

Ripristino del Sistema
Tramite DVD di Ripristino
Il DVD di Ripristino contiene un' immagine del sistema operativo
installato dal fabbricante. Il DVD di Ripristino, insieme al DVD
di Supporto, offre una soluzione completa per il ripristino del
sistema, che è così riportato rapidamente allo stato operativo
originario, purchè il disco rigido sia in buone condizioni. Prima
di iniziare ad utilizzare il DVD di Ripristino, copiare i file dati (tipo
files PST Outlook) in un dispositivo USB o in un drive di rete e
annotare le impostazioni di configurazioni personalizzate (come
le impostazioni di rete) .
1. Accendere il Desktop PC ASUS e si vedrà visualizzato il logo
ASUS. Premere F8 per accedere al menu Please select boot
device.
2. Inserire il DVD di Ripristino
nell’ unità ottica e selezionare
tale unità (“CDROM:XXX”) come dispositivo di avvio. Premere
Enter (Entra), quindi cliccare su uno dei tasti per continuare.
3. Appare la finestra
Windows Boot Manager. Selezionare
Windows Setup [EMS Enabled] e premere Enter. Attendere
Italiano
la comparsa del messaggio Windows is loading files .
4. Selezionare dove installare un nuovo sistema. Le opzioni sono:
Recover system to a partition
Questa opzione eliminerà soltanto una delle partizioni da
selezionare di seguito, mantenendo le altre e creerà una
nuova partizione del sistema come disco “C.” Selezionare una
partizione e cliccare NEXT (AVANTI).
Recover system to entire HD
Questa opzione eliminerà tutte le partizioni dall’ unità disco
rigido e creerà una nuova partizione del sistema, come disco
“C”. Selezionare e cliccare Yes (Sì).
5.
Seguire le istruzioni sullo schermo per completare il
processo di ripristino.
In fase di ripristino del sistema, saranno persi tutti i dati. Prima
dell' operazione, assicurarsi di eseguire una copia di riserva.
18 ASUS CP Series Desktop PC

6. Al termine del ripristino del sistema, si richiede di inserire il
DVD di supporto nell’ unità ottica. Cliccare OK e sarà riavviato
il sistema.
7. Dopo aver riavviato il sistema, Windows® Vista™ inizia
le configurazioni. Seguire le istruzioni sullo schermo per
completare il processo e poi riavviare il computer.
Questo DVD di Ripristino è esclusivamente per il Desktop PC ASUS.
NON utilizzarlo su altri computer. Visitare il sito web ASUS www.
asus.com per gli aggiornamenti.
Italiano
ASUS CP Series Desktop PC 19
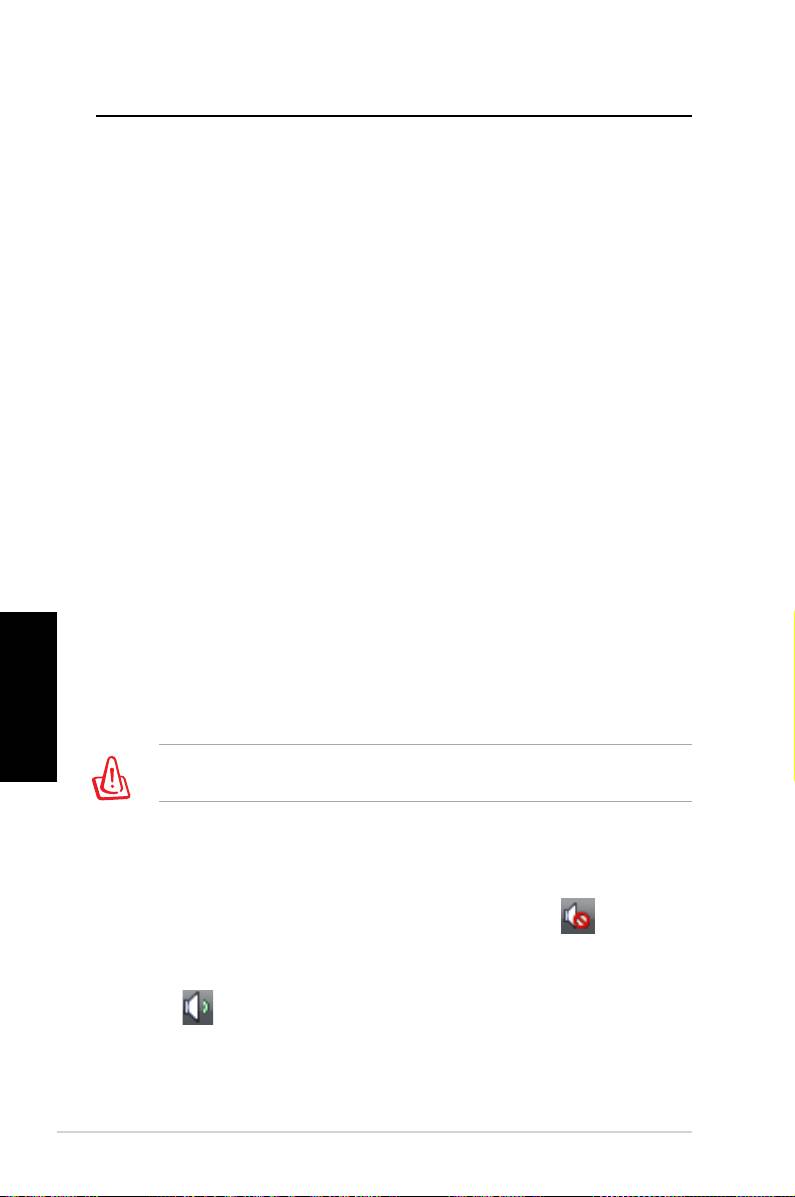
Risoluzione dei Problemi
Se questa sezione non offre risposte ai problemi riscontrati nel
dispositivo, contattare direttamente l’ azienda, ai riferimenti forniti
nel DVD di supporto.
Cosa posso fare se non riesco ad accendere il Desktop PC ?
Controllare se si illumina il LED dell’ alimentazione sul pannello
frontale. Se il sistema non è alimentato, la spia non si accende.
• Verificare che il cavo di alimentazione sia inserito.
• Quando si utilizza un cavo di estensione o un regolatore di
tensione, accertarsi che sia inserito nella presa a muro e funzioni.
Cosa posso fare se il Desktop PC non riesce ad accedere al
sistema operativo?
• Assicurarsi di utilizzare moduli di memoria supportati dal
sistema e che siano stati correttamente installati nei socket.
• Verificare che le periferiche siano compatibili con il sistema.
Determinati dispositivi di archiviazione USB, per esempio, sono
caratterizzati da differenti strutture dell’ unità disco ed entrano
facilmente in modalità sospensione.
Italiano
Se la suddetta procedura non risolve il problema, contattare il
rivenditore oppure eseguire un ripristino del sistema tramite il
DVD di Ripristino in dotazione.
In fase di ripristino del sistema, saranno persi tutti i dati. Prima dell'
operazione, assicurarsi di eseguire una copia di riserva dei dati.
Perchè non riesco a sentire niente dagli altoparlanti / cuffie?
Controllare l’ icona volume sulla barra delle applicazioni di
Windows® per vedere se è impostata su “silenzio” . In questo
caso, cliccare due volte sull’ icona per visualizzare la barra del
volume, quindi premere sull’ icona “silenzio” per annullare tale
modalità .
20 ASUS CP Series Desktop PC

Perchè non è possibile leggere o scrivere su un CD/DVD?
• Assicurarsi che il disco utilizzato sia compatibile con l’ unità
ottica.
• Controllare che il disco sia stato inserito correttamente e che
non ci siano graffi sulla sua superficie.
• Scoprire se sul disco è attivata la protezione da scrittura.
Italiano
ASUS CP Series Desktop PC 21

Italiano
22 ASUS CP Series Desktop PC
Stolní počítač ASUS řady CP
Uživatelská příručka
Česky

CZ3995
První vydání V1
červenec 2008
Copyright© 2008 ASUSTeK COMPUTER INC. Všechna práva vyhrazena.
Žádná část této příručky, včetně popsaných výrobků a softwaru, nesmí být
kopírována, přenášena, přepisována, ukládána do paměťového zařízení
nebo překládána do jakéhokoliv jazyka v žádné formě ani žádnými prostředky
vyjma dokumentace, které kupující vytvoří jako zálohu, bez výslovného
Česky
písemného souhlasu společnosti ASUSTeK COMPUTER INC. (“ASUS”).
Názvy produktů a společností uvedené v této příručce mohou nebo nemusí
být registrované ochranné známky nebo autorská práva příslušných
společností a jsou použity pouze identikaci nebo vysvětlení a pro dobro
vlastníka bez úmyslu porušit tyto značky nebo práva. Všechny ochranné
známky jsou majetkem příslušných vlastníků.
Věnovali jsme maximální snahu tomu, aby obsah této příručky byl správný
a aktuální. Nicméně neposkytujeme žádnou záruku ohledně přesnosti jejího
obsahu. Výrobce si vyhrazuje právo provádět změny bez předchozího
upozornění.

Obsah
Notices ......................................................................... 4
Bezpečnostní zásady ................................................... 6
Poznámky k této příručce ............................................ 7
Vítejte .................................................................8
Obsah krabice .............................................................. 8
Popis stolního počítače ...................................9
Části předního / zadního panelu .................................. 9
Nastavení stolního počítače ..........................12
Připojení zařízení ....................................................... 12
Jak připojit napájení ................................................... 13
Stisknutím vypínače zapněte systém ........................ 13
Používání dálkového ovladače Media Center (volitelné)
.. 14
Obnovení systému .........................................16
Použití disku DVD pro obnovení ............................................16
Odstraňování problémů ................................... 18
Česky
Stolní počítač ASUS řady CP 3

Notices
Federal Communications Commission Statement
This device complies with Part 15 of the FCC Rules.
Operation is subject to the following two conditions:
• This device may not cause harmful interference, and
• This device must accept any interference received
including interference that may cause undesired operation.
This equipment has been tested and found to comply with the
limits for a Class B digital device, pursuant to Part 15 of the
FCC Rules. These limits are designed to provide reasonable
protection against harmful interference in a residential
installation. This equipment generates, uses and can radiate
radio frequency energy and, if not installed and used in
accordance with manufacturer’s instructions, may cause
harmful
interference to radio communications. However, there is no
guarantee that interference will not occur in a particular
installation. If this equipment does cause harmful interference
to radio or television reception, which can be determined by
turning the equipment off and on, the user is encouraged to
try to correct the interference by one or more of the following
measures:
• Reorient or relocate the receiving antenna.
• Increase the separation between the equipment and
receiver.
Česky
• Connect the equipment to an outlet on a circuit different
from that to which the receiver is connected.
• Consult the dealer or an experienced radio/TV technician
for help.
The use of shielded cables for connection of the monitor
to the graphics card is required to assure compliance with
FCC regulations. Changes or modications to this unit not
expressly approved by the party responsible for compliance
could void the user’s authority to operate this equipment.
Stolní počítač ASUS řady CP

Canadian Department of Communications
Statement
This digital apparatus does not exceed the Class B limits for
radio noise emissions from digital apparatus set out in the
Radio Interference Regulations of the Canadian Department
of Communications.
This class B digital apparatus complies with Canadian ICES-
003.
Macrovision Corporation Product Notice
This product incorporates copyright protection technology
that is protected by method claims of certain U.S. patents
and other intellectual property rights owned by Macrovision
Corporation and other rights owners. Use of this copyright
protection
technology must be authorized by Macrovision Corporation,
and is intended for home and other limited viewing uses
only unless otherwise authorized by Macrovision
Corporation. Reverse engineering or disassembly is
prohibited.
Česky
Stolní počítač ASUS řady CP 5

Bezpečnostní zásady
Tento stolní počítač ASUS byl zkonstruován a otestován, aby
splňoval nejaktuálnější bezpečnostní normy pro technologii
IT. Pro zajištění bezpečnosti je však nutné, abyste si přečetli
následující bezpečnostní instrukce.
Instalace počítače
• Před používáním počítače si přečtěte a dodržujte veškeré
pokyny v dokumentaci.
• Tento počítač nepoužívejte v blízkosti vody nebo zdroje
tepla, například radiátoru.
• Tento počítač umístěte na stabilní povrch.
• Chcete-li umístit počítač na jiné zařízení, použijte stojan.
V případě umístění tohoto počítače na jiné zařízení bez
stojanu může dojít k omezení větrání a poškození počítače.
• Otvory ve skříni slouží k větrání. Tyto otvory neucpávejte
ani nezakrývejte. Okolo počítače zajistěte dostatečný
prostor pro větrání. Do větracích otvorů počítače
nezasunujte žádné předměty.
• Používáte-li prodlužovací kabel, ujistěte se, že celkové množství
proudu odebírané zařízeními připojenými k prodlužovacímu
kabelu nepřekročí maximální hodnotu pro daný kabel.
Péče během používání
• Na napájecí kabel nestoupejte ani nepokládejte žádné
předměty.
Česky
•
Zabraňte potřísnění počítače vodou nebo jinými tekutinami.
• Počítačem stále prochází malé množství elektrického
proudu, i když je vypnutý.
Před čistěním počítače vždy odpojte veškeré napájecí,
modemové a síťové kabely z elektrických zásuvek.
• Pokud se u počítače setkáte s některým z následujících
technických problémů, odpojte napájecí kabel a obraťte
se na kvalikovaného servisního technika nebo prodejce.
• Je poškozen napájecí kabel nebo zástrčka.
• Do počítače vnikla tekutina.
Stolní počítač ASUS řady CP
• Počítač nefunguje správně, přestože se řídíte
návodem k použití.
• Došlo k pádu počítače nebo k poškození skříně.
• Změnil se výkon počítače.
Bezpečnost jednotky CD-ROM - VAROVÁNÍ
LASEROVÉ ZAŘÍZENÍ 1. TŘÍDY
NEDEMONTUJTE
Záruka se nevztahuje na výrobky, které byly
uživateli demontovány
Tento symbol přeškrtnutého kontejneru ukazuje, že tento
produkt (elektrické nebo elektronické zařízení a knoíková
baterie s obsahem rtuti) nesmí být likvidován společně s
komunálním odpadem. Seznamte se s místními vyhláškami
pro likvidaci elektronických produktů.
Poznámky k této příručce
V této uživatelské příručce je uvedeno několik poznámek a
varování, které je třeba dodržovat, aby bylo možné některé
postupy provést bezpečně a úplně. Tyto poznámky mají
různou úroveň důležitosti (viz níže):
VAROVÁNÍ!
Důležité informace, které musí být dodržovány
v zájmu bezpečného provozu.
Česky
DŮLEŽITÉ! Důležité informace, které musí být dodržovány,
aby se zabránilo poškození dat, součástí nebo osob.
TIP: Tipy pro provádění úkolů.
POZNÁMKA: Informace pro zvláštní situace.
Stolní počítač ASUS řady CP

Vítejte
Blahopřejeme vám k zakoupení stolního počítače ASUS.
Níže je uveden obsah krabice s vaším novým stolním
počítačem, ale jednotlivé položky se mohou lišit podle
modelů. Společnost ASUS si vyhrazuje právo na změnu dílů
nebo příslušenství pro zajištění optimální použitelnosti pro
zákazníky.
Pokud je některá položka poškozena nebo chybí, obraťte se
na prodejce.
Obsah krabice
• Stolní počítač ASUS x1
• Klávesnice x1
• Myš x1
• Napájecí kabel x1
• Podpůrný disk DVD x1
• Disk DVD pro obnovu x1
• Instalační příručka x1
• Záruční karta x1
• Dálkový ovladač (volitelný) x1
Veškeré aktuální informace najdete na webových stránkách
společnosti ASUS na adrese http://support.asus.com.
Česky
8 Stolní počítač ASUS řady CP
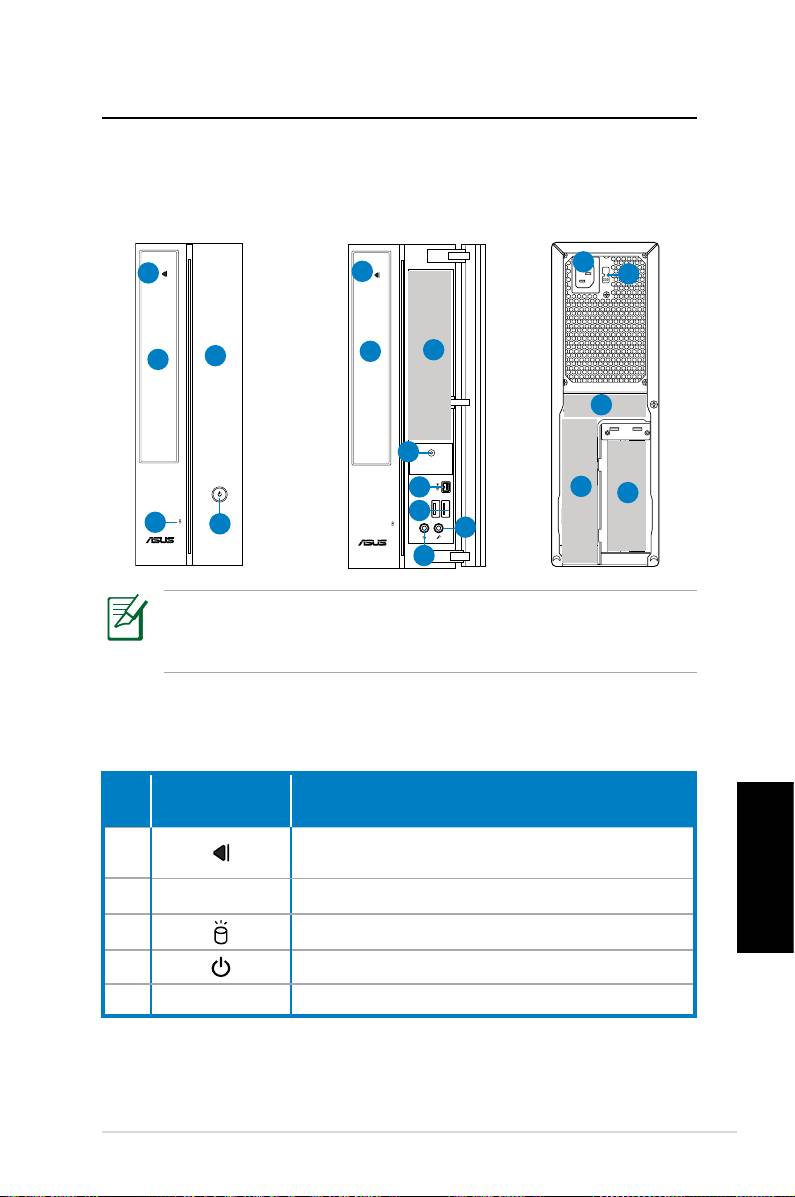
Popis stolního počítače
Části předního / zadního panelu
Přední strana
Přední strana
Zadní strana
(zavřená)
(otevřená)
11
1
1
12
2
6
5
2
13
4
7
14
15
8
3
4
10
9
*Šedé části obsahují porty předního/zadního panelu. Tyto
porty a jejich umístění se mohou lišit v závislosti na modelu
vašeho počítače.
Tlačítko/
Č.
Popis
indikátor LED
Stisknutím vysuňte disk z pozice pro
1.
optickou jednotku.
Česky
2. Kryt pozice optické jednotky
3. Indikátor LED pevného disku
.
Vypínač
5. Kryt předního panelu
pokračování na další straně
Stolní počítač ASUS řady CP 9
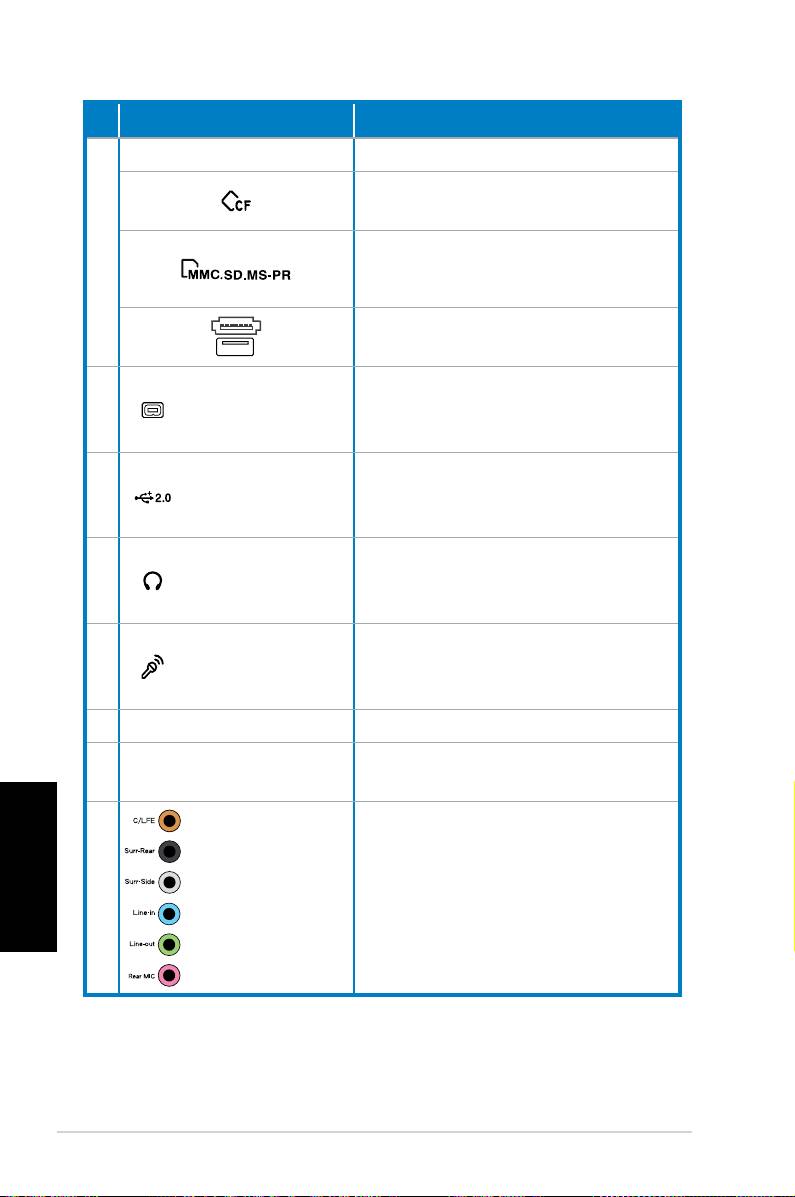
Č.
Solt/Port Popis
Infračervené rozhraní (volitelně).
Slot pro kartu CompactFlash®/
Microdrive™ .
Slot pro kartu MultiMediaCard/
6
Secure Digital™/ Memory Stick
Pro™.
USB+E-SATA port.
Slouží k připojení zařízení IEEE
kolíkový port
.
139, například digitálního
IEEE 139a
kamkordéru.
Slouží k připojení zařízení USB,
Porty rozhraní
8.
například myši, klávesnice
USB 2.0
nebo fotoaparátu.
Zdířka pro
Slouží k připojení stereofonních
9.
připojení
reproduktorů nebo sluchátek.
sluchátek
Zdířka pro
připojení
Slouží k připojení mikrofonu.
mikrofonu
Konektor napájení Připojení napájecího kabelu.
Slouží k volbě vstupního
Volič napětí
napětí.
Česky
Porty .1
Slouží k připojení .1 (8)
(8)kanálového
kanálového reproduktorového
zvuku
systému.
pokračování na další straně
10 Stolní počítač ASUS řady CP
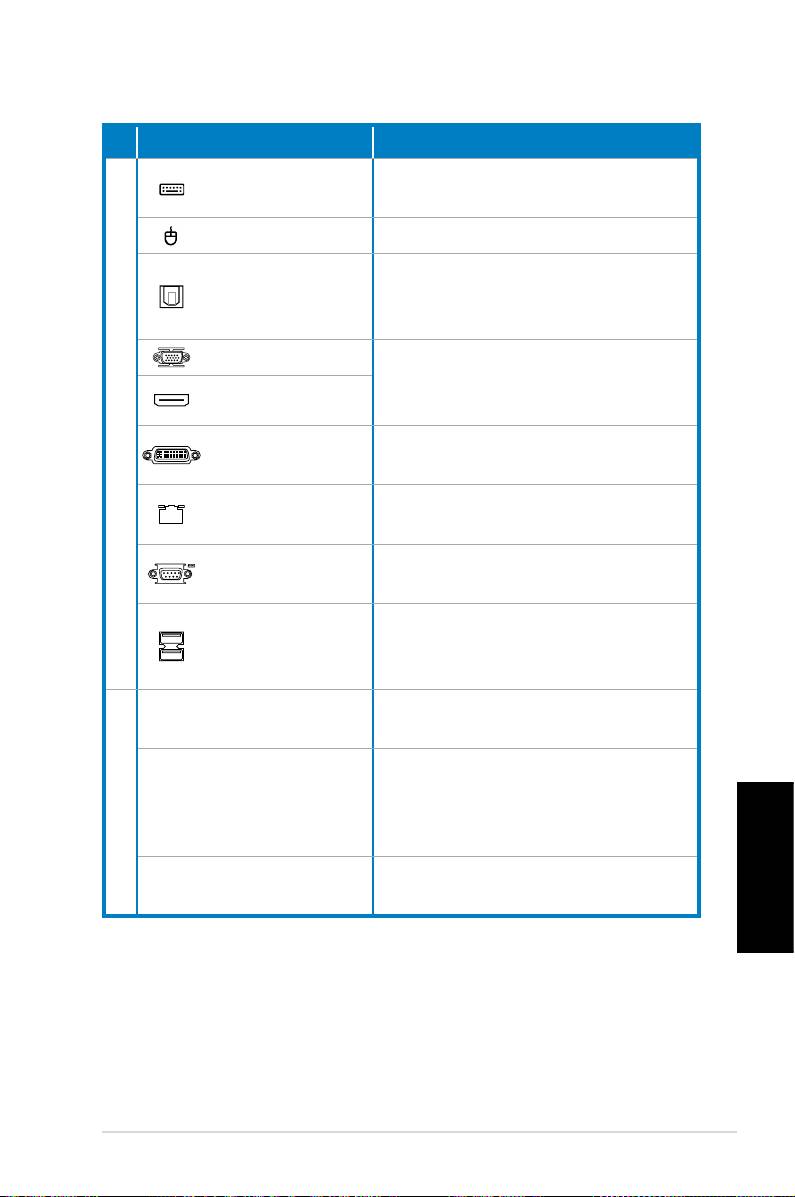
Č. Solt/Port Popis
Port klávesnice
Připojuje se k PS/2 klávesnici.
PS/2
Port myši PS/2t Připojuje se k PS/2 myši.
Port optického
Slouží k připojení zesilovače
výstupu S/
pro výstup digitálního zvuku.
PDIF
Port VGA
Slouží k připojení televizoru
nebo monitoru s odlišným
Port HDMI
výstupem videa.
Slouží pro připojení k televizoru
Port DVI
nebo monitoru.
Port LAN (RJ-
Slouží k připojení síťového
5)
kabelu.
Umožňuje připojení zařízení
COM port
vyhovujících sériové normě.
Slouží k připojení zařízení USB,
Porty rozhraní
například myši, klávesnice
USB 2.0
nebo fotoaparátu.
Tyto štěrbiny použijte k instalaci
Rozšiřovací štěrbiny
rozšiřovacích karet.
Port DVI/S-Video/VGA Karta VGA (volitelně)
Port FM/RF/IR/S-
Karta TV tuneru (volitelně)
Česky
Video
Stolní počítač ASUS řady CP 11
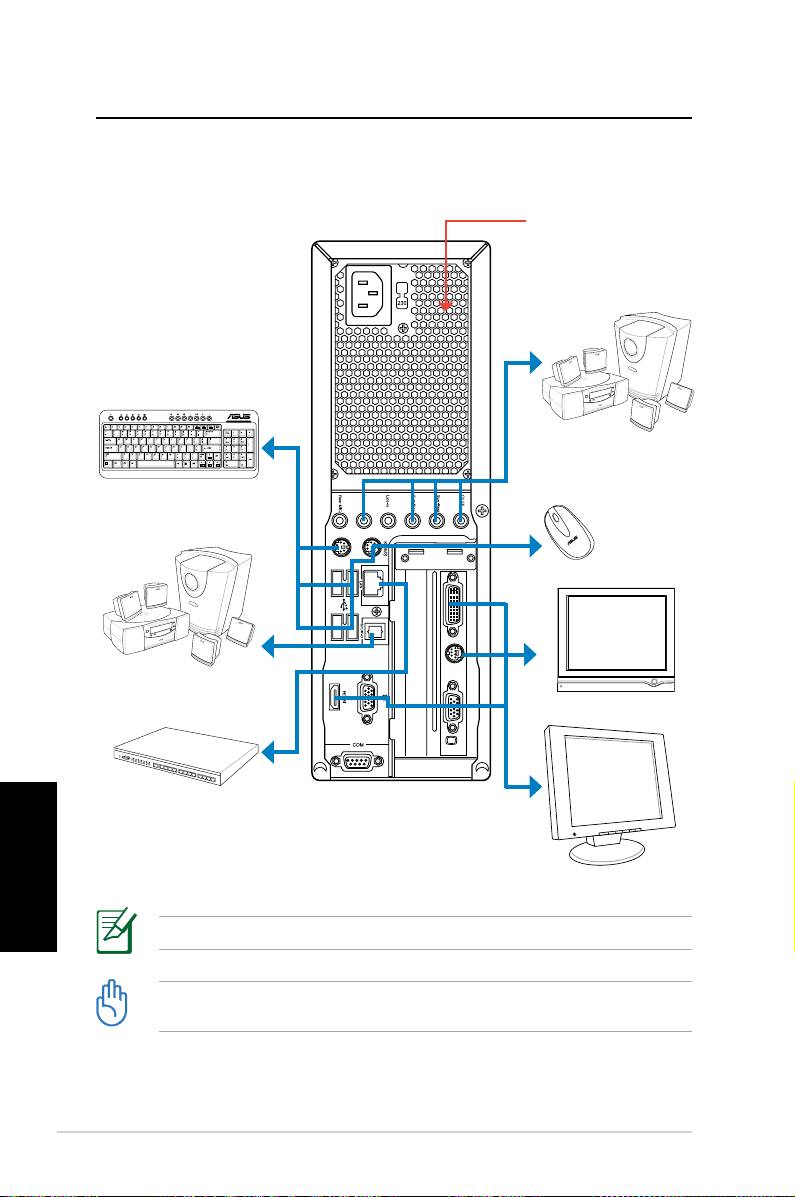
Nastavení stolního počítače
Připojení zařízení
Tyto otvory
neucpávejte ani
nezakrývejte
7.1(8)kanálový
reproduktorový
systém
Klávesnice
Myš
7.1(8)kanálový
reproduktorový
TV
systém
Síťový rozbočo-
vač/přepínač
Česky
Displej
Obrázky jsou jen informační. Skutečné technické údaje se mohou lišit.
• Tento výrobek používejte při okolní teplotě do 35°C..
• Tyto ventilační otvory nezakrývejte.
12 Stolní počítač ASUS řady CP
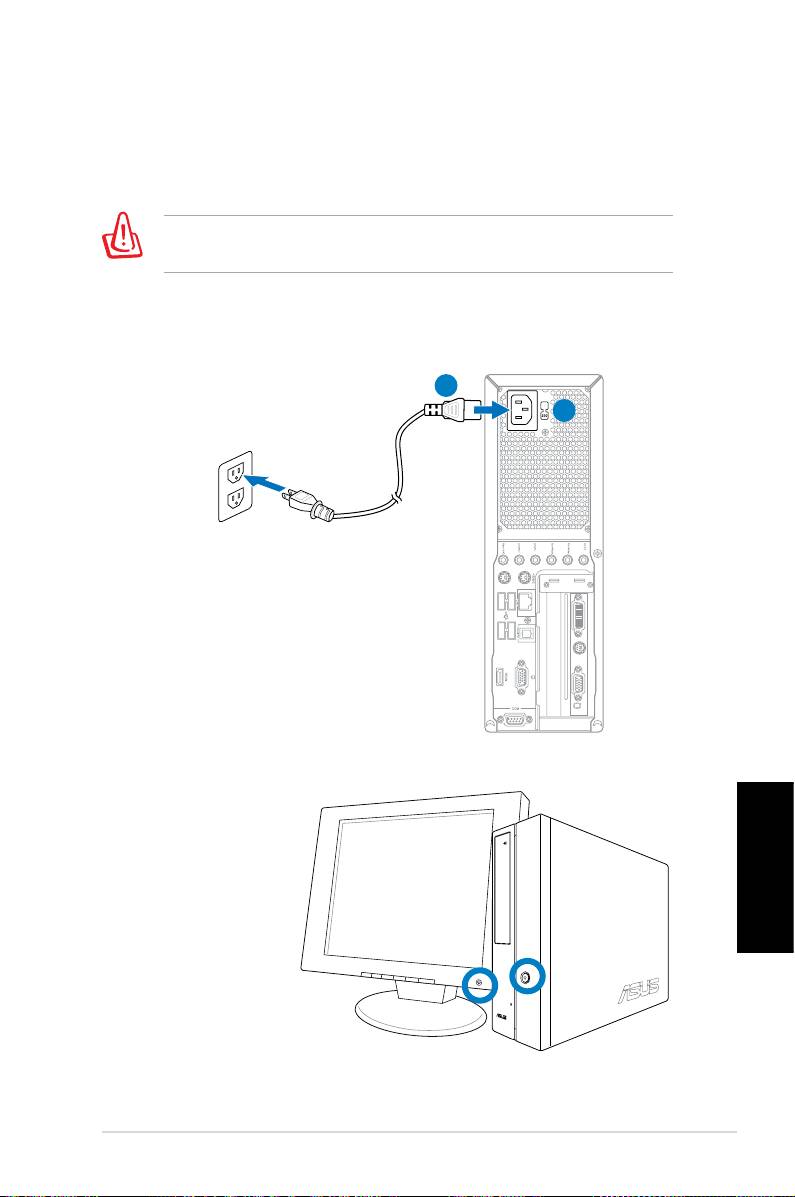
Jak připojit napájení
1. Přepnutím nastavte volič napětí na příslušné vstupní
napětí používané ve vaší zemi.
Nastavení voliče napěti na 115 V ve státě, kde se
používá 230 V poškodí váš systém!
2. Připojte napájecí kabel k napájecímu konektoru a
zasuňte jej do zásuvky ve zdi.
2
1
Stisknutím vypínače zapněte systém
Česky
Stolní počítač ASUS řady CP 13
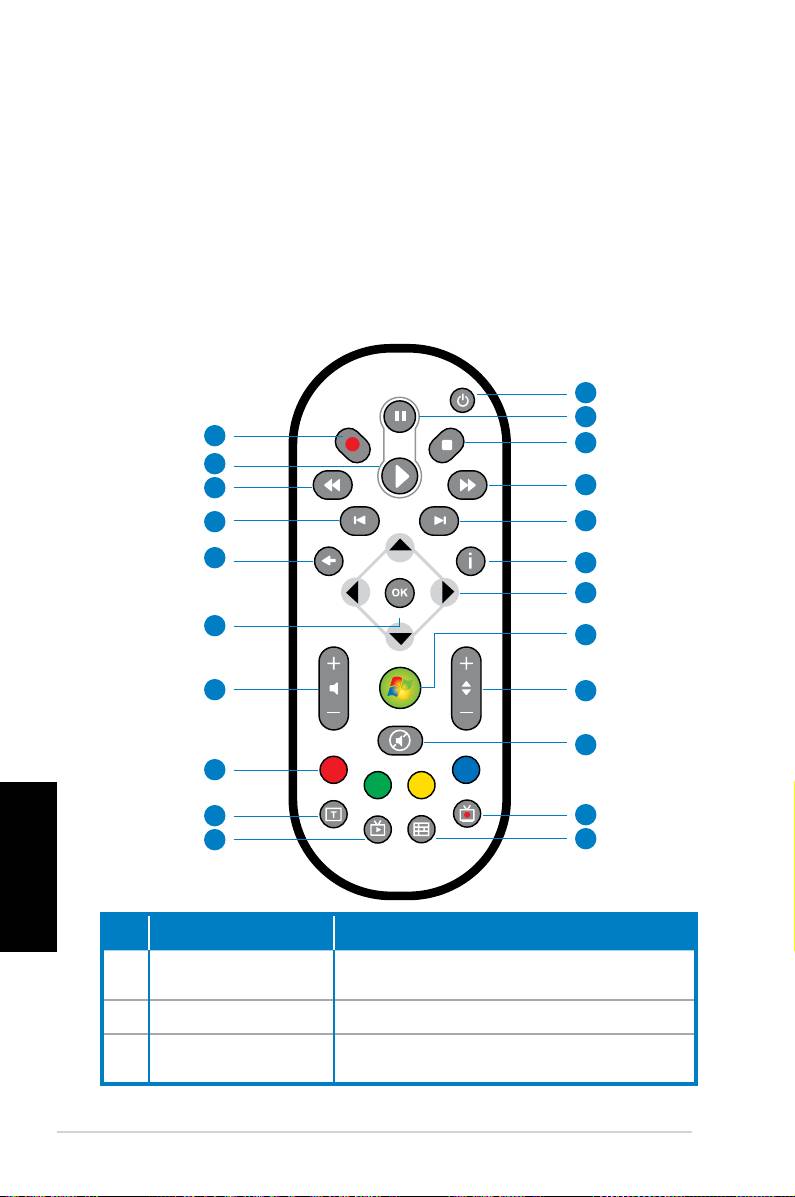
Používání dálkového ovladače Media
Center (volitelné)
Dálkový ovladač můžete používat ke spuštění programu
Media Center a přehrávání multimediálních souborů, např.
hudebních či lmových. Rovněž můžete nainstalovat externí
TV box pro sledování a nahrávání televizních programů.
Seznamte se s funkcemi tlačítek dálkového ovladače, které
jsou popsány v následující tabulce.
1
2
22
3
21
20
4
19
5
18
6
7
17
8
16
9
10
15
14
11
Česky
13
12
Č. Tlačítko Popis
Stisknutím zapnete/vypnete obra-
1. Napájení
zovku a reproduktory.
2. Pozastavit Stisknutím pozastavíte přehrávání.
Stisknutím přerušíte přehrávání
3. Zastavit
multimediálního souboru.
1 Stolní počítač ASUS řady CP
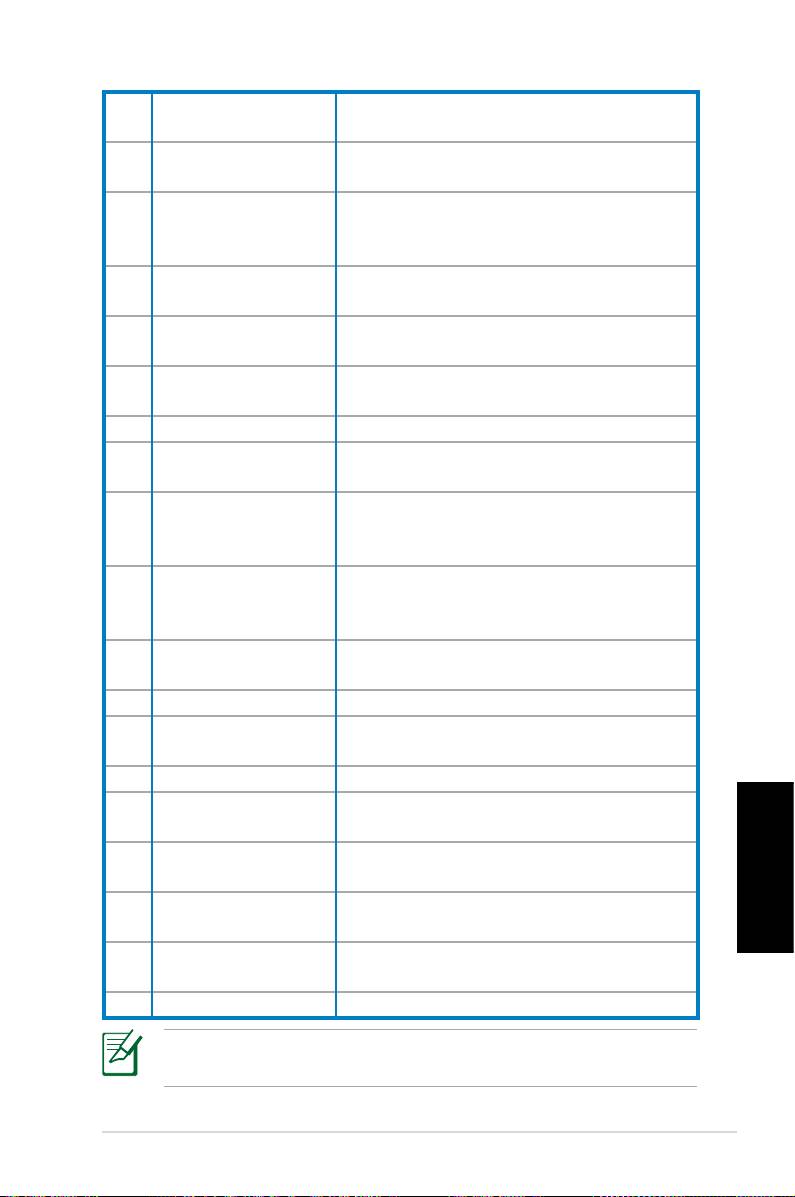
Rychle posunout
Stisknutím tohoto tlačítka rychle
.
dopředu
posunete soubor s médii dopředu.
Stisknutím tohoto tlačítka přejdete
5. Další skladba
na další skladbu.
Stisknutím zobrazíte informace o
.
Informace
programu v rámci Media Center
nebo jiných nabídek.
Čtyřsměrná navi-
Slouží k procházení zobrazených
.
gační tlačítka
nabídek.
®
Windows
Media
Stisknutím spustíte program Media
8.
Center
Center.
O kanál nahoru/
Stisknutím můžete přepínat mezi
9.
dolů
televizními kanály.*
10. Ztlumit Stisknutím vypnete výstup zvuku.
Stisknutím zobrazíte seznam s
11. Nahrávky TV
nahranými televizními pořady.*
EPG (Elektronic-
Stisknutím tohoto tlačítka se zob-
12.
ký programový
razí obrazovka s elektronickým
průvodce)
programovým průvodcem.*
Tlačítko živého
Stisknutím tohoto tlačítka můžete
13.
televizního vysí-
sledovat programy živého televizní-
lání
ho vysílání. *
Slouží k přepínání mezi zadáváním
1.
Přepnout
číslic a abecedních znaků.
15. Tlačítka teletextu
K dispozici pouze u evropských modelů.
Zvýšit/snížit hla-
1
Stisknutím zvýšíte/snížíte hlasitost.
sitost
1.
OK
Stisknutím tohoto tlačítka potvrdíte akci.
Stisknutím tohoto tlačítka se vrátíte
18. Zpět
na předchozí stránku.
Stisknutím tohoto tlačítka přejdete
19. Předchozí skladba
na předchozí stránku.
Česky
Stisknutím tohoto tlačítka posunete
20. Převíjení
soubor s médii dozadu.
Stisknutím přehrajete multimediální
21. Přehrát
soubor.
22 Záznam
Stisknutím spustíte nahrávání z televize.
*Tento počítač není dodáván se zabudovaným TV tunerem.
Chcete-li používat funkci TV, nejdříve zakupte externí TV box.
Stolní počítač ASUS řady CP 15

Obnovení systému
Použití disku DVD pro obnovení
Disk DVD pro obnovení obsahuje bitovou kopii operačního
systému nainstalovaného do počítače během výroby. Disk DVD
pro obnovení společně s podpůrným diskem DVD představují
komplexní řešení obnovení, které rychle obnoví počítač do
původního funkčního stavu za předpokladu, že je v pořádku váš
pevný disk. Před použitím disku DVD pro obnovení zkopírujte
vaše datové soubory (například soubory PST aplikace Outlook)
do zařízení USB nebo na síťovou jednotku a zapište si vlastní
nastavení kongurace (například síťová nastavení).
1. Zapněte stolní počítač ASUS. Zobrazí se logo ASUS.
Stisknutím klávesy F8 přejděte do nabídky Vyberte
spouštěcí zařízení.
2. Vložte disk DVD pro obnovení do optické jednotky a
vyberte optickou jednotku („CDROM:XXX“) jako spouště-
cí zařízení. Stiskněte klávesu Enter a potom pokračujte
stisknutím libovolné klávesy.
3. Zobrazí se okno
Správce spouštění Windows. Vyberte
možnost Instalace Windows [EMS povoleno] a stisk-
něte klávesu Enter. Počkejte, dokud bude zobrazena
zpráva Systém Windows načítá soubory.
. Vyberte umístění instalace nového systému. K dispozici
jsou následující možnosti:
Obnovit systém do oddílu
Tato volba odstraní pouze oddíl, který jste vybrali níže, umožní
Česky
vám zachovat ostatní oddíly a vytvoří nový systémový oddíl
jako jednotku „C“. Vyberte oddíl a klepněte na tlačítko DALŠÍ.
Obnovit systém na celý pevný disk
Tato volba odstraní z vašeho pevného disku všechny
oddíly a vytvoří nový systémový oddíl jako jednotku „C“.
Vyberte a klepněte na tlačítko Ano.
5. Při obnovování postupujte podle zobrazených pokynů.
Během obnovení systému budou ztracena veškerá data.
Před obnovením systému nezapomeňte provést zálohování.
1 Stolní počítač ASUS řady CP

. Po dokončení obnovení systému budete vyzváni, abyste
vložili podpůrný disk DVD do optické jednotky. Klepnutím
na tlačítko OK se počítač restartuje.
. Po restartování počítače začne systém Windows®
Vista™ provádět kongurace systému. Při kongurování
postupujte podle zobrazených pokynů a potom
restartujte počítač.
Tento disk DVD pro obnovení je určen pouze pro stolní
počítač ASUS. NEPOUŽÍVEJTE jej s jinými počítači.
Veškeré aktualizace jsou k dispozici na webu společnosti
ASUS www.asus.com.
Česky
Stolní počítač ASUS řady CP 1

Odstraňování problémů
Přečtěte si následující otázky a odpovědi, které vám mohou
pomoci při odstraňování problémů. Pokud nenajdete odpovědi
na vaše otázky, můžete nás kontaktovat přímo prostřednictvím
kontaktních informací na podpůrném disku DVD.
Co mám dělat, když stolní počítač nelze spustit?
Zkontrolujte, zda svítí indikátor napájení LED na předním
panelu. Pokud počítač není napájen, tento indikátor nesvítí.
• Zkontrolujte, zda je připojený napájecí kabel.
• Používáte-li prodlužovací kabel nebo regulátor napětí,
zkontrolujte, zda je připojený do elektrické zásuvky a
zapnutý.
Co mám dělat, když stolní počítač nemůže spustit
operační systém?
• Zkontrolujte, zda používáte paměťové moduly
podporované systémem a zda jsou správně nainstalovány
v paticích.
• Zkontrolujte, zda jsou periferní zařízení kompatibilní se
systémem. Například některá paměťová zařízení USB
mají odlišnou diskovou strukturu a snadněji přecházejí do
režimu spánku.
Pokud se problém nepodaří odstranit pomocí výše
uvedených pokynů, obraťte se na prodejce nebo proveďte
obnovení systému pomocí dodaného disku DVD pro
Česky
obnovení.
Během obnovení systému budou ztracena veškerá
data. Před obnovením systému nezapomeňte provést
zálohování.
Proč není slyšet z reproduktorů/sluchátek žádný zvuk?
Podle ikony hlasitosti na hlavním panelu systému Windows®
zkontrolujte, zda není ztlumený zvuk . Pokud ano,
poklepáním na tuto ikonu zobrazte indikátor hlasitosti a
18 Stolní počítač ASUS řady CP

potom klepnutím na ikonu ztlumení pod indikátorem zrušte
režim ztlumení .
Proč nelze načítat ani zapisovat na disk CD/DVD?
• Zkontrolujte, zda používáte disk, který je kompatibilní s
optickou jednotkou.
• Zkontrolujte, zda je disk správně vložen či zda není
poškrábaný.
• Zjistěte, zda není disk chráněn proti zápisu.
Česky
Stolní počítač ASUS řady CP 19

Česky
20 Stolní počítač ASUS řady CP
ASUS CP sorozatú asztali PC
Felhasználói kézikönyv
Magyar

HUG3995
Első kiadás, 1. verzió
Augusztus 2008
Copyright © 2008 ASUSTeK COMPUTER INC, Minden jog fenntartva
Az alábbi tájékoztató, valamint a benne ismertetett szoftverek és egyéb
termékek semelyike nem másolható, terjeszthető, rögzíthető adattároló
rendszereken, vagy fordítható le bármely más nyelvre semmilyen for-
mában és módon - kivéve a termék vásárlója által készített biztonsági
másolatokat – anélkül, hogy erről előzetesen az ASUSTeK COMPUTER
INC. (ASUS) cég írásos engedélyt ne adna.
A jelen kézikönyvben említett termékeket és cégneveket csak azonosítási
célra használtuk, azok a jogtulajdonosok bejegyzett védjegyei vagy
szerzői jogok által védett tulajdonai lehetnek. Az összes védjegy a
jogtulajdonos tulajdona.
Magyar
Minden tőlünk telhetőt megtettünk, hogy a kézikönyvben megadott adatok
pontosak legyenek és a termékkel kapcsolatos aktuális információkat
tükrözzék. A gyártó a kézikönyvben előforduló hibákért felelősséget nem
vállal. Az előzetes bejelentés nélküli változtatás joga fenntartva.

Tartalomjegyzék
Tartalomjegyzék ........................................................... 3
Notices ......................................................................... 4
A biztonságos üzemeltetéssel kapcsolatos információk
.. 6
Megjegyzések a kézikönyvhöz .................................... 7
Üdvözöljük ........................................................8
A csomag tartalma ....................................................... 8
Az asztali PC felépítése....................................9
Az előlap és a hátsó panel ........................................... 9
A PC üzembehelyezése ..................................12
A perifériák csatlakoztatása ....................................... 12
A tápkábel csatlakoztatása ........................................ 13
A számítógép bekapcsolása ...................................... 13
A távirányító használata (opcionális) ......................... 14
A rendszer helyreállítása ...............................16
A helyreállító DVD használata ................................... 16
Problémamegoldás ........................................18
Magyar
ASUS CP sorozatú asztali PC 3

Notices
Federal Communications Commission State-
ment
This device complies with Part 15 of the FCC Rules. Operation is subject
to the following two conditions:
• This device may not cause harmful interference, and
• This device must accept any interference received including interfer
-
ence that may cause undesired operation.
This equipment has been tested and found to comply with the limits for a
Class B digital device, pursuant to Part 15 of the FCC Rules. These limits
are designed to provide reasonable
protection against harmful interference in a residential
installation. This equipment generates, uses and can radiate radio fre-
quency energy and, if not installed and used in accordance with manufac-
turer’s instructions, may cause harmful
interference to radio communications. However, there is no
guarantee that interference will not occur in a particular
installation. If this equipment does cause harmful interference to radio or
television reception, which can be determined by
turning the equipment off and on, the user is encouraged to try to correct
the interference by one or more of the following measures:
• Reorient or relocate the receiving antenna.
• Increase the separation between the equipment and receiver.
• Connect the equipment to an outlet on a circuit different from that to
which the receiver is connected.
• Consult the dealer or an experienced radio/TV technician for help.
The use of shielded cables for connection of the monitor to
the graphics card is required to assure compliance with FCC
regulations. Changes or modications to this unit not expressly
approved by the party responsible for compliance could void the
user’s authority to operate this equipment.
Magyar
4 ASUS CP sorozatú asztali PC

Canadian Department of Communications
Statement
This digital apparatus does not exceed the Class B limits for radio noise
emissions from digital apparatus set out in the Radio
Interference Regulations of the Canadian Department of
Communications.
This class B digital apparatus complies with Canadian ICES-003.
Macrovision Corporation Product Notice
This product incorporates copyright protection technology that is protected
by method claims of certain U.S. patents and other intellectual property
rights owned by Macrovision Corporation and other rights owners. Use of
this copyright protection
technology must be authorized by Macrovision Corporation, and is
intended for home and other limited viewing uses only unless otherwise
authorized by Macrovision Corporation. Reverse engineering or disassem-
bly is prohibited.
Magyar
ASUS CP sorozatú asztali PC 5

A biztonságos üzemeltetéssel kapcsola-
tos információk
Az Ön ASUS CP sorozatú asztali számítógépét az informatikai beren-
dezésekre vonatkozó legújabb szabványok szerint tervezték és tesztelték.
Kérjük, az Ön biztonsága érdekében olvassa el és tartsa be az alábbi
biztonsági előírásokat.
A rendszer üzembe helyezése
• A számítógép üzembe helyezése előtt olvassa el a Felhasználói
kézikönyvet, és pontosan kövesse az utasításait.
• Ne használja a terméket víz vagy hőforrások, például fűtőtest kö
-
zelében.
• A számítógépet stabil felületen használja.
• A készülékházon található nyílások a szellőztetést szolgálják. Ne zárja
el vagy fedje le a szellőzőnyílásokat. Győződjön meg arról, hogy a
számítógép körül elegendő hely áll rendelkezésre, és semmi sem
akadályozza a megfelelő szellőzést. Ügyeljen arra, hogy idegen tárgy
ne kerüljön a szellőzőnyílásokba!
• Ha hosszabbító kábelt használ, ellenőrizze, hogy a hosszabbítóhoz
csatlakoztatott berendezések teljes áramfelvétele nem haladja-e meg
a hosszabbító kábel maximális terhelhetőségét.
Használat közben
• Ne lépjen a hálózati kábelre, és ügyeljen arra, hogy ne tegyen rá sem-
mit.
• Ne öntsön vizet vagy más folyadékot a rendszerre.
• A rendszer kikapcsolás után is csekély mennyiségű feszültség alatt
van.
A rendszer tisztítása előtt mindig húzza ki az összes tápkábelt, tele
-
fonkábelt és hálózati kábelt a hálózati csatlakozóból.
• Ha a készülék használata közben az alábbi műszaki problémákat
tapasztalja, húzza ki a tápkábelt, és vegye fel a kapcsolatot a szerviz-
Magyar
zel vagy az Ön ASUS viszonteladójával.
• A tápkábel vagy a csatlakozó dugó sérült.
6 ASUS CP sorozatú asztali PC
• Folyadék ömlött a készülékbe.
• A rendszer abnormálisan működik annak ellenére, hogy betartotta
a használati utasítás minden lépését.
• A rendszert elejtették, vagy a burkolata megsérült.
• A rendszer teljesítménye megváltozik.
BIZTONSÁGI FIGYEMEZTETÉS a CD-ROM
meghajtóval kapcsolatban
I. OSZTÁLYÚ LÉZERTERMÉK
TILOS SZÉTSZERELNI!
A rendszer megbontása a garancia megszűnését
vonja maga után.
Az áthúzott kerekes szeméttárolót ábrázoló jelzéssel
ellátott terméket (elektromos és elektronikus berendezések
és higanytartalmú gombelemek) nem szabad háztartási
szemétként kezelni. Az elektronikus termékek elhelyezését
illetően tájékozódjon a helyi hatóságoknál.
Megjegyzések a kézikönyvhöz
Annak érdekében, hogy bizonyos lépéseket megfelelően hajtsunk végre,
az alábbi jelölések lesznek segítségünkre a kézikönyvben.
FIGYELMEZTETÉS!
Fontos információ, amelyet be kell tartani a
biztonságos üzemeltetés érdekében.
FONTOS! Olyan információ, amit mindenképpen be kell tartanunk
egy feladat elvégzéséhez.
Tipp: Tanácsok a feladatok elvégzéséhez.
MEGJEGYZÉS: Kiegészítő információk.
Magyar
ASUS CP sorozatú asztali PC 7

Üdvözöljük
Gratulálunk az ASUS asztali PC megvásárlásához. Az Ön új asztali PC
csomagjának tartalma lentebb olvasható, de ez a modelltől is függ. Az
ASUS fenntartja magának a jogot, hogy a vásárlók érdekében más alka-
trészeket és tartozékokat mellékeljen a számítógéphez.
Lépjen kapcsolatba a viszonteladóval, amennyiben bármelyik cikk sérült
vagy hiányzik.
A csomag tartalma
• ASUS asztali PC x1
• Billentyűzet x1
• Egér x1
• Tápkábel x1
• Támogatás DVD x1
• Helyreállító DVD x1
• Telepítési útmutató x1
• Garancia kártya x1
• Távirányító (választható) x1
Friss információkért látogassa meg az ASUS honlapját (http://
support.asus.com)!
Magyar
8 ASUS CP sorozatú asztali PC
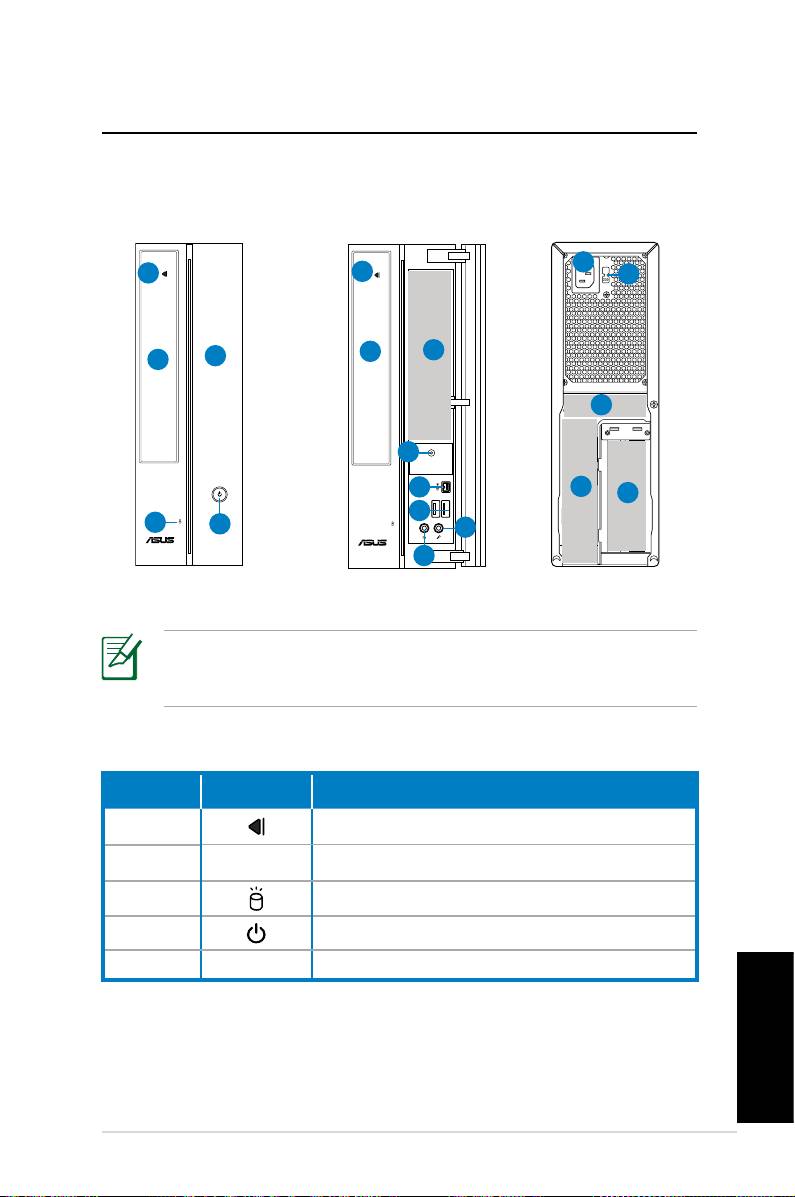
A PC felépítése
Az előlap és a hátsó panel
Előlap (zárva)
Előlap (nyitva) Hátlap
11
1
1
12
2
6
5
2
13
4
7
14
15
8
3
4
10
9
*A szürkével jelölt területeken találhatók a számítógép
csatlakozói. A csatlakozók és elhelyezésük modelltől függően
változhat.
Sorszám Gomb/LED Leírás
1. A CD/DVD lemez kiadása.
2. Az optikai meghajtó ajtaja.
3. HDD LED
4. Bekapcsoló gomb.
5. Az előlap takarópanele.
Folytatás a következő oldalon
Magyar
ASUS CP sorozatú asztali PC 9

Szám Nyílás/Port Leírás
Infravörös (opcionális).
®
CompactFlash
/Microdrive™
kártyaolvasó.
6
MultiMediaCard/Secure Digital™/
Memory Stick Pro™ kártyaolvasó.
USB+E-SATA csatlakozó.
IEEE 1394a csat-
IEEE 1394 eszközök (pl. Digitális
7.
lakozó
kamera) csatlakoztatásához.
USB készülékekhez csatlakozik,
USB 2.0 csatla-
8.
mint pl. az egér, billentyűzet, vagy
kozó
kamera.
Fejhallgató
A sztereó hangfalakat vagy a
9.
kimenet
fülhallgatót ide csatlakoztassa.
Csatlakoztassa a mikrofont ebbe
10. Mikrofon aljzat
az aljzatba.
11. Tápcsatlakozó A tápkábel csatlakoztatásához.
A bemeneti feszültség
12.
Feszültségválasztó
kiválasztásához.
7.1 (8)-
Egy 7.1(8) csatornás hangszóró
13.
csatornás audio
rendszerhez csatlakozik.
csatlakozó
Folytatás a következő oldalon
Magyar
10 ASUS CP sorozatú asztali PC
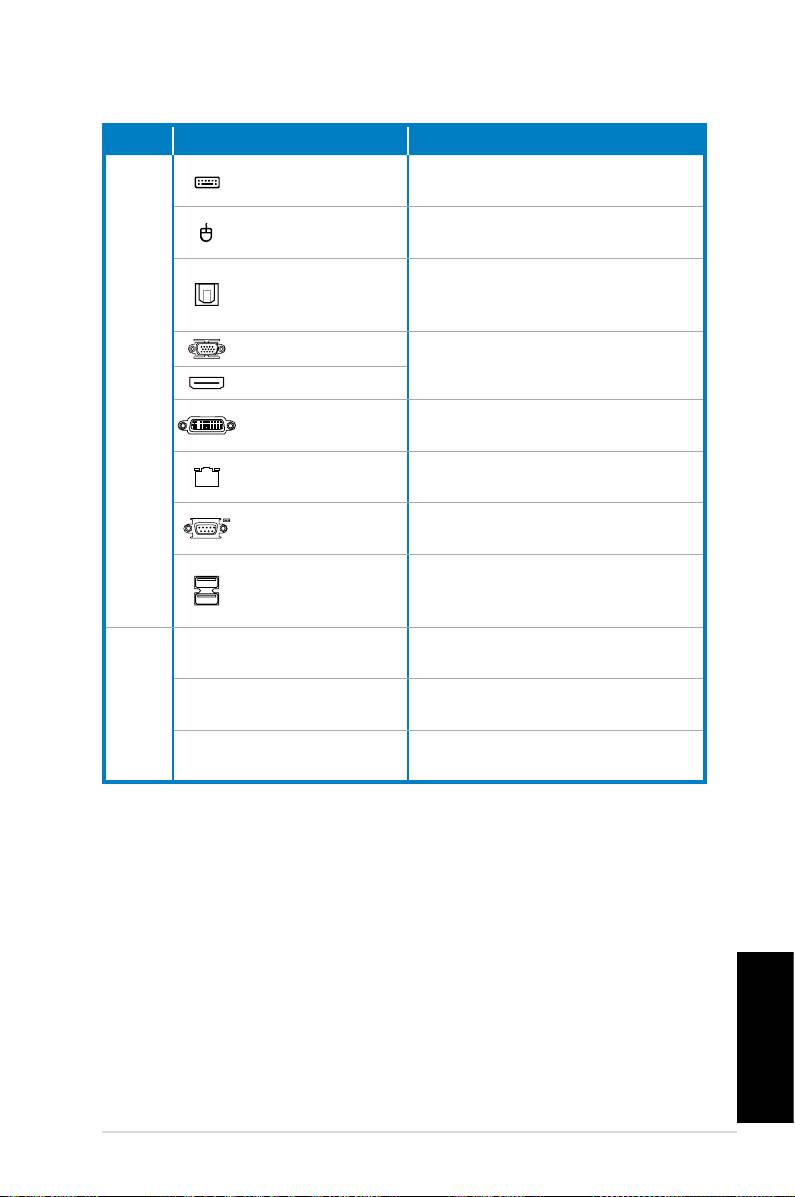
Nem. Nyílás/Port Leírás
PS/2 billentyűzet
PS/2 billentyűzet csatlakozta-
csatlakozó
tásához.
PS/2
PS/2 egér csatlakoztatásához.
egérport
Optikai
Egy digitális audio kimeneti
S/PDIF kim csat-
erősítőhöz csatlakoztatható.
lakozó
VGA csatlakozó
Különböző TV vagy monitor video
kimenetekhez csatlakoztatható
HDMI csatlakozó
14.
TV készülékek vagy monitorok
DVI csatlakozó
csatlakoztatásához
LAN (RJ-45)
Ide csatlakoztassa a hálózati
csatlakozó
kábelt.
A soros specikációnak megfelelő
COM csatlakozó
eszközök csatlakoztatásához.
USB készülékekhez
USB 2.0
csatlakozik, mint pl. az egér,
csatlakozó
billentyűzet, vagy kamera.
A bővítőnyílásokat bővítőkártyák
Bővítőnyílások
telepítésére lehet használni.
DVI/S-Video/VGA
15.
VGA kártya (opcionális)
csatlakozó
FM/RF/IR/S-Video
TV-tuner kártya (opcionális)
csatlakozó
Magyar
ASUS CP sorozatú asztali PC 11
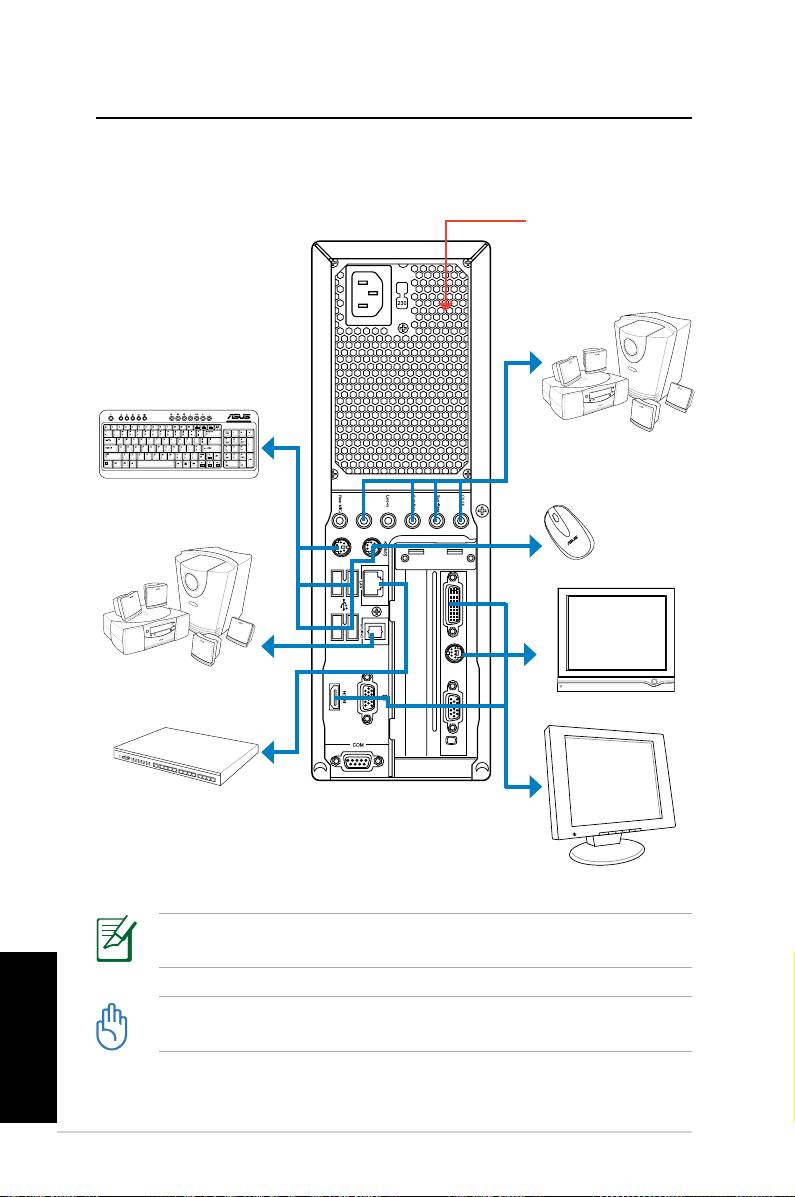
Asztali PC jének beállítása
A készülékek összekapcsolása
Ne takarja le ezeket
a nyílásokat.
7.1(8)-csatornás
házi mozi rendszer
Billentyűzet
Egér
7.1(8)-csatornás
házi mozi rendszer
TV
Hálózati hub/switch
Kijelző
Az ábrák tájékoztató jellegűek. A termék tényleges műszaki adatai
eltérhetnek.
Magyar
• A terméket 35˚C alatti hőmérsékleten használja.
• Ne zárja el vagy fedje le a szellőzőnyílásokat.
12 ASUS CP sorozatú asztali PC

A tápkábel csatlakoztatása
1. Állítsa a feszültségválasztó kapcsolót a területének megfelelő
bemeneti tápfeszültségre.
A kapcsoló 115 V-ra állítása 230 V-os hálózati feszültséget
alkalmazó területen súlyosan károsítja a rendszert!
2. Csatlakoztassa a hálózati tápkábelt a tápcsatlakozó aljzathoz, a
dugót pedig a fali aljzatba.
2
1
A számítógép bekapcsolása
Magyar
ASUS CP sorozatú asztali PC 13
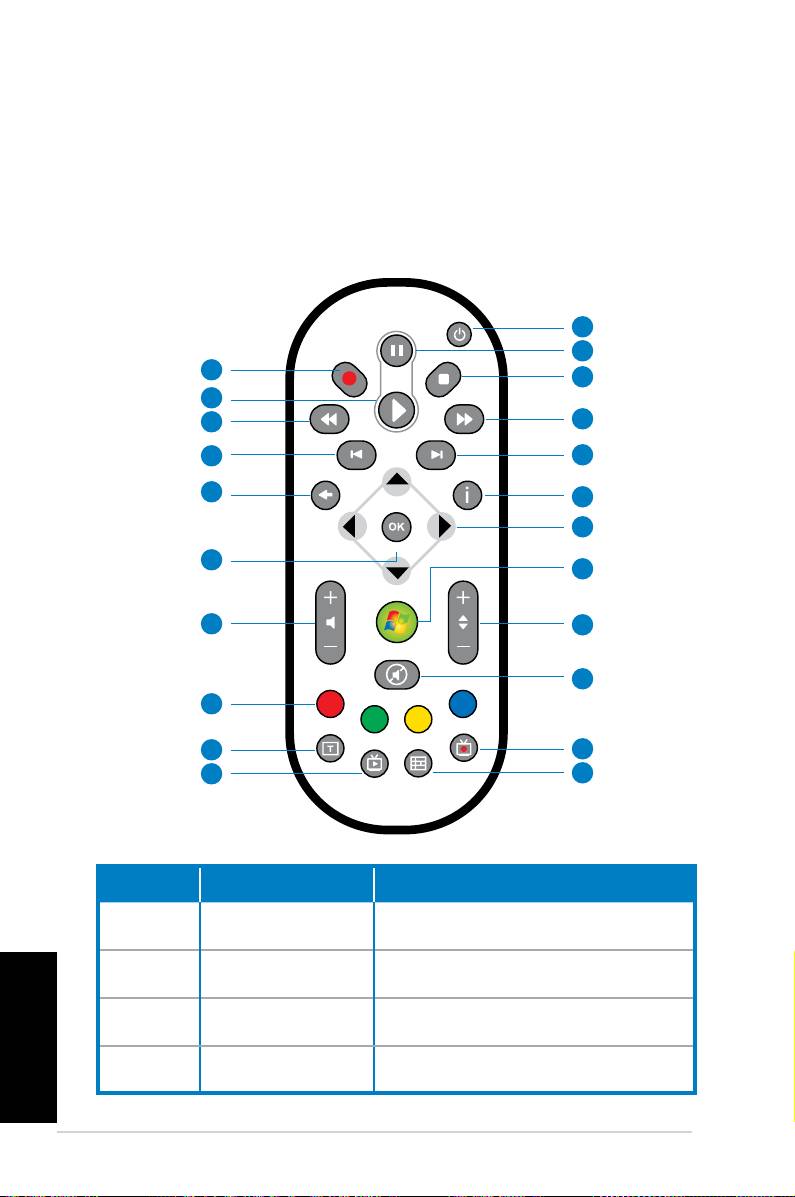
A távirányító használata (opcionális)
Használja a A távirányító használata a Média Center program elindí-
tásához, melynek segítségével zenéket és lmeket játszhat le. Ehetősége
van TV tunerkártya telepítésére is, amellyel TV műsorokat nézhet és
rögzíthet.
Az alábbi ábrán a távirányító nyomógombjainak funkcióját láthatja.
1
2
22
3
21
20
4
19
5
18
6
7
17
8
16
9
10
15
14
11
13
12
Sorszám Gomb Leírás
A monitor és a hangfalak be/
1. Bekapcsológomb
kikapcsolása.
Nyomja meg a lejátszás
2. Szünet
megszakításához.
Magyar
Nyomja meg a média fájl
3. Állj
lejátszásának megállításához.
Nyomja meg a média fájl
4. Előre tekerés
előretekeréséhez.
14 ASUS CP sorozatú asztali PC
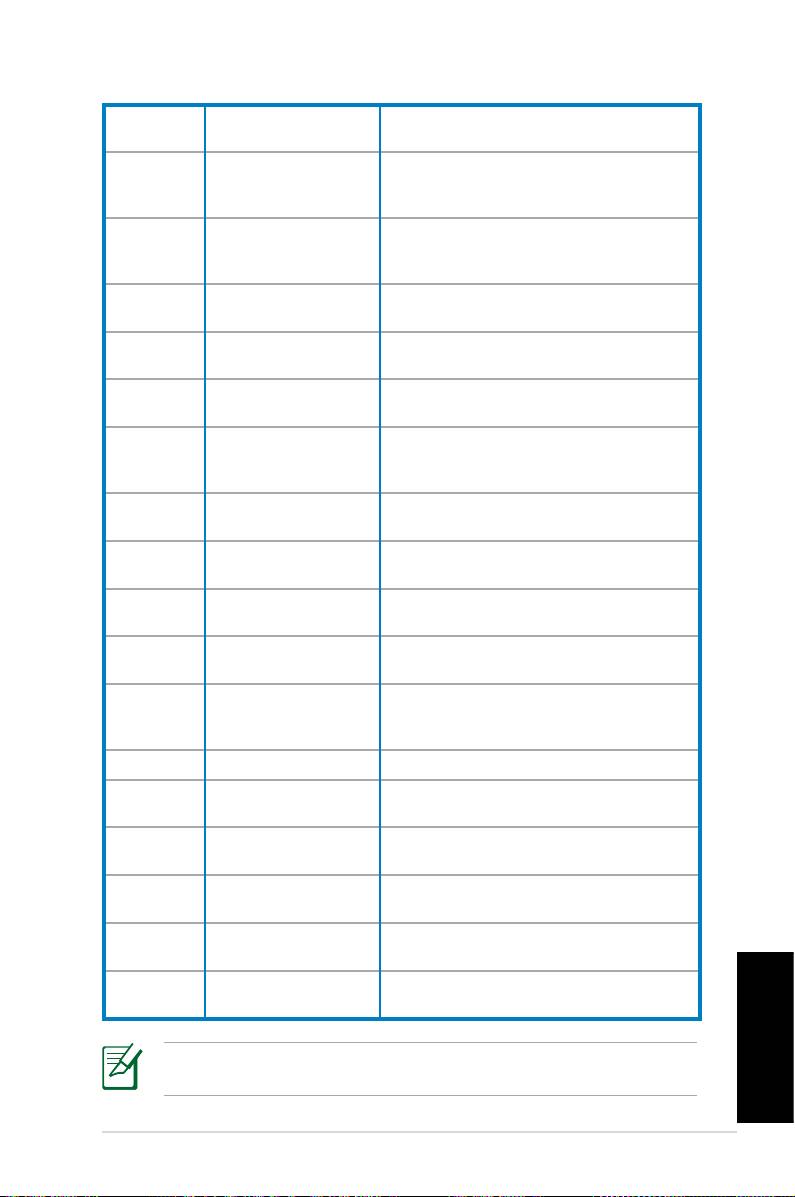
Nyomja meg hogy a következő
5. Következő szám
számra lépjen.
A Média Center program in-
6. Információ
formációinak vagy menüinek
megjelenítése.
Négy irányú
A képernyőn megjelenő menük-
7.
navigációs
ben való navigáláshoz.
gombok
®
Windows
Media
Nyomja meg, hogy elindítsa a
8.
Center
Média Center programot.
Nyomja meg a TV csatornák
9. Csatorna fel/le
váltásához.
Nyomja meg a hang elnémí-
10. Elnémít
tásához.
Nyomja meg a felvett TV pro-
11. Felvett műsor
gramok listájának megtekinté-
séhez.*
EPG (elektroni-
Nyomja meg, hogy megjelenjen
12.
kus Műsorfüzet)
az Elektronikus műsorújság.*
Nyomja meg, hogy élő TV
13. Élő TV gomb
műsort nézhessen.*
Váltás numerikus és alfanumeri-
14. Váltás
kus bemenet között.
Csak európai modelleken érhető
15. Teletext gombok
el.
Nyomja meg a hangerő
16 Hangerő fel/le
növelése/csökkentése
érdekében.
17. OK Választás megerősítése
Nyomja meg, hogy visszamen-
18. Visszatérés
jen az előző oldalra.
Nyomja meg, hogy visszamen-
19. Előző szám
jen az előző számra.
Nyomja meg a média fájl vissza-
20. Visszatekerés
tekeréséhez.
Nyomja meg a média fájl
21. Lejátszás
lejátszásához.
Nyomja meg a TV műsor felvé-
22 Felvétel
telének elkezdéséhez.
*A rendszerben nincs előre beépített TV tuner. A TV funkció
Magyar
használatához Vásároljon egy külső TV tunert.
ASUS CP sorozatú asztali PC 15

A rendszer helyreállítása
A helyreállító DVD használata
A helyreállító DVD a rendszer gyári beállításait tartalmazza. A támoga-
tás DVD-vel együtt egy hatékony és gyors megoldást kínál a rendszer
gyári állapotba hozásához, feltéve, hogy a merevlemez működőképes.
A helyreállító DVD használata előtt ne feledjen egy USB vagy hálózati
meghajtóra biztonsági másolatot készíteni az adatairól (mint például az
Outlook PST fájok), és jegyezze fel a speciális beállításokat (például a
hálózat beállításai).
1. Kapcsolja be az ASUS PC –jét, ekkor az ASUS logo megjelenik.
Nyomja meg az F8-at, hogy beléphessen a Boot menübe.
2. A képernyőn megjelenő lehetőségek közül válassza ki a CDROM:
XXX eszközt bootmeghajtóként. Üssön Entert, majd egy tetszőleges
bilentyűt a folytatáshoz.
3. Megjelenik a Windows Boot Manager ablaka. Válassza a Windows
Telepítése [EMS Enabled] lehetőséget, majd üssön Entert. Várjon,
amíg „A Windows fájlokat másol” üzenet megjelenik.
4. Válassza ki, hogy hova telepíti az új rendszert. A lehetőségek:
A rendszer helyreállítása adott partícióra
Ezzel az opcióval lehetőségünk nyílik arra, hogy csak az a partíció
törlődjön, amelyre a rendszert telepítjük, így a más partíciókon levő
adataink megmaradnak. Válassza a „Partícionálás” lehetőséget, majd
kattintson a Tovább gombra.
A teljes merevlemez helyreállítása
Ezzel az opcióval a teljes merevlemez törlődik, és a telepítő automati-
kusan hozza létre a partíciókat. Ennjek a lehetőségnek a kiválasztása
után kattintson az Igen gombra.
5. Kövesse a képernyőn megjelenő utasításokat, hogy befejezze a hely-
reállítási folyamatot.
Minden adata el fog veszni a helyreállítás során. Győződjön
meg arról, hogy adatairól biztonsági másolatot készített, mielőtt
nekikezdene rendszere helyreállításához.
Magyar
16 ASUS CP sorozatú asztali PC

6. Miután a helyreállítás befejeződött, tegye be a támogató DVD-t az
optikai meghajtóba. Kattintson az OK-ra és a rendszer újraindul.
®
7. Miután a rendszer újraindult, a Windows
Vista™ elkezdi a rendszer-
beállítások elvégzését Kövesse a képernyőn megjelenő utasításokat,
hogy befejezze a folyamatot, majd indítsa újra a számítógépet.
Ez a helyreállító DVD csak az ASUS CP sorozatú asztali
számítógépekhez használható. NE HASZNÁLJA más
számítógépeken. További információkat az ASUS honlapján
(http://www.asus.com) talál.
Magyar
ASUS CP sorozatú asztali PC 17
Problémamegoldás
Amennyiben problémába ütközik a számítógép használatakor, az alábbi
kérdések és válaszok segíthetnek a hibakeresésben. Amennyiben a hibát
nem ehet ezek alapján elhárítani, kérjük, lépjen kapcsolatba veünk a Tá-
mogatás DVD-n található kapcsolatfelvételi lehetőségek valamelyikén.
Mit tehetek, ha az asztali PC-met nem tudom bekapcsolni?
Ellenőrizze, hogy a bekapcsológombon taláható lámpa az gép első részén
világít-e. Ha nem világít, akkor nincs áram alatt a rendszer.
• Nézze meg, hogy a tápkábel be van-e dugva.
• Amennyiben elosztót használ nézze meg, hogy az be van-e dugva a
konnektorba és be van e kapcsolva.
Mit tehetek, nem indul el az operációs rendszer?
• Győződjön meg róla, hogy olyan memória modulokat használ, me-
lyeket a rendszer támogat és ezeket megfelelően csatlakoztatta az
aljzatokba.
• Ellenőrizze a számítógéphez csatlakoztatott eszközöket, hogy, kom
-
patibilisek-e a rendszerrel. Néhány USB háttértár különböző felépítésű
lehet, és könnyen alvó üzemmódba kapcsolnak.
Amennyiben a fenti lépések nem oldották meg a problémáját, lépjen
kapcsolatba viszonteladójával, vagy végezze el a rendszer helyreállítását a
mellékelt helyreállító DVD segítségével.
Minden adata el fog veszni a helyreállítás során. Győződjön
meg arról, hogy adatairól biztonsági másolatot készített, mielőtt
nekikezdene rendszere helyreállításához.
Miért nem hallok hangot a hangfalakból/fejhallgatóból?
®
Ellenőrizze a hangerő ikont a Windows
tálcán, nincs-e elnémítva
. Amennyiben igen, kattinson kétszer az ikonra, ekkor megjelenik a
hangerősség skála, kattintson az Elnémít négyzetre, hogy törölje az
elnémítást .
Magyar
18 ASUS CP sorozatú asztali PC

Miért nem tudok CD/DVD-t írni vagy olvasni?
• Győződjön meg róla, hogy olyan lemezt használ, mely kompatibilis az
optkai meghajtóval.
• Ellenőrizze, hogy megfelelően helyezte be a lemezt, vagy nem sérült a
lemez.
• Nézze meg, hogy a lemez nem írásvédett-e.
Magyar
ASUS CP sorozatú asztali PC 19

Magyar
20 ASUS CP sorozatú asztali PC
Русский
Настольный ПК ASUS
серии CР
Руководство пользователя

Русский
R3995
Первая редакция V1
Июль 2008
Copyright © 2007 ASUSTeK COMPUTER INC. Все права защищены.
Никакая часть этого руководства, включая изделия и программное обеспечение,
описанные в нем, не может быть дублирована, передана, преобразована, сохранена
в системе поиска или переведена на другой язык в любой форме или любыми
средствами, кроме документации, хранящейся покупателем с целью резервирования,
без специального письменного разрешения ASUSTeK COMPUTER INC. (ASUS).
Продукты и названия корпораций, имеющиеся в этом руководстве могут быть
зарегистрированными торговыми марками или авторскими правами соответствующих
компаний, и используются только для идентификации или объяснения без намерений
что-либо нарушить.
Технические характеристики и сведения, содержащиеся в данном руководстве,
представлены только для информативного использования, и могут быть изменены
в любое время без уведомления, и не должны быть истолкованы как обязательства
ASUS. ASUS не берет на себя никакой ответственности или обязательств за любые
ошибки или неточности в данном руководстве, включая изделия или программное
обеспечение, описанные в нем.

Содержание
Уведомления ..................................................................................4
Техника безопасности ...................................................................6
Русский
Примечания к руководству ...........................................................7
Приветствие ..................................................................... 8
Комплект поставки ........................................................................8
Знакомство с ПК ............................................................. 9
Передняя / задняя панели.............................................................9
Установка ПК ................................................................. 12
Подключение устройств..............................................................12
Подключение блока питания ......................................................13
Нажатие кнопки питания для включения системы ..................13
Восстановление системы ............................................ 23
Использование диска восстановления ......................................23
Быстрое восстановление системы ............................................24
Устранение неисправностей ....................................... 25
ASUS ПК 3

Уведомления
Русский
Удостоверение Федеральной комиссии по средствам связи
Данное устройство соответствует части 15 Правил FCC. Его
использование возможно при следующих двух условиях:
• Данное устройство не вызывает вредоносных воздействий.
• Данное устройство принимает любое внешнее воздействие,
включая воздействия, вызывающие нежелательные
результаты.
Данное оборудование было протестировано и сочтено
соответствующим ограничениям по цифровым устройствам класса В
в соответствии с частью 15 Правил FCC. Эти ограничения рассчитаны
на обеспечение защиты в разумных пределах от вредоносных
воздействий при установке в жилом помещении. Данное оборудование
создает, использует и может излучать энергию в радиодиапазоне,
которая, при установке или использовании данного оборудования
не в соответствии с инструкциями производителя, может создавать
помехи в радиосвязи. Тем не менее, невозможно гарантировать
отсутствие помех в каждом конкретном случае. В случае, если
данное оборудование действительно вызывает помехи в радио или
телевизионном приеме, что можно проверить, включив и выключив
данное оборудование, пользователю рекомендуется попытаться
удалить помехи следующими средствами:
• Переориентировать или переместить принимающую антенну.
• Увеличить расстояние между данным прибором и приемником.
• Подключить данное оборудование к розетке другой электроцепи,
нежели та, к которой подключен приемник.
• Проконсультироваться с продавцом или квалифицированным
радио/ ТВ техником.
Используйте экранированные кабели для подключения монитора
к видеокарте, поскольку это гарантирует совместимость с
требованиями FCC. Изменения или дополнения к данному пункту,
не согласованные, непосредственно, со стороной, ответственной
за соответствие правилам, могут сделать недействительным право
пользователя на пользование данным оборудованием.
4 ASUS ПК

Удостоверение Департамента по средствам связи Канады
Данное цифровое устройство не превышает ограничения класса В
по выделению радиошума от цифровых устройств, установленных
Русский
в правилах по радиопомехам департамента по средствам связи
Канады. Данное цифровое устройство класса В соответствует
стандарту ICES-003.
Информация об изделии корпорации Macrovision
Данное изделие включает в себя технологию защиты авторских прав,
защищенную формулами определенных патентов США и иные права
интеллектуальной собственности, принадлежащие корпорации Mac-
rovision и другим лицам. Использование данной технологии защиты
авторских прав возможно только с согласия корпорации Macrovi-
sion и предусмотрено только для домашнего и иного ограниченного
использования, если иное не предписано корпорацией Macrovision.
Инженерный анализ и разборка запрещены.
ASUS ПК 5

Информация о безопасности
Русский
Ваш ASUS ПК спроектирован и протестирован для соответствия
последним стандартам безопасности оборудования. Тем не менее, для
безопасного использования продукта важно выполнять инструкции,
приведенные в этом документе.
Установка системы
• Перед эксплуатацией вашего устройства прочитайте все
нижеследующие инструкции.
• Не используйте устройство поблизости от воды или источника
тепла, например радиатора.
• Устанавливайте систему на устойчивую поверхность.
• Отверстия на корпусе предназначены для вентиляции. Не
закрывайте эти отверстия. Убедитесь, что вы оставили свободное
пространство вокруг системы для ее вентиляции. Не вставляйте
объекты в вентиляционные отверстия устройства.
• Используйте продукт при температуре в диапазоне от 0°C до
40°C.
• При использовании удлинителя убедитесь, что общая мощность
нагрузки не превышает норму для удлинителя.
Эксплуатация
• Не наступайте на шнур питания.
• Не проливайте на систему воду или любую другую жидкость.
• Когда система выключена, там остается напряжение. Перед
очисткой системы всегда отключайте все кабели.
• Если вы столкнулись со следующими проблемами, отключите
питание и обратитесь в сервис или к вашему продавцу.
• Шнур или вилка питания повреждены.
• В систему попала жидкость.
• Система не работает даже в том случае когда вы следуете
инструкциям по эксплуатации.
6 ASUS ПК
• Система упала.
• Изменилась производительность системы.
CD-ROM
Русский
Лазерный продукт класса 1
Не разбирать
Не разбирать
Гарантия не распространяется на продукты,
разобранные пользователями
Символ перечеркнутого мусорного бака означает, что этот
продукт(электрическое, электронное оборудование и содержащий
ртуть аккумулятор) не следует утилизировать с бытовым мусором.
Ознакомьтесь с правилами утилизации таких продуктов.
Примечания к руководству
В руководстве имеются примечания и предупреждения, с которыми
вам нужно ознакомиться для успешного выполнения задач.
Внимание: Информация, которой вы должны следовать во
избежание повреждений.
Важно: Инструкции, которым вы должны следовать при
выполнении задач.
Совет: Советы и полезная информация, которая поможет
Примечание: Дополнительная информация для особых ситуаций.
ASUS ПК 7

Приветствие
Поздравляем вас с приобретением продукции ASUS. Комплект
Русский
поставки вашего устройства показан ниже, но может изменяться
в зависимости от модели. ASUS оставляет за собой право
заменять компоненты и аксессуары для обеспечения оптимальной
эксплуатации.
Если что-то повреждено или отсутствует, обратитесь к продавцу.
Комплект поставки:
• ПК ASUS x1
• Клавиатура x1
• Мышь x1
• Шнур питания x1
• DVD с драйверами и утилитами x1
• DVD восстановления x1
• Руководство по установке x1
• Гарантийный талон x1
• Пульт (опция) x1
• Для получения обновлений посетите сайт ASUS http://support.
asus.com.
8 ASUS ПК
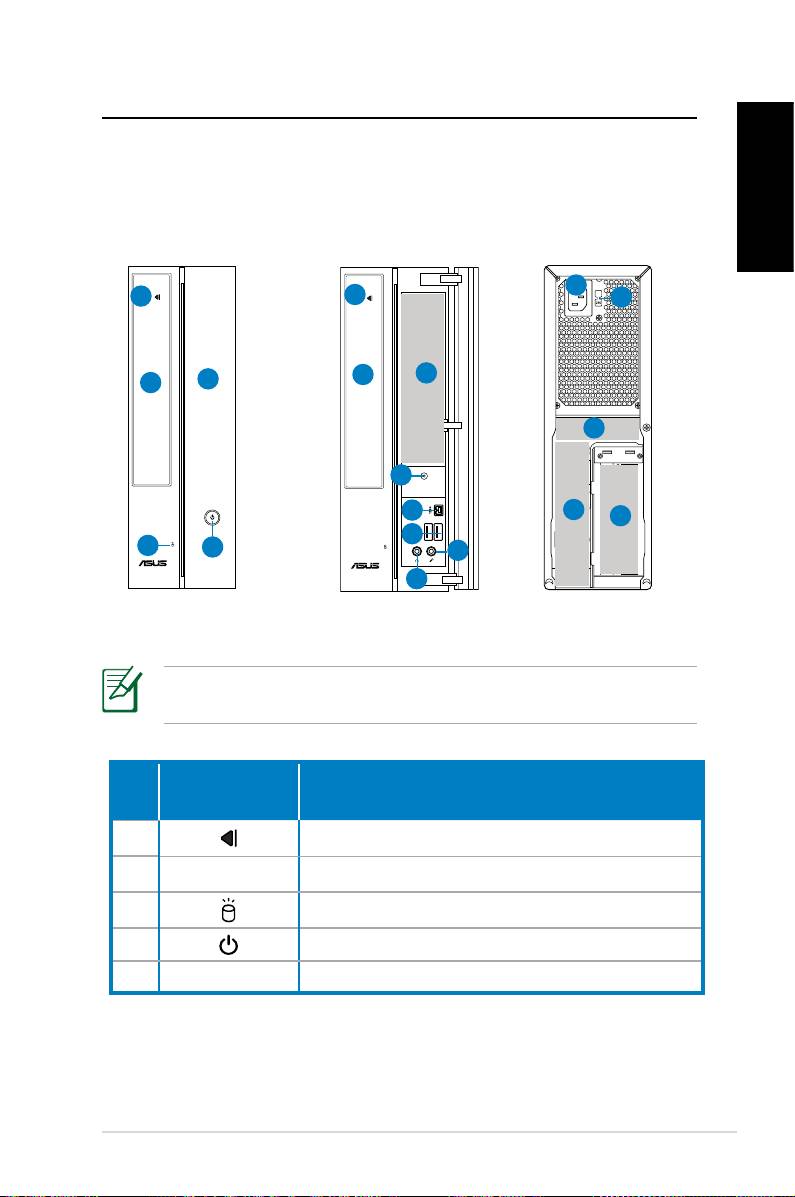
Знакомство с ПК
Передняя / задняя панели
Вид спереди
Вид спереди
(закрыто)
(открыто)
Вид сзади
Русский
11
1
1
12
2
6
5
2
13
4
*
7
14
15
8
3
4
10
9
*На серой области рисунка находятся порты. Порты и их
расположение может изменяться в зависимости от модели.
Кнопка/
No.
Описание
индикатор
1. Кнопка извлечения диска
2. Крышка оптического привода.
3. Индикатор жесткого диска
4. Кнопка питания
5. Крышка передней панели
Продолжение на следующей странице
ASUS ПК 9
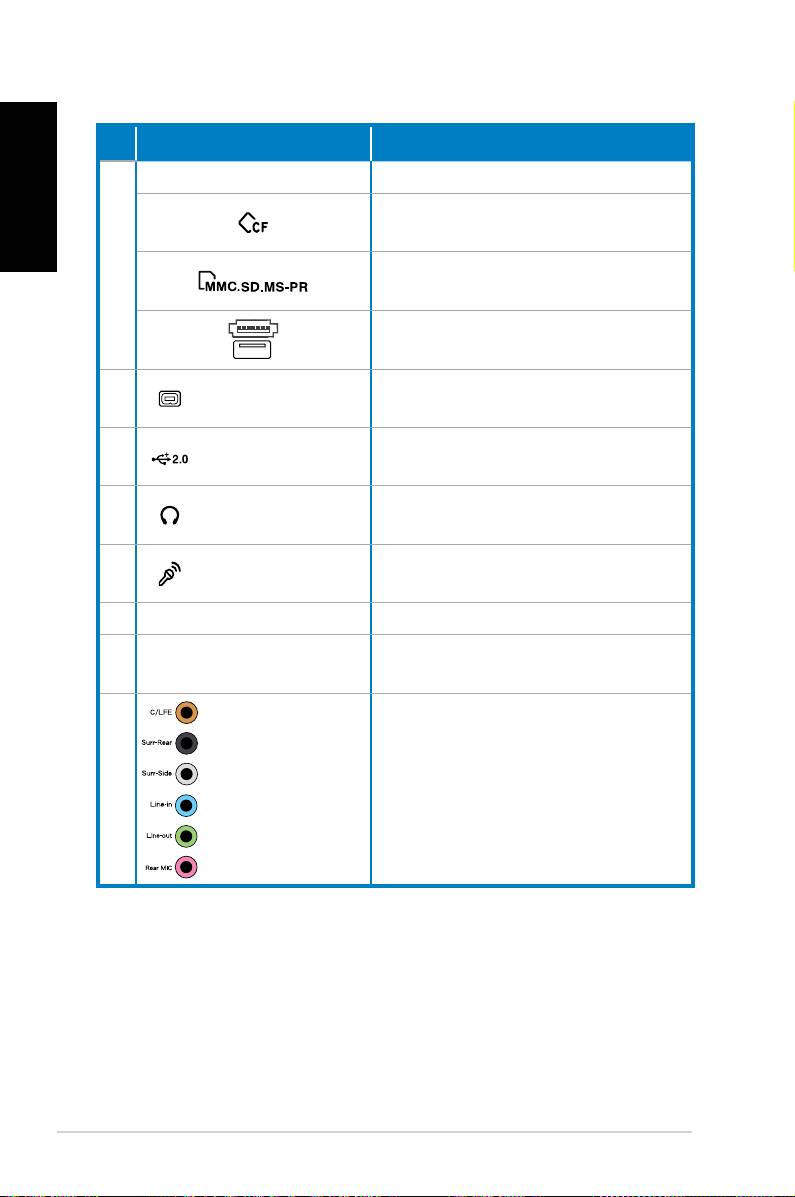
Русский
No.
Слот/порт Описание
ИК (опция).
Слот карты CompactFlash®/Micro-
drive™
6
Слот карты MultiMediaCard/Secure
Digital™/ Memory Stick Pro™
Порты USB+E-SATA
4-контактный
Подключение устройств IEEE 1394
7.
порт IEEE 1394a
например цифровой камеры.
Подключение USB устройств
8. Порты USB 2.0
например клавиатуры, мыши.
Разъем
Подключение стереосистемы или
9.
наушников
наушников.
Разъем
10.
Подключение микрофона.
микрофона
11. Разъем питания Подключение шнура питания.
Переключатель
12.
Выбор входящего напряжения.
напряжения
Подключение к 7.1(8)-канальной
7.1(8)-channel
13.
акустической системе.
audio ports
Продолжение на следующей странице
10 ASUS ПК
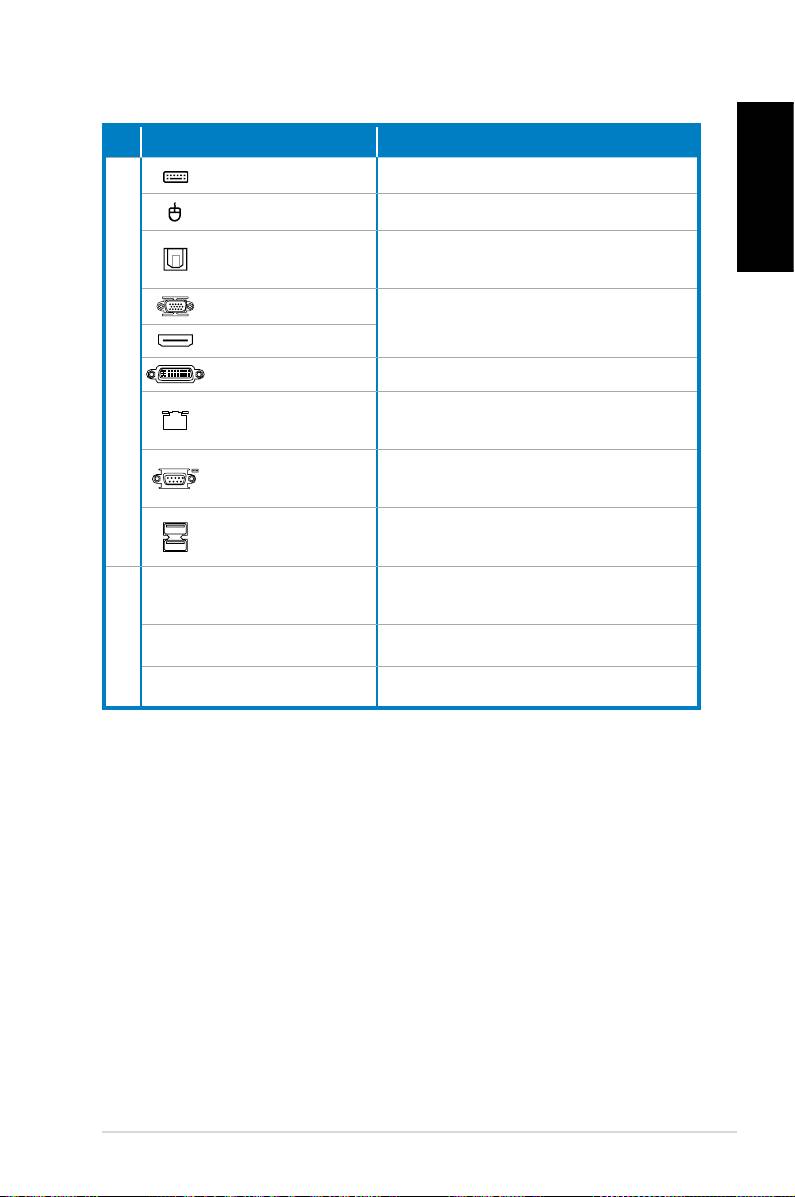
No. Слот/порт Описание
Клавиатура PS/2 Подключение PS/2 клавиатуры.
Мышь PS/2 Подключение PS/2 мыши.
Русский
Оптический
Подключение к усилителю.
S/PDIF Out
Разъем VGA
Подключение к ТВ или монитору
Разъем HDMI
14.
Разъем DVI Подключение к ТВ или монитору
Разъем LAN
Подключение сетевого кабеля.
(RJ-45)
Подключение устройств с
COM порт
последовательным интерфейсом.
Подключение USB устройств
Порты USB 2.0
например клавиатуры, мыши.
Используются для установки карт
Слоты расширения
расширения.
15.
Разъем DVI/S-Video/VGA Видеокарта (опция)
Разъем FM/RF/IR/S-Video ТВ- тюнер (опция)
ASUS ПК 11
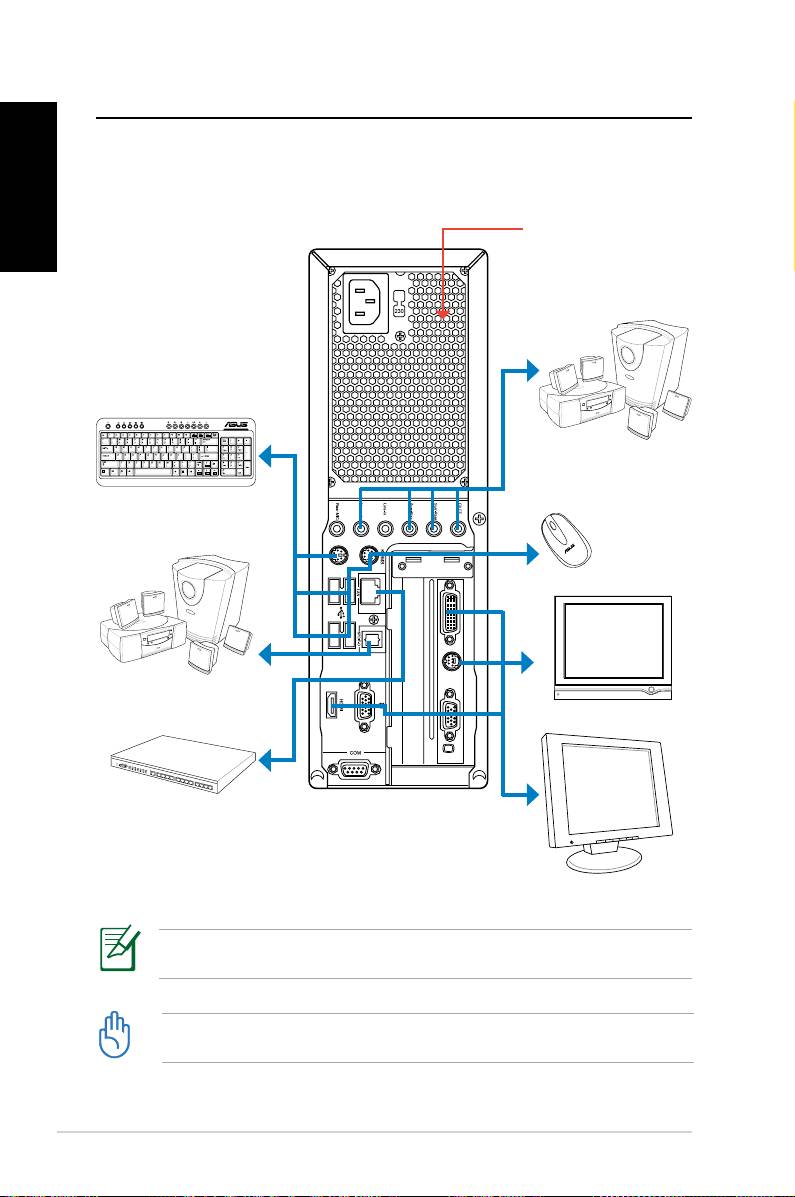
Установка ПК
Русский
Подключение устройств
Не блокируйте эти
отверстия.
7.1(8)-канальная
акустическая
система
Клавиатура
Мышь
7.1(8)-канальная
акустическая
ТВ
система
Хаб/коммутатор
Монитор
Примечание: Иллюстрации приведены только для справки и могут отличаться от вашего
продукта.
• Используйте продукт при температуре ниже 35˚C.
• Не закрывайте вентиляционные отверстия.
12 ASUS ПК
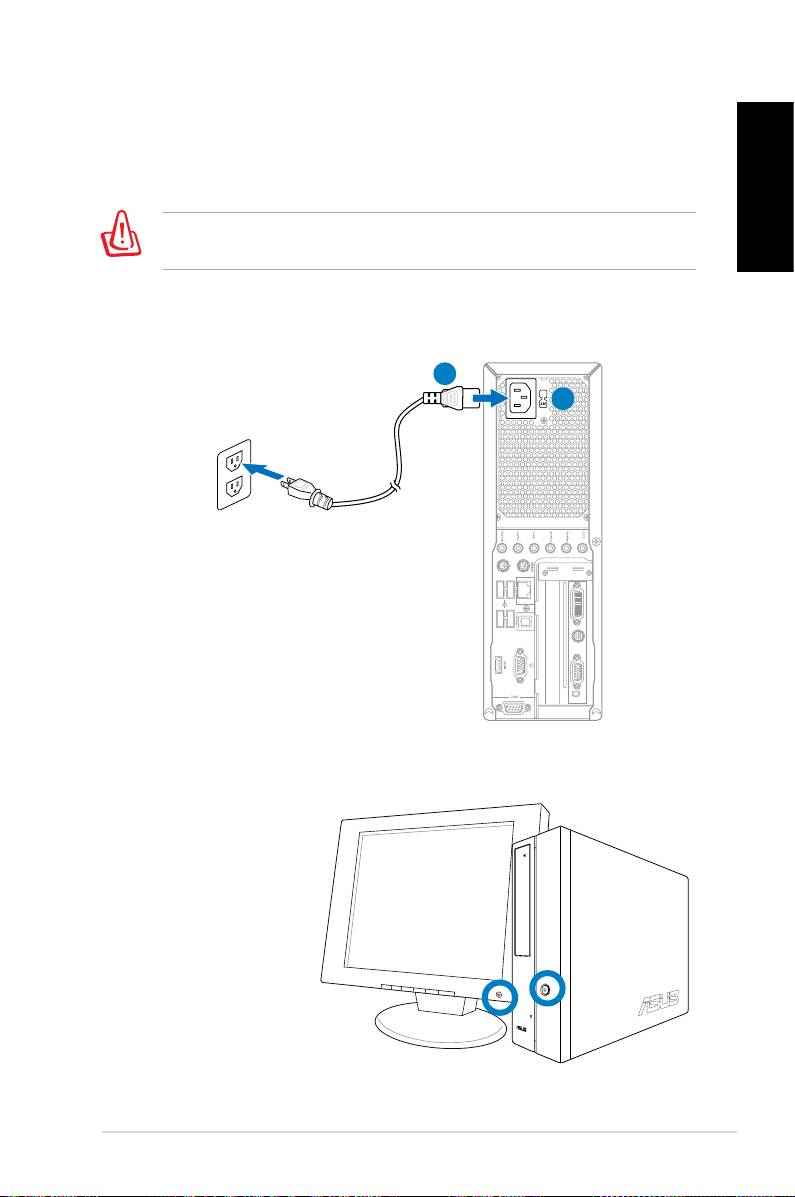
Подключение питания
1. Установите переключатель напряжения в положение, которое
соответствует входному напряжению.
Русский
Установка переключателя в положение 115V при входящем 220V
повредит вашу систему!
2. Подключите шнур питания к разъему питания и розетке.
2
1
Нажатие кнопки питания для включения
системы
ASUS ПК 13
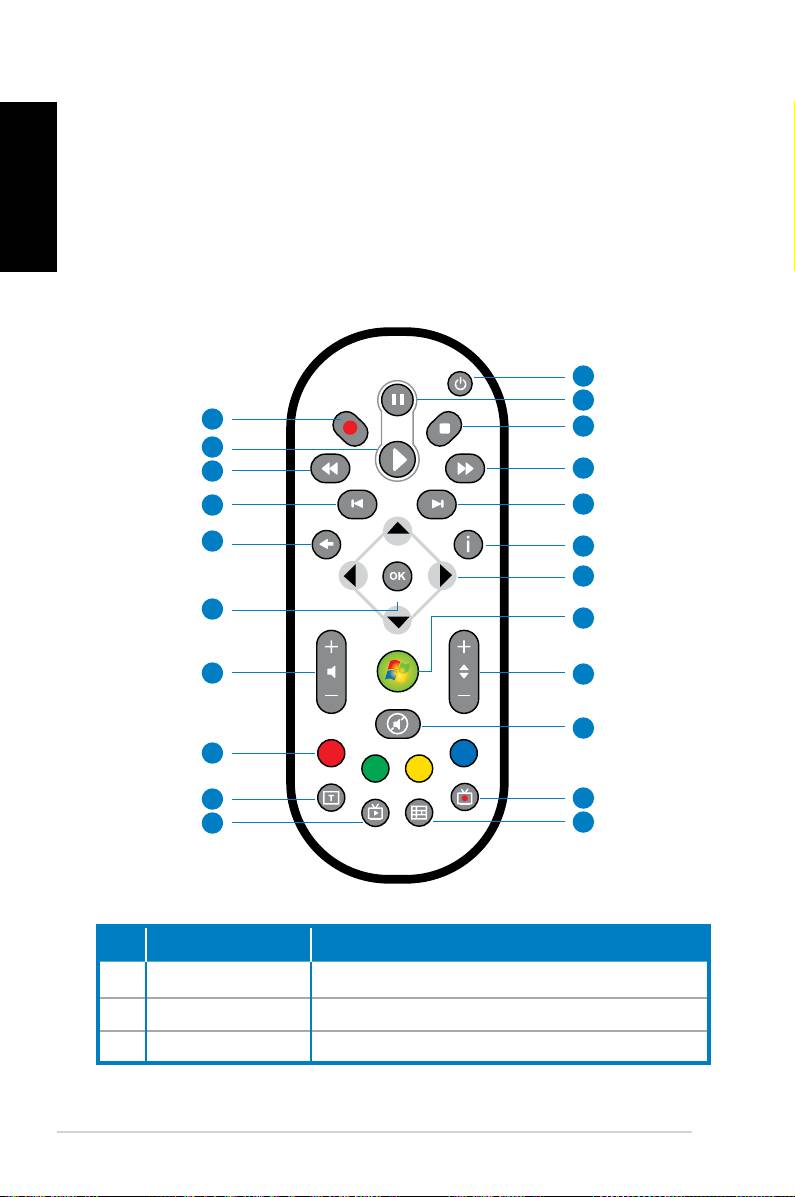
Использование пульта ДУ
Русский
(опция)
Используйте пульт для запуска программ, воспроизведения видео
и музыки. Также вы можете установить внешний ТВ-тюнер для
просмотра и записи телепередач.
Описание кнопок приведено в таблице внизу.
1
2
22
3
21
20
4
19
5
18
6
7
17
8
16
9
10
15
14
11
13
12
No. Кнопка Описание
1. Питание Нажмите для включения экрана и колонок.
2. Пауза
Нажмите для приостановки воспроизведения.
3. Стоп Нажмите для остановки воспроизведения.
14 ASUS ПК
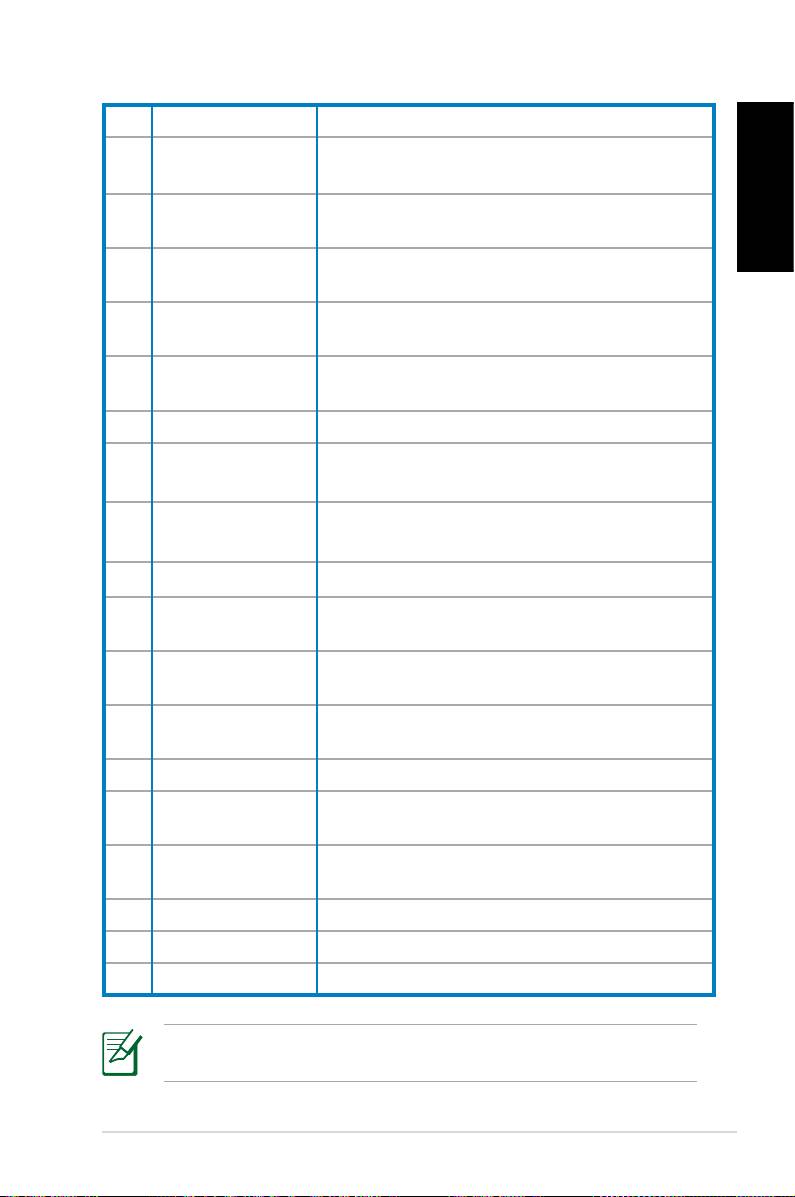
4.
Перемотка вперед
Нажмите для перемотки вперед.
Следующая
Нажмите для перехода на следующую
5.
дорожка
дорожку.
Нажмите для отображения
Русский
6. Информация
информационного экрана.
Кнопки
7.
Нажмите для навигации в меню.
навигации
Windows® Media
Нажмите для запуска программы
8.
Center
медиацентр.
Канал вверх/
9.
Нажмите для смены ТВ канала.*
вниз
10. Выключить звук Нажмите для отключения звука.
Записанные
Нажмите для отображения списка
11.
передачи
записанных телепрограмм.*
EPG (программа
Нажмите для отображения программы
12.
передач)
телепередач.*
13.
Включение ТВ
Нажмите для просмотра телепрограмм.*
Кнопка
Нажмите для переключения между
14.
переключения
цифровым и буквенным вводом.
Кнопки
15.
Доступны только на европейских моделях.
телетекста
Нажмите для увеличения/уменьшения
16
Громкость
громкости звука.
17. OK Нажмите для подтверждения действия.
Нажмите для возврата на предыдущую
18. Назад
страницу.
Предыдущая
Нажмите для возврата на предыдущую
19.
дорожка
дорожку.
20. Перемотка Нажмите для перемотки.
21.
Воспроизведение
Нажмите для воспроизведения.
22 Запись Нажмите для начала записи.
*Система поставляется без встроенного ТВ тюнера. Для использования
ТВ функций, сначала приобретите внешний ТВ тюнер.
ASUS ПК 15

Восстановление системы
Русский
Использование диска восстановления
Диск восстановления включает образ операционной системы,
установленной на заводе. Диск восстановления предоставляет
возможность быстрого восстановления программного обеспечения в
его первоначальное рабочее состояние. Перед использованием диска
восстановления, скопируйте ваши данные на USB или сетевой диск и
запишите параметры конфигурации (например сетевые параметры).
1. Включите ASUS ПК, появится логотип ASUS. Нажмите
F8 для
входа в меню выбора загрузочного устройства.
2. Вставьте диск восстановления в оптический привод и выберите
оптический привод (“CDROM:XXX”). Нажмите Enter, а затем
любую клавишу для продолжения.
3. Появится окно
Windows Boot Manager. Выберите Windows
Setup [EMS Enabled] и нажмите Enter. Подождите пока не
появится сообщение Windows is loading files.
4. Выберите способ установки сиcтемы. Имеются следующие
опции:
Recover system to a partition
Эта опция удалит только один раздел, который вы выбрали
ниже, позволив вам сохранить другие разделы и создаст новый
системный раздел как диск “C”. Выберите раздел и нажмите
NEXT.
Recover system to entire HD
Эта опция удалит все разделы на вашем жестком диске и создаст
новый системный раздел как диск “C”. Выберите и нажмите
Yes.
5.
Следуйте экранным инструкциям для завершения процесса.
Во время восстановления вы можете потерять все данные. Перед
восстановлением системы сохраните ваши данные.
16 ASUS ПК

6. После завершения восстановления извлеките диск из
оптического привода. Нажмите OK для перезагрузки системы.
7. После перезагрузки системы, Windows® Vista™ начнет
Русский
конфигурацию системы. Следуйте экранным инструкциям,
затем перезагрузите компьютер.
Этот диск восстановления предназначен только для ASUS ПК.
Не используйте его для других компьютеров. Обновления можно
найти на сайте ASUS www.asus.com.
ASUS ПК 17
Устранение неисправностей
Прочитайте следующие вопросы и ответы. Если они вам не помогли,
Русский
вы можете обратиться непосредственно к нам, используя контактную
информацию на прилагаемом диске.
Что делать если я не могу включить ПК?
Убедитесь, что индикатор питания горит. Если не горит, то в вашей
системе нет питания.
• Убедитесь, что шнур питания подключен.
• При использовании удлинителя или стабилизатора напряжения
убедитесь, что он подключен к розетке питания.
Что делать если не загружается операционная система?
• Убедитесь, что ваша память поддерживается системой и вы ее
правильно установили.
• Убедитесь, что ваши периферийные устройства совместимы
с системой. Некоторые устройства USB переходят в спящий
режим.
Если вышеперечисленное не помогло вам решить проблему,
обратитесь к вашему продавцу или восстановите систему с помощью
диска восстановления.
Во время восстановления вы можете потерять все данные. Перед
восстановлением системы сохраните ваши данные.
Почему я ничего не слышу из динамиков/наушников?
Проверьте значок громкость в панели управления Windows® и
убедитесь что звук не выключен .Если так, дважды щелкните по
значку громкости и включите звук .
18 ASUS ПК

Почему CD/DVD не может читать или писать?
• Убедитесь, что ваш диск совместим с оптическим приводом.
• Убедитесь, что диск правильно вставлен.
Русский
• Диск может быть только для чтения.
ASUS ПК 19

Русский
20 ASUS ПК
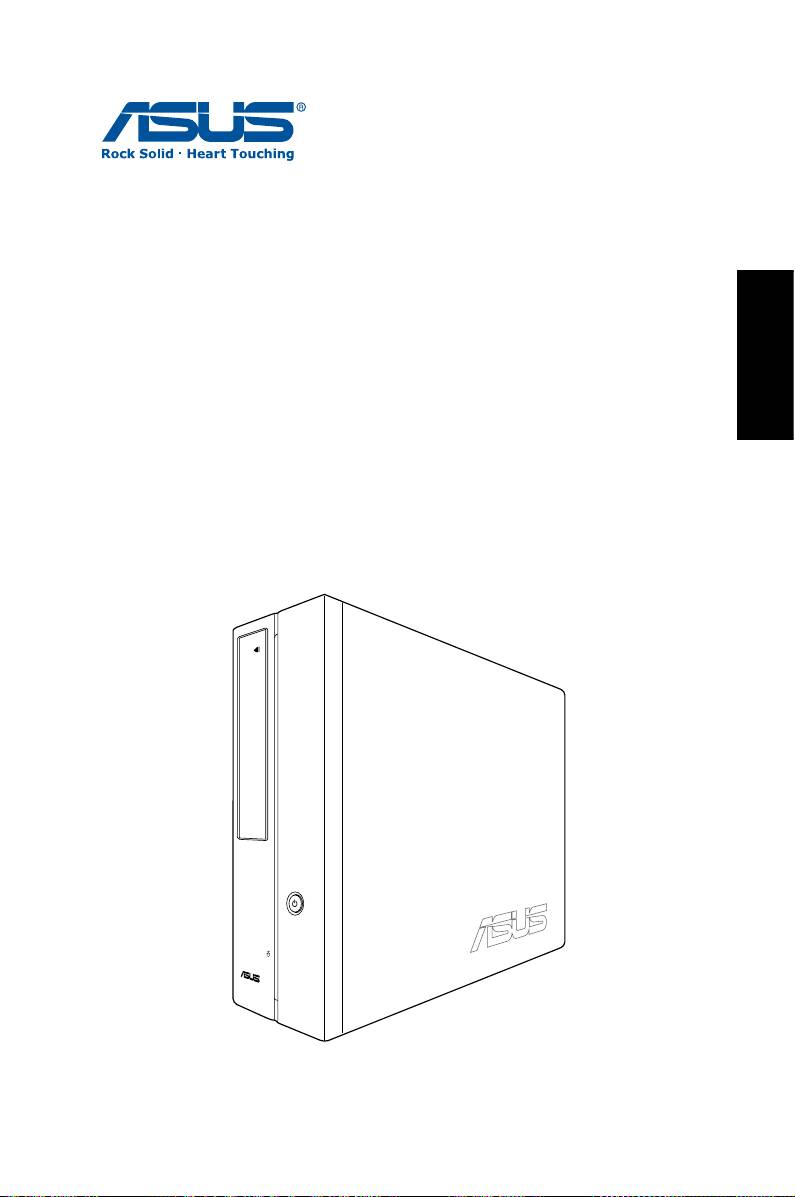
PC Desktop da série CP da
ASUS
Português
Manual do utilizador

PG3995
Primeira Edição V1
Julho 2008
Português
Copyright © 2008 ASUSTeK COMPUTER INC. Reservados todos os direitos.
Nenhuma parte deste manual, incluindo os produtos e software aqui descritos, pode
ser reproduzida, transmitida, transcrita, armazenada num sistema de recuperação, ou
traduzida para outro idioma por qualquer forma ou por quaisquer meios, excepto a
documentação mantida pelo comprador como cópia de segurança, sem o consenti-
mento expresso e por escrito da ASUSTeK COMPUTER INC. (“ASUS”).
Os nomes dos produtos e das empresas mencionados neste manual podem ou não
ser marcas registadas ou estarem protegidos por direitos de autor que pertencem às
respectivas empresas. Estes nomes são aqui utilizados apenas para fins de identificação
ou explicação, para benefício dos proprietários e sem qualquer intenção de violação dos
direitos de autor. Todas as marcas registadas pertencem aos respectivos proprietários.
Foram feitos todos os esforços para assegurar que o conteúdo deste manual está
correcto e actualizado. No entanto, não podemos garantir a precisão do conteúdo do
mesmo e o fabricante reserva-se o direito de fazer alterações sem aviso prévio.

Índice
Notices ....................................................................................................4
Informações de segurança ..............................................................6
Notas acerca deste manual .............................................................7
Bem-vindo .............................................................. 8
Conteúdos da embalagem ..............................................................8
Conhecer o seu Desktop PC .................................. 9
Características dos painéis frontal / posterior ..........................9
Montar o seu Desktop PC .................................... 12
Português
Ligar os Dispositivos .......................................................................12
Ligar a alimentação .........................................................................13
Premir o botão de alimentação para ligar o sistema ........... 13
Utilizar o controlo remoto Media Center (opcional) ...........14
Recuperar o seu sistema ..................................... 16
Utilizar o DVD de recuperação ....................................................16
Resolução de problemas ..................................... 18
PC Desktop da série CP da ASUS 3

Notices
Federal Communications Commission Statement
This device complies with Part 15 of the FCC Rules. Operation is
subject to the following two conditions:
• This device may not cause harmful interference, and
• This device must accept any interference received including
Português
interference that may cause undesired operation.
This equipment has been tested and found to comply with the
limits for a Class B digital device, pursuant to Part 15 of the FCC
Rules. These limits are designed to provide reasonable
protection against harmful interference in a residential
installation. This equipment generates, uses and can radiate radio
frequency energy and, if not installed and used in accordance
with manufacturer’s instructions, may cause harmful
interference to radio communications. However, there is no
guarantee that interference will not occur in a particular
installation. If this equipment does cause harmful interference to
radio or television reception, which can be determined by
turning the equipment off and on, the user is encouraged to
try to correct the interference by one or more of the following
measures:
• Reorient or relocate the receiving antenna.
• Increase the separation between the equipment and receiver.
• Connect the equipment to an outlet on a circuit different from
that to which the receiver is connected.
• Consult the dealer or an experienced radio/TV technician for
help.
The use of shielded cables for connection of the monitor to
the graphics card is required to assure compliance with FCC
regulations. Changes or modifications to this unit not expressly
approved by the party responsible for compliance could void
the user’s authority to operate this equipment.
4 PC Desktop da série CP da ASUS

Canadian Department of Communications Statement
This digital apparatus does not exceed the Class B limits for radio
noise emissions from digital apparatus set out in the Radio
Interference Regulations of the Canadian Department of
Communications.
This class B digital apparatus complies with Canadian ICES-003.
Português
Macrovision Corporation Product Notice
This product incorporates copyright protection technology that
is protected by method claims of certain U.S. patents and other
intellectual property rights owned by Macrovision Corporation
and other rights owners. Use of this copyright protection
technology must be authorized by Macrovision Corporation, and
is intended for home and other limited viewing uses only unless
otherwise authorized by Macrovision Corporation. Reverse
engineering or disassembly is prohibited.
PC Desktop da série CP da ASUS 5

Informações de segurança
O ASUS Desktop PC foi concebido e testado de forma a satisfazer as
mais recentes normas de segurança aplicáveis aos equipamentos de
tecnologia de informação. No entanto, para garantir a sua segurança, é
importante que leia as seguintes normas de segurança.
Instalação do seu sistema
Português
• Leia e siga todas as instruções incluídas na documentação
antes de começar a utilizar o seu sistema.
• Não utilize este produto próximo de água ou de fontes de
calor, tais como radiadores.
• Instale o sistema sobre uma superfície estável.
• Utilize o suporte se quiser empilhar o seu NOVA. O empilhamento
do sistema sem o suporte pode dificultar a ventilação do PC e
danificá-lo.
• As aberturas existentes no chassis destinam-se a permitir a
ventilação do PC. Não bloqueie ou tape estas aberturas. Certi-
fique-se de que o espaço em redor do sistema é suficiente para
permitir a ventilação do mesmo. Nunca introduza qualquer
tipo de objectos através das aberturas de ventilação.
• Se utilizar uma extensão com este produto, certifique-se de
que a amperagem total dos dispositivos ligados à extensão
não excede a amperagem da mesma.
Cuidados a ter durante a utilização
• Não pise o cabo de alimentação e não coloque quaisquer
objectos sobre o mesmo.
• Não derrame água ou outros líquidos sobre o sistema.
• Quando o sistema está desligado, continua a existir passagem
de uma pequena quantidade de corrente eléctrica.
Antes de limpar o sistema, desligue sempre todos os cabos de
alimentação, do modem e de rede das tomadas eléctricas.
• Se o produto apresentar os seguintes problemas técnicos,
desligue o cabo de alimentação e contacte um técnico
qualificado ou a loja onde comprou o produto.
• O cabo de alimentação ou a ficha apresentam danos.
• Se tiver derramado líquido para o interior do sistema.
6 PC Desktop da série CP da ASUS
• Se o sistema não funcionar normalmente mesmo
quando são seguidas as instruções de funcionamento.
• Se tiver deixado cair o sistema ou se a caixa externa deste
estiver danificada.
• Se o desempenho do sistema sofrer alguma alteração.
AVISO relativo à segurança da unidade de CD-ROM
PRODUTO LASER CLASSE 1
Português
NÃO DESMONTAR
A garantia não é aplicável para os produtos que
foram desmontados pelos utilizadores
O símbolo do caixote do lixo com uma cruz por cima indica que o
produto (equipamento eléctrico e electrónico e bateria contendo
mercúrio) não deve ser depositado junto do lixo doméstico.
Consulte os regulamentos locais relativamente à eliminação de
equipamentos electrónicos.
Notas acerca deste manual
Existem algumas notas e avisos neste manual que deve ter em
atenção de maneira a concluir totalmente determinadas tarefas
de forma segura. Estas notas têm diferentes níveis de importân-
cia conforme descrito a seguir:
AVISO! Informação importante que deve ser seguida para uma
utilização segura.
IMPORTANTE! Informação vital que deve seguir para evitar danos ao nível
dos dados e dos componentes do PC e ainda ferimentos pessoais.
SUGESTÃO: Sugestões para a conclusão de tarefas.
NOTA: Informação para situações especiais.
PC Desktop da série CP da ASUS 7

Bem-vindo
Parabéns pela sua aquisição do ASUS Desktop PC. Os conteúdos
da embalagem do seu novo Desktop PC estão listados abaixo
mas podem variar consoante os modelos. A ASUS reserva o direi-
to de substituir componentes ou acessórios de forma a providen-
ciar um serviço optimizado.
Contacte o seu vendedor se algum dos itens estiver danificado
Português
ou em falta.
Conteúdos da embalagem
• ASUS Desktop PC x1
• Teclado x1
• Rato x1
• Cabo de alimentação x1
• DVD de suporte x1
• DVD de recuperação x1
• Guia de Instalação x1
• Cartão de garantia x1
• Controlo remoto (opcional) x1
Visite o sítio Web da ASUS em http://support.asus.com para
quaisquer actualizações.
8 PC Desktop da série CP da ASUS
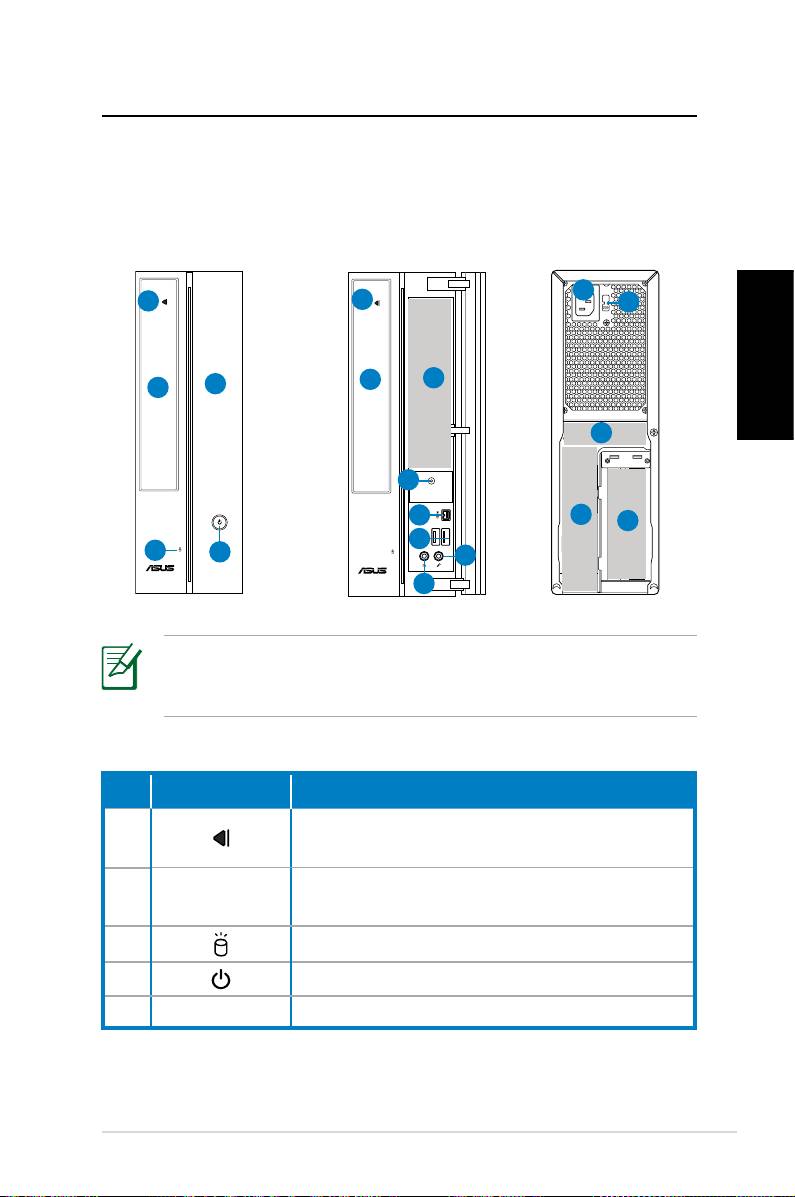
Conhecer o seu Desktop PC
Características dos painéis frontal /
posterior
Frontal
Frontal
Posterior
(Fechado)
(Aberto)
11
1
1
12
2
6
5
2
Português
13
4
7
14
15
8
3
4
10
9
*As áreas a cinzento contém portas dos painéis frontal/
posterior. Estas portas e as suas localizações podem variar
consoante o modelo do seu sistema.
Nº. Botão/LED Descrição
Prima para ejectar o disco da unidade
1.
óptica.
Tampa do compartimento da unidade
2.
óptica
3. LED unidade de Disco Rígido
4. Botão de alimentação
5. Tampa do painel frontal
Continua na próxima página
PC Desktop da série CP da ASUS 9
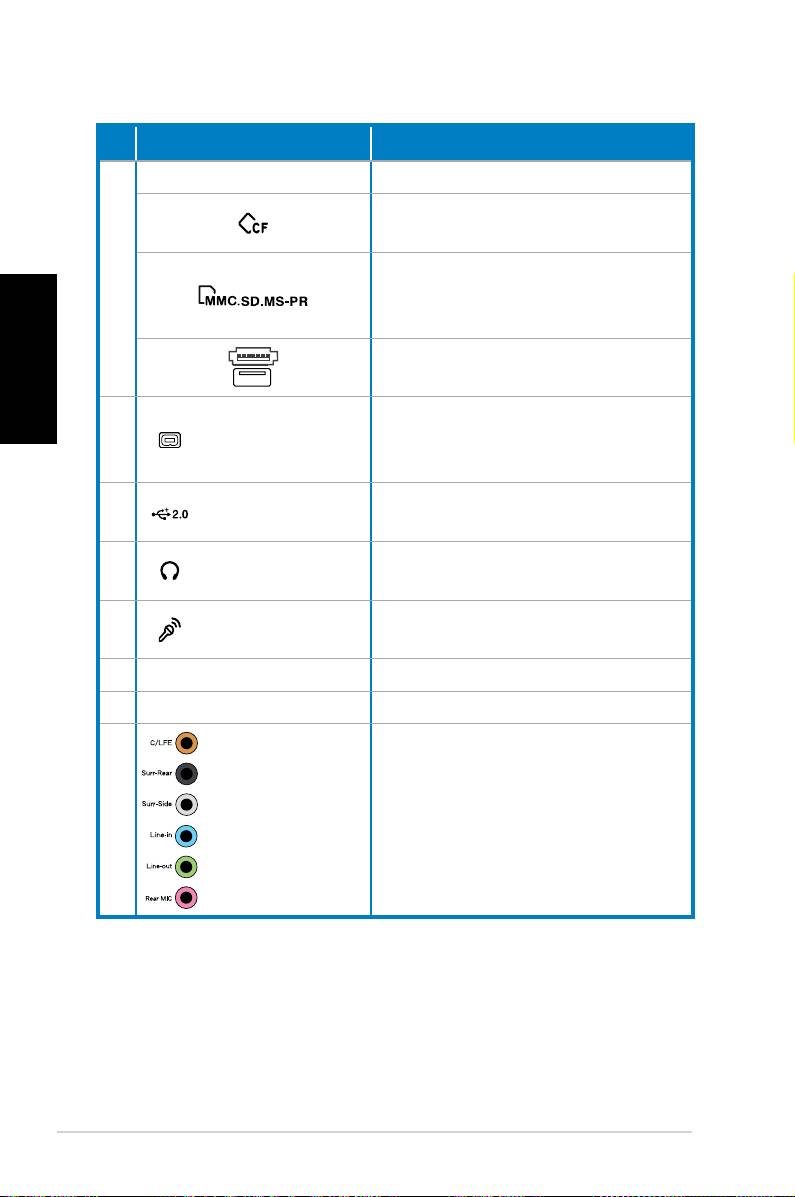
Nº.
Ranhura/Porta Descrição
Infravermelho (opcional)
Ranhura para cartão de memória
CompactFlash®/Microdrive™
Ranhura para cartões de
6
Português
memória MultiMediaCard/Secure
Digital™/ Memory Stick Pro™
Porta de USB+E-SATA.
Conectar a uma televisão ou
Porta IEEE 1394a
7.
monitor com saída de vídeo
de 4 pinos
diferente.
Portas de USB
Conecta a dispositivos USB tais
8.
2.0
como um rato, teclado, ou câmara.
Entrada
Ligar auscultadores ou
9.
auscultadores
altifalantes a esta entrada.
Entrada
Ligar um microfone a esta
10.
microfone
entrada.
11. Conector de alimentação Liga o cabo de alimentação.
12. Selector de voltagem Selecciona a voltagem de entrada.
Portas de 7.1
Conectar a um sistema de som
13.
(8)-canal áudio
7.1 (8).
Continua na próxima página
10 PC Desktop da série CP da ASUS
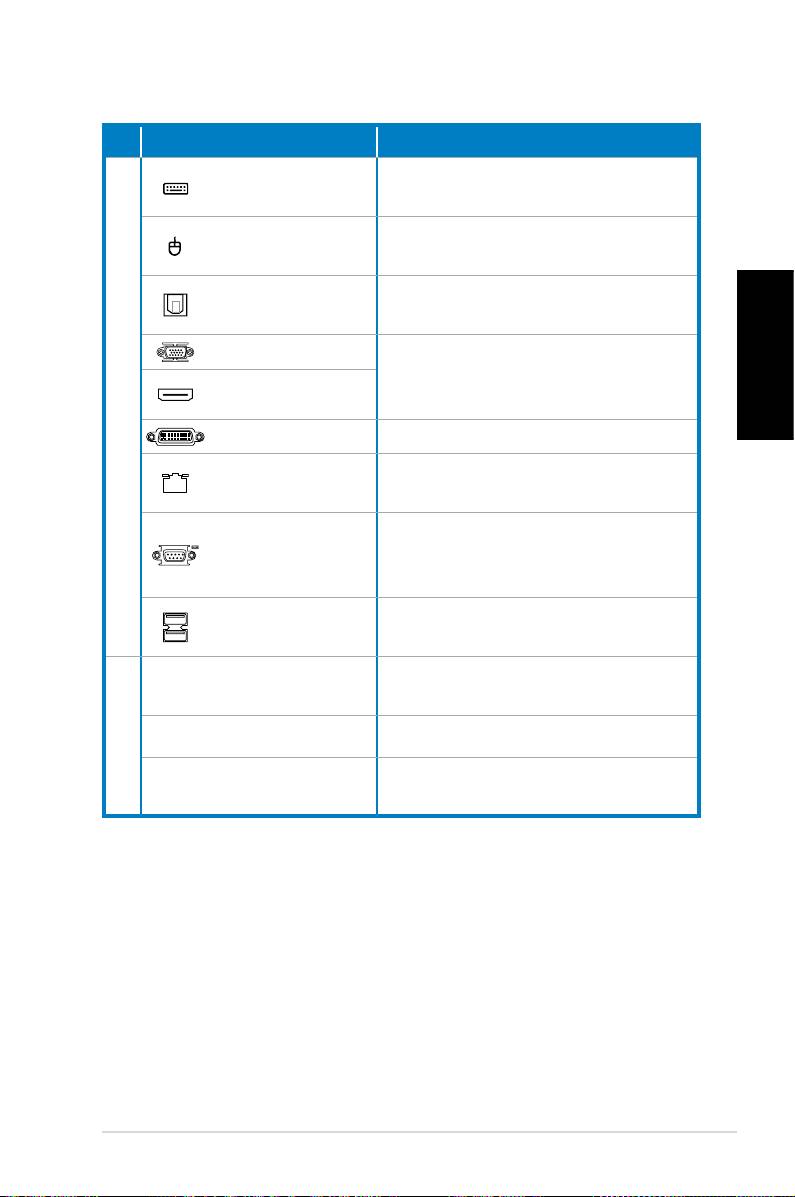
Nº. Ranhura/Porta Descrição
Porta para
Liga a um teclado PS/2.
teclado PS/2
Porta para rato
Liga a um rato PS/2.
PS/2
Porta saída
Conectar a um amplificador para
S/PDIF Óptico
saída de áudio digital.
Porta VGA
Conectar a uma televisão ou
monitor com saída de vídeo
Porta HDMI
diferente.
Português
14.
Porta DVI Liga a um televisor ou monitor.
Porta LAN
Ligar um cabo de rede a esta
(RJ-45)
porta.
Liga a dispositivos que estão em
Porta COM
conformidade com as
especificações de série.
Portas de USB
Conecta a dispositivos USB tais
2.0
como um rato, teclado, ou câmara.
Utilize as ranhuras para instalar
Ranhuras de expansão
placas de expansão.
15.
Porta DVI/S-Vídeo/VGA Placa VGA (opcional)
Placa sintonizadora para TV
Porta FM/RF/IR/S-Vídeo
(opcional)
PC Desktop da série CP da ASUS 11
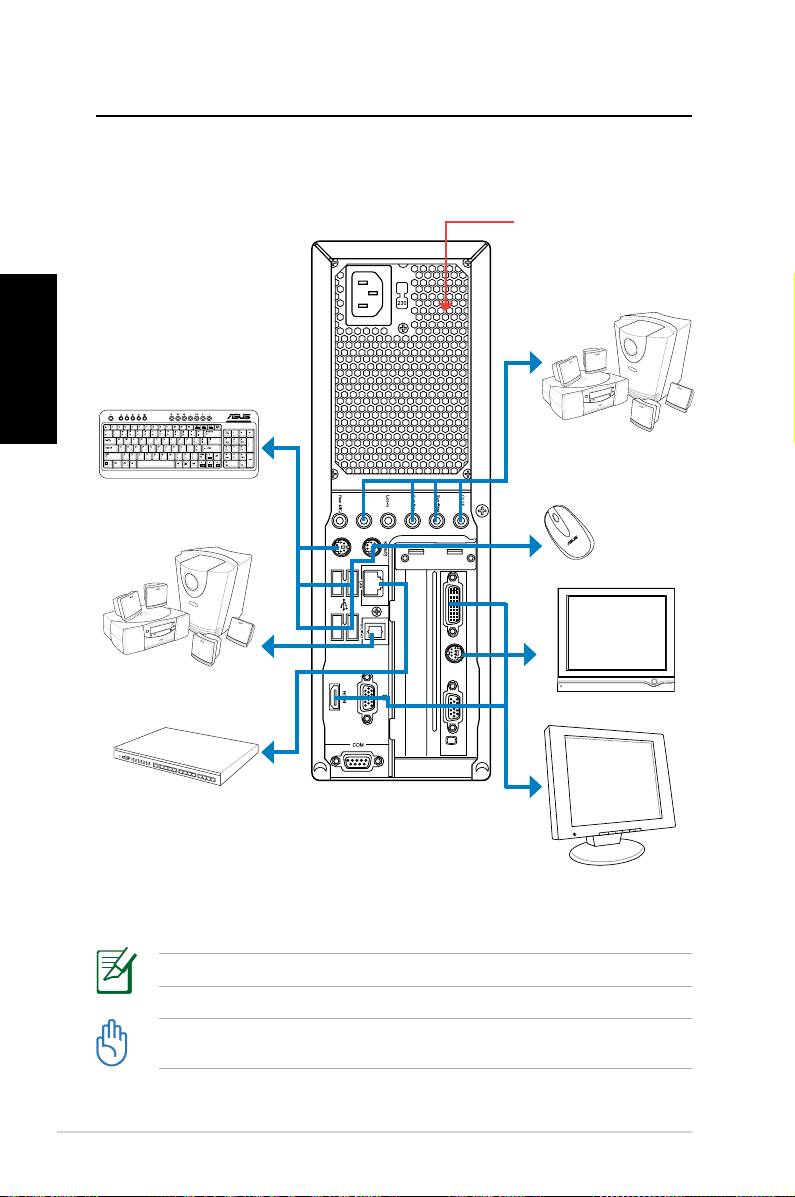
Montar o seu Desktop PC
Ligar os Dispositivos
Não bloqueie ou tape
estas aberturas.
Português
Sistema de som
7.1 (8)
Teclado
Rato
Sistema de som
7.1 (8)
TV
Switch/
concentrador de
rede
Ecrã
As ilustrações são unicamente para referência. As especificações do produto podem variar.
• Utilize este produto a uma temperatura ambiente abaixo de 35˚C.
• Não bloqueie ou tape estas entradas de ar.
12 PC Desktop da série CP da ASUS
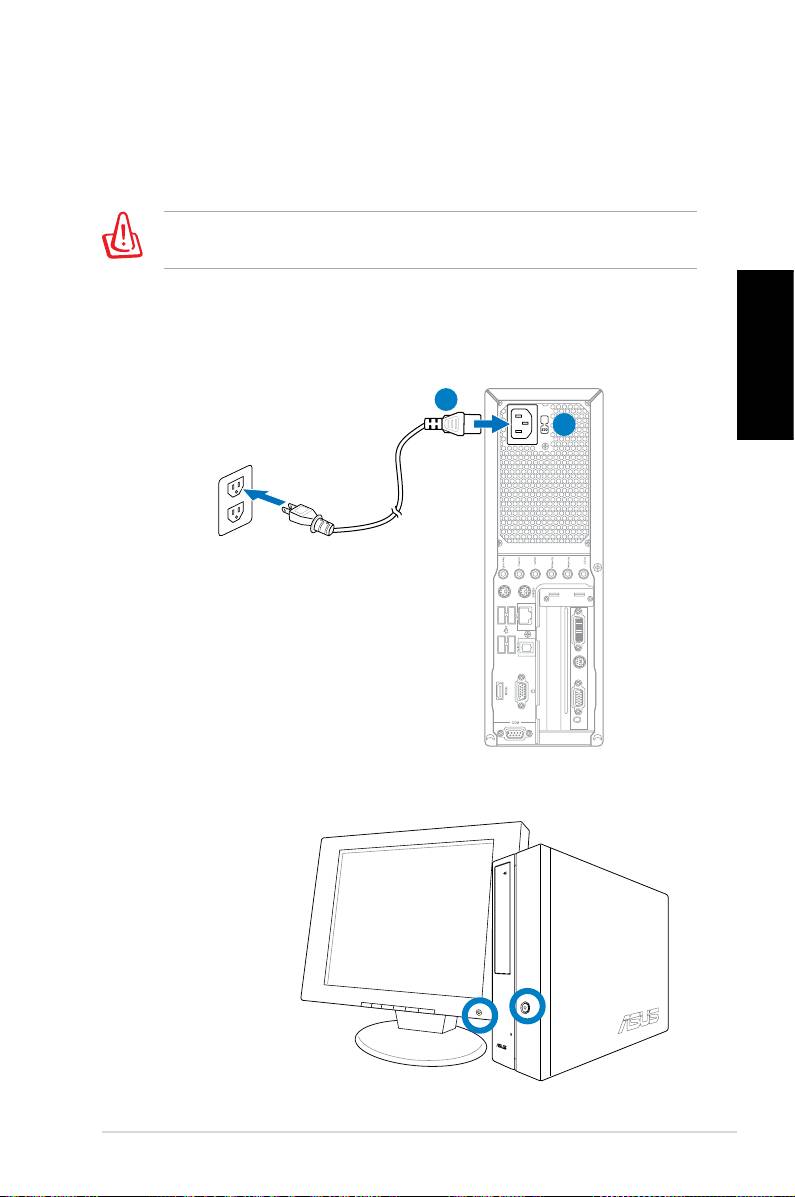
Ligar a alimentação
1. Coloque o selector de voltagem na voltagem de entrada
apropriada de acordo com a voltagem na sua área.
A definição do selector de voltagem para 115 V numa área de
230 V irá danificar o sistema!
2. Ligue o cabo de alimentação ao conector de alimentação e
depois faça a ligação a uma tomada eléctrica.
3. Prima o Comutador de Alimentação.
2
Português
1
Premir o botão de alimentação para
ligar o sistema
PC Desktop da série CP da ASUS 13
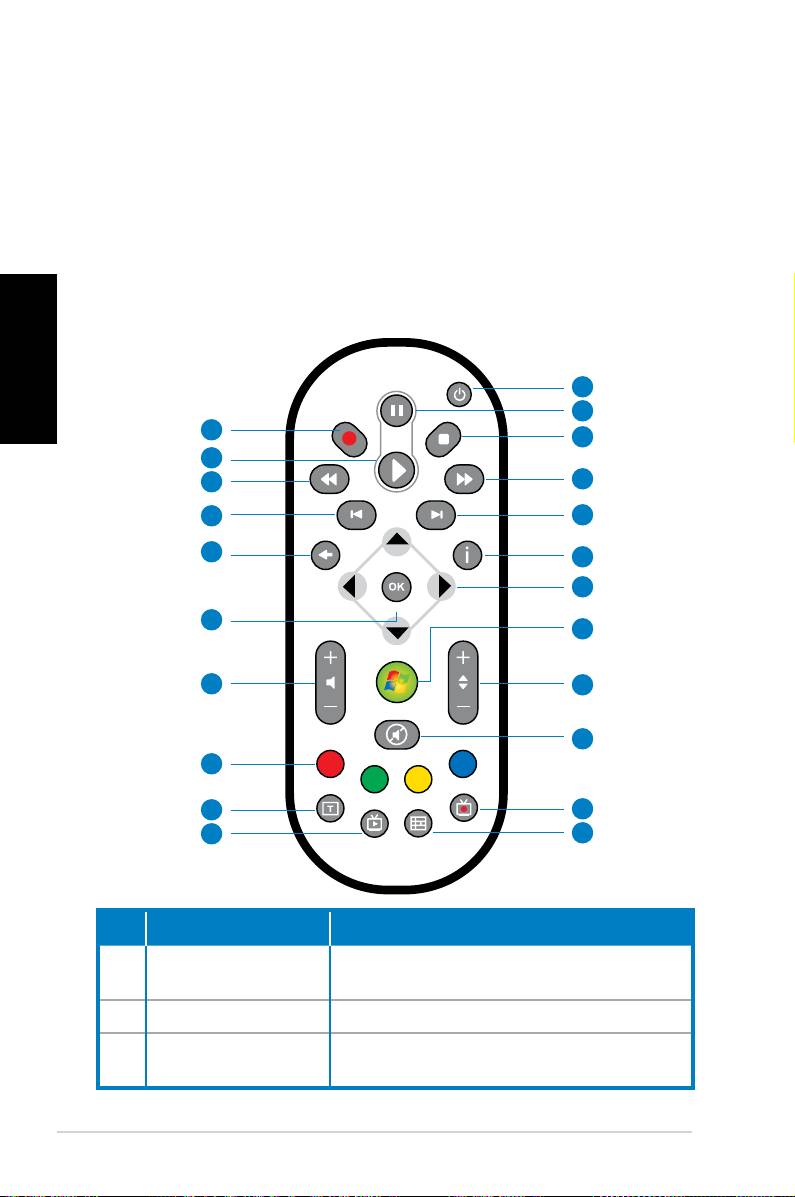
Utilizar o controlo remoto Media
Center (opcional)
Utilizar o controlo remoto para iniciar o programa Media Center
para reproduzir ficheiros de media tais como música e filmes.
Também pode instalar uma caixa de TV externa para ver TV e gra-
var programas de TV.
Português
Consulte a tabela abaixo para familiarizar-se com as funções dos
botões do controlo remoto.
1
2
22
3
21
20
4
19
5
18
6
7
17
8
16
9
10
15
14
11
13
12
Nº. Botão Descrição
Botão de
Prima para ligar/desligar a alimenta-
1.
alimentação
ção do ecrã e dos altifalantes.
2. Pausa Prima para pausar a reprodução.
Prima para parar a reprodução de um
3. Parar
ficheiro de media.
14 PC Desktop da série CP da ASUS
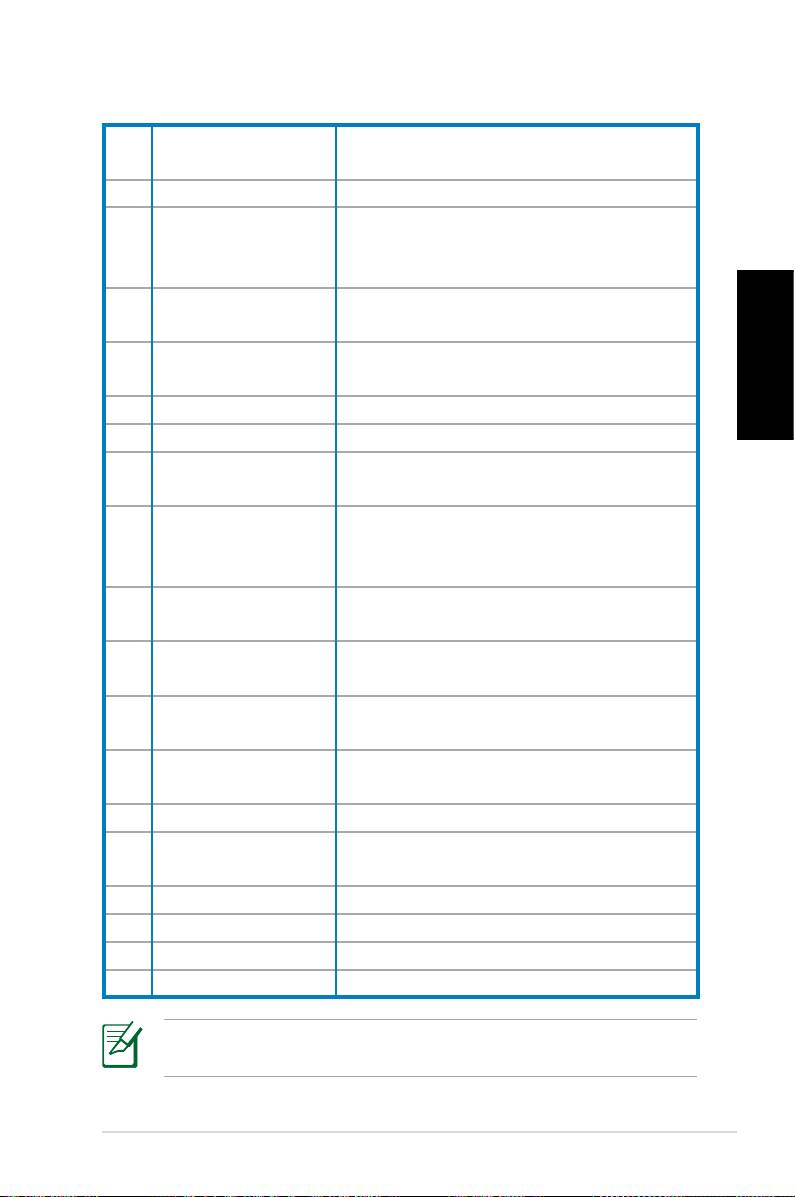
Prima para fazer avançar um ficheiro
4. Avançar rápido
de media.
5. Faixa Seguinte Prima para ir para a faixa seguinte.
Prima para apresentar informação do
6. Informação
programa no Media Center ou outro
menu de opções.
Tecla de navegação
7.
Prima para percorrer menus.
multi-direccional
Windows® Media
Prima para iniciar o programa Media
8.
Center
Center.
Português
9. Canal acima/abaixo Prima para mudar os canais de TV.*
10. Cortar o som Prima para desactivar a saída de áudio.
Prima para apresentar uma lista dos
11. TV Gravada
seus programas de TV gravados.*
EPG (Guia de
Prima para apresentar o ecrã do guia
12.
Programação
de programação electrónica.*
Electrónica)
Prima para visualizar programas de
13. Botão TV ao vivo
TV ao vivo. *
Alterna entre digitação numérica e
14. Alternar
digitação alfabética.
Disponível somente nos modelos
15. Botões teletexto
Europeus.
Aumentar/
16
Prima para aumentar/diminuir o volume.
diminuir volume
17. OK Prima para confirmar uma acção.
Prima para retroceder para a página
18. Retroceder
anterior.
19. Faixa anterior Prima para regressar à faixa anterior.
20. Rebobinar
Prima para rebobinar um ficheiro de media.
21. Reproduzir
Prima para reproduzir um ficheiro de media.
22 Gravar Prima para iniciar a gravação de TV.
*O sistema não dispõe de sintonizador de TV integrado. Para
utilizar a função de TV, adquira uma caixa de TV externa primeiro.
PC Desktop da série CP da ASUS 15

Recuperar o seu sistema
Utilizar o DVD de recuperação
O DVD de recuperação inclui uma imagem do sistema operativo ins-
talado no seu sistema na fábrica. O DVD de recuperação, em conjun-
to com o DVD de suporte, providencia uma solução de recuperação
compreensiva que restaura rapidamente o seu sistema para o seu
estado inicial de funcionamento, considerando que a sua unidade
Português
de disco rígido esteja em boas condições de funcionamento. Antes
de utilizar DVD de recuperação, copie os seus ficheiros de dados (tais
como os ficheiros PST do Outlook) para um dispositivo USB ou uma
unidade de rede e tome nota de quaisquer definições de configura-
ção personalizadas (tais como definições de rede).
1. Ligue o seu ASUS Desktop PC e aparecerá o logótipo ASUS.
Prima F8 para aceder ao menu Por favor seleccione o dis-
positivo de arranque.
2. Insira o DVD de recuperação na unidade óptica e seleccione
a unidade (“CDROM:XXX”) como dispositivo de arranque.
Prima Enter e depois prima qualquer tecla para continuar.
3. Aparecerá a janela
Gestor de Arranque do Windows. Selec-
cione Configuração do Windows [EMS Enabled] e prima
Enter. Aguarde enquanto a mensagem O Windows está a
carregar ficheiros estiver apresentada.
4. Seleccione onde instalar o novo sistema. As opções são:
Recuperar o sistema para uma partição
Esta opção apagará apenas a partição que seleccionar
abaixo, permitindo-lhe manter outras partições, e criar uma
nova partição do sistema como unidade “C.” Seleccione uma
partição e clique em Seguinte.
Recuperar o sistema para todo o Disco Rígido
Esta opção apagará todas as partições no seu disco rígido
e criará uma nova partição do sistema como unidade “C.”
Seleccione e clique em Sim.
5. Siga as instruções no ecrã para completar o processo de
recuperação.
Perderá todos os dados guardados no disco rígido durante a
recuperação do sistema. Certifique-se de que faz uma cópia de
segurança dos mesmos antes de iniciar a recuperação do sistema.
16 PC Desktop da série CP da ASUS

6. Depois de completada a recuperação do sistema, ser-lhe-á
pedido que insira o DVD de suporte na unidade óptica. Cli-
que OK e o sistema reiniciará.
7. Após o reinício, o Windows® Vista iniciará as configurações
do sistema. Siga as instruções no ecrã para completar o pro-
cesso, e depois reinicie o computador.
Este DVD de recuperação é de utilização exclusiva com o
ASUS Desktop PC. NÃO o utilize em outros computadores.
Visite o sítio Web da ASUS em www.asus.com para quaisquer
actualizações.
Português
PC Desktop da série CP da ASUS 17
Resolução de problemas
Leia as seguintes P&Rs para uma orientação de resolução de
problemas. Se estas não lhe facultarem as respostas pretendidas,
pode contactar-nos directamente para as informações de con-
tactos facultadas no DVD de suporte.
O que posso fazer se o meu Desktop PC não puder ser ligado?
Português
Verifique se o LED de alimentação no painel frontal acende. Este
não acende se não houver qualquer alimentação do sistema.
• Verifique se o cabo de alimentação está conectado.
• Ao utilizar uma extensão ou um regulador de voltagem, certi
-
fique-se de que os conectou à tomada de rede e os ligou.
O que posso fazer se o meu Desktop PC não conseguir aceder
ao sistema operativo?
• Certifique-se de que utiliza módulos de memória que o siste
-
ma suporte e que os instalou devidamente nas ranhuras.
• Verifique se os seus dispositivos periféricos são compatíveis
com o sistema. Alguns dispositivos de armazenamento USB,
por exemplo, têm uma estrutura de unidade de disco e en-
tram no modo de suspensão facilmente.
Se os passos acima não resolverem o problema, contacte o seu
vendedor ou proceda a uma recuperação do sistema usando o
DVD de recuperação facultado.
Perderá todos os dados guardados no disco rígido durante a
recuperação do sistema. Certifique-se de que faz uma cópia de
segurança dos mesmos antes de iniciar a recuperação do sistema.
Porque razão não consigo ouvir nenhum som nos meus altifa-
lantes/auscultadores?
Verifique o ícone do volume na barra de tarefas do Windows®
para ver se está definido para sem som . Se assim for, faça du-
plo clique sobre este ícone para apresentar a barra de volume, e
depois clique no ícone sem som na barra de tarefas para cancelar
o modo sem som .
18 PC Desktop da série CP da ASUS

Porque razão é que não consigo ler/gravar um CD/DVD?
• Certifique-se de que utiliza um disco compatível com a unida
-
de óptica.
• Verifique se inseriu o disco devidamente ou se existem alguns
riscos no disco.
• Verifique se o disco não tem protecção contra escrita.
Português
PC Desktop da série CP da ASUS 19

Português
20 PC Desktop da série CP da ASUS
Equipo de sobremesa ASUS
CP Series
Manual del usuario
Español

S3995
Primera edición V1
Agosto de 2008
Español
Copyright © 2008 ASUSTeK COMPUTER INC. Todos los derechos reservados.
No se permite la reproducción, transmisión, transcripción o almacenamiento en sistemas
de recuperación de ninguna parte de este manual, incluyendo los productos y el software
descritos en él, así como la traducción total o parcial de este manual a cualquier idioma de
ninguna forma o medio sin la autorización expresa y por escrito de ASUSTeK COMPUTER
INC. (“ASUS”), a excepción de aquellas partes de este manual que el usuario conserve para
fines de copia de seguridad.
Los productos y nombres de empresas que aparecen en este manual pueden o no ser
marcas registradas o propiedad intelectual de sus respectivas compañías y solamente se
usan para identificación o explicación y en beneficio de los propietarios sin intención de
infringir ningún derecho. Todas las marcas comerciales son propiedad de sus respectivos
propietarios.
Se han realizado todos los esfuerzos posibles para asegurar que el contenido de este
manual sea correcto y esté actualizado. Sin embargo, no se garantiza la precisión de los
contenidos y el fabricante se reserva el derecho de realizar cambios sin previo aviso.

Contenidos
Notices ....................................................................................................4
Información de seguridad ...............................................................6
Notas sobre este manual ..................................................................7
Bienvenido ............................................................. 8
Contenido del paquete .....................................................................8
Familiarizarse con el equipo Desktop PC ............ 9
Características de los paneles frontal y posterior ....................9
Configurar su Desktop PC ................................... 12
Conectar dispositivos .....................................................................12
Conectar la alimentación ..............................................................13
Presionar el botón de alimentación para encender
el sistema ............................................................................................13
Usar el mando a distancia de Media Center (opcional) ......14
Español
Recuperar el sistema ........................................... 16
Utilizar el DVD de recuperación ..................................................16
Solucionar problemas ......................................... 18
Equipo de sobremesa ASUS CP Series 3

Notices
Federal Communications Commission Statement
This device complies with Part 15 of the FCC Rules. Operation is
subject to the following two conditions:
• This device may not cause harmful interference, and
• This device must accept any interference received including
interference that may cause undesired operation.
This equipment has been tested and found to comply with the
limits for a Class B digital device, pursuant to Part 15 of the FCC
Rules. These limits are designed to provide reasonable
protection against harmful interference in a residential
Español
installation. This equipment generates, uses and can radiate radio
frequency energy and, if not installed and used in accordance
with manufacturer’s instructions, may cause harmful
interference to radio communications. However, there is no
guarantee that interference will not occur in a particular
installation. If this equipment does cause harmful interference to
radio or television reception, which can be determined by
turning the equipment off and on, the user is encouraged to
try to correct the interference by one or more of the following
measures:
• Reorient or relocate the receiving antenna.
• Increase the separation between the equipment and receiver.
• Connect the equipment to an outlet on a circuit different from
that to which the receiver is connected.
• Consult the dealer or an experienced radio/TV technician for
help.
The use of shielded cables for connection of the monitor to
the graphics card is required to assure compliance with FCC
regulations. Changes or modifications to this unit not expressly
approved by the party responsible for compliance could void
the user’s authority to operate this equipment.
4 Equipo de sobremesa ASUS CP Series

Canadian Department of Communications
Statement
This digital apparatus does not exceed the Class B limits for radio
noise emissions from digital apparatus set out in the Radio
Interference Regulations of the Canadian Department of
Communications.
This class B digital apparatus complies with Canadian ICES-003.
Advertencia sobre Productos de Macrovision Corporation
Este producto incorpora una tecnología de protección de
los derechos de autor que está protegida por métodos de
reclamo de ciertas patentes de los EE.UU. y por otros derechos
internacionales de propiedad intelectual poseídos por
Macrovision Corporation y otros propietarios de derechos. El uso
de esta tecnología de protección de los derechos de autor debe
Español
estar autorizado por Macrovision Corporation, y está destinado
al uso en el hogar y a otros usos limitados a menos que de otro
modo sea autorizado por Macrovision Corporation. Las copias
de ingeniería o el desmontaje están prohibidas.
Equipo de sobremesa ASUS CP Series 5

Información de seguridad
El dispositivo ASUS Desktop PC se ha diseñado y comprobado para
cumplir las normativas más recientes de seguridad para equipos
de tecnología de la información. No obstante, para garantizar su
seguridad, es importante que lea las siguientes instrucciones de
seguridad.
Configurar el sistema
• Lea y siga todas las instrucciones de la documentación antes
de usar el sistema.
• No utilice este producto junto a zonas con agua o fuentes de
calor, como por ejemplo radiadores.
• Coloque el sistema en una superficie estable.
• Use la base de soporte si desea poner de pie el sistema NOVA.
Si lo pone de pie sin dicha base, dificultará la ventilación y el
Español
sistema podría resultar dañado.
• Las aberturas de la carcasa son parte del sistema de ventilación
del producto. No las bloquee. Asegúrese de dejar suficiente
espacio alrededor del sistema para proporcionarle la
ventilación adecuada. Nunca inserte objetos de ningún tipo en
las aberturas de ventilación.
• Si usa un alargador, asegúrese de que el valor nominal de la
corriente de los dispositivos enchufados no supera el de dicho
alargador.
Consideraciones a tener en cuenta durante el uso
• No camine sobre el cable de alimentación ni coloque nada
sobre él.
• No derrame agua ni ningún otro líquido en el sistema.
• Cuando el sistema está apagado, sigue consumiendo una
pequeña cantidad de corriente eléctrica.
Desenchufe siempre todas las tomas de corriente, el módem y
los cables de red antes de limpiar el sistema.
• Si detecta los siguientes problemas técnicos en el producto,
desenchufe el cable de alimentación y póngase en contacto
con un técnico profesional o con su proveedor.
• El cable o el enchufe de alimentación está dañado.
• Se ha derramado líquido dentro del sistema.
6 Equipo de sobremesa ASUS CP Series
• El sistema no funciona correctamente aunque se hayan segui-
do las instrucciones de funcionamiento.
• El sistema se ha dejado caer o la carcasa está dañada.
• El rendimiento del sistema cambia.
ADVERTENCIA de seguridad
relacionada con la unidad de CD-ROM
PRODUCTO LÁSER DE CLASE 1
NO DESMONTAR
La garantía no se aplica a productos desmontados
por los usuarios
Este símbolo de la papelera con ruedas tachada indica que el
producto (equipo eléctrico y electrónico y pila de botón que
Español
contiene mercurio) no se debe arrojar a la basura municipal.
Consulte las normas locales sobre desecho de productos
electrónicos.
Notas sobre este manual
A lo largo de esta guía se usan algunas notas y advertencias
que debe tener en cuenta para llevar a cabo ciertas tareas de
forma segura y completa. Estas notas tienen diferentes grados de
importancia según se describe a continuación:
!ADVERTENCIA¡ Información importante que debe seguir para
usar el producto de forma segura.
¡IMPORTANTE! Información fundamental que debe seguir para
no dañar los datos, los componentes o a las personas.
SUGERENCIA: Consejos para completar tareas.
NOTA: Información para situaciones especiales.
Equipo de sobremesa ASUS CP Series 7

Bienvenido
Enhorabuena por la compra del dispositivo ASUS Desktop PC.
El contenido del paquete de nuevo Desktop PC se muestra a
continuación, pero puede variar en función del modelo. ASUS se
reserva el derecho de reemplazar los componentes y accesorios
para proporcionar un servicio al cliente óptimo.
Póngase en contacto con su proveedor si alguno de estos com-
ponentes falta o está dañado.
Contenido del paquete
• ASUS Desktop PC x1
• Teclado x1
• Ratón x1
Español
• Cable de alimentación x1
• DVD de soporte x1
• DVD de recuperación x1
• Guía de instalación x 1
• Tarjeta de garantía x1
• Mando a distancia (opcional) x1
Visite el sitio Web de ASUS en http://support.asus.com para
obtener cualquier actualización.
8 Equipo de sobremesa ASUS CP Series
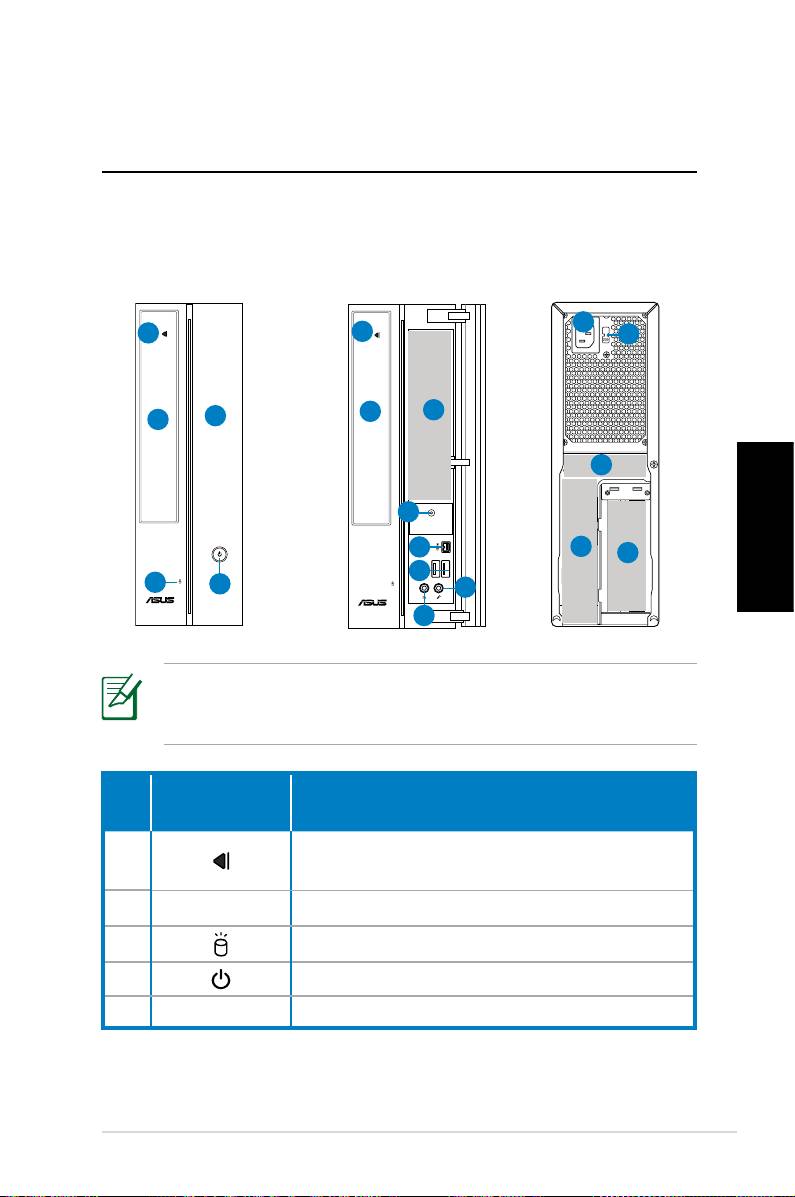
Familiarizarse con el equipo
Desktop PC
Características de los paneles
frontal y posterior
Panel frontal
Panel frontal
Panel posterior
(cerrado)
(abierto)
11
1
1
12
2
6
5
2
13
4
7
14
15
Español
8
3
4
10
9
*Las áreas de color gris contienen los puertos de los paneles
frontal y posterior. Estos puertos y sus ubicaciones pueden
variar en función del modelo del sistema.
Botón/
Nº
Descripción
Indicador LED
Presione para expulsar un disco de la
1.
bahía de unidad óptica.
2. Cubierta del zócalo de la Unidad Óptica.
3. LED de la unidad de disco duro.
4. Botón de encendido.
5. Tapa del panel frontal.
continúa en la página siguiente
Equipo de sobremesa ASUS CP Series 9
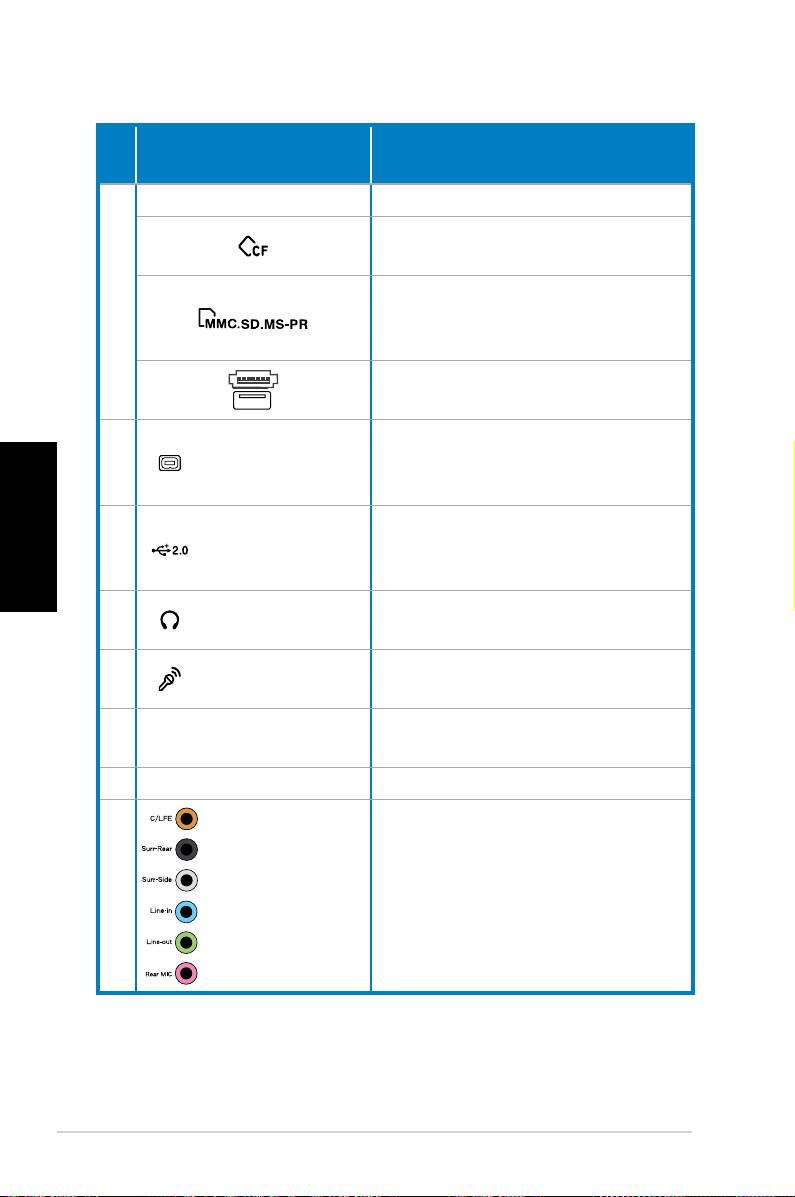
Botón/
Nº.
Descripción
Indicador LED
Infrarrojos (opcional).
Ranura para tarjeta
CompactFlash®/Microdrive™
Ranura para tarjetas
6
MultiMediaCard/Secure Digital™/
Memory Stick Pro™.
Puerto USB+E-SATA.
Puerto IEEE
Conecta un dispositivo IEEE
7.
1394a de 4 con-
1394 como por ejemplo una
Español
tactos
videograbadora digital.
Conecta dispositivos USB como
8. Puertos USB 2.0
por ejemplo, ratones, teclados o
cámaras.
Conector para
Enchufe un dispositivo estéreo o
9.
auriculares
auriculares en este conector.
Conector para
Enchufe un micrófono en este
10.
micrófono
conector.
Conector de
Permite conectar el cable de
11.
alimentación
alimentación.
12. Selector de voltaje Selecciona el voltaje de entrada.
Puertos de
Conecta un sistema de altavoces
13.
audio de 7.1 (8)
de 7.1(8) canales.
canales
continúa en la página siguiente
10 Equipo de sobremesa ASUS CP Series
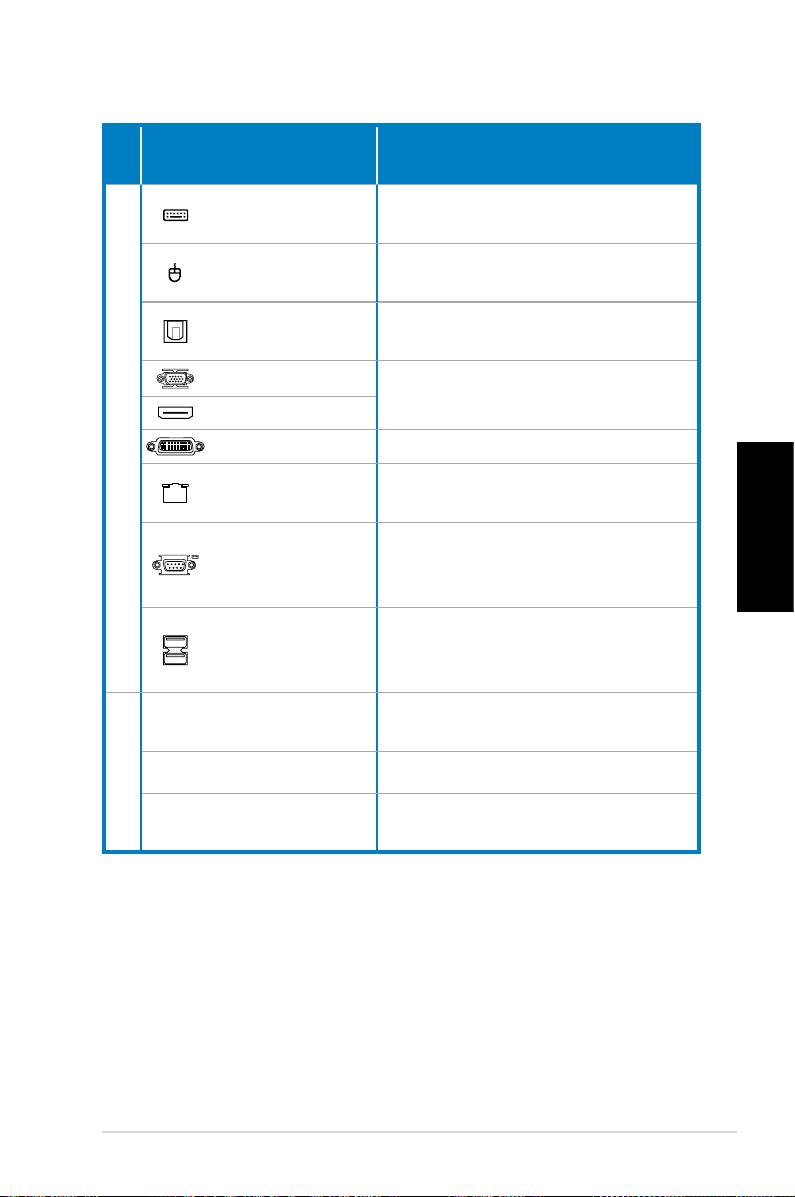
Botón/
Nº
Descripción
Indicador LED
Puerto para
Permite conectar un teclado PS/2.
teclado PS/2
Puerto para
Permite conectar un ratón PS/2.
ratón PS/2
Puerto Salida
Conecta un amplificador para
S/PDIF óptico
salida de audio digital.
Puerto VGA
Conecta un televisor o monitor
con salida de vídeo diferente.
Puerto HDMI
14.
Puerto DVI Conexión a una TV o monitor.
Puerto LAN (RJ-
Enchufe un cable de red a este
45)
puerto.
Permite conectar dispositivos
Puerto COM
que cumplan la especificación
Español
serie.
Conecta dispositivos USB como
Puertos USB 2.0
por ejemplo, ratones, , teclados o
cámaras.
Use las ranuras cuando instale
Ranuras de expansión
tarjetas de expansión.
15.
Puerto DVI/S-Video/VGA Tarjeta VGA (opcional)
Puerto FM/RF/IR/S-
Tarjeta sintonizadora de TV (op-
Video
cional)
Equipo de sobremesa ASUS CP Series 11
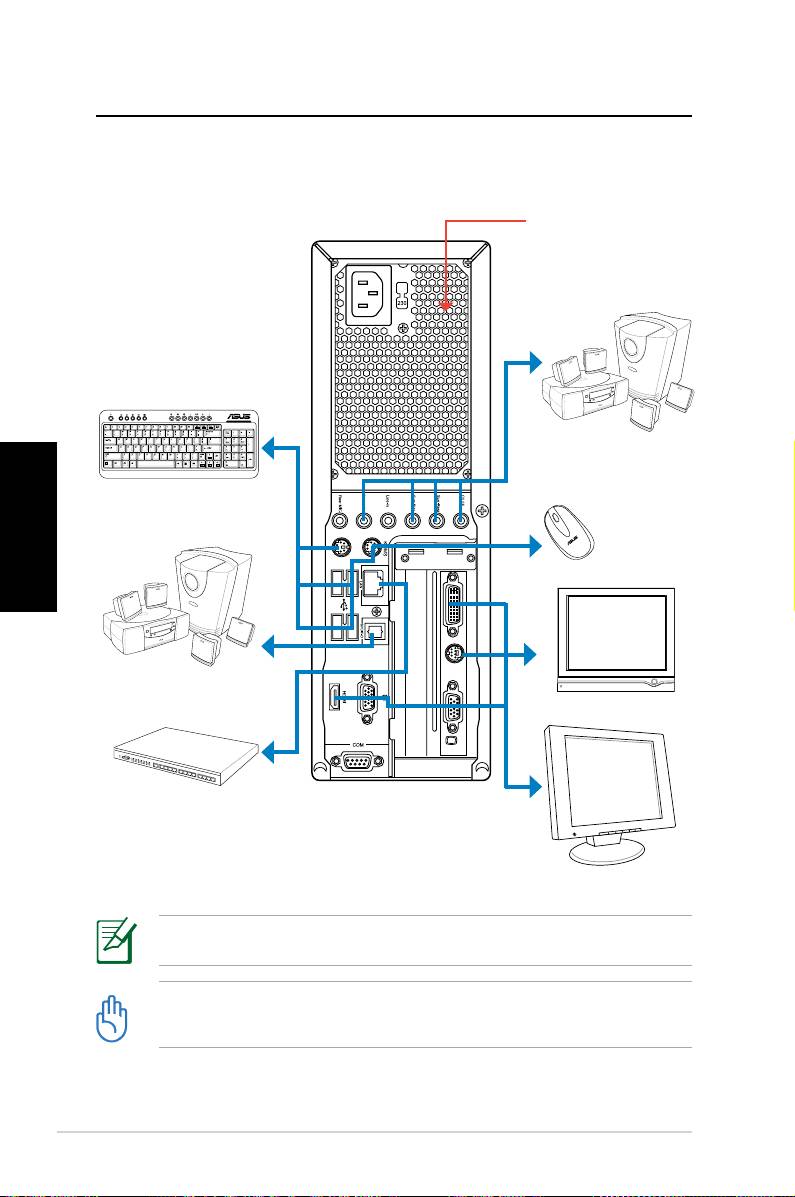
Congurar su Desktop PC
Conectar dispositivos
No bloquee ni tape
estas aberturas.
Sistema de altavoces
de 7.1 (8) canales
Español
Teclado
Ratón
Sistema de altavoces
de 7.1 (8) canales
TV
Concentrador o conmu-
tador de red
Pantalla
Las ilustraciones son solamente para referencia. Las especificaciones del producto real
pueden variar.
• Use este producto en entornos donde la temperatura ambiente no supere los
35 ˚C.
• No bloquee ni tape estas aberturas.
12 Equipo de sobremesa ASUS CP Series
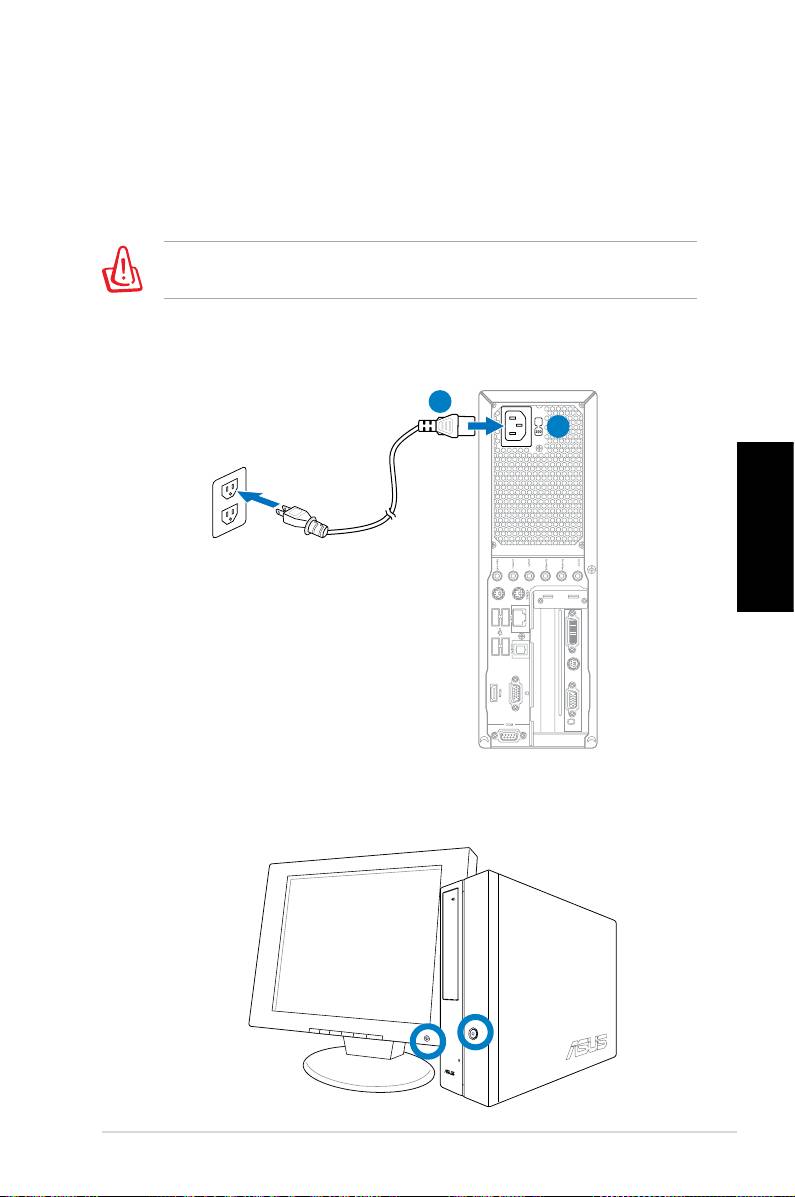
Conectar la alimentación
1. Coloque el selector de voltaje en la posición correcta para
seleccionar el voltaje de entrada adecuado en función de la
tensión utilizada en su región.
¡El sistema resultará dañado si establece el selector de voltaje
en 115 V en una zona en la que se usan 230 V!
2. Enchufe el cable de alimentación entre conector de
alimentación y la toma de corriente eléctrica.
2
1
Español
Presionar el botón de alimentación
para encender el sistema
Equipo de sobremesa ASUS CP Series 13
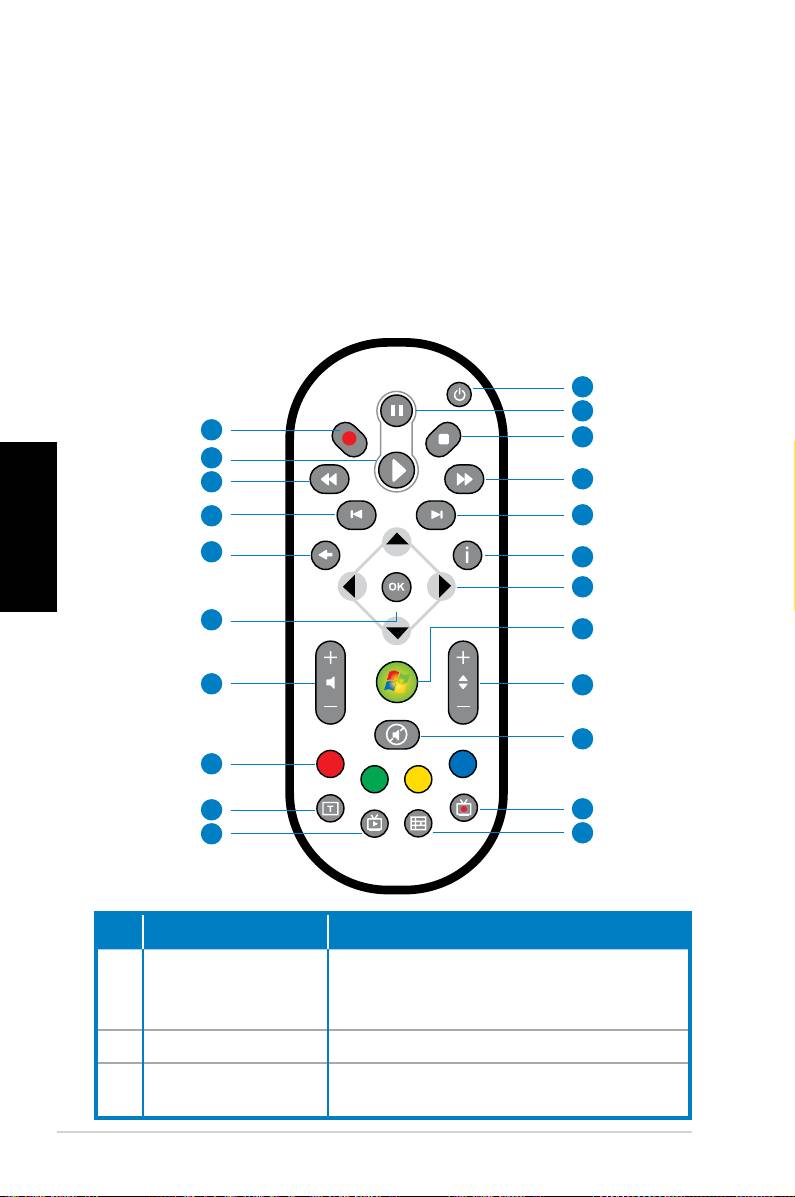
Usar el mando a distancia de Media
Center (opcional)
Use el mando a distancia para iniciar el programa Media Center
para reproducir archivos multimedia, como por ejemplo música y
películas. También puede instalar un televisor externo para ver la
televisión y grabar programas de televisión.
Consulte la tabla siguiente para familiarizarse con las funciones
de los botones especiales del mando a distancia.
1
2
22
3
21
Español
20
4
19
5
18
6
7
17
8
16
9
10
15
14
11
13
12
Nº Botón Descripción
Presiónelo para conectar y desconec-
1. Alimentación
tar la alimentación de la pantalla y los
altavoces.
2. Pausa Permite pausar una reproducción.
Permite detener la reproducción de
3. Detener
un archivo multimedia.
14 Equipo de sobremesa ASUS CP Series
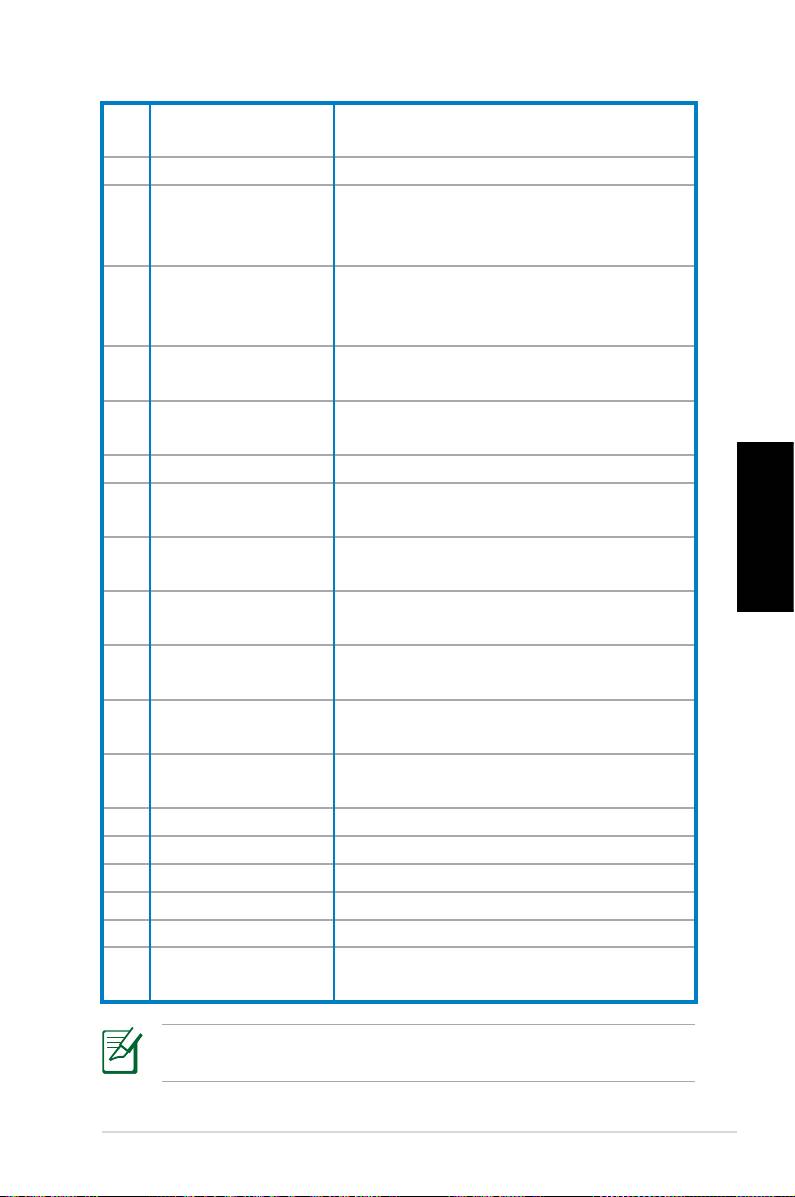
Hace avanzar rápidamente un archivo
4. Avance rápido
multimedia.
5. Pista siguiente Permite ir a la pista siguiente.
Permite mostrar información del
6. Información
programa bajo Media Center u otras
opciones de menú.
Botones de des-
7.
plazamiento de 4
Permiten recorrer los menús OSD.
direcciones
Windows® Media
Permite iniciar el programa Media
8.
Center
Center.
Subir o bajar
Permiten cambiar de canal de televi-
9.
canales
sión.*
10. Desactivar audio Permite deshabilitar la salida de audio.
Programas de TV
Permite mostrar una lista de los pro-
11.
grabados
gramas de TV grabados.*
EPG (Guía electró-
Permite mostrar la pantalla de la Guía
12.
Español
nica de programas)
electrónica de programas.*
Botón TV en
Presiónelo para ver programas de TV
13.
directo
en directo. *
Permite alternar entre la entrada
14. Mayús
numérica y alfanumérica.
Botones de tele-
Solamente están disponibles en los
15.
texto
modelos europeos.
Subir o bajar
16
Permite subir o bajar el volumen.
volumen
17. Aceptar Permite confirmar una acción.
18. Volver Permite volver a la página anterior.
19. Pista anterior Permite volver a la pista anterior.
20. Rebobinar
Permite rebobinar un archivo multimedia.
21. Reproducir
Permite reproducir un archivo multimedia.
Presiónelo para iniciar la grabación
22 Grabar
de programas de TV.
*El sistema no incluye sintonizador de TV integrado. Para usar la
función de televisión, adquiera antes un televisor externo.
Equipo de sobremesa ASUS CP Series 15

Recuperar el sistema
Utilizar el DVD de recuperación
El DVD de recuperación incluye una imagen del sistema opera-
tivo, instalada en el equipo portátil en la propia fábrica. El DVD
de recuperación, junto con el DVD de soporte, proporciona una
solución de recuperación total que restaura rápidamente sistema
a su estado de trabajo original siempre que la unidad de disco
duro se encuentre en buen estado de funcionamiento. Antes
de utilizar el DVD de recuperación, copie los archivos de datos
(como por ejemplo los archivos PST de Outlook) en un dispo-
sitivo USB o en una unidad de red y anote las configuraciones
personalizadas (como por ejemplo la configuración de red).
1. Encienda el equipo ASUS Desktop PC. Aparecerá el logotipo
de ASUS. Presione F8 para entrar en el menú Seleccione el
Español
dispositivo de arranque.
2. Inserte el DVD de recuperación en la unidad óptica y selec
-
cione esta unidad (“CDROM:XXX”) como el dispositivo de
arranque. Presione Entrar y, a continuación, cualquier letra
para continuar.
3. Aparecerá la ventana
Administrador de arranque de Win-
dows. Seleccione Programa de instalación de Windows
[EMS habilitado] y presione Entrar. Espere cuando aparezca
el mensaje Windows está cargando archivos.
4. Seleccione la ubicación en la que desea instalar un nuevo
sistema. Opciones disponibles:
Recuperar el sistema en una partición
Esta opción eliminará solamente la partición seleccionada,
permitiendo conservar otras opciones y creará una nueva
partición del sistema como unidad “C”. Seleccione una parti-
ción y haga clic en SIGUIENTE.
Recuperar el sistema en toda la unidad de disco duro
Esta opción eliminará todas las particiones de la unidad de
disco duro y creará una nueva partición como unidad “C”.
Realice la selección y haga clic en Sí.
5. Siga las instrucciones que aparezcan en la pantalla para
completar el proceso de recuperación.
Se perderán todos los datos durante la recuperación del
sistema. Asegúrese de hacer una copia de seguridad de dichos
datos antes de recuperar el sistema.
16 Equipo de sobremesa ASUS CP Series

6. Cuando la recuperación del sistema se haya completado, se
le pedirá que inserte el DVD de soporte en la unidad óptica.
Haga clic en Aceptar y el sistema se reiniciará.
7. Cuando el sistema se reinicie, Windows® Vista™ iniciará las
configuraciones de dicho sistema. Siga las instrucciones de la
pantalla para completar el proceso y reinicie el equipo.
Este DVD de recuperación solamente se puede aplicar
al equipo ASUS Desktop PC. NO lo use en otros equipos.
Visite el sitio Web de ASUS www.asus.com para obtener las
actualizaciones.
Español
Equipo de sobremesa ASUS CP Series 17

Solucionar problemas
Las siguientes preguntas y respuestas constituyen una guía para
solucionar problemas. Si sigue sin encontrar respuesta a sus pro-
blemas, puede ponerse en contacto directamente con nosotros
mediante la información proporcionada en el DVD de soporte.
¿Qué puedo hacer si mi equipo Desktop PC no se puede encender?
Compruebe si el indicador LED de alimentación situado en el
panel frontal se ilumina. No se iluminará si no se proporciona
alimentación al sistema.
• Compruebe si el cable de alimentación está enchufado.
• Cuando use un alargador o un regulador de voltaje, asegúrese
de que lo ha enchufado a la toma de corriente eléctrica y de
que lo ha activado.
Español
¿Qué puedo hacer si mi equipo Desktop PC no puede activar el
sistema operativo?
• Asegúrese de que usa módulos que admita el sistema y de
que los instala correctamente en los zócalos.
• Compruebe si los dispositivos periféricos son compatibles con
el sistema. Algunos dispositivos de almacenamiento USB, por
ejemplo, tienen una estructura de unidad de disco diferente y
entran en el modo de suspensión con mucha facilidad.
Si los pasos anteriores no solucionan el problema, póngase en
contacto con su distribuidor o realice la recuperación del sistema
usando el DVD de recuperación proporcionado.
Se perderán todos los datos durante la recuperación del
sistema. Asegúrese de hacer una copia de seguridad de dichos
datos antes de recuperar el sistema.
¿Por qué no suenan los altavoces o los auriculares?
Compruebe el icono de volumen en la barra de tareas de Windows®
para ver si está establecido en el modo de silencio . Si es así,
haga doble clic en este icono para mostrar la barra de volumen y,
a continuación, haga clic en el icono de silencio bajo la barra para
cancelar el modo de silencio .
18 Equipo de sobremesa ASUS CP Series

¿Por qué no se pueden realizar operaciones de lectura o escri-
tura en un CD o DVD?
• Asegúrese de que usa un disco compatible con la unidad
óptica.
• Compruebe si ha insertado el disco correctamente o si está
rayado.
• Compruebe si el disco está protegido contra escritura.
Español
Equipo de sobremesa ASUS CP Series 19

Español
20 Equipo de sobremesa ASUS CP Series
Komputer biurkowy ASUS
serii CP
Podręcznik użytkownika
Polski

PL3995
Wydanie pierwsze V1
Sierpień 2008
Copyright © 2008 ASUSTeK COMPUTER INC. Wszelkie prawa zastrzeżone.
Polski
Żadnej z części tego podręcznika, włącznie z opisem produktów
i oprogramowania, nie można powielać, przenosić, przetwarzać,
przechowywać w systemie odzyskiwania danych lub tłumaczyć na inne
języki, w jakiejkolwiek formie lub w jakikolwiek sposób, za wyjątkiem
wykonywania kopii zapasowej dokumentacji otrzymanej od dostawcy,
bez wyraźnego, pisemnego pozwolenia ASUSTeK COMPUTER INC.
(“ASUS”).
Żadnej z części tego podręcznika, włącznie z opisem produktów
i oprogramowania, nie można powielać, przenosić, przetwarzać,
przechowywać w systemie odzyskiwania danych lub tłumaczyć na inne
języki, w jakiejkolwiek formie lub w jakikolwiek sposób, za wyjątkiem
wykonywania kopii zapasowej dokumentacji otrzymanej od dostawcy, bez
wyraźnego, pisemnego pozwolenia producenta.
Produkty i nazwy firm pojawiające się w tym podręczniku mogą, ale nie
muszą być zastrzeżonymi znakami towarowymi lub prawami autorskimi
ich odpowiednich właścicieli i używane są wyłącznie w celu identyfikacji
lub wyjaśnienia z korzyścią dla ich właścicieli i bez naruszania ich praw.
Wszystkie znaki towarowe sa własnością ich odpowiednich właścicieli.

Spis treści
Notices ......................................................................... 4
Informacje dotyczące bezpieczeństwa ........................ 6
Uwagi do tego podręcznika ......................................... 7
Witamy ...............................................................8
Zawartość opakowania ................................................ 8
Poznanie budowy komputera typu desktop ..9
Elementy na panelu przednim/tylnym .......................... 9
Ustawienia komputera typu desktop ............12
Podłączanie urządzeń ............................................... 12
Podłączenie zasialnia ................................................ 13
W celu włączenia systemu należy nacisnąć przycisk
zasilania ..................................................................... 13
Używanie pilota zdalnego sterowania Media Center
(opcjonalny) ............................................................... 14
Przywracanie systemu ...................................16
Używanie dysku recovery DVD ................................. 16
Polski
Rozwiązywanie problemów ...........................18
Komputer biurkowy ASUS serii CP

Notices
Federal Communications Commission Statement
This device complies with Part 15 of the FCC Rules. Operation is
subject to the following two conditions:
• This device may not cause harmful interference, and
• This device must accept any interference received including
interference that may cause undesired operation.
This equipment has been tested and found to comply with the
limits for a Class B digital device, pursuant to Part 15 of the FCC
Rules. These limits are designed to provide reasonable
protection against harmful interference in a residential
installation. This equipment generates, uses and can radiate radio
frequency energy and, if not installed and used in accordance
with manufacturer’s instructions, may cause harmful
interference to radio communications. However, there is no
guarantee that interference will not occur in a particular
installation. If this equipment does cause harmful interference to
radio or television reception, which can be determined by
Polski
turning the equipment off and on, the user is encouraged to
try to correct the interference by one or more of the following
measures:
• Reorient or relocate the receiving antenna.
• Increase the separation between the equipment and receiver.
• Connect the equipment to an outlet on a circuit different from
that to which the receiver is connected.
• Consult the dealer or an experienced radio/TV technician for
help.
The use of shielded cables for connection of the monitor to
the graphics card is required to assure compliance with FCC
regulations. Changes or modifications to this unit not expressly
approved by the party responsible for compliance could void
the user’s authority to operate this equipment.
4 Komputer biurkowy ASUS serii CP

Canadian Department of Communications
Statement
This digital apparatus does not exceed the Class B limits for radio
noise emissions from digital apparatus set out in the Radio
Interference Regulations of the Canadian Department of
Communications.
This class B digital apparatus complies with Canadian ICES-003.
Macrovision Corporation Product Notice
This product incorporates copyright protection technology that
is protected by method claims of certain U.S. patents and other
intellectual property rights owned by Macrovision Corporation
and other rights owners. Use of this copyright protection
technology must be authorized by Macrovision Corporation, and
is intended for home and other limited viewing uses only unless
otherwise authorized by Macrovision Corporation. Reverse
engineering or disassembly is prohibited.
Polski
Komputer biurkowy ASUS serii CP

Informacje dotyczące bezpieczeństwa
Urządzenie ASUS NOVA P20/P22 jest zaprojektowane
i przetestowane zgodnie z najnowszymi standardami
bezpieczeństwa dotyczącymi urządzeń technologii
informatycznych. Dla zapewnienia bezpieczeństwa, ważne
jest jednak, aby przeczytać następujące informacje dotyczące
bezpieczeństwa.
Instalacja systemu
• Przed rozpoczęciem obsługi systemu należy przeczytać
wszystkie instrukcje dostępne w dokumentacji i postępować
zgodnie z nimi.
• Urządzenia nie można używać w pobliżu wody lub źródeł
ciepła, np. grzejników.
• System należy ustawić na stabilnej powierzchni.
• Aby ustawić system NOVA jako wieżę należy wykorzystać
stojak. Ustawienie systemu bez wykorzystania stojaka utrudni
wentylację i może spowodować uszkodzenie systemu.
• Otwory w obudowie służą do wentylacji. Nie można ich
blokować lub przykrywać. Należy pamiętać, aby wokół
systemu zostawić odpowiednią przestrzeń umożliwiającą
wentylację. Do otworów wentylacyjnych nie można wkładać
Polski
żadnych przedmiotów.
• Przy używaniu przedłużacza należy sprawdzić, czy
prąd znamionowy urządzenia nie przekracza prądu
znamionowego przedłużacza.
Ostrożność podczas używania
• Na kablu nie można stawać jak też kłaść na nim żadnych
przedmiotów.
• System nie może być oblany wodą lub inną cieczą.
• Po wyłączeniu systemu pobiera on w dalszym ciągu
niewielką ilość prądu. Przed czyszczeniem systemu należy
zawsze odłączyć zasilanie, modem i kable sieciowe.
• Po wystąpieniu następujących problemów technicznych
należy odłączyć kabel zasilający i skontaktować się z
wykwalikowanym technikiem serwisu lub sprzedawcą.
• Uszkodzenie kabla zasilającego lub wtyczki.
6 Komputer biurkowy ASUS serii CP
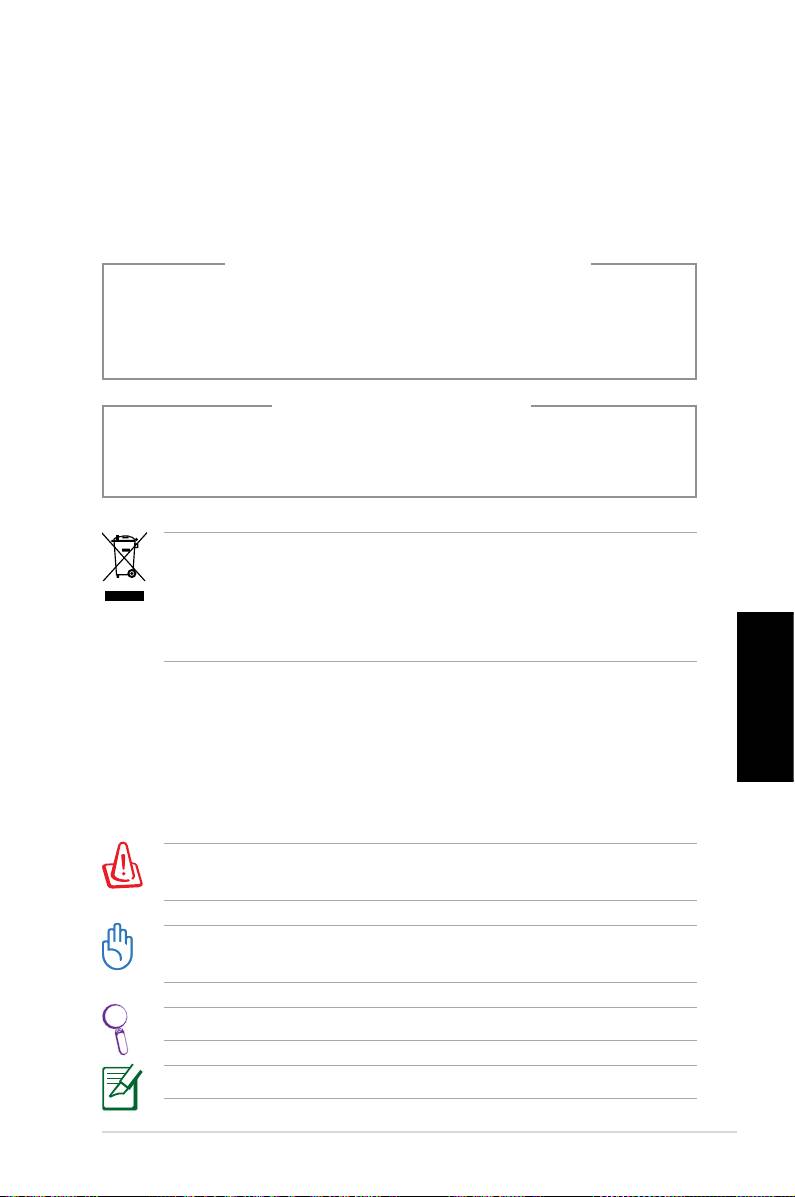
• Oblanie systemu cieczą.
• Nieprawidłowe funkcjonowanie systemu nawet przy
przestrzeganiu instrukcji .
• System uległ uszkodzeniu mechanicznemu.
• Zmieniły się parametry pracy systemu.
OSTRZEŻENIE dotyczące
bezpieczeństwa napędu CD-ROM
PRODUKT LASEROWY KLASY 1
NIE ROZBIERAĆ
Gwarancja nie obejmuje produktów, które
zostały rozmontowane przez użytkownika
Symbol przekreślonego pojemnika na śmieci oznacza, że
produkt (urządzenie elektryczne, elektroniczne oraz baterie
zawierające rtęć) nie mogą być wyrzucane jako odpady
komunalne. Utylizację produktów elektronicznych należy
prowadzić zgodnie z lokalnymi przepisami.
Uwagi do tego podręcznika
Polski
Kilka uwag i ostrzeżeń związanych z wykonaniem pewnych
czynności w sposób bezpieczny i prawidłowy. Uwagi te mają
różną ważność zgodnie z poniższym opisem:
OSTRZEŻENIE! Ważne informacje, które muszą być
przestrzegane ze względów bezpieczeństwa
W
AŻNE! Znaczące informacje, które muszą być przestrzegane,
aby uniknąć uszkodzeń danych, elementów lub osób.
WSKAZÓWKA: Wskazówka dla wykonania zadania.
UWAGA: Informacje dotyczące specycznych sytuacji.
Komputer biurkowy ASUS serii CP

Witamy
Gratulujemy zakupienia komputera ASUS Desktop.
Wymieniona poniżej zawartość opakowania nowego
komputera typu desktop może się różnić w zależności od
modelu. Firma ASUS zastrzega sobie prawo do zamiany
dostarczonych komponentów lub akcesoriów w celu
zapewnienia optymalnego działania.
Jeśli któregokolwiek elementu brakuje lub jest on
uszkodzony należy skontaktować się ze sprzedawcą.
Zawartość opakowania
• Komputer ASUS Desktop x1
• Klawiatura x1
• Mysz x1
• Przewód zasilający x1
• Pomocniczy dysk DVD x1
• Dysk DVD Recovery x1
• Instrukcja instalacji x1
Polski
• Karta gwarancyjna x1
• Pilot zdalnego sterowania (opcjonalny) x1
W celu uzyskania aktualizacji należy odwiedzić stronę sieci
web ASUS, pod adresem http://support.asus.com.
8 Komputer biurkowy ASUS serii CP
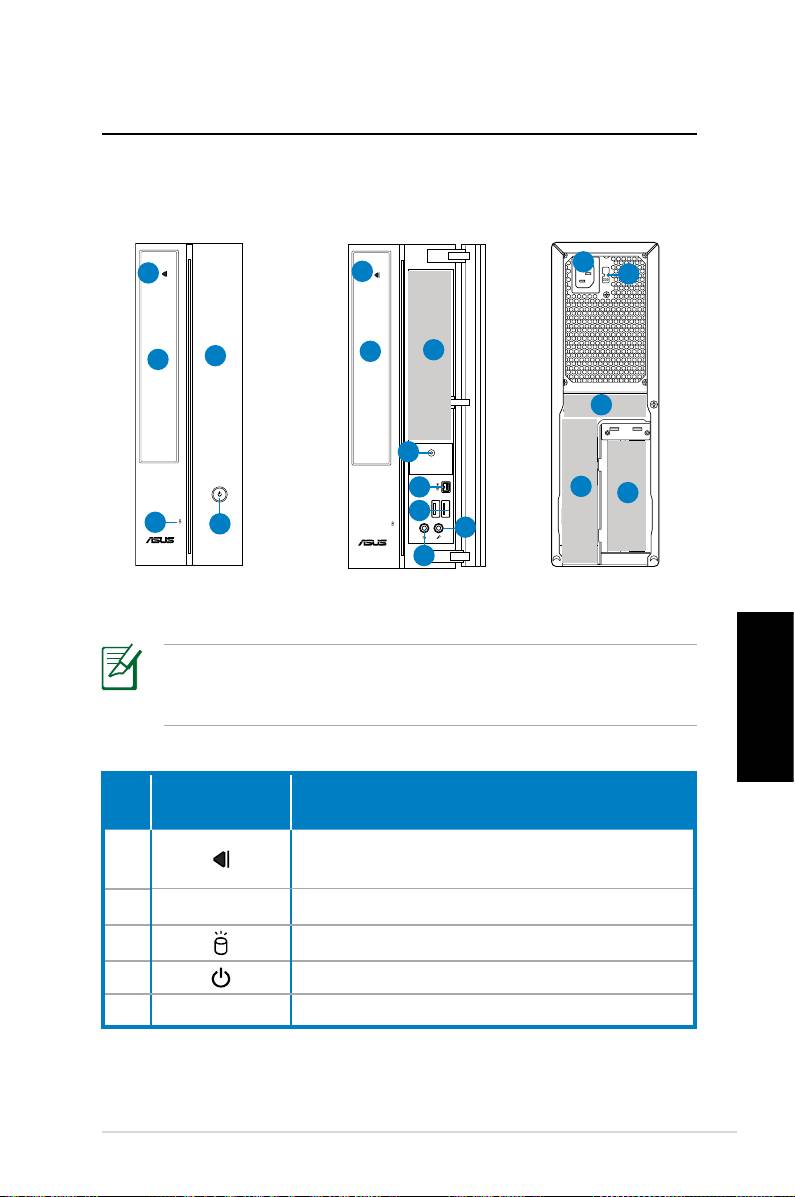
Poznanie budowy komputera
typu desktop
Elementy na panelu przednim/tylnym
Przód
Przód
Tył
(Zamknięty)
(Otwarty)
11
1
1
12
2
6
5
2
13
4
7
14
15
8
3
4
10
9
*Szare miejsca zawierają porty paneli przedniego/tylnego.
Porty te i ich lokalizacje mogą być różne, w zależności od
modelu systemu.
Polski
Przycisk/
Nr
Opis
LED
Naciśnij, aby wysunąć płytę z kieszeni
1.
napędu optycznego.
2.
Pokrywa wnęki napędu optycznego.
3.
Dioda LED dysku twardego..
4.
Przycisk zasilania.
5. Pokrywa panela przedniego
ciąg dalszy na następnej stronie
Komputer biurkowy ASUS serii CP
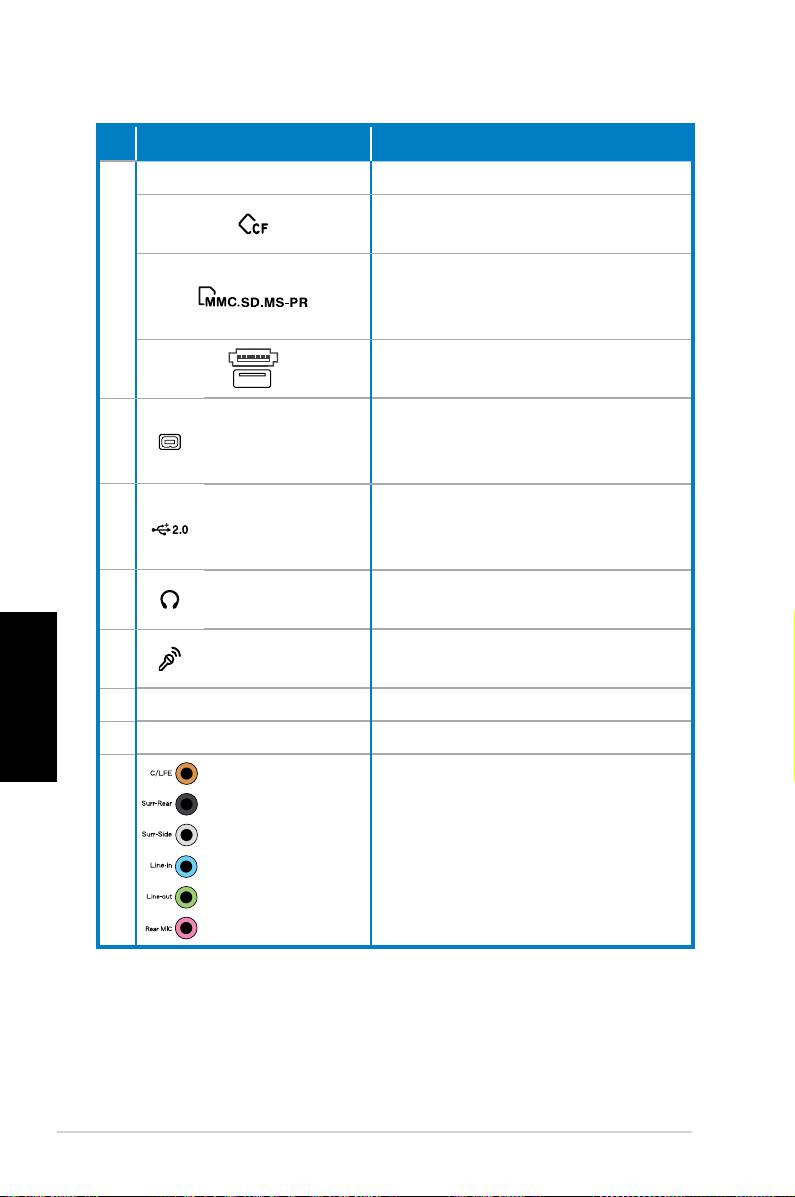
Nr.
Gniazdo/Port Opis
Podczerwień (opcjonalna).
®
Gniazdo karty CompactFlash
/
Microdrive™.
Gniazdo kart MultiMediaCard/
6
Secure Digital™/ Memory Stick
Pro™..
USB+E-SATA port.
Podłączanie urządzenia IEEE
4-pinowy port
7.
1394 takiego jak kamera
IEEE 1394a
cyfrowa.
Do podłączenia urządzeń USB
8. Porty USB 2.0
takich jak mysz, klawiatura lub
aparat.
Gniazdo
Podłączanie zestawu stereo
9.
słuchawek
lub słuchawek.
Gniazdo
Polski
10.
Podłączanie mikrofonu.
mikrofonu
11. Złącze zasilania Podłączenie kabla zasilania.
12. Selektor napięcia Wybór napięcia wejścia.
Porty 7.1 (8)-
Do podłączenia z systemem
13.
kanałowego
głośników 7.1 (8)-kanałowym.
audio
ciąg dalszy na następnej stronie
10 Komputer biurkowy ASUS serii CP
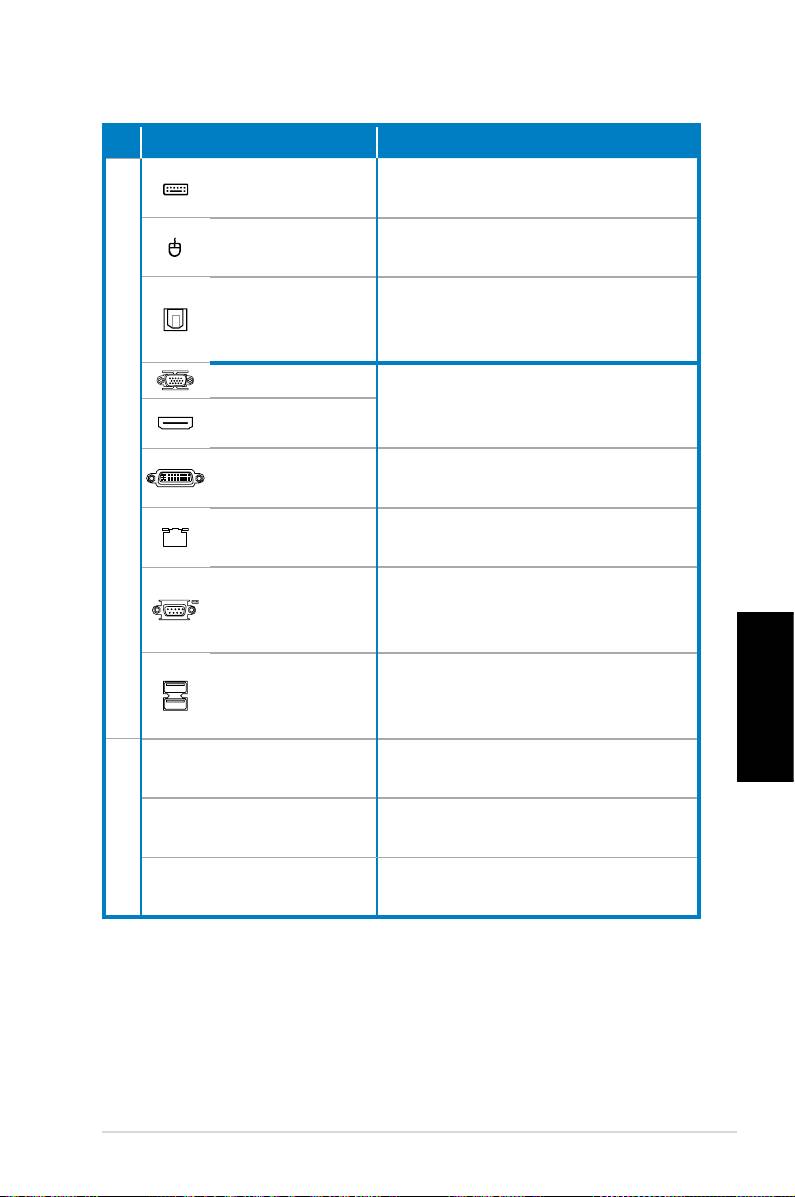
Nr.
Gniazdo/Port Opis
Port klawiatury
Podłączenie do klawiatury
PS/2
PS/2.
Port myszy
Podłączenie do myszy PS/2.
PS/2
Port wyjścia
Do podłączenia wzmacniacza
optycznego
dla cyfrowego wyjścia audio.
S/PDIF
Port VGA
Podłączanie do telewizora lub
monitora z innym wyjściem
Port HDMI
wideo.
14.
Do połączenia z telewizorem
Złącze DVI
lub monitorem.
Port LAN
Podłączanie kabla sieciowego.
(RJ-45)
Podłączenie do urządzeń,
Port COM
które spełniają specykacje
połączenia szeregowego.
Do podłączenia urządzeń USB
Porty USB 2.0
takich jak mysz, klawiatura lub
aparat.
Polski
Użyj gniazd do instalacji kart
Gniazda rozszerzeń
rozszerzenia.
Złącze DVI/S-Video/
Karta graczna VGA
15.
VGA
(opcjonalna)
Złącze FM/RF/IR/S-
Karta tunera TV (opcjonalna)
Video
Komputer biurkowy ASUS serii CP

Ustawienia komputera typu desktop
Podłączanie urządzeń
Nie należy blokować
lub przykrywać tych
miejsc
7.1(8)-kanałowy
system głośników
Klawiatura
Mysz
Polski
7.1(8)-kanałowy
system głośników
TV
7.1(8)-kanałowy
system głośników
Wyświetlacz
Ilustracje służą wyłącznie jako odniesienie. Rzeczywiste specykacje produktu mogą
być inne.
• Produkt można używać przy temperaturze otoczenia poniżej 35˚C.
• Nie należy blokować lub przykrywać tych szczelin.
12 Komputer biurkowy ASUS serii CP
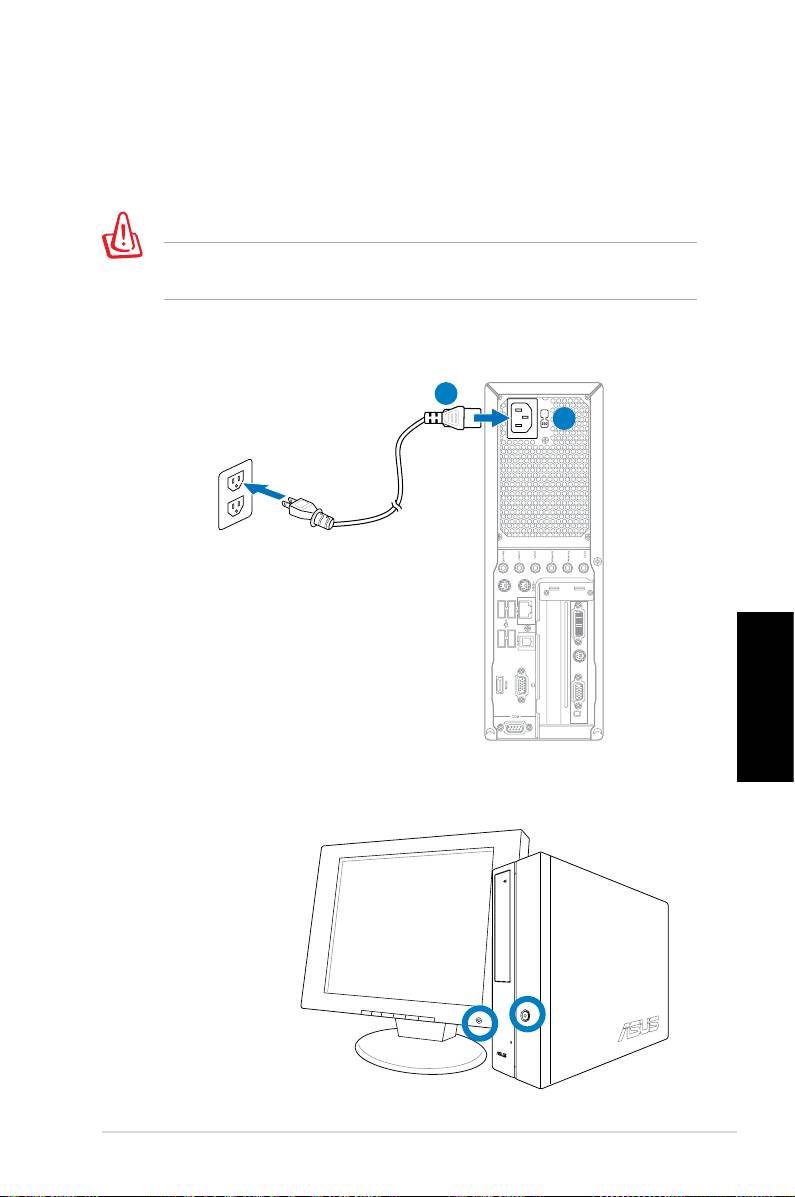
Podłączenie zasialnia
1. Przełącz selektor napięcia na odpowiednie napięcie
wejścia, zgodnie z napięciem stosowanym w danym
regionie.
Ustawienie selektora napięcia na 115V w regionie gdzie
stosowane jest napięcie 230V spowoduje uszkodzenie systemu.
2. Podłącz przewód zasilający do złącza zasilania i podłącz
go do ściennego gniazda zasilania.
2
1
Polski
W celu włączenia systemu należy
nacisnąć przycisk zasilania
Komputer biurkowy ASUS serii CP
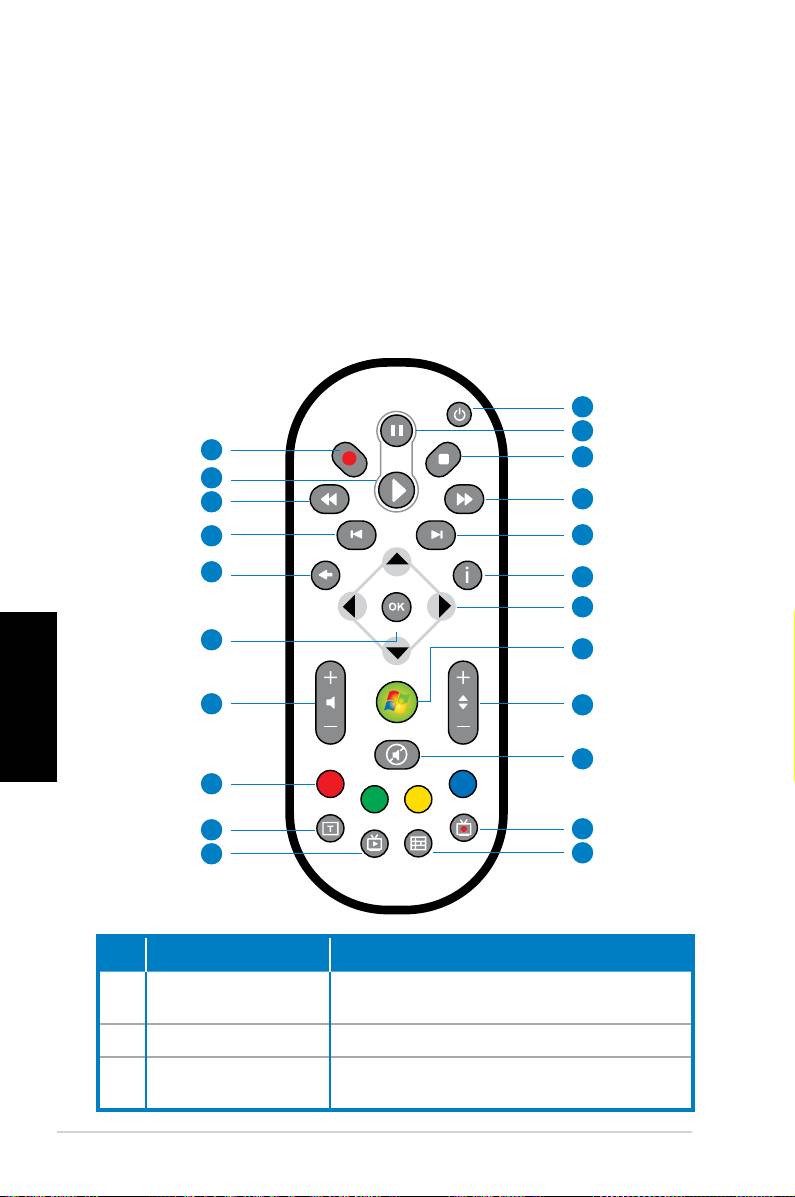
Używanie pilota zdalnego sterowania
Media Center (opcjonalny)
Użyj pilota zdalnego sterowania do uruchomienia programu
Media Center w celu odtwarzania plików multimedialnych
i lmów. Do oglądania telewizji i nagrywania programów
telewizyjnych można także zainstalować zewnętrzną
przystawkę telewizyjną.
Sprawdź tabelę poniżej w celu zapoznania użytkownika z
funkcjami przycisków pilota zdalnego sterowania.
1
2
22
3
21
20
4
19
5
18
6
7
17
8
Polski
16
9
10
15
14
11
13
12
Nr Przycisk Opis
Naciśnij w celu włączenia/wyłączenia
1.
Zasilanie
zasilania ekranu i głośników.
2.
Pauza Naciśnij w celu wstrzymania odtwarzania.
Naciśnij, aby zatrzymać odtwarzanie
3.
Zatrzymaj
pliku multimediów.
14 Komputer biurkowy ASUS serii CP
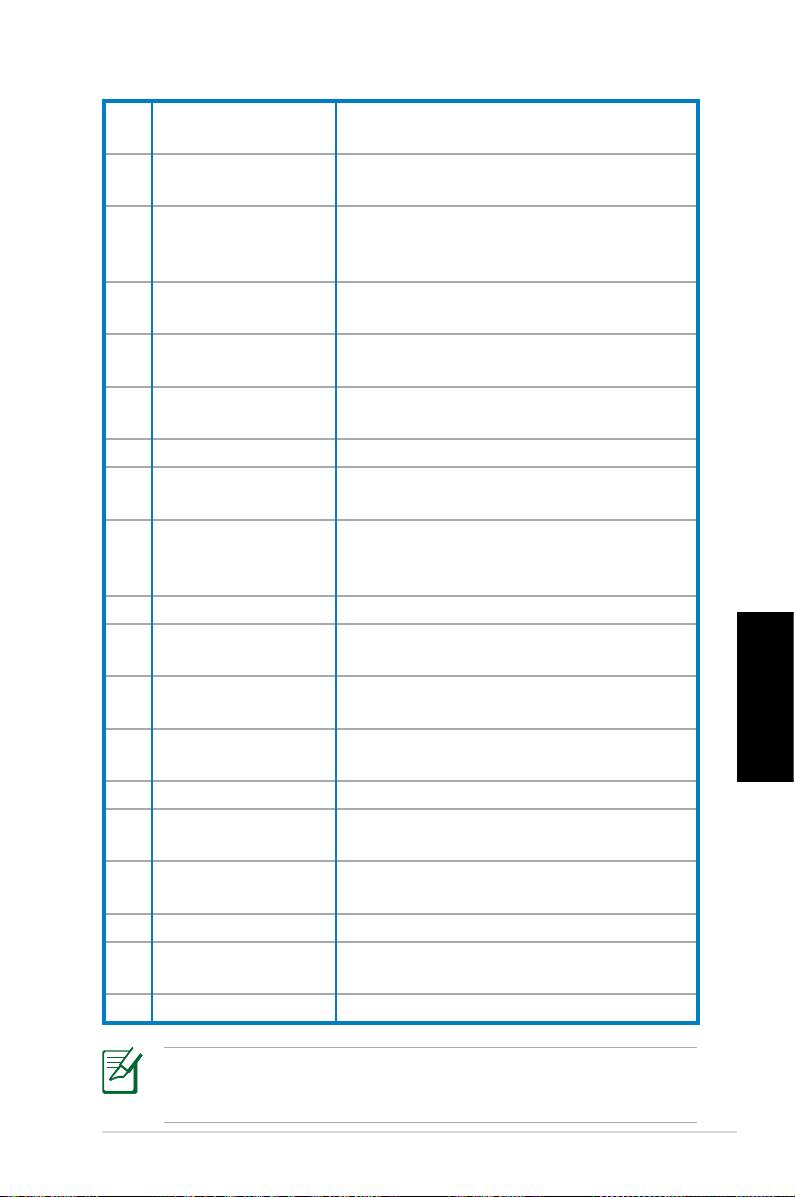
Szybkie przewijanie
Naciśnij w celu szybkiego przewinięcia
4.
do przodu
do przodu pliku multimediów.
Naciśnij w celu przejścia do następnej
5.
Następna ścieżka
ścieżki.
Naciśnij w celu wyświetlenia informacji o
6.
Informacje
programie w Media Center lub w innym
menu opcji.
Cztery przyciski
Naciśnij w celu przewinięcia menu
7.
nawigacji
ekranowych.
Windows® Media
Naciśnij w celu uruchomienia programu
8.
Center
Media Center.
Naciśnij w celu zmiany kanałów
9.
Kanał w górę/w dół
telewizyjnych.*
10.
Wyciszenie Naciśnij w celu wyłączenia wyjścia audio.
Naciśnij w celu wyświetlenia listy nagra-
11.
Nagrane TV
nych porogramów TV.*
EPG (Elektroniczny
Naciśnij w celu wyświetlenia ekranu
12.
przewodnik
elektronicznego przewodnika
programowy)
programowego.*
13.
Przycisk Live TV
Naciśnij w celu oglądania telewizji na żywo.*
Przełączenie pomiędzy wprowadzaniem
14.
Przełącz
wartości numerycznych i alfabetycznych.
Dostępne jedynie w modelach na rynek
15.
Przyciski teletekstu
europejski.
Polski
Głośność w górę/w
Naciśnij w celu zwiększenia/zmniejszenia
16
dół
głośności.
17.
OK Naciśnij w celu potwierdzenia akcji.
Naciśnij w celu powrotu do poprzedniej
18.
Powrót
strony.
Naciśnij w celu przejścia do poprzedniej
19.
Poprzednia ścieżka
ścieżki.
20.
Przewiń Naciśnij, aby przewinąć plik multimediów.
Naciśnij w celu odtworzenia pliku
21.
Odtwarzaj
multimediów.
22
Nagrywaj
Naciśnij w celu rozpoczęcia nagrywania TV.
*System nie jest dostarczany z wbudowanym tunerem
TV. W celu użycia funkcji TV należy zakupić najpierw
zewnętrzną przystawkę TV.
Komputer biurkowy ASUS serii CP

Przywracanie systemu
Używanie dysku recovery DVD
Dysk recovery DVD zawiera obraz systemu operacyjnego
zainstalowanego w systemie fabrycznie. Dysk recovery DVD,
działa przy obsłudze DVD, zapewniając pełne rozwiązanie
przywracania, umożliwiające szybkie przywrócenie systemu
do stanu oryginalnego, przy założeniu, że dysk twardy działa
prawidłowo. Przed użyciem dysku recovery DVD należy
skopiować pliki z danymi (takie jak pliki PST programu Outlook)
do urządzenia USB lub do napędu sieciowego i zapisać własne
ustawienia konguracji (takie jak ustawienia sieci).
1. Włącz komputer ASUS Desktop, po czym pojawi się
logo ASUS. Naciśnij F8, aby przejść do menu Wybierz
urządzenie rozruchowe.
2. Włóż dysk recovery DVD do napędu optycznego
i wybierz napęd optyczny (“CDROM:XXX”) jako
urządzenie rozruchowe. Naciśnij Enter, a następnie
naciśnij dowolny przycisk w celu kontynuacji.
3. Pojawi się okno
Menedżer uruchomienia Windows.
Wybierz Instalacja Windows [Włączone EMS] i naciśnij
Enter. Zaczekaj na wyświetlenie komunikatu Ładowanie
Polski
plików przez system Windows.
4. Wybierz miejsce instalacji nowego systemu. Dostępne
opcje to:
Przywracanie partycji systemowej
Ta opcja umożliwia powoduje usunięcie wyłącznie
wybranej poniżej partycji, umożliwiając pozostawienie
innych partycji i utworzenie nowej partycji systemowej
jako napędu “C.” Wybierz partycję i kliknij DALEJ.
Przywrócenie systemu na cały dysk twardy
Ta opcja usuwa z dysku twardego wszystkie partycje
i tworzy nową partycję systemową, jako napęd “C.”
Wybierz i kliknij Tak.
5. Wykonaj wyświetlone na ekranie instrukcje w celu
dokończenia procesu przywracania.
Podczas przywracania systemu, utracone zostaną
wszystkie dane. Przed wykonaniem przywracania systemu
należy upewnić się, że utworzona została kopia zapasowa.
16 Komputer biurkowy ASUS serii CP

6. Po zakończeniu przywracania systemu, pojawi
się polecenie włożenia do napędu optycznego
pomocniczego dysku DVD. Kliknij OK, po czym nastąpi
ponowne uruchomeinie systemu.
7. Po ponownym uruchomieniu systemu, system
Windows® Vista™ rozpocznie wykonywanie konguracji
systemu. Wykonaj instrukcje ekranowe w celu
dokończenia procesu, a następnie uruchom ponownie
komputer.
Ten dysk recovery DVD może być używany wyłącznie w
komputerach ASUS Desktop. NIE NALEŻY go używać
w innych komputerach. W celu wykonania jakichkolwiek
aktualizacji należy odwiedzić stronę sieci web ASUS, pod
adresem www.asus.com.
Polski
Komputer biurkowy ASUS serii CP

Rozwiązywanie problemów
Przeczytaj podaną poniżej część Q&A (Pytania i odpowiedzi)
pomocną w rozwiązywaniu problemów. Jeśli zamieszczone
informacje nie rozwiązują problemu, można skontaktować
się bezpośrednio, wykorzystując informacje kontaktowe
dostarczone na pomocniczym dysku DVD.
Co można zrobić, jeśli nie można włączyć zasilania
komputera typu desktop?
Sprawdź, czy świeci się wskaźnik LED na panelu przednim.
Wskaźnik nie świeci się, gdy do systemu nie jest podłączone
zasilanie.
• Sprawdź, czy jest podłączony przewód zasilający.
• Gdy używany jest przedłużacz lub regulator napięcia
należy upewnić się, że został on podłączony do gniazdka
ściennego oraz, że jest włączony.
Co można zrobić, jeśli nie można uruchomić systemu
operacyjnego komputera typu desktop?
• Upewnij się, że używane są moduły pamięci obsługiwane
Polski
przez system oraz, że zostały one prawidłowo
zainstalowane w gniazdach.
• Sprawdź, czy urządzenia peryferyjne są zgodne z syste
-
mem. Niektóre urządzenia pamięci USB, na przykład,
mają różną strukturę dysku i łatwo przechodzą do trybu
uśpienia.
Jeśli wymienione wyżej czynności nie rozwiązują problemu,
skontaktuj się z dostawcą lub wykonaj przywracanie
systemu, wykorzystując dostarczony dysk recovery DVD.
Podczas przywracania systemu, utracone zostaną
wszystkie dane. Przed wykonaniem przywracania systemu
należy upewnić się, że utworzona została kopia zapasowa.
18 Komputer biurkowy ASUS serii CP

Dlaczego nie słychać dźwięków z głośników/słuchawek?
®
Sprawdź ikonę głośności na pasku zadań Windows
, aby
przekonać się, czy ustawione zostało wyciszenie . Jeśli
tak, kliknij dwukrotnie tę ikonę w celu wyświetlenia paska
głośności, a następnie kliknij ikonę wyciszenia na pasku w
celu anulowania trybu wyciszenia .
Dlaczego nie można odczytywać lub zapisywać danych
na dysku CD/DVD?
• Upewnij się, że używany jest dysk zgodny z napędem
optycznym.
• Sprawdź, czy dysk został włożony prawidłowo lub, czy nie
jest zarysowany.
• Sprawdź, czy dysk nie jest zabezpieczony przed zapisem.
Polski
Komputer biurkowy ASUS serii CP

Polski
20 Komputer biurkowy ASUS serii CP
