Asus Motherboard – page 2
Manual for Asus Motherboard
Table of contents
- Index 1. English .................................................................................1
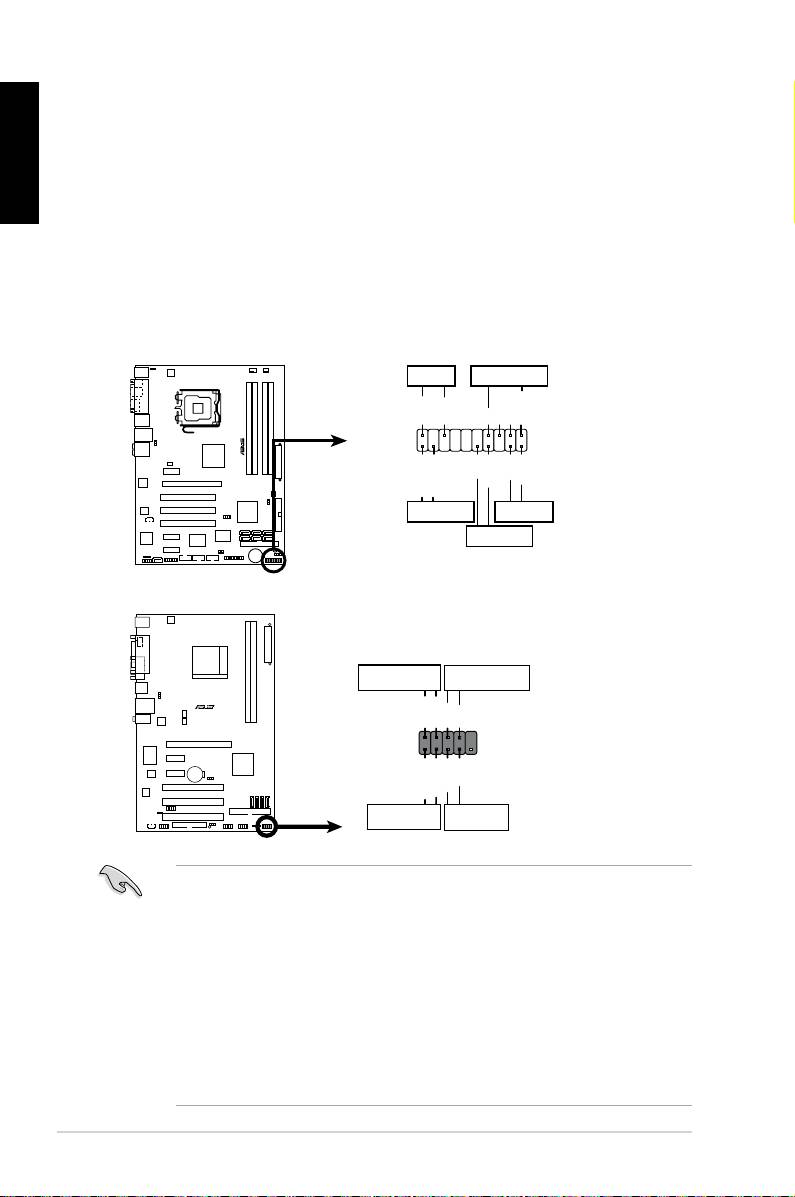
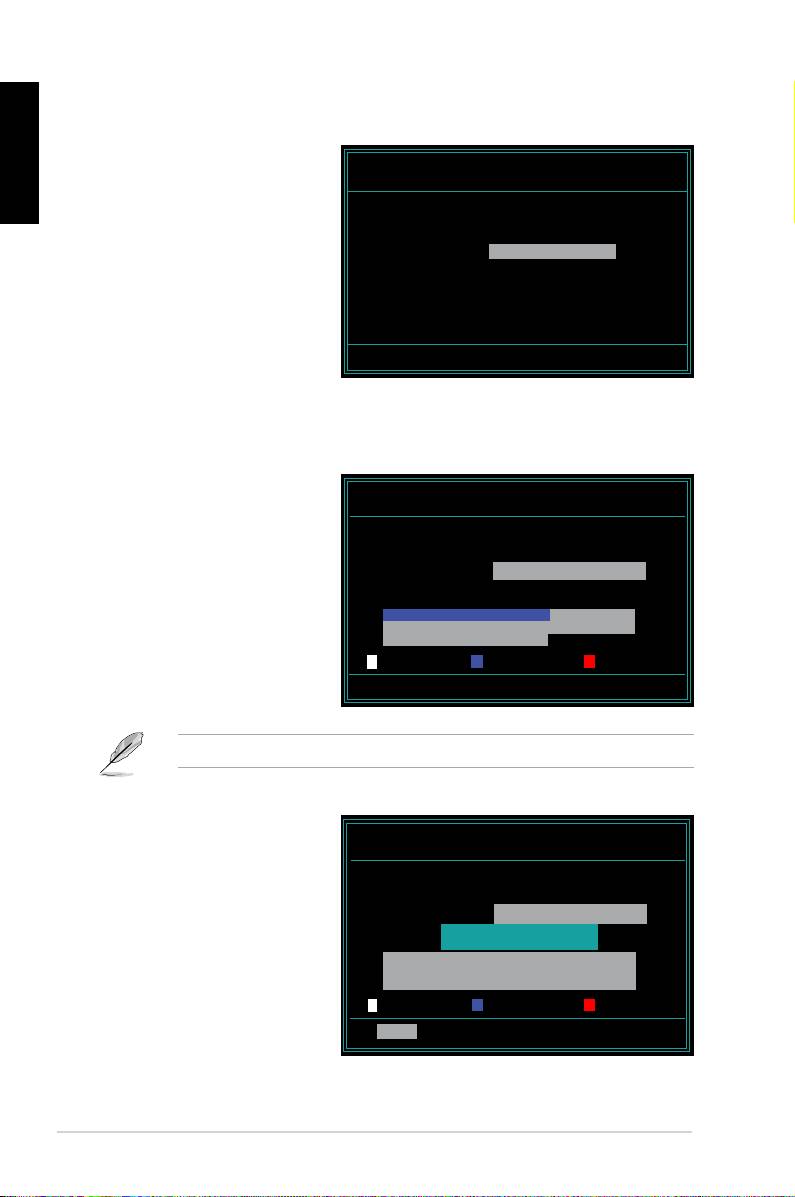
1.8 Front panel cables
English
• RESET (Reset Switch)
• SPEAKER (Speaker Connector)
20
M2N-X
Reset
ANE
RESET
PLED SPEAKER
P5B-E
PLED+
PLED-
+5V
Ground
Ground
Speaker
®
PANEL
PWR
Reset
Ground
Ground
IDE_LED+
IDE_LED-
IDE_LED
RESET
PWRSW
*
Requires an ATX power supply.
20-8 pin front panel connector
PIN1
PIN1
10-1 pin front panel connector
Connect these connectors to the motherboard according to the label.
for the ground pins and the color‑coded wire for the signal pins.
to the connector PIN1 on the motherboard.
user guide for more information.

ASUS Q-Connector
English
user guide for details.
details.
1.9 Connecting the ATX power
connector on the motherboard.
20-pin power connector
24-pin power connector
(on the 24-pin female counterpart)
4-pin power connector
ASUS Motherboard installation guide 21
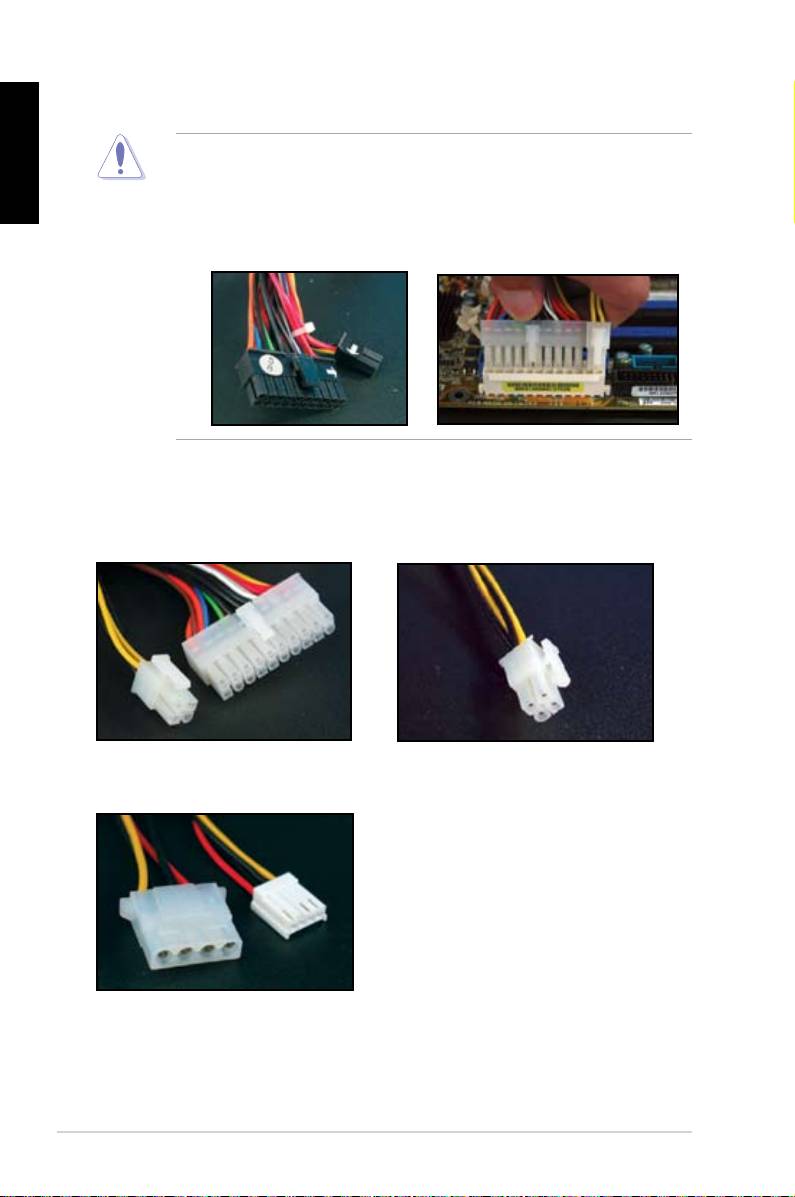
English
connectors to the motherboard.
two connectors and install to the 24‑pin connectors on the motherboard.
Power connectors
20+4 (24) pin ATX connector
4-pin ATX connector
peripheral power connector (left)
oppy power connector (right)
22
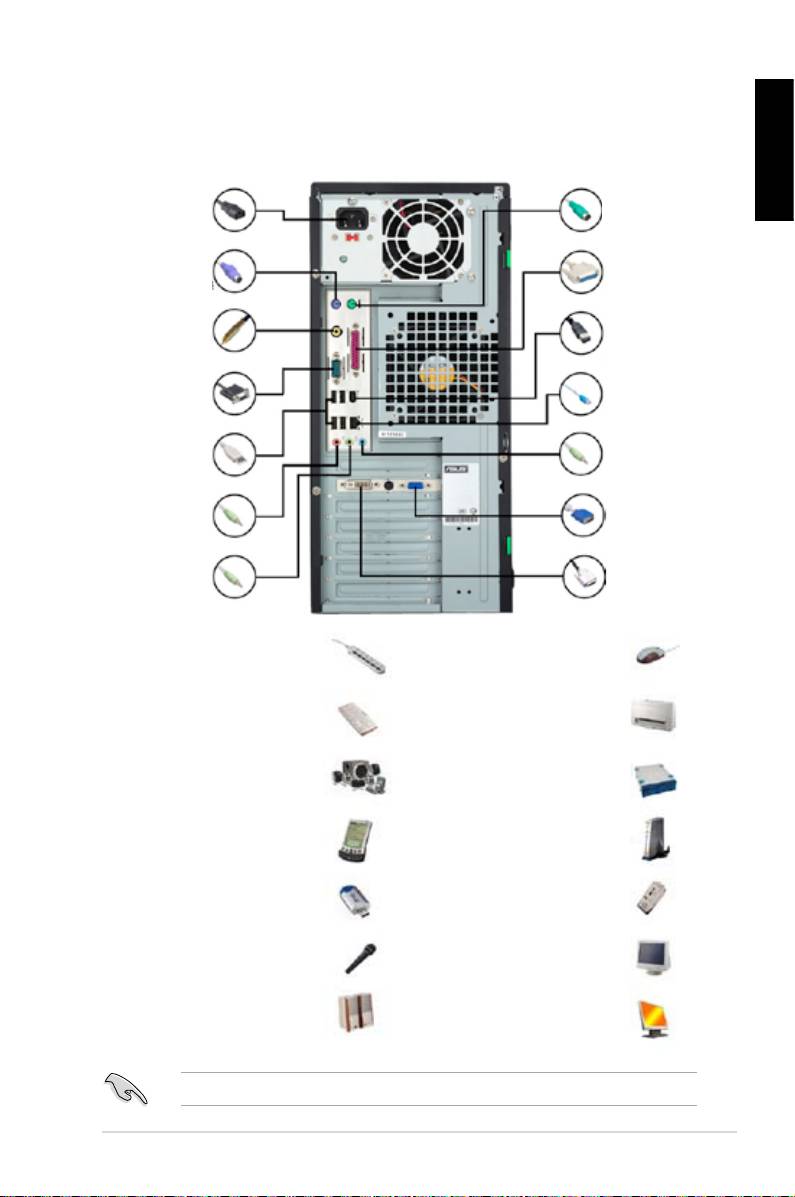
1.10 Peripheral devices and accessories
English
1. AC power plug
8. PS/2
mouse port
2. PS/2 keyboard
9. Parallel port
port
3. S/PDIF out port
10. IEEE1394 port
4. Serial port
11. LAN (RJ45) port
5. USB port
12. Line in port
13. Video graphics
6. Microphone port
adapter port
7. Line out port 14. DVI port
extension cord
mouse
hard disk drive
microphone
ASUS Motherboard installation guide 23

1.11 Startingupforthersttime
English
the BIOS beeps.
BIOS Beep Description
short beeps
short beeps then a pause (repeated)
short beeps
(AMI BIOS)
Four short beeps
Troubleshooting
Trouble Action
• Cannot turn on the computer
working.
The computer is on but the
monitor is black.
• Shut down the computer and remove the power cord.
socket.
a warning message pops on
the screen.)
drive.
• Make sure the device drivers are installed.
24

Chapter 2: Manage/update BIOS
2.1 AFUDOS utility
English
corrupted during the updating process.
Copying the current BIOS
afudos /o[lename]
characters for the extension name.
A:\>afudos /oOLDBIOS1.rom
Main lename Extension name
A:\>afudos /oOLDBIOS1.rom
AMI Firmware Update Utility - Version 1.19(ASUS V2.07(03.11.24BB))
Copyright (C) 2002 American Megatrends, Inc. All rights reserved.
Reading ash ..... done
Write to le...... ok
A:\>
Updating the BIOS le
ASUS Motherboard installation guide 25

English
afudos /i[lename]
disk.
A:\>afudos /iP5K3D.ROM
A:\>afudos /iP5K3D.ROM
AMI Firmware Update Utility - Version 1.19(ASUS V2.07(03.11.24BB))
Copyright (C) 2002 American Megatrends, Inc. All rights reserved.
WARNING!! Do not turn off power during ash BIOS
Reading le ....... done
Reading ash ...... done
Advance Check ......
Erasing ash ...... done
Writing ash ...... 0x0008CC00 (9%)
A:\>afudos /iP5K3D.ROM
AMI Firmware Update Utility - Version 1.19(ASUS V2.07(03.11.24BB))
Copyright (C) 2002 American Megatrends, Inc. All rights reserved.
WARNING!! Do not turn off power during ash BIOS
Reading le ....... done
Reading ash ...... done
Advance Check ......
Erasing ash ...... done
Writing ash ...... done
Verifying ash .... done
Please restart your computer
A:\>
26 Manage/update BIOS
2.2 Award BIOS Flash Utility
Updating the BIOS
English
FAT 16/12 format.
AwardBIOS Flash Utility for ASUS V1.14
(C) Phoenix Technologies Ltd. All Rights Reserved
the name of the disk
For NF590-SLI-M2N32-SLI-DELUXE DATE:03/30/2006
Flash Type - PMC Pm49FL004T LPC/FWH
assignment) to switch to
File Name to Program:
Message: Please input File Name!
<Enter>. The Award BIOS
ASUS Motherboard installation guide 27
English
AwardBIOS Flash Utility for ASUS V1.14
the File Name to Program
(C) Phoenix Technologies Ltd. All Rights Reserved
For NF590-SLI-M2N32-SLI-DELUXE DATE:03/30/2006
Flash Type - PMC Pm49FL004T LPC/FWH
File Name to Program: M2N32SLI.bin
Message: Do You Want To Save Bios (Y/N)
following screen appears.
AwardBIOS Flash Utility for ASUS V1.14
(C) Phoenix Technologies Ltd. All Rights Reserved
For NF590-SLI-M2N32-SLI-DELUXE DATE:03/30/2006
Flash Type - PMC Pm49FL004T LPC/FWH
File Name to Program: M2N32SLI.bin
Programming Flash Memory - OFE00 OK
Write OK No Update Write Fail
Warning: Don’t Turn Off Power Or Reset System!
AwardBIOS Flash Utility for ASUS V1.14
Flashing Complete
(C) Phoenix Technologies Ltd. All Rights Reserved
message indicating that
For NF590-SLI-M2N32-SLI-DELUXE DATE:03/30/2006
Flash Type - PMC Pm49FL004T LPC/FWH
File Name to Program: M2N32SLI.bin
Flashing Complete
Remove the disk then
Press <F1> to Continue
press <F1> to restart the
Write OK No Update Write Fail
F1
Reset
28 Manage/update BIOS
Saving the current BIOS le
English
process.
1. Follow steps 1 to 6 of the
AwardBIOS Flash Utility for ASUS V1.14
(C) Phoenix Technologies Ltd. All Rights Reserved
previous section.
For NF590-SLI-M2N32-SLI-DELUXE DATE:03/30/2006
Flash Type - PMC Pm49FL004T LPC/FWH
File Name to Program: 0112.bin
following screen appears.
Save current BIOS as:
Message:
AwardBIOS Flash Utility for ASUS V1.14
(C) Phoenix Technologies Ltd. All Rights Reserved
For NF590-SLI-M2N32-SLI-DELUXE DATE:03/30/2006
Flash Type - PMC Pm49FL004T LPC/FWH
then press <Enter>.
File Name to Program: 0112.bin
Checksum: 810DH
Save current BIOS as: 0113.bin
Message: Please Wait!
AwardBIOS Flash Utility for ASUS V1.14
(C) Phoenix Technologies Ltd. All Rights Reserved
disk, then returns to the
For NF590-SLI-M2N32-SLI-DELUXE DATE:03/30/2006
Flash Type - PMC Pm49FL004T LPC/FWH
File Name to Program: 0113.bin
Now Backup System BIOS to
File!
Message: Please Wait!
ASUS Motherboard installation guide 29

2.3 ASUS Update utility
English
®
package.
ASUS Update requires an Internet connection either through a network or an
Internet Service Provider (ISP).
Installing ASUS Update
30 Manage/update BIOS
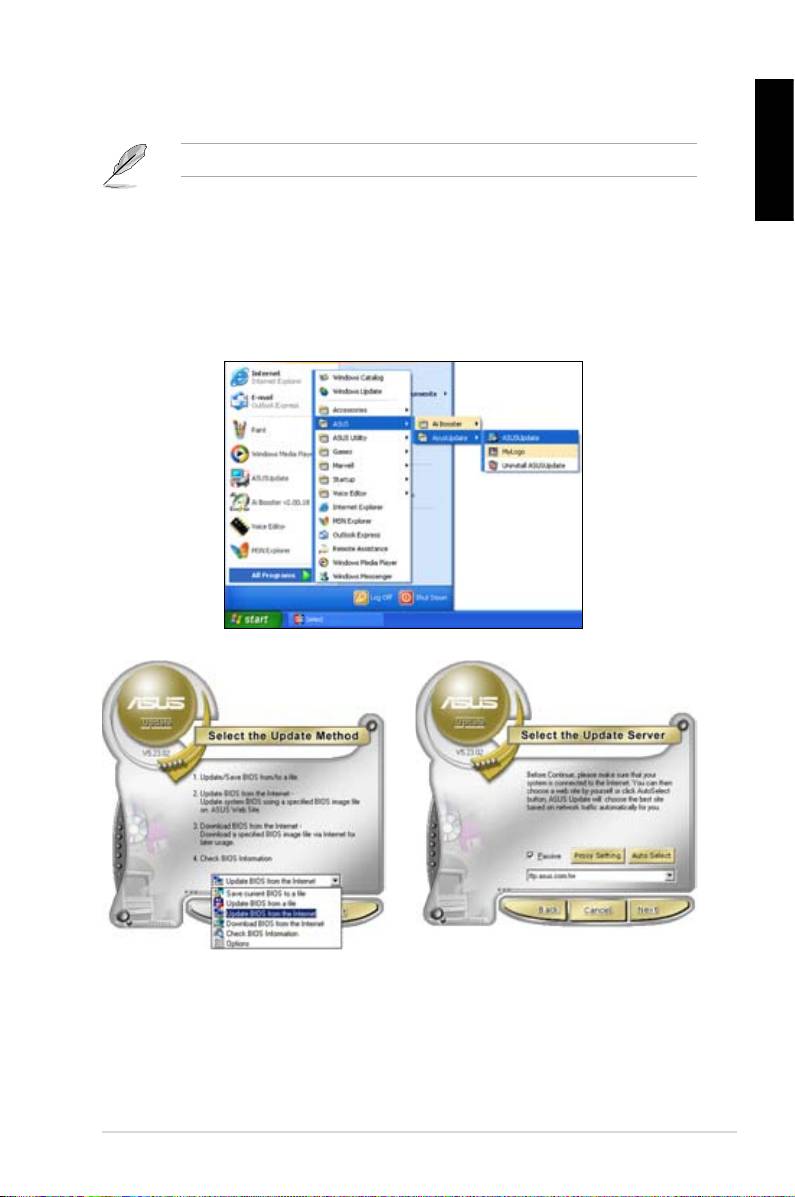
®
English
Updating the BIOS through the Internet
®
desktop, click Start >
Programs > ASUS > ASUSUpdate > ASUSUpdate. The ASUS Update main
window appears.
2. Select Update BIOS from the
3. Select the ASUS FTP site nearest
drop‑down menu list, then click
Next.
click Auto Select. Click Next.
ASUS Motherboard installation guide 31
English
4. From the FTP site, select the BIOS
Click Next.
5. Follow the screen instructions to
complete the update process.
capable of updating itself through
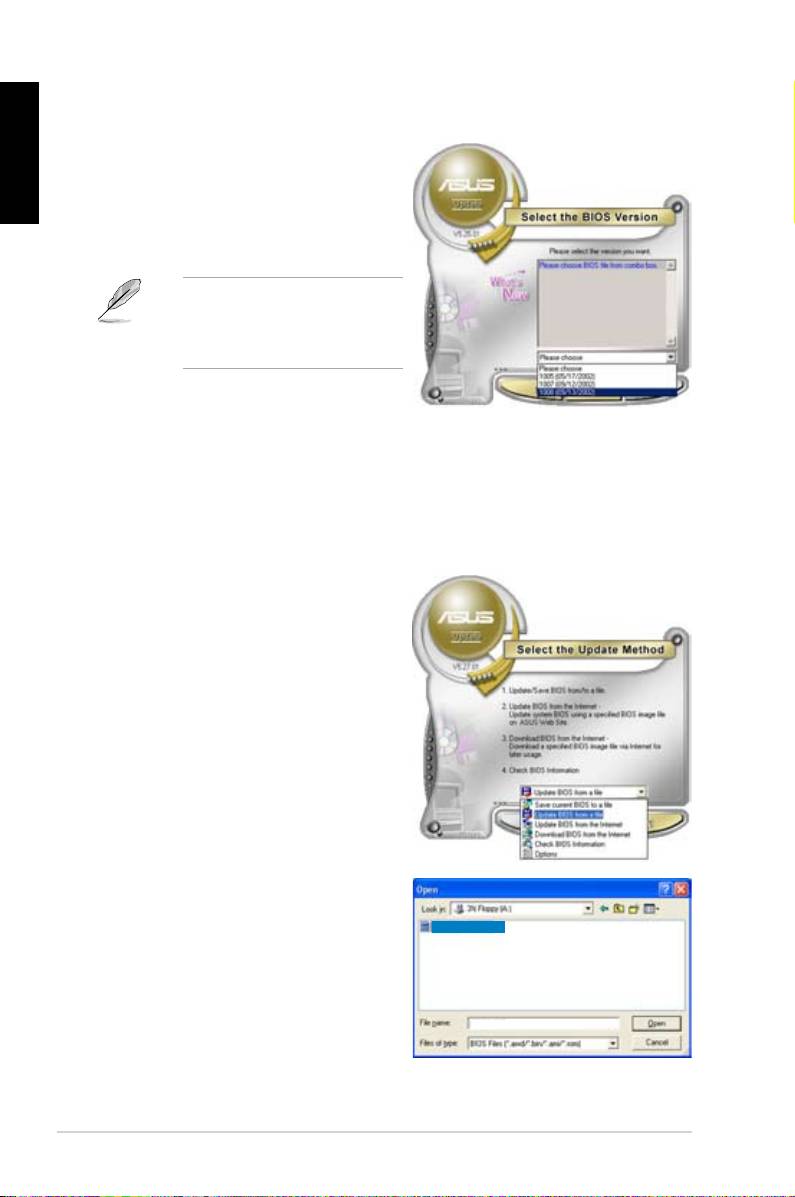
Updating the BIOS through a BIOS le
®
desktop, click Start
> Programs > ASUS > ASUSUpdate > ASUSUpdate. The ASUS Update
main window appears.
2. Select
Update BIOS from the
drop‑down menu list, then click Next.
window, then click Open.
P5K3 Deluxe
4. Follow the screen instructions to
complete the update process.
P5K3 Deluxe
32 Manage/update BIOS
Chapter 3: Troubleshooting
3.1 Troubleshooting for Motherboard DIY
English
3.1.1 Basic troubleshooting
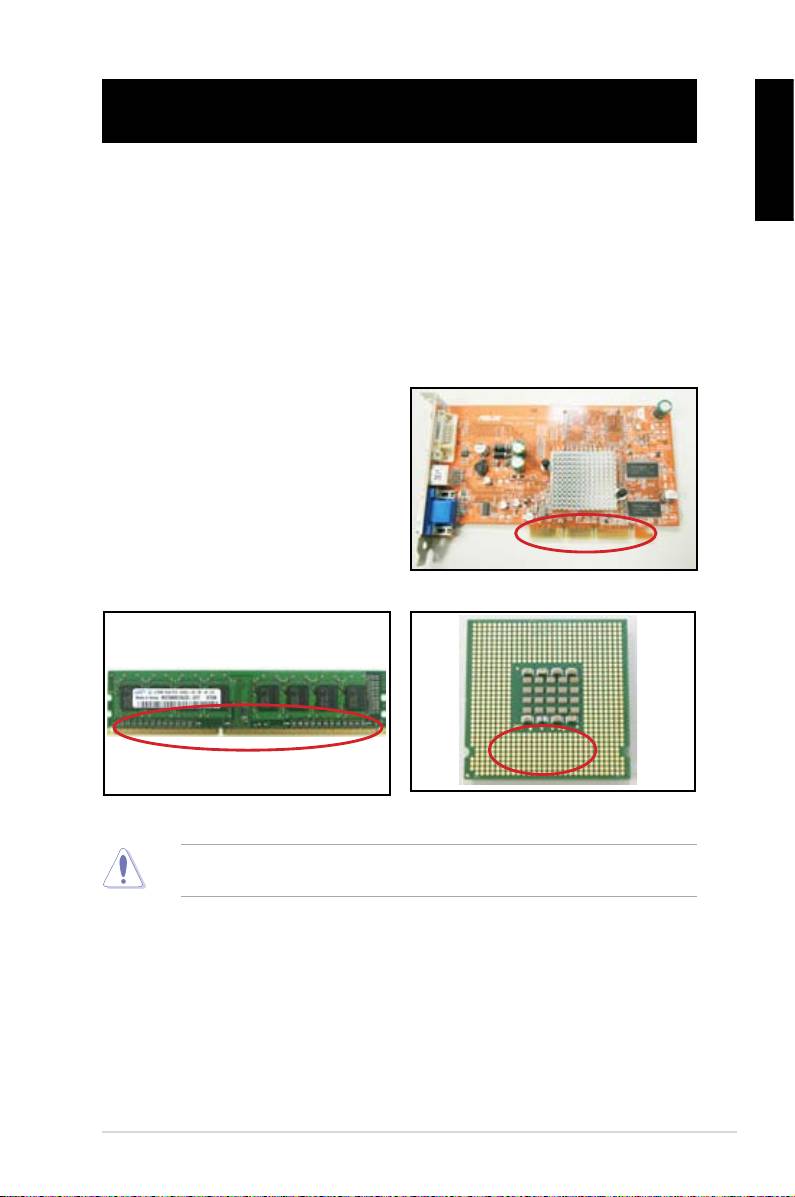
A. Bad connection
1. Make sure there is no contaminants
on the gold contact or the pins.
2. Use a cotton bud or an eraser
crumbs.
VGA card gold contact
DIMM gold contact
LGA775 processor gold contact points
ASUS Motherboard installation guide 33
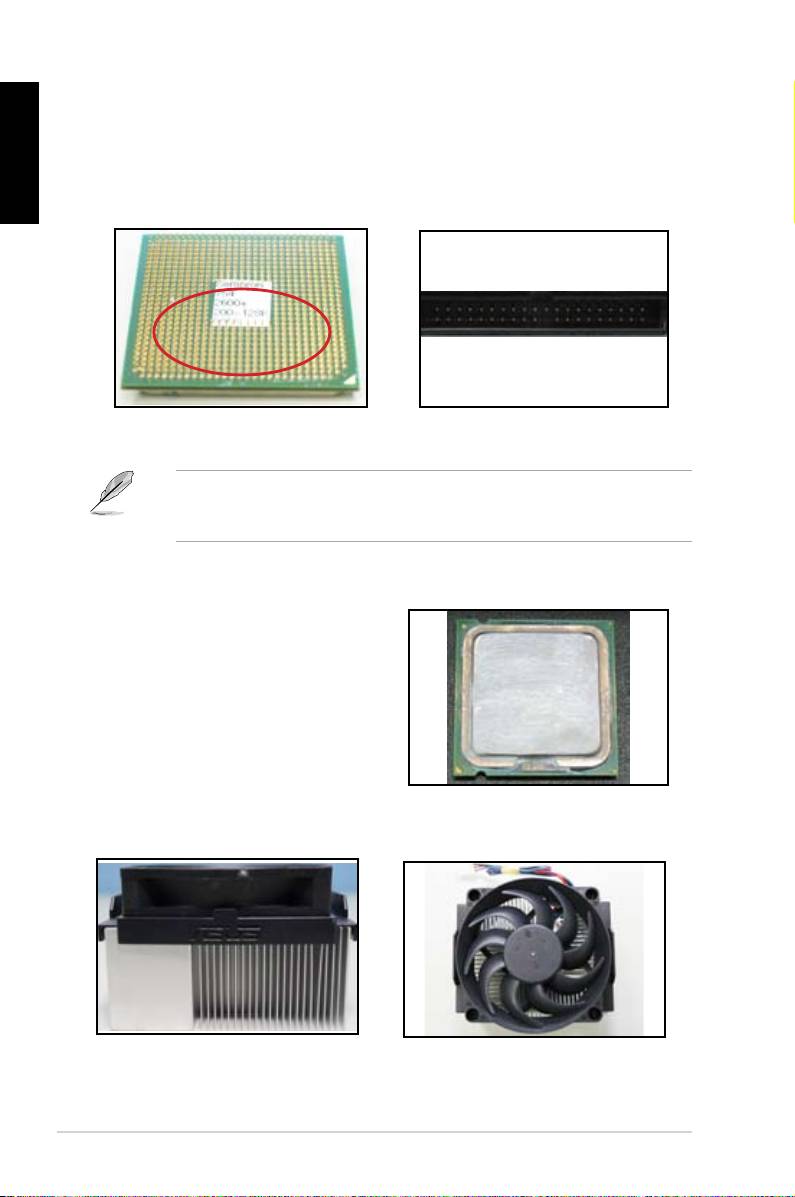
English
CPU pins. A broken and bended pin will cause the component malfunction.
AMD CPU gold pins
Connector pins
B. CPU overheated
thermal paste to the exposed area
of the CPU that the heatsink will be
in contact with. Make sure that it is
CPU surface
2. Make sure there is no contaminants on the heatsink and fan.
Side view of heatsink and fan
Top view of heatsink and fan
3. Follow the instructions of heatsink and fan manufacturers to clean the
contaminants that will slow down the fan rotation.
34 Troubleshooting
3.2 Other common troubles
unplugged.
English
Test (POST).
• If there are BIOS beeps, refer to section 1.11 for details.
Check Items
Power
Screen
Heatsink
BIOS
Error
Reference
LED
display
and fan
beeps
messages
page
No power Off No Stop No N/A 3‑4
No
On No Stop No N/A 3‑5
screen
On No Running No N/A 3‑5
display
On No Running N//A 3‑5
Failure to
On Running 3‑5
enter OS
On Running No 3‑5
On Running No No 3‑5
team for further help.
ASUS Motherboard installation guide 35
English
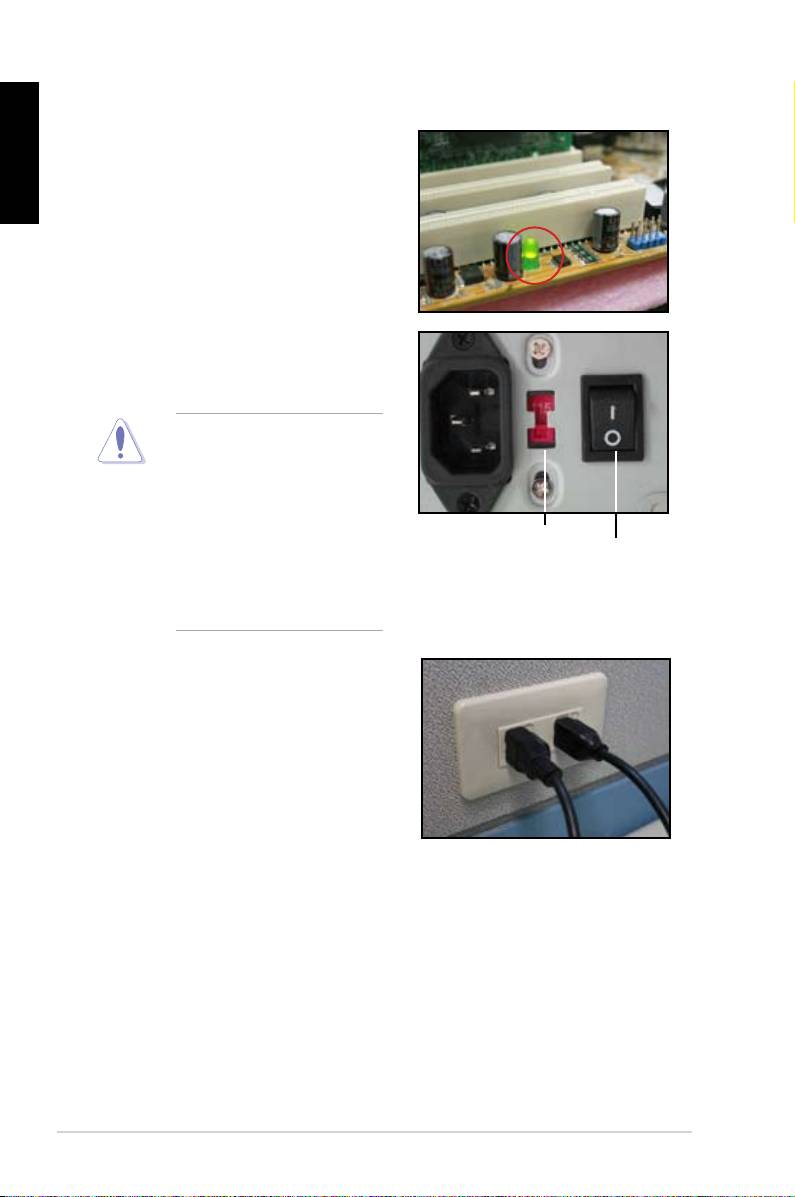
3.2.1 No power
the problem.
input voltage, ensure to
disconnect the power
plug. Failure to do so will
AC input voltage switch
Power switch
“—”: On; “O”: Off
power cord to the wall outlet.
• Connect the power plug
NOT connect it to the power
extension, uninterruptible
devices.
• Exchange the power plugs of
check whether the wall outlet is
36 Troubleshooting

3.2.2 Failure to boot-up; No screen display
English
the monitor.
2. Make sure if the problem comes from expansion devices.
3.2.3 Failure to enter the operating system
Contact the device retailer for help.
driver.
the BIOS to load the setup defaults. Refer the motherboard user guide for
details.
ASUS Motherboard installation guide 37

English
using an anti‑virus application.
3.2.4 FAQs
normal.
disk drives.
38 Troubleshooting

Chapter 4: Computer care tips
4.1 Proper care of your PC
English
the computer when it is turned on in case of damage. Internal dust will affect
the operating disk drive and contribute to overheating problem which will cause
computer crash or damage the components.
4.2 Basic knowledge
the ventilation holes. Excessive heat will cause the monitor malfunction.
4. Place the computer on a stable surface.
the best surroundings temperature. Use an air conditioner or a electric fan to
gain a better heat dissipation.
4.3 Usage knowledge
recommended.
cleaning)
• Uninstall the motherboad and hard/optical disk drives, then clean them
with canned air or a soft brush.
static vacuum.
ASUS Motherboard installation guide 39
