Asus WL-500W: 4. Application features
4. Application features: Asus WL-500W
WL-500W Wireless Router Quick Start Guide
4. Application features
The WL-500W Wireless Router provides multiple application features such as
the USB storage share, the Download Master (a download utility), and the USB
English
printer share. In this Quick Start Guide, the most popular features and their setup
procedures are introduced. For more application features, please refer to the full
version of the user manual included in the support CD.
Warning:
Before unplugging the USB storage disk from WL-500W, you must eject
the disk in
Status & Log -> External USB Disk
page to prevent data corruption.
Note:
Before applying change and rebooting WL-500W, make sure all USB applications
are disabled, it would take more than 20 seconds for WL-500W to reboot.
1) Sharing USB storage
To use this feature, you need to plug a USB storage disk to the USB2.0 port on the
rear panel of WL-500W. Make sure the hard disk is formatted and partitioned properly.
Note:
FAT32 has a 2GB le size limitation and do not support les above that size. If
you want to use les of over 2GB, you must format the disk to EXT2 le system.
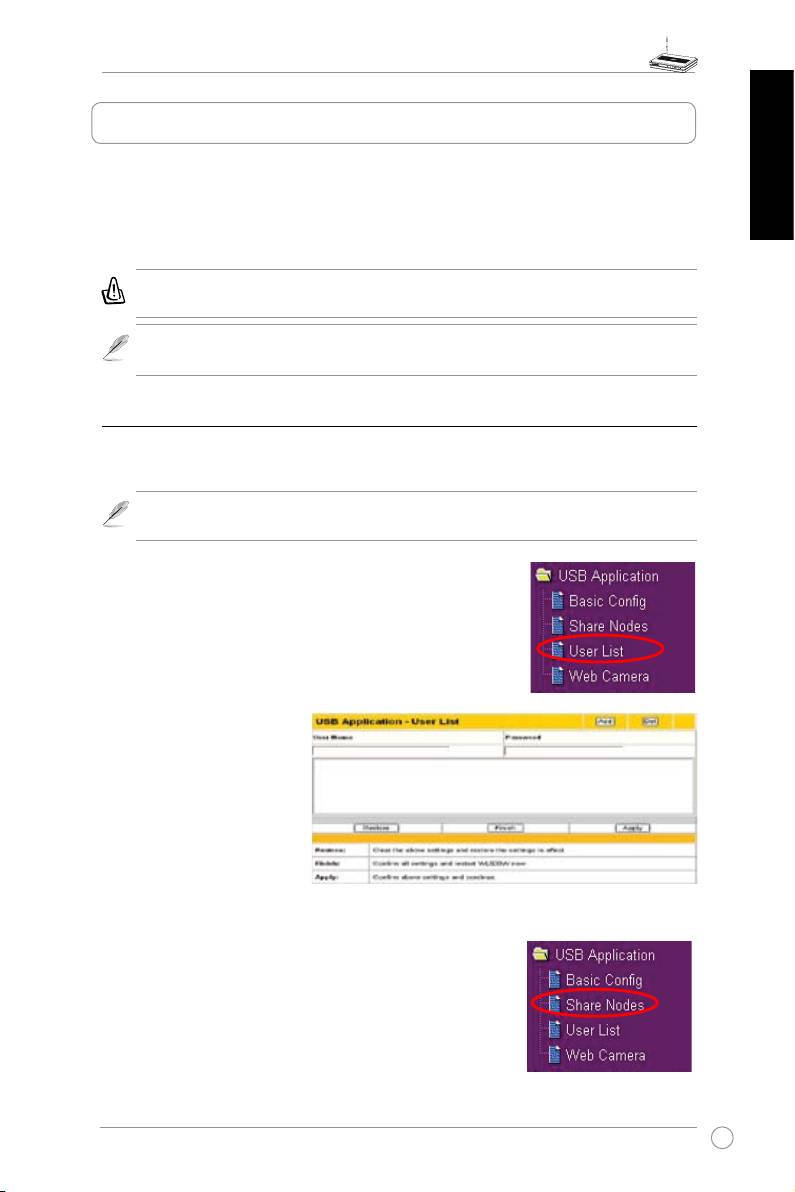
Creating user account
To share the data in the USB storage, you need to create
user accounts rst.
1. Click
USB Application -> User List
in the left side menu to
open the conguration page.
2. I npu t
Use r N ame
and
Password
for the accounts.
Click
Add
to add the account
to the list.
3. To d el et e an a cc oun t,
select the account from the
list and click
Del
.
4. Click
Apply
to apply the
changes and restart the
wireless router.
Creating share folder and access right
You can create a new share folder or share an existing
folder in your hard disk.
1. Click
USB Application -> Share Nodes
in the left side menu
to open the conguration page.
13
WL-500W Wireless Router Quick Start Guide
English
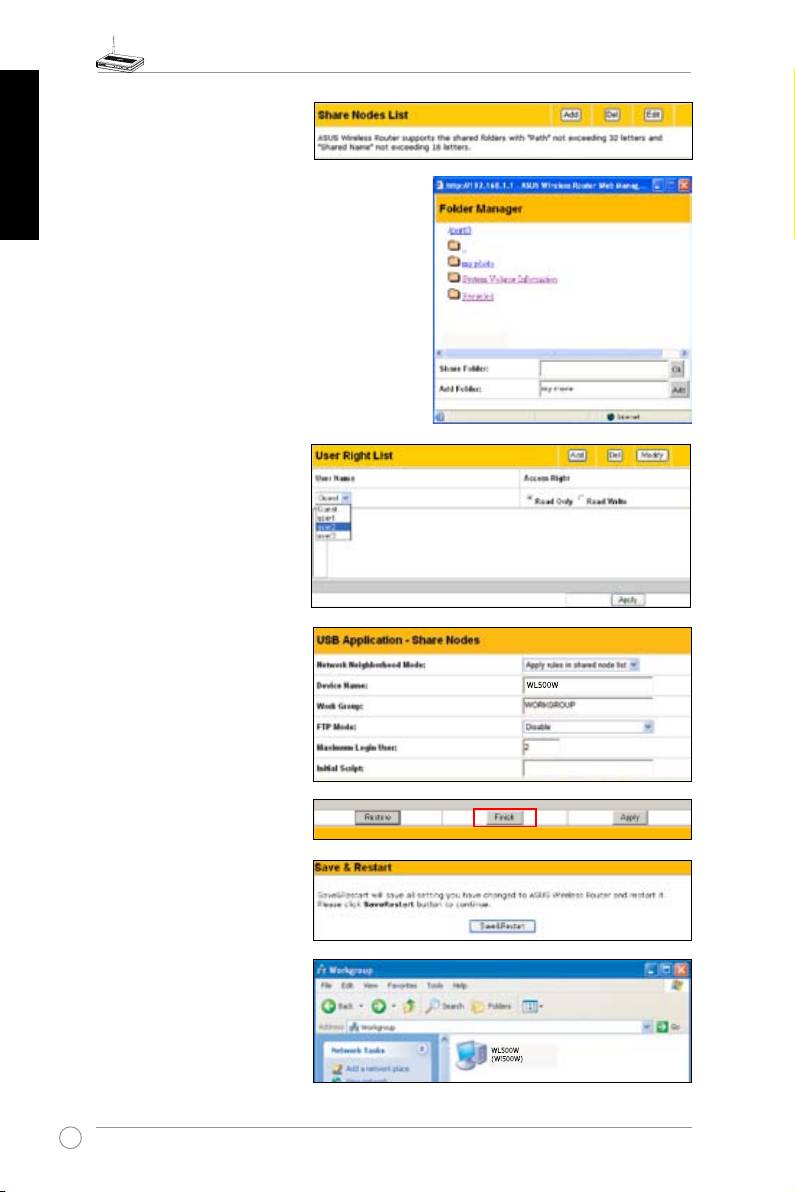
2. Click
Add
to add a share
folder.
3. Select the folder you want to share
from Folder Manager and click
Ok
.
To create a share folder, input the
folder name in
Add Folder
field
and press
Add
.
4. Dene the access right for
the share folder by appoint
User Name
and
Access
Right
. Click
Add
to add
the access right rule. When
finished, click
Apply
to
save the conguration.
5. Set Network Neighbourhood
Mode to
Apply rules in
shared node list
, Work
Group to
WORKGROUP
to
enable all computers within
WORKGROUP to access
WL-500W USB storage.
6. Click
Finish
.
7. Click
Save & Restart
to
restart the wireless router
and activate the settings.
8. Open
My Network Place
from a computer connected
to WL-500W. Click
view
work group computers
,
you can see WL-500W in
the
Workgroup
category.
All les on the USB storage
are ready for sharing.
14

WL-500W Wireless Router Quick Start Guide
2) Setting up FTP site
WL-500W can also serve as an FTP site. You can make your FTP site accessible to
all users, or set up an access policy to restrict anonymous login. To use this feature,
you need to plug a USB storage disk to the USB2.0 port on the rear panel of WL-
English
500W. Make sure the hard disk is formatted and partitioned properly.
1. To a l l o w a n o n y m o u s
l o g i n : S e t N e t w o r k
Neighbourhood Mode to
Share all partitions in
disk
, FTP Mode to
Login
to fir st partition
. T he
anonymous login directory
is the root directory of rst
partition.
To allow accout login only: Set
Network Neighbourhood Mode
to
Apply rules in shared node
list
, FTP Mode to
Login to
first matched shared node
.
Click
Add
in the Share Node List
to specify the access directory
and access right of FTP account.
2. The
Maximum Login User
eld
species the maximum number
of concurrent users. The default
value is 6.
3. Click
Finish
to activate the
settings and reboot. This process
may take several minutes.
4. Type
ftp://192.168.1.1
into
the address box of your Web
browser and press Enter to
login the FTP site.
15
WL-500W Wireless Router Quick Start Guide
English
3) Download Master
The Download Master helps to manage the download tasks without turning your
computer on. To use this function, you need to: 1) mount a USB storage to WL-500W
Wireless Router; and 2) install ASUS Utilities from the support CD.
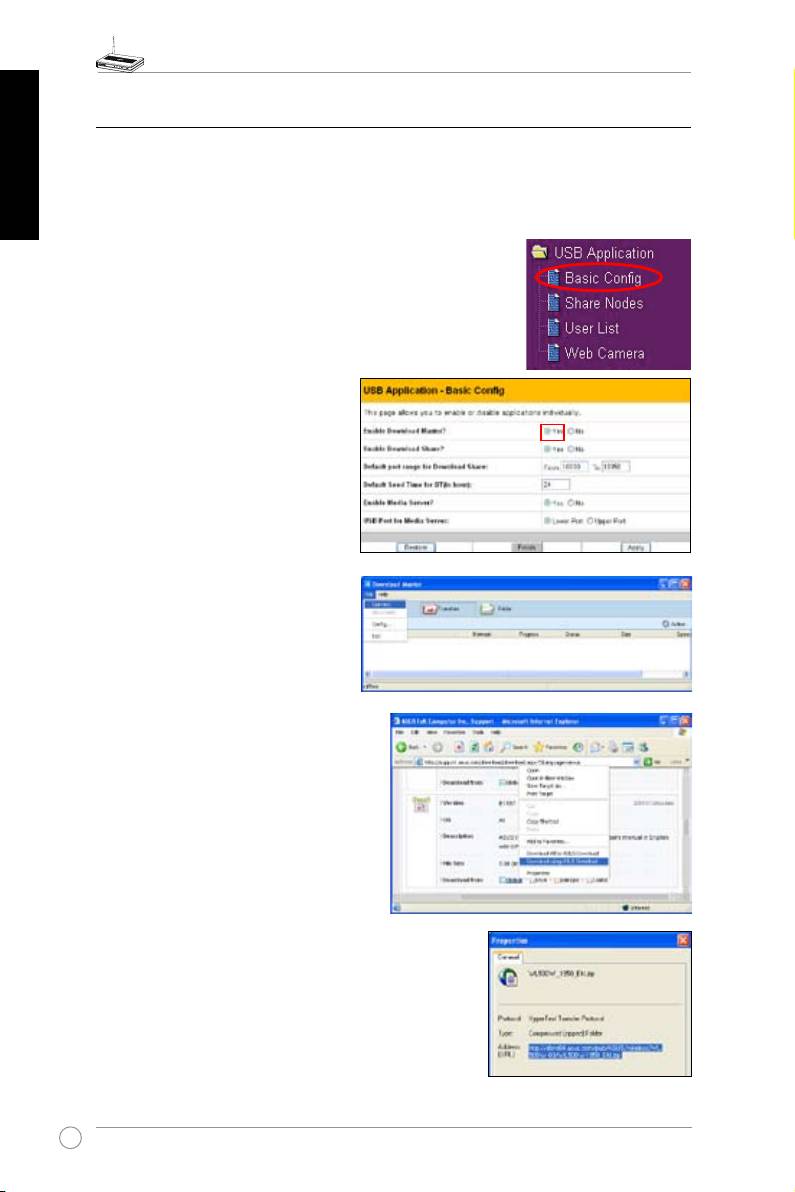
1. Click
Basic Cong
page in USB Application folder.
2. Set
Enable Download Master
to
Yes
. If you want to share the
downloaded file with your LAN
users, set
Enable Download
Share
to
Yes
. Click
Finish
and
save and restart the wireless
router.
3. Open Download Master from Start
-> All Programs -> ASUS Utility
->WL-500W Wireless Router ->
Download Master. Click
File ->
Connect
to associate with WL-
500W.
4.
HTTP download (1)
Right click the download link
on the Web page and click
Download using ASUS
Download
. A window in
step 5 appears to indicate
download progress.
HTTP download (2)
Right click the download
link on the Web page and
click
Properties.
Copy the
download
Address (URL)
.
16
WL-500W Wireless Router Quick Start Guide
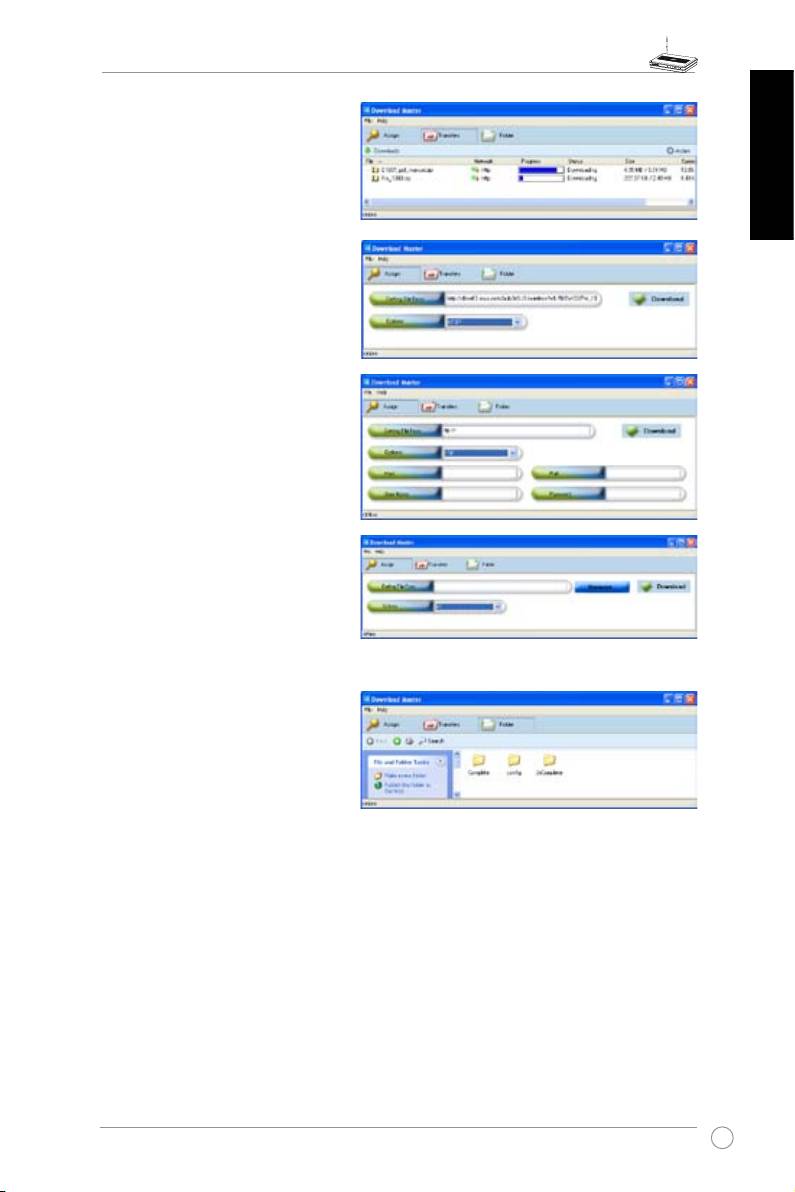
If you select
Download using
ASUS Download
, you can see
the download task is added to
the
Transfer
list. The blue bars
indicate the progress of download
English
tasks.
If you copy the download address,
click
Assign
button in the utility.
Paste the address into
Getting
File From
box, select
HTTP
from
Options eld, and click
Download
button to start.
5. FTP download
Click
Transfer
button of the
Download Master and select
FTP
in the Options eld. Input the FTP
site address, Port number, User
Name, Password. Click Download
to start.
6. BT download
S a v e t h e BT s e e d o n y o u r
computer. Click
Transfer
button of
the Download Master and select
BT
in the Options field. Click
Browse
to locate the seed file.
Click
Download
to start.
7. Click
Folder
button to view the
download le. Open the
Complete
folder to view or copy the nished
files to your local hard disk. The
unfin ished tasks a re kept in
InComplete
folder.
17

WL-500W Wireless Router Quick Start Guide
English
4) Sharing USB printer
You can connect a comptible USB printer to the USB2.0 port of WL-500W to
share the printer with your LAN users. Follow the procedures below to setup your
computers to utilize the printer server function of WL-500W.
Installing USB printer
Plug your USB printer to the USB2.0 port on WL-500W rear
panel. To verify whether your printer is properly installed to the
WL-500W Wireless router, click
Status & Log -> Status
. If
Printer Model
is correct and
Printer Status
is
On-Line
, you can
share this printer within your LAN.
Setting up printer client under Windows XP
Follow the steps below to install network printer on your clients.
1. Run Add Printer Wizard from
Start ->
2. Select
Local printer attached to this
Printers and Faxes -> Add a printer
.
computer
and click
Next
.
3. Select
Create a new port
and set Type
4. Click
Next
to setup TCP/IP port for
of port to
Standard TCP/IP Port
, then
accessing the network printer.
click
Next
.
18
WL-500W Wireless Router Quick Start Guide
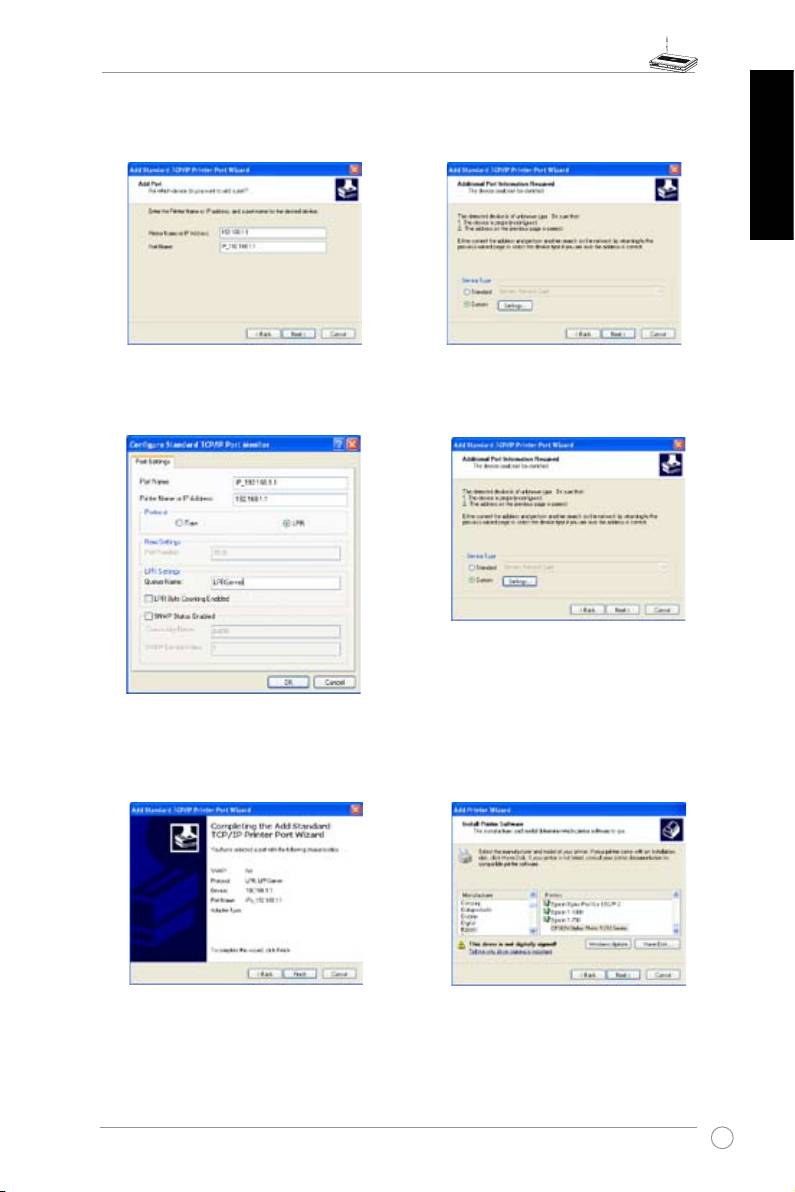
5. Input the IP address of WL-500W in
6. Select
Custom
and click
Settings.
the
Printer Name of IP Address
eld
and click
Next
.
English
7. S e t
P rot o c ol
t o
L PR
a n d t y p e
8. Press
Next
to finish standard TCP/IP
LPRServer
in
Queue Name
eld. Click
port setting.
Next
to continue.
9. Press
Finish
to complete the settings
10. Install printer driver from the vendor-
and return to Add Printer Wizard.
model list. If your printer is not in the
list, click
Have Disk
to manually locate
the printer driver.
19
WL-500W Wireless Router Quick Start Guide
English
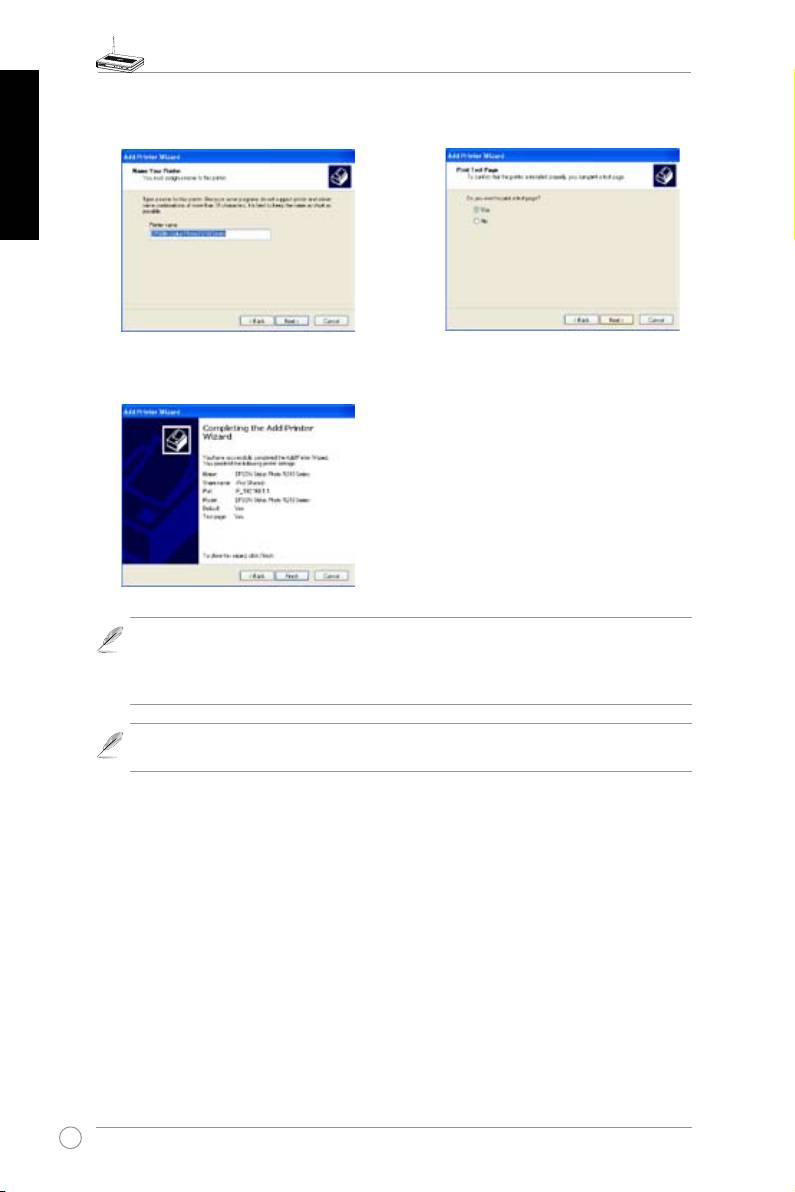
11. Click
Next
to accept the default name
12. Select
Yes
to print a test page. Click
for the printer.
Next
to print.
13. The installation is complete. Click
Finish
to quit the Add Printer Wizard.
Note:
If you have already installed the printer locally on your computer, right click the
printer icon and select
Property
-> Port
tab to add a standard TCP/IP port. Click
Add
Port
then select
Standard TCP/IP Port
and click
New Port
button. Refer to step 5-8
for setting procedures.
®
Note:
If you use Windows
98 or ME which does not support Standard TCP/IP port,
you need to use Romote Port which is supported by WL-500W.
20
Table of contents
- Index
- WL-500W SuperSpeed N Wireless Multi-Function Router Quick Start Guide
- Manufacturer Contact Information
- Table of contents
- 1. Package contents
- 3. Getting started
- 4. Application features
- WL-500W SuperSpeed N Wireless Multifunktions-Router
- Hersteller-Kontaktinformationen
- Inhaltsverzeichnis
- 1. Packungsinhalt
- 3. Erste Schritte
- 4. Anwendungsfunktionen
- Guide de démarrage rapide
- Contacts constructeur
- Table des matières
- 1. Contenu de la boîte
- 3. Pour démarrer
- 4. Applications
- WL-500W SuperSpeed N Router Wireless Multi-Funzionale
- Manufacturer Contact Information
- Indice
- 4. Caratteristiche dell’applicazione
- Enrutador Inalámbrico Multi-Función WL-500W SuperSpeed N Guía de Instalación Rápida
- Información de Contacto del Fabricante
- Tabla de Contenidos
- 1. Contenido del Paquete
- 3. Introducción
- 4. Aplicaciones
- WL-500W Суперcкоростной N Мультифункциональный беспроводный маршрутизатор Руководство по быстрой установке
- Контактная информация изготовителя
- 1. Комплект поставки
- 3. Настройка маршрутизатора
- 4. Прикладные возможности
