Indesit K6 C51: How To Use Your Appliance
How To Use Your Appliance: Indesit K6 C51
28
How To Use Your Appliance
The various features of cooker are controlled through the
knobs and buttons located on the control panel.
Attention: The first time you use the oven we recommend
that you set the thermostat on the highest setting and leave
the oven on for about a half of an hour with nothing in it.
Then, open the oven door and let the room air. The odour
that is often detected during this initial use is due to the
evaporation of substances used to protect the oven dur-
ing storage and until it is installed.
Attention: Only use the bottom shelf of the oven when
using the rotisserie to cook (where present). For all other
types of cooking, never use the bottom shelf and never
place anything on the bottom of the oven when it is in
operation because this could damage the enamel. Always
place your cookware (dishes, aluminium foil, etc. etc.) on
the grate provided with the appliance inserted especially
along the oven guides.
The Oven Control Knobs
This multi-function oven combines the advantages of tra-
ditional convection ovens with those of the more modern
fan assisted models in a single appliance.
It is an extremely versatile appliance that allows you to
choose easily and safely between 5 different cooking
modes. The various features offered by the oven are se-
lected by means of selector knob “L” and thermostat “M”
situated on the control panel.
“Defrosting” Mode
Position of thermostat knob “M”: any
The fan located on the bottom of the oven makes the air
circulate at room temperature around the food. This is
recommended for the defrosting of all types of food, but in
particular for delicate types of food which do not require
heat, such as for example: ice cream cakes, cream or
custard desserts, fruit cakes. By using the fan, the
defrosting time is approximately halved. In the case of
meat, fish and bread, it is possible to accelerate the
process using the “multi-cooking” mode and setting the
temperature to 80° - 100°C.
Convection Mode
Position of thermostat knob “M”: between 60°C and Max.
On this setting, the top and bottom heating elements come
on. This is the classic, traditional type of oven which has
been perfected, with exceptional heat distribution and re-
duced energy consumption. The convection oven is still
unequalled when it comes to cooking dishes made up of
several ingredients, e.g. cabbage with ribs, Spanish style
cod, Ancona style stockfish, tender veal strips with rice,
etc. Excellent results are achieved when preparing veal
or beef-based dishes as well (braised meats, stew, gou-
lash, wild game, ham etc.) which need to cook slowly and
require basting or the addition of liquid. It nonetheless re-
mains the best system for baking cakes as well as fruit
and cooking using covered casserole dishes for oven bak-
ing. When cooking in convection mode, only use one drip-
ping pan or cooking rack at a time, otherwise the heat
distribution will be uneven. Using the different rack heights
available, you can balance the amount of heat between
the top and the bottom of the oven. Select from among
the various rack heights based on whether the dish needs
more or less heat from the top.
Fan Assisted Mode
Position of thermostat knob “M”: Between 60°C and Max.
The heating elements, as well as the fan, will come on.
Since the heat remains constant and uniform throughout
the oven, the air cooks and browns food uniformly over its
entire surface. With this mode, you can also cook various
dishes at the same time, as long as their respective cook-
ing temperatures are the same. A maximum of 2 racks
can be used at the same time, following the instructions in
the section entitled: “Cooking On More Than One Rack”.
This fan assisted mode is particularly recommended for
dishes requiring a gratin finish or for those requiring con-
siderably prolonged cooking times, such as for example:
lasagne, pasta bakes, roast chicken and potatoes, etc…
Moreover, the excellent heat distribution makes it possi-
ble to use lower temperatures when cooking roasts. This
results in less loss of juices, meat which is more tender
and a decrease in the loss of weight for the roast. The fan
assisted mode is especially suited for cooking fish, which
can be prepared with the addition of a limited amount of
condiments, thus maintaining their flavour and appear-
ance.
Desserts: the fan assisted mode is also perfect for baking
leavened cakes.
Moreover, this mode can also be used to thaw quickly
white or red meat and bread by setting the temperature to
80 °C. To thaw more delicate foods, set the thermostat to
60°C or use only the cold air circulation feature by setting
the thermostat to 0°C.
“Top” oven
Position of thermostat knob “M”: Between 60°C and Max.
The top heating element comes on.
This mode can be used to brown food at the end of cook-
ing.
Grill
Position of thermostat knob “M”: Max
The top heating element and the turnspit come on.
The extremely high and direct temperature of the grill makes
it possible to brown the surface of meats and roasts while
locking in the juices to keep them tender. The grill is also
highly recommended for dishes that require a high
temperature on the surface: such as beef steaks, veal, rib
steak, filets, hamburgers etc...
Always leave the oven door ajar during cooking, except
when using the turnspit.
Some grilling examples are included in the “Practical Cooking
Advice” paragraph.
Fan Assisted Grill
Position of thermostat knob “M”: between 60°C and 200°C.
The top central heating element and the fan come on. This
combination of features increases the effectiveness of the
unidirectional thermal radiation of the heating elements
through forced circulation of the air throughout the oven.
This helps prevent food from burning on the surface, al-
29
lowing the heat to penetrate right into the food. Excellent
results are achieved with kebabs made with meats and
vegetables, sausages, ribs, lamb chops, chicken in a spicy
sauce, quail, pork chops, etc.
All “gratin” cooking must be done with the oven door shut.
This mode is also ideal for cooking fish steaks, like sword-
fish, tuna, grouper, stuffed cuttlefish etc.
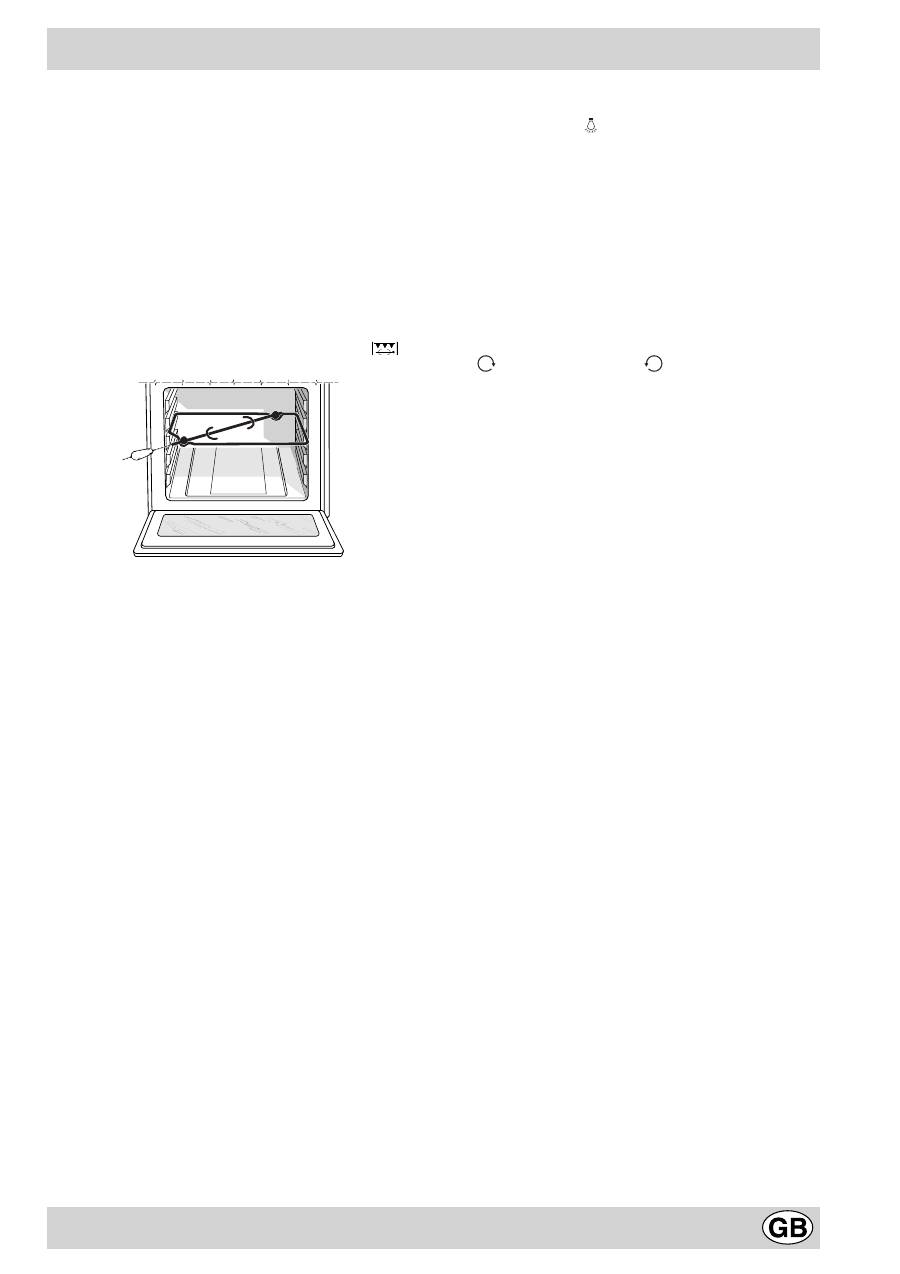
The turnspit
To start the turnspit, proceed as follows:
a) place the oven tray on the 1st rack;
b) insert the special turnspit support on the 3rd rack and
position the spit by inserting it through the special hole
into the turnspit at the back of the oven;
c) start the turnspit using knob “L” to select setting
.
The oven light
Set knob “L” to the symbol to turn it on. It lights the
oven and stays on when any of the electrical heating ele-
ments in the oven come on.
Thermostat Light (O)
This light indicates that the oven is heating. When it turns
off, the temperature inside the oven has reached the set-
ting made with the thermostat knob. At this point, the light
will turn on and off as the oven maintains the temperature
at a constant level.
Timer Knob (S)
In order to use the timer, it must be wound by turning the
"S" knob almost one complete turn in the clockwise direc-
tion
. Then, turning it back
, set the desired time by
lining up the number for the minutes with the mark on the
control panel.
Оглавление
- Avvertenze
- Istruzioni per l’installazione
- Caratteristiche tecniche
- Istruzioni per l’uso
- Consigli pratici per la cottura
- Consigli pratici per l'uso del piano in ceramica
- Istruzioni sull'uso del piano di cottura in ceramica
- Consigli pratici per la cottura
- Manutenzione ordinaria e pulizia della cucina
- Important
- Installation Instructions
- Cooker description
- How To Use Your Appliance
- Practical Cooking Advice
- Pratical advice for using the electric plates
- User's instructions the ceramic hob
- Routine Maintenance and Cleaning
- Ïðåäóïðåæäåíèÿ
- Óñòàíîâêà
- Òåõíè÷åñêèå õàðàêòåðèñòèêè Êóõîííàÿ ïëèòà ñ ìíîãîôóíêöèîíàëüíûì äóõîâûì øêàôîì
- Ðóêîâîäñòâî ïî ýêñïëóàòàöèè
- Ïðàêòè÷åñêèå ñîâåòû ïî ïðèãîòîâëåíèþ áëþä
- Ïðàêòè÷åñêèå ðåêîìåíäàöèè ïî èñïîëüçîâàíèþ ñòåêëîêåðàìè÷åñêîé âàðî÷íîé ïàíåëè Èíñòðóêöèè ïî ýêñïëóàòàöèè ñòåêëîêåðàìè÷åñêîé âàðî÷íîé ïàíåëè
- Ðåãóëÿðíîå òåõíè÷åñêîå îáñëóæèâàíèå è ÷èñòêà êóõîííîé ïëèòû
- Conseils
- Instructions pour l’installation
- Caractéristiques Techniques
- La cuisinière avec four multifonction et table vitrocéramique
- Mode d'emploi
- Mode d'emploi de la table vitrocéramique
- Conseils utiles pour la cuisson
- Maintenance ordinaire et entretien de la cuisinière
- Aanwijzingen
- Het installeren
- Technische kenmerken
- Beschrijving van het fornuis
- Instructies voor het gebruik
- Instructies voor het gebruik van het keramische kookvlak
- Kooktips
- Normaal onderhoud en reinigen van het fornuis
- Merloni Elettrodomestici
