Indesit IF-51-K.A-IX-S: Start-up and use
Start-up and use: Indesit IF-51-K.A-IX-S
20
GB
Start-up and use
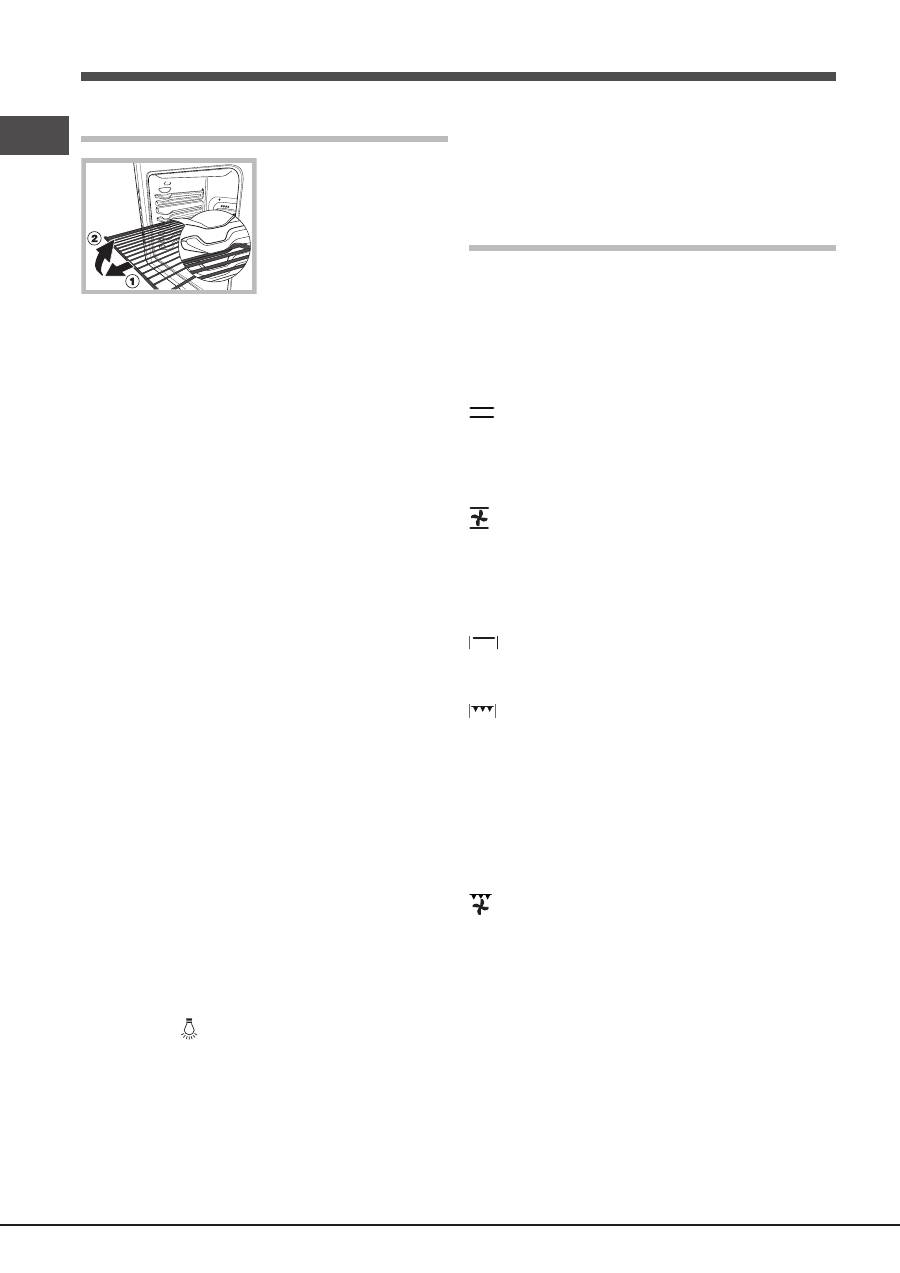
WARNING !
The oven is
provided with a stop system
to extract the racks and
prevent them from coming
out of the oven (1).
As shown in the drawing,
to extract them completely,
simply lift the racks, holding
them on the front part, and
pull (2).
!
The first time you use your appliance, heat the empty
oven with its door closed at its maximum temperature for
at least half an hour. Ensure that the room is well ventilated
before switching the oven off and opening the oven door.
The appliance may emit a slightly unpleasant odour caused
by protective substances used during the manufacturing
process burning away.
Starting the oven
1. Select the desired cooking mode by turning the
SELECTOR knob.
2. Select the desired temperature using the THERMOSTAT
knob. A list detailing cooking modes and suggested cooking
temperatures can be found in the Cooking advice table (see
Cooking modes).
3. The THERMOSTAT indicator light indicates that the oven
is heating up to the temperature set.
4. During cooking it is always possible to:
- change the cooking mode by turning the SELECTOR knob;
- adjust the temperature by turning the THERMOSTAT knob;
- stop cooking by turning the SELECTOR knob to the “0”
position.
!
Never put objects directly on the bottom of the oven; this
will prevent the enamel coating from being damaged.
!
Always place cookware on the rack(s) provided.
Cooling ventilation
In order to cool down the external temperature of the oven,
a cooling fan blows a stream of air between the control
panel and the oven door, as well as towards the bottom of
the oven door.
!
Once cooking has been completed, the cooling fan
continues to operate until the oven has cooled down
sufficiently.
Oven light
When selecting with the SELECTOR knob the oven light
goes on. It remains lit when a cooking mode is selected.
How to use the timer
1. To set the buzzer, turn the TIMER knob clockwise almost
one complete revolution.
2. Turn the knob anticlockwise to set the desired time: align
the minutes shown on the TIMER knob with the indicator
on the control panel.
3. The timer operates in minutes: when the selected time
has elapsed, a buzzer will sound.
!
The timer does not turn the oven on or off.
Cooking modes
Cooking modes
!
A temperature value between 60°C and MAX can be set
for all cooking modes except the following:
• GRILL (recommended: set only to MAX power level)
• GRATIN (recommended: do not exceed 200°C).
TRADITIONAL OVEN
mode
Both the top and bottom heating elements will come on.
When using this traditional cooking mode, it is best to use
one cooking rack only. If more than one rack is used, the
heat will be distributed unevenly.
MULTILEVEL
mode
All the heating elements (top, bottom and circular) switch
on and the fan begins to operate. Since the heat remains
constant throughout the oven, the air cooks and browns
food in a uniform manner. A maximum of two racks may be
used at the same time.
TOP OVEN
mode
The top heating element comes on. This mode can be used
to brown food at the end of cooking.
GRILL
mode
The top heating element comes on. The extremely high and
direct temperature of the grill makes it possible to brown
the surface of meats and roasts while locking in the juices
to keep them tender. The grill is also highly recommended
for dishes that require a high temperature on the surface:
such as beef steaks, veal, rib steak, filets, hamburgers etc...
Some grilling examples are included in the “Practical
Cooking Advice” paragraph. Always cook in this mode with
the oven door closed.
GRATIN
mode
The top heating element, as well as the fan, will come on.
This combination of features increases the effectiveness of
the unidirectional thermal radiation provided by the heating
elements through forced circulation of the air throughout the
oven. This helps prevent food from burning on the surface
and allows the heat to penetrate right into the food. Always
cook in this mode with the oven door closed.
Practical cooking advice
!
Do not place racks in position 1 and 5 during fan-assisted
cooking. This is because excessive direct heat can burn
temperature sensitive foods.
!
In the GRILL and GRATIN cooking modes, particularly when
using the rotisserie spit, place the dripping pan in position 1
to collect cooking residues (fat and/or grease).
GB
21
MULTI-COOKING
• Use positions 2 and 4, placing the food which requires
more heat on 2.
• Place the dripping pan on the bottom and the rack on top.
GRILL
• Place the rack in position 3 or 4. Position the food in the
centre of the rack.
• We recommend that the power level is set to maximum.
The top heating element is regulated by a thermostat
and may not always operate constantly.
PIZZA
• For best results when cooking pizza, use the MULTI-
COOKING mode.
• Use a light aluminium pizza pan. Place it on the rack
provided.
For a crispy crust, do not use the dripping pan (prevents
crust from forming by extending cooking time).
• If the pizza has a lot of toppings, we recommend adding
the mozzarella cheese on top of the pizza halfway
through the cooking process.
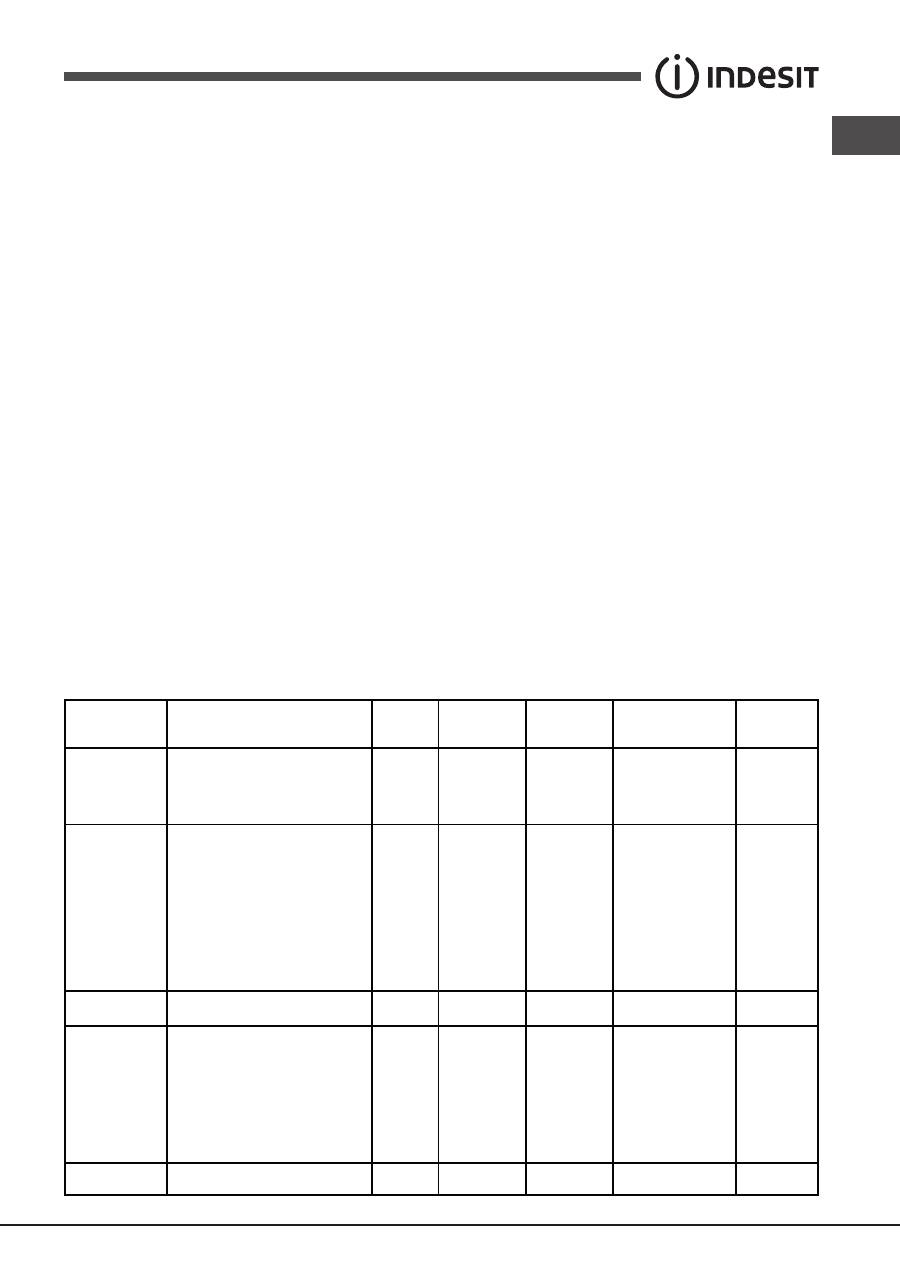
Cooking
modes
Foods
Weight
(in kg)
Rack
position
Pre-heating
time (min)
Recommended
temperature
Cooking
time
(minutes)
Convection
Oven
Duck
Roast veal or beef
Pork roast
Biscuits (short pastry)
Tarts
1
1
1
-
1
3
3
3
3
3
15
15
15
15
15
200
200
200
180
180
65-75
70-75
70-80
15-20
30-35
Multi-cooking
Pizza (on 2 racks)
Lasagne
Lamb
Roast chicken + potatoes
Mackerel
Plum cake
Cream puffs (on 2 racks)
Biscuits (on 2 racks)
Sponge cake (on 1 rack)
Sponge cake (on 2 racks)
Savoury pies
1
1
1
1+1
1
1
0.5
0.5
0.5
1
1.5
2 and 4
3
2
2 and 4
2
2
2 and 4
2 and 4
2
2 and 4
3
15
10
10
15
10
10
10
10
10
10
15
230
180
180
200
180
170
190
180
170
170
200
15-20
30-35
40-45
60-70
30-35
40-50
20-25
10-15
15-20
20-25
25-30
Top oven
Browning food to perfect cooking -
3/4
15
220
-
Grill
Soles and cuttlefish
Squid and prawn kebabs
Cod filet
Grilled vegetables
Veal steak
Cutlets
Hamburgers
Mackerels
Toasts
1
1
1
1
1
1
1
1
4
4
4
4
3 or 4
4
4
4
4
4
5
5
5
5
5
5
5
5
5
Max
Max
Max
Max
Max
Max
Max
Max
Max
8-10
6-8
10
10-15
15-20
15-20
7-10
15-20
2-3
Gratin
Grilled chicken
Cuttlefish
1.5
1.5
2
2
5
5
200
200
55-60
30-35
Cooking advice table
Оглавление
- Bedienungsanleitung
- Avvertenze
- Avertissements
- Advertências
- Belangrijk
- Assistenza
- Assistência
- Descrizione dell’apparecchio
- Beschreibung Ihres Gerätes
- Descrizione dell’apparecchio
- Installazione
- Avvio e utilizzo
- Precauzioni e consigli
- Installation
- Start-up and use
- Precautions and tips
- Installation
- Mise en marche et utilisation
- Précautions et conseils
- Instalación
- Puesta en funcionamiento y uso
- Precauciones y consejos
- Instalação
- Início e utilização
- Precauções e conselhos
- Installation
- Inbetriebsetzung und Gebrauch
- Vorsichtsmaßregeln und Hinweise
- Het installeren
- Starten en gebruik
- Voorzorgsmaatregelen en advies
- Установка
- Включение и эксплуатация
- Предосторожности и рекомендации
- Техническое обслуживание и уход
