Indesit K6 C10/R: Pratical advice for using the electric plates
Pratical advice for using the electric plates: Indesit K6 C10/R
Pratical advice for using the electric plates
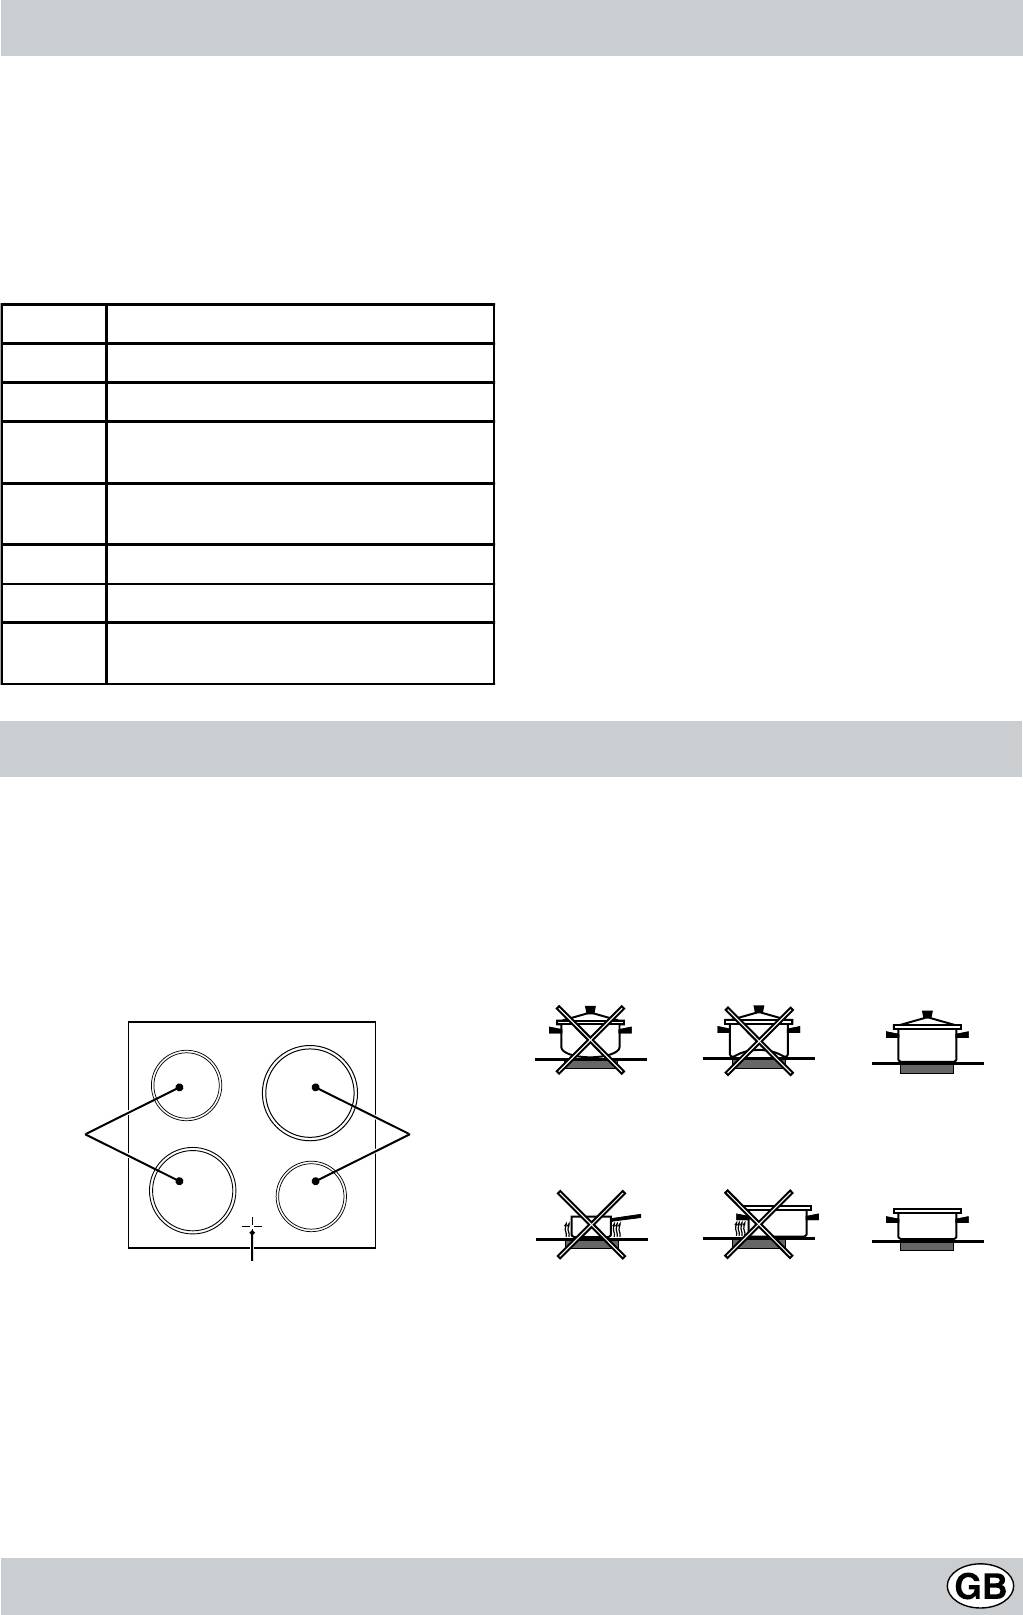
The control knobs for the hob electric hotplates (N)
Electric hotplate indicator light (H)
The cookers can be fitted with normal and rapid electric
This light comes on when any of the electrical hotplates on a
hotplates in a variety of combinations (the rapid hotplates
hob which features electric hotplates have been turned on.
can be distinguished from the rest by the red boss in the
centre of the same). To avoid any heat loss and damage to
the hotplates, we advise you to use pans with a flat bottom,
with a diameter which matches that of the hotplate itself. The
table contains the different settings indicated on the knobs
and the use for which the hotplates are recommended.
Setting Normal or Fast Plate
0
Off
1
Cooking vegetables, fish
Cooking potatoes (using steam) soups,
2
chickpeas, beans.
Continuing the cooking of large quantities
3
of food, minestrone
4
For roasting (average)
5
For roasting (above average)
For browning and reaching a boil in a
6
short time.
User's instructions the ceramic hob
Description
Instructions for using the pyroceram top
The hobs have been provided with radiant electric heaters.
To obtain the best results from your hob, there are some
These heaters are incorporated under the surface of the
basic rules to follow when cooking or preparing food.
hob as zones which redden while they are in use.
• All types of pots and pans may be used on the ceramic
A. Cooking area (A).
glass cooktop. However, the bottom surface must be
B. A lights which indicate whether the corresponding
perfectly flat (see Fig. A). Naturally, the thicker the
heaters are at a temperature in excess of 60° C; even
bottom of the pot or pan, the more uniformly the heat
if the hob/zone has been switched off.
is distributed.
Fig. A
• Make sure that the base of the pan completely covers
AA
the cooking ring, so as to make full use of the heat
produced (Fig. B)
B
Fig. B
• Always make sure that the pan base is always dry and
clean so as to guarantee proper contact as well as
Description of the heating elements
longer-lasting pans and the long life-span of the hob.
The radiant heating elements are composed of circular
• Do not use the same pans which are used for cooking
heating elements. They only become red after being turned
on gas burners. The heat strength of gas burners may
on for 10-20 seconds.
deform the pan base and will not give the same results
if it is subsequently used on a glazed ceramic hob.
17
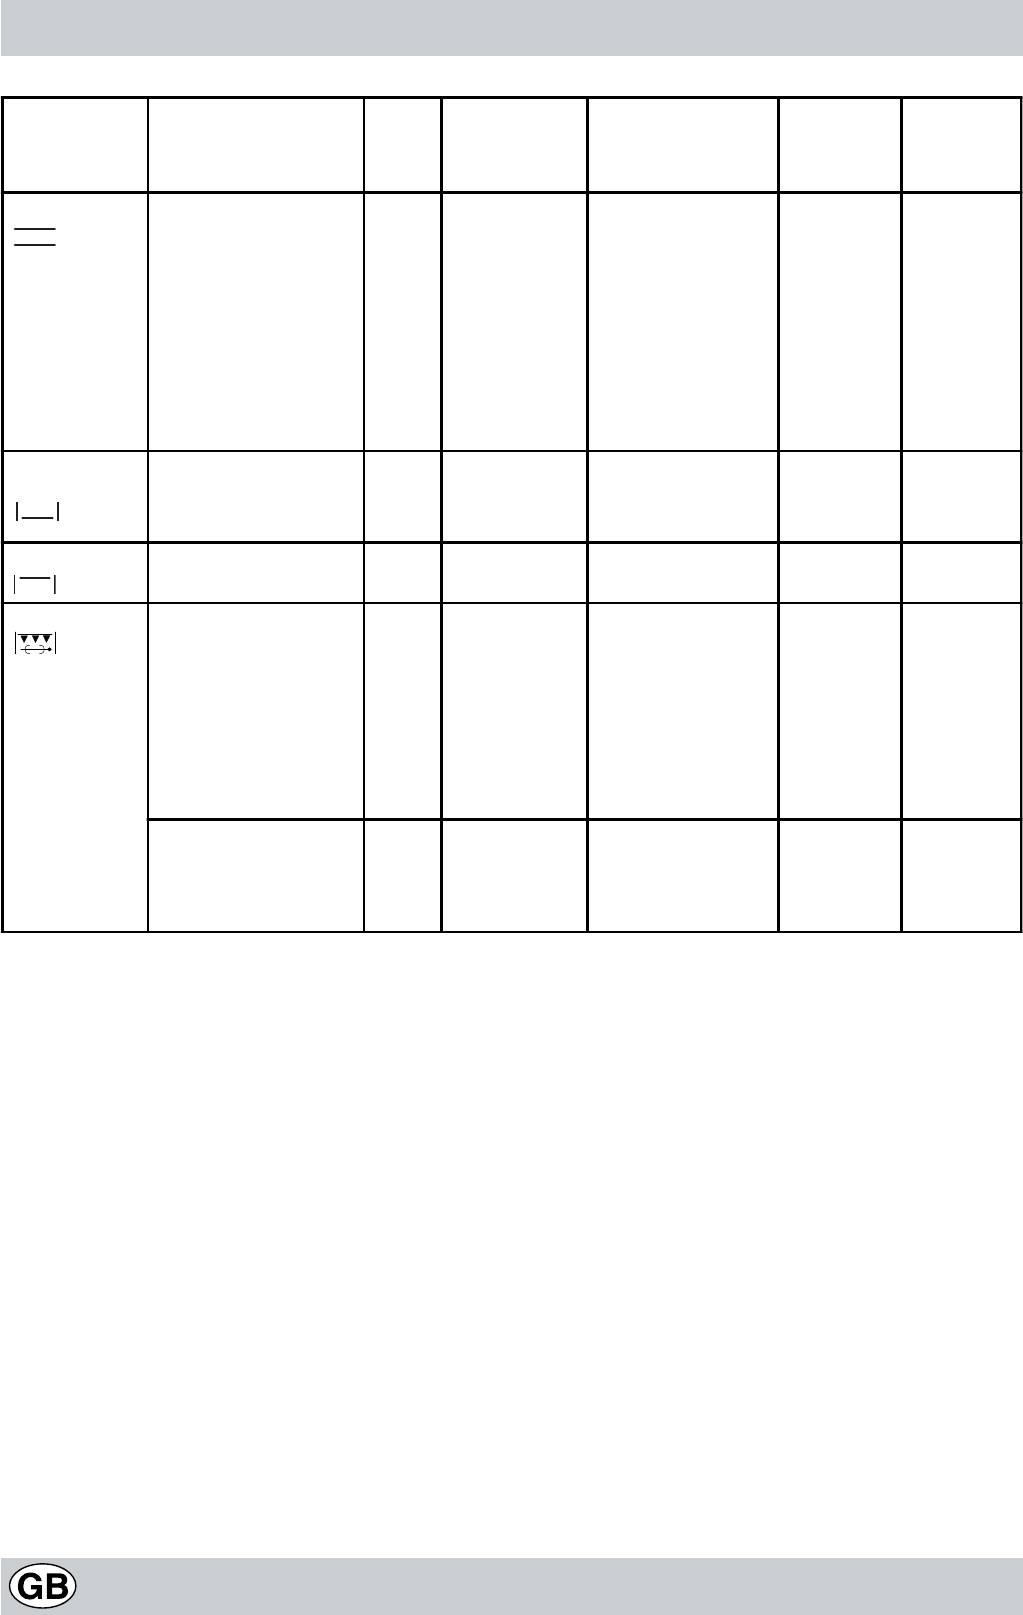
Selector knob
Food to be cooked Weight
Cooking rack
Preheating time
Thermostat
Cooking
setting
(in kg)
position from
(minutes)
knob
time
bottom
setting
(minutes)
1 Convection
Duck
1
3
15
200
65-75
Roast veal or beef
1
3
15
200
70-75
Pork roast
1
3
15
200
70-80
Biscuits (short pastry)
-
3
15
180
15-20
Tarts
1
3
15
180
30-35
Lasagne
1
3
10
190
35-40
Lamb
1
2
10
180
50-60
Mackerel
1
2
10
180
30-35
Plum-cake
1
2
10
170
40-50
Cream puffs
0.3
3
10
180
30-35
Sponge-cake
0.5
3
10
170
20-25
Savoury pies
1.5
3
15
200
30-35
2 Pastry
Raised Cakes
0,5
3
15
160
30-40
Mode
Tarts
1
3
15
180
35-40
Fruit cakes
1
3
15
180
50-60
Brioches
0,5
3
15
160
25-30
3 Top Oven
Browning food to
- 3/4 15 220 -
perfect cooking
4 Grill
Soles and cuttlefish
1
4
5
Max
8-10
Squid and prawn
kebabs
1
4
5
Max
6-8
Cod filet
1
4
5
Max
10
Grilled vegetables
1
3/4
5
Max
10-15
Veal steak
1
4
5
Max
15-20
Cutlets
1
4
5
Max
15-20
Hamburgers
1
4
5
Max
7-10
Mackerels
1
4
5
Max
15-20
Toasted sandwiches
n.° 4
4
5
Max
2-3
With rotisserie
(where
present)
Veal on the spit
1.0
-
5
Max
80-90
Chicken on the spit
1.5
-
5
Max
70-80
Lamb on the spit
1.0
-
5
Max
70-80
NB:
cooking times are approximate and may vary according to personal taste. When cooking using the grill, the
dripping pan must always be placed on the 1st oven rack from the bottom.
18
Оглавление
- Avvertenze
- Installazione
- Caratteristiche tecniche
- Istruzioni per l’uso
- Consigli pratici per la cottura
- Consigli pratici per l'uso del piano in ceramica
- Manutenzione ordinaria e pulizia della cucina
- Consigli pratici per la cottura
- Important
- Installation Instructions
- Technical Characteristics
- How To Use Your Appliance
- Practical Cooking Advice
- Pratical advice for using the electric plates
- Routine Maintenance and Cleaning
- Ïðåäóïðåæäåíèÿ
- Óñòàíîâêà
- Òåõíè÷åñêèå õàðàêòåðèñòèêè
- Ðóêîâîäñòâî ïî ýêñïëóàòàöèè
- Ïðàêòè÷åñêèå ñîâåòû ïî ïðèãîòîâëåíèþ áëþä
- Ïðàêòè÷åñêèå ðåêîìåíäàöèè ïî èñïîëüçîâàíèþ ñòåêëîêåðàìè÷åñêîé âàðî÷íîé ïàíåëè
- Ðåãóëÿðíîå òåõíè÷åñêîå îáñëóæèâàíèå è ÷èñòêà êóõîííîé ïëèòû
- Advertencias
- Instrucciones para la instalación
- Características técnicas
- Las diferentes funciones presentes en la cocina
- Consejos prácticos per la preparación
- Consejos prácticos para el uso de la zonas de calentamiento
- Mantenimiento periódico y limpieza de la cocina
- Advertências
- Instalação
- Características técnicas
- Instruções para a utilização
- Conselhos práticos para a cozedura
- Conselhos práticos para a utilização da placa de vitrocerâmica
- Manutenção ordinária e limpeza do fogão
- Conselhos práticos para a cozedura


