Asus USB-BT400 – page 3
Manual for Asus USB-BT400
Table of contents
- Bluetooth 4.0 USB Dongle Before you proceed Installing the Bluetooth driver
- Using the Bluetooth 4.0 USB Dongle

USB-BT400
Llave USB Bluetooth 4.0
© Todos los derechos reservados.
Todos los nombres comerciales son marcas comerciales registradas de los fabricantes respectivos.
El nombre y la marca Bluetooth son propiedad de Bluetooth SIG, Inc.
Antes de empezar
NOTA: Desinstale todo el software Bluetooth que haya instalado con anterioridad en su ordenador.
®
1. Windows
XP SP3: Haga clic en Start (Inicio) > Control Panel (Panel de control) > Add or Remove
Programs (Agregar o quitar programas).
®
Windows
7: Haga clic en Start (Inicio) > Control Panel (Panel de control) > Programs
(Programas) > Programs and Features (Programas y características) > Uninstall a
program (Desinstalar un programa).
®
Windows
8: Haga clic en + I > Control Panel (Panel de control) > Programs (Programas)
> Programs and Features (Programas y características) > Uninstall a program
(Desinstalar un programa).
2. Quite cualquier software Bluetooth de la lista de aplicaciones.
Instalar el controlador Bluetooth
1. Inserte el CD de soporte en la unidad óptica del equipo. Si el CD no se ejecuta automáticamente, busque el
contenido del mismo y haga doble clic en el archivo Autorun.exe.
2. En la pantalla de instalación de software Bluetooth, haga clic en Agree and Install Bluetooth Software
(Aceptar e instalar el software Bluetooth).
3. Siga las instrucciones de la pantalla que inserte la llave USB Bluetooth 4.0 cuando se le pida.
4. Cuando el proceso de instalación se complete, haga clic en Finish (Finalizar). Reinicie el sistema para
completar la instalación.
®

Utilizar la llave USB Bluetooth 4.0
1. Inserte la llave USB Bluetooth 4.0 al puerto USB del equipo.
2. Para iniciar la asociación de dispositivos Bluetooth, realice uno de los siguientes procedimientos:
• Haga clic con el botón secundario en el icono Bluetooth de la bandeja del sistema y seleccione Add a Device
(Agregar un dispositivo).
®
• Windows
XP SP3: Haga clic en Start (Inicio) > Control Panel (Panel de control) > Bluetooth
Devices (Dispositivos Bluetooth) > Add (Agregar)
®
• Windows
7: Haga clic en Start (Inicio) > Control Panel (Panel de control) > Hardware and
Sound (Hardware y sonido) > Add a Bluetooth device (Agregar un dispositivo
Bluetooth)
®
• Windows
8: 1. Haga clic en + I y, a continuación, haga clic en Change PC settings (Cambiar
conguración de PC). Haga clic en Devices (Dispositivos) > Add a device
(Agregar un dispositivo).
2. Haga clic en + W, escriba “bluetooth” en el cuadro de búsqueda y, a
continuación, haga clic en Add a device (Agregar dispositivo Bluetooth).

USB-BT400
ด็องเกิลบลูทูธ 4.0 USB
© สงวนลิขสิทธิ์
ชื่อการค้าทั้งหมดเป็นเครื่องหมายการค้าจดทะเบียนของผู้ผลิตแต่ละแห่งที่แสดงในที่นี้
ชื่อบลูทูธ และเครื่องหมายการค้าบลูทูธ เป็นของ Bluetooth SIG, Inc.
ก่อนที่จะเริ่มต้น
หมายเหตุ: ถอนการติดตั้งซอฟต์แวร์บลูทูธที่ติดตั้งไว้ก่อนหน้านี้บนคอมพิวเตอร์ของคุณ
®
1. Windows
XP SP3: คลิกไอคอน Start (เริ่ม) > Control Panel (แผงควบคุม) > Add or Remove Programs
(เพิ่มหรือลบโปรแกรม)
®
Windows
7: คลิกไอคอน Start (เริ่ม) > Control Panel (แผงควบคุม) > Programs (โปรแกรม)
> Programs and Features (โปรแกรมและคุณสมบัติ) > Uninstall a program
(ถอนการติดตั้งโปรแกรม)
®
Windows
8: คลิกไอคอน + I > Control Panel (แผงควบคุม) > Programs (โปรแกรม) >
Programs and Features (โปรแกรมและคุณสมบัติ) > Uninstall a program
(ถอนการติดตั้งโปรแกรม)
2. ลบซอฟต์แวร์บลูทูธบนรายการแอปพลิเคชั่นออก
การติดตั้งไดรเวอร์บลูทูธ
1. ใส่แผ่น CD สนับสนุนลงในออปติคัลไดรฟ์ของคอมพิวเตอร์ของคุณ ถ้า CD ไม่รันโดยอัตโนมัติ ให้เรียกดูเนื้อหาของแผ่น
CD สนับสนุน และดับเบิลคลิกที่ไฟล์ Autorun.exe
2. บนหน้าจอการติดตั้งซอฟต์แวร์บลูทูธ, คลิก Agree and Install Bluetooth Software
(ยอมรับและติดตั้งซอฟต์แวร์บลูทูธ)
3. ทำตามขั้นตอนบนหน้าจอ และเสียบด็องเกิลบลูทูธ 4.0 USB เมื่อระบบบอก
4. เมื่อกระบวนการตั้งค่าสมบูรณ์, คลิก Finish (เสร็จ) บูตระบบใหม่เพื่อทำการติดตั้งให้สมบูรณ์
®

การใช้ด็องเกิลบลูทูธ 4.0 USB
1. เสียบด็องเกิลบลูทูธ 4.0 USB ลงในพอร์ต USB ของคอมพิวเตอร์ของคุณ
2. ในการเริ่มการจับคู่อุปกรณ์บลูทูธ ให้ดำเนินการอย่างใดอย่างหนึ่งต่อไปนี้:
• คลิกขวาที่ไอคอนบลูทูธบนถาดระบบ และเลือก Add a device (เพิ่มอุปกรณ์)
®
• Windows
XP SP3: คลิกไอคอน Start (เริ่ม) > Control Panel (แผงควบคุม) > Bluetooth Devices
(อุปกรณ์บลูทูธ) > Add (เพิ่ม)
®
• Windows
7: คลิกไอคอน Start (เริ่ม) > Control Panel (แผงควบคุม) > Hardware and Sound
(ฮาร์ดแวร์และเสียง) > Add a Bluetooth device (เพิ่มอุปกรณ์บลูทูธ)
®
• Windows
8: 1. คลิก + I จากนั้นคลิก Change PC settings (เปลี่ยนแปลงการตั้งค่า PC)
คลิก Devices (อุปกรณ์) > Add a device (เพิ่มอุปกรณ์)
2. คลิก + W, พิมพ์ “bluetooth” ในกล่องค้นหา และคลิก
Add Bluetooth device (เพิ่มอุปกรณ์บลูทูธ)

USB-BT400
Bluetooth 4.0 USB Donanım Anahtarı
© Tüm hakları saklıdır.
Tüm ticari adlar listelenen üreticilerin tescilli ticari markalarıdır.
Bluetooth adı ve Bluetooth ticari markaları Bluetooth SIG, Inc.’e aittir.
Başlamadan önce
NOT: Bilgisayarınızda önceden yüklü olan Bluetooth yazılımı varsa bu yazılımı kaldırın.
®
1. Windows
XP SP3: Start (Başlat) > Control Panel (Denetim Masası) > Add or Remove Programs
(Program Ekle veya Kaldır).
®
Windows
7: Start (Başlat) > Control Panel (Denetim Masası) > Programs (Programlar) >
Programs and Features (Programlar ve Özellikler) > Uninstall a program (Bir
programı kaldır).
®
Windows
8: + I > Control Panel (Denetim Masası) > Programs (Programlar) > Programs and
Features (Programlar ve Özellikler) > Uninstall a program (Bir programı kaldır).
2. Uygulamalar listesindeki herhangi bir Bluetooth yazılımını kaldırın.
Bluetooth sürücüyü yükleme
1. Destek CD’sini bilgisayarınızın optik sürücüsüne yerleştirin. Eğer CD otomatik çalışmazsa, destek CD’sinin
içeriğine göz atın ve Autorun.exe dosyasına iki kez tıklayın.
2. Bluetooth Yazılımı kurulum ekranında, Agree and Install Bluetooth Software (Kabul et ve Bluetooth
Yazılımını Kur) üzerine tıklayın.
3. Ekranda verilen talimatları izleyin ve Bluetooth 4.0 USB Donanım anahtarını uyarı verildiğinde takın.
4. Kurulum süreci tamamlandığında, Finish (Bitir) üzerine tıklayın. Kurulumu tamamlamak için sistemi yeniden
başlatın.
®

Bluetooth 4.0 USB Donanım Anahtarını Kullanma
1. Bluetooth 4.0 USB Donanım anahtarını bilgisayarınızın USB girişine takın.
2. Bluetooth aygıtlarını eşleştirmeye başlamak için, aşağıdakilerden birini yerine getirin:
• Sistem Tepsisinde Bluetooth simgesine sağ tıklayın ve Add a device (Bir aygıt seç) üzerine tıklayın.
®
• Windows
XP SP3: Start (Başlat) > Control Panel (Denetim Masası) > Bluetooth Devices
(Bluetooth Aygıtları) > Add (Ekle)
®
• Windows
7: Start (Başlat) > Control Panel (Denetim Masası) > Hardware and Sound
(Donanım ve Ses) > Add a Bluetooth device (Bir Bluetooth aygıtı ekle)
®
• Windows
8: 1. + I üzerine tıklayın ve ardından Change PC settings (PC ayarlarını değiştir)
üzerine tıklayın. Devices (Aygıtlar) > Add a device (Bir aygıt ekle) üzerine
tıklayın
2. + W, üzerine tıklayın, arama kutusuna “bluetooth” girin ve Add Bluetooth
device (Bluetooth aygıtı ekle) üzerine tıklayın

USB-BT400
Заглушка Bluetooth 4.0 USB
© Всі права застережені.
Всі торгівельні марки є зареєстрованими торгівельними марками відповідних згаданих виробників.
Назва Bluetooth та торгівельні марки Bluetooth є власністю Bluetooth SIG, Inc.
Перш ніж почати
ПРИМІТКА: Видаліть будь-яке попередньо інстальоване на комп’ютері ПЗ Bluetooth.
®
1. Windows
XP SP3: Клацніть по піктограмі Start (Старт) > Control Panel (Контрольна панель) > Add or
Remove
Programs (Додати або видалити програми).
®
Windows
7: Клацніть по піктограмі Start (Старт) > Control Panel (Контрольна панель) > Programs
(Програми) > Programs and Features (Програми та особливі характеристики)>
Uninstall a program (Деінсталювати програму).
®
Windows
8: Клацніть по піктограмі + I > Control Panel > Programs > Programs and Features >
Uninstall a program.
2. Видаліть будь-яке ПЗ Bluetooth зі списку задач.
Інсталяція драйвера Bluetooth
1. Вставте CD підтримки до оптичного дисководу на комп’ютері. Якщо CD не запускається автоматично, перегляньте
зміст підтримки CD і двічі клацніть по файлу Autorun.exe.
2. На екрані інсталяції ПЗ Bluetooth клацніть по Agree and Install Bluetooth Software (Погоджуюся та інсталюю ПЗ
Bluetooth).
3. Виконуйте інструкції на екрані та вставте заглушку Bluetooth 4.0 USB, коли буде підказано.
4. Коли завершиться процес налаштування, клацніть Finish (Завершити). Перезавантажте систему, щоб завершити
інсталяцію.
®

Користування заглушкою Bluetooth 4.0 USB
1. Вставте заглушку Bluetooth 4.0 USB до порту USB на комп’ютері.
2. Щоб почати поєднання в пару пристроїв Bluetooth, зробіть одне з наступних:
• Правою кнопкою клацніть по піктограмі Bluetooth на системному лотку і виберіть Add a device (Додати
пристрій).
®
• Windows
XP SP3: Клацніть по піктограмі Start (Старт) > Control Panel (Контрольна панель) >
Bluetooth Devices (Пристрої Bluetooth) > Add (Додати)
®
• Windows
7: Клацніть по піктограмі Start (Старт) > Control Panel (Контрольна панель) >
Hardware and Sound (Мікропрограма і звук) > Add a Bluetooth device (Додати
пристрій Bluetooth)
®
• Windows
8: 1. Клацніть + I , а потім - Change PC settings (Змінити налаштування ПК).
Клацніть Devices (Пристрої) > Add a device (Додати пристрій)
2. Клацніть + W, наберіть у вікні пошуку “bluetooth” і клацніть по Add Bluetooth
device (Додати пристрій Bluetooth)

Federal Communications Commission Statement
This device complies with Part 15 of the FCC Rules. Operation is subject to the following two conditions:
• This device may not cause harmful interference.
• This device must accept any interference received, including interference that may cause undesired operation.
This equipment has been tested and found to comply with the limits for a class B digital device, pursuant to Part
15 of the FCC Rules. These limits are designed to provide reasonable protection against harmful interference in a
residential installation.
This equipment generates, uses and can radiate radio frequency energy and, if not installed and used in accordance
with the instructions, may cause harmful interference to radio communications. However, there is no guarantee that
interference will not occur in a particular installation. If this equipment does cause harmful interference to radio or
television reception, which can be determined by turning the equipment off and on, the user is encouraged to try to
correct the interference by one or more of the following measures:
• Reorient or relocate the receiving antenna.
• Increase the separation between the equipment and receiver.
• Connect the equipment into an outlet on a circuit different from that to which the receiver is connected.
• Consult the dealer or an experienced radio/TV technician for help.
CAUTION:
Any changes or modications not expressly approved by the party responsible for
compliance could void the user’s authority to operate the equipment.
Prohibition of Co-location
This device and its antenna(s) must not be co-located or operating in conjunction with any other antenna or transmitter.
FCC Radiation Exposure Statement
This equipment complies with FCC radiation exposure limits set forth for an uncontrolled environment. This euipment
shhould be installed and operated with minimum distance 20cm between the radiator and your body.
CE Mark Warning

This is a Class B product, in a domestic environment, this product may cause radio interference, in which case the
user may be required to take adequate measures.
NCC Warning Statement
Article 12
Without permission, any company, rm or user shall not alter the frequency, increase the power, or change the
characteristic and functions of the original design of the certied lower power frequency electric machinery.
Article 14
The application of lower power frequency electric machineries shall not affect the navigation safety nor interfere a
legal communication, if an interference is found, the service will be suspended until improvement is made and the
interference no longer exists.
低功率電波輻射性電機管理辦法
(1)「經型式認證合格之低功率射頻電機,非經許可,公司、商號或使用者均不得擅自變更頻率、加大功率或變更原設計
之特性及功能」以及(2)「低功率射頻電機之使用不得影響飛航安全及干擾合法通信;經發現有干擾現象時,應立即停
用,並改善至無干擾時方得繼續使用。前項合法通信,指依電信法規定作業之無線電通信。低功率射頻電機須忍受合法
通信或工業、科學及醫療用電波輻射性電機設備之干擾」。
IC Warning Statement
Under Industry Canada regulations, this radio transmitter may only operate using an antenna of a type and maximum
(or lesser) gain approved for the transmitter by Industry Canada. To reduce potential radio interference to other users,
the antenna type and its gain should be so chosen that the equivalent isotropically radiated power (e.i.r.p.) is not more
than that necessary for successful communication.
This radio transmitter(IC: 3568A-USBBT400) has been approved by Industry Canada to operate with the antenna
types listed below with the maximum permissible gain and required antenna impedance for each antenna type
indicated. Antenna types not included in this list, having a gain greater than the maximum gain indicated for that type,

are strictly prohibited for use with this device.
This Class [B] digital apparatus complies with Canadian ICES-003.
Cet appareil numérique de la classe [B] est conforme à la norme NMB-003 du Canada.
IC Radiation Exposure Statement:
This equipment complies with IC RSS-102 radiation exposure limits set forth for an uncontrolled environment. This
equipment should be installed and operated with minimum distance 20cm between the radiator & your body.
Operation is subject to the following two conditions: (1) this device may not cause interference, and (2) this device must
accept any interference, including interference that may cause undesired operation of the device.
REACH
Complying with the REACH (Registration, Evaluation, Authorisation, and Restriction of Chemicals) regulatory
framework, we published the chemical substances in our products at ASUS REACH website at http://csr.asus.
com/english/REACH.htm.
Manufacturer
ASUSTeK Computer Inc.
Tel: +886-2-2894-3447
Address: No. 150, LI-TE RD., PEITOU, TAIPEI 112, TAIWAN
Authorised representative in Europe
ASUS Computer GmbH
Address: HARKORT STR. 21-23, D-40880 RATINGEN, DEUTSCHLAND
Authorised distributors in Turkey
BOGAZICI BIL GISAYAR SAN. VE TIC. A.S.
Tel: +90 212 3311000
Address: AYAZAGA MAH. KEMERBURGAZ CAD. NO.10 AYAZAGA/ISTANBUL
CIZGI Elektronik San. Tic. Ltd. Sti.
Tel: +90 212 3567070
Address: CEMAL SURURI CD. HALIM MERIC IS MERKEZI
No: 15/C D:5-6 34394 MECIDIYEKOY/ISTANBUL
EEE Yönetmeliğine Uygundur.
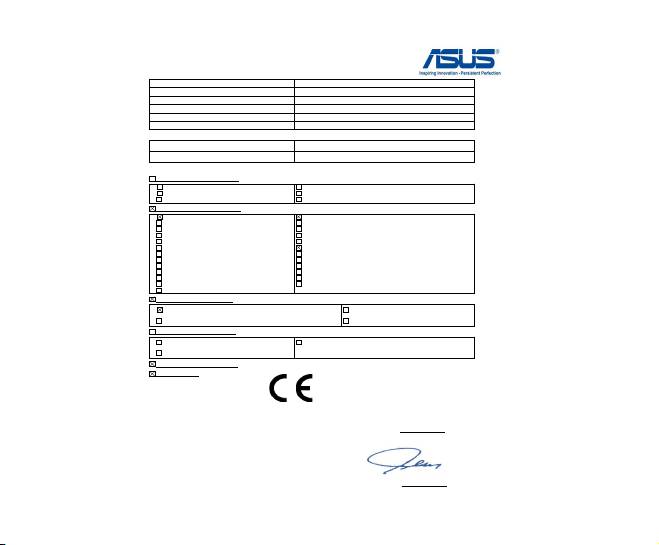
EC Declaration of Conformity
We, the undersigned,
Manufacturer:
ASUSTeK COMPUTER INC.
Address, City:
4F, No. 150, LI-TE Rd., PEITOU, TAIPEI 112, TAIWAN
Country:
TAIWAN
Authorized representative in Europe:
ASUS COMPUTER GmbH
Address, City:
HARKORT STR. 21-23, 40880 RATINGEN
Country:
GERMANY
declare the following apparatus:
Product name : Bluetooth 4.0 USB Dongle
Model name : USB-BT400
conform with the essential requirements of the following directives:
2004/108/EC-EMC Directive
EN 55022:2010
EN 55024:2010
EN 61000-3-2:2006+A2:2009
EN 61000-3-3:2008
EN 55013:2001+A1:2003+A2:2006
EN 55020:2007+A11:2011
1999/5/EC-R &TTE Directive
EN 300 328 V1.7.1(2006-10)
EN 301 489-1 V1.9.2(2011-09)
EN 300 440-1 V1.6.1(2010-08)
EN 301 489-3 V1.4.1(2002-08)
EN 300 440-2 V1.4.1(2010-08)
EN 301 489-4 V1.4.1(2009-05)
EN 301 511 V9.0.2(2003-03)
EN 301 489-7 V1.3.1(2005-11)
EN 301 908-1 V5.2.1(2011-05)
EN 301 489-9 V1.4.1(2007-11)
EN 301 908-2 V5.2.1(2011-07)
EN 301 489-17 V2.1.1(2009-05)
EN 301 893 V1.6.1(2011-11)
EN 301 489-24 V1.5.1(2010-09)
EN 302 544-2 V1.1.1(2009-01)
EN 302 326-2 V1.2.2(2007-06)
EN 302 623 V1.1.1(2009-01)
EN 302 326-3 V1.3.1(2007-09)
EN 300 330-1 V1.7.1(2010-02)
EN 301 357-2 V1.4.1(2008-11)
EN 300 330-2 V1.5.1(2010-02)
EN 50385:2002
EN 50360:2001
EN 62311:2008
EN 62479:2010
2006/95/EC-LVD Directive
EN 60950-1 :2006+A1:2010+A11:2009+A12:2011
EN 60065:2002 / A2:2010
EN 60950-1 / A12:2011
EN 60065:2002 / A12:2011
2009/125/EC-ErP Directive
Regulation (EC) No. 1275/2008
Regulation (EC) No. 278/2009
Regulation (EC) No. 642/2009
2011/65/EU-RoHS Directive
Ver. 121001
CE marking
(EC conformity marking)
Position : CEO
Name : Jerry Shen
Declaration Date: Nov. 16, 2012
Year to begin affixing CE marking:2012
Signature :
__________
