Asus BM6835 – page 4
Manual for Asus BM6835
Table of contents
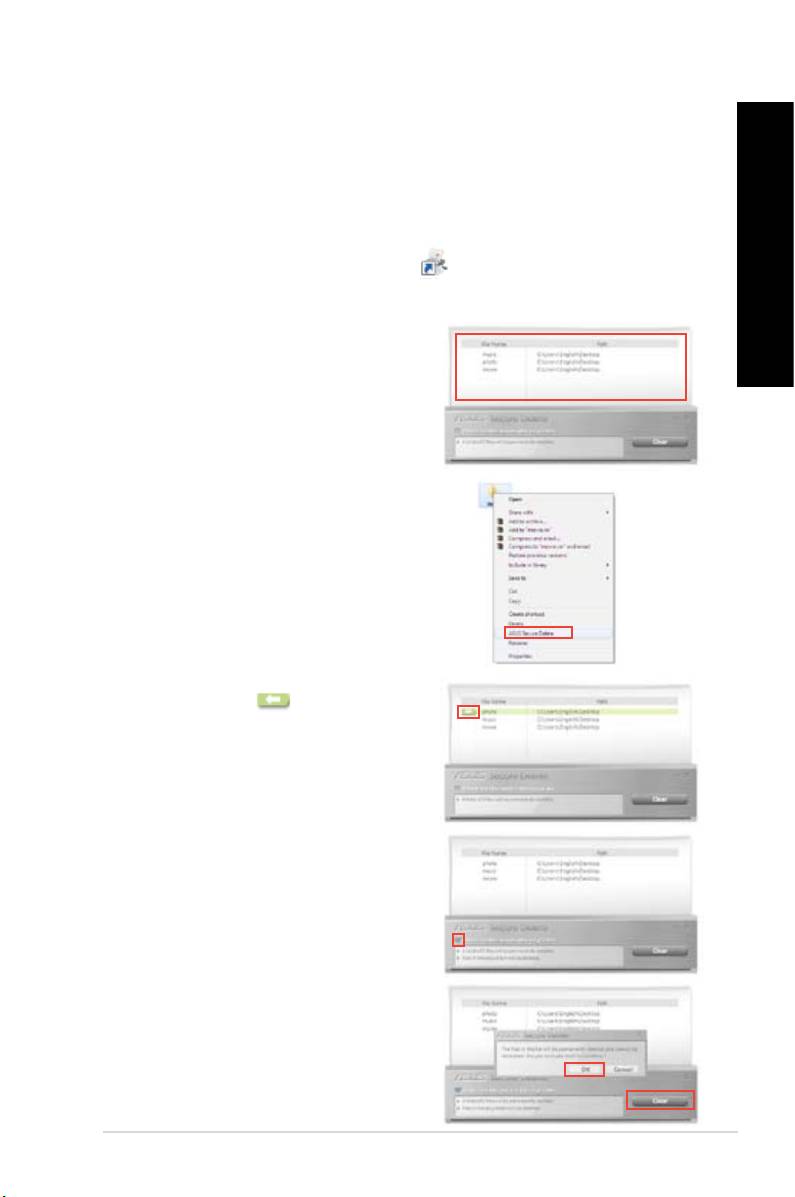
ASUS Secure Delete makes deleted les completely irrecoverable via a simple drag-and-
drop interface, thus protecting your data security.
1. Do either of the following to launch ASUS Secure Delete:
®
• Click the ASUS Secure Delete shortcut on the Windows
desktop,
• Click > > ASUS > .
2. Do any of the following to add les to the
deletion box:
• Drag and drop the les to the deletion
box.
• Right-click the le then select ASUS
Secure Delete.
3. To remove a le from the deletion list, select
the le, then click .
4. Tick
bin if you want to permanently delete all the
les in the recycle bin.
5. Click , and then click on the
conrmation message to permanently delete
all the les listed in the deletion box and the
recycle bin (if selected in step 3).
ENGLISH
ENGLISH
ENGLISH
ENGLISH
ASUS BM6635(MD560), BM6835, and BP6335(SD560) 59

ENGLISH
ASUS Business Suite is a collection of applications that help you obtain maximum
®
performance of your business PC. It integrates the following Intel
and ASUS utilities:
• ASUS EPU
•
•
ENGLISH
•
®
•
®
Intel
SBA is a combination of hardware and software features that provides unique
security and productivity capabilities designed for small businesses.
Before installing ASUS Business Suite, you have to enable the Wake On LAN (WOL)
feature. To enable WOL, enter the BIOS Setup. From the screen, click
> APM, and then set the item to .
Place the support DVD in the optical drive. Double-click the setup.exe le from the ASUS
Business Suite folder in the Software folder in the support DVD.
®
ASUS Business Suite automatically starts when you enter the Windows
®
operating system. The ASUS Business Suite icon appears in the Windows
notication area. Double-click the icon to launch ASUS Business Suite.
The screenshots of ASUS Business Suite in this user manual are for reference only. The
actual screenshots vary with models.
®
60 Chapter 6: Using the utilities
ENGLISH
ENGLISH
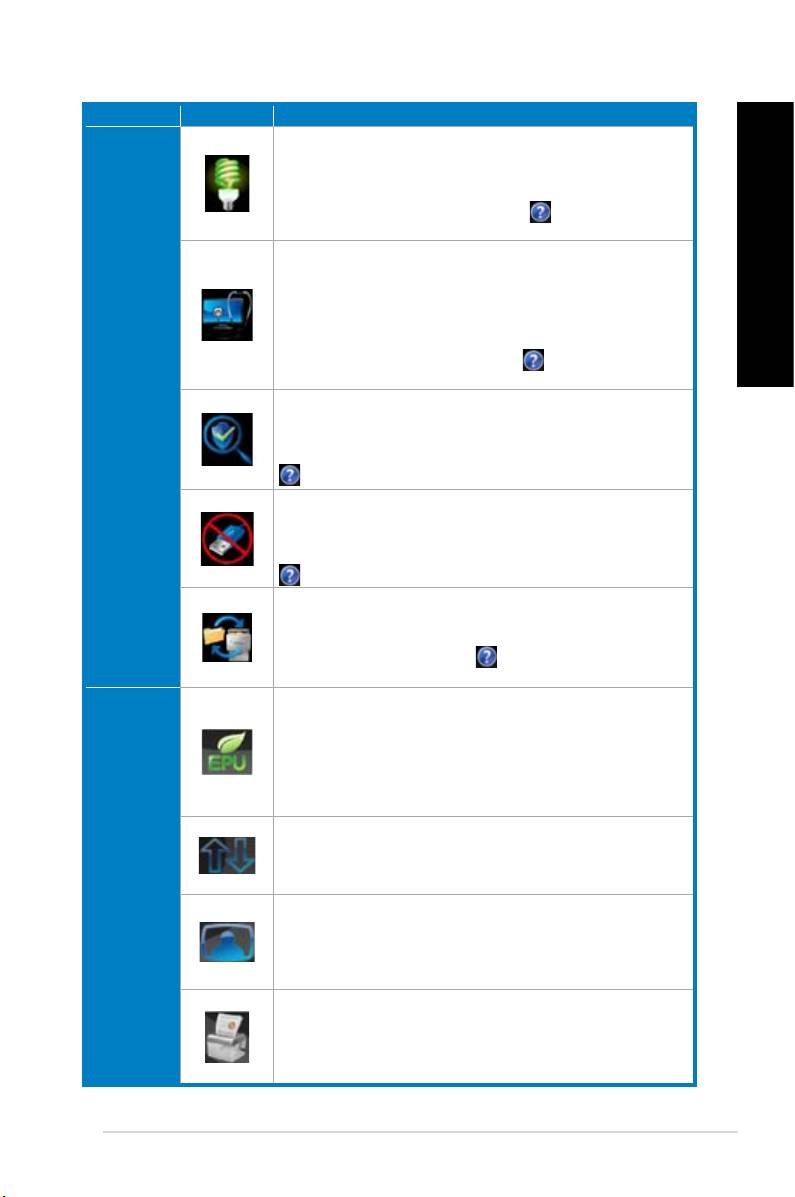
Energy Saver allows you to schedule your computer to enter the sleep
state at the end of your workday and wake up at the start of your
workday. This helps greatly reduce energy costs and improve productivity
of your business. For more information, click on the ASUS Business
Suite main menu.
PC Health Center lets you quickly and easily schedule all maintenance
tasks such as data backup, system updates, and disk defragmentation
to run outside business hours even if your computer has been shut
down, as long as your computer is plugged to a power source. With PC
Health Center, your computer always run at its best performance during
business hours. For more information, click on the ASUS Business
Suite main menu.
®
SBA
Software Monitor provides a hardware-level monitoring of security-related
applications that are installed on your computer and alerts you when a
monitored application is disabled or attacked. For more information, click
on the ASUS Business Suite main menu.
USB Blocker lets you quickly and easily specify the type of USB
devices that can connect to your computer so as to prevent viruses and
unauthorized data transfers on your computer. For more information, click
on the ASUS Business Suite main menu.
Data Backup and Restore automatically backs up your data even when
your computer is powered off, as long as it is plugged in to a power
source. For more information, click on the ASUS Business Suite
main menu.
ASUS EPU
EPU (Energy Processing Unit), the world’s rst real-time system
power-saving chip, automatically detects the current system load and
intelligently moderates power usage. It offers a total system-wide energy
optimization, reduces fan noise, and extends the component’s lifespan.
Refer to the ASUS Ai Suite II section of this chapter for the detailed
conguration of this utility.
Allows you to manage, save, and update the motherboard BIOS in
®
Windows
OS. Refer to the ASUS Ai Suite II section of this chapter for
the detailed conguration of this utility.
This feature allows you to convert your favorite photo into a 256-color
boot logo for a more colorful and vivid image on your screen. Refer to the
ASUS Ai Suite II section of this chapter for the detailed conguration of
this utility.
ASUS Secure Delete makes deleted les completely irrecoverable via
a simple drag-and-drop interface, thus protecting your data security.
Refer to the ASUS Secure Delete section of this chapter for the detailed
conguration of this utility.
ENGLISH
ENGLISH
ENGLISH
ENGLISH
ASUS BM6635(MD560), BM6835, and BP6335(SD560) 61

ENGLISH
Nero 9 allows you to create, copy, burn, edit, share, and update different kinds of data.
1. Insert the Nero 9 DVD into your optical drive.
2. If Autorun is enabled, the main menu appears automatically.
ENGLISH
If Autorun is disabled, double-click the le from the main directory of your Nero
9 DVD.
3. From the main menu, click .
4. Select the language you want to use for Installation Wizard. Click .
5. Click to continue.
6. Tick . When done, click .
7. Select then click .
8. Tick then click
.
9. When done, click .
1. From the main menu, click > Add.
2. Select the les that you want to burn. When done, click Add.
3. After selecting les that you want to burn, click Burn to burn the les to a disc.
For more details about using Nero 9, refer to the Nero website at www.nero.com
62 Chapter 6: Using the utilities
ENGLISH
ENGLISH

The system recovery partition quickly restores your Desktop PC’s software to its original
working state. Before using the system recovery partition, copy your data les (such as
Outlook PST les) to USB storage devices or to a network drive and make note of any
customized conguration settings (such as network settings).
The system recovery partition is a reserved space on your hard disk drive used to restore the
operating system, drivers, and utilities installed on your Desktop PC at the factory.
DO NOT delete the system recovery partition, which is the partition without volume label
on Disk 0. The system recovery partition is created at the factory and cannot be restored if
deleted. Take your Desktop PC to an authorized ASUS service center if you have problems
with the recovery process.
1. Press <F9> during bootup.
2. Highlight Windows Setup [EMS Enabled] and press .
3. From the Recover system to a partition screen, click .
4. Follow the onscreen instructions to complete the recovery process.
Visit the ASUS website at www.asus.com for updated drivers and utilities.
ENGLISH
ENGLISH
ENGLISH
ENGLISH
ASUS BM6635(MD560), BM6835, and BP6335(SD560) 63
ENGLISH
Remove the external hard disk drive before performing system recovery on your Desktop
PC. According to Microsoft, you may lose important data because of setting up Windows on
the wrong disk drive or formatting the incorrect drive partition.
ENGLISH
1. Insert the Recovery DVD into the optical drive. Your Desktop PC needs to be powered
ON.
2. Restart the Desktop PC and press <F8> on bootup and select the optical drive (may be
labeled as “CD/DVD”) and press <> to boot from the Recovery DVD.
3. Select OK to start to restore the image.
4. Select OK to conrm the system recovery.
Restoring will overwrite your hard drive. Ensure to back up all your important data before
the system recovery.
5. Follow the onscreen instructions to complete the recovery process.
DO NOT remove the Recovery disc, unless instructed to do so, during the recovery process
or else your partitions will be unusable.
Visit the ASUS website at www.asus.com for updated drivers and utilities.
64 Chapter 6: Using the utilities

ENGLISH
ENGLISH
This chapter presents some problems you might encounter and the possible solutions.
?
• Check if your computer is properly connected.
• Check if the wall outlet is functioning.
• Check if the Power Supply Unit is switched on. Refer to the section Turning
in Chapter 1.
?
• Do the following to close the programs that are not responding:
1. Simultaneously press <Alt> + <Ctrl> + <Delete> keys on the keyboard,
then click .
2. Click tab.
3. Select the program that is not responding, then click .
• If the keyboard is not responding. Press and hold the Power button on the top
of your chassis until the computer shuts down. Then press the Power button
to turn it on.
?
• Ensure that you enter the correct network security key for the wireless network
you want to connect to.
• Connect the external antennas (optional) to the antenna connectors on the
ASUS WLAN Card and place the antennas on the top of your computer
chassis for the best wireless performance.
?
Check if the Number Lock LED is off. When the Number Lock LED is on,
the keys on the number key pad are used to input numbers only. Press the
Number Lock key to turn the LED off if you want to use the arrow keys on the
number key pad.
ASUS BM6635(MD560), BM6835, and BP6335(SD560) 65

ENGLISH
ENGLISH
66 Chapter 7: Troubleshooting
ENGLISH
ENGLISH
?
• Check if the monitor is powered on.
• Ensure that your monitor is properly connected to the video output port on
your computer.
• If your computer comes with a discrete graphics card, ensure that you connect
your monitor to a video output port on the discrete graphics card.
• Check if any of the pins on the monitor video connector is bent. If you discover
bent pins, replace the monitor video connector cable.
• Check if your monitor is plugged to a power source properly.
• Refer to the documentation that came with your monitor for more
troubleshooting information.
?
• Ensure that the both monitors are powered on.
• During POST, only the monitor connected to the VGA port has display. The
dual display function works only under Windows.
• When a graphics card is installed on your computer, ensure that you connect
the monitors to the output port on the graphics card.
• Check if the multiple displays settings are correct. Refer to section
in Chapter 3 for details.
?
• The rst time you connect your USB storage device to your computer,
Windows automatically installs a driver for it. Wait for a while and go to My
Computer to check if the USB storage device is detected.
• Connect your USB storage device to another computer to test if the USB
storage device is broken or malfunctions.
?
®
The Windows
System Restore feature allows you to restore or undo changes
to your computer’s system settings without affecting your personal data such
as documents or photos. For more details, refer to the section
in Chapter 2.
ENGLISH
ENGLISH
?
ENGLISH
• It is caused by the different resolutions of your monitor and your HDTV. Adjust
the screen resolution to t your HDTV. To change the screen resolution:
1. Do any of the following to open the setting screen:
• Click > > >
> .
• Right click anywhere on your Windows desktop. When the pop-up
ENGLISH
menu appears, click > >
.
2. Adjust the resolution. Refer to the documentation came with your HDTV
for the resolution.
3. Click or . Then click on the conrmation
message.
?
• Ensure that you connect your speakers to the Line out port (lime) on the front
panel or the rear panel.
• Check if your speak is connected to a electrical source and turned on.
• Adjust your speakers’ volume.
• Ensure that your computer’s system sounds are not Muted.
• If it is muted, the volume icon is displayed as . To enable the system
sounds, click from the Windows notication area, then click .
• If it is not muted, click and drag the slider to adjust the volume.
• Connect your speakers to another computer to test if the speakers arer
working properly.
?
• Check if the disc is placed with the label side facing up.
• Check if the disc is centered in the tray, especially for the discs with
non-standard size or shape.
• Check if the disc is scratched or damaged.
?
1. Click > .
2. Right-click , then click from the menu.
ASUS BM6635(MD560), BM6835, and BP6335(SD560) 67
ENGLISH
ENGLISH
68 Chapter 7: Troubleshooting
ENGLISH
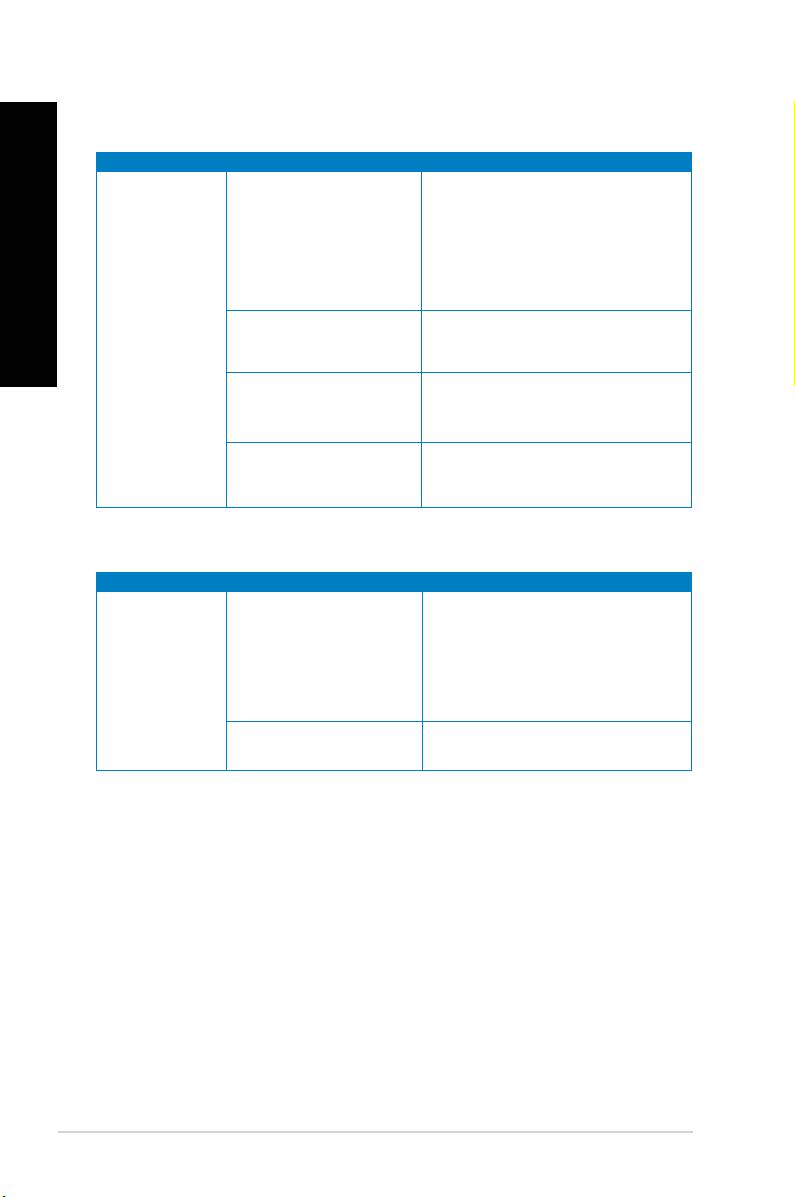
ENGLISH
• Set your computer’s power voltage
switch to your area’s power
requirements.
Incorrect power voltage
• Adjust the voltage settings. Ensure
that the power cord is unplugged
from the power outlet.
No power
Press the power key on the front panel
(The power
Your computer is not
to ensure that your computer is turned
indicator is off)
turned on.
on.
Your computer’s power
• Ensure that the power cord is
cord is not properly
properly connected.
connected.
• Use other compatible power cord.
PSU (Power supply unit)
Try installing another PSU on your
problems
computer.
• Connect the signal cable to the
The signal cable is
correct display port (onboard VGA or
No display
not connected to the
discrete VGA port).
output after
correct VGA port on your
• If you are using a discrete VGA
turning the
computer.
card, connect the signal cable to the
computer on
discrete VGA port.
(Black screen)
Signal cable problems Try connecting to another monitor.
ENGLISH
ENGLISH
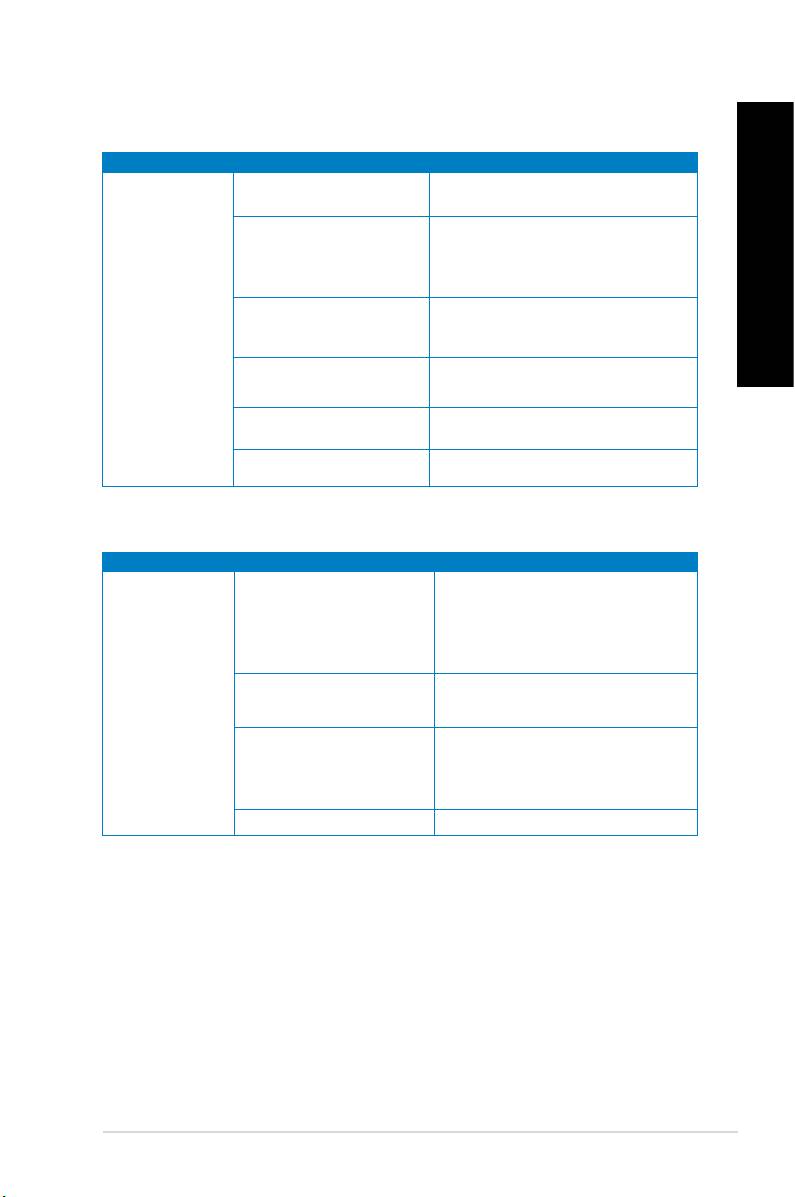
LAN
ENGLISH
The LAN cable is not
Connect the LAN cable to your
connected.
computer.
Ensure the LAN LED is on. If not,
try another LAN cable. If it still does
LAN cable problems
not work, contact the ASUS service
ENGLISH
center.
Your computer is not
Cannot access
Ensure that your computer is properly
properly connected to a
the Internet
connected to a router or hub.
router or hub.
Contact your Internet Service Provider
Network settings
(ISP) for the correct LAN settings.
Problems caused by the
Close the anti-virus software.
anti-virus software
Driver problems Reinstall the LAN driver
Audio
• Refer to your computer’s user
Speaker or headphone is
manual for the correct port.
connected to the wrong
• Disconnect and reconnect the
port.
speaker to your computer.
Speaker or headphone
Try using another speaker or
No Audio
does not work.
headphone.
Try both the front and back audio
The front and back audio
ports. If one port failed, check if the
ports do not work.
port is set to multi-channel.
Driver problems Reinstall the audio driver
ASUS BM6635(MD560), BM6835, and BP6335(SD560) 69
ENGLISH
ENGLISH
70 Chapter 7: Troubleshooting
ENGLISH
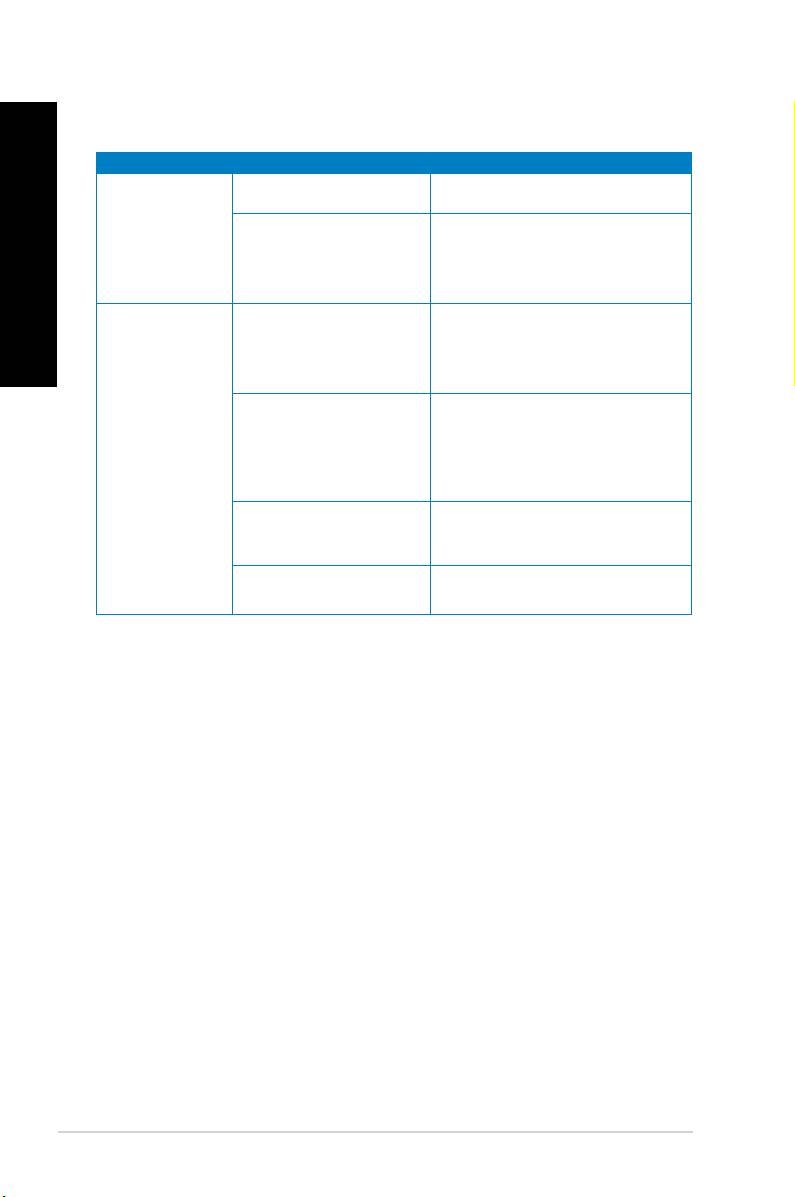
ENGLISH
Too many programs are
Close some of the programs.
running.
System speed is
• Use an anti-virus software to
too slow
scan for viruses and repair your
Computer virus attack
computer.
• Reinstall the operating system.
• Send the damaged hard disk
drive to ASUS Service Center for
Hard disk drive failure
servicing.
• Replace with a new hard disk drive.
• Replace with compatible memory
modules.
The system often
Memory module problems
• Remove the extra memory
hangs or freezes.
modules that you have installed,
then try again.
There is not enough
Move your computer to an area with
air ventilation for your
better air ow.
computer.
Incompatible softwares are
Reinstall the OS and reinstall
installed.
compatible softwares.
ENGLISH
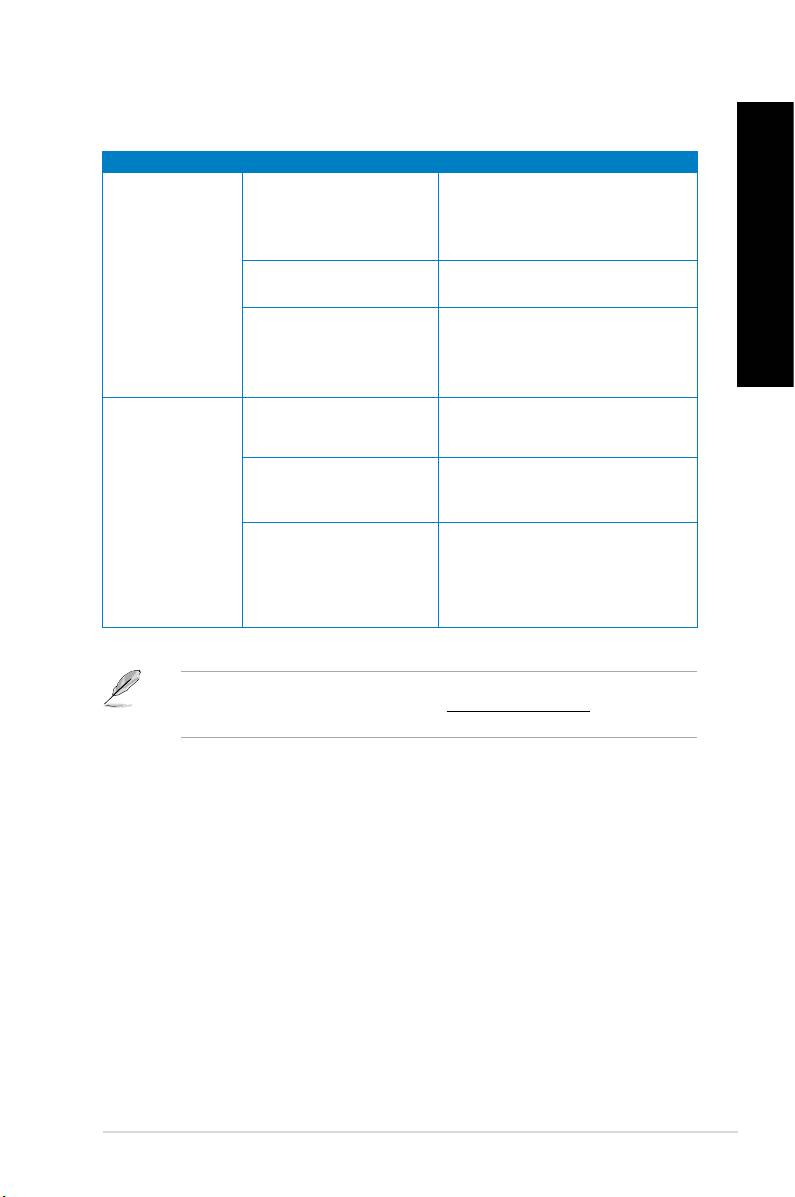
ENGLISH
ENGLISH
It is normal. The fan runs on its
Your computer is booting
full speed when the computer is
up.
powering on. The fan slows down
after entering the OS.
Too noisy right
ENGLISH
The BIOS settings have
Restore the BIOS to its default
after turning on
been changed.
settings.
the computer.
Update the BIOS to the latest
version. Visit the ASUS Support
Old BIOS version
site at to
download the latest BIOS versions.
Ensure that you are using a
The CPU fan has been
compatible or ASUS-recommended
replaced.
CPU fan.
There is not enough
Ensure that your computer is
air ventilation for the
Computer is too
working in an area with good air ow.
computer.
noisy when in use.
• Update the BIOS.
The system temperature is
• If you know how to reinstall the
too high.
motherboard, try to clean the inner
space of the chassis.
If the problem still persists, refer to your Desktop PC’s warranty card and contact the ASUS
Service Center. Visit the ASUS Support site at for the service
center information.
ASUS BM6635(MD560), BM6835, and BP6335(SD560) 71

Address 15 Li-Te Road, Peitou, Taipei, Taiwan 11259
Telephone +886-2-2894-3447
Fax +886-2-2890-7798
E-mail info@asus.com.tw
Web site www.asus.com.tw
Telephone +86-21-38429911
Online support support.asus.com
Address 800 Corporate Way, Fremont, CA 94539, USA
Telephone +1-510-739-3777
Fax +1-510-608-4555
Web site usa.asus.com
Telephone +1-812-282-2787
Support fax +1-812-284-0883
Online support support.asus.com
Address Harkort Str. 21-23, D-40880 Ratingen, Germany
Fax +49-2102-959911
Web site www.asus.de
Online contact www.asus.de/sales
Telephone (Component) +49-1805-010923*
Telephone (System/Notebook/Eee/LCD) +49-1805-010920*
Support Fax +49-2102-9599-11
Online support support.asus.com
ASUSTeK Computer Inc.
No.150, LI-TE RD., PEITOU, TAIPEI 112,
TAIWAN
ASUS Computer GmbH
HARKORT STR. 21-23, 40880 RATINGEN,
GERMANY
ASUS ПК
BM6635(MD560)
BM6835
BP6335(SD560)
BM6635(MD560)
BM6835
BP6335(SD560)
Руководство пользователя

R7286
Русский
Первое издание
Май 2012
Русский
Copyright © 2012 ASUSTeK Computer Inc. Все права защищены.
Любая часть этого руководства, включая оборудование и программное обеспечение, описанные в нем, не может
быть дублирована, передана, преобразована, сохранена в системе поиска или переведена на другой язык в любой
форме или любыми средствами, кроме документации, хранящейся покупателем с целью резервирования, без
специального письменного разрешения ASUSTeK COMPUTER INC. (“ASUS”).
Гарантия прекращается если: (1)изделие отремонтировано, модифицировано или изменено без письменного
разрешения ASUS; (2)серийный номер изделия поврежден, неразборчив либо отсутствует.
ASUS предоставляет данное руководство "как есть" без гарантии любого типа, явно выраженной или
подразумеваемой, включая неявные гарантии или условия получения коммерческой выгоды или пригодности для
конкретной цели, но не ограничиваясь этими гарантиями и условиями. Ни при каких обстоятельствах компания
ASUS, ее директора, должностные лица, служащие или агенты не несут ответственности за любые косвенные,
специальные, случайные или являющиеся следствием чего-либо убытки (включая убытки из-за потери прибыли,
потери бизнеса, потери данных, приостановки бизнеса и т.п.), даже если ASUS сообщила о возможности таких
убытков, возникающих из- за любой недоработки или ошибки в данном руководстве или продукте.
Технические характеристики и сведения, содержащиеся в данном руководстве, представлены только для
информативного использования, и могут быть изменены в любое время без уведомления, и не должны быть
истолкованы как обязательства ASUS. ASUS не берет на себя никакой ответственности или обязательств за
любые ошибки или неточности в данном руководстве, включая изделия или программное обеспечение, описанные
в нем.
Продукты и названия корпораций, имеющиеся в этом руководстве могут являться зарегистрированными торговыми
знаками или авторскими правами соответствующих компаний и используются только в целях идентификации.
74
Русский
Русский

Содержание
Уведомления .......................................................................................................................77
Информация о правилах безопасности .........................................................................79
Значки, используемые в руководстве ...........................................................................80
Где найти больше информации .......................................................................................80
Комплект поставки ............................................................................................................81
Глава 1 Начало работы
Добро пожаловать! ............................................................................................................83
Знакомство с компьютером .............................................................................................83
Подготовка компьютера к работе...................................................................................93
Включение/отключение компьютера .............................................................................98
Глава 2 Использование Windows 7
Первое включение .............................................................................................................99
Использование рабочего стола Windows 7 .................................................................100
Управление файлами и папками....................................................................................102
Сброс к настройкам по умолчанию ..............................................................................104
Защита компьютера .........................................................................................................105
Получение справки и поддержки Windows .................................................................106
Глава 3 Подключение устройств к компьютеру
Подключение USB-накопителя ......................................................................................107
Подключение микрофона и колонок ............................................................................109
Глава 4 Использование компьютера
Правильная поза при использовании настольного компьютера ...........................113
Использование оптического привода (на некоторых моделях) .............................114
Конфигурация портов USB в BIOS ................................................................................115
Глава 5 Подключение к сети Интернет
Проводное подключение ................................................................................................117
75
Русский
Русский
Русский
Русский

Содержание
Русский
Глава 6 Использование утилит
ASUS AI Suite II...................................................................................................................121
ASUS WebStorage ..............................................................................................................128
ASUS Easy Update .............................................................................................................130
ASUS Secure Delete ...........................................................................................................131
Русский
ASUS Business Suite .........................................................................................................132
Nero 9 ...............................................................................................................................134
Восстановление системы ...............................................................................................135
Глава 7 Устранение неисправностей
Устранение неисправностей ..........................................................................................137
Контактная информация ASUS ......................................................................................144
76
Русский
Русский

Уведомления
Утилизация и переработка
Компания ASUS берет на себя обязательства по утилизации старого оборудования, исходя из
принципов всесторонней защиты окружающей среды. Мы предоставляем решения нашим клиентам
для переработки наших продуктов, аккумуляторов и других компонентов, а также упаковки. Для
получения подробной информации об утилизации и переработке в различных регионах посетите
http://csr.asus.com/english/Takeback.htm.
REACH
Согласно регламенту ЕС REACH (Registration, Evaluation, Authorization, and Restriction of
Chemicals – Регистрация, Оценка, Разрешения и Ограничения на использование Химических
веществ), на сайте ASUS REACH размещен список химических веществ содержащихся в
продуктах ASUS: http://csr.asus.com/english/REACH.htm
Удостоверение Федеральной комиссии по связи США
Данное устройство соответствует части 15 Правил FCC. Эксплуатация оборудования допустима
при соблюдении следующих условий:
• Данное устройство не должно создавать помех
• На работу устройства могут оказывать влияние внешние помехи, включая помехи,
вызывающие нежелательные режимы его работы.
Данное оборудование было протестировано и сочтено соответствующим ограничениям по
цифровым устройствам класса В в соответствии с частью 15 Правил FCC. Эти ограничения
рассчитаны на обеспечение защиты в разумных пределах от вредоносных воздействий при
установке в жилом помещении. Данное оборудование генерирует и излучает радиочастотную
энергию, которая может создавать помехи в радиосвязи, если устройство установлено или
используется не в соответствии с инструкциями производителя. Тем не менее, невозможно
гарантировать отсутствие помех в каждом конкретном случае. В случае, если данное оборудование
действительно вызывает помехи в радио или телевизионном приеме, что можно проверить,
включив и выключив данное оборудование, пользователю рекомендуется попытаться удалить
помехи следующими средствами:
• Переориентировать или переместить принимающую антенну.
• Увеличить расстояние между данным прибором и приемником.
• Подключить данное оборудование к розетке другой электроцепи, нежели та, к которой
подключен приемник.
• Проконсультироваться с продавцом или квалифицированным радио/ ТВ-техником.
Используйте экранированные кабели для подключения монитора к видеокарте - это гарантирует
совместимость с требованиями FCC. Изменения или дополнения к данному пункту, не
согласованные непосредственно со стороной, ответственной за соответствие правилам, могут
сделать недействительным право пользователя на пользование данным оборудованием.
77
Русский
Русский
Русский
Русский

Требования по воздействию радиочастоты
Русский
Это оборудование должно быть установлено и работать в соответствии с инструкциями, и антенны,
используемые с этим передатчиком должны быть установлены на расстоянии не менее 20 см от
людей и не должны быть расположены рядом с другими антеннами или передатчиками. Конечные
пользователи должны следовать инструкциям по эксплуатации для уменьшения воздействия
радиочастотной энергии.
Удостоверение Департамента по средствам связи Канады
Русский
Данное цифровое устройство не превышает ограничения класса В по выделению радиошума от
цифровых устройств, установленных в правилах по радиопомехам департамента по средствам
связи Канады.
Данное цифровое устройство класса В соответствует стандарту ICES-003.
Информация об изделии корпорации Macrovision
Данное изделие включает в себя технологию защиты авторских прав, защищенную патентами
США, и иные права интеллектуальной собственности, принадлежащие корпорации Macrovision
и другим лицам. Использование данной технологии защиты авторских прав возможно только с
согласия корпорации Macrovision и предусмотрено только для домашнего и иного ограниченного
использования, если иное не предписано корпорацией Macrovision. Инженерный анализ и
разборка запрещены.
Внимание, литиево-ионный аккумулятор
ВНИМАНИЕ: При замене аккумулятора на аккумулятор другого типа возможен взрыв..
Заменяйте аккумулятор только на аккумулятор такого же типа или аналогичный,
рекомендованный производителем. Утилизируйте использованные аккумляторы в
соответвии с инструкциями производителя.
78
Русский
Русский
