Asus BM6835 – page 3
Manual for Asus BM6835
Table of contents
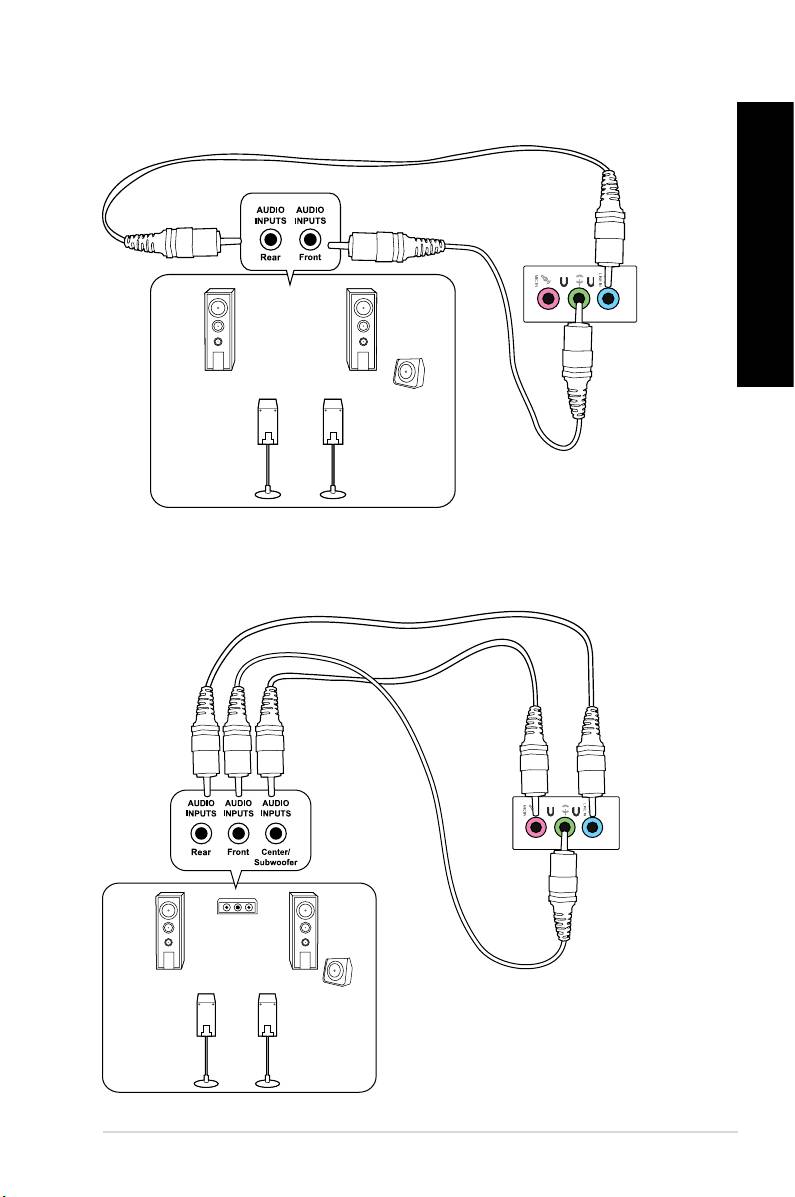
LINE OUT
LINE OUT
ENGLISH
ENGLISH
ENGLISH
ENGLISH
ASUS BM6635(MD560), BM6835, and BP6335(SD560) 39
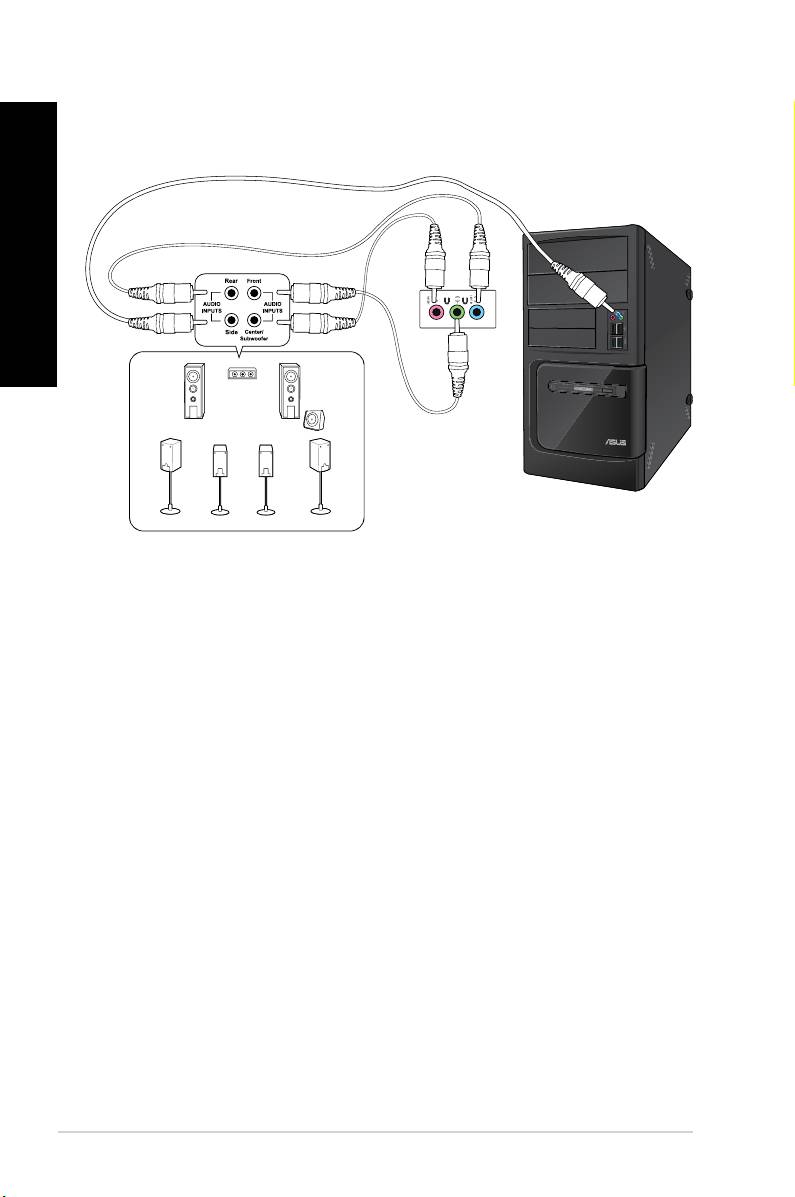
LINE OUT
ENGLISH
ENGLISH
40 Chapter 3: Connecting devices to your computer
ENGLISH
ENGLISH
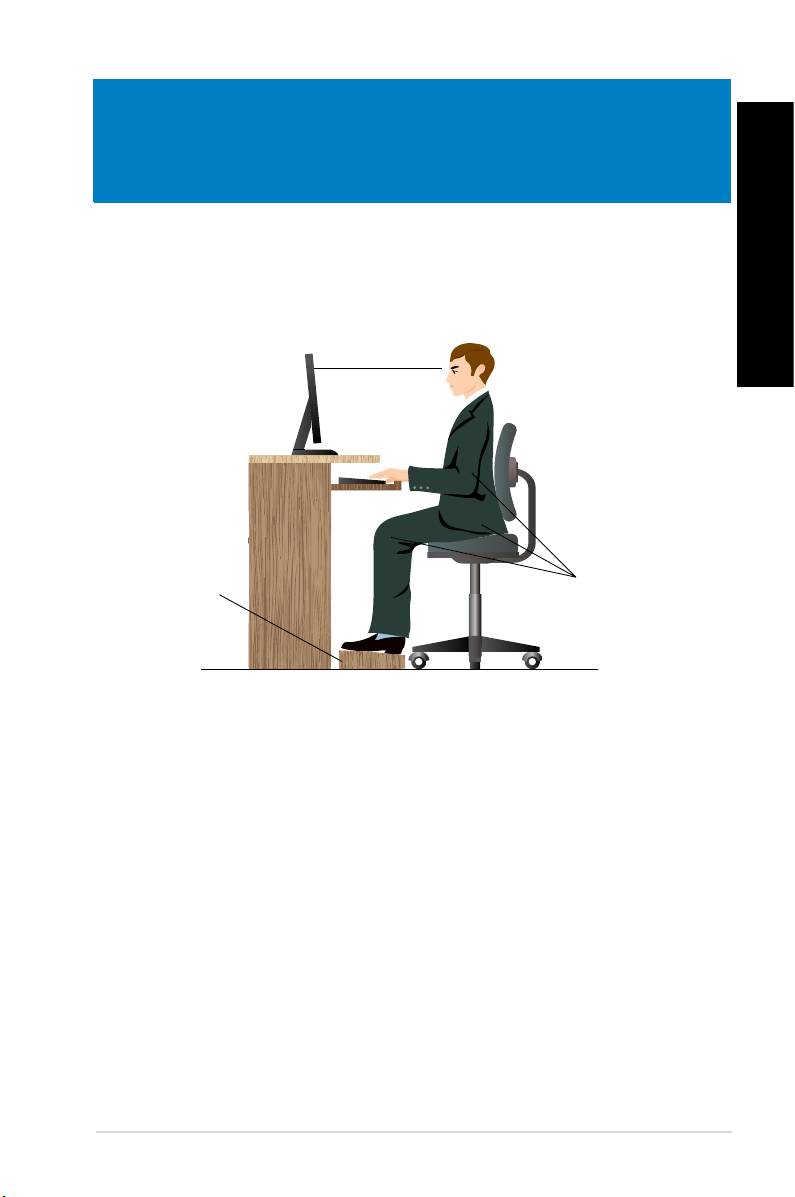
When using your Desktop PC, maintaining the proper posture is necessary to prevent strain to
your wrists, hands, and other joints or muscles. This section provides you with tips on avoiding
physical discomfort and possible injury while using and fully enjoying your Desktop PC.
ASUS BM6635(MD560), BM6835, and BP6335(SD560) 41
Eye level to the top of
the monitor screen
Foot rest 90˚ angles
• Position your computer chair to make sure that your elbows are at or slightly above the
keyboard to get a comfortable typing position.
• Adjust the height of your chair to make sure that your knees are slightly higher than
your hips to relax the backs of your thighs. If necessary, use a footrest to raise the level
of your knees.
• Adjust the back of your chair so that the base of your spine is rmly supported and
angled slightly backward.
• Sit upright with your knees, elbows and hips at an approximately 90º angle when you
are at the PC.
• Place the monitor directly in front of you, and turn the top of the monitor screen even
with your eye level so that your eyes look slightly downward.
• Keep the mouse close to the keyboard, and if necessary, use a wrist rest for support to
reduce the pressure on your wrists while typing.
• Use your Desktop PC in a comfortably-lit area, and keep it away from sources of glare
such as windows and straight sunlight.
• Take regular mini-breaks from using your Desktop PC.
ENGLISH
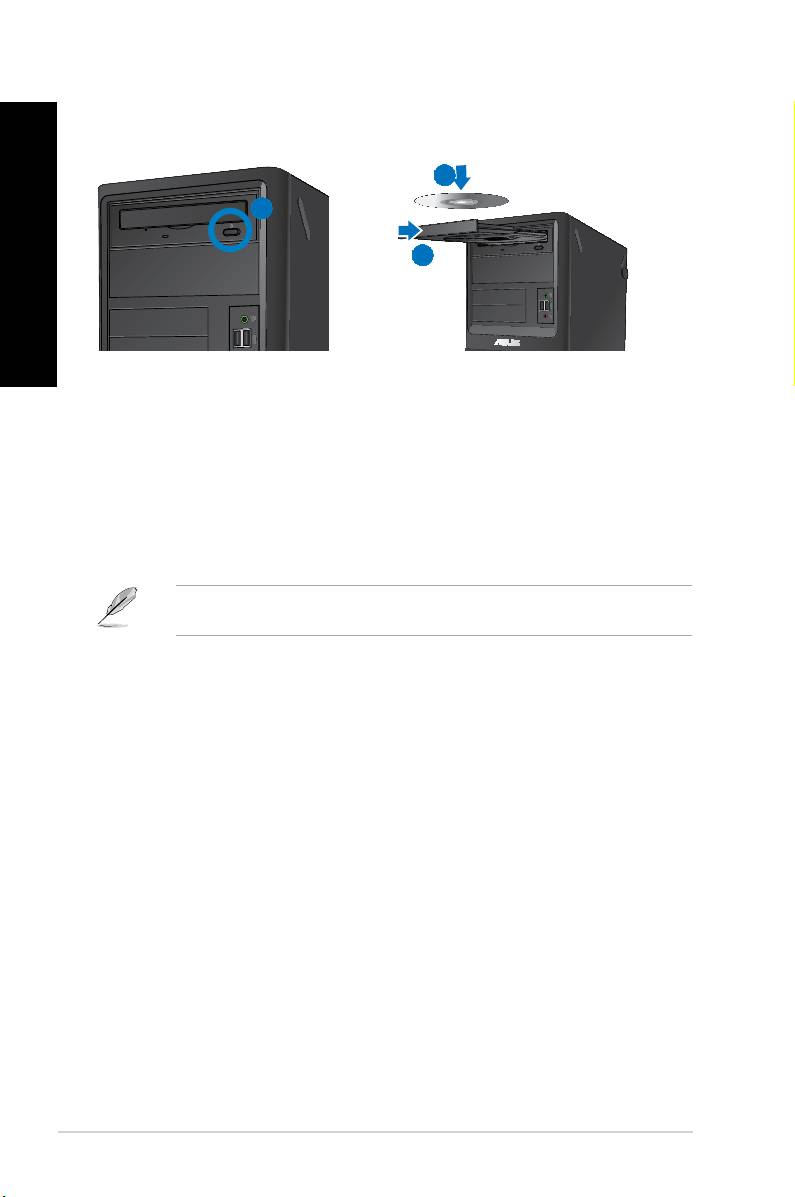
2
1
3
ENGLISH
1. While your system is on, press the eject button below the drive bay cover to open the
tray.
2. Place the disc to the optical drive with the label side facing up.
3. Push the tray to close it.
4. Select a program from the AutoPlay window to access your les.
®
If AutoPlay is NOT enabled in your computer, click Windows
7 button on the taskbar,
click , and then double-click the CD/DVD drive icon to access the data on it.
1. While the system is on, do either of the following to eject the tray:
• Press the eject button below the drive bay cover.
• Right-click the CD/DVD drive icon on the screen, and then click .
2. Remove the disc from the disc tray.
42 Chapter 4: Using your computer
ENGLISH
ENGLISH
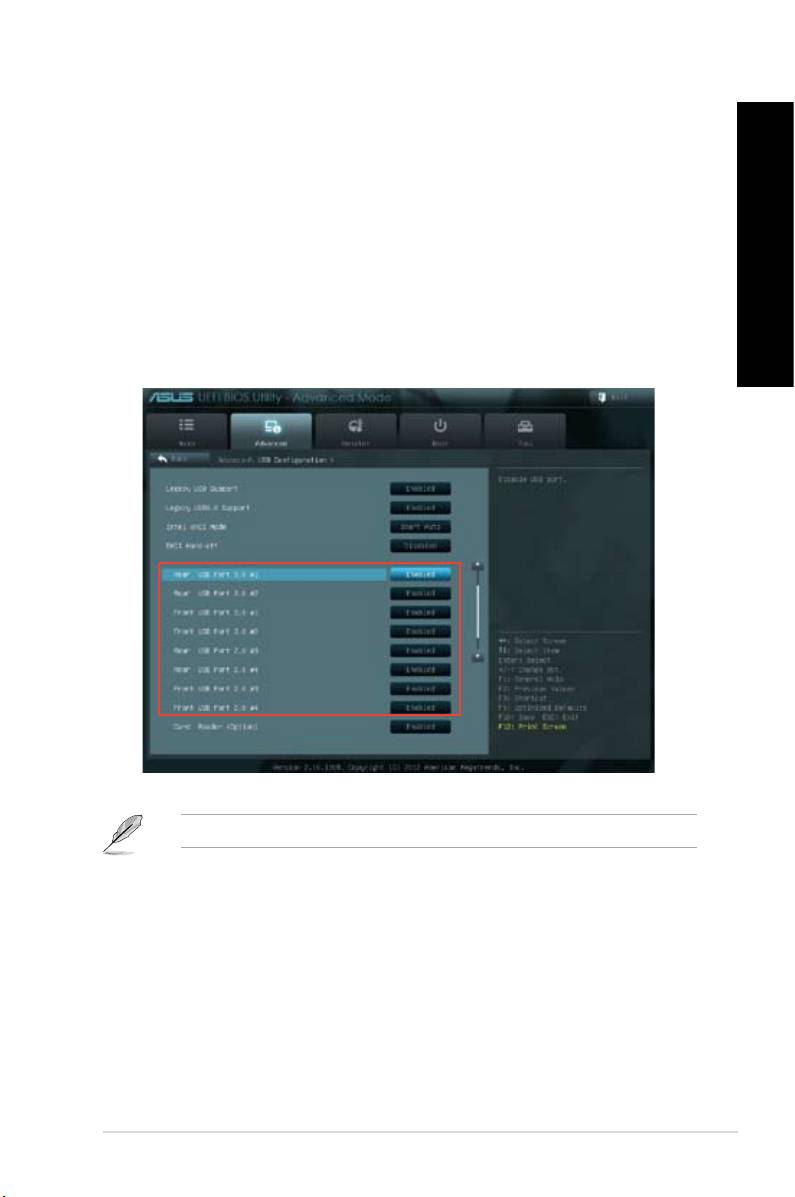
You can enable or disable the front and rear USB 2.0 and USB 3.0 ports from the BIOS
Setup.
1. Press <Delete> to enter the BIOS Setup at startup.
2. From the BIOS Setup screen, click > .
3. Select the USB port that you want to enable or enable.
4. Press <Enter> to enable or disable the selected USB port.
5. Click and select to save the changes made.
Refer to Chapter 1 for the locations of the USB ports.
ENGLISH
ENGLISH
ENGLISH
ENGLISH
ASUS BM6635(MD560), BM6835, and BP6335(SD560) 43

ENGLISH
ENGLISH
44 Chapter 4: Using your computer
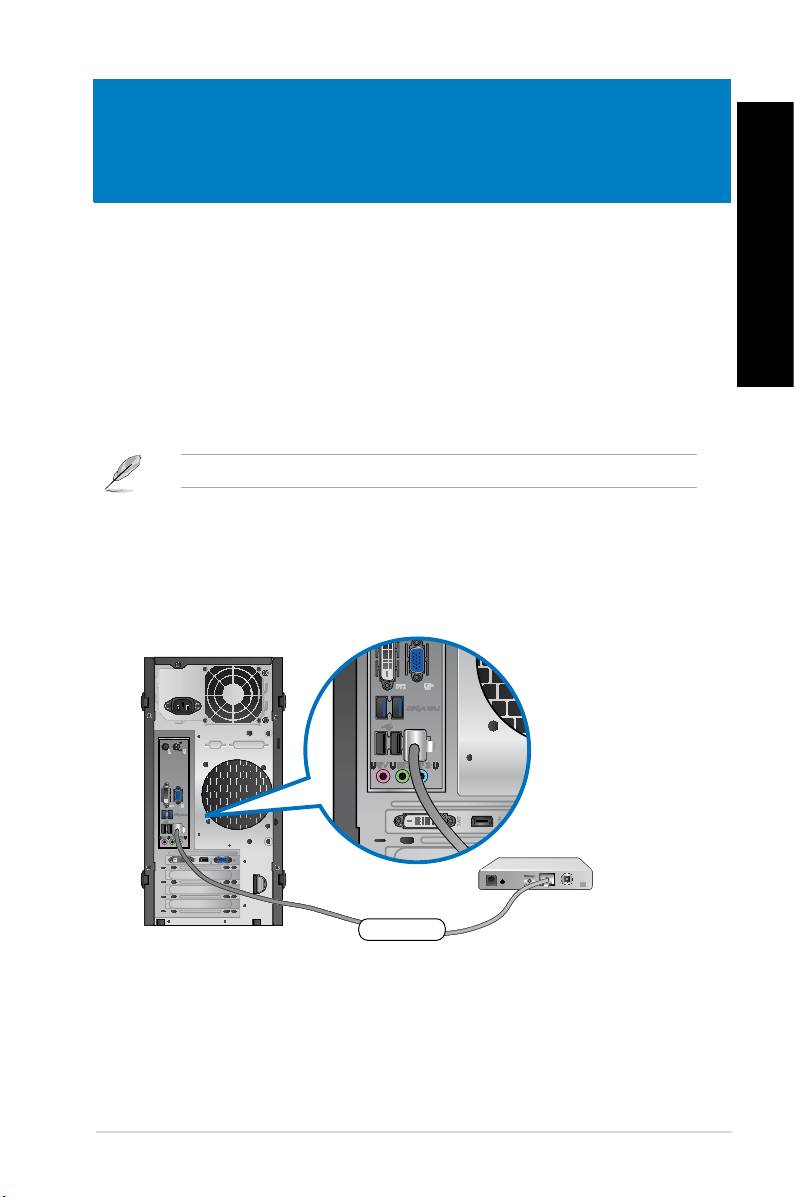
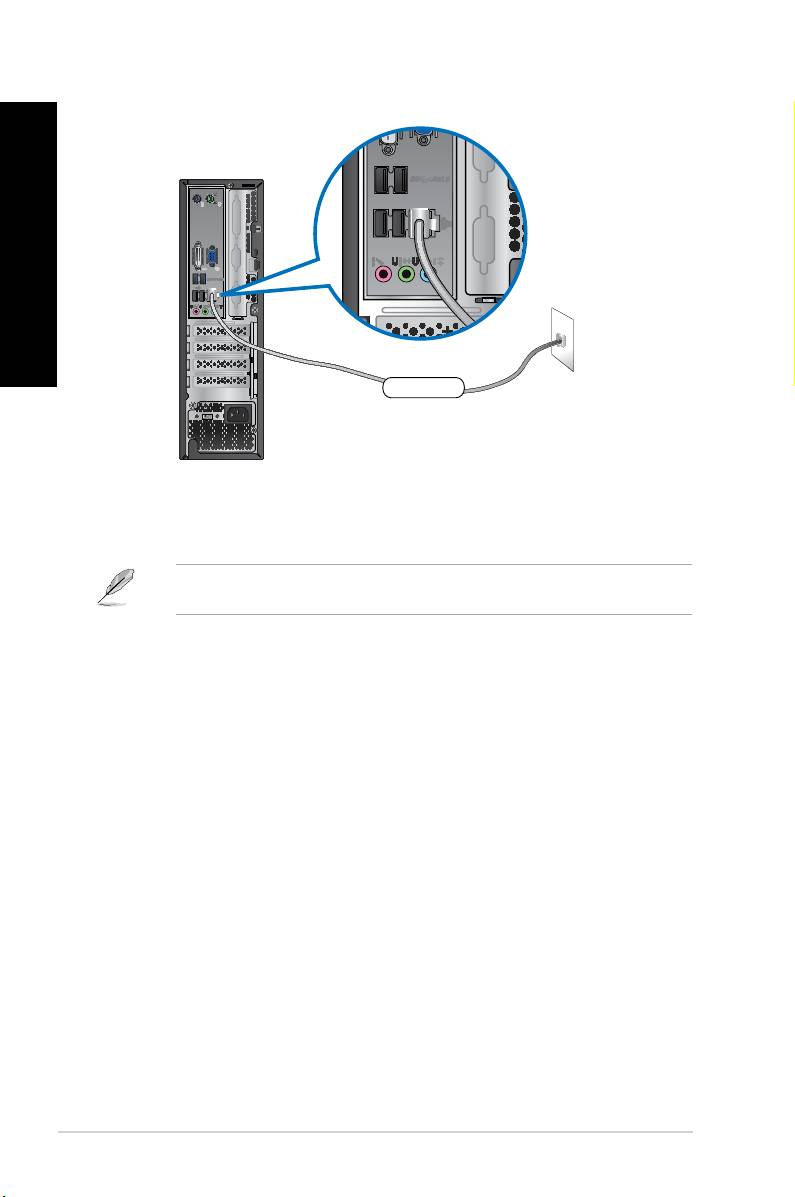
Use an RJ-45 cable to connect your computer to a DSL/cable modem or a local area network
(LAN).
1. Set up your DSL/cable modem.
Modem
RJ-45 cable
ENGLISH
ENGLISH
Refer to the documentation that came with your DSL/cable modem.
2. Connect one end of an RJ-45 cable to the LAN (RJ-45) port on the rear panel of your
computer and the other end to a DSL/cable modem.
BM6635(MD560)
ASUS BM6635(MD560), BM6835, and BP6335(SD560) 45
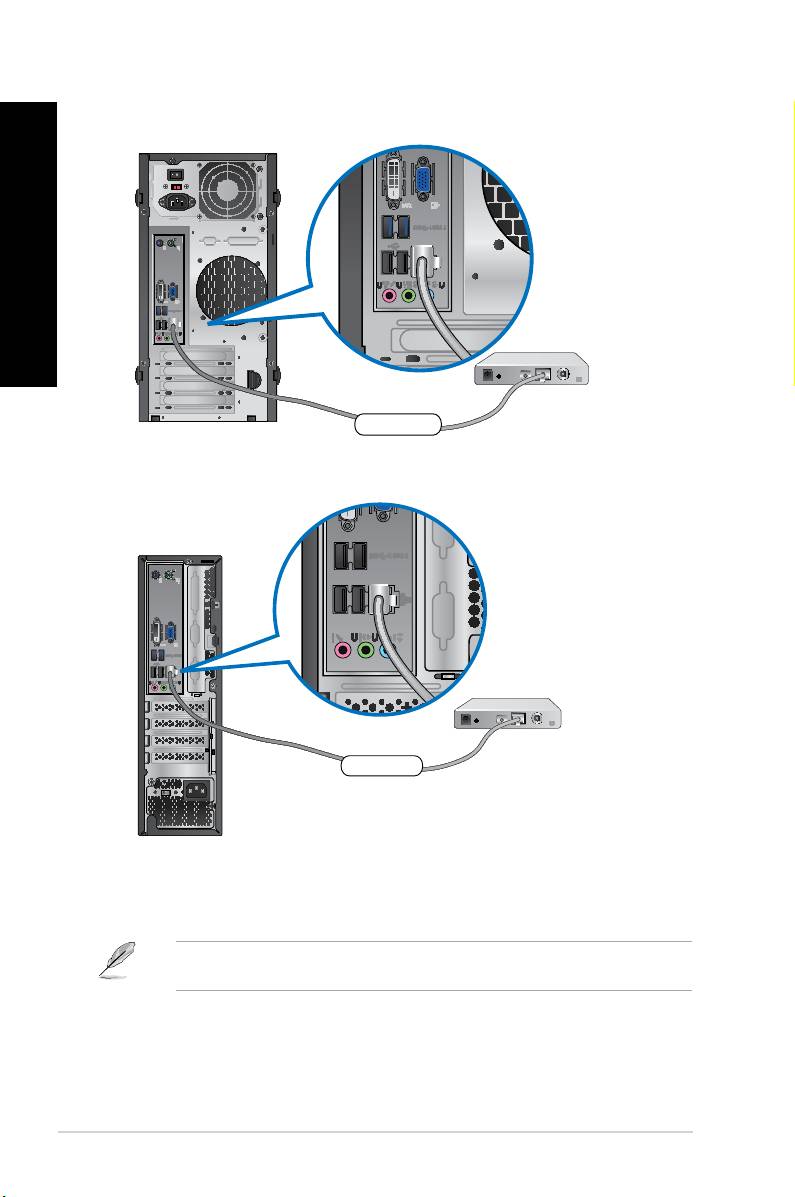
3. Turn on the DSL/cable modem and your computer.
4. Congure the necessary Internet connection settings.
Contact your Internet Service Provider (ISP) for details or assistance in setting up your
Internet connection.
Modem
RJ-45 cable
BP6335(SD560)
Modem
RJ-45 cable
BM6835
ENGLISH
ENGLISH
46 Chapter 5: Connecting to the Internet
ENGLISH
ENGLISH
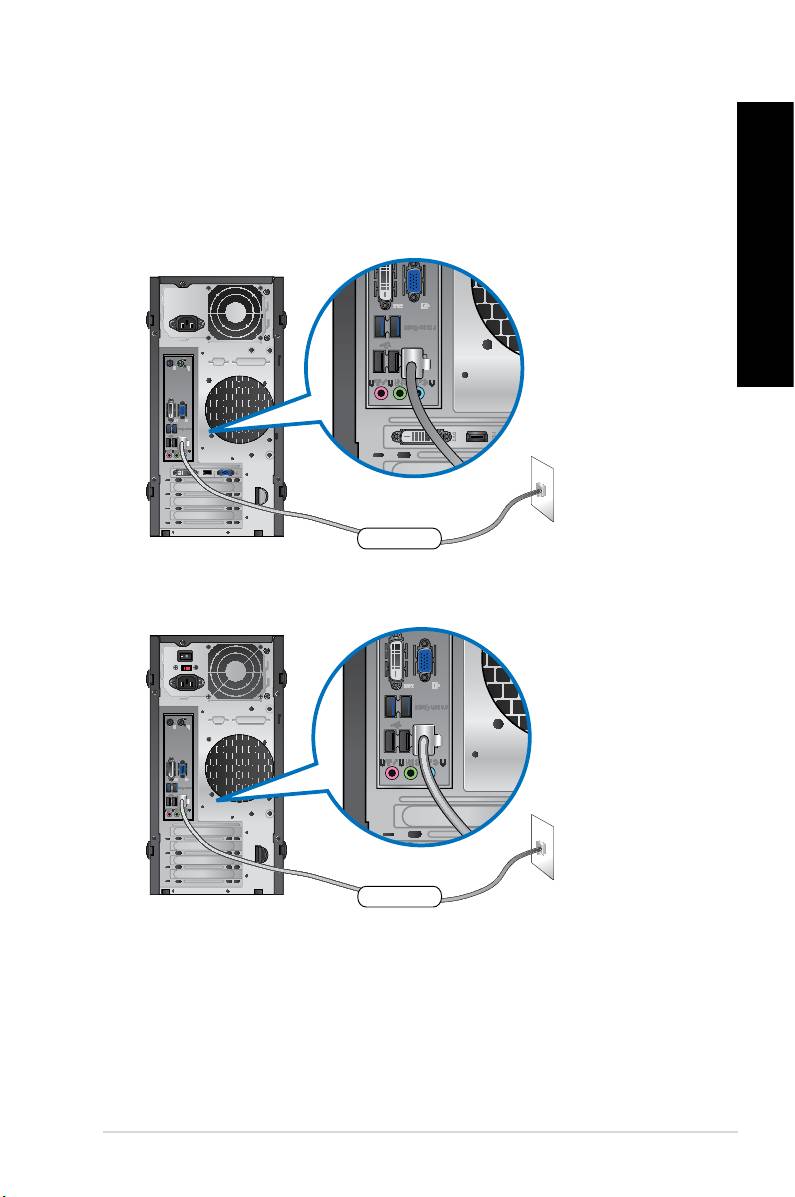
1. Connect one end of an RJ-45 cable to the LAN (RJ-45) port on the rear panel of your
computer and the other end to your LAN.
LAN
RJ-45 cable
BM6635(MD560)
LAN
RJ-45 cable
BM6835
ENGLISH
ENGLISH
ENGLISH
ENGLISH
ASUS BM6635(MD560), BM6835, and BP6335(SD560) 47
BP6335(SD560)
2. Turn on your computer.
3. Congure the necessary Internet connection settings.
Contact your network administrator for details or assistance in setting up your Internet
connection.
LAN
RJ-45 cable
ENGLISH
ENGLISH
48 Chapter 5: Connecting to the Internet
ENGLISH
The Support DVD and Recovery DVD may not be included in the package. You may use
the system recovery partition feature to create the Support DVD and Recovery DVD. For
ENGLISH
details, refer to in this chapter.
ASUS AI Suite II is an all-in-one interface that integrates several ASUS utilities and allows
users to launch and operate these utilities simultaneously.
This utility is pre-installed on some models. For models without an operating system, follow
the steps below to install this utility.
1. Place the support DVD in the optical drive. The Drivers installation tab appears if
Autorun is enabled.
2. Click the tab, then click .
3. Follow the onscreen instructions to complete the installation.
®
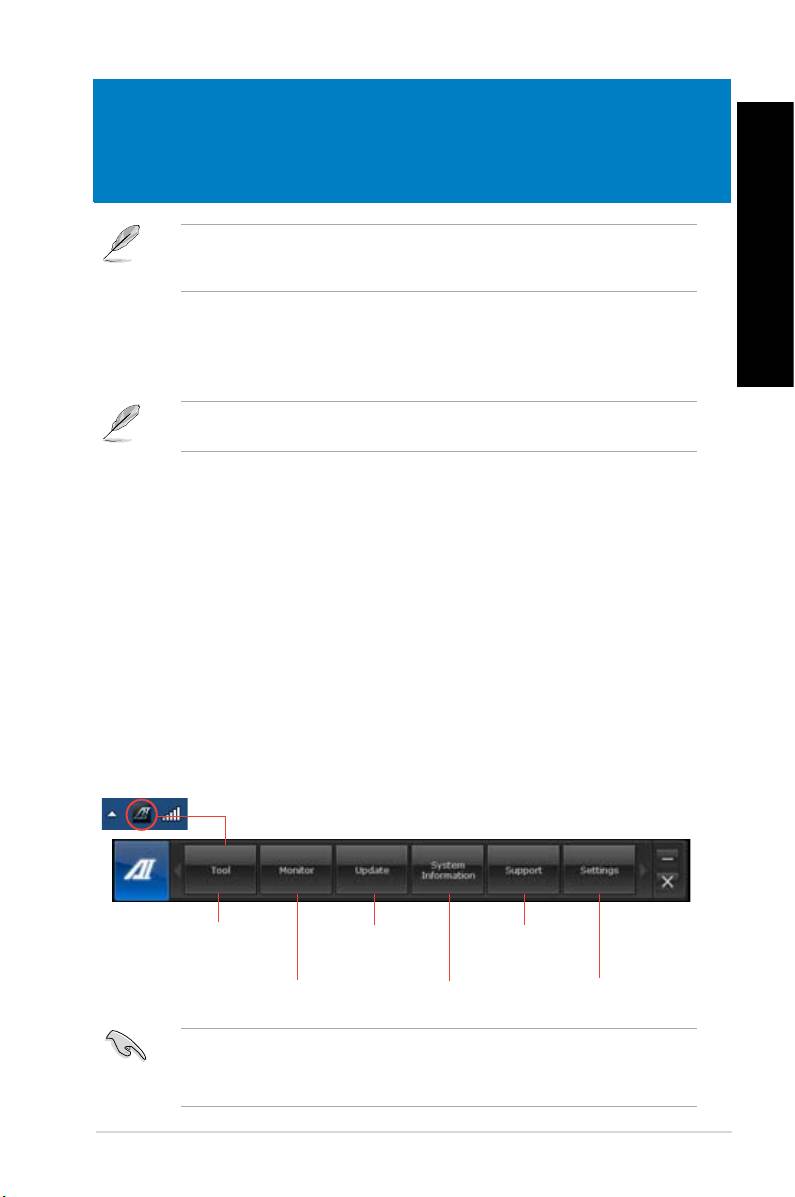
AI Suite II automatically starts when you enter the Windows
operating system. The AI Suite
®
II icon appears in the Windows
notication area. Click the icon to open the AI Suite II main
menu bar.
Click each button to select and launch a utility, to monitor the system, to update the
motherboard BIOS, to display the system information, and to customize the settings of AI
Suite II.
• The applications in the Tool menu vary with models.
• The screenshots of AI Suite II in this user manual are for reference only. The actual
screenshots vary with models.
ASUS BM6635(MD560), BM6835, and BP6335(SD560) 49
ENGLISH
The Tool menu includes the EPU, Probe II, and Sensor Recorder panels.
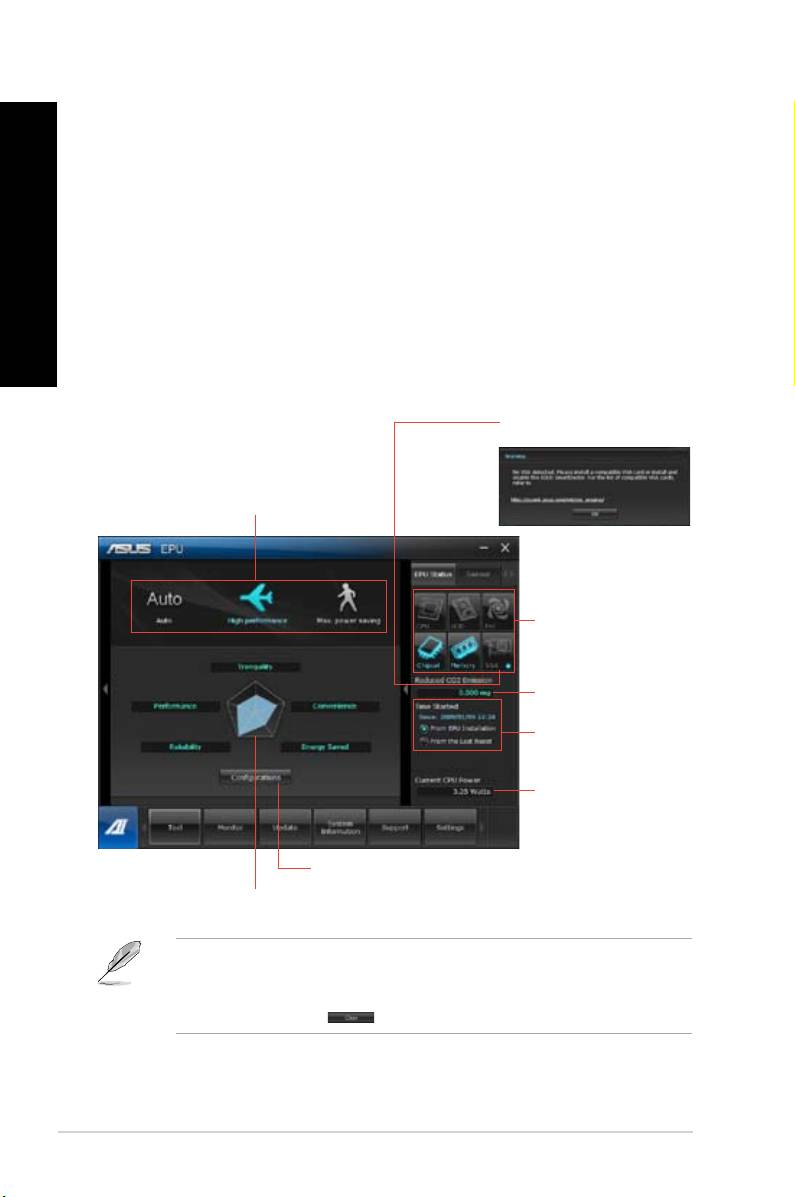
EPU is an energy-efcient tool that provides you with a total power-saving solution. It detects
the current loading and intelligently adjusts the power usage in real-time. When you select
the Auto mode, the system changes modes automatically according to the current system
status. It allows you to customize each mode through conguring the settings such as CPU
ENGLISH
frequency, vCore Voltage, and Fan Control.
• Click Tool > EPU on the AI Suite II main menu bar.
• * Select to show the CO2 that has been reduced since you
installed EPU.
• * Select to show the total CO2 that has been reduced since you
click the Clear button .
50 Chapter 6: Using the utilities
ENGLISH
ENGLISH
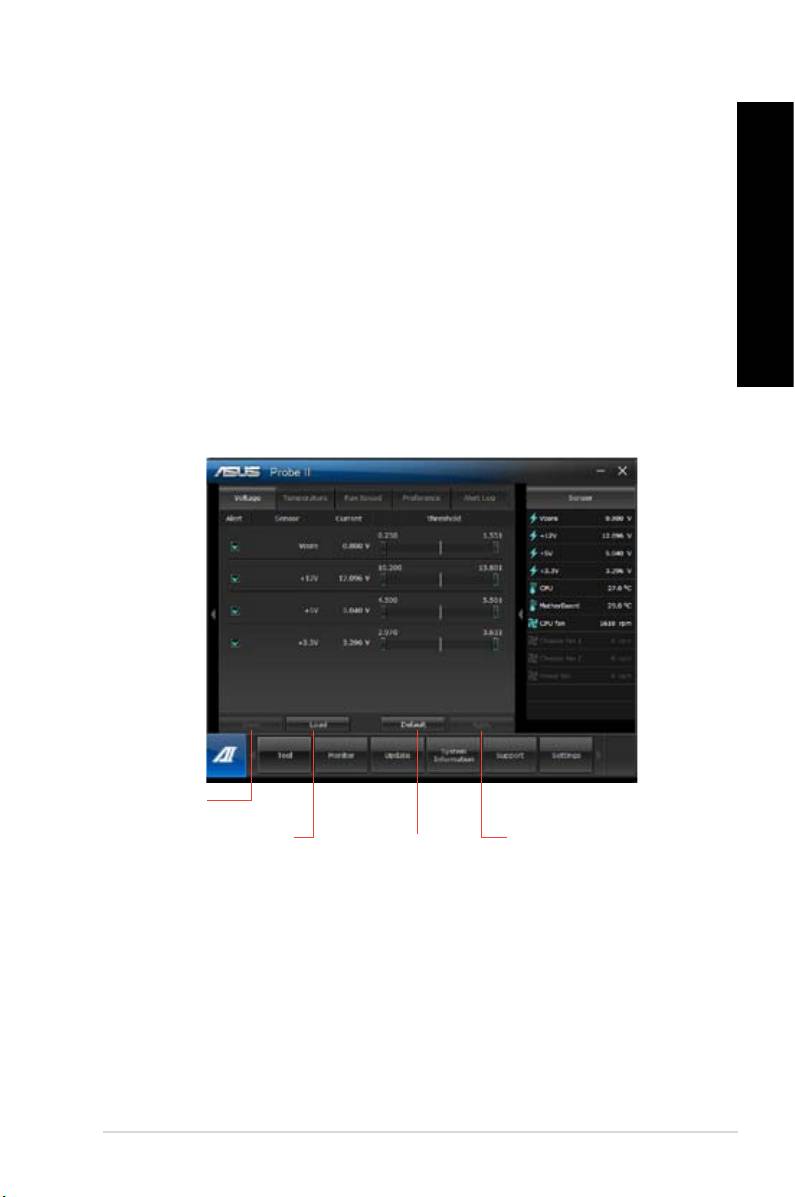
Probe II is a utility that monitors the computer’s vital components, and detects and alerts you
of any problem with these components. Probe II senses fan rotations, CPU temperature,
and system voltages, among others. With this utility, you are assured that your computer is
always at a healthy operating condition.
• Click on the AI Suite II main menu bar.
• Click the tabs to activate the sensors or to adjust the
sensor threshold values.
• The tab allows you to customize the time interval of sensor alerts, or
change the temperature unit.
ENGLISH
ENGLISH
ENGLISH
ENGLISH
ASUS BM6635(MD560), BM6835, and BP6335(SD560) 51
ENGLISH
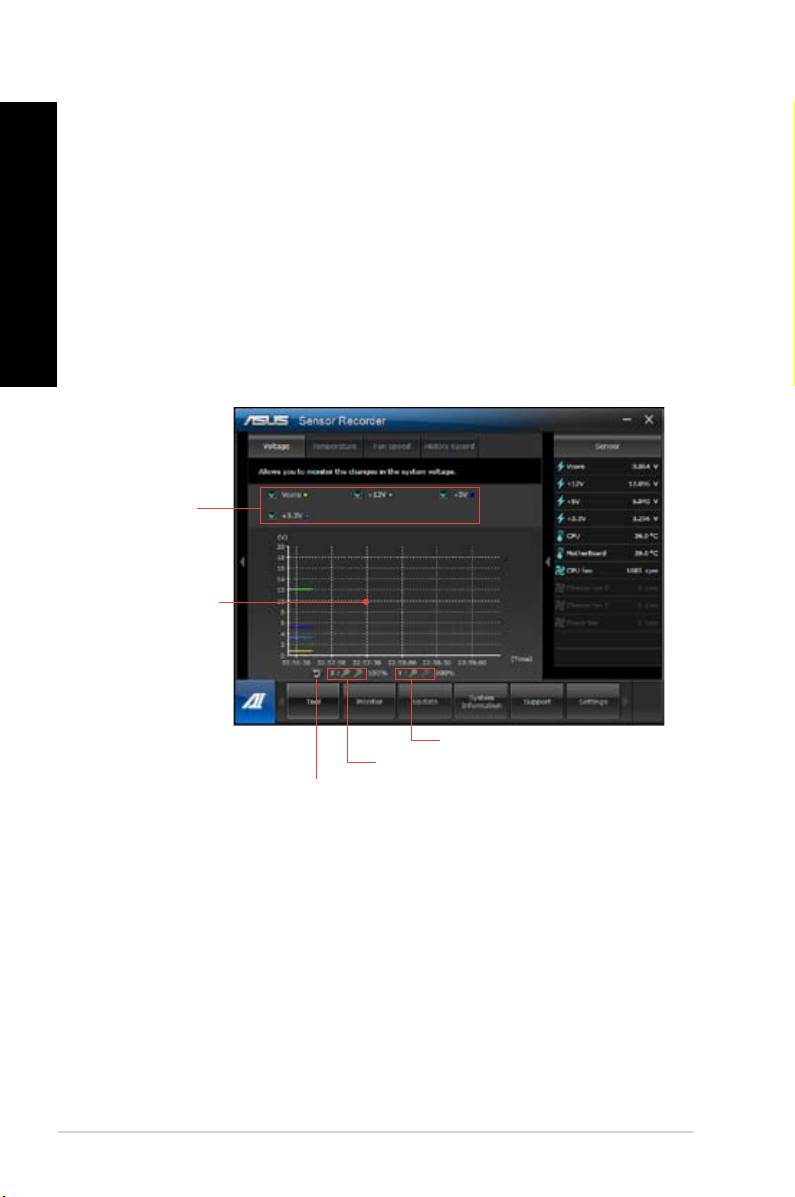
Sensor Recorder allows you to monitor the changes in the system voltage, temperature, and
fan speed, as well as recording the changes.
• Click Tool > on the AI Suite II main menu bar.
ENGLISH
• Click the tabs and select the sensors that you want
to monitor.
• The tab allows you to record the changes in the sensors that you
enable.
52 Chapter 6: Using the utilities
ENGLISH
ENGLISH

The menu includes the Sensor and CPU Frequency panels.
The Sensor panel displays the current value of a system sensor such as fan rotation, CPUdisplays the current value of a system sensor such as fan rotation, CPU
temperature, and voltages.
• Click > on the AI Suite II main menu bar.
The CPU Frequency panel displays the current CPU frequency and CPU usage.displays the current CPU frequency and CPU usage.
• Click > on the AI Suite II main menu bar.
The Update menu allows you to update the motherboard BIOS and the BIOS boot logo with
the ASUS designed update utilities.
The ASUS Update is a utility that allows you to manage, save, and update the motherboard
®
BIOS in Windows
OS. The ASUS Update utility allows you to update the BIOS directlypdate the BIOS directly
from the Internet, download the latest BIOS le from the Internet, update the BIOS from an, download the latest BIOS le from the Internet, update the BIOS from an
updated BIOS le, save the current BIOS le or view the BIOS version information.
1. From the ASUS Update screen, select , then click .
2. Select the ASUS FTP site nearest you to avoid network trafc.
Tick the two items if you want to enable the BIOS downgradable and Auto-BIOS
backup functions.
3. Select the BIOS version that you want to download, then click .
When no updated version is detected, a message is displayed informing you that there
is no new BIOS le from the BIOS server.
4. Click if you want to change the boot logo, which is the image appearing on screen
during the Power-On Self-Tests (POST). Otherwise, click Otherwise, click No.
5. Follow the onscreen instructions to complete the update process.
ENGLISH
ENGLISH
ENGLISH
ENGLISH
ASUS BM6635(MD560), BM6835, and BP6335(SD560) 53

ENGLISH
1. From the ASUS Update screen, select , then click .
2. Locate the BIOS le from the Open window, click , and click .
3. Click if you want to change the boot logo, which is the image appearing on screen
during the Power-On Self-Tests (POST). Otherwise, click Otherwise, click No.
ENGLISH
4. Follow the onscreen instructions to complete the update process.
ASUS MyLogo allows you to customize the boot logo. The boot logo is the image that
appears on screen during the Power-On Self-Tests (POST). ASUS MyLogo allows you to:ASUS MyLogo allows you to:
• Change the current BIOS boot logo of your motherboard
• Change the boot logo of a downloaded BIOS le and update this BIOS to your
motherboard
• Change the boot logo of a downloaded BIOS le without updating this BIOS to your
motherboard
Ensure that the BIOS item Full Screen Logo is set to [Enabled] to display the boot logo.
See the section Boot Settings Conguration of the BIOS Setup chapter in the user manual.
1. From the AI Suite II main menu bar, click
2. Select any of these three options, then click :
• Change the BIOS boot logo of my motherboard
• Change the boot logo of a downloaded BIOS le and update this BIOS to my
motherboard
• Change the boot logo of a downloaded BIOS le (But do not update this BIOS to
my motherboard)
Before using the last two options, ensure that you download a BIOS le to your computer
using ASUS Update.
3. Locate the picture le that you want to use as the boot logo (and the downloaded BIOS
if required) and then click .
4. Move the slider or click for the system to automatically adjusts
the screen resolution.
5. Click the button to preview the way the picture is displayed during
the POST. Left-click the mouse to return to the setting screen.
6. Click when the adjustment is nished.
7. Click and follow the onscreen instructions to complete the process.
54 Chapter 6: Using the utilities
ENGLISH
ENGLISH

The System Information screen displays the information about the motherboard, CPU, and
memory slots.
• Click the MB tab to see the details on the motherboard manufacturer, product name,
version, and BIOS.
• Click the tab to see the details on the processor and the Cache.
• Click the tab and then select the memory slot to see the details on the
memory module installed on the corresponding slot.
• Click the tab and then select each disk to see the details on it.
The Support screen displays the information about the ASUS website, technical support
website, download support website, or contact information.
The Settings screen allows you to customize the main menu bar settings and the interface’s
skin.
• Application allows you to select the application that you want to enable.
• Bar allows you to modify the bar setting,
• Skin allows you to customize the interface’s contrast, brightness, saturation, hue, and
gamma.
ENGLISH
ENGLISH
ENGLISH
ENGLISH
ASUS BM6635(MD560), BM6835, and BP6335(SD560) 55
ENGLISH
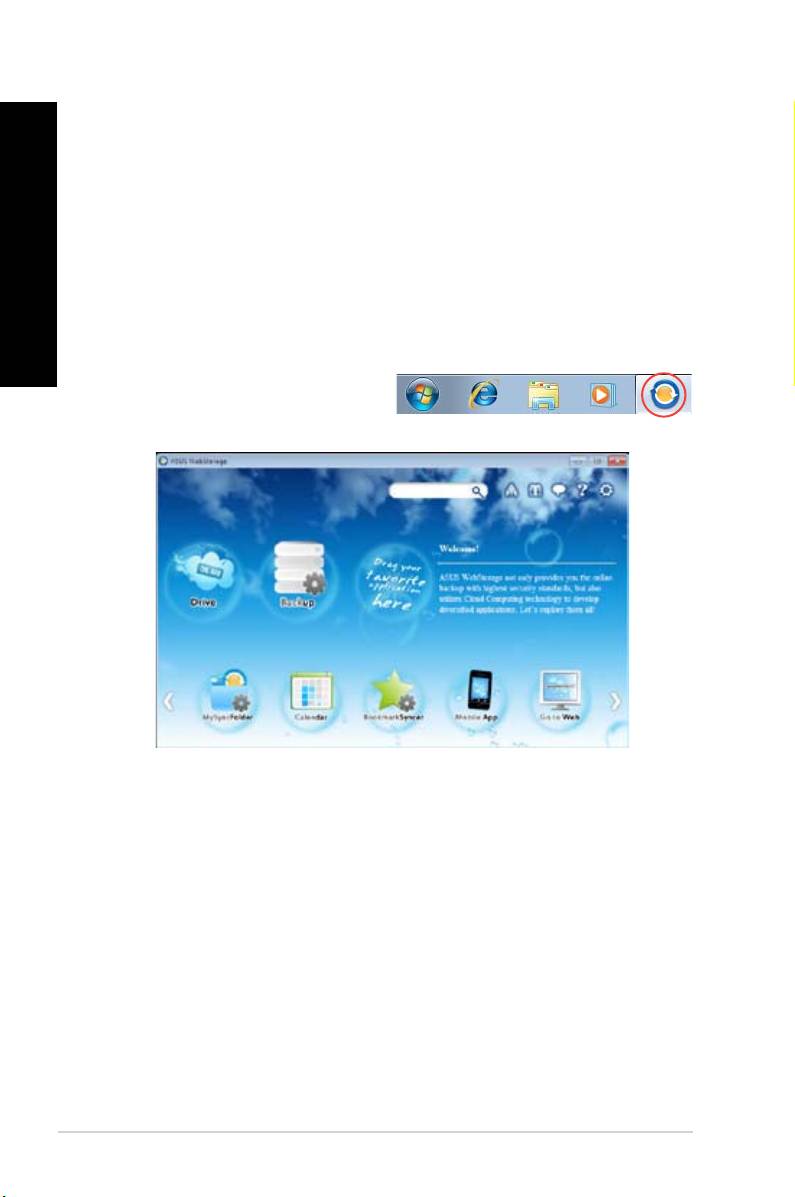
ASUS WebStorage is designed to help you retrieve your data to your notebooks,
smartphones or tablets wherever there is internet connection.
Place the support DVD in the optical drive. Double-click the setup.exe le from the ASUS
WebStorage folder in the Software folder in the support DVD.
ENGLISH
®
To launch the WebStorage from the Windows
desktop, click
. The WebStorage quick bar
®
appears in the Windows
taskbar. Right-
click this icon to switch between the quick
bar and the main window.
Allows your to retrieve all your backups, synced les, share groups and password protected
data from here. Right-click the mouse to preview les before downloading or generating a
sharing URL.
Allows you to quickly back up your important data, set your preferences for your backup
schedule, and select Auto-Backup to automatically backup your data.
Allows you to store your les to MySyncFolder for easy access and sharing without the
limitation of location or storage space.
56 Chapter 6: Using the utilities
ENGLISH
ENGLISH
ASUS WebStorage automatically synchronizes your calendar events to all your computers to
allow you to browse through your calendar from any of your computers.
BookmarkSyncer allows you to save your browser preference and favorite websites in the
cloud storage.
ASUS WebStorage’s mobile applications allow you to synchronize your les between your
mobile devices. It also allows you to preview or stream les on your mobile device.
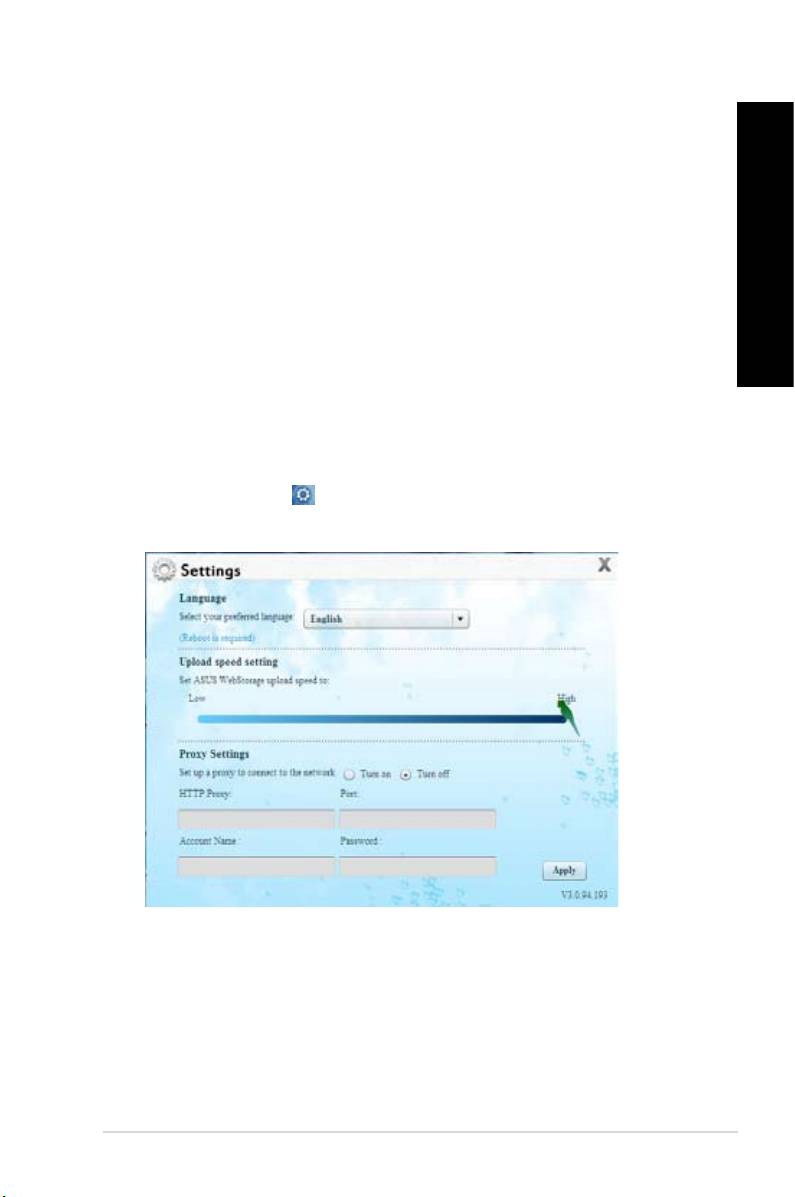
ASUS WebStorage allows you to experience its value-added cloud service without the risk of
losing your data.
1. Click the icon to launch the Settings screen.
2. Follow the onscreen instructions to complete the conguration.
ENGLISH
ENGLISH
ENGLISH
ENGLISH
ASUS BM6635(MD560), BM6835, and BP6335(SD560) 57
ENGLISH
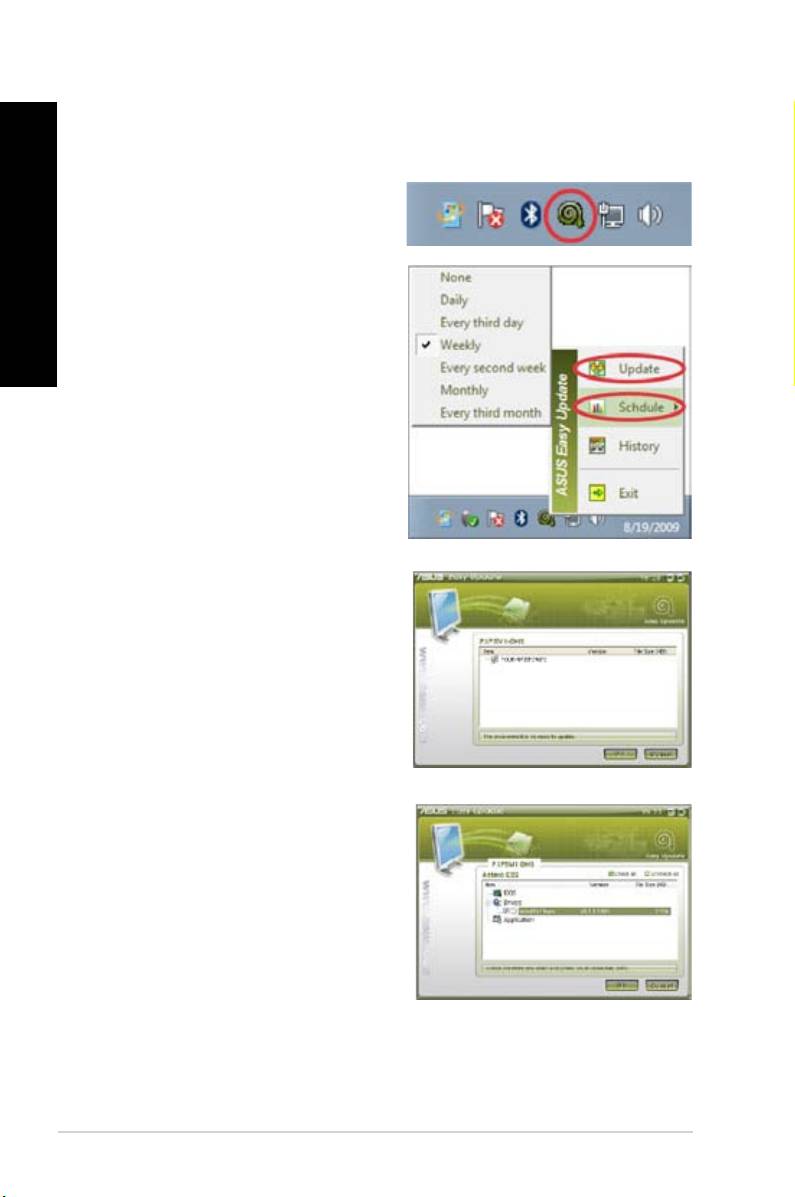
ASUS Easy Update is a software tool that automatically detects the latest drivers and
applications for your system.
®
1. From the Windows
notication area,
right-click the icon.
2. Select to set how often you
ENGLISH
want to update your system.
3. Select to activate the update.
4. Click to display the items you can
download.
5. Check the item(s) you want to download,
and then click .
58 Chapter 6: Using the utilities
ENGLISH
ENGLISH
