Kenwood KRC-694: Installation
Installation: Kenwood KRC-694
KRC-694(E)_U.S_r3 02.11.11 7:34 PM Page 29
Installation
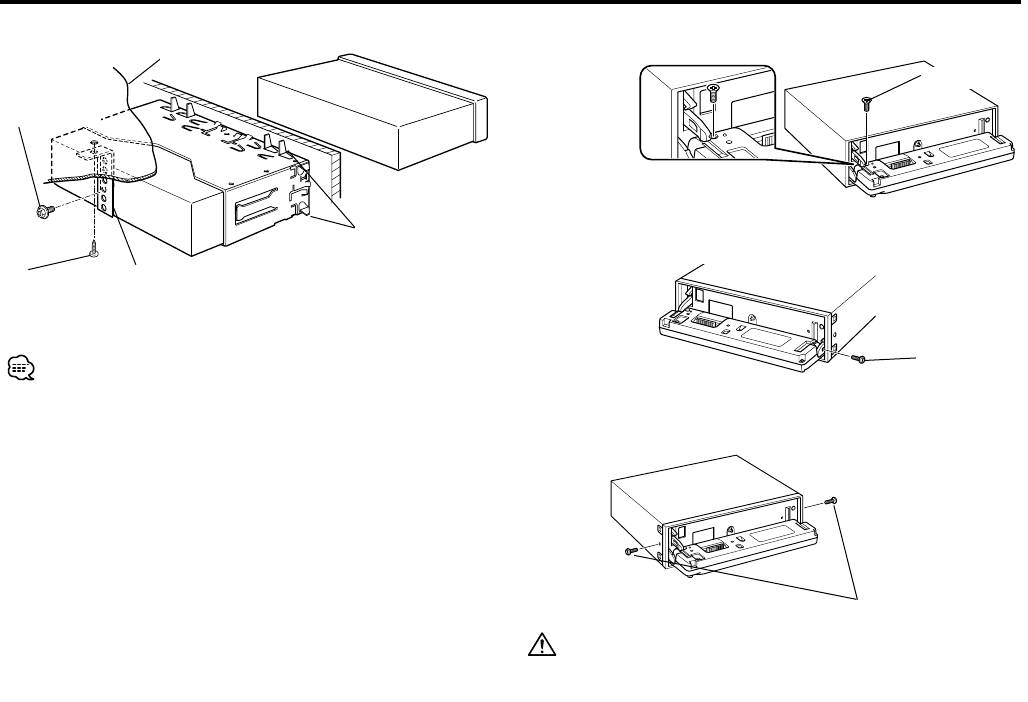
■ Installation
3 Tighten the screw (ø2.6 × 12 mm) (Accessory 4) in the hole
shown on the diagram.
Firewall or metal support
Accessory4
Screw (M4X8)
(commercially
available)
Bend the tabs of the
4 Tighten the screw (ø2 × 4 mm) (Accessory 5) in the hole
mounting sleeve
shown on the diagram.
with a screwdriver or
Self-tapping
Metal mounting
similar utensil and
screw
strap
attach it in place.
(commercially
(commercially
available)
available)
Make sure that the unit is installed securely in place. If the unit is
Accessory5
unstable, it may malfunction (eg, the sound may skip).
5 Tighten the screws (ø2 × 6 mm) (Accessory 6) in the holes
shown on the diagram.
■ Screwing the Faceplate on the Unit
If you want to fasten the faceplate to the main unit so that it
does not fall off.
1 Refer to the section <Removing the hard rubber frame> and
then remove the hard rubber frame.
Accessory6
2 Drop open the faceplate by pressing the Release button.
Never insert the screws in any other screw hole than the one specified.
If you screw them in another hole, it will contact and may cause
damage to the mechanical parts inside the unit.
— 29 —
Оглавление
- CASSETTE RECEIVER
- Contents
- Safety precautions
- Safety precautions About Cassette tape
- General features
- General features
- Tuner features
- RDS features
- RDS features
- RDS features Cassette player features
- Cassette player features
- External disc control features
- Menu system
- Menu system
- Menu system
- Accessories
- Connecting Wires to Terminals
- Installation
- Installation
- Troubleshooting Guide
- Troubleshooting Guide
- Specifications
- Cодержание
- Меры предосторожности
- Меры предосторожности О кассетах
- Общие характеристики
- Общие характеристики
- Cвойства тюнера
- Cвойства RDS
- Cвойства RDS
- Cвойства RDS Cвойства кассетного проигрывателя
- Cвойства кассетного проигрывателя
- Функции управления внешним диском
- Система меню
- Система меню
- Система меню
- Принадлежности
- Подсоединение кабелей к гнездам для подключения
- Установка
- Установка
- Поиск и устранение неисправностей
- Поиск и устранение неисправностей
- Технические характеристики
- Treść
- Środki ostrożności
- Środki ostrożności Uwagi dotyczące kaset
- Ogólne możliwości
- Ogólne możliwości
- Możliwości tunera
- Możliwości RDS
- Możliwości RDS
- Możliwości RDS Możliwości odtwarzacza kaset
- Możliwości odtwarzacza kaset
- Możliwości sterowania zewnętrznymi płytami
- Menu systemu
- Menu systemu
- Menu systemu
- Akcesoria
- Podłączanie przewodów do końcówek
- Podłączanie przewodów do końcówek
- Instalacja
- Instalacja
- Przewodnik wykrywania i usuwania usterek
- Przewodnik wykrywania i usuwania usterek
- Dane techniczne


