Indesit WITXL-1051-(EU): Care and maintenance
Care and maintenance: Indesit WITXL-1051-(EU)
4
GB
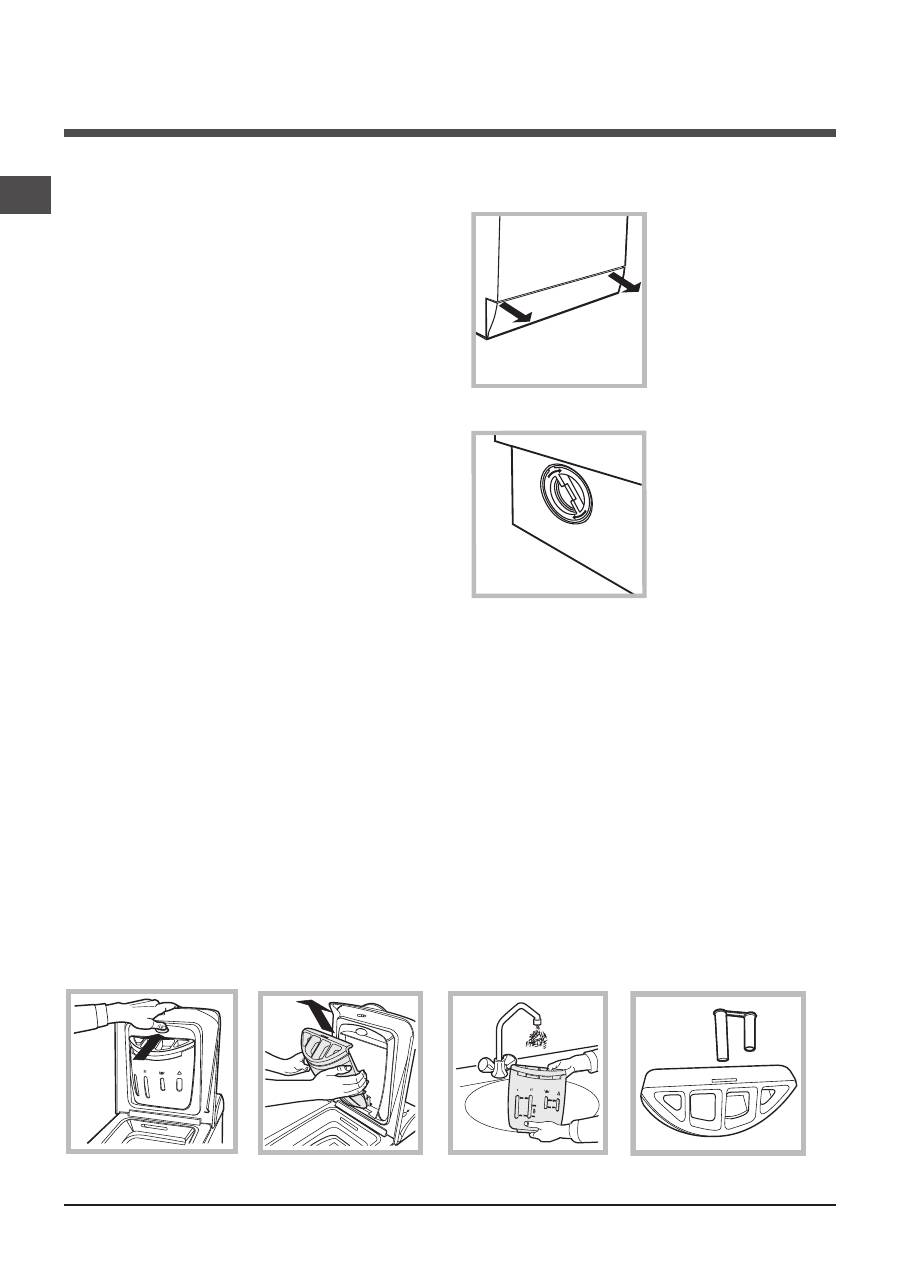
To access the pre-chamber:
1. using a screwdriver,
remove the cover pa-
nel on the lower front
part of the washing
machine (
see figure
)
;
2. unscrew the lid by
rotating it anti-clockwi-
se (
see
figure
)
:
a little
water may trickle out.
This is perfectly nor-
mal;
3. clean the inside tho-
roughly;
4. screw the lid back
on;
5. reposition the panel,
making sure the hooks
are securely in place
before you push it onto
the appliance.
Checking the water inlet hose
Check the inlet hose at least once a year. If there
are any cracks, it should be replaced immedia-
tely: during the wash cycles, water pressure is
very strong and a cracked hose could easily
split open.
!
Never use second-hand hoses.
Care and maintenance
Cutting off the water and electricity supplies
• Turn off the water tap after every wash cycle.
This will limit wear on the hydraulic system in-
side the washing machine and help to prevent
leaks.
• Unplug the washing machine when cleaning it
and during all maintenance work.
Cleaning the washing machine
The outer parts and rubber components of the
appliance can be cleaned using a soft cloth
soaked in lukewarm soapy water. Do not use
solvents or abrasives.
Caring for the door and drum of your appliance
• Always leave the porthole door ajar in order to
prevent unpleasant odours from forming.
Cleaning the pump
The washing machine is fitted with a self-cleaning
pump which does not require any maintenance.
Sometimes, small items (such as coins or buttons)
may fall into the pre-chamber which protects the
pump, situated in its bottom part.
!
Make sure the wash cycle has finished and
unplug the appliance.
How to clean the detergent dispenser
Fig. 1
Fig. 2
Cleaning:
Then clean the dispenser under a tap
(fig. 3)
using an old toothbrush and, once the pair of
siphons inserted in the top of compartments
1 and 2
(fig. 4)
have been pulled out, check
whether the same are not clogged and then
rinse them.
Reassembly:
Do not forget to rein-
sert the pair of siphons
into the special housings
and then to replace the
dispenser into its seat,
clicking it into place
(fig.
4, 2 and 1)
.
Disassembly:
Press lightly on the
large button on the
front of the detergent
dispenser and pull it
upwards
(fig. 1)
.
Fig. 3
Fig. 4
Оглавление
- Installation
- Care and maintenance
- Precautions and advice
- Washing machine description
- Starting and Programmes
- Personalisations
- Detergents and laundry
- Troubleshooting
- Service
- Инструкции за ползване
- Монтиране
- Поддръжка и почистване
- Мерки за безопасност и препоръки
- Описание на пералната машина
- Включване и програми
- Програмиране според потребностите
- Перилни препарати и тъкани
- Проблеми и мерки за отстраняването им
- Сервизно обслужване
- Οδηγίες χρήσης
- Εγκατάσταση
- Συντήρηση και φροντίδα
- Προφυλάξεις και συμβουλές
- Περιγραφή του πλυντηρίου
- Εκκίνηση και Προγράμματα
- Προσωπικές Ρυθμίσεις
- Απορρυπαντικά και ρούχα
- Προβλήματα και λύσεις
- Τεχνική Υποστήριξη
- Instrucciones para el uso
- Instalación
- Mantenimiento y cuidados
- Precauciones y consejos
- Descripción de la lavadora
- Puesta en marcha y Programas
- Personalizaciones
- Detergentes y ropa
- Anomalías y soluciones
- Asistencia
- Mode d’emploi
- Installation
- Entretien et soin
- Précautions et conseils
- Description du lave-linge
- Mise en marche et Programmes
- Personnalisations
- Produits lessiviels et linge
- Anomalies et remèdes
- Assistance
- Довідник користувача
- Установлення
- Опис пральної машини
- Пуск машини і програми
- Налаштування пiд власнi потреби
- Пральні засоби і білизна
- Запобіжні заходи тапоради
- Догляд та очищення
- Несправності та засоби їх усунення
- Допомога
- Руководство по экпуатации
- Установка
- Описание стиральной машины
- Запуск машины. Программы
- Персонализация стирки
- Моющие средства и белье
- Предупреждения и рекомендации
- Обслуживание и уход
- Устранение неисправностей
- Сервисное обслуживание
