Indesit K3 G55S: Start-up and use
Start-up and use: Indesit K3 G55S
22
GB
Using the hob
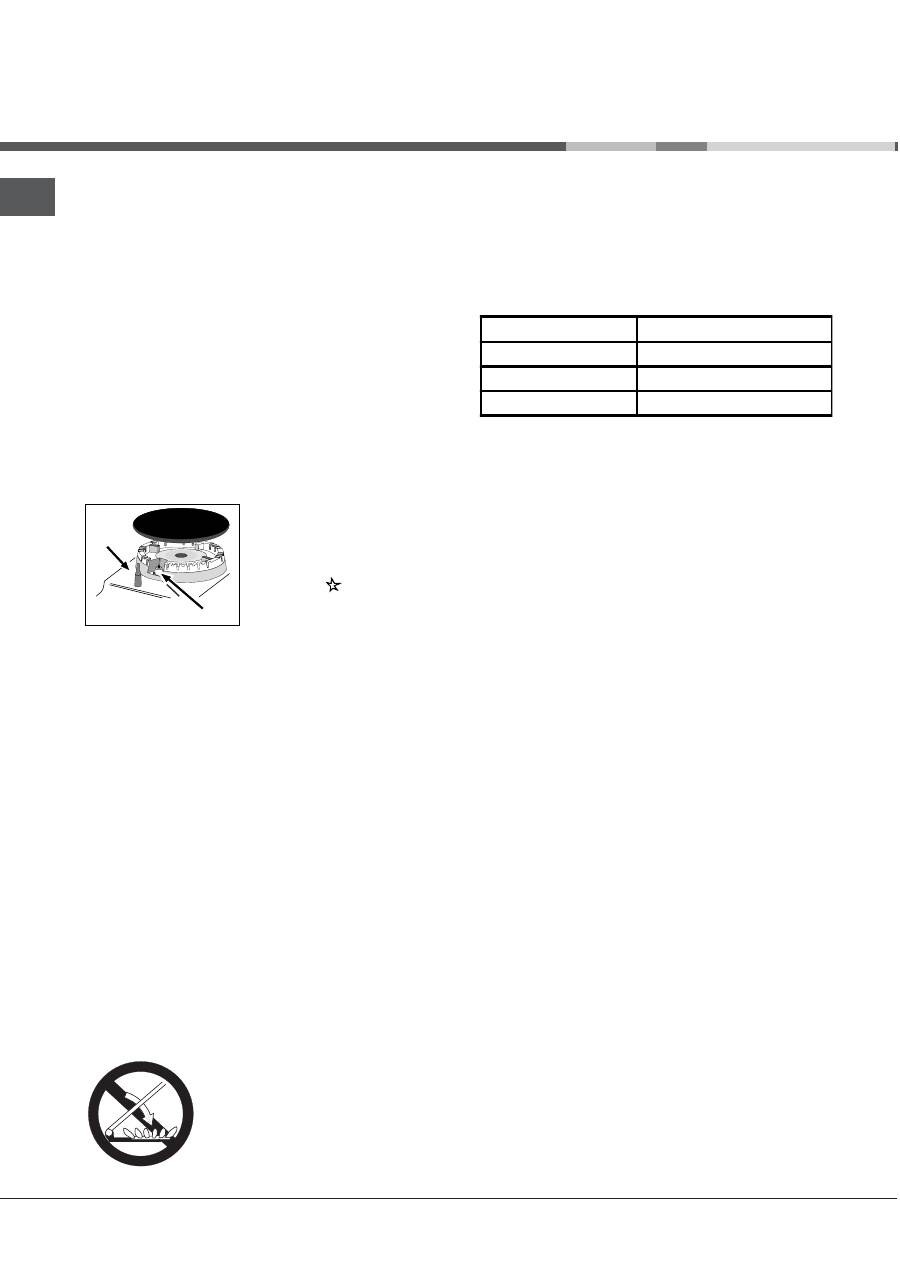
Lighting the burners
For each BURNER knob there is a complete ring
showing the strength of the flame for the relevant
burner.
To light one of the burners on the hob:
1. Bring a flame or gas lighter close to the burner.
2. Press the BURNER knob and turn it in an
anticlockwise direction so that it is pointing to the
maximum flame setting
E
.
3. Adjust the intensity of the flame to the desired
level by turning the BURNER knob in an
anticlockwise direction. This may be the minimum
setting
C
, the maximum setting
E
or any position
in between the two.
If the appliance is fitted with
an electronic lighting
device* (
X
), press the
ignition button, marked with
the symbol
, then hold
the BURNER knob down
and turn it in an
anticlockwise direction, towards the maximum flame
setting, until the burner is lit.
Several models are equipped with an ignition device
which is built into the knob; in this case the
electronic ignition device* is present (
C
) but the
ignition button is not. Simply press the BURNER
knob and turn it in an anticlockwise direction so that
it is pointing to the maximum flame setting, until the
burner is lit. The burner may be extinguished when
the knob is released. If this occurs, repeat the
operation, holding the knob down for a longer period
of time.
!
If the flame is accidentally extinguished, switch off
the burner and wait for at least 1 minute before
attempting to relight it.
If the appliance is equipped with a flame failure
safety device*(X), press and hold the BURNER knob
for approximately 2-3 seconds to keep the flame
alight and to activate the device.
To switch the burner off, turn the knob until it
reaches the stop position •.
Start-up and use
Practical advice on using the burners
For the burners to work in the most efficient way
possible and to save on the amount of gas
consumed, it is recommended that only pans that
have a lid and a flat base are used. They should also
be suited to the size of the burner.
To identify the type of burner, please refer to the
diagrams contained in the “Burner and nozzle
specifications”.
Using the oven
!
The first time you use your appliance, heat the
empty oven with its door closed at its maximum
temperature for at least half an hour. Ensure that the
room is well ventilated before switching the oven off
and opening the oven door. The appliance may emit a
slightly unpleasant odour caused by protective
substances used during the manufacturing process
burning away.
!
Before operating the product, remove all plastic
film from the sides of the appliance.
!
! !
!
! Only use the bottom shelf of the oven when using
the rotisserie to cook (where present). For all other
types of cooking, never use the bottom shelf and
never place anything on the bottom of the oven
when it is in operation because this could damage
the enamel. Always place your cookware (dishes,
aluminium foil, etc. etc.) on the grate provided with
the appliance inserted especially along the oven
guides.
The Oven Control Knobs
The “5 Programms” oven combines all the
advantages of traditional “static” ovens with those of
modern “ventilated” ones.
The”5 Programms” oven is extremely versatile and
offers 5 different but sure and easy ways of cooking.
Use the knobs to select the different cooking
functions available on the “5 Programms” oven:
selector knob ;
thermostat knob .
*
Only available in certain models.
ur
er
are
dia
eter
Fast
(R)
24
-
26
Semi
Fast
(S)
16
-
20
Auxiliary
(A)
10
-
14
X
C
WARNING! The glass lid can
WARNING! The glass lid can
WARNING! The glass lid can
WARNING! The glass lid can
WARNING! The glass lid can
break in if it is heated up. Turn
break in if it is heated up. Turn
break in if it is heated up. Turn
break in if it is heated up. Turn
break in if it is heated up. Turn
off all the burners and the
off all the burners and the
off all the burners and the
off all the burners and the
off all the burners and the
electric plates before closing
electric plates before closing
electric plates before closing
electric plates before closing
electric plates before closing
the lid. *Applies to the models
the lid. *Applies to the models
the lid. *Applies to the models
the lid. *Applies to the models
the lid. *Applies to the models
with glass cover only.
with glass cover only.
with glass cover only.
with glass cover only.
with glass cover only.
23
GB
When the selector knob is on any other setting than
that identified by the “ooooo”, the oven light turns on.
The setting identified by the symbol makes it
possible to turn the oven light on without having any
of the oven heating elements on. When the oven
light is on, it means that the oven is in use, and it
will remain on for the entire time the oven is being
used.
“Defrosting” Mode
Position of thermostat knob : any
any
any
any
any
The fan located on the bottom of the oven makes the
air circulate at room temperature around the food.
This is recommended for the defrosting of all types
of food, but in particular for delicate types of food
which do not require heat, such as for example: ice
cream cakes, cream or custard desserts, fruit
cakes. By using the fan, the defrosting time is
approximately halved. In the case of meat, fish and
bread, it is possible to accelerate the process using
the “ventilation mode” mode and setting the
temperature to 80° - 100°C.
1.Convection Mode
- Position of thethermostat knob: between 50
50
50
50
50°C and
M a x
M a x
M a x
M a x
M a x
On this setting, the light comes on and the top and
bottom heating elements are activated. This is the
classic, traditional type oven which has perfected,
with exceptional heat distribution and reduced
energy consumption. The convection oven is still
unequalled when it comes to cooking dishes made
up of several ingredients, e.g. cabbage with ribs,
stews, etc. Excellent results are achieved when
preparing meat-based dishes as well (braised
meats, stew, goulash, wild game, ham etc.) which
need to cook slowly and require basting or the
addition of liquid. It still remains the best system for
cooking pastries and fruit in general and when using
specific covered containers for oven cooking. When
cooking in convection mode, only use one dripping-
pan or cooking rack at a time, otherwise the heat
distribution will be uneven. Select from among the
various rack heights based on whether the dish
needs more or less heat from the top or bottom.
2. Ventilation Mode
- Position of the thermostat knob: between 50
50
50
50
50°C
and Max
Max
Max
Max
Max
Since the heat remains constant and uniform
throughout the oven due to the fan at the behind, the
air cooks and browns food uniformly over its entire
surface. With this mode, you can also cook various
dishes at the same time, as long as their respective
cooking temperatures are the same. A maximum of
2 rack levels can be used at the same time,
following the instructions in the section entitled,
“Cooking On More Than One Rack”. This cooking
mode is ideal for au gratin dishes or those which
require an extended cooking time like lasagne,
macaroni bake, chicken and roast potatoes, etc...
Moreover, the excellent heat distribution makes it
possible to use lower temperatures when cooking roasts.
This results in less loss of juices, meat which is more
tender and a decrease in the loss of weight for the roast.
The ventilated mode is especially suited for cooking fish,
which can be prepared with the addition of a limited
amount of condiments, thus maintaining their flavour and
appearance. Excellent results can also be attained when
cooking vegetable like courgettes, aubergines, peppers,
tomatoes, etc.
Desserts: leavened cakes are also perfect for the
ventilated mode. Moreover, this mode can also be
used to thaw meat, fish and bread by setting the
temperature to 80°-100°C. To thaw more delicate
foods, set the thermostat to 50°C or use only the
cold air circulation feature by setting the thermostat
to 0°C.
3.Top heating element
- Position of the thermostat knob: between 50
50
50
50
50°C and
M a x
M a x
M a x
M a x
M a x
The extremely high and direct temperature of the
grill makes it possible to brown the surface of meats
and roasts while locking in the juices to keep them
tender. The grill is also highly recommended for
dishes that require high temperature on the surface:
beef steaks, veal, entrecôte, filets, hamburger etc...
4. The “Grill”
- Position of the thermostat knob: between 50
50
50
50
50°C
and Max
Max
Max
Max
Max
This oversized grill has a completely new design,
increasing cooking efficiency by 50%. The double
grill also eliminates pockets of unheated air in the
corners of the oven.
Important: Always leave the oven door
Important: Always leave the oven door
Important: Always leave the oven door
Important: Always leave the oven door
Important: Always leave the oven door
closed when using the grill setting
closed when using the grill setting
closed when using the grill setting
closed when using the grill setting
closed when using the grill setting n order to
achieve the best results and save on energy (about
10%).
When using the grill, place the rack at the top rack
heights (see cooking table) and place the dripping-
pan beneath the oven rack to prevent grease from
falling onto the bottom of the oven.
5. Ventilated Grill :
- Position of the “thermostat knob: between 50
50
50
50
50°C
and Max
Max
Max
Max
Max
This combination of features increases the
effectiveness of the unidirectional thermal radiation
&
24
GB
of the heating elements through forced air circulation
of the air throughout the oven. This helps prevents
foods from burning on the surface, allowing the heat
to penetrate into the food. Excellent results are
achieved with kebabs made with meats and
vegetables, sausages, ribs, lamb chops, chicken,
quail, pork chops, etc. This mode is also ideal for
cooking fish steaks, like swordfish, tuna, grouper
etc.
In this function, the rotisserie motor will also turn on
(where present). Cooking with this function is
especially recommended for meat dishes such as
loins, poultry, etc….
Note: When using the grill (features 3, 4, 5), the oven
door must be closed.
Thermostat Light
This light indicates that the oven is heating. When it
turns off, the temperature inside the oven has
reached the setting made with the thermostat knob.
At this point, the light will turn on and off as the oven
maintains the temperature at a constant level.
Cooking Control Timer Knob (only on a few
(only on a few
(only on a few
(only on a few
(only on a few
models)
models)
models)
models)
models)
Some models are equipped with a timer program to
control when the oven shuts off during cooking. To
use this feature, you must wind the knob one full
turn in the counter-clockwise direction
; Then, turn
the knob in the clockwise direction
, to set the
time by matching up the indicator on the control
panel with the number of minutes on the knob. At
the end of the programmed length of time, the timer
will sound and automatically turn off the oven.
!!!!!: to use the oven in manual mode without the
cooking control timer, match the indicator on the
control panel with the
symbol on the timer knob.
When the oven is not in use, the cooking control
timer can be used like a normal timer.
!
Avoid the children touch the oven door because it is
very hot during the cooking.
The rotisserie
To operate the rotisserie, proceed as follows:
a )
a )
a )
a )
a )
place the dripping-pan on
the 1st rack;
b )
b )
b )
b )
b )
insert the special rotisserie
support on the 4th rack and
position the spit by inserting it
through the special hole into the
rotisserie at the back of the
oven;
c )
c )
c )
c )
c )
to start the spit, set the
oven selection knob on setting
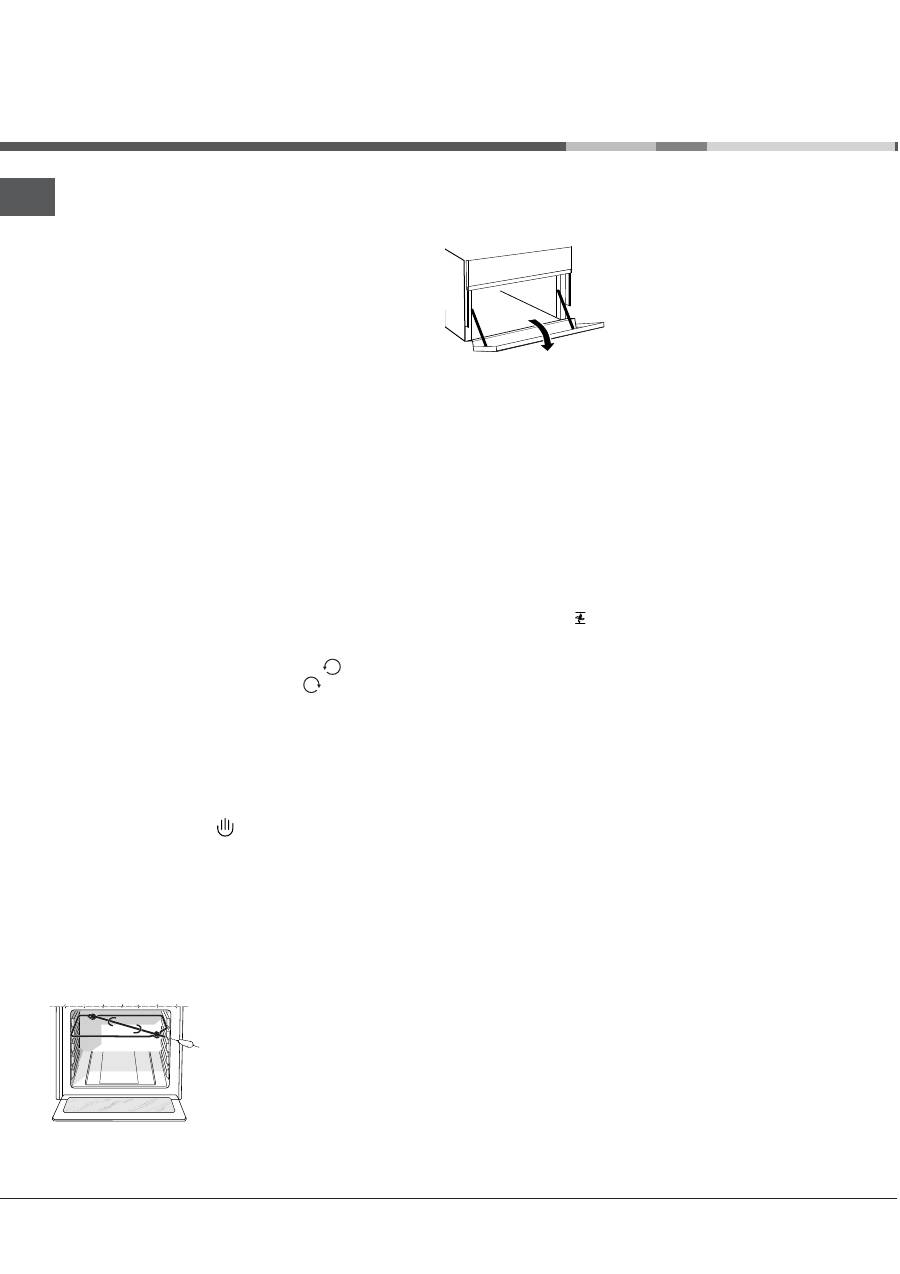
Storage recess below the oven*
Below the oven a recess can
be used to contain cooking
pans and cooker accessories.
Moreover, during oven
operation, it may be used to
keep food warm.To open the
storage is necessary turn it
downwards.
Caution:
Caution:
Caution:
Caution:
Caution: this storage recess
must not be used to store
inflammable materials.
The oven offers a wide range of alternatives which
allow you to cook any type of food in the best
possible way. With time you will learn to make the
best use of this versatile cooking appliance and the
following directions are only a guideline which may
be varied according to your own personal
experience.
Preheating
If the oven must be preheated (this is generally the
case when cooking leavened foods), the “fan
fan
fan
fan
fan
assisted
assisted
assisted
assisted
assisted” mode can be used to reach the
desired temperature as quickly as possible in order
to save on energy.
Once the food has been placed in the oven, the
most appropriate cooking mode can then be
selected.
Cooking on More Than One Rack
If you have to cook on more than one rack at the
same time, use only the “fan assisted mode
fan assisted mode
fan assisted mode
fan assisted mode
fan assisted mode”
which is the only one that is appropriate for this type
of cooking.
• The oven is fitted with 5 racks. During fan
assisted cooking, use two of the three central
racks; the lowest and highest racks receive the
hot air directly and therefore delicate foodstuffs
could be burnt on these racks.
• As a general rule, use the 2nd and 4th rack from
the bottom, placing the foodstuffs that require
greater heat on the 2nd rack from the bottom. For
example, when cooking meat roasts together with
other food, place the roast on the 2nd rack from
the bottom and the more delicate food on the 4th
rack from the bottom.
• When cooking foodstuffs that require differing
times and temperatures, set a temperature that is
somewhere between the two temperatures
required, place the more delicate food on the 4th
rack from the bottom and take the food requiring
less time out of the oven first.
• Use the dripping pan on the lower rack and the
grid on the upper;
Only available in certain models.
*

25
GB
*
Only available in certain models.
Using the Grill
This multi-function oven offers you 2 different
2 different
2 different
2 different
2 different
grilling modes.
grilling modes.
grilling modes.
grilling modes.
grilling modes.
Use the “grill
grill
grill
grill
grill” mode
with the oven door
with the oven door
with the oven door
with the oven door
with the oven door
shut
shut
shut
shut
shut, placing the food under the centre of the grill
(situated on the 3rd or 4th rack from the bottom).
To catch any fat and/or grease that may drip from
the rack, place the dripping pan provided on the
first rack from the bottom.
When using this mode, we recommend you set the
energy level to the highest setting, even though
lower levels can be set, simply by adjusting the
thermostat knob to the desired level.
Setting ,
“fan assisted grill
fan assisted grill
fan assisted grill
fan assisted grill
fan assisted grill”,only with the
only with the
only with the
only with the
only with the
oven door shut,
oven door shut,
oven door shut,
oven door shut,
oven door shut, is extremely useful for grilling
foods rapidly, as the distribution of heat makes it
possible not only to brown the surface, but also to
cook the bottom part.
Moreover, it can also be used for browning foods at
the end of the cooking process, such as adding that
gratin finish to pasta bakes, for example.
When using this mode, place the grid on the 2nd or
3rd oven rack from the bottom (see cooking table)
then, to prevent fat and grease from dripping onto
the bottom of the oven and thus smoke from
forming, place a dripping-pan on the 1st rack from
the bottom.
! Always use the grill with the oven door
! Always use the grill with the oven door
! Always use the grill with the oven door
! Always use the grill with the oven door
! Always use the grill with the oven door
shut.
shut.
shut.
shut.
shut. This will allow you both to obtain excellent
results and to save on energy (approximately 10%).
When using this mode, we advise you to set the
thermostat to 200°C, as it is the most efficient way
to use the grill, which is based on the use of infrared
rays. However, this does not mean you cannot use
lower temperatures, simply by adjusting the
thermostat knob to the desired temperature.
Therefore the best results when using the grill
modes are obtained by placing the grid on the lower
racks (see cooking table) then, to prevent fat and
grease from dripping onto the bottom of the oven
and smoke from forming, place a dripping-pan on
the 1st oven rack from the bottom.
Baking Cakes
When baking cakes, always place them in a
preheated oven. Make sure you wait until the oven
has been preheated thoroughly (the red light “O
O
O
O
O” will
turn off). Do not open the oven door during baking to
prevent the cake from dropping.
Cooking Pizza
For best results when cooking pizza, use the
For best results when cooking pizza, use the
For best results when cooking pizza, use the
For best results when cooking pizza, use the
For best results when cooking pizza, use the
“““““fan assisted “
“
“
“
“ mode:
mode:
mode:
mode:
mode:
• Preheat the oven for at least 10 minutes;
• Use a light aluminium pizza pan, placing it on the
grid supplied with the oven. If the dripping pan is
used, this will extend the cooking time, making it
difficult to get a crispy crust;
• Do not open the oven door frequently while the
pizza is cooking;
• If the pizza has a lot of toppings (three of four),
we recommend you add the mozzarella cheese on
top halfway through the cooking process.
• When cooking pizza on two racks, use the 2nd
and 4th with a temperature of 220°C and place the
pizzas in the oven after having preheated it for at
least 10 minutes.
Cooking Fish and Meat
When cooking white meat, fowl and fish, use
temperature settings from 180 °C to 200 °C.
For red meat that should be well done on the outside
while tender and juicy in the inside, it is a good idea
to start with a high temperature setting (200°C-
220°C) for a short time, then turn the oven down
afterwards.
In general, the larger the roast, the lower the
temperature setting. Place the meat on the centre of
the grid and place the dripping pan beneath it to
catch the fat.
Make sure that the grid is inserted so that it is in the
centre of the oven. If you would like to increase the
amount of heat from below, use the low rack heights.
For savoury roasts (especially duck and wild game),
dress the meat with lard or bacon on the top.
Electronic timer*
This function displays the time and works as a timer
which counts down to zero.
!
All functions will be implemented approximately 7
seconds after they have been set.
Resetting the clock
After the appliance has been connected to the
power supply, or after a power cut, the clock display
will begin to blink, showing the figure: 0:00
0:00
0:00
0:00
0:00
• Press button
G
G
G
G
G
and then buttons
-
and
+
to set
the exact time. Press and hold the buttons to
quicken the count upwards.
Any necessary modifications can be made by
repeating the above process.
26
GB
elector
knob
settin
Food
to
be
cooked
ei
"
t
(in
k
)
Cookin
rack
#
osition
$
rom
bottom
%
re
"
eatin
time
(minutes)
T
"
ermostat
knob
settin
Cookin
time
(minutes)
&
e
$
rostin
All
G
rozen
G
ood
Con
'
ection
Duck
Roast
H
eal
or
bee
G
Pork
roast
Biscuits
(short
pastry)
Tarts
1
1
1
-
1
3
3
3
3
3
15
15
15
15
15
200
200
200
180
180
65-75
70-75
70-80
15-20
30-35
(
an
assisted
Pizza
(on
2
racks)
Lasagne
Lamb
Roast
chicken
I
potatoes
Mackerel
Plum-cake
L
ream
pu
GG
s
(on
2
racks)
Biscuits
(on
2
racks)
Sponge
cake
(on
1
rack)
Sponge
cake
(on
2
racks)
Sa
H
oury
pies
1
1
1
1
1
1
0.5
0.5
0.5
1.0
1.5
2-4
3
2
2-4
2
2
2-4
2-4
2
2-4
3
15
10
10
10
10
10
10
10
10
10
15
220
200
180
180
180
170
190
180
170
170
200
15-20
30-35
50-60
60-75
30-35
40-50
20-25
10-15
15-20
20-25
25-30
To
#)'
en
Browning
G
ood
to
per
G
ect
cooking
-
3/4
15
220
-
Grill
Soles
and
cuttle
G
ish
S
O
uid
and
prawn
kebabs
L
od
G
ilet
Q
rilled
H
egetables
R
eal
steak
L
utlets
T
amburgers
Mackerels
Toasted
sandwiches
1
1
1
1
1
1
1
1
n.
U
4
4
4
4
3/4
4
4
4
4
4
5
5
5
5
5
5
5
5
5
Max
Max
Max
Max
Max
Max
Max
Max
Max
8-10
6-8
10
10-15
15-20
15-20
7-10
15-20
2-3
(
an
assisted
rill
Q
rilled
chicken
L
uttle
G
ish
1.5
1.5
3
3
5
5
200
200
55-60
30-35
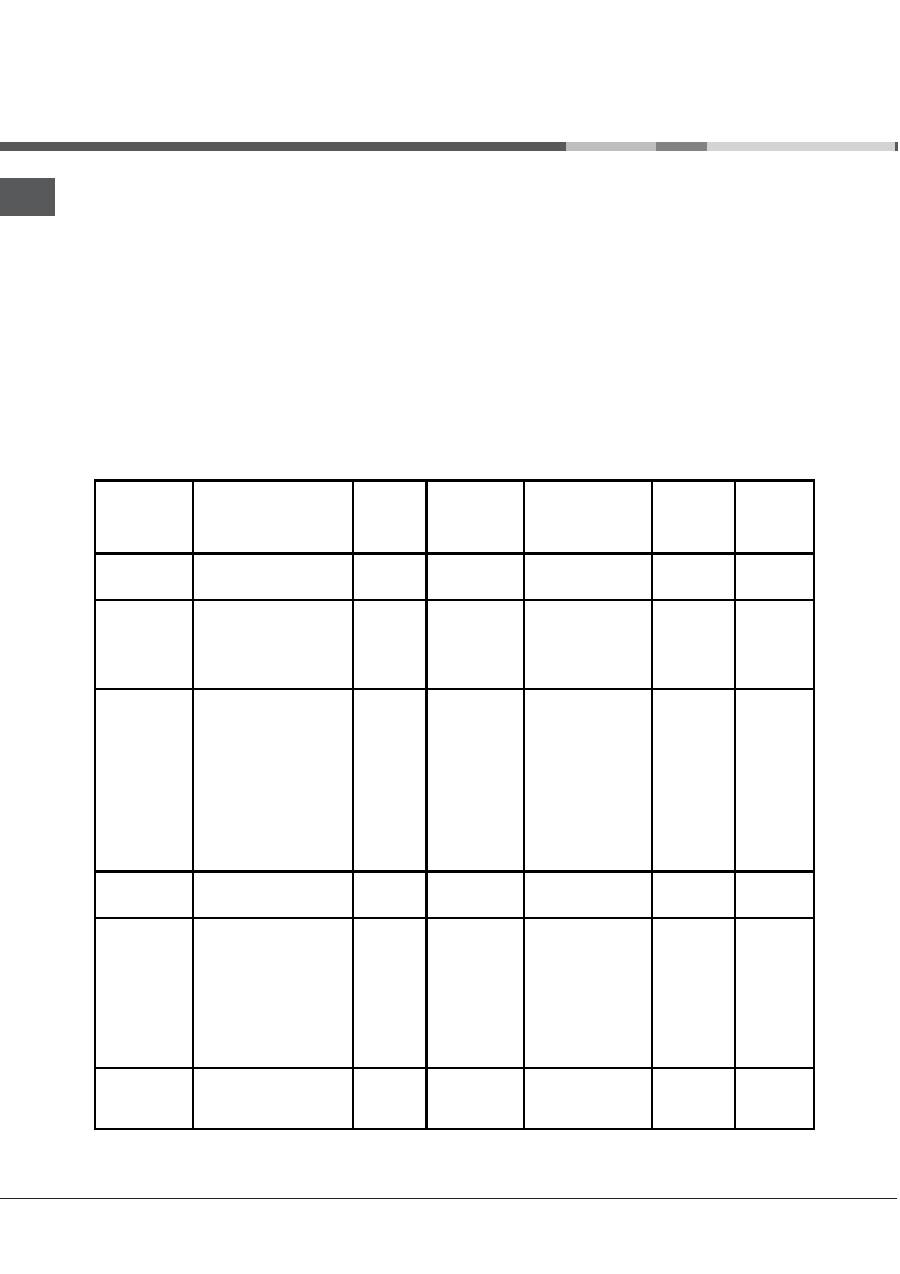
NB
*
cooking
times
are
approximate
and
may
H
ary
according
to
personal
taste.
When
cooking
using
the
grill
or
G
an
assisted
grill,
the
dripping
pan
must
always
be
placed
on
the
1st
o
H
en
rack
G
rom
the
bottom.
Oven cooking advice table
Timer feature
This function may be accessed by pressing the
nnnnn
button, after which the display will show the symbol
nnnnn
. Every time the
+
button is pressed it
corresponds to a time increase of 10 seconds, until
it reaches 99 minutes and 50 seconds. After this
point, each press of the button represents an
increase of one minute, up to a maximum of 10
hours.
Pressing the
-
button reduces the time.
After the time period has been set, the timer will
begin to count down. When the timer reaches zero,
the buzzer will sound (this may be stopped by
pressing any button).
The time may be displayed by pressing the
G
G
G
G
G
button, and the
nnnnn
symbol indicates that the timer
function has been set. After approximately 7
seconds, the display will automatically revert to the
timer.
Cancelling a time that has already been set
Press the
–
button until the display shows 0:00.
0:00.
0:00.
0:00.
0:00.
Adjusting the buzzer volume
After selecting and confirming the clock settings,
use the
–
button to adjust the volume of the alarm
buzzer.
Оглавление
- Installazione
- Descrizionedell’apparecchio
- Avvio e utilizzo
- Precauzioni e consigli
- Manutenzione e cura
- Assistenza
- Operating Instructions
- Installation
- Descriptionof theappliance
- Start-up and use
- Precautions and tips
- Care and maintenance
- Руководство по эксплуатации
- Установка
- Описаниеизделия
- Включение и эксплуатация
- Предосторожности и рекомендации
- Техническоеобслуживание и уход
- Használati útmutató
- Beszerelés
- A KÉSZÜLÉK LEÍRÁSA
- Bekapcsolás és használat
- Óvintézkedések és tanácsok
- Karbantartás és ápolás
- Інструкціі з експлуатаціі
- Встановленн
- Опис плити
- Включення і використання
- Запобіжні засоби и поради
- Догляд i технічне обслуговування
