Indesit HIM 531 EK.A: Hob
Hob: Indesit HIM 531 EK.A
Hob
Type of hob
Recommended power levels for various types of cooking:
GB
Set. Radiant Burner
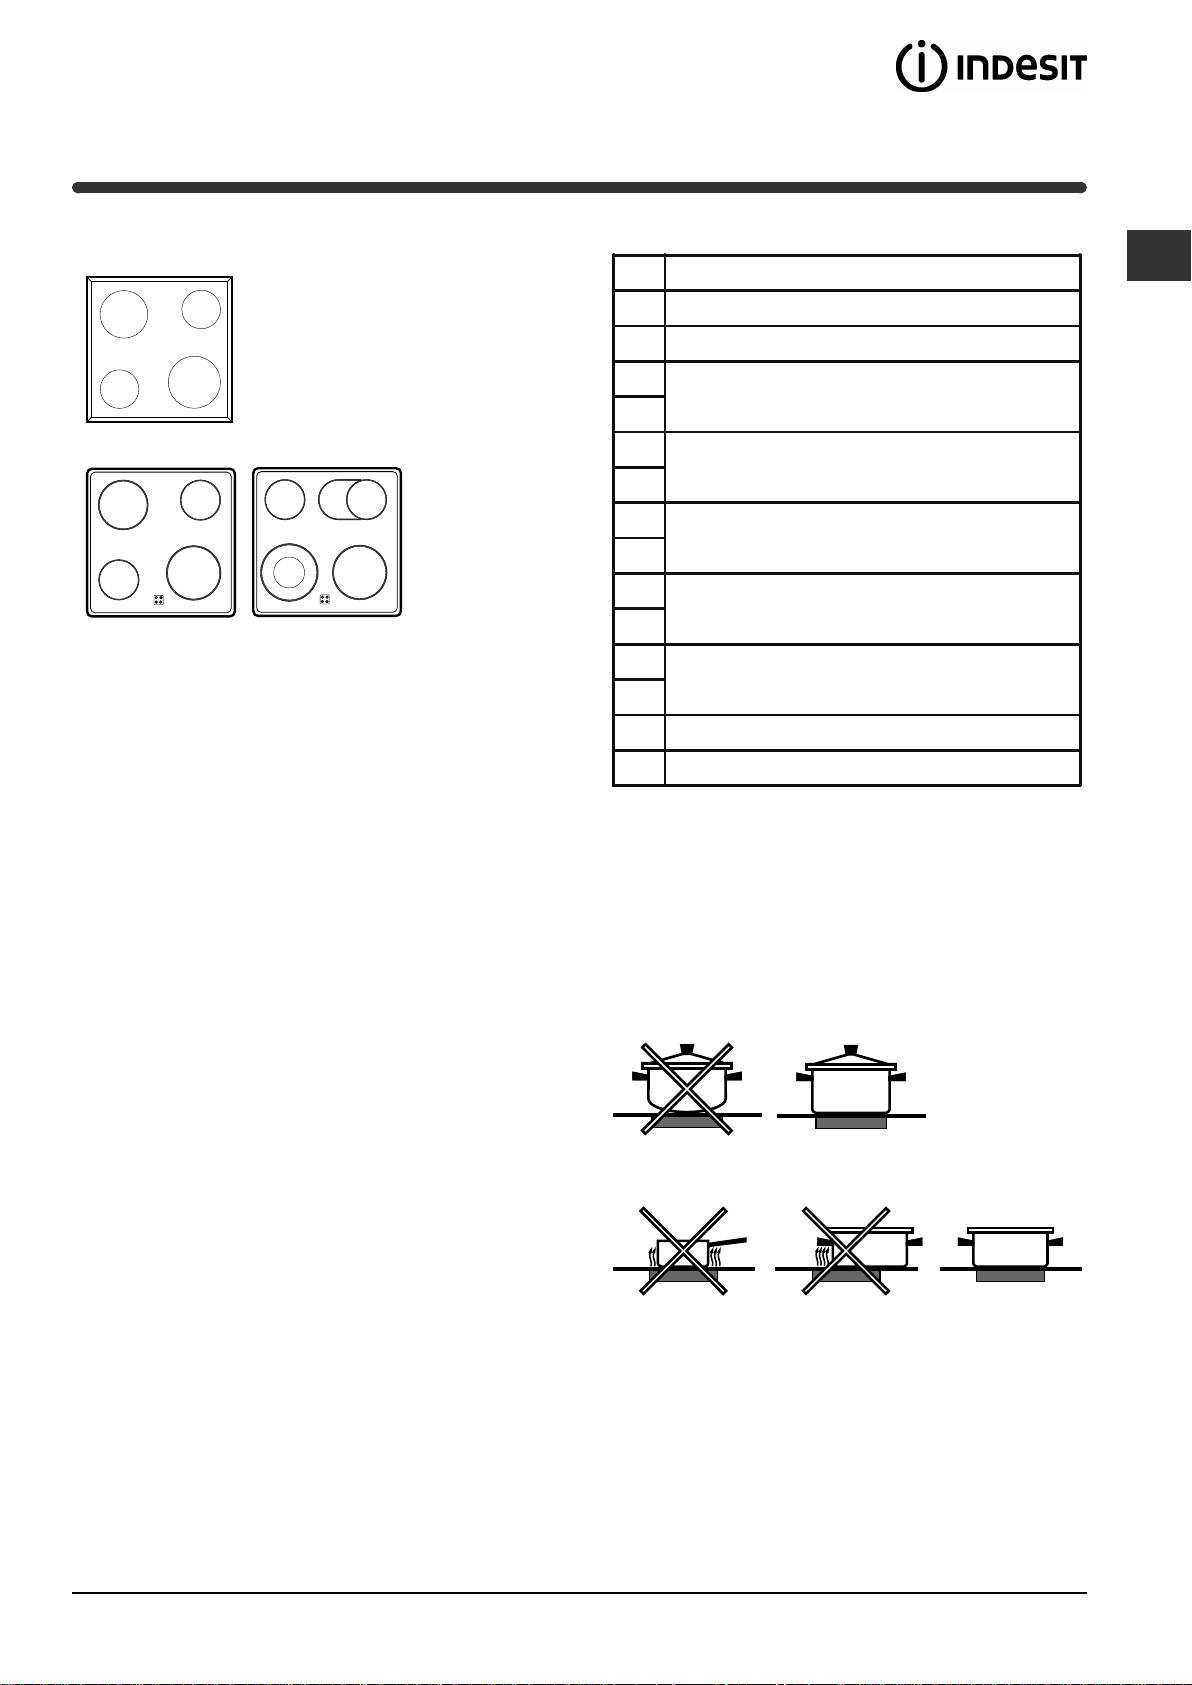
The oven is combined with a hob that
can be made up of two types of
0
Off
heating elements: cast-iron electric
1
plates (see diagram 1) or glass
To melt butter and chocolate.
ceramic hobs, which may be
2
traditional (see diagram 2) or with
To heat liquids.
extendable cooking zones (see
3
diagram 3).
4
For creams and sauces.
5
6
For cooking at the boiling point.
7
8
For roasts.
9
10
Switching on the glass ceramic hob
For boiling large pieces of meat.
11
Traditional cooking zones
12
For frying.
Traditional cooking zones are made up of circular heating
elements. They turn red approximately ten seconds after
A
they have been turned on.
Each cooking zone is fitted with a control knob allowing
you to select from 12 different temperature settings from a
minimum of 1 to a maximum of 12.
Extendable cooking zones
The extendable radiant elements (B) are recognisable by
the fact that they have a double heating zone. You can turn
on only the smaller internal cooking zone or both the
external and internal zones.
The control knob allows you to choose between two power
levels, which are both adjustable between a minimum
value of 1 to a maximum of 12:
• The lowest power level can be set by turning the knob
clockwise from 1 to 12.
• Turn the knob to completely (A) until you hear a slight
click, to enable the maximum power level, which in turn
can be adjusted between 12 and 1 by turning the knob
anticlockwise. To restore the minimum power level, turn
the knob and set it back to position 0.
For double cooking zones, the first part of the knob
movement activates the smaller cooking zone (internal). To
activate both (internal and external), it is necessary to turn
the knob completely (A) and then select the desired power
level between 12 and 1.
Residual heat indicator lights (only available on
certain models)
The indicator lights (C) indicate that the temperature of the
corresponding cooking zones have exceeded 60°C, even
after the heating element has been switched off.
9
A
diagram 1
A
A
A
B
diagram 3
diagram 2
A
B
A
A
C
C
For utilising both cooking areas.
Practical advice on using the glass
ceramic hob
! The glue that is applied on the gaskets leaves some
traces of grease on the glass. Before using the appliance,
we recommend you eliminate these with a special non-
abrasive cleaning product. During the first few hours of use
there may be a smell of rubber which will disappear very
quickly.
To obtain the best results with your hob:
• Use flat-bottomed pans to ensure that they adhere to the
cooking zone perfectly.
• Always use pans with a diameter that is large enough to
cover the hotplate fully, in order to use all the available
heat.
• Make sure that the bottom of the cookware is always dry
and clean to guarantee correct adherence and long life,
not only for the cooking zones but also for the cookware
itself.
• Avoid using the same cookware that is used on gas
burners: the heat concentration on gas burners may
deform the base of the pan, causing it not to adhere
correctly.
• Never leave a cooking zone on without cookware on it
because as it heats up and rapidly reaches the
maximum level, it could damage the heating elements.
Оглавление
- Installation
- Start-up and use
- Cooking modes
- Hob
- The electronic cooking programmer
- Precautions and tips
- Maintenance and care
- Installation
- Mise en marche et utilisation
- Programmes
- Table de cuisson
- Le programmateur de cuisson électronique
- Précautions et conseils
- Nettoyage et entretien
- Het installeren
- Starten en gebruik
- Programma’s
- Kookplaat
- De elektronische programmeur
- Voorzorgsmaatregelen en advies
- Onderhoud en verzorging
- Installation
- Inbetriebsetzung und Gebrauch
- Programme
- Kochfeld
- Der elektronische Garprogrammierer
- Vorsichtsmaßregeln und Hinweise
- Reinigung und Pflege
- ÅãêáôÜóôáóç
- Åêêßíçóç êáé ÷ñÞóç
- ÐñïãñÜììáôá
- Åðßðåäï øçóßìáôïò
- Ï çëåêôñïíéêüò ðñïãñáììáôéóôÞò
- ÐñïöõëÜîåéò êáé óõìâïõëÝò
- ÓõíôÞñçóç êáé öñïíôßäá
- Монтаж
- Включение и эксплуатация
- Программы
- Варочная панель,
- Электронный таймер программирования выпечки
- Предосторожности и рекомендации
- Техническое обслуживание и уход
