Dell C__Dock II Expansion Station: инструкция
Раздел: Компьютерная техника, комплектующие, аксессуары
Тип: Ноутбук
Инструкция к Ноутбуку Dell C__Dock II Expansion Station
Оглавление

0G913fc1.fm Page 1 Thursday, October 18, 2001 1:25 PM
Dell™ Latitude™ C/Dock II Expansion Station
System Information Guide
Příručka k zařízení
Systeminformation
Systeeminformatiegids
Järjestelmätiedot
Guide d'information sur le système
Systeminformationshandbuch
Informazioni di sistema
Veiledning for systeminformasjon
Przewodnik – informacje o systemie
Èíôîðìàöèîííîå ðóêîâîäñòâî ïî ñèñòåìå
Guía de información del sistema
Systeminformationsguide
Model PDX
www.dell.com | support.dell.com

0G913bk1.book Page 2 Thursday, October 18, 2001 12:33 PM

0G913bk1.book Page 1 Thursday, October 18, 2001 12:33 PM
Dell™ Latitude™ C/Dock II Expansion Station
System Information Guide
www.dell.com | support.dell.com

0G913bk1.book Page 2 Thursday, October 18, 2001 12:33 PM
Notes, Notices, and Cautions
NOTE: A NOTE indicates important information that helps you make better use of your computer.
NOTICE: A NOTICE indicates either potential damage to hardware or loss of data and tells you
how to avoid the problem.
CAUTION: A CAUTION indicates a potential for property damage, personal injury,
or death.
____________________
Information in this document is subject to change without notice.
© 2001 Dell Computer Corporation. All rights reserved.
Reproduction in any manner whatsoever without the written permission of Dell Computer Corporation is strictly
forbidden.
Trademarks used in this text: Dell, the DELL logo, Latitude, and DellWare are trademarks of Dell Computer Corporation;
3Com is a trademark of 3Com Corporation; Microsoft, Windows, and Windows NT are registered trademarks of
Microsoft Corporation.
Other trademarks and trade names may be used in this document to refer to either the entities claiming the marks and
names or their products. Dell Computer Corporation disclaims any proprietary interest in trademarks and trade names
other than its own.
This product incorporates copyright protection technology that is protected by method claims of certain U.S. patents
and other intellectual property rights owned by Macrovision Corporation and other rights owners. Use of this copyright
protection technology must be authorized by Macrovision Corporation, and is intended for home and other limited
viewing uses only unless otherwise authorized by Macrovision Corporation. Reverse engineering or disassembly is
prohibited.
October 2001 P/N 0G913 Rev. A01

0G913bk1.book Page 3 Thursday, October 18, 2001 12:33 PM
Dell™ Latitude™ C/Dock II Expansion Station
System Information Guide
This document contains getting started, safety, regulatory, and warranty
information about your Dell Latitude C/Dock II Expansion Station as well
as information about other Dell documents that are available and how to
obtain them.
Other Documents Available
• Documentation updates, which are sometimes included with your
docking device to describe changes to your docking device or software.
Always read these updates before consulting any other documentation
because the updates often contain the latest information.
• Documentation included with any options you purchase separately
from your docking device. This documentation includes information
that you need to configure and install these options in your docking
device.
Getting Help
Dell provides a number of tools to help you if your docking device does not
perform as expected. For information on these help tools, see the “Getting
Help” section in the computer’s User’s Guide.
Docking Device Overview
NOTE: Alert your network administrator before you connect the docking
device to a network.
You must attach an AC adapter to the docking device before you dock the
computer to the docking device and turn on the computer. The AC adapter
powers the docking device and the computer at the same time. Any battery
installed in the computer charges while you use the docking device.
System Information Guide 3
0G913bk1.book Page 4 Thursday, October 18, 2001 12:33 PM
NOTICE: Always use the Dell PA-6 AC adapter that came with the docking
device. If you use any other commercially available AC adapter—or the AC
adapter from older models of Dell computers—you may damage the docking
device or the computer.
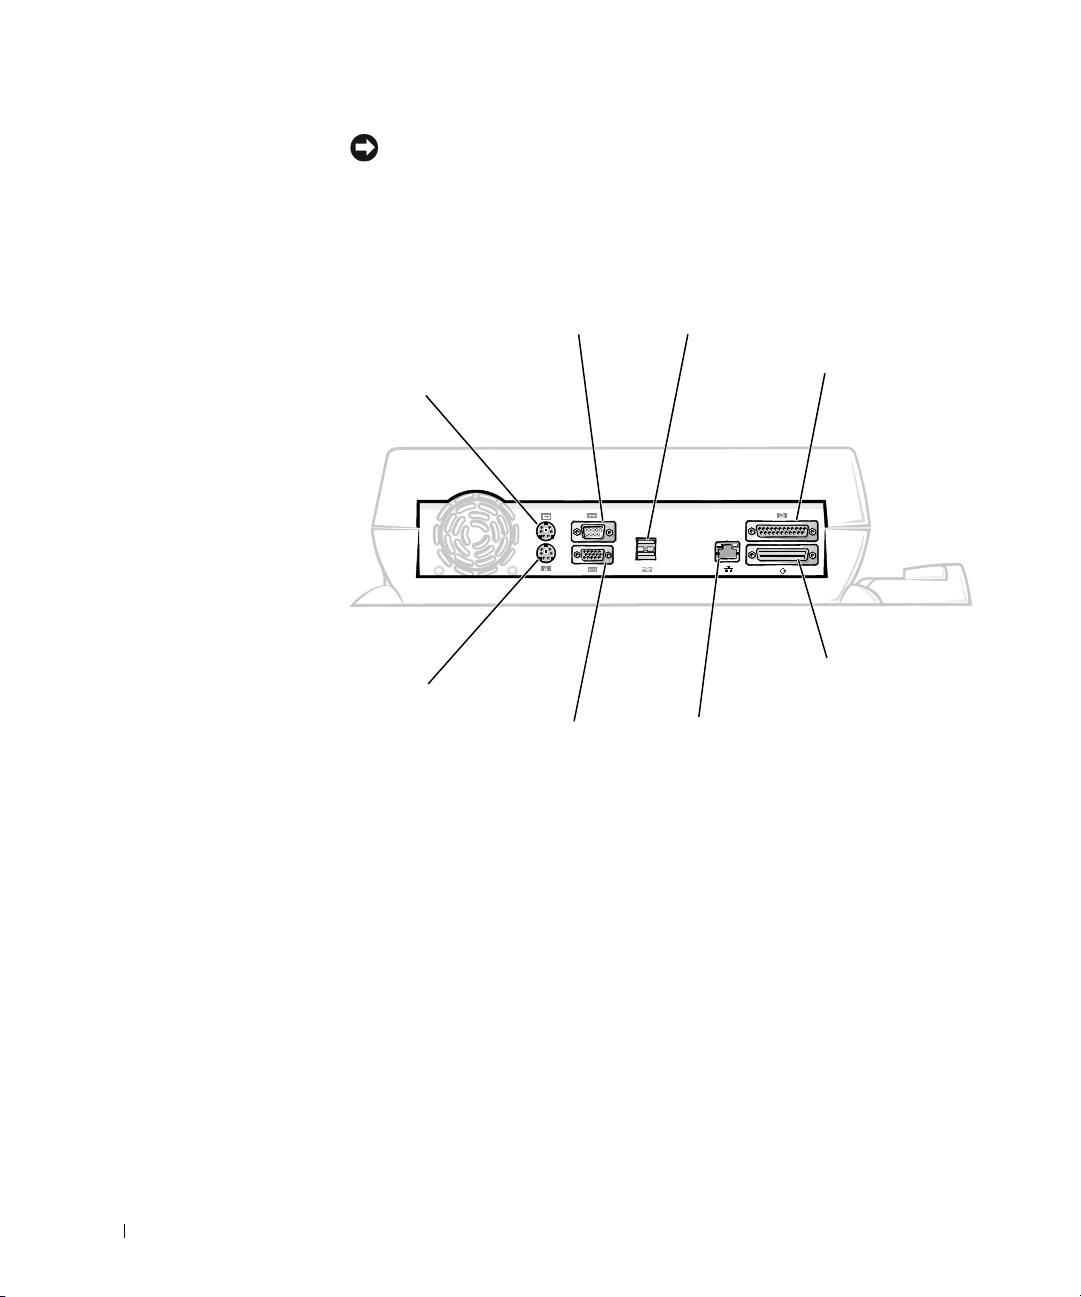
I/O Panel of the Docking Device
serial connector USB connectors (2)
PS/2-keyboard
parallel connector
connector
www.dell.com | support.dell.com
PS/2-mouse
SCSI
connector
connector
video connector network connector
The “External I/O Connectors” table shows the icons for each of the
connectors on the back of the docking device and indicates the type of
external device(s) that you can attach to each connector.
4 System Information Guide
0G913bk1.book Page 5 Thursday, October 18, 2001 12:33 PM
External I/O Connectors
Connector
Icon Connector Description
One or two USB devices, such as a USB mouse, connect to
the dual USB connector.
An external PS/2-style keyboard or external numeric keypad
connects to the PS/2 keyboard connector.
An external PS/2-compatible mouse connects to the PS/2
mouse connector.
A serial device, such as a serial mouse or external modem,
connects to the serial port connector.
A network interface cable connects to the NIC connector.
A parallel device, such as a printer, connects to the parallel
port connector.
An external monitor connects to the video connector.
The AC adapter that came with the docking device connects
to the AC adapter connector.
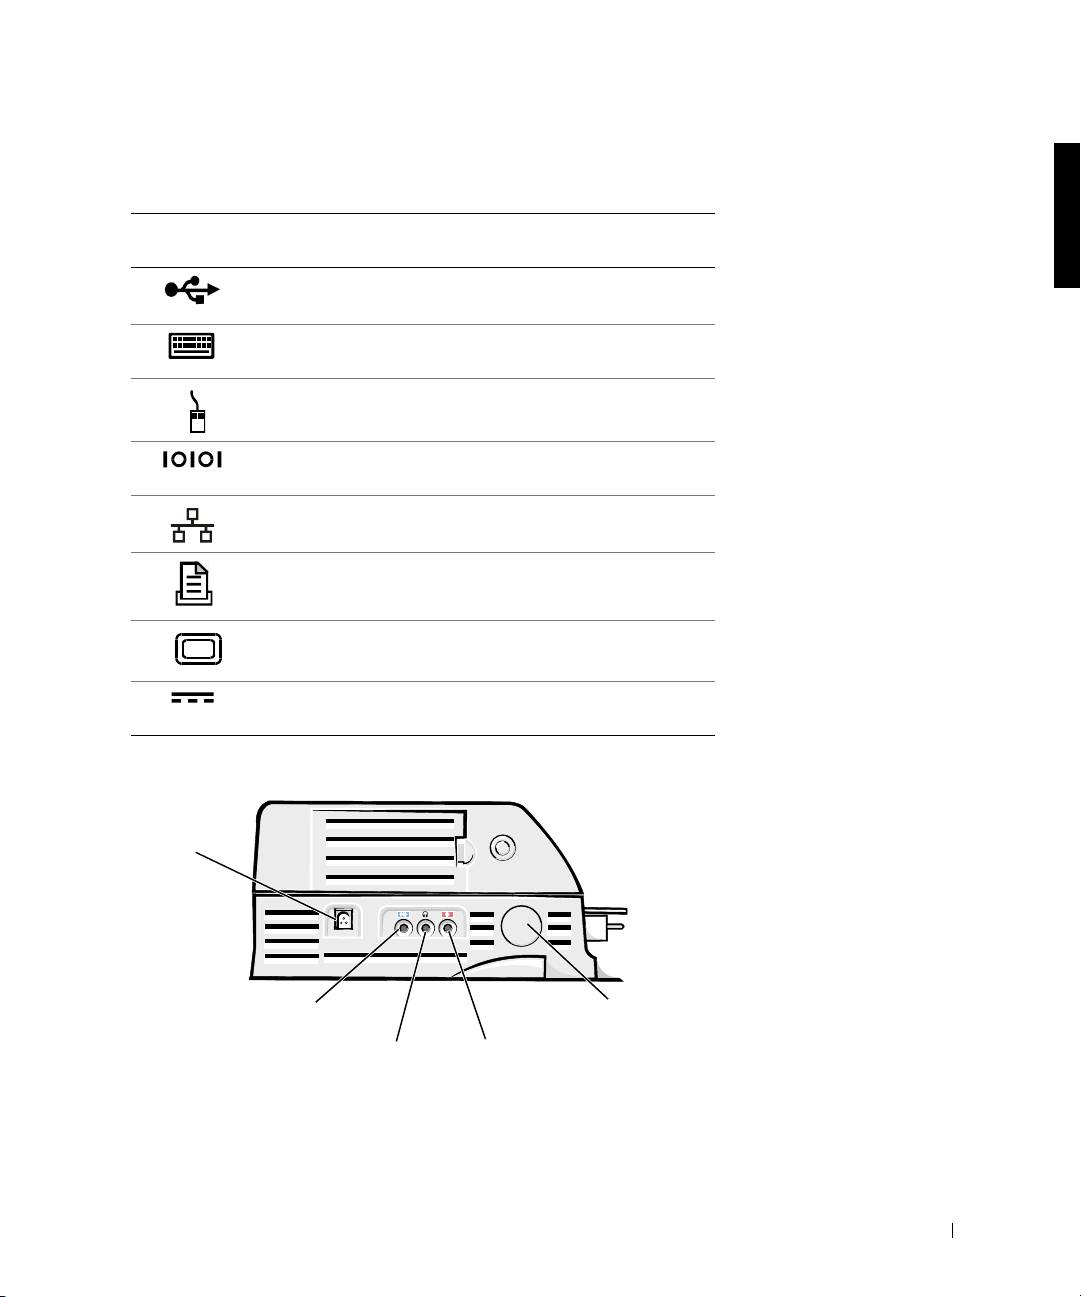
Audio Connectors and Infrared Sensor
AC adapter
connector
line-in/audio-in connector
infrared sensor
headphones/speaker connector microphone connector
System Information Guide 5
0G913bk1.book Page 6 Thursday, October 18, 2001 12:33 PM
Docking Control Base Controls and Indicators
security lock slotsecurity lock
padlock slot
slot (not on all
devices)
locked position
unlocked position
eject position
www.dell.com | support.dell.com
docking
indicator
eject/locking lever
drive access indicator
undock request
button
power indicator
power button
Monitor Stand
NOTICE: The stand supports monitors that weigh up to 45.3 kilograms (kg)
(100 pounds [lb]). Heavier monitors may damage the stand
, computer, and
docking device.
6 System Information Guide
0G913bk1.book Page 7 Thursday, October 18, 2001 12:33 PM
Docking Device With the Monitor Stand
monitor stand
docking device
computer docking control
base
NOTE: Be sure that the back legs on the monitor stand engage the slots on
either side of the docking control base.
Before Docking the Computer
®
®
®
If your computer is running the Microsoft
Windows
9x, Windows NT
,
or Windows Millennium (Me) operating system, you must first check your
computer for existing docking drivers. If your computer does not have the
docking drivers, install them before you dock the computer for the first
time. To install the docking drivers, perform the steps in “Installing the
Docking Drivers.”
System Information Guide 7

0G913bk1.book Page 8 Thursday, October 18, 2001 12:33 PM
NOTE: If your computer is running the Windows XP or Windows 2000
operating system
, the drivers are installed automatically and you do not need
to perform the steps in
“Installing the Docking Drivers.” Go to “Docking Your
Computer.
”
Check Your Computer for Existing Docking Drivers
1 Double-click My Computer.
2 Double-click Control Panel.
3 Double-click Add/Remove Programs.
4 Locate the correct docking drivers from the list of programs.
www.dell.com | support.dell.com
For Windows 9x and Windows Me, check for the driver with Quick
Install in the name. For example: Dell Dock Quick Install for
Windows.
For Windows NT, check for NT Softex Docking Services.
If your computer does not have the docking drivers, go to the next section,
“Installing the Docking Drivers.” If your computer has the docking drivers,
go to “Docking Your Computer.”
Installing the Docking Drivers
You can install your docking drivers in one of the following ways:
• Install the drivers from the ResourceCD or Drivers and Utilities CD
that came with your computer or docking device.
• Download the drivers from the Dell support website.
Installing the Docking Drivers From the ResourceCD or Drivers and
Utilities CD
1 Insert the ResourceCD or Drivers and Utilities CD into the CD drive.
In most cases, the CD should start running automatically. If it does
not, start Windows
Explorer, click your CD drive directory to display
the CD contents, and then double-click the autorcd application file. If
a welcome screen appears, click Next. The first time that you run the
CD, it might prompt you to install some setup files. Click OK and
follow the instructions on the screen to continue.
8 System Information Guide

0G913bk1.book Page 9 Thursday, October 18, 2001 12:33 PM
2 From the Language pull-down menu on the toolbar, select your
preferred language for the driver (if available).
A welcome screen appears.
3 Click Next.
4 Under Search Criteria, select the appropriate categories from the
System Model and Operating System pull-down menus.
If your system is running Windows 9x or Windows Me, select System
Utilities from the Device Type pull-down menu, and then select
Drivers from the Topic pull-down menu.
If your system is running Windows NT, select System Utilities from the
Device Type pull-down menu, and then select Utilities from the Topic
pull-down menu.
A link or links appear(s) for the specific drivers or utilities used by your
computer.
5 If your system is running Windows 9x or Windows Me, click the link for
the Dell Dock QuickInstall utility.
The Dell Dock QuickInstall file is a utility that installs the required
docking drivers on your computer.
If your computer is running Windows NT, click the link for Softex
Docking Services.
6 Click the Install button to start the automatic installation. At the
welcome screen, follow the screen prompts to complete the
installation.
NOTE: Some ResourceCDs may require users to navigate through folders to
obtain the correct driver. For complete instructions on reinstalling drivers, see
your User’s Guide.
Installing the Docking Drivers From the Dell Support Website
1 Go to the Dell support website at http://support.dell.com. If you are
visiting the website for the first time, specify your country by clicking
the map that appears.
The Welcome to support.dell.com page opens.
System Information Guide 9

0G913bk1.book Page 10 Thursday, October 18, 2001 12:33 PM
2 Enter your docking device information, and then click Go!
Click Downloads For Your Dell.
The Downloads For Your Dell window appears, including a short form
for you to fill out.
3 Enter your system service tag number, or select your Dell system.
4 Select your operating system and operating system language.
5 Select System and Configuration Utilities as your download category.
6 Click Go!.
7 If your computer is running Windows 9x or Windows Me, locate and
www.dell.com | support.dell.com
click the link for the Dell Dock QuickInstall utility.
If your computer is running Windows NT, locate and click the link for
Softex Docking Services.
8 Follow the instructions on the screen to download and install the
required drivers.
After you download the files and before you install the drivers, make
sure to view the readme.txt file that is included in the downloaded files
for important information about the installation.
Docking Your Computer
If you attach a monitor to the docking device and turn the monitor on, the
screen image appears on the monitor. To switch the image to the computer
display, or to both the monitor and the computer display, press
<Fn><F8>.
When you dock the computer to the docking device and turn the computer
on, the green power light on the docking control base lights up (see
“Docking Control Base Controls and Indicators”).
NOTICE: To avoid losing data, save any open files before you dock the
computer.
NOTICE: If a Peripheral Component Interconnect (PCI) video card is
installed in the docking device
, shut down the computer before docking or
undocking to avoid losing data.
1
Save all files, close and exit all application programs, exit the operating
system, and turn off the computer.
10 System Information Guide
0G913bk1.book Page 11 Thursday, October 18, 2001 12:33 PM
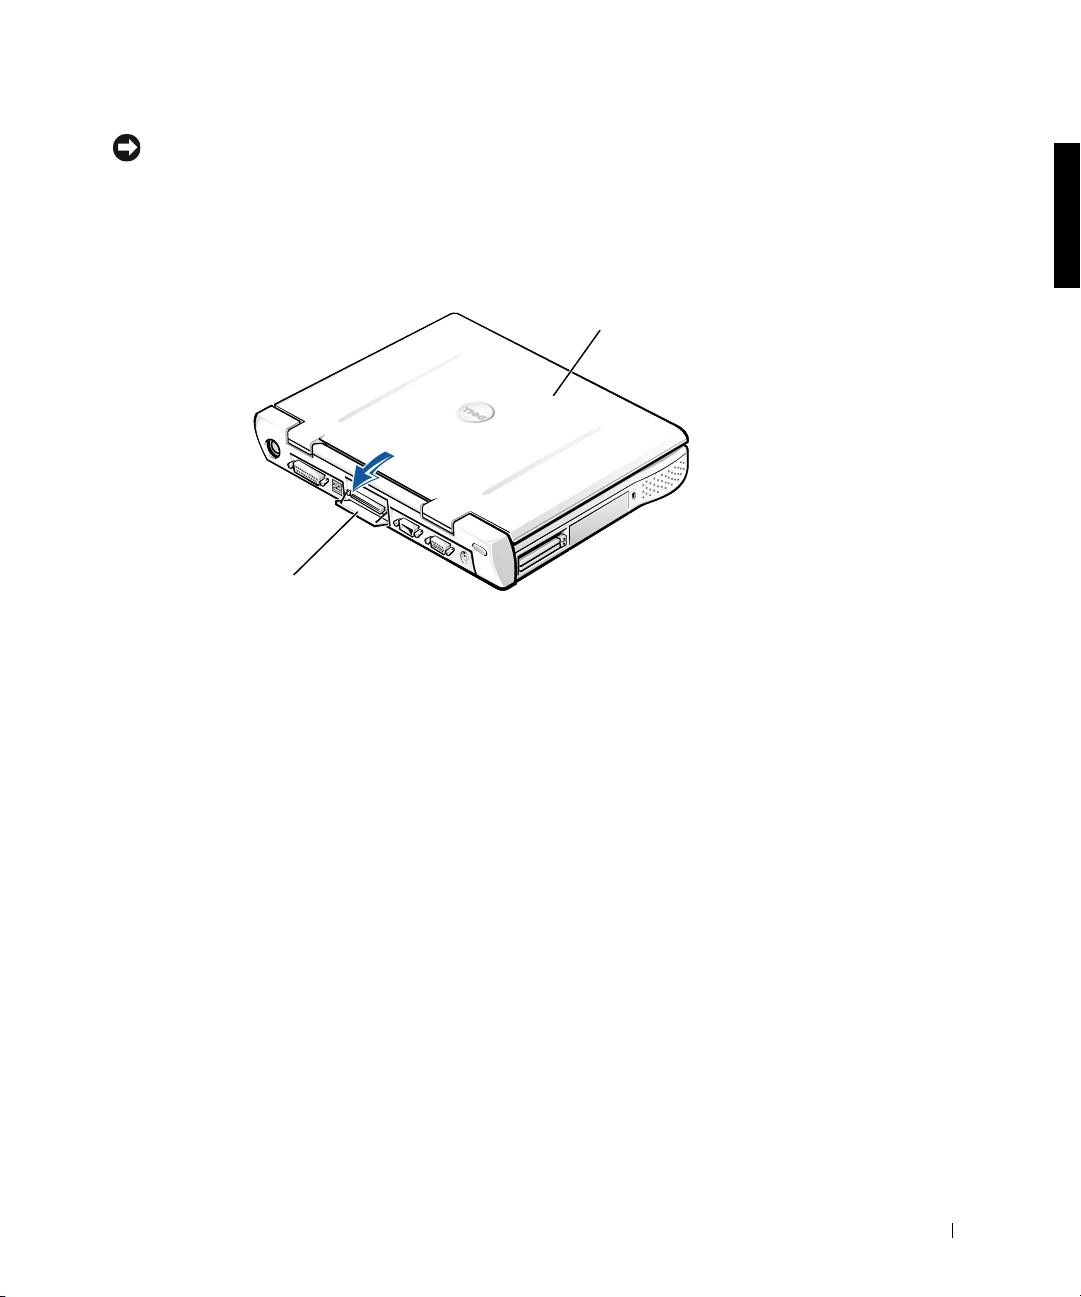
NOTICE: To avoid damaging the docking connector, open the docking panel
door before you attempt to dock the computer to the docking device.
2
If the computer has a docking panel door, open the docking panel door
on the back of the computer.
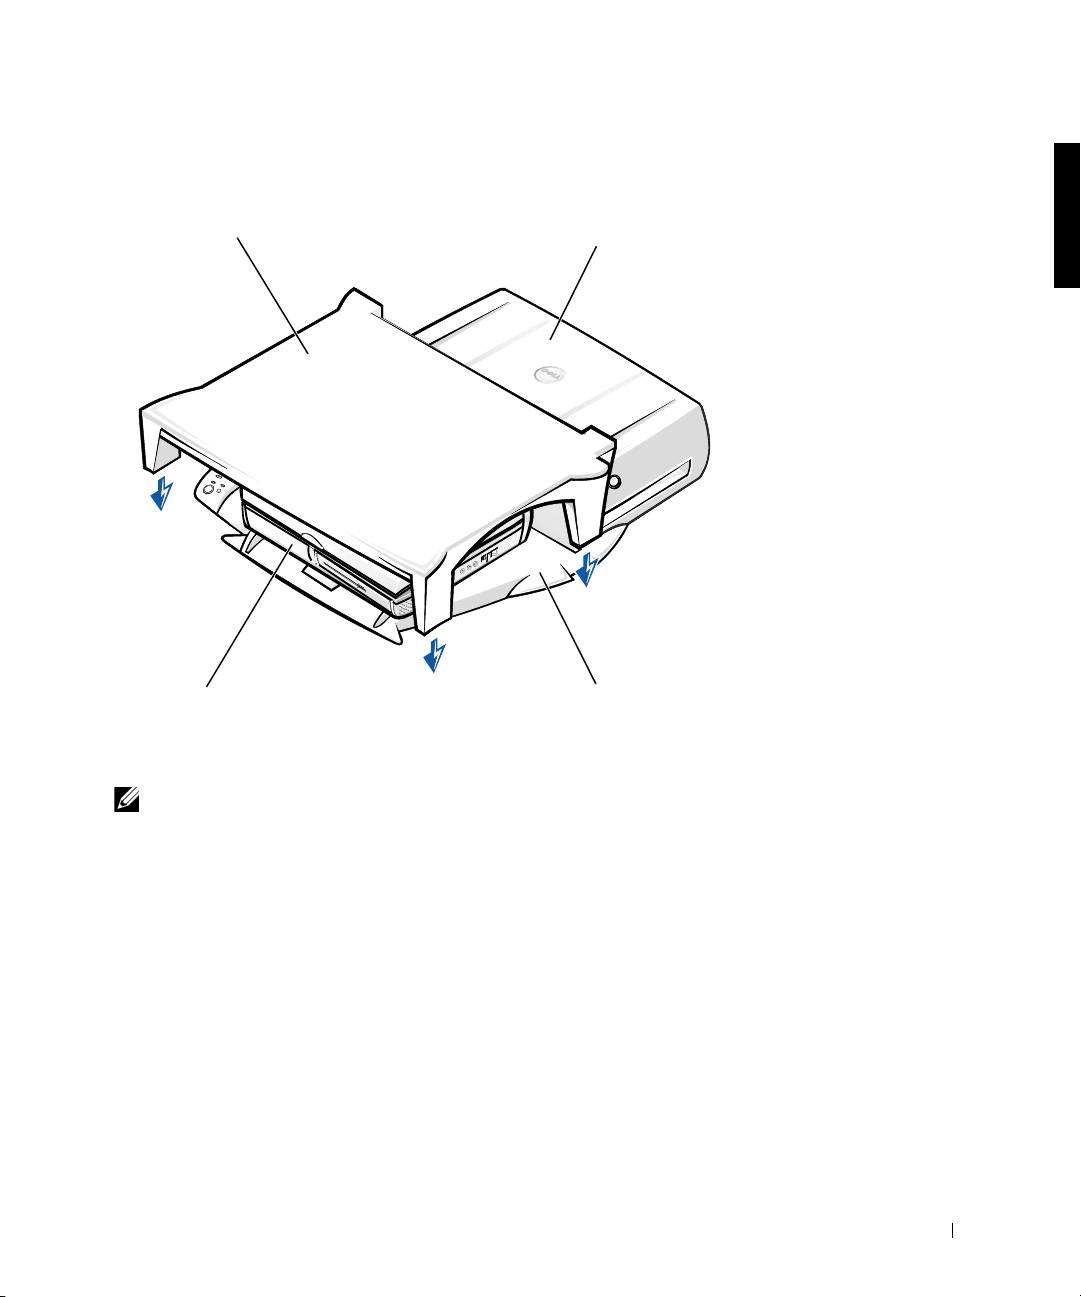
Docking Panel Door on the Computer
computer
docking panel door
(not on all computers)
3
If you are using the docking device with a monitor stand, close the
computer display.
4 Ensure that the eject/locking lever is in the unlocked position.
System Information Guide 11
0G913bk1.book Page 12 Thursday, October 18, 2001 12:33 PM
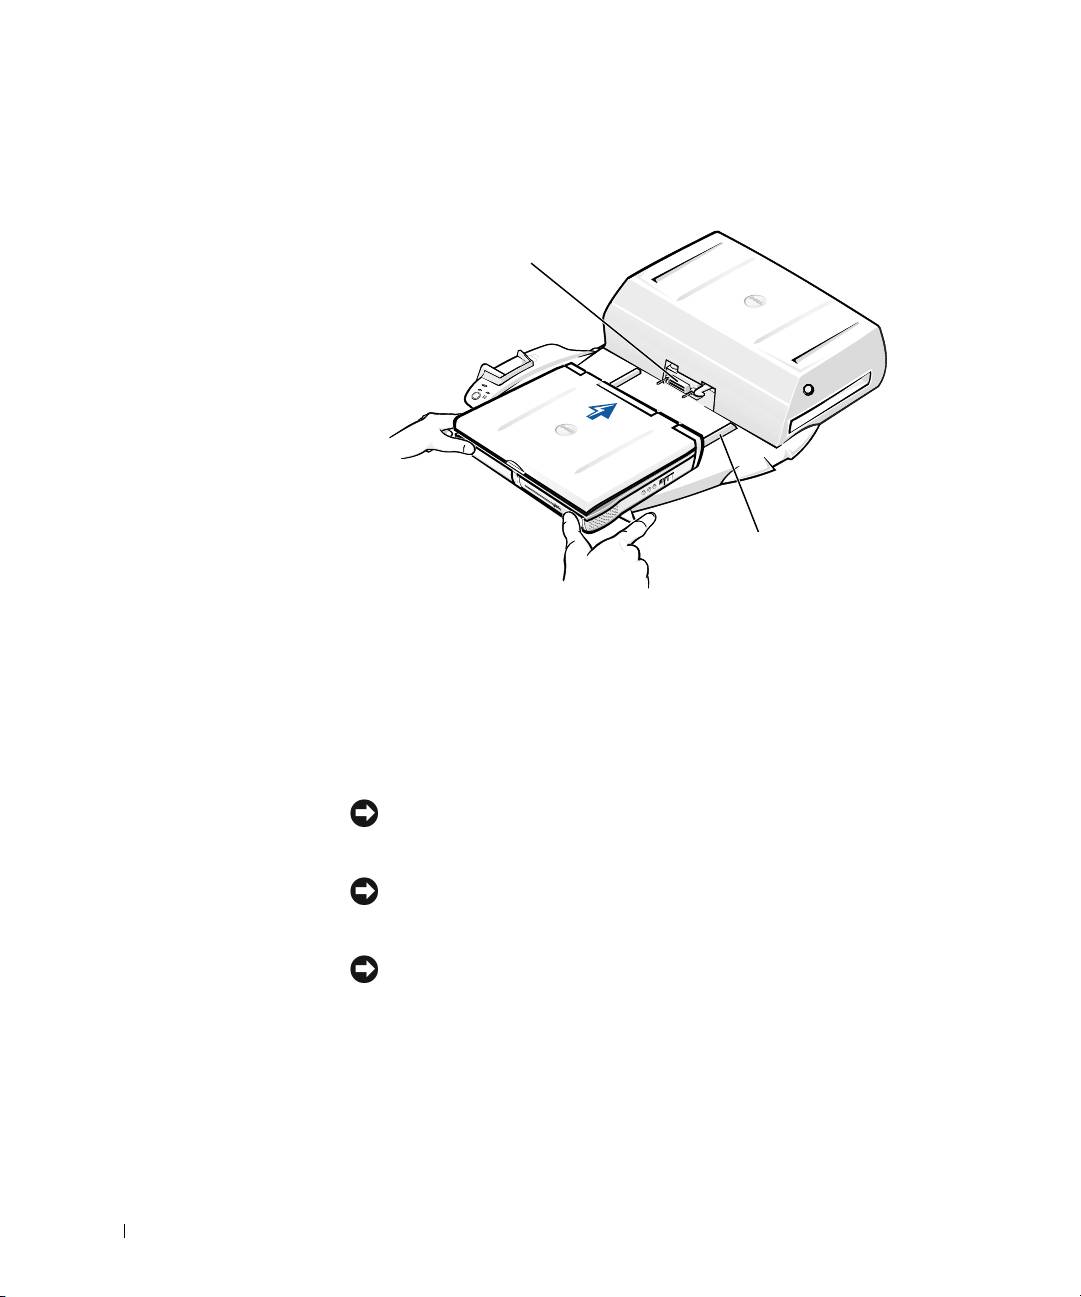
5 Dock the computer to the docking device as follows:
Docking the Computer
docking connector
www.dell.com | support.dell.com
alignment rails (2)
a Horizontally center the computer on the docking device platform,
with the back of the computer facing the docking device docking
connector, as shown in “Docking the Computer.”
b Slide the computer toward the connector until you feel the
grooves on the bottom of the computer engage with the alignment
rails.
NOTICE: If you attempt to push the computer all the way into the docking
device without engaging the alignment rails, you may irreparably damage the
docking connector on the computer.
NOTICE: Do not pick up the computer or the docking device separately when
they are connected because you may damage the connectors on the computer
and the docking device.
NOTICE: If you are using a monitor with the monitor stand
, remove the
monitor from the stand before moving the docking control base into place.
c Gently push the computer forward until the docking connector is
fully engaged.
12 System Information Guide

0G913bk1.book Page 13 Thursday, October 18, 2001 12:33 PM
Docking for the First Time With Windows XP and Windows 2000
1 Dock and turn on your computer.
2 Press <F2> during the system boot routine to view the system setup
program.
3 Set Docking IRQ to Optimized.
4 Set Universal Connect to Enabled.
5 Exit the system setup program.
Your system will continue the boot process.
In Windows 2000, the Add New Hardware Wizard appears.
NOTE: In Windows XP, the operating system automatically installs the drivers
in the background. In Windows 2000, the Add New Hardware Wizard
automatically installs your drivers.
NOTE: In Windows XP and Windows 2000, to reinstall drivers or ensure the
best drivers are installed, see “Updating Drivers in Windows XP, Windows
2000, or Windows Me” later in this document.
Docking for the First Time With Windows Me
1 Dock and turn on your computer.
2 Press <F2> during the system boot routine to view the system setup
program.
3 Set Docking IRQ to Optimized.
4 Set Universal Connect to Enabled.
5 Exit the system setup program.
Your system will continue the boot process.
The Add New Hardware Wizard appears.
6 Select Search for the Best Driver for Your Device (Recommended)
and click Next.
7 Click Next.
8 Follow the prompts on the Add New Hardware Wizard.
9 Whenever prompted, select Search for the Best Driver for Your
Device (Recommended) and click Next.
System Information Guide 13

0G913bk1.book Page 14 Thursday, October 18, 2001 12:33 PM
10 Continue to follow the prompts to complete the installation.
The Windows desktop appears and the installation is complete.
Docking for the First Time With Windows NT 4.0
1 Dock and turn on your computer.
2 Either press <F2> during the system boot routine, or press
<Fn><F1> after your computer boots to view the system setup
program.
3 Set Docking IRQ to Optimized.
4 Set Universal Connect to Enabled.
www.dell.com | support.dell.com
5 Exit the system setup program.
6 Press <Ctrl><Alt><Del> to log on.
Docking Station Setup window appears and indicates that the
computer must be undocked to continue.
7 Click OK and wait for the computer to turn off.
8 Undock the computer (see “Undocking the Computer”).
The computer restarts automatically. If it does not, turn on the
computer.
9 Select OK at the Device Removal window.
10 Click Start and select Shut Down.
11 Wait for the computer to turn off completely and redock the computer
to the docking device.
The computer restarts automatically. If it does not, turn on the
computer.
12 Press <Ctrl><Alt><Del> to log on.
The computer automatically detects new devices.
13 When prompted, select Install System Provided Driver for the
Selected Device (Recommended) and click OK.
14 Click Continue at the Windows NT Setup window.
15 Select Install System Provided Driver for the Selected Device
(Recommended) and click OK.
14 System Information Guide

0G913bk1.book Page 15 Thursday, October 18, 2001 12:33 PM
16 Select the name of your network interface controller (NIC) from the
drop-down menu.
17 Select whether the network adapter should obtain an IP address from a
server, or whether an IP address is specified.
If you do not know what to select, see your system administrator.
18 Follow the prompts to complete the installation.
The Windows desktop appears and the installation is complete.
The computer cannot enter suspend-to-disk mode while docked.
Docking for the First Time With Windows 98
1 Dock and turn on your computer.
2 Either press <F2> during the system boot routine, or press
<Fn><F1> after your computer boots to view the system setup
program.
3 Set Docking IRQ to Optimized.
4 Set Universal Connect to Enabled.
5 Exit the system setup program.
6 If the Configuration Setup window appears, click OK.
The Add New Hardware Wizard appears.
7 Click Next.
8 Select Search for the Best Driver for Your Device (Recommended)
and click Next.
9 Remove the check-mark next to each option and click Next.
A window appears, indicating that Windows is ready to detect the best
driver for your device.
10 Follow the prompts on the Add New Hardware Wizard.
11 Whenever prompted, select Search for the Best Driver for Your
Device (Recommended) and click Next.
12 Continue to follow the prompts to complete the installation.
The Windows desktop appears and the installation is complete.
System Information Guide 15

0G913bk1.book Page 16 Thursday, October 18, 2001 12:33 PM
Docking for the First Time With Windows 95
1 Dock and turn on your computer.
2 Either press <F2> during the system boot routine, or press
<Fn><F1> after your computer boots to view the system setup
program.
3 Set Docking IRQ to Optimized.
4 Set Universal Connect to Enabled.
5 Exit the system setup program.
The computer automatically detects new hardware.
www.dell.com | support.dell.com
6 Click Yes at the System Settings Change window.
The computer restarts and automatically detects new hardware.
7 If the Configuration Setup window appears, click OK.
8 Click OK at the Network window.
9 Select the Identification tab at the next Network window.
10 Enter a Computer Name and Workgroup that will identify your
computer on the network, and click Close.
If you are unsure what Computer Name and Workgroup to enter,
check with your system administrator.
NOTE: You must enter a Computer Name and Workgroup to proceed with the
driver installation.
The computer automatically copies files and builds a driver
information database.
11 Click Yes at the System Settings Change window.
The computer restarts.
An Enter Network Password window appears. If you do not wish to set
a username and password at this point, or if you have not yet been
provided one for use by your system administrator, click Cancel.
The computer automatically detects new hardware.
12 Click OK at the Configuration Setup window.
The Windows desktop appears and the installation is complete.
16 System Information Guide

0G913bk1.book Page 17 Thursday, October 18, 2001 12:33 PM
NOTE: To use the USB connectors, you must install the USB supplement from
your ResourceCD in the Win95\OSUpdate directory. If you install the USB
supplement, your computer cannot enter suspend mode. Dell recommends that
you do not install the USB supplement unless you intend to use USB devices.
Updating Drivers in Windows XP and Windows 2000
To update drivers in Windows XP and Windows 2000:
1 Right-click My Computer and click Manage. (In Windows XP, click
the Start button to access My Computer. In Windows 2000, My
Computer is located on the Windows desktop.)
2 In the Computer Management window, click Device Manager, and
double-click Network adapters.
3 Double-click 3Com 3C920 Integrated Fast Ethernet Controller.
4 Click the Driver tab.
5 Click Update Driver... and follow the prompts.
Updating Drivers in Windows Me
To update drivers in Windows Me:
1 Right-click My Computer on the desktop and click Properties.
2 In the System Properties window, click the Device Manager tab, and
double-click Network adapters.
3 Double-click 3Com 3C920 Integrated Fast Ethernet Controller.
4 Click the Driver tab.
5 Click Update Driver... and follow the prompts.
System Information Guide 17
0G913bk1.book Page 18 Thursday, October 18, 2001 12:33 PM
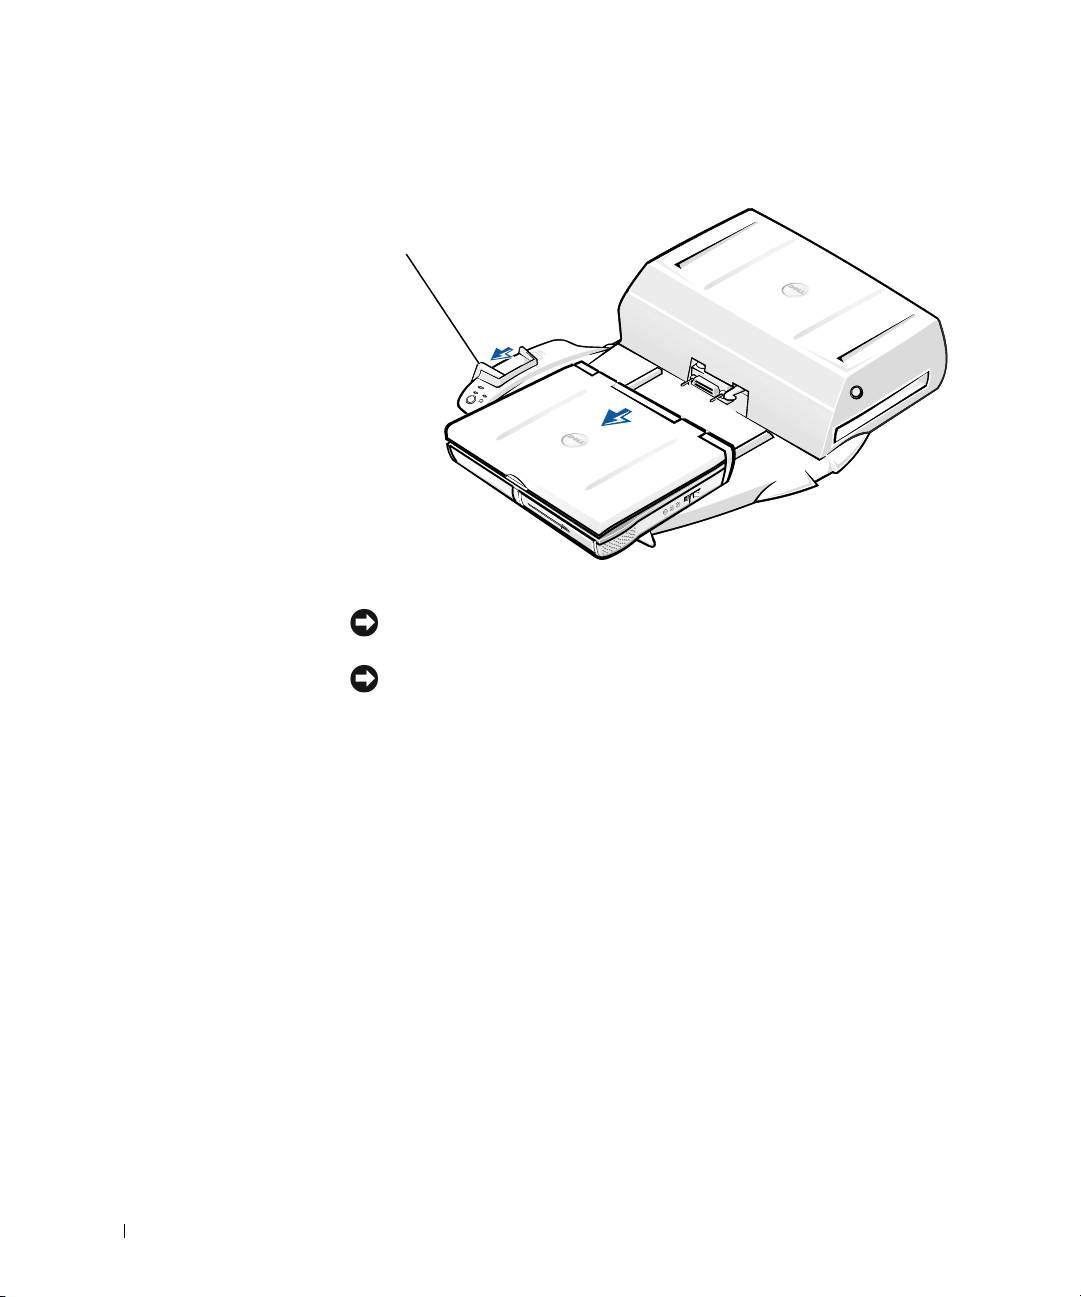
Undocking the Computer
eject/locking
lever
www.dell.com | support.dell.com
NOTICE: If the computer does not have power from a battery, the computer
turns off when you undock it
, and you will lose all unsaved data.
NOTICE: Never undock the computer without first preparing the computer. If
you undock before preparing the computer
, you will lose data and the computer
may not recover normal operation for several minutes
, if at all.
To prepare the computer for undocking, perform one of the following:
• Press <Fn><Esc> on the computer's keyboard
(or <Scroll Lock><Esc> on an external keyboard).
Wait a few seconds for the power light on the computer to turn off.
• In Windows XP, click the Start button, and then click Undock
Computer.
In Windows 95, Windows 98, Windows Me, or Windows 2000, click the
Start button, and then click Eject PC.
In Windows NT, click the docking icon on the taskbar, and then click
Undock to place the computer in suspend mode.
Wait a few seconds for the power light on the computer to turn off.
18 System Information Guide
