Dell Precision T7400: инструкция
Раздел: Бытовая, кухонная техника, электроника и оборудование
Тип: Компьютер
Инструкция к Компьютеру Dell Precision T7400
Оглавление
- Примечания, замечания и предупреждения
- Содержание
- 196 Содержание
- Источники информации Что требуется найти? Информация находится здесь
- Что требуется найти? Информация находится здесь
- Что требуется найти? Информация находится здесь
- Что требуется найти? Информация находится здесь
- Что требуется найти? Информация находится здесь
- Что требуется найти? Информация находится здесь
- Настройка компьютера Изменение положения корпуса компьютера Изменение вертикального положения корпуса на горизонтальное
- Изменение горизонтального положения корпуса на вертикальное Установка компьютера в ограниченное пространство
- Краткий справочник 205
- 206 Краткий справочник
- Перенос информации на новый компьютер Microsoft Windows XP
- Мастер переноса файлов и параметров ОДГОТОВЬТЕ НОВЫЙ КОМПЬЮТЕР К ПЕР ЕНОСУ ФАЙЛОВ — СКОПИРУЙТЕ ДАННЫЕ С ИСХОДНОГО КОМПЬЮТЕР А —
- ПЕР ЕНЕСИТЕ ДАННЫЕ НА НОВЫЙ КОМПЬЮТЕР — Мастер переноса файлов и параметров ОЗДАЙТЕ ДИСК МАСТЕРА ПЕР ЕНОСА —
- СКОПИРУЙТЕ ДАННЫЕ С ИСХОДНОГО КОМПЬЮТЕР А — ПЕР ЕНЕСИТЕ ДАННЫЕ НА НОВЫЙ КОМПЬЮТЕР —
- Microsoft Windows Vista Устройства защиты питания Фильтры бросков напряжения
- Стабилизаторы напряжения Источники бесперебойного питания
- Сведения о компьютере Вид спереди (вертикальное положение корпуса)
- 7 разъемы
- 13 индикатор сетевого соединения
- Вид сзади (вертикальное положение корпуса)
- Разъемы на задней панели
- 8 индикатор активности сети
- 11 разъемы Уход за компьютером Компьютер, клавиатура и монитор
- Мышь (неоптическая) Дисковод гибких дисков Компакт-диски и диски DVD
- Средства поиска и устранения неисправностей Индикаторы питания
- Диагностические индикаторы
- Коды диагностических индикаторов во время самотестирования при включении питания Сочетание индикаторов
- Сочетание индикаторов
- Сочетание индикаторов
- Сочетание индикаторов
- Сочетание индикаторов
- Сочетание индикаторов Кодовые сигналы
- Код Причина Код
- Код
- Системные сообщения
- NO BOOT DEVICE AVAILABLE (НЕТ ЗАГРУЗОЧНЫХ УСТРОЙСТВ)— NO TIMER TICK INTERRUPT (ОТСУТСТВУЕТ ПРЕРЫВАНИЕ ОТ ТАЙМЕРА)— N ON-SYSTEM DISK OR DISK ERROR (НЕСИСТЕМНЫЙ ДИСК ИЛИ ОШИБКА N OT A BOOT DISKETTE (ОТСУТСТВУЕТ ЗАГРУЗОЧНАЯ ДИСКЕТА)—
- Средство устранения неполадок оборудования Windows XP: Windows Vista: Dell Diagnostics Когда использовать программу Dell Diagnostics
- Запуск программы Dell Diagnostics с жесткого диска
- Запуск программы Dell Diagnostics сдиска Drivers and Utilities (Драйверы и утилиты) 1 2 3 4 5
- 6 7 8 9 10 11
- Главное меню программы Dell Diagnostics Пункт меню Функция
- Вкладка Функция Поиск и устранение неисправностей
- Неполадки батарейки Неполадки дисководов
- Неполадки оптического дисковода Неполадки записи на оптический дисковод
- Неполадки жесткого диска Неполадки электронной почты, модема и подключения к Интернету
- ЗАПУСТИТЕ СРЕДСТВО ДИАГНОСТИКИ МОДЕМА — УБЕДИТЕСЬ, ЧТО МОДЕМ ОБМЕНИВАЕТСЯ ИНФОРМАЦИЕЙ С WINDOWS —
- УБЕДИТЕСЬ, ЧТО ВЫ ПОДКЛЮЧЕНЫ К ИНТЕРНЕТУ — Убедитесь, что вы Сообщения об ошибках
- Неполадки устройства IEEE 1394
- Неполадки клавиатуры РОВЕРЬТЕ КАБЕЛЬ КЛАВИАТУРЫ — Компьютер не запускается
- Компьютер не реагирует на действия пользователя Программа не реагирует на действия пользователя Неоднократное аварийное завершение программы
- Появляется сплошной синий экран Другие неполадки программного обеспечения Неполадки памяти Е СЛИ ВЫДАЕТСЯ СООБЩЕНИЕ О НЕДОСТАТОЧНОЙ ПАМЯТИ —
- ЕСЛИ ВОЗНИКАЮТ ДРУГИЕ ПРОБЛЕМЫ С ПАМЯТЬЮ — Неполадки мыши П РОВЕРЬТЕ КАБЕЛЬ МЫШИ — ПЕРЕЗАГРУЗИТЕ КОМПЬЮТЕР — П РОВЕРЬТЕ НАСТРОЙКИ МЫШИ —
- ПЕРЕУСТАНОВИТЕ ДРАЙВЕР МЫШИ — Смотрите раздел «Драйверы» АПУСТИТЕ СРЕДСТВО УСТРАНЕНИЯ НЕПОЛАДОК ОБОРУДОВАНИЯ — Неполадки сети Неполадки питания
- ЕСЛИ ИНДИКАТОР ПИТАНИЯ МИГАЕТ ЗЕЛЕНЫМ СВЕТОМ — Компьютер СЛИ ИНДИКАТОР ПИТАНИЯ НЕ ГОРИТ — Компьютер выключен или не ЕСЛИ ИНДИКАТОР ПИТАНИЯ МИГАЕТ ЖЕЛТЫМ СВЕТОМ — На компьютер ЕСЛИ ИНДИКАТОР ПИТАНИЯ ГОРИТ ЖЕЛТЫМ СВЕТОМ — Возможно, УСТРАНИТЕ ПОМЕХИ — Возможными источниками помех являются.
- Неполадки принтера У БЕДИТЕСЬ, ЧТО WINDOWS РАСПОЗНАЕТ ПРИНТЕР —
- Неполадки сканера Неполадки, связанные со звуком и динамиками
- Не слышен звук из динамиков
- Неполадки видеоадаптера и монитора На экране изображения
- Текст на экране трудночитаем
- УСТАНОВИТЕ НАСТРОЙКИ WINDOWS ДЛЯ ДИСПЛЕЯ — Плохое качество трехмерного изображения Информация нормально читается только на части экрана
- Указатель
- 258 Указатель
- Указатель 259
- 260 Указатель
- Указатель 261

Dell Precision™ T7400
Quick Reference Guide
Model DCDO
www.dell.com | support.dell.com

Notes, Notices, and Cautions
NOTE: A NOTE indicates important information that helps you make better use of
your computer.
NOTICE: A NOTICE indicates either potential damage to hardware or loss of data
and tells you how to avoid the problem.
CAUTION: A CAUTION indicates a potential for property damage, personal injury,
or death.
____________________
Information in this document is subject to change without notice.
© 2007 Dell Inc. All rights reserved.
Reproduction in any manner whatsoever without the written permission of Dell Inc. is strictly forbidden.
Trademarks used in this text: Dell, the DELL logo, and Dell Precision are trademarks of Dell Inc.;
Microsoft, Windows, and Windows Vista are either trademarks or registered trademarks of Microsoft
Corporation in the United States and/or other countries.
Other trademarks and trade names may be used in this document to refer to either the entities claiming
the marks and names or their products. Dell Inc. disclaims any proprietary interest in trademarks and
trade names other than its own.
Model DCDO
September 2007 P/N GX691 Rev. A00

Contents
Finding Information . . . . . . . . . . . . . . . . . . . . 5
Setting Up Your Computer
. . . . . . . . . . . . . . . . . 9
Changing Between Tower and
Desktop Orientations
. . . . . . . . . . . . . . . . . 9
Installing Your Computer in an Enclosure
. . . . . 10
Transferring Information to a New Computer
. . . . 13
Power Protection Devices
. . . . . . . . . . . . . 16
About Your Computer
. . . . . . . . . . . . . . . . . . 18
Front View (Tower Orientation)
. . . . . . . . . . 18
Back View (Tower Orientation)
. . . . . . . . . . 20
Back Panel Connectors
. . . . . . . . . . . . . . 21
Cleaning Your Computer
. . . . . . . . . . . . . . . . 23
Computer, Keyboard, and Monitor
. . . . . . . . . 23
Mouse (Non-Optical)
. . . . . . . . . . . . . . . . 23
Floppy Drive
. . . . . . . . . . . . . . . . . . . . 24
CDs and DVDs
. . . . . . . . . . . . . . . . . . . 24
Troubleshooting Tools
. . . . . . . . . . . . . . . . . . 24
Power Lights
. . . . . . . . . . . . . . . . . . . . 24
Diagnostic Lights
. . . . . . . . . . . . . . . . . . 26
Beep Codes
. . . . . . . . . . . . . . . . . . . . 30
System Messages
. . . . . . . . . . . . . . . . . 31
Hardware Troubleshooter
. . . . . . . . . . . . . 32
Dell Diagnostics
. . . . . . . . . . . . . . . . . . 33
Troubleshooting
. . . . . . . . . . . . . . . . . . 36
Index . . . . . . . . . . . . . . . . . . . . . . . . . . . . . . . 53
Contents 3

4 Contents
Finding Information
NOTE: Some features or media may be optional and may not ship with your computer.
Some features or media may not be available in certain countries.
NOTE: Additional information may ship with your computer.
What Are You Looking For? Find It Here
• A diagnostic program for my computer
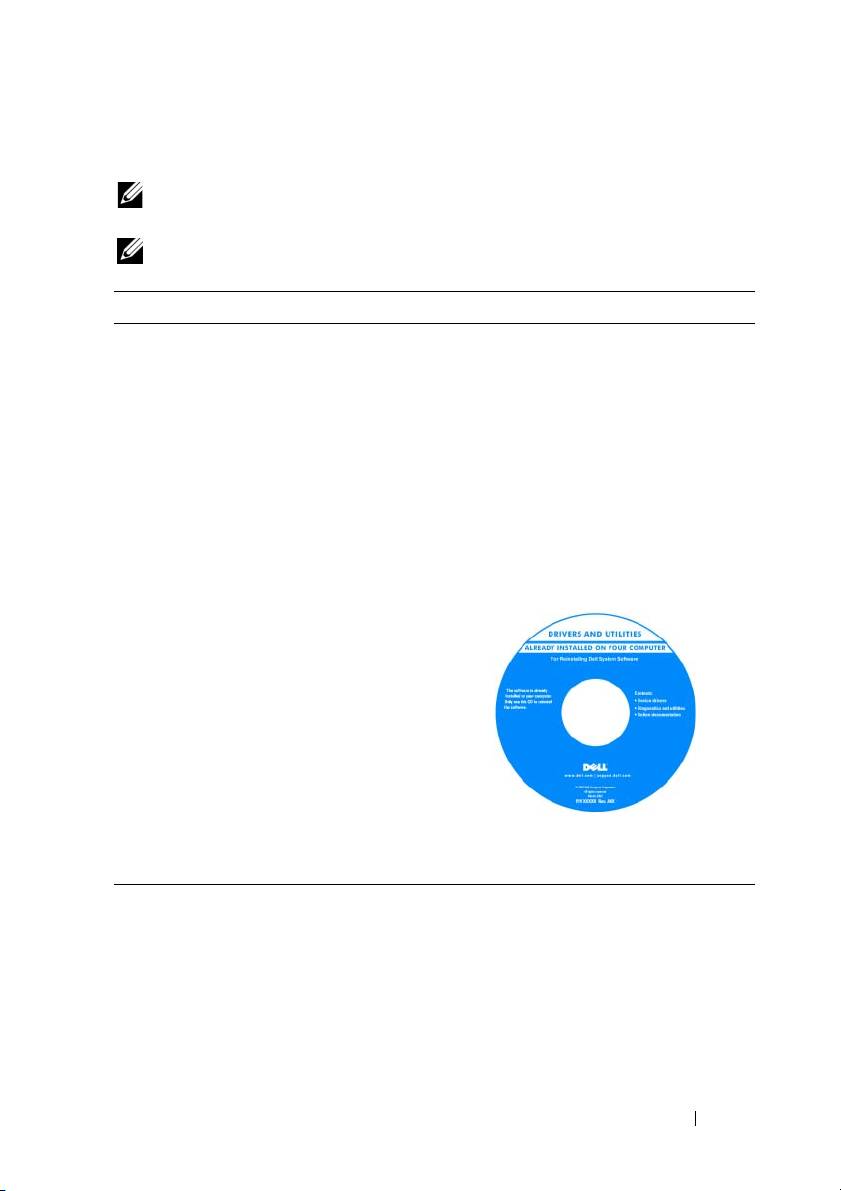
Drivers and Utilities Disc
• Drivers for my computer
NOTE: The Drivers and Utilities disc may
be optional and may not ship with your
• My device documentation
computer.
• Desktop System Software (DSS)
Documentation and drivers are already
installed on your computer. You can use
the Drivers and Utilities disc to reinstall
drivers (see "Reinstalling Drivers and
Utilities" in your User’s Guide) and to run
the Dell™ Diagnostics (see "Dell
Diagnostics" on page 33).
NOTE: Drivers and documentation updates
can be found at support.dell.com.
• How to remove and replace parts
Dell Precision™ User’s Guide
®
®
•Specifications
Microsoft
Windows
XP and Microsoft
Windows Vista™ Help and Support Center
• How to configure system settings
1
Click
Start
→
Help and Support
→
• How to troubleshoot and solve problems
Dell User and System Guides
→
System Guides
.
2
Click the
User’s Guide
for your computer.
Quick Reference Guide 5
What Are You Looking For? Find It Here
• Warranty information
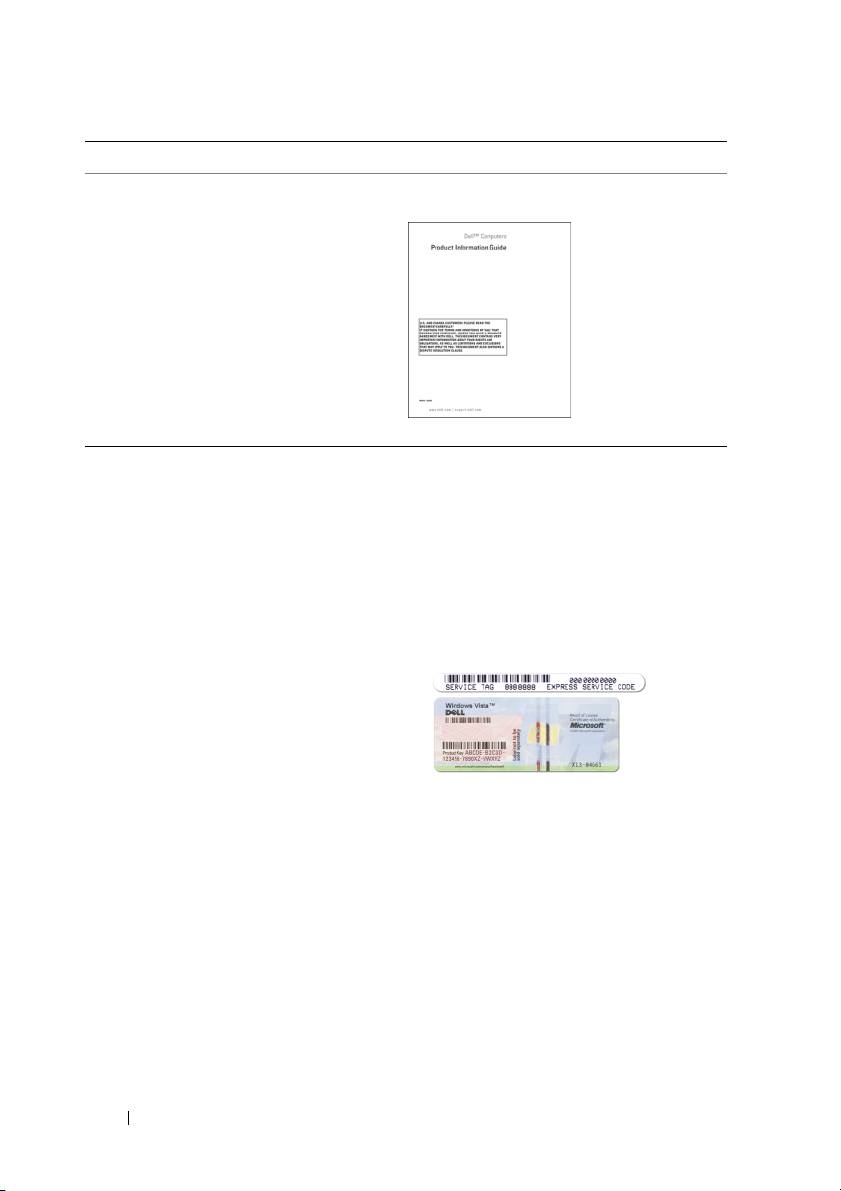
Dell™ Product Information Guide
• Terms and Conditions (U.S. only)
• Safety instructions
• Regulatory information
• Ergonomics information
• End User License Agreement
• Service Tag and Express Service Code
Service Tag and Microsoft Windows
®
®
Product Key
•Microsoft
Windows
Product Key
These labels are located on your computer:
• Use the Service Tag to identify your
computer when you use
support.dell.com
or contact Dell support.
• Enter the Express Service Code to direct
your call when contacting Dell support.
NOTE: As an increased security measure,
the newly designed Microsoft Windows
license label incorporates a missing portion,
or hole, to discourage removal of the label.
6 Quick Reference Guide

What Are You Looking For? Find It Here
• Solutions — Troubleshooting hints and
Dell Support Website — support.dell.com
tips, articles from technicians, online
NOTE: Select your region or business
courses, and frequently asked questions
segment to view the appropriate support site.
• Community — Online discussion with
other Dell customers
• Upgrades — Upgrade information for
components, such as the memory, hard
drive, and operating system
• Customer Care — Contact information,
service call and order status, and warranty
and repair information
• Service and support — Service call status,
support history, service contract, and
online discussions with support
• Dell Technical Update Service — Proactive
e-mail notification of software and
hardware updates for your computer
• Reference — Computer documentation,
details on my computer configuration,
product specifications, and white papers
• Downloads — Certified drivers, patches,
and software updates
• Desktop System Software (DSS) — If you
To download Desktop System Software:
reinstall the operating system for your
1
Go to
support.dell.com
, select your
computer, you should also reinstall the
country/region, and then click
Drivers
DSS utility. DSS automatically detects
& Downloads
.
your computer and operating system and
2
Click
Select Model
or
Enter a Tag
,
installs the updates appropriate for your
make the appropriate selections or enter
configuration, providing critical updates
the appropriate information for your
for your operating system and support for
computer, and then click
Confirm
.
processors, optical drives, USB devices, for
3
Scroll down to
System and Configuration
example. DSS is necessary for correct
Utilities
→
Desktop System Software
,
operation of your Dell computer.
and then click
Download Now.
NOTE: The support.dell.com user interface
may vary depending on your selections.
Quick Reference Guide 7
What Are You Looking For? Find It Here
• How to use Windows XP
Windows Help and Support Center
1
Click
Start
→
Help and Support
.
• How to use Windows Vista
2
Type a word or phrase that describes
• How to work with programs and files
your problem and click the arrow icon.
• How to personalize my desktop
3
Click the topic that describes
your problem.
4
Follow the instructions on the screen.
• How to reinstall my operating system
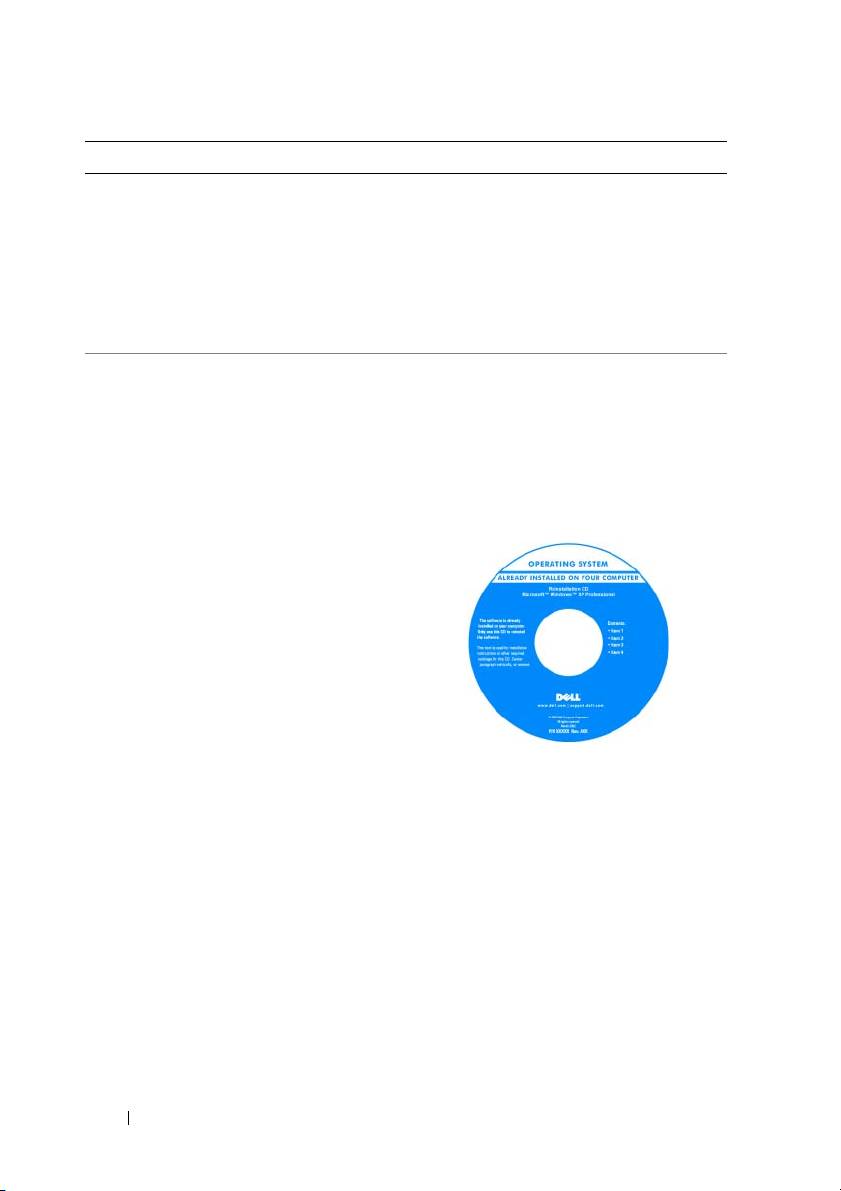
Operating System Disc
The operating system is already installed
on your computer. To reinstall your
operating system, use the Operating System
disc that came with your computer (see
"Restoring Your Operating System" in your
User’s Guide).
After you reinstall your operating system,
use the optional Drivers and Utilities disc
to reinstall drivers for the devices that
came with your computer.
Your operating system product key label is
located on your computer.
NOTE: The color of your operating system
installation disc varies according to the
operating system you ordered.
8 Quick Reference Guide

What Are You Looking For? Find It Here
• How to use Linux
Dell Supported Linux Sites
• E-mail discussions with users of Dell
• linux.dell.com
Precision products and the Linux
• lists.us.dell.com/mailman/listinfo/linux-
operating system
precision
• Additional information regarding Linux
and my Dell Precision computer
Setting Up Your Computer
Changing Between Tower and Desktop Orientations
CAUTION: Before you begin any of the procedures in this section, follow the
safety instructions in the
Product Information Guide
.
NOTE: To change your computer to either the tower or the desktop orientation, you
must use an optional kit available from Dell. See "Product Information" in your
User’s Guide for more details on ordering from Dell.
NOTE: The tower computer supports one more 3.5-inch drive in the front than does
the desktop computer.
1
Follow the procedures in "Before You Begin" in your
User’s Guide
.
2
Remove the computer cover (see "Removing the Computer Cover" in your
User’s Guide
).
3
Remove the front panel (see "Removing the Front Panel" in your
User’s Guide
).
4
Remove the drive panel and prepare the drive panel by adding or removing
inserts, as needed (see "Drive Panels" in your
User’s Guide
).
Switching From Tower to Desktop Orientation
1
Remove all installed floppy drives or media card readers by following the steps
in "Removing a Floppy Drive or Media Card Reader (Tower Computer)" in
your
User’s Guide
, and then reinstall a single floppy drive or media card reader
by following the steps in "Installing a Floppy Drive or Media Card Reader
(Desktop Computer)" in your
User’s Guide
.
2
Remove all installed optical drives by following the steps in "Removing an
Optical Drive (Tower Computer)" in your
User’s Guide
, and then reinstall
the drives by following the steps in "Installing an Optical Drive (Desktop
Computer)" in your
User’s Guide
.
Quick Reference Guide 9

Switching From Desktop to Tower Orientation
1
Remove the floppy drive or media card reader (if installed) by following
the steps in "Removing a Floppy Drive or a Media Card Reader (Desktop
Computer)" in your
User’s Guide
, and then reinstall the floppy drive or
media card reader by following the steps in "Installing a Floppy Drive or
Media Card Reader (Tower Computer)" in your
User’s Guide
.
2
Remove all installed optical drives by following the steps in "Removing an
Optical Drive (Desktop Computer)" in your
User’s Guide
, and reinstall the
drives by following the steps in "Installing an Optical Drive (Tower Computer)"
in your
User’s Guide
.
Installing Your Computer in an Enclosure
Installing your computer in an enclosure can restrict airflow, can cause your
computer to overheat, and may impact your computer’s performance. Follow
the guidelines below when installing your computer in an enclosure.
NOTICE: The operating temperature specified in this manual reflects the maximum
ambient operating temperature. The ambient room temperature must be
a consideration when installing your computer in an enclosure. For details about
your computer’s specifications, see "Specifications" in your User’s Guide.
10 Quick Reference Guide
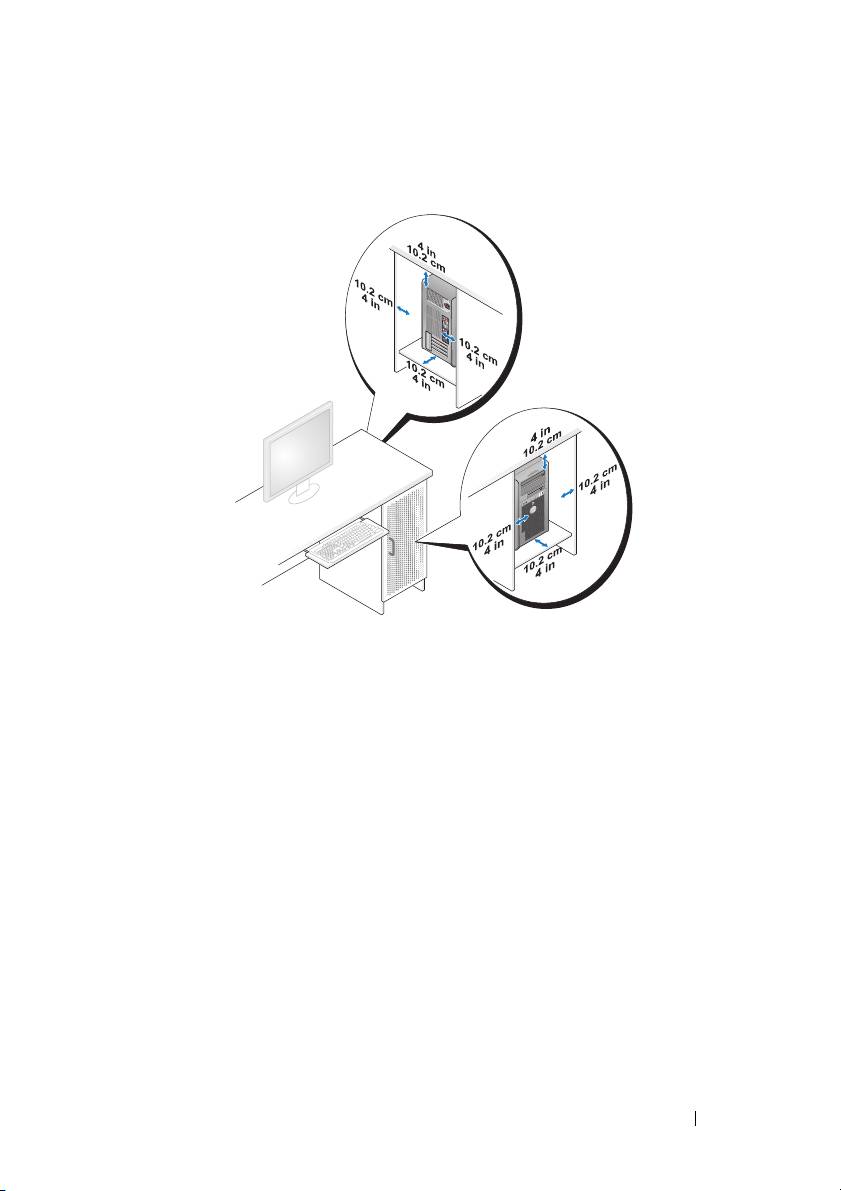
• Leave 10.2 cm (4 in) minimum clearance on all vented sides of the computer
to permit the airflow required for proper ventilation.
• If your computer is installed in a corner on or under a desk, leave 5.1 cm
(2 in) minimum clearance from the back of the computer to the wall to
permit the airflow required for proper ventilation.
• If your enclosure has doors, ensure that they allow at least 30 percent airflow
through the enclosure (front and back).
Quick Reference Guide 11
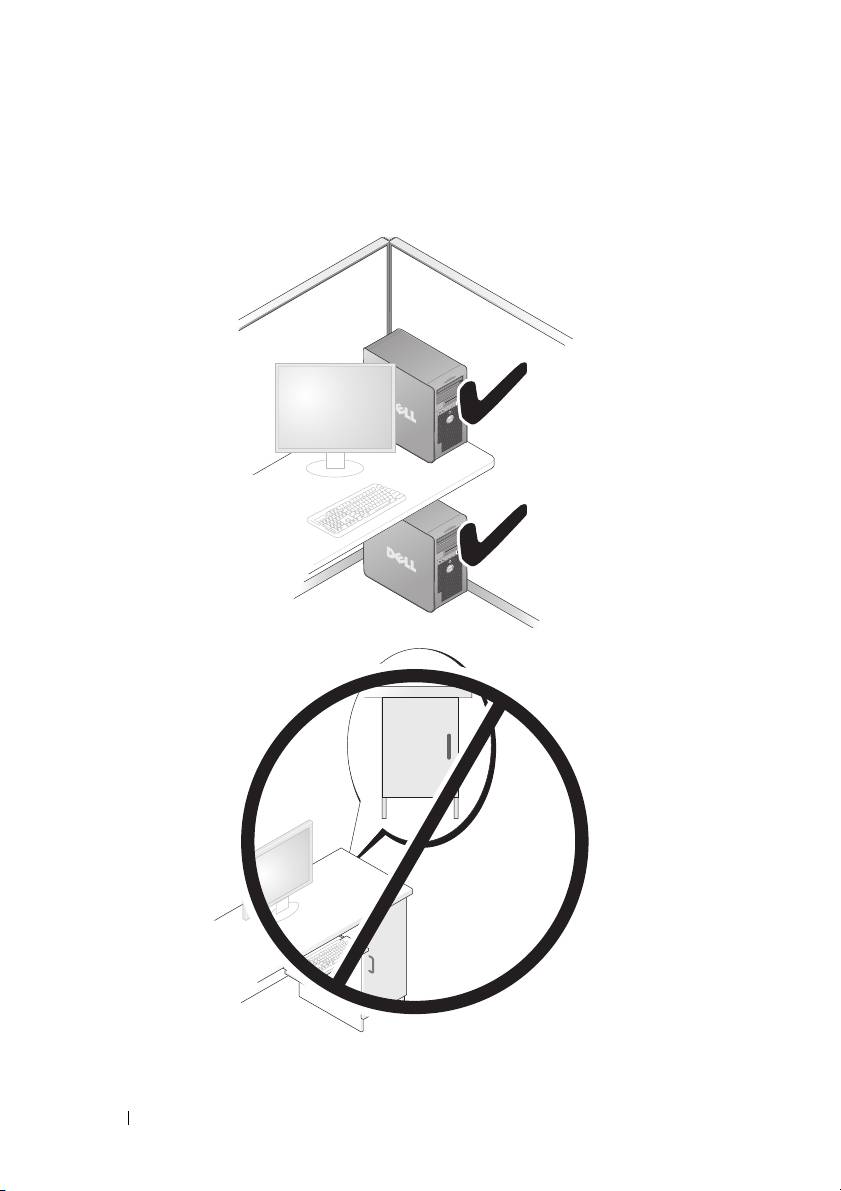
• Do not install your computer in an enclosure that does not allow airflow.
Restricting the airflow
can cause your computer to overheat and may
impact your computer’s performance
.
12 Quick Reference Guide

Transferring Information to a New Computer
You can use your operating system wizards to help you transfer files and other
data from one computer to another computer.
Microsoft Windows XP
The Microsoft
Windows XP operating system provides the Files and Settings
Transfer Wizard to transfer data, such as:
• E-mail messages
• Toolbar settings
•Window sizes
• Internet bookmarks
You can transfer data from one computer to another computer over a network
or serial connection, or by storing the data on removable media, such as
a writable CD or DVD.
NOTE: You can transfer information from one computer to another computer by
directly connecting a serial cable to the input/output (I/O) ports of the two computers. To
transfer data over a serial connection, you must use the Network Connections
utility in the Control Panel to perform additional configuration steps, such as setting
up an advanced connection and designating the host computer and the guest computer.
For instructions on setting up a direct cable connection between two computers,
see Microsoft Knowledge Base Article #305621, titled How to Set Up a Direct Cable
Connection Between Two Computers in Windows XP. This information may not be
available in certain countries.
Using the Files and Settings Transfer Wizard requires the Operating System
disc that came with your computer or a wizard disk, which the wizard can
create for you.
NOTE: For more information about transferring data, search support.dell.com for
document #154781 (What Are The Different Methods To Transfer Files From My Old
Computer To My New Dell™ Computer Using the Microsoft Windows XP Operating
System?).
NOTE: Access to the Dell Knowledge Base document may not be available in
certain countries.
Quick Reference Guide 13

Files and Settings Transfer Wizard (With the Operating System Disc)
NOTE: The Files and Settings Transfer Wizard designates the source computer from
which data is to be transferred as the old computer, and designates the destination
computer to which the data is going to be transferred as the new computer.
PREPARE THE DESTINATION COMPUTER FOR THE FILE TRANSFER —
1
Click
Start
→
All Programs
→
Accessories
→
System Tools
→
Files and
Settings Transfer Wizard
.
2
Under
Which computer is this?
, click
New computer
, and then click
Next
.
3
Under
Do you have a Windows XP CD?
, click
I will use the wizard from
the Windows XP CD
, and then click
Next
.
4
Review the information under
Now go to your old computer
, and then go
to the source computer. Do
not
click
Next
.
COPY DATA FROM THE SOURCE COMPUTER —
1
Insert the Windows XP
Operating System
disc into the source computer.
The
Welcome to Microsoft Windows XP
screen appears.
2
Click
Perform additional tasks
.
3
Under
What do you want to do?
, click
Transfer files and settings
.
The
Files and Settings Transfer Wizard
window appears.
4
Click
Next
.
5
Under
Which computer is this?
, click
Old Computer
, and then click
Next
.
6
Under
Select a transfer method
, click the transfer method of your choice,
and then click
Next
.
7
Under
What do you want to transfer?
, click to select the data you want to
transfer, and then click
Next
.
The selected data is copied and the
Completing the Collection Phase
screen appears.
8
Click
Finish
.
14 Quick Reference Guide

TRANSFER DATA TO THE DESTINATION COMPUTER —
1
Go to the destination computer.
2
Under
Now go to your old computer
, click
Next
.
3
Under
Where are the files and settings?
, click to select the method you
chose for transferring your settings and files, and then click
Next
.
The wizard reads the collected files and settings and applies them to the
destination computer. When the transfer is complete, the
Finished
screen appears.
4
Click
Finished
, and then restart the computer.
Files and Settings Transfer Wizard (Without the Operating System Disc)
To run the Files and Settings Transfer Wizard without the Operating System
disc, you must create a wizard disk. The wizard disk allows you to create
a backup image file on removable media.
NOTE: The Files and Settings Transfer Wizard designates the source computer from
which data is to be transferred as the old computer, and designates the destination
computer to which the data is going to be transferred as the new computer.
CREATE A WIZARD DISK —
1
On the destination computer, click
Start
→
All Programs
→
Accessories
→
System Tools
→
Files and Settings Transfer Wizard
.
2
Under
Which computer is this?
, click
New computer
, and then click
Next
.
3
Under
Do you have a Windows XP CD?
, click
I want to create a Wizard Disk
in the following drive
, and then click
Next.
4
Insert a writable CD or DVD, and then click
OK
.
5
Review the information under
Now go to your old computer
, and then go
to the source computer. Do
not
click
Next
.
COPY DATA FROM THE SOURCE COMPUTER —
1
Insert the wizard disk into the source computer.
2
Click
Start
→
Run
.
3
Click
Browse...
and navigate to
fastwiz
on the wizard disk, and then click
OK
.
4
Under
Which computer is this?
, click
Old Computer
, and then click
Next
.
5
Under
Select a transfer method
, click the transfer method of your choice,
and then click
Next
.
Quick Reference Guide 15

6
Under
What do you want to transfer?
, click to select the data you want to
transfer, and then click
Next
.
The selected data is copied and the
Completing the Collection Phase
screen appears.
7
Click
Finish
.
TRANSFER DATA TO THE DESTINATION COMPUTER —
1
Go to the destination computer.
2
Under
Now go to your old computer
, click
Next
.
3
Under
Where are the files and settings?
, click to select the method you chose
for transferring your settings and files, and then click
Next
.
The wizard reads the collected files and settings and applies them to the
destination computer. When the transfer is complete, the
Finished
screen appears.
4
Click
Finished
, and then restart the computer.
Microsoft Windows Vista
1
Click the Windows Vista Start button , and then click
Transfer files
and settings
→
Start Windows Easy Transfer.
2
In the
User Account Control
dialog box, click
Continue
.
3
Click
Start a new transfer
or
Continue a transfer in progress
.
Follow the instructions provided on the screen by the Windows Easy Transfer
wizard.
Power Protection Devices
Several devices are available to protect against power fluctuations and failures:
• Surge protectors
• Line conditioners
• Uninterruptible power supplies (UPS)
16 Quick Reference Guide

Surge Protectors
Surge protectors and power strips equipped with surge protection help prevent
damage to your computer from voltage spikes that can occur during electrical
storms or after power interruptions. Some surge protector manufacturers include
warranty coverage for certain types of damage. Carefully read the device warranty
when choosing a surge protector and compare joule ratings to determine the
relative effectiveness of different devices. A device with a higher joule rating
offers more protection.
NOTICE: Most surge protectors do not protect against power fluctuations or
power interruptions caused by nearby lightning strikes. When lightning occurs in
your area, disconnect the telephone line from the telephone wall jack and
disconnect your computer from the electrical outlet.
Many surge protectors have a telephone jack for modem protection. See the
surge protector documentation for modem connection instructions.
NOTICE: Not all surge protectors offer network adapter protection. Disconnect the
network cable from the network wall jack during electrical storms.
Line Conditioners
NOTICE: Line conditioners do not protect against power interruptions.
Line conditioners are designed to maintain AC voltage at a fairly constant level.
Uninterruptible Power Supplies
NOTICE: Loss of power while data is being saved to the hard drive may result in
data loss or file damage.
NOTE: To ensure maximum battery operating time, connect only your computer to
a UPS. Connect other devices, such as a printer, to a separate power strip that
provides surge protection.
A UPS protects against power fluctuations and interruptions. UPS devices contain
a battery that provides temporary power to connected devices when AC power
is interrupted. The battery charges while AC power is available. See the UPS
manufacturer documentation for information on battery operating time and to
ensure that the device is approved by Underwriters Laboratories (UL).
Quick Reference Guide 17
About Your Computer
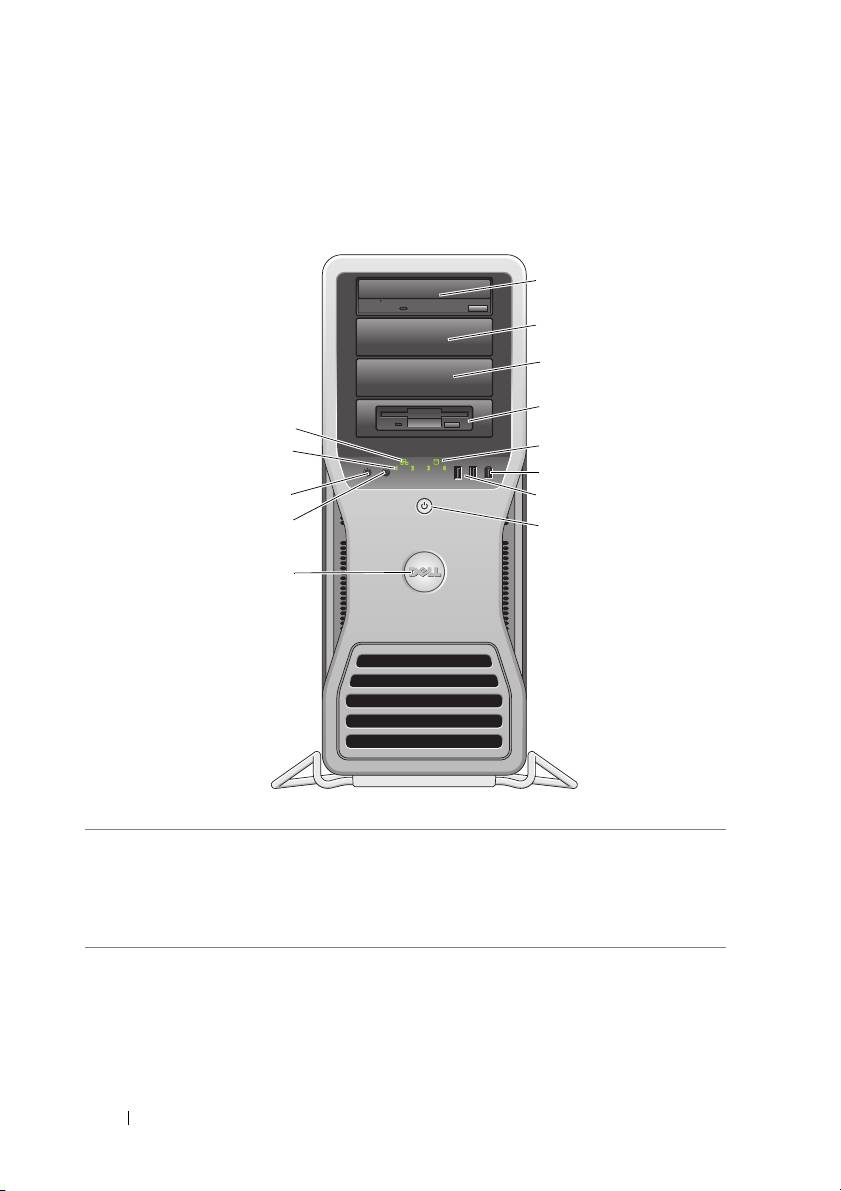
Front View (Tower Orientation)
1
2
3
4
13
5
12
6
11
7
10
8
9
1–3 5.25-inch
Can hold a CD/DVD drive, or a media card reader, floppy
drive bays
drive, or a SATA hard drive in a 5.25-inch drive bay carrier.
The hard-drive carrier is only for use in the 5.25-inch drive
bays. The floppy-drive/media card reader and hard-drive
carriers are not interchangeable.
18 Quick Reference Guide

4 5.25-inch drive
Can hold a CD/DVD drive, or a media card reader, a floppy
bay with special
drive, or a SATA hard drive in a 5.25-inch drive bay carrier. The
3.5-inch drive
drive-panel plate shown here is only for use with a floppy drive
panel plate
or media card reader; you can install the plate in front of any of
the four 5.25-inch drive bays. For more information, see "Drive
Panels" in your User’s Guide.
The hard-drive carrier is only for use in the 5.25-inch drive
bays. The floppy-drive/media card reader and hard-drive
carriers are not interchangeable.
5 hard-drive
The hard drive light is on when the computer reads data from
activity light
or writes data to the hard drive. The light might also be on
when a device such as your CD drive is operating.
6 IEEE 1394
Use the IEEE 1394 connector for high-speed data devices
connector
such as digital video cameras and external storage devices.
7USB 2.0
Use the front USB connectors for devices that you connect
connectors (2)
occasionally, such as flash memory keys, cameras, or bootable
USB devices.
Dell recommends that you use the back USB connectors for
devices that typically remain connected, such as printers
and keyboards.
8 power button,
Press the power button to turn on the computer. The light in
power light
the center of this button indicates the power state. For more
information, see "Controls and Lights" in your User’s Guide.
NOTE: To avoid losing data, do not use the power button to
turn off the computer. Instead, perform an operating system
shutdown.
9 Dell badge You can rotate the Dell badge so that "Dell" is read horizontally,
depending on whether you use the desktop or tower orientation.
10 headphone
Use the headphone connector to attach headphones.
connector
11 microphone
Use the microphone connector to attach a personal
connector
computer microphone for voice or musical input into a sound
or telephony program.
12 diagnostic
Use these lights to help you troubleshoot a computer problem
lights (4)
based on the diagnostic code. For more information, see
"Diagnostic Lights" in your User’s Guide.
13 network link light The network link light is on when a good connection exists
between a 10-Mbps, 100-Mbps, or 1000-Mbps (or 1-Gbps)
network and the computer.
Quick Reference Guide 19
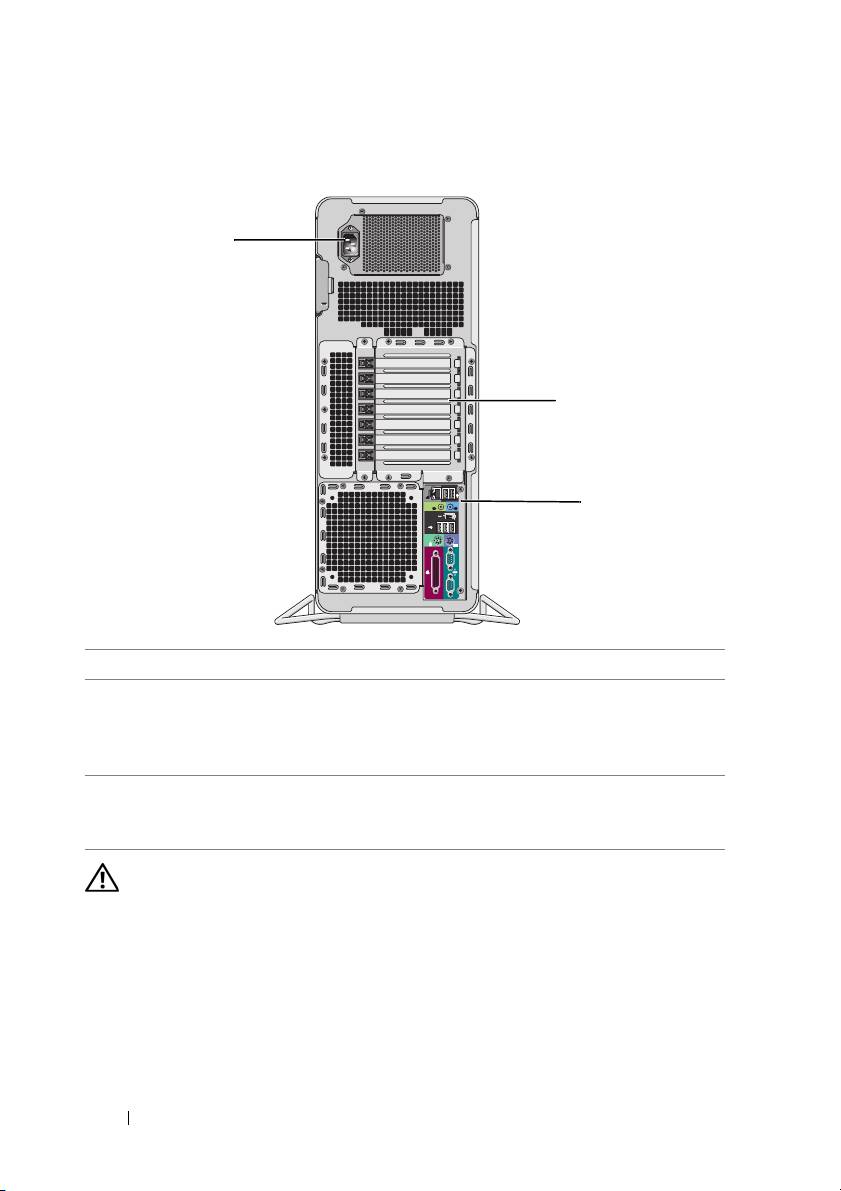
Back View (Tower Orientation)
1
2
3
1 power connector Connect the power cable.
2 card slots Slots 2–6 support full-length cards, including one PCI, two PCI
Express 2.0 x16, and two PCI-X slots. Slots 1 and 7 support
half-length cards, including one PCI Express x8 (wired as x4)
and one PCI-X slot.
3 back panel
Plug USB, audio, and other devices into the appropriate
connectors
connector (see "Back Panel Connectors" on page 21 for more
information).
CAUTION: Ensure that none of the computer air vents are blocked. Blocking them
can cause serious thermal problems.
20 Quick Reference Guide
