Dell ST2310 Monitor: инструкция
Раздел: Компьютерная техника, комплектующие, аксессуары
Тип: Монитор
Инструкция к Монитору Dell ST2310 Monitor
Оглавление
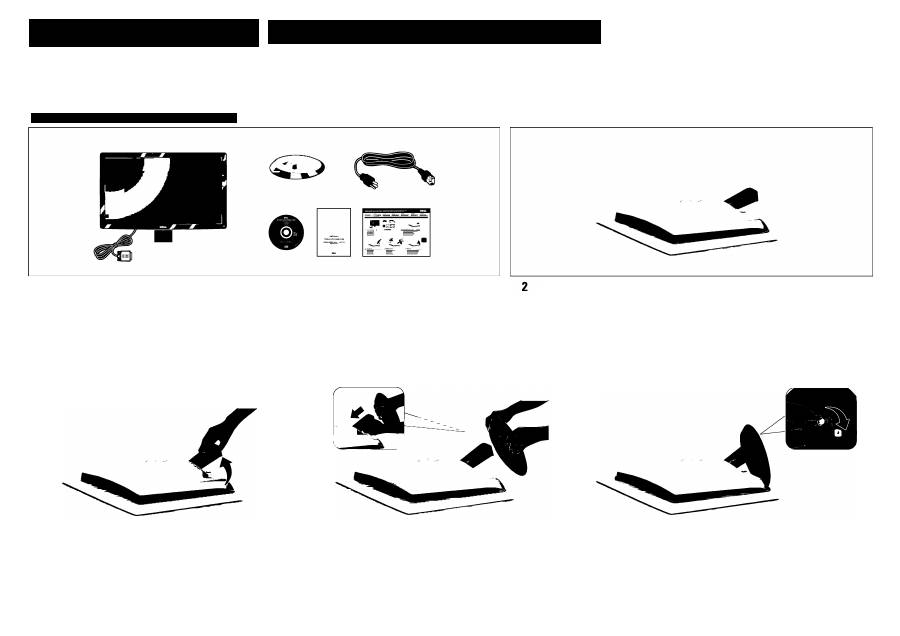
- ОСТОРОЖНО: Проверьте содержимое коробки Снимите крышку и поставьте на нее монитор Поднимите подставку монитора Подсоедините основание к стойке Затяните винт
- Подключайте монитор ТОЛЬКО с помощью ОДНОГО из следующих кабелей: синего кабеля VGA, белого кабеля DVI (продается отдельно) или кабеля HDMI (продается отдельно). ПРИМЕЧАНИЕ. Для наилучшего качества изобра> ПРИМЕЧАНИЕ. Для Нажмите кнопку питания 1. Предустановленные режимы* ПРИМЕЧАНИЕ: Для получения дополнительной информации см.
Setting Up Your Monitor
Setup Ihres Monitors | Configuration de votre moniteur | Instalación de su monitor |
Instalagao do monitor | Impostazione del monitor | Настройка монитора
¿li, CAUTION:
Before setting up your Dell™ monitor,
see the safety instructions that shipped
with your monitor.
¿ik
VORSICHT:
Bevor Sie Ihren Dell™-Computer einrichten
und in Betrieb nehmen, beachten Sie bitte
die Sicherheitsanweisungen, die mit Ihrem
Computer mitgeliefert werden.
¿INATTENTION:
Avant de configurer et d'utiliser votre
ordinateur Dell™, consultez les précautions
de sécurité livrées avec votre moniteur.
¿ÍN PRECAUCIÓN:
Antes de configurar y utilizar su equipo
Dell™, consulte las instrucciones de
seguridad que se entregan con el mismo.
¿IN CUIDADO:
Antes de voce ajustar e operar seu computador
Dell™, veja as instrugoes de seguranga
que sao enviadas com seu monitor.
¿k ATTENZIONE:
Prima di installare ed usare il computer
Dell™, leggere le istruzioni di sicurezza
fornite in dotazione al monitor.
ОСТОРОЖНО:
Перед настройкой монитора Dell™
ознакомьтесь с инструкциями по безопаснхти,
поставляемыми с монитором.
Dell ST2210 / ST2310 / ST2410 Flat Panel Monitor
1 Verify the contents of the box
Überprüfen Sie den Lieferumfang
Vérifiez le contenu de la boîte
Verifique los contenidos de la caja
Verifique о conteúdo da caixa
Verificare il contenuto della scatola
Проверьте содержимое коробки
Remove the cover and place the monitor on it
Nehmen Sie die Abdeckung ab, und stellen Sie den Monitor darauf
Enievez le cache et placez le moniteur dessus
Extraiga la cubierta у coloque el monitor sobre ella
Retire a cobertifra e coloque o monitor sobre a mesma
Rimuovere la copertura e collocarvi spora il monitor
Снимите крышку и поставьте на нее монитор
3
Lift the monitor stand
Heben Sie den Monitorstander an
Soulevez l'embase du moniteur
Levante el soporte del monitor
Levante о suporte do monitor
Sollevare la base del monitor
Поднимите подставку монитора
4
Attach the base to the stand
Befestigen Sie die Unterseite am Ständer
Fixez l'embase sur le support
Coloque la base en el soporte
Prenda a base no suporte
Attaccare la base al supporto
Подсоедините основание к стойке
5
Tighten the screw
Die Schraube festziehen
Serrez la vis
Apriete el tornillo
Aperte о parafuso
Stringere le viti
Затяните винт
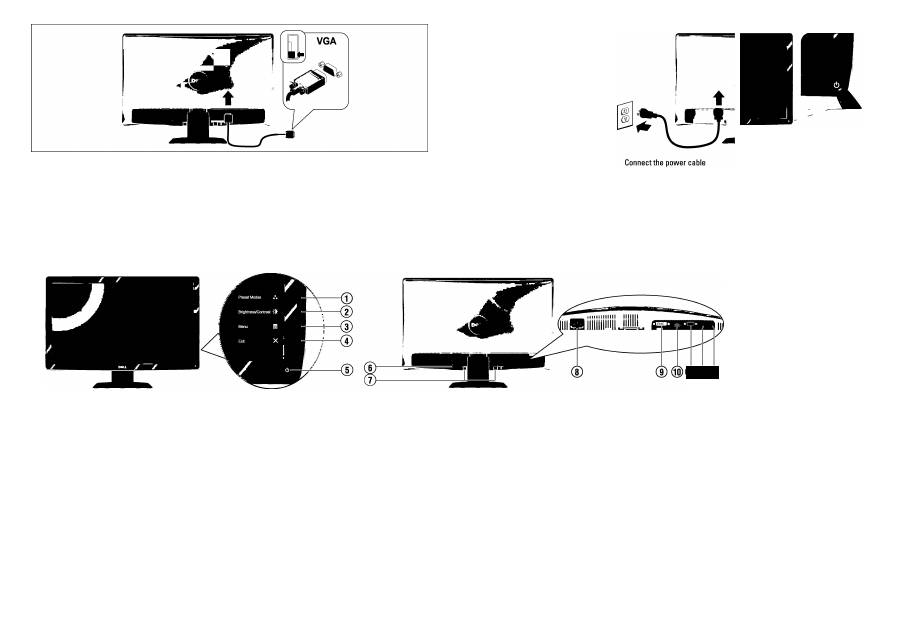
Connect the monitor using ONLY ONE of the following cables: the Blue VGA cable, the White DVI cable (optional
purchase) or HOMI cable (optional purchase)
Der Monitor sollte nur unter Verwendung EINES der folgenden Kabel angeschlossen werden: blaues VGA-Kabel, weißes
DVI-Kabel(getrennt erhältlich) oder HDMI-Kabel (getrennt erhältlich).
Branchez le moniteur en n'utilisant QU'UN SEUL des câbles suivants : câble bleu VGA, câble blanc DVI (à acheter
en option) ou câble HDMI (à acheter en option)
Conecte el monitor utilizando SÓLO UNO de los siguientes cables: el cable VGA azul, el cable DVI blanco (debe adquirirse
por separado) o el cable HDMI (debe adquirirse por separado)
Conecte o monitor usando APENAS UM dos seguintes cabos: o cabo VGA Azul, o cabo DVI Branco (compra opcional) ou o cabo HDMI (compra opcional)
Connettere il monitori utilizzando SOLO UNO dei seguenti cavi: il cavo VGA blu, il cavo DVI bianco (acquisto opzionale) о il cavo HDMI (acquisto opzionale)
Подключайте монитор ТОЛЬКО с помощью ОДНОГО из следующих кабелей: синего кабеля VGA, белого кабеля DVI (продается
отдельно) или кабеля HDMI (продается отдельно).
NOTE:
It is recommended that you
connect the monitor using the white
DVI cable or HDMI cable (optional
purchase) for better performance.
HINWEIS:
Urn eine bessere Leistung
zu erzielen, sollte der Monitor mit
dem weißen DVI-Kabel oder dem
HDMI-Kabel (getrennt erhältlich)
angeschlossen werden.
REMARQUE
: gourdes performances
optimales, il est recommandé de
brancher le moniteur en utilisant le
câble blanc DVI ou le câble HDMI
(à acheter en option).
NOTA:
Se recomienda conectar el
monitor utilizando el cable DVI blanco
o el cable HDMI (debe adquirirse por
separado) para obtener el máximo
rendimiento.
OBS.:
Recomendamos que voce
conecte o monitor usando o cabo
DVI Branco ou о cabo HDMI (compra
opcional) para um melhordesempenho.
NOTA:
Si consiglia di connettere il
monitor usandoli cavo DVI bianco о
il cavo HDMI (acquisto opzionale)
per una migliore prestazione.
ПРИМЕЧАНИЕ. Для наилучшего
качества изобра>
1
«ния ремомеидуется
лодключать монитор при помощи
белого кабеля
DVI
или кабеля
HDMI
(приобретается отдельно).
NOTE:
То purchase
DVI or HDMI cable,
visit Dell.com
HINWEIS:
Sie können
ein DVI- oder ein
HDMI-Kabel auf
Dell.com kaufen.
REMARQUE:
consultez
le site Dell.com pour
acheter le câble DVI
ou HDMI
NOTA:
Si deseaadquiiir
un cable DVI о HDMI,
visite Dell.com
OBS.:
Para comprar о
cabo DVI ou HDMI, por
favor, visite a Dell.com
NOTA:
Per l'acquisto
di un cavo DVI о HDMI,
visitare Dell.com
ПРИМЕЧАНИЕ. Для
приобретения кабеля
DVI или HDMI посетите
веб-сайт Dell.com.
Das Netzkabel anschIieGen
Branchez le cordon d'alimentation
Conecte el cable de alimentación
Conecte о cabo de força
Connettere il cavo di alimentazione
Подключите кабель питания
8 Press the power button
Die Netztaste driicken
Appuyez sur le bouton marche/arrêt
Pulse el botón de encendido
Pressione о botâo de força
Premere il pulsante d'alimentazione
Нажмите кнопку питания
шт
1. Preset Modes*
2. Brightness/Contrast*
3. OSD Menu
4. Exit
5. Power Button
(with power light indicator)
6. Security Lock Slot
7. Dell Soundbar Mounting Brackets
8. AC Power Connector
9. DVI Connector
10. HDMI Connector
11.
VGA Connector
12.
Audio In
13.
Audio Out
* This is defeuit selling, it can be changed to
"AutoAdjusT'or "Input Source".
1. Voreingestellte Modi*
2. Helligkeit/Kontrast*
3. OSD-Menü
4. Verlassen
5. Ein/Aus
6. Steckplatz für Sicherheitsschloss
7. Dell Soundbar-Befestigungsklammern
8. Netzstromanschluss
9. Connecteur DVI
10. Connecteur HDMI
11. Connecteur VGA
IZAudioeingang
13.Audioausgang
* Dies ist die Standardeinstellung. Sie kann auf "Autom.
Justieren" oder auf "Eingabequelle" abgeändert werden.
1. Modes de préréglage*
2. Luminosité/Contraste*
3. Menu OSD
4. Quitter
5. Alimentation
(avec témoin lumineux d'alimentation)
6. Fente du cadenas de sécurité
7. Attaches de montage de la barre son Dell
8. Prise d'alimentation CA
9. Connecteur DVI
10. Connecteur HDMI
11. Connecteur VGA
12. Entrée audio
13. Sortie audio
* Il s'agit du réglage par défaut il peut être changé sur
"Réglage auto" ou "Source d'entrée".
1. Modos predefinidos*
2. Brillo y Contraste*
3. OSD menú
4. Salir
5. Encendido
(con indicador luminoso de encendido)
6. Ranura de bloqueo de seguridad
7. Soportes de montaje de Dell Soundbar
8. Conectar de alimentación AC
9. Conexión DVI
10. Conexión HDMI
11. Conexión VGA
12. Entrada de audio
13. Salida de audio
* Esta es la configuración predeterminada, aunque puede
cambiarse a "Ajuste automático" o "Fuente de entrada".
1. Modos pré-definidos*
2. Brilho e Contraste*
3. Menu OSD
4. Saída
5. Uga/desliga
(com luz indicadora de funcionamento)
6. Ranhura detrava de segurança
7. Suportes de fixaçâo do Dell Soundbar
8. Conectar de Força CA
9. Conectar DVI
10. Conectar HDMI
11. Conectar V(3A
12. Entrada de Audio
13. Saída de Audio
* Este é um ajuste padreo, ele pode ser modificado para
"Auto Ajuste" ou "Inserir Fonte".
1. Modalità predefinite*
2. Luminosil^Contrasto*
3. Menu OSD
4. Esci
5. Tasto d'alimentazione
(con indicatore luminoso)
6. Slot blocco di sicurezza
7. Staffe di montaggio barra audio Dell
8. Connettore alimentazione CA
9. Connettore DVI
10. Connettore HDMI
11. Connettore VGA
12. Ingresso audio
13. Uscita audio
0 "Input Source" (Origine d'input)
1. Предустановленные режимы*
2. Яркость/Контрастность*
3. Экранное меню
4. Выход
5. Кнопка питания
(с индикатором питания)
6. Гнездо для замка безопасности
7. Г нездо для замка безопасное!
8. Разъем питания переменного тока
9. Разъем DVI
10. Разъем HDMI
11. Разъем VGA
12. Вход звука.
13. Аудиовыход
* Это настройка по умолчанию, ее можно изменить
на параметр "Автоматическая регулировка" или
"Источник вхррэ".
NOTE:
For more information see the User’s
Guide in the Drivers and Documentation
media that shipped with your monitor.
HINWEIS:
Weitere Informationen finden Sie
im Benutzerhandbuch im Medium "Treiber
und Dokumentation", das mit Ihrem Monitor
mitgeliefert wird.
REMARQUE:
Pour plus d'informations consultez
le Guide Utilisateur sur le support Pilotes et
documentation livré avec votre moniteur.
NOTA:
para más información, consulte el
Manual del usuario en el medio de
Documentación y controladores que
incluye su monitor.
0BSERVAQÄ0.:
Para mais informagóes veja
Guia do Usuàrio na mídia Drivers e
Documentagáo que é enviada junto ao seu monitor.
NOTA:
Per altre informazioni, fare riferimento
alla Guida all’uso, del supporto Drivers and
User Documentation (Driver e Documentazione)
fornito in dotazione al monitor.
ПРИМЕЧАНИЕ: Для получения
дополнительной информации см.
Руководство пользователя на диске
"Драйверы и документация", поставляемом
с монитором.
О
Printed in China.
Printed on recycled paper.
506280013300R(A)XX
(DELL P/N:C336T Rev.AOO)
D^L'
Information in this document is subject to
change without notice.
© 2009 Deii Inc. All rights reserved.
Reproduction in any manner whatsoever
without the written permission of Dell Inc.
Is strictly forbidden.
Dell
and the
DELL
logo are trademarks of Dell Inc.
Dell disclaims proprietary Interest in the marks and
names of others.
Änderung dt
jederzeit voi
© 2009 Deii inc. Alie Ri
Die Reproduzierung dieser Materialien unter irgendeiner
Form Ohre die schriftliche Erlaubnis von Dell Inc. Ist
strengstens verboten.
Dell
und das
DELL
Logo sind Warenzeichen von Dell Inc.
Dell hat keine Eigentumsrechte über Marken und
Namen anderer Inhaber.
!s dans ce document
© 2009 Dell Inc. tous droits réservés.
La reproduction de ces contenus de quelque
façon sans la permission écrite de Dell Inc.
est strictement interdite.
Dell
et le logo
DELL
sont des marques déposées
de Dell Inc.
Dell renonce à tout intérêt de propriété dans les
marques et noms des autres.
Dell
et le logo
DELL
sont des marques déposées de
Dell Inc.
Dell renonce à tout Intérêt de propriété dans les
marques et noms des autres.
Agoslo 2009
As informagóes neste documento estáo sujeitas
a alteragáo sem aviso.
© 2009 Dell Ine. Tndo os direilos reservados.
Dell
e o logotipo
DELL
sao marcas comerciáis da Dell Ine.
A Dell nega qualquer interesse de propriedade em
marcas e nomes de terceiros.
Le informazioni di qi
Dell
ed il logo
DELL
sono marchi di fabbrica registrati
della Dell Ine.
Dell nega ogni Interesse di proprietà In marchi e nomi diversi
dal proprio.
Информация, содержащаяся в настоящем документе,
подлежит изменению без предварительного уведомления.
© 2009 Dell Inc. Все права защищены.
Dell и логотип De//являются товарными знаками компании
Dell Ine. Компания Dell не претендует на право собственности
других товарных знаков.
