Dell ST2220 Monitor: инструкция
Раздел: Компьютерная техника, комплектующие, аксессуары
Тип: Монитор
Инструкция к Монитору Dell ST2220 Monitor
Оглавление
- Проверьте содержимое коробки Надежно присоедините стойку к основанию Затяните винт с накатанной головкой под основанием стойки ОСТОРОЖНО: Снимите крышку и поставьте на нее монитор Прикрепите подставку к монитору
- Подключите кабель питания Руководство пользователя на диске "Драйверы и документация", поставляемом 1. Функциональная клавиша 1 Подключайте монитор ТОЛЬКО с помощью ОДНОГО из следующих кабелей: синего кабеля VGA Коснитесь кнопки выключения питания (светоиндикатор под логотипом Dell)
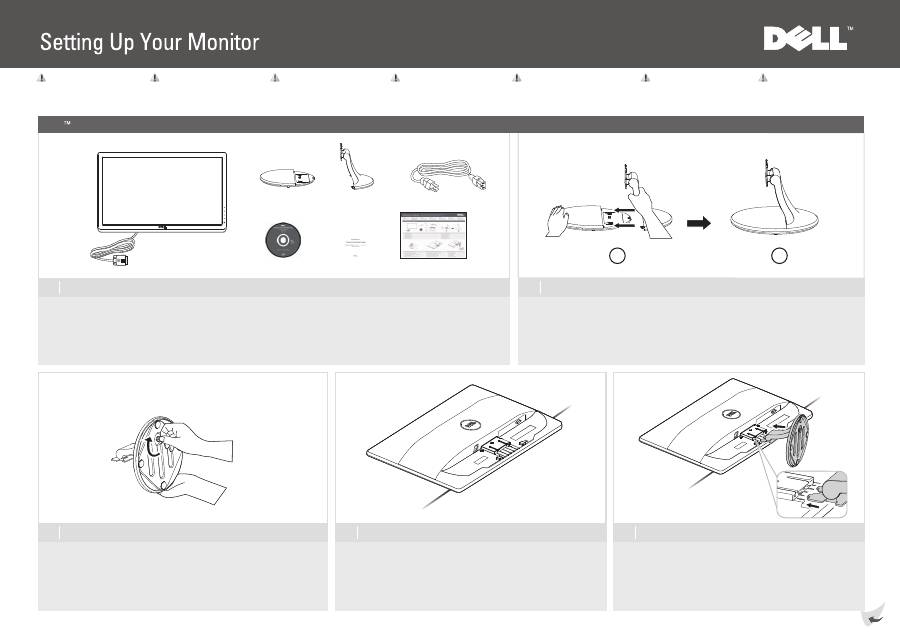
Verify the contents of the box
1 3 2
Setup Ihres Monitors | Configuration de votre moniteur | Instalación de su monitor |
Instalação do monitor | Impostazione del monitor |
Настройка
монитора
PRECAUCIÓN:
Antes de configurar y utilizar su equipo
Dell™, consulte las instrucciones de
seguridad que se entregan con el mismo.
CAUTION:
Before setting up your Dell™ monitor ,
see the safety instructions that shipped
with your monitor.
CUIDADO:
Antes de você ajustar e operar seu computador
Dell™, veja as instruções de segurança
que são enviadas com seu monitor.
ATTENZIONE:
Prima di installare ed usare il computer
Dell™, leggere le istruzioni di sicurezza
fornite in dotazione al monitor.
VORSICHT:
Bevor Sie Ihren Dell™-Computer einrichten
und in Betrieb nehmen, beachten Sie bitte
die Sicherheitsanweisungen, die mit Ihrem
Computer mitgeliefert werden.
ATTENTION :
Avant de configurer et d'utiliser votre
ordinateur Dell™, consultez les précautions
de sécurité livrées avec votre moniteur.
Überprüfen Sie den Lieferumfang
Vérifiez le contenu de la boîte
Verifique los contenidos de la caja
Verifique o conteúdo da caixa
Verificare il contenuto della scatola
Проверьте содержимое коробки
Attach the base to the stand firmly
Den Sockel gut an den Ständer befestigen
Fixez l'embase fermement au socle
Fije la base al soporte firmemente
Prenda a base no suporte com firmeza
Fissare la base al supporto
Надежно присоедините стойку к основанию
Tighten the thumbscrew below the stand base
Die Flügelschraube unter dem Ständersockel festziehen
Serrez la vis moletée sous l'embase du socle
Enrosque el tornillo de apriete manual situado bajo la base del soporte.
Aperte o parafuso abaixo da base do suporte
Stringere la vite sotto il supporto
Затяните винт с накатанной головкой под основанием стойки
ОСТОРОЖНО:
Перед настройкой монитора Dell™
ознакомьтесь с инструкциями по
безопаснос
ти
,
поставляемыми с монитором.
4
Remove the cover and place the monitor on it
Nehmen Sie die Abdeckung ab, und stellen Sie den Monitor darauf
Enlevez le cache et placez le moniteur dessus
Extraiga la cubierta y coloque el monitor sobre ella
Retire a cobert
ų
ra e coloque o monitor sobre a mesma
Rimuovere la copertura e collocarvi spora il monitor
Снимите крышку и поставьте на нее монитор
5
Attach the stand to the monitor
Den Monitor am Ständer befestigen
Fixez le support au moniteur
Instale el soporte en el monitor
Fixar a base ao monitor
Fissare la base al monitor
Прикрепите подставку к монитору
1
2
Dell ST2220 monitor
w w w . d e l l . c o m | s u p p o r t . d e l l . c o m
Änderung der Informationen in diesem Dokument
jederzeit vorbehalten.
© 2010 Dell Inc. Alle Rechte vorbehalten.
Die Reproduzierung dieser Materialien unter irgendeiner
Form ohre die schriftliche Erlaubnis von Dell Inc. ist
strengstens verboten.
Dell und das DELL Logo sind Warenzeichen von Dell Inc.
Dell hat keine Eigentumsrechte über Marken und
Namen anderer Inhaber.
Juni 2010
Les informations contenues dans ce document
sont sujettes à modifications sans préavis.
© 2010 Dell Inc. tous droits réservés.
La reproduction de ces contenus de quelque
façon sans la permission écrite de Dell Inc.
est strictement interdite.
Dell et le logo DELL sont des marques déposées
de Dell Inc.
Dell renonce à tout intérêt de propriété dans les
marques et noms des autres.
Juin 2010
La reproducción de dichos materiales sin permiso por
escrito de Dell Inc. queda terminantemente prohibida.
© 2010 Dell Inc. Todos los derechos reservados.
La reproducción de dichos materiales sin permiso por
escrito de Dell Inc. queda terminantemente prohibida.
Dell et le logo DELL sont des marques déposées de
Dell Inc.
Dell renonce à tout intérêt de propriété dans les
marques et noms des autres.
Junio 2010
Информация, содержащаяся в настоящем документе,
подлежит изменению без предварительного уведомления.
©
2010 Dell Inc. Все права защищены.
Воспроизведение данных материалов в любом виде без
письменного согласия компании Dell Inc. запрещено.
Dell и логотип Dell являются товарными знаками компании
Dell Inc. Компания Dell не претендует на право собственности
других товарных знаков.
Июнь 2010
As informações neste documento estão sujeitas
a alteração sem aviso.
© 2010 Dell Inc. Todo os direitos reservados.
A reprodução destes materiais em qualquer maneira
sem a permissão escrita da Dell Inc. é estritamente
proibida.
Dell e o logotipo DELL são marcas comerciais da Dell Inc.
A Dell nega qualquer interesse de propriedade em
marcas e nomes de terceiros.
Junho 2010
Le informazioni di questo documento sono soggette
a cambiamenti senza preavviso.
© 2010 Dell Inc. Tutti i diritti sono riservati..
Qualsiasi tipo di riproduzione di questi materiali, senza
l’autorizzazione scritta della Dell Inc. è severamente proibita.
Dell ed il logo DELL sono marchi di fabbrica registrati
della Dell Inc.
Dell nega ogni interesse di proprietà in marchi e nomi diversi
dal proprio.
Giugno 2010
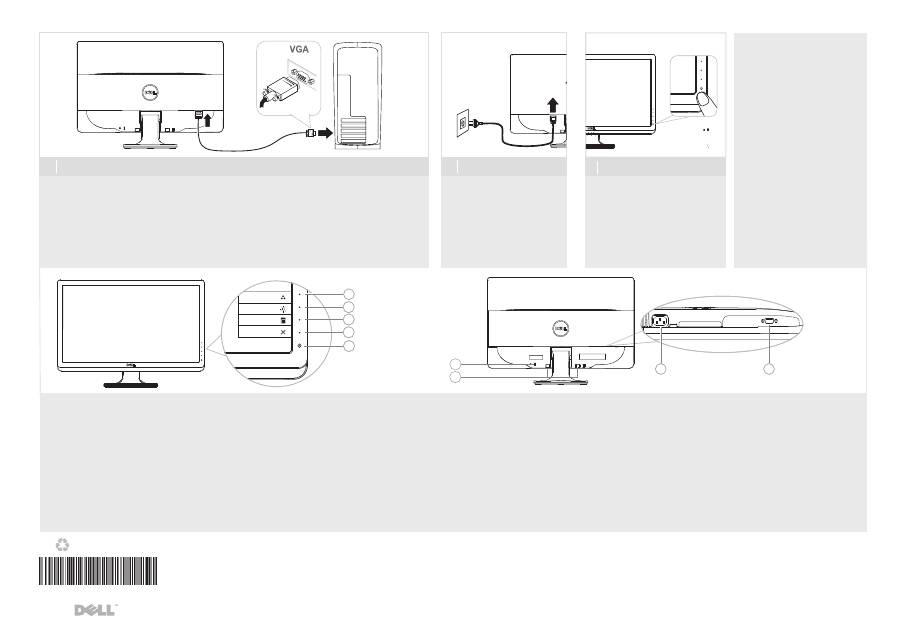
NOTE
: For more information see the User’s
Guide in the Drivers and Documentation
media that shipped with your monitor.
6 7
Connect the power cable
8
Touch the Power button
(light indicator below Dell logo)
Printed in China.
Printed on recycled paper.
Das Netzkabel anschließen
Branchez le cordon d'alimentation
Conecte el cable de alimentación
Conecte o cabo de força
Connettere il cavo di alimentazione
Подключите кабель питания
HINWEIS
: Weitere Informationen finden Sie
im Benutzerhandbuch im Medium "Treiber
und Dokumentation", das mit Ihrem Monitor
mitgeliefert wird.
REMARQUE
: Pour plus d'informations consultez
le Guide Utilisateur sur le support Pilotes et
documentation livré avec votre moniteur.
NOTA
: para más información, consulte el
Manual del usuario en el medio de
Documentación y controladores que
incluye su monitor.
ПРИМЕЧАНИЕ:
Для получения
дополнительной информации см.
Руководство пользователя на диске
"Драйверы и документация", поставляемом
с монитором.
OBSERVAÇÃO.
: Para mais informações veja
Guia do Usuário na mídia Drivers e
Documentação que é enviada junto ao seu monitor.
NOTA
: Per altre informazioni, fare riferimento
alla Guida all’uso, del supporto Drivers and
User Documentation (Driver e Documentazione)
fornito in dotazione al monitor.
1. Touche raccourci 1
Modes de préréglage
2. Touche raccourci 2
Luminosité/Contraste
3. Menu OSD
4. Quitter
5. Marche / Arrêt
(témoin lumineux sous le logo Dell)
6. Fente du cadenas de sécurité
7. Attaches de montage de la barre son Dell
8. Prise d'alimentation CA
9. Connecteur VGA
* Il s’agit du réglage par défaut, il peut être changé sur
"Réglage auto" ou "Source d’entrée".
1. Tecla de acceso directo 1
Modos predefinidos
2. Tecla de acceso directo 2
Brillo y Contraste
3. OSD menu
4. Salir
5. Encendido/apagado
(indicador luminoso bajo el logotipo de Dell)
6. Ranura de bloqueo de seguridad
7. Soportes de montaje de Dell Soundbar
8. Conector de alimentación AC
9. Conexión VGA
* Esta es la configuración predeterminada, aunque puede
cambiarse a "Ajuste automático" o "Fuente de entrada".
1. Tecla de atalho 1
Modos pré-definidos
2. Tecla de atalho 2
Brilho e Contraste
3. Menu OSD
4. Saída
5. Ligar/Desligar Força
(indicador de luz abaixo do logotipo Dell)
6. Ranhura de trava de segurança
7. Suportes de fixação do Dell Soundbar
8. Conector de Força CA
9. Conector VGA
* Este é um ajuste padrão, ele pode ser modificado para
"Auto Ajuste" ou "Inserir Fonte".
1. Tasto scorciatoia 1
Modalità predefinite
2. Tasto scorciatoia 2
Luminosità/Contrasto
3. Menu OSD
4. Esci
5. Accensione/spegnimento
(indicatore luminoso sotto il logo Dell)
6. Slot blocco di sicurezza
7. Staffe di montaggio barra audio Dell
8. Connettore alimentazione CA
9. Connettore VGA
* Questa è l'impostazione predefinita che può essere
modificata su "Auto Adjust" (Regolazione automatica)
o "Input Source" (Origine d'input)
1. Direkttaste 1
Voreingestellte Modi
2. Direkttaste 2
Helligkeit / Kontrast
3. OSD-Menü
4. Verlassen
5. Ein/Aus
(Leuchtanzeige unter dem Dell-Logo)
6. Steckplatz für Sicherheitsschloss
7. Dell Soundbar-Befestigungsklammern
8. Netzstromanschluss
9. Connecteur VGA
* Dies ist die Standardeinstellung. Sie kann auf "Autom.
Justieren" oder auf "Eingabequelle" abgeändert werden.
1. Функциональная клавиша 1
Предустановленные режимы
2. Функциональная клавиша 2
Яркость/Контрастность
3. Экранное меню
4. Выход
5. Питание Вкл./Выкл
(светоиндикатор под логотипом Dell)
6. Гнездо для замка безопасности
7. Гнездо для замка безопасност
8. Разъем питания переменного тока
9. Разъем VGA
* Это настройка по умолчанию, ее можно изменить
на параметр
"
Автоматическая регулировка
"
или
"Источник входа
"
.
(DELL P/N:KW7JP Rev.A00)
Information in this document is subject to
change without notice.
© 2010 Dell Inc. All rights reserved.
Reproduction in any manner whatsoever
without the written permission of Dell Inc.
is strictly forbidden.
Dell and the DELL logo are trademarks of Dell Inc.
Dell disclaims proprietary interest in the marks and
names of others.
June 2010
1. Shortcut Key 1:
Preset Modes
2. Shortcut Key 2:
Brightness/Contrast
3. OSD Menu
4. Exit
5. Power On/Off
(light indicator below Dell logo)
6. Security Lock Slot
7. Dell Soundbar Mounting Brackets
8. AC Power Connector
9. VGA Connector
*
This is default setting, it can be changed to
“Auto Adjust” or “Input Source”.
Connect the monitor using ONLY ONE of the following cables: the Blue VGA cable
Der Monitor sollte nur unter Verwendung EINES der folgenden Kabel angeschlossen werden: blaues VGA-Kabel.
Branchez le moniteur en n'utilisant QU'UN SEUL des câbles suivants : câble bleu VGA
Conecte el monitor utilizando SÓLO UNO de los siguientes cables: el cable VGA azul
Conecte o monitor usando APENAS UM dos seguintes cabos: o cabo VGA Azul
Connettere il monitori utilizzando SOLO UNO dei seguenti cavi: il cavo VGA blu
Подключайте монитор ТОЛЬКО с помощью ОДНОГО из следующих кабелей: синего кабеля VGA
Die Ein/Aus-Taste (Power) berühren
(Leuchtanzeige unter dem Dell-Logo)
Touchez le bouton d'alimentation
(témoin lumineux sous le logo Dell)
Toque el botón de encendido
(indicador luminoso bajo el logotipo de Dell)
Toque o botão de Força
(indicador de luz abaixo do logotipo Dell)
T
occ
ar
e il tasto d'alimentazi
o
ne
(indicatore luminoso sotto il logo Dell)
Коснитесь кнопки выключения питания
(светоиндикатор под логотипом Dell)
Preset Modes
Brightness/Contrast
Menu
Exit
1
2
3
4
5
6
7
9
8
Q41G78S1700 8A
