Dell E170S Monitor: инструкция
Раздел: Компьютерная техника, комплектующие, аксессуары
Тип: Монитор
Инструкция к Монитору Dell E170S Monitor
Оглавление
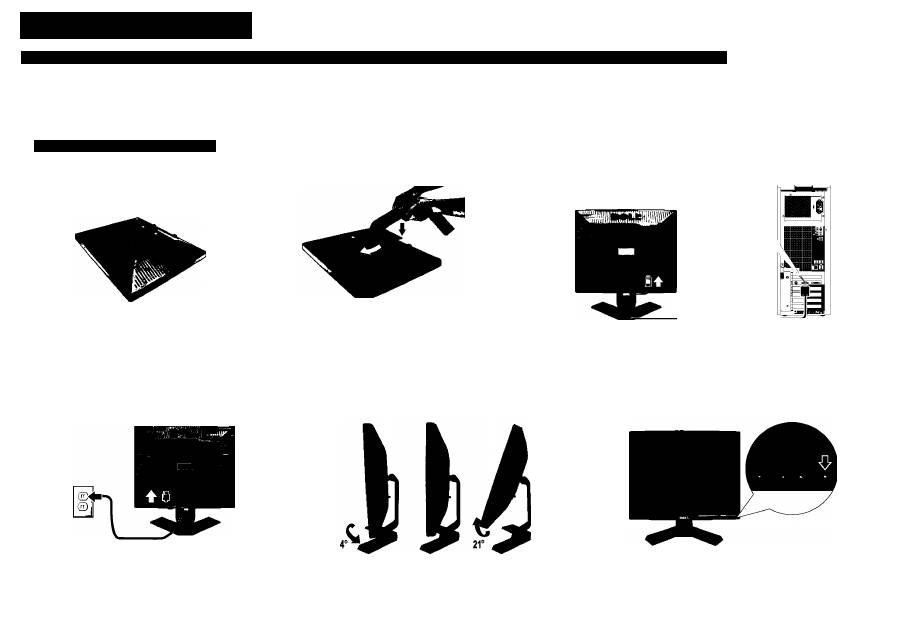
- ВНИМАНИЕ: Снимите крышку и поставьте на нее монитор. Прикрепите подставку к монитору, Подключите монитор к компьютеру синим VGA-кабелем. Подключите кабель питания. Настроить монитор Нажмите кнопку питания.
- 1. Экранное меню Получение информации
Setting Up Your Monitor
Installation de votre téléviseur | Configurar su monitor | Установка монитора | Einrichten des Monitors | Configurazione del monitor | Configuraçâo de seu monitor
CAUTION:
Before you set up and operate your Dell™ monitor,
see the safety Instructions that ship with your
monitor.
Attention :
Avant d'installer et d'utiliser votre moniteur
Dell™, lisez les instructions de sécurité
fournies avec votre moniteur.
A
Precaución:
Antes de instalary utilizar su monitor Dell™,
consulte las instrucciones de seguridad que
se envían con su monitor.
Dell™ E170S/E190S Fiat Panel Monitor
1 Remove the cover and place the monitor on it
¿là.
ВНИМАНИЕ:
Перед установкой и эксплуатацией
монитора Dell™ ознакомьтесь с
правилами техники безопасности,
входящими в комплект поставки
монтитора.
А
Achtung:
А ,
Bevor Sie den Dell™ Monitor einrichten und
verwenden, lesen Sie bitte die dem Monitor
beigelegten Sicherheitshinweise.
Prima di installare il monitor Dell
le norme di sicurezza fomite insieme al
monitor.
Cuidado:
Antes de configurar e operar seu monitor
Dell™ consute as instrucòes de seguranga
enviadas com o aparelho.
Attach the stand to the monitor
3
Connect the monitor using the blue VGA cable
Ю1
VGA
Enlevez le couvercle et placez-y le moniteur.
Retire la cubierta у coloque el monitor sobre ella.
Снимите крышку и поставьте на нее монитор.
Abdeckung entfernen und Monitor daraufsetzen.
Togliere la copertura e collocarvi sopra il monitor.
Remover a tampa e colocar о monitor sobre ele.
Fixez le support au moniteur.
Instale el soporte en el monitor.
Прикрепите подставку к монитору,
□en Ständer am Monitor befestigen
Fissare il supporto al monitor.
Anexar a base ao monitor.
Branchez le moniteur en utilisant le câble bleu VGA.
Conecte el monitor utilizando el cable VGA azul.
Подключите монитор к компьютеру синим VGA-кабелем.
Schließee Sie den Monitor über das blaue VGA-Kabel an.
Collegare II monitor usando II cavo VGA blu.
Conecte о monitor usando о cabo VGA azul
4 Connect the power cable
5
Adjust the monitor 0 Press the power button
Branchez le cordon d’alimentation.
Conecte el cable de alimentación.
Подключите кабель питания.
Schließen Sie die Netzkabel an.
Collegare il cavo di alimentazione.
Conecte о cabo de alimentaçâo
Aiustez le moniteur.
Ajuste el monitor.
Настроить монитор
Stellen Sie den Monitor ein.
Regolare ol monitor.
Wyregulowac monitor
Appuyez sur le bouton marche/arrèt.
Presione el botón de encendido.
Нажмите кнопку питания.
Drücken Sie die Ein-/Austaste.
Accendere
II
monitor.
Pressione о botáo de allmentagào
About Your Monitori
A propos de votre moniteur | Acerca de su monitor | Сведения о мониторе | Info zum Monitor | Informacje о monitorze | Sobre seu monitor
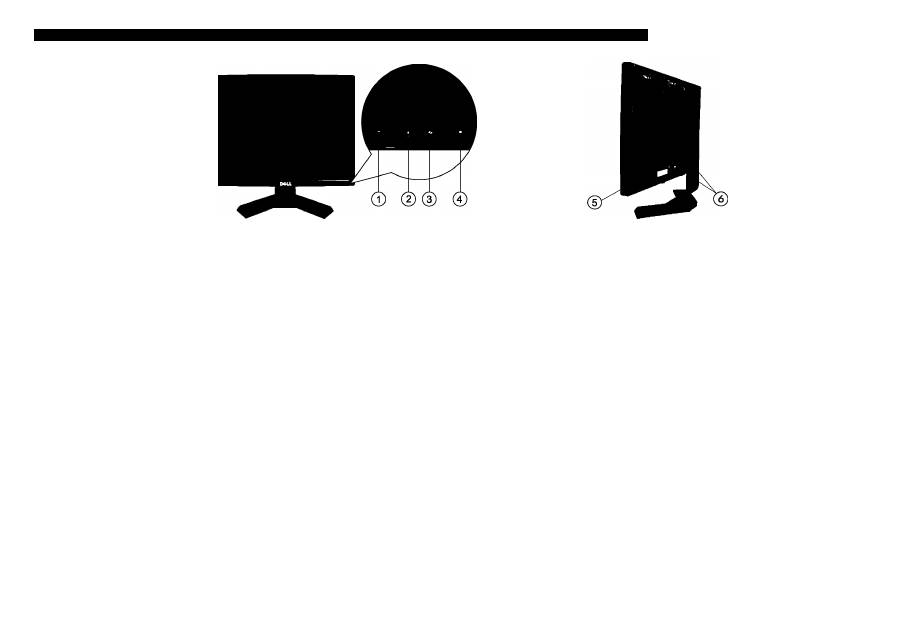
1. OSD menu button
2. Down (-) button/Brightness & Contrast
3. Up (+) button/Auto Adjust
4. Power On/Off button (with LED indicator)
5. Stand removal button
6. Cabie management slot
1. OSD-Menü.
2. Abwärtstaste (-)/Helligkeit und Kontrast
3. Aufwärtstaste(+)/Auto-Einstellung
4. Eln-/Austaste (mit LED-Anzeige)
5. Entrieguiungstaste
6. Kabeihaiter
1. Menu OSD
2. Bouton vers le bas (-)/Luminosité et contraste
3. Bouton vers le haut(+)/Réglage automatique
4. Bouton marche/arrêt (avec voyant DEL)
5. Bouton verrouillage
6. Support de câbles
1. Puisante menu
2. Puisante glù(-)/Lumlnosltà e contrasto
3. Pulsante su (+)/Regolazione automatica
4. Pulsante ON/OFF con Indicazione LED
5. Tasto di sblocco
6. Foro di gestione del cavo
1. Menú OSD.
2. Botón abajo (-)/Brlllo y Contraste
3. Botón arriba (+)/Ajuste automático
4. Botón de encendido/apagado (con Indicador LED)
5. Botón para bloquear
6. Guía de cables
1. Menú OSD
2. Botáo Abalxo(-)/Brílho e contraste
3. Botáo Acima (+)/Ajuste automático
4. Botáo Allmentagáo llgada/desllgada (com Indicador LED)
5. Botáo de bloquelo
6. Suporte de cabos
1. Экранное меню
2. Кнопка «вниз» (-), яркость и контрастность.
3. Кнопка «вверх» (+), автоматическая настройка.
4. Кнопка включения и выключения питания
(со светодиодным индикатором).
5. Кнопка выпуска
6. Отверстие для кабелей
@
Finding Infoimation
For more information see the
User's Guide
on the Drivers and
Documentation
media.
Rechercher des informations Búsqueda de información
Pour plus d'informations, reportez-
vous au Guide de l'utilisateur sur le
CD Pilotes et Documentation.
Para más información, consulte el
manual del usuario en los medios
de controladores y documentación.
Получение информации
Дополнительную информацию
см. в руководстве пользователя
на диске с драйверами и
документацией.
Weitere Informationen
Weitere Informationen finden
Sie in dem Benutzerhandbuch
auf dem Treiber- und
Dokumentationsmedium.
Dove reperire informazioni
Per maggiori irribimazioni, vedere ia
guida utente dei monitor in Driver e
documenti di supporto utente.
Encontrar informagóes
Para obter mais informa^óes
consulte o guía de usuàrio nas
unidades e midia de
documentagào.
О
Printed in China
D0LL
Information In thU document Is subjea to diange without notice.
«2009 Dell Inc All rights reserved.
(DELL P/N:M867N rev AOO)
P/N: 4J.0TN01.002
^
«2009 Dell Inc Tous droits rd
Demand the logo DELL sont des marques déposées de Dell Inc4
Dell dénie tout Intérêt propriétaire dans les marques et les noms
commerciaux autres que les slerts.
La Información de este documento se encuentra sujeta a
«2009 Dell Inc. Все права at
Воспроиавепаниа данных материалов в
OñVy el logotipo de
DELL
son marcas registradas de Dell Inc
Dell descarga todo su interés de propiedad sobre las mareas y
rkombres de otras empresas.
Febrero de 2009
w w w . d e i i . c o m | s u p p o r t . d e i l . c o m
o 2009 Dell Inc Alie Rechte Vorbehalten.
Dell
и логотип
DELL
являются товарными
знаками Dell Ine. Dell отказывается от
частного интереса в марках и наименоааниях
других сторон,
von Dell Ine. lat strikt untersagL
Oe//und das OQL-Logo sind Marken der Dell Inc.
Dell erhebt keinerlei ElgentumsansprOche auf
aridere als Ihre eigenen Marken und Namen.
«2009 Dell IrK. Tu«l IdlritU riservati.
È saweramente vietata la hproduzlorte di questi
materiali In qualsiasi modo senza II et
scritto di Dell Ine.
IO ntarehi registrati di Dell Ine.,
»resse di proprietà escleslva
nel marchi e nelle denominazioni di altri.
О 2009Dell Ine Todos os dlreltos re
Oe//eo logo
DELL
sio marcas registradas da
Dell Ine. Dell néo tem Interesse de propriedade
nas marcas e nomes deterceiros.
