Dell Latitude XT2: инструкция
Раздел: Компьютерная техника, комплектующие, аксессуары
Тип: Ноутбук
Инструкция к Ноутбуку Dell Latitude XT2
Оглавление
- Dell™ Latitude™ XT2 Service Manual

Dell™ Latitude™ XT2 Service Manual
Notes, Cautions, and Warnings
If you purchased a Dell™ n Series computer, any references in this document to Microsoft®
Windows
®
operating systems are not applicable.
Information in this document is subject to change without notice.
© 2009 Dell Inc. All rights reserved.
Reproduction of this material in any manner whatsoever without the written permission of Dell Inc. is strictly forbidden.
Trademarks used in this text:
Dell
, the
DELL
logo,
Latitude, TravelLite, Wi-Fi Catcher,
and
ExpressCharge,
are trademarks of Dell Inc.;
Intel
,
Pentium, Celeron
a n d
Core
are registered
trademarks of Intel Corporation;
Bluetooth
is a registered trademark owned by Bluetooth SIG, Inc. and is used by Dell under license;
TouchStrip
is a trademark of Zvetco Biometrics,
LLC;
Blu-ray Disc
is a trademark of the Blu-ray Disc Association;
Microsoft
,
Windows, Windows Server, MS-DOS, Aero, Windows Vista
.
and the
Windows Vista
start button
are either
trademarks or registered trademarks of Microsoft Corporation in the United States and/or other countries.
Other trademarks and trade names may be used in this document to refer to either the entities claiming the marks and names or their products. Dell Inc. disclaims any
proprietary interest in trademarks and trade names other than its own.
Model PP12S
September 2009 Rev. A01
Tablet-PC Features
Working on Your Tablet-PC
Adding and Replacing Parts
Specifications
Diagnostics
System BIOS
NOTE:
A NOTE indicates important information that helps you make better use of your computer.
CAUTION:
A CAUTION indicates potential damage to hardware or loss of data if instructions are not followed.
WARNING:
A WARNING indicates a potential for property damage, personal injury, or death.
System BIOS
Dell™ Latitude™ XT2 Service Manual
BIOS Screen Navigation Keystrokes
<F12> Menu
Boot Menu
Entering System Setup
Your Tablet-PC offers the following system BIOS options:
l
Bring up a one-time boot menu by pressing <F12>
l
Access the System Setup utility by pressing <F2>
BIOS Screen Navigation Keystrokes
Use the following keystrokes to navigate the BIOS screens.
<F12> Menu
Press <F12> when the Dell™ logo appears to initiate a one
-time boot menu with a list of the valid boot devices for the system.
Diagnostics
and
Enter Setup
options are also included in this menu. The devices listed on the boot menu depend on the bootable devices in the system. This menu is useful when you are
attempting to boot to a particular device or to bring up the diagnostics for the system. Using the boot menu does not make any changes to the boot order
stored in the BIOS.
Boot Menu
Your Tablet-PC features an enhanced one-time boot menu. The enhanced menu features the following improvements:
l
Easier access
—
Access the menu by pressing <F12> during system boot.
l
User prompting
—
The missing keystroke is now displayed on the BIOS splash screen.
l
Added diagnostics options
—
The boot menu now includes two new options:
BIOS Setup
and
Diagnostics
.
Entering System Setup
Press <F2> to enter System Setup and change the user-definable settings. If you have trouble entering System Setup using this key, press <F2> when the
keyboard LEDs first flash.
Follow the on-screen instructions to view and/or change any settings. On each screen, the system setup options are listed at the left. To the right of each
option is the setting or value for that option. You can change settings that appear as white type on the screen. Options or values that you cannot change
(because they are determined by your Tablet-PC) appear less bright.
The upper-right corner of the screen displays help information for the currently highlighted option. The lower-right corner displays information about the
computer. System setup key functions are listed across the bottom of the screen.
The system setup screens display the current setup information and settings for your computer, such as:
l
System configuration
l
Boot order
l
Boot (start-up) configuration
l
Basic device configuration settings
l
System security and hard drive password settings
Navigation Keystrokes
Action
Keystroke
Expand and collapse field
<Enter>, left- and right-arrow keys, or +/
–
Expand or collapse all fields
< >
Exit BIOS
<Esc>
—
Remain in Setup, Save/Exit, Discard/Exit
Change a setting
Left- and right-arrow keys
Select field to change
<Enter>
Cancel a modification
<Esc>
Reset defaults
<Alt><F> or
Load Defaults
menu option
NOTE:
Depending on your computer and any installed devices, the items listed in this section may or may not appear.
Diagnostics
Dell™ Latitude™ XT2 Service Manual
Device Status
Battery Status
Keyboard Status
LED Error Codes
Device Status LEDs
Device status LEDs are a good source for diagnosing common problems that may occur on your Tablet-PC.
Battery Status
If the computer is connected to an electrical outlet, the battery light operates as follows:
l
Alternately blinking amber light and blue light
—
An unauthenticated or unsupported, non-Dell AC adapter is attached to your Tablet-PC.
l
Alternately blinking amber light with steady blue light
—
Temporary battery failure with AC adapter present.
l
Constantly blinking amber light
—
Fatal battery failure with AC adapter present.
l
Light off
—
Battery in full charge mode with AC adapter present.
l
Blue light on
—
Battery in charge mode with AC adapter present.
Battery Charge and Health
To check the battery charge, press and release the status button on the battery charge gauge to illuminate the charge-level lights. Each light represents
approximately 20 percent of the total battery charge. For example, if four lights are on, the battery has 80 percent of its charge remaining. If no lights appear,
the battery has no charge.
To check the battery health using the charge gauge, press and hold the status button on the battery charge gauge for at least 3 seconds. If no lights appear,
the battery is in good condition and more than 80 percent of its original charge capacity remains. Each light represents incremental degradation. If five lights
appear, less than 60 percent of the charge capacity remains, and you should consider replacing the battery.
Keyboard Status LEDs
The light located above the function key F4 turns on when the numeric keypad is enabled.
The light located above the function key F5 turns on when the Scroll Lock function is enabled.
The light located on the caps lock key turns on when the Caps Lock function is enabled.
LED Error Codes
Turns on when you turn on the Tablet-PC and blinks when the Tablet-PC is in a power management mode.
Turns on when the Tablet-PC reads or writes data.
Turns on steadily or blinks to indicate battery charge status.
Turns on when wireless networking is enabled.
Turns on when a card with Bluetooth
®
wireless technology is enabled. To turn off only the Bluetooth
wireless technology function, right-click the icon in the system tray and select
Disable Bluetooth Radio
.
Error Code Appearance
Description
Next Step
Caps
Lock
Numeric
Lock
Scroll
Lock
ON
FLASH
FLASH
No SODIMMs are installed
1.
Install supported memory modules.
2.
If memory is already present, reseat the module(s) one at time in each slot.
3.
Try known good memory from another computer or replace the memory.
4.
Replace the system board.
FLASH
ON
ON
System board error
1.
Reseat the processor.
2.
Replace the system board.
3.
Replace the processor.
FLASH
ON
FLASH
LCD Panel Error
1.
Reseat the LCD cable.
2.
Replace the LCD panel.
3.
Replace the video card / system board.
OFF
FLASH
OFF
Memory compatibility error
1.
Install compatible memory modules.
2.
If two modules are installed remove one and test. Try the other module in the
same slot and test. Test the other slot with both modules.
3.
Replace the memory.
4.
Replace the system board.
1.
Reseat the memory.
2.
If two modules are installed remove one and test. Try the other module in the

ON
FLASH
ON
Memory is detected but has errors
same slot and test. Test the other slot with both modules.
3.
Replace the memory
4.
Replace the system board.
OFF
FLASH
FLASH
Modem Error
1.
Reseat the modem.
2.
Replace the modem.
3.
Replace the system board.
FLASH
FLASH
OFF
Option ROM Error
1.
Reseat the device.
2.
Replace the device.
3.
Replace the system board.
OFF
ON
OFF
Storage device error
1.
Reseat the hard drive and optical drive.
2.
Test the computer with just the hard drive and just the optical drive.
3.
Replace the device that is causing the failure.
4.
Replace the system board.
FLASH
FLASH
ON
Video card error
1.
Replace the system board.
Digitizer Options Tab
Dell™ Latitude™ XT2 Service Manual
The
Digitizer Options
tab is used for the following:
l
Input mode selection
l
Touch tuning
l
Launching diagnostics
l
Restoring default settings
Input Mode
The N-trig applet has 4 operating modes:
l
Pen Only
—
In this mode, the stylus is the only device that can be used as the input device with the N-trig digitizer. Changing from Pen Only mode to
any other mode is done by clicking with an active input device on the N-trig Applet icon in the system tray. When the applet is open, select desired mode
and press OK.
l
Touch Only
—
In Touch Only mode, a single finger is the only input device that can be used with the N-trig digitizer. Using the stylus is not possible. It is
important to note that only a single hand contact is allowed with the digitizer for proper execution. Changing Touch Only mode into any other mode is
done by tapping the N-trig Applet icon in System Tray using a finger or other active input device and choosing the desired mode. Press OK to confirm.
l
Auto Mode
—
The N-Trig digitizer is capable of detecting a stylus as well as finger touch. The purpose of Auto Mode is to allow the user intuitive toggling
between the Pen Only or Touch Only modes. The default input device for Auto Mode is the stylus as long as it is in range of the tablet screen (hovering
in proximity or in contact). A basic principle in Auto Mode is that stylus detection in the digitizer proximity would turn the digitizer into Pen Only mode as
an overriding priority. A double-tap finger gesture on the screen (similar in style to a mouse double-click) will switch the digitizer from Pen Only mode to
Touch Only mode. The system will remain in Touch Only mode as long as the stylus is out of range. Once the stylus is detected in range the system will
automatically switch to Pen Only mode.
l
Dual Mode (Vista Only)
—
Dual Mode is a unique operational mode that is functional only while using the Microsoft Vista operating system. In this
mode, the OS switches automatically between the available pointing device according to its internal priority and attributes.
Touch Tuning
If you believe that the Tablet-PC's finger detection function is not working properly, a recalibration of the touch feature may be in order. To accomplish this click
the
Reset
button and then follow the on-screen prompts.
A message indicating success or failure appears once the reset routine completes. If the result is failure, try running the diagnostics.
Diagnostics
Running the diagnostics will help determine the functionality of the digitizer. Start by clicking the
Troubleshoot
button. Pressing the
Self Test
button on the
subsequent pop-up window starts the diagnostics.
After the test is complete, the results are displayed as illustrated below.
CAUTION:
Do NOT touch the screen while touch reset is in progress.

Use this table to define the result codes.
Digitizer Self Test Result Codes
Code
Test
Error Details
Symptoms
7
A-trigs connectivity
Digitizer analog
processor fail
Digitizer is unable to initialize or read samples from analog processor. No pen or touch position is
reported.
11
Stylus excitation
No pen excitation
Signals received during the stylus excitation test are below certain limit. Pen may be not
functional or detected in tip only.
14
Sensor Antenna
disconnects
Digitizer grid disconnect
There are disconnected lines. Pen or touch may be malfunctioning in a specific physical display
area.
15
Sensor Antenna shorts
Digitizer grid shortcut
There are shorted lines. Pen or touch may be malfunctioning in a specific physical display area.
18
Channel imbalance
Digitizer channel
degraded
There is an unbalanced channel. Pen or touch may be malfunctioning in a specific physical display
area.
19
Capacitor calibration
Digitizer calibration
degraded
The calibration capacitor in a certain channel is set to minimal or maximum value. Pen or touch
may be malfunctioning in a specific physical display area.
47
Internal Firmware
Error
Internal Firmware Error
Firmware resource problem in executing diagnostics. Diagnostics tool is not functional.
48
Critical Malfunction
Device Error
Critical malfunction was detected, test cannot continue.
49
Host Timeout Error
Host Timeout Error
Host communication or resources problem in executing diagnostics.
50
Capacitor Calibration
Required
Hardware calibration is
required
Hardware calibration is required to gain maximum performance.

Tablet-PC Features
Dell™ Latitude™ XT2 Service Manual
Tablet-PC Modes
Tablet-PC Buttons
Tablet-PC Interface
Tablet-PC Settings
Tablet-PC Pen
Application Matrix
Interaction Options Tab
Dell™ Latitude™ XT2 Service Manual
The
Interaction Options
tab controls the visual and sound effects that can modify the user experience while operating the system's various modes.
Auto Mode Switching Graphical Indicator
This section enables you to select a .gif file (image) to be displayed whenever an auto mode switching event is detected. You can select the event that will
cause the graphical indicator to appear:
l
Pen
®
Touch
: Pen is detected after finger usage.
l
Touch
®
Pen
: Touch is detected after pen usage.
Sound Feedback
This section enables you to select which .wav file (sound) will be played when the finger touches the screen. The sound can be tested using the play button.
One can enable/disable this functionality using the specified radio button.
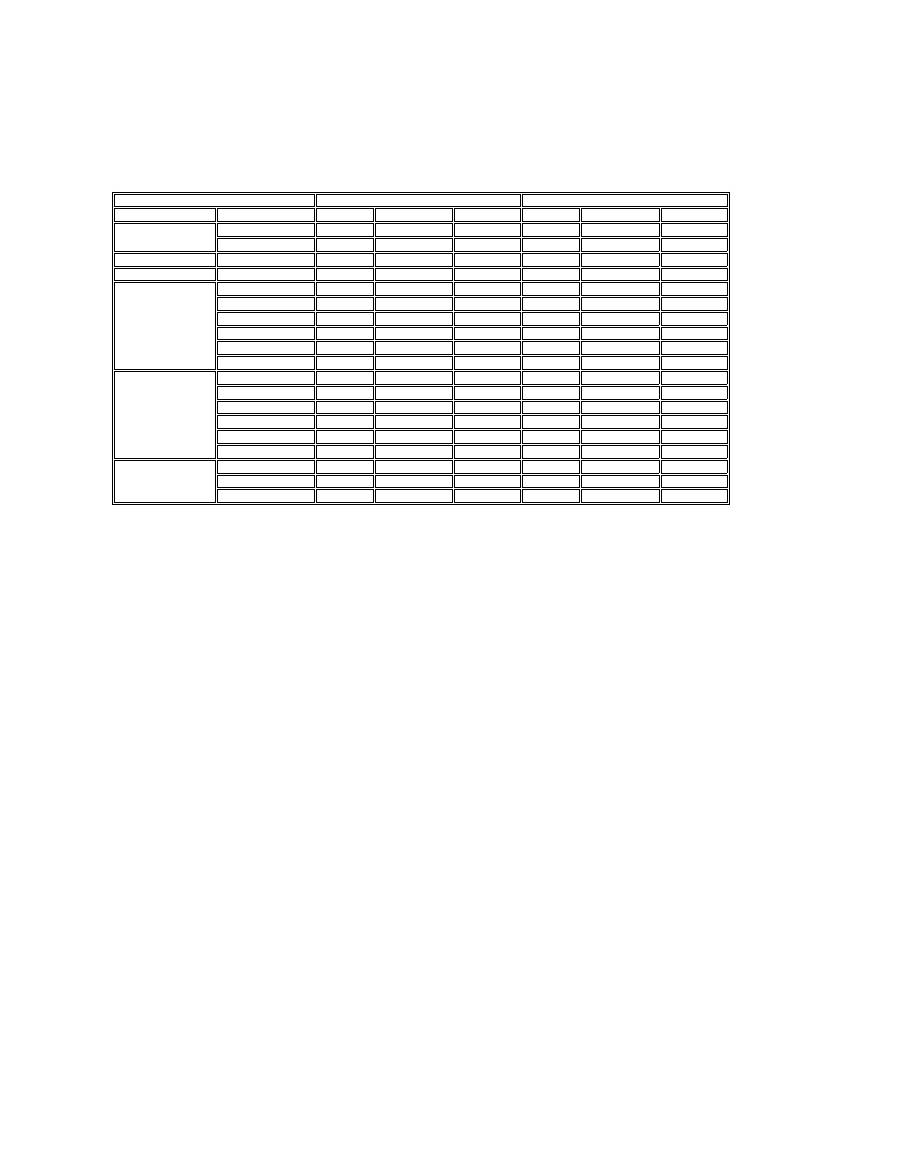
Application Matrix
Dell™ Latitude™ XT2 Service Manual
The following matrix shows the gestures supported by the operating system and specific application software packages. Other applications may also respond
to these gestures.
Operating System
Microsoft™ Windows Vista™
Microsoft Windows™ XP
Application Family
Application Name
Pinch/Zoom Horizontal Scroll Vertical Scroll Pinch/Zoom Horizontal Scroll Vertical Scroll
Windows
Explorer
Yes
Yes
Yes
No
Yes
Yes
Photo Gallery
Yes
Yes
Yes
No
No
No
Windows Live
Photo Gallery
Yes
Yes
Yes
No
No
No
Virtual Earth
No
No
No
No
No
No
Microsoft Office 2007
Outlook
®
Yes
Yes
No
Yes
Yes
No
Word
Yes
Yes
Yes
Yes
Yes
No
Excel
®
Yes
Yes
Yes
Yes
Yes
No
Power Point
®
Yes
Yes
Yes
Yes
Yes
Yes
One Note
®
Yes
Yes
Yes
Yes
Yes
No
Picture Manager
Yes
Yes
Yes
Yes
Yes
Yes
Microsoft Office 2003
Outlook
®
Yes
Yes
Yes
Yes
Yes
Yes
Word
Yes
Yes
Yes
Yes
Yes
Yes
Excel
®
Yes
Yes
Yes
Yes
Yes
Yes
Power Point
®
Yes
Yes
Yes
Yes
Yes
Yes
One Note
®
Yes
Yes
Yes
Yes
Yes
Yes
Picture Manager
Yes
Yes
Yes
Yes
Yes
Yes
Web Browsers
Internet Explorer 6
®
No
No
No
Yes
Yes
Yes
Internet Explorer 7
®
Yes
Yes
Yes
Yes
Yes
Yes
FireFox
®
Yes
Yes
Yes
Yes
Yes
Yes
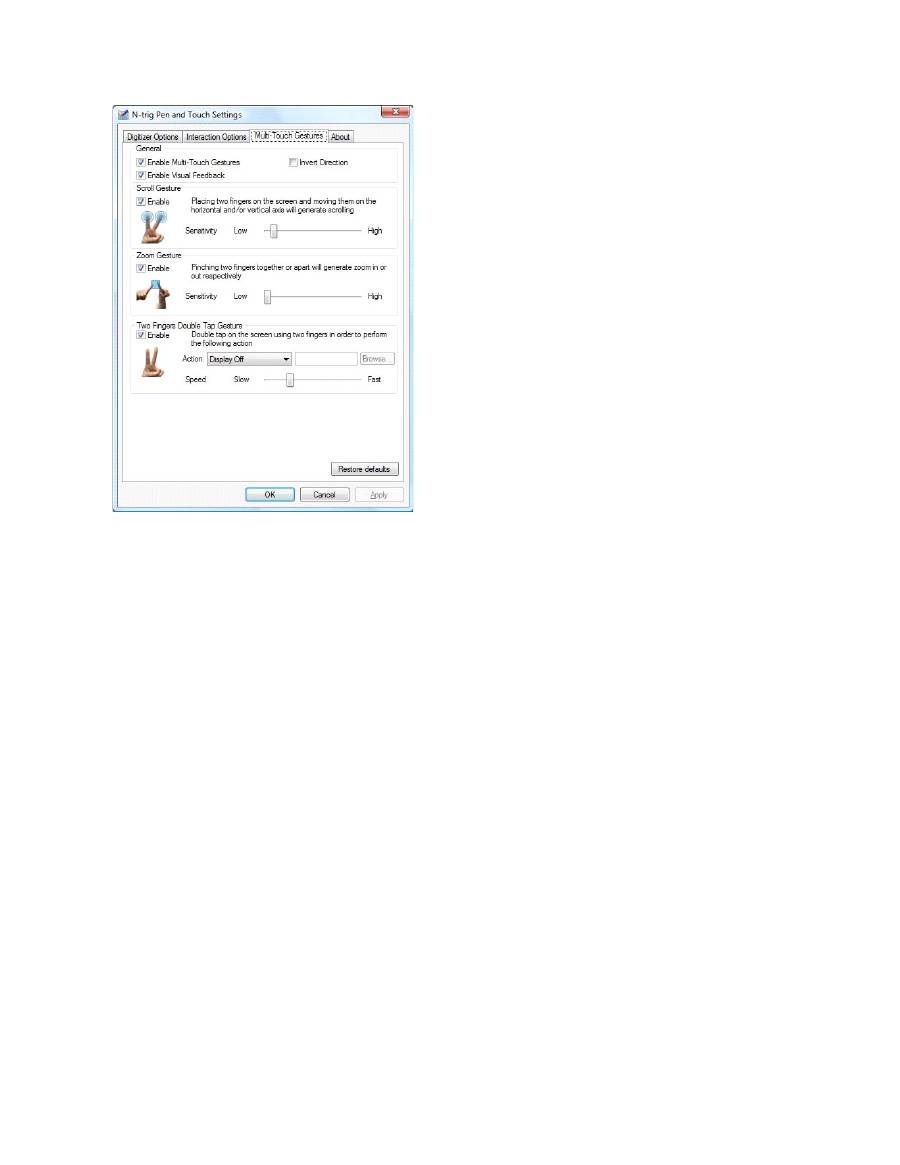
Multi-Touch Gestures Feature
Dell™ Latitude™ XT2 Service Manual
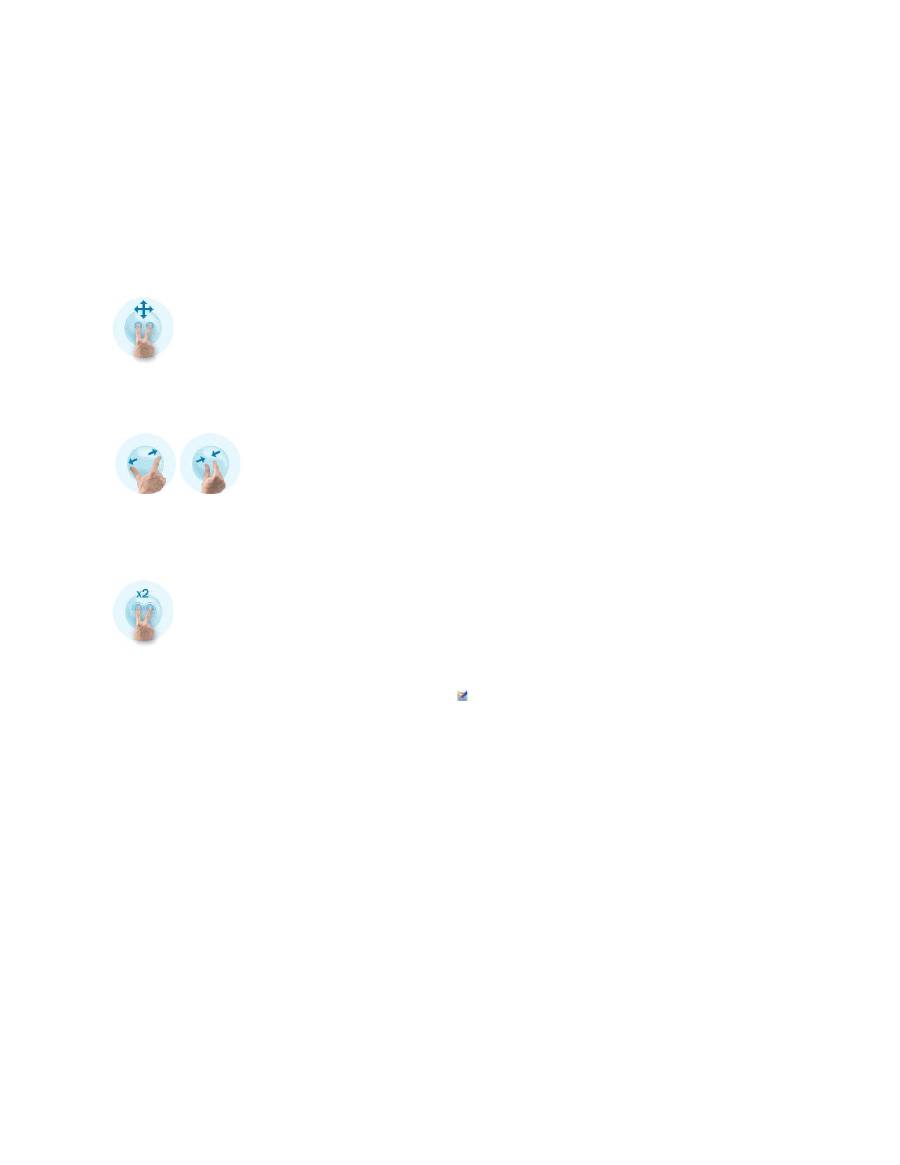
Gestures
Gestures are expressions made while touching the screen of your Tablet PC with two fingers. They are interpreted as user commands to the operating system
or active application software. When the operating system recognizes a gesture, an icon confirming the gesture appears on the screen. This multi-touch
update includes three gestures: a scroll gesture, a zoom gesture, and a two-finger double-tap gesture. Gesture features and descriptive icons shown herein
are sourced by N-trig.
Scroll Gesture
Placing two fingers on the screen and moving them horizontally or vertically generates scrolling in the direction of movement: right, left, up, or down.
Zoom Gesture
Touching the screen with two fingers and moving them together or apart generates a zoom-in or zoom-out command to the screen.
Two-Fingers Double-Tap Gesture
Tapping the screen twice with two fingers sends an operating system command that you can configure. It can be used to perform actions, such as turning the
display off and disabling touch gestures (default), or run an executable program, such as one that opens Internet Explorer.
Sensitivity Setup
To adjust the sensitivity for the two-finger gestures, double-click the N-trig icon (
) in the system tray, and tap the Multi-Touch Gestures tab. Set the sliders
for each gesture as desired.
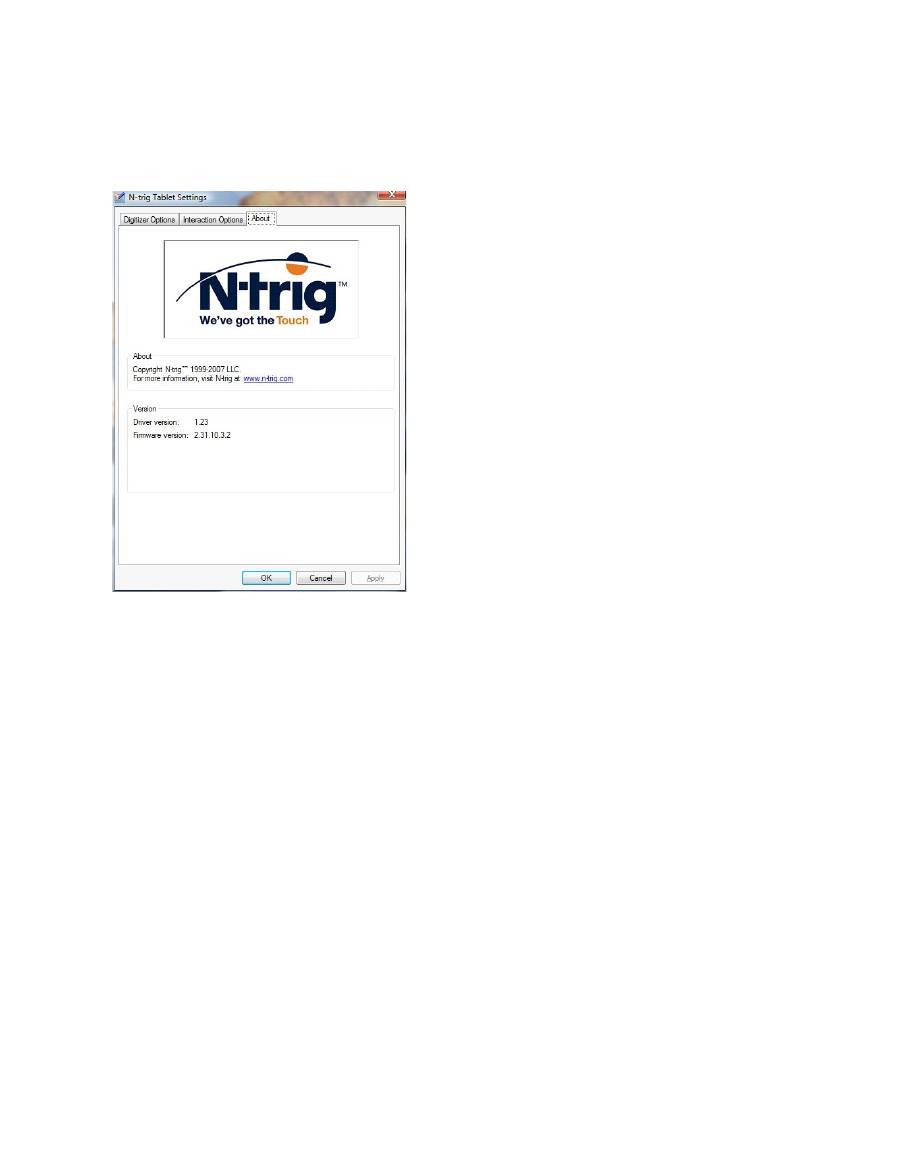
About Tab
Dell™ Latitude™ XT2 Service Manual
The
About
tab is used to find information such as the driver version and firmware revision numbers. The firmware revision number can also be obtained by
hovering your pointer over the N-trig Tablet Settings icon in the system tray.

Adding and Replacing Parts
Dell™ Latitude™ XT2 User's Guide
Main Battery
Memory and Mini-Card Cover
Memory
Hard Drive
Mini-Card
System Board
Heat Sink and Fan Assembly
Battery Latch
Coin-Cell Battery
Grip Cover
Display Assembly
Palm Rest
Speaker
Internal Card With Bluetooth
®
Wireless Technology
Hinge Cover
Keyboard

Tablet-PC Pen
Dell™ Latitude™ XT2 Service Manual
Calibrating the Pen
Troubleshooting
Your Tablet-PC uses a specifically designed electrostatic pen or
stylus
for use in tablet PC mode. Instead of relying on battery power, the energy source for the
stylus is magnetic energy produced by the excitation coil built into the digitizer itself. The signal from the coil is picked up by the stylus and triggers the stylus
to transmit an electric field.
The transmitted electric field is sensed by a matrix of conductive lines, accurate stylus position determined using the low amplitude signals received on the
vertical and horizontal conductors, and an appropriate signal is transferred to the digitizer's on-board processor.
Tips come in two colors/types, blue and black. The blue tips are designed for a "softer" writing feel. The black tips present a "harder" writing feel. The system
ships with a total of 5 (3 blue and two black) tips. These tips are easily replaced by using the pen-tip removal tool which looks similar to an oversized pair of
tweezers. This tool also ships with the Tablet-PC.
Calibrating the Pen
The pen can function at the default calibration or at a calibration set by you or by another user. It is recommended that you use the pen only while it is
calibrated to your personal calibration settings. Calibration optimizes pen performance for each user.
To calibrate the pen:
1.
Open
QuickSet
.
2.
Click
System
®
Tablet Settings
.
3.
On the
Dell Tablet Settings
window, click
Pen & Input
then click
Calibrate
.
4.
Follow the instructions on the screen. The calibration markers are displayed on the screen as plus signs (+). Tap the pen in the exact center of each of
the calibration markers.
Troubleshooting
The pen is the first component to be investigated in the event of a suspected problem with the digitizer. Verify the tip is in good shape (free of chips, excessive
wear, etc.) by closely examining it. If there is any doubt, you should change out the tip with a new one or one that is known to be in good condition.
You should also verify that the touch capabilities are not affected. Switch to touch mode and see if the problem still exists. If there are no symptoms present
while in touch mode, the pen tip is the most likely suspect. If the problem does persist in touch mode you should run diagnostics and take the necessary steps
depending on the results.
NOTE:
In the event of a suspected digitizer failure, the pen tip should be examined. If the tip is damaged it needs to be replaced. This will oftentimes
remedy to problem with the digitizer.
NOTE:
Be sure to calibrate the pen for use in both portrait and landscape display orientations.
Specifications
Processors
System Information
ExpressCard™
SD™ Card
Memory
Smart Card
Ports and Connectors
Communications
Video
Audio
Display
Keyboard
Touch Pad
Battery
AC Adapter
Fingerprint Reader
Physical
Environmental
NOTE:
Offerings may vary by region. For more information regarding the configuration of
your Tablet-PC, click
Start
(or
Start
in Windows XP)
®
Help and Support
, and then
select the option to view information about your Tablet-PC.
Processor
Processor type
Intel
® Core™ 2 Duo ULV
L2 cache
3 MB
External bus frequency
800 MHz
System Information
System chipset
Intel SFF Chipset
Data bus width
64 bits
DRAM bus width
Dual-channel (2) 64-bit buses
Processor address bus width
36 bits
Flash EPROM
4 MB
PCI bus
32 bits
ExpressCard™
NOTE:
The ExpressCard slot is designed only for ExpressCards. It does NOT support PC cards.
ExpressCard connector
ExpressCard slot (supports both USB- and PCIe-
based interfaces)
Cards supported
34 mm ExpressCards
External bus frequency
800 MHz
Secure Digital (SD) Memory Card Reader
Cards supported
SD, SDIO, SD HC, Mini SD (w/adapter) MMC, MMC+,
Mini MMC (w/adapter))
Memory
Memory module connector
one user-accessible SODIMM socket
Memory module capacities
1 GB, 2 GB, 4 GB
Memory type
DDR3 SODIMM
Minimum memory
1 GB (onboard memory)
Maximum memory
5 GB capable (requires 64-bit Windows Vista
®
operating system)
Smart Card
Read/write capabilities
Reads and writes to all ISO 7816 1/2/3/4
microprocessor cards (T=0, T=1)
Cards supported
3 V and 5 V
Program technology supported
Java cards
Interface speed
9600
–
115,200 bps
EMV level
Level 1 certified
WHQL certification
PC/SC
Compatibility
Compatible within a PKI environment
Insert/eject cycles
Certified for up to 100,000 cycles
Ports and Connectors
Audio
microphone connector, stereo headphone/speakers
connector
IEEE 1394
4-pin serial connector
E-dock
Standard E-Dock connector for devices such as E-
Dock advanced port replicators and expansion
stations
The optional media base can be connected to the E-
Dock connector.
Mini-card
One dedicated half-mini-card slot for WLAN
One dedicated full-mini-card slot for WWAN / GPS
(mobile broadband)
Network adapter
RJ-45 port
USB
two 4-pin USB 2.0-compliant connectors
Powered USB
5-pin power supply and 4-pin USB
2.0-compliant connector
USB
Two 4-pin USB 2.0-compliant connectors
One USB connector can be used as an eSATA
connector. The other USB connector with PowerShare
can be used to charge a USB device when the
computer is turned on or off.
Video
15-hole connector
Communications
Network adapter
10 / 100 / 1000 Ethernet LAN on system board
Wireless
internal WLAN, WWAN, and Bluetooth
®
wireless
support (if optional cards are purchased)
Video
Video type
integrated
Video controller
Mobile Intel
®
GMA X4500 Graphics Controller
Data bus
integrated
Video memory
up to 256 MB shared memory
Audio
Audio type
two-channel high definition audio codec
Audio controller
IDT 92HD71B
Stereo conversion
24-bit (analog-to-digital and digital-to-analog)
Interfaces:
Internal
high definition audio
External
microphone-in connector, stereo
headphones/speakers mini-connector
Speaker
one 4-ohm speaker
Internal speaker amplifier
2-Watt channel into 4 ohms
Volume controls
Volume control buttons and program menus
Display
Type (active-matrix TFT)
Active X / Y
12.1 inches WXGA
Dimensions
Height
261.12 mm (10.28 inches)
Width
163.2 mm (6.43 inches)
Diagonal
307.34 mm (12.1 inches)
Maximum Resolutions
1280 x 800 at 262 K colors
Operating angle
0° (closed) to 160°
Refresh rate
60 Hz (40 Hz in All Day Battery Life (ADBL) mode)
Viewing angles
Horizontal
40/40°
Vertical
15/30°
Pixel pitch
0.204
Power consumption (panel with backlight, typical)
3.0 W (max)
Keyboard
Number of keys
87 (U.S. and Canada); 88 (Europe); 91 (Japan)
Layout
QWERTY/AZERTY/Kanji
Touch Pad
X/Y position resolution
(graphics table mode)
240 CPI
Size
Width
73.0-mm (2.9-inch) sensor-active area
Height
42.9-mm (1.7-inch) rectangle
Battery
Type
4-cell: 28 Whr/14.8V
6-cell: 58 Whr/11.1V
Slice 48: Whr/11.1V
Dimensions:
Depth
4
-cell lithium-ion battery
210 mm (8.27 inches)
6
-cell lithium-ion battery
210 mm (8.27 inches)
Slice
9.5 mm (0.38 inch)
Height
4
-cell lithium-ion battery
18 mm (0.71 inch)
6
-cell lithium-ion battery
23.2 mm (0.91 inch)
Slice
186 mm (7.32 inches)
Width
4
-cell lithium-ion battery
46.5 mm (1.83 inch)
6
-cell lithium-ion battery
68.5 mm (2.7 inches)
Slice
279 mm (10.98 inches)
Weight
4
-cell lithium-ion battery
0.2 kg (0.44 lb)
6
-cell lithium-ion battery
0.37
–
0.38 kg (0.82
–
0.84 lb)
Slice
0.59
–
0.61 kg (1.3
–
1.34 lb)
Voltage
11.1 VDC (6-cell, Slice)
14.8 VDC (4-cell)
Charge time (approximate)
Computer off
approximately 1 hour to 80% capacity (4-cell battery)
Approximately 2 hours to 100% capacity (4 cell battery)
Life span (approximate)
300 charge/discharge cycles
Temperature range
Operating
0° to 35°C (32° to 95°F)
Storage
-
10° to 60°C (14° to 140°F)
Coin-cell battery
CR-2032
AC Adapter
Input voltage
90
–
264 VAC
Input current (maximum)
1.1 A
Input frequency
47
–
63 Hz

Output current
3.3 A (maximum at 10ms pulse)
2.3 A (continuous)
Output power
45 W or higher
Rated output voltage
19.5
±
1.0 VDC
Dimensions:
Height
16 mm (0.63 inch)
Width
63 mm (2.48 inches)
Depth
88 mm (3.46 inches)
Temperature range:
Operating
0° to 40°C (32° to 104°F)
Storage
–10° to 70°C (–50° to 158°F)
Fingerprint Reader (optional)
Type
UPEK TCS3 TouchStrip™ strip sensor with CMOS active
capacitive pixel-sensing technology
Array size
248 x 2 pixels
Physical
Height
19.95
–
26.82 mm (0.79
–
1.06 inch)
Width
290.6 mm
–
296.6 mm (11.44
–
11.68 inches)
Depth
204 mm
–
226 mm (8.03
–
8.9 inches)
Weight
1 kg (2.2 lb)
Environmental
Temperature range:
Operating
0°
to 35°C (32° to 95°F)
Storage
–40°
to 65°C (–40° to 149°F)
Relative humidity (maximum):
Operating
10% to 90% (non-condensing)
Storage
5% to 95% (non-condensing)
Maximum vibration (using a random-vibration spectrum that simulates user environment):
Operating
0.66 GRMS
Storage
1.3 GRMS
Maximum shock (measured with hard drive in head-parked position and a 2-ms half-sine pulse):
Operating
143 G
Storage
163 G
Altitude (maximum):
Operating
–
15.2 to 3048 m (
–
50 to 10,000 ft)
Storage
–
15.2 to 3048 m (
–
50 to 10,000 ft)
Airborne contaminant level
G2 or lower as defined by ANSI/ISA-S71.04-1985
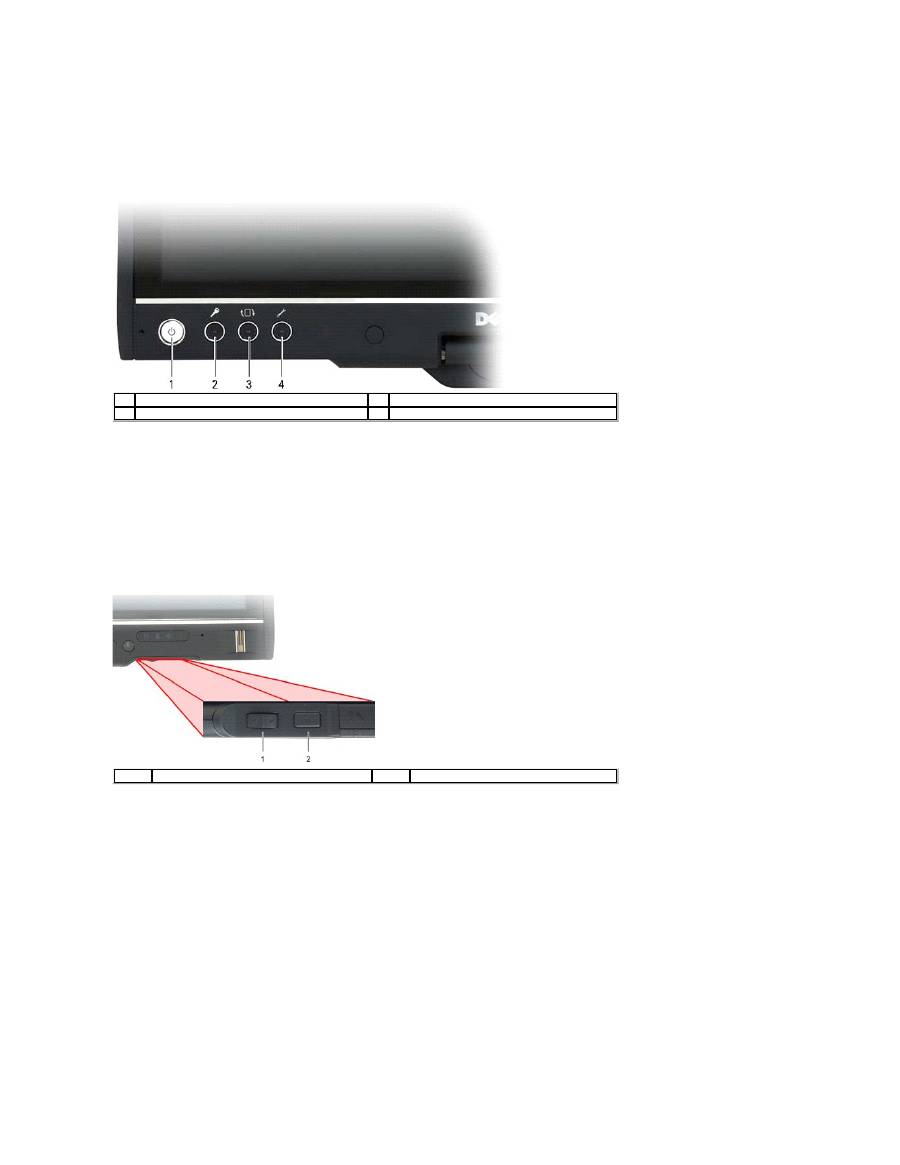
Tablet-PC Buttons
Dell™ Latitude™ XT2 Service Manual
Your Tablet-PC has three tablet buttons located beside the power button. In order for these buttons to function properly,
Dell Control Point System Manager
must be installed.
Power button
—
Used to power the system on and off.
Windows Security button
—
If you use your Tablet-PC in tablet mode, press this button to access the Windows Task Manager dialog box or a login screen,
the same way you use the <Ctrl><Alt><Del> key sequence in notebook mode.
Screen rotate button
—
While the Tablet-PC is in tablet mode, use the screen rotate button to change the display orientation from portrait to landscape
mode. Each time you press and release the screen rotate button, the screen image rotates clockwise 90 degrees.
QuickSet tablet settings button
—
Press this button to view and configure options for the Tablet-PC and the pen through Dell Control Point System Manager.
You can configure this button to perform a different action using Windows Vista™ Tablet
-PC Settings.
Scroll Buttons
Using the Scroll Control
l
To scroll through a list of items or a set of pages one at a time, shift the scroll control up or down and release. The control automatically returns to the
center/neutral position when released.
l
To rapidly scroll through a list of items or a set of pages, shift the control up or down and hold it, releasing it when you wish to stop scrolling.
l
To select objects, press and release the scroll control when it is in the center/neutral position.
l
To launch context sensitive menus, press and hold the scroll control until a complete circle is drawn on the display then release. This is equivalent to
clicking the right mouse button on a notebook computer.
Use the back button to move backwards in applications that support navigation, such as web browsers and Windows Explorer. It is also used to close the
active window.
l
To move backward, press and release the back button.
l
To close the active window, press and hold the back button.
l
To customize the back button behavior, use the Tablet and Pen Settings in Windows Vista.
1
Power button
3
Screen rotate button
2
Windows Security button
4
Dell Control Point button
1
Scroll control
2
Back button
Tablet-PC Interface
Dell™ Latitude™ XT2 Service Manual
Microsoft™ Windows Vista™ /XP Tablet
-PC Interface Comparison
Windows Vista
Windows™ XP
Windows Vista/XP Tablet-PC Interface Comparison
Depending on the configuration you ordered, your Tablet-PC shipped with either the Windows Vista or Windows XP operating system. There are several
differences in the Tablet PC-interfaces between the two. Listed below are the primary differences.
*
Available as a separate download from Microsoft.
Windows Vista
Pen Usage
Using the Pen as a Mouse
You can use the pen the same way you use a mouse or touch pad with a notebook computer. Holding the pen near the display makes a small cursor appear.
Moving the pen moves the cursor.
The table below describes how to use the pen.
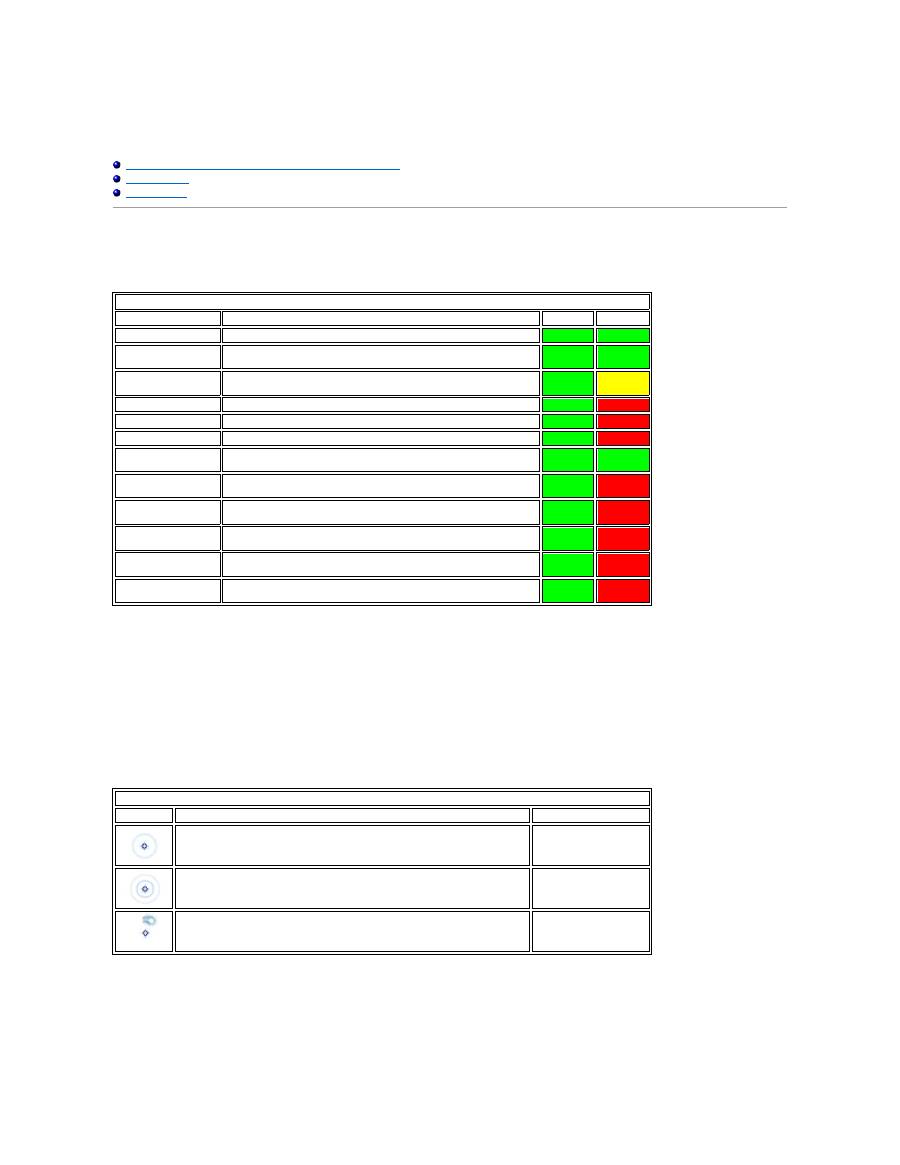
Tablet PC Interface Comparison Table
Feature
Description
Vista
XP
Touch
Ability to use finger as an input device.
YES
YES
Windows Journal
Native note-taking application which takes input directly from pen or
touch.
YES
YES
Snipping Tool
Tool used to capture portions of visual data (documents, pictures, etc.)
via pen or touch.
YES
YES*
Flicks
Gesture activated shortcuts for common tasks.
YES
NO
Check Boxes
Visual identifier in folders for selecting files.
YES
NO
Cursor Feedback
Visual indicator for tap location.
YES
NO
Tablet Input Panel
Tool used to input data via pen or touch that takes the place of a
keyboard.
YES
YES
Input device-sensitive
tools
Tablet Input Panel and icon change size according to pen or touch being
used.
YES
NO
Tablet Cursor
Special Tablet cursor used for Tablet PC functions as opposed to a
standard mouse pointer.
YES
NO
Touch Widget
Separate tool that appears in Touch Mode used for right-clicking
purposes.
YES
NO
Cursor Feedback
Ability to see if the target has been hit by using visual feedback for
success.
YES
NO
Cursor Feedback
Ability to see if the target has been hit by using visual feedback for
success.
YES
NO
Electrostatic Pen Usage
Appearance
Action
Function
Gently tap the pen tip on the screen of your Tablet PC.
Same as a single-click on
a mouse.
Gently tap the pen tip twice in quick succession on the screen of your Tablet-PC.
Same as a double-click on
a mouse.
Touch the pen on the screen and hold it in place momentarily until Windows
draws a complete circle around the cursor.
Same as a right-click on a
mouse.
