Dell S520 Projector: инструкция
Раздел: Компьютерная техника, комплектующие, аксессуары
Тип: Монитор
Инструкция к Монитору Dell S520 Projector
Оглавление
Replacing the Dell™ S520 Projector Lamp
Ersetzen der Dell™ S520 Projektorlampe
Remplacer la Lampe du Projecteur Dell™ S520
Cambio de la lámpara del proyector Dell™ S520
Sostituzione della lampada del proiettore Dell™ S520
Substituir a lãmpada do projetor S520 Dell™
Dell™ S520 プロジェクターランプの交換
Dell™ S520 投影仪的灯泡更换
Замена проекционной лампы Dell™ S520
Dell™ S520 Projektör Lambasını Değiştirme
www.dell.com/support
About Cautions and
Warnings
CAUTION: A CAUTION indicates potential damage to hardware or
loss of data if instructions are not followed.
WARNING: A WARNING indicates a potential for property damage,
personal injury, or death.
____________________
Information in this document is subject to change without notice.
© 2013 Dell Inc. All rights reserved. Printed in China. Printed on recycled paper.
Reproduction of these materials in any manner whatsoever without the written
permission of Dell Inc. is strictly forbidden.
Trademarks used in this text: Dell and the DELL logo are trademarks of Dell Inc.; DLP
®
and DLP
logo are trademarks of TEXAS INSTRUMENTS INCORPORATED.
Other trademarks and trade names may be used in this document to refer to either
the entities claiming the marks and names or their products. Dell Inc. disclaims any
proprietary interest in trademarks and trade names other than its own.
Model S520
September 2013 Rev. A00
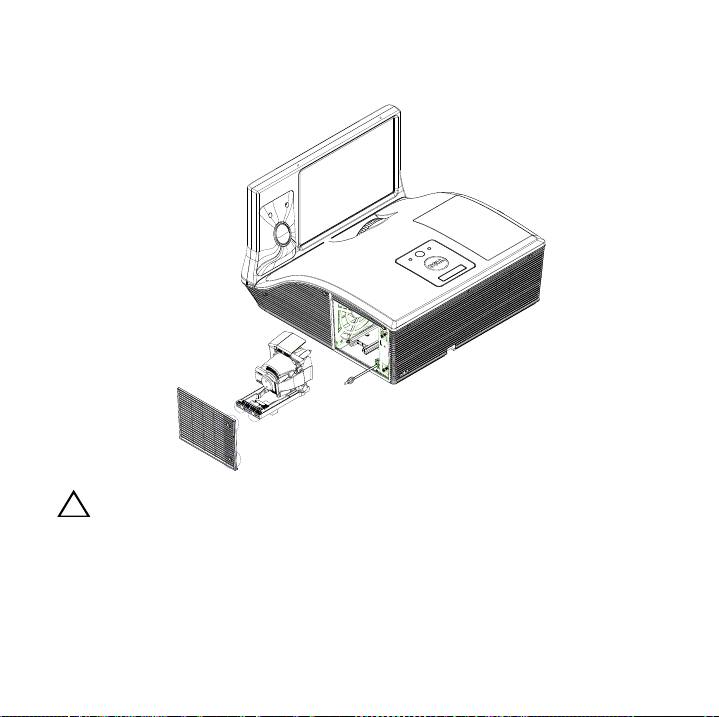
Replacing the Dell™ S520 Projector Lamp
The following message appears on the screen when your projector lamp
is approaching its end of life and needs to be changed:
Lamp is approaching the end of its useful life in the operation.
Replacement suggested! www.dell.com/lamps
CAUTION: Before you begin any of the procedures in this section,
follow the Safety Instructions in the user’s manual.
To replace the lamp:
1 Turn off the projector and disconnect the power cable.
WARNING: The lamp becomes very hot when in use. Do not
attempt to replace the lamp until the projector has been allowed
to cool down for at least 30 minutes.
2
Let the projector cool for at least 30 minutes.
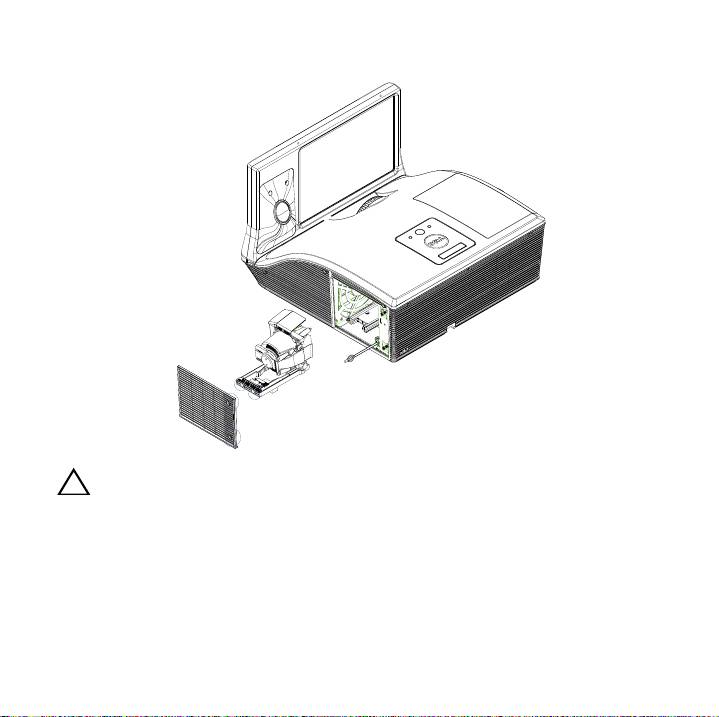
3
Loosen the screws that secure the lamp cover, and remove the cover.
CAUTION: Do not touch the projector lamp or the lamp glass at any
time. Projector lamps are very fragile and may shatter if touched.
CAUTION: If the lamp shatters, remove all the broken pieces from
the projector and dispose or recycle according to state, local, or
federal law. For more information see www.dell.com/hg.
4
Loosen the two screws that secure the lamp.
5
Pull the lamp up by its metal handle.
6
Replace with the new lamp.
NOTE: Dell™ may require lamps replaced under warranty to be
returned. Otherwise, dispose or recycle the lamp.
7
Tighten the two screws that secure the lamp.
8
Replace the lamp cover and tighten the screws.
9
Reset the lamp usage time. (See Changing the Lamp in the User's Guide.)
CAUTION: Lamp Disposal (for the US only)
- LAMP(S) INSIDE THIS PRODUCT CONTAIN MERCURY AND
MUST BE RECYCLED OR DISPOSED OF ACCORDING TO LOCAL,
STATE OR FEDERAL LAWS. FOR MORE INFORMATION, GO TO
WWW.DELL.COM/HG OR CONTACT THE ELECTRONIC INDUSTRIES
ALLIANCE AT WWW.EIAE.ORG. FOR LAMP-SPECIFIC DISPOSAL
INFORMATION, CHECK WWW.LAMPRECYCLE.ORG.
Vorsicht und Warnung
VORSICHT: Eine VORSICHT-Mitteilung zeigt potentielle Hardware-
Schäden oder möglichen Datenverlust an, falls die Anweisungen
nicht korrekt befolgt werden.
WARNUNG: Eine WARNUNG weist auf Gefahrenquellen hin, die
Sachschäden, Verletzungen oder sogar den Tod von Personen zur
Folge haben können.
____________________
Die Information in diesem Dokument kann ohne Vorankündigung geändert
werden.
© 2013 Dell Inc. Alle Rechte vorbehalten. Gedruckt in China. Auf Recyclingpapier
gedruckt.
Reproduktionen dieser Materialien sind ohne vorherige schriftliche Genehmigung
von Dell Inc. strengstens untersagt.
Marken in diesem Text: Dell, das DELL -Logo sind Marken von Dell Inc.; DLP und das
®
DLP
logo sind Marken von TEXAS INSTRUMENTS INCORPORATED.
Alle anderen in dieser Dokumentation genannten Marken und
Handelsbezeichnungen sind Eigentum der entsprechenden Hersteller und Firmen.
Dell Inc. verzichtet auf alle Besitzrechte an Marken und Handelsbezeichnungen, die
nicht ihr Eigentum sind.
Modell S520
September 2013 Rev. A00
Ersetzen der Dell™ S520
Projektorlampe
Die folgende Meldung erscheint auf dem Bildschirm, wenn die
Lebensdauer Ihrer Projektorlampe zu Ende geht, und ein Lampenwechsel
nötig wird:
Das Gebrauchsende der Lampe ist im Betrieb bald erreicht. Ein
Lampenwechsel wird empfohlen! www.dell.com/lamps
VORSICHT: Bevor Sie mit den in diesem Kapitel gezeigten
Vorgängen beginnen, beachten Sie die auf Sicherheitshinweise.
Wenn Sie die Lampe wechseln:
1
Schalten Sie den Projektor ab und ziehen Sie den Netzstecker.
WARNUNG: Die Lampe wird während des Gebrauchs sehr heiß.
Wechseln Sie die Lampe erst, nachdem sich der Projektor
mindestens 30 Minuten lang abgekühlt hat.
2
Lassen Sie den Projektor mindestens 30 Minuten lang abkühlen.

3
Lösen Sie die Schrauben, mit denen die Lampenabdeckung befestigt ist,
und entfernen Sie die Abdeckung.
VORSICHT: Berühren Sie nie die Lampe oder das Lampenglas.
Projektorlampen sind leicht zerbrechlich und können bereits bei
Berührung beschädigt werden.
VORSICHT: Falls die Lampe platzt, entfernen Sie alle Scherbenreste
aus dem Projektor und entsorgen Sie sie entsprechend den
geltenden Entsorgungsvorschriften. Weitere Informationen hierzu
finden Sie unter www.dell.com/hg.
4
Lösen Sie die beiden Schrauben, mit denen die Lampe befestigt ist.
5
Ziehen Sie die Lampe am Metallgriff nach oben.
6
Setzen Sie die neue Lampe ein.
ANMERKUNG: Dell™ fordert Sie möglicherweise auf, im Rahmen
der Garantie gewechselte Lampen an Dell zurückzuschicken.
Andernfalss sollten Sie die Lampe entsorgen.
7
Ziehen Sie die beiden Schrauben, mit denen die Lampe befestigt ist.
8
Schließen Sie das Lampenfach wieder und schrauben Sie den Deckel mit
den zwei Schrauben fest.
9
Setzen Sie die Lampenbetriebsdauer zurück. (Siehe Auswechseln der
Lampe im Bedienungsanleitung.)

Avertissements et Attention
AVERTISSEMENT: Un AVERTISSEMENT indique un risque de
dommage à l’appareil ou de perte de données si les instructions ne
sont pas suivies.
ATTENTION: Un signe ATTENTION indique un risque de dommage
matériel, de blessure corporelle ou de mort.
____________________
Les informations contenues dans ce document sont sujettes à modification sans
préavis.
© 2013 Dell Inc. Tous droits réservés. Imprimé en Chine. Imprimé sur du papier
recyclé.
La copie de ces documents, sous quelque forme que ce soit, sans l’autorisation écrite
de Dell Inc. est strictement interdite.
Marques utilisées dans ce texte : Dell, le logo DELL et PowerVault sont des marques
®
commerciales de Dell Inc. ; DLP et le logo DLP
sont des marques commerciales de
T
EXAS INSTRUMENTS INCORPORATED.
D’autres marques et noms commerciaux peuvent être utilisés dans ce document
pour faire référence aux entités se réclamant de ces marques et de ces noms ou à
leurs produits. Dell Inc. dénie tout intérêt propriétaire dans les marques et les noms
commerciaux autres que les siens.
Modèle S520
Septembre 2013 Rev. A00
Remplacer la Lampe du Projecteur
Dell™ S520
Le message suivant apparaît sur l’écran lorsque la lampe de votre
projecteur est près de la fin de sa durée de vie et qu'elle doit être changée:
La lampe atteint sa fin de vie en fonctionnement. Songez à la remplacer!
www.dell.com/lamps
AVERTISSEMENT: Avant de débuter quelque procédure que ce soit
de cette section, lisez et suivez les Instructions de sécurité.
Pour remplacer la lampe :
1
Eteignez le projecteur et débranchez le cordon d'alimentation.
ATTENTION: La lampe devient très chaude en cours d'utilisation.
Pour remplacer la lampe attendez que le projecteur ait refroidi
pendant au moins 30 minutes.
2
Laissez le projecteur se refroidir pendant au moins 30 minutes.
3
Desserrez les vis de fixation du couvercle de la lampe, et retirez le
couvercle.
AVERTISSEMENT: Ne touchez pas la lampe ou le verre de la lampe à
aucun moment. Ils sont très fragiles et peuvent se briser si vous les
touchez.
AVERTISSEMENT: Si la lampe est brisée, enlevez toutes les débris du
projecteur et jetez-les ou recyclez-les conformément aux lois
locales, régionales et fédérales. our plus d¡?informations, visitez
www.dell.com/hg.
4
Dévissez les deux vis de fixation de la lampe.
5
Soulevez la lampe en la tenant par sa partie métallique.
6
Remplacez par une lampe neuve.
REMARQUE : Dell™ peut demander que les lampes remplacées
durant la période de garantie lui soient renvoyées. Sinon, jetez ou
recyclez la lampe.
7
Vissez les deux vis de fixation de la lampe.
8
Replacez le couvercle de lampe et serrez les vis.
9
Réinitialisez le temps d'utilisation de la lampe. (Voir le Remplacer la lampe
dans le Guide d'utilisation.)

Precauciones y advertencias
PRECAUCIÓN: Una PRECAUCIÓN indica un daño potencial en el
hardware o una pérdida de datos si no se siguen las instrucciones.
ADVERTENCIA: Una ADVERTENCIA indica que se pueden producir
daños materiales o personales o, incluso, la muerte.
____________________
La información de este documento está sujeta a cambios sin previo aviso.
© 2013 Dell Inc. Todos los derechos reservados. Impreso en China. Impreso en
papel reciclado.
Queda expresamente prohibida la reproducción de estos materiales de cualquier
forma, fuere lo que fuere, sin permiso por escrito de Dell Inc.
Marcas comerciales que aparecen en este documento: Dell, el logotipo DELL son
®
marcas comerciales de Dell Inc.; DLP y el logotipo DLP
son marcas comerciales de
T
EXAS INSTRUMENTS INCORPORATED.
Otras marcas y nombres comerciales pueden usarse en este documento para
referirse a entidades ya sea a las entidades que reclaman las marcas o a sus productos.
Dell Inc. niega cualquier interés de propiedad de las marcas y nombres de marcas
distintas a las suyas.
Modelo S520
Septiembre de 2013 Rev. A00

Cambio de la lámpara del proyector
Dell™ S520
EL mensaje siguiente aparece en la pantalla cuando la lámpara del
proyector está llegando al final de su vida útil, y es necesario cambiarla:
La lámpara está alcanzando el fin de su vida útil a funcionamiento. Debe
cambiarla. www.dell.com/lamps
PRECAUCIÓN: Antes de comenzar cualquiera de los
procedimientos de esta sección, siga las instrucciones de seguridad.
Para cambiar la lámpara:
1
Apague el proyector y desconecte el cable de alimentación.
ADVERTENCIA: La lámpara se calienta mucho durante el uso. No
intente cambiarla hasta que el proyector se haya dejado enfriar
durante al menos 30 minutos.
2
Deje que el proyector se enfríe durante al menos 30 minutos.

3
Afloje los tornillos que sujetan la tapa de la lámpara y quite la tapa.
PRECAUCIÓN: No toque el foco ni el vidrio de la lámpara en ningún
momento. Las lámparas de los proyectores sin muy frágiles y
pueden romperse si se tocan.
PRECAUCIÓN: Quite todas las piezas rotas del proyector y tírelas o
recíclelas según la ley estatal, local o federal. Para más información,
consulte www.dell.com/hg.
4
Afloje los 2 tornillos que sujetan la lámpara.
5
Tome la lámpara por su asa de metal.
6
Coloque la nueva lámpara.
NOTA: Es posible que Dell™ solicite que las lámparas reemplazadas
bajo garantía sean devueltas a Dell. De lo contrario, elimine o recicle
la lámpara.
7
Afloje los 2 tornillos que sujetan la lámpara.
8
Vuelva a colocar la tapa de la lámpara y apriete los tornillos.
9
Restaure el tiempo de uso de la lámpara. (Consulte el Cambio de la
lámpara en el Guía del usuario.)

Richiami all'Attenzione e Avvisi
ATTENZIONE: Un richiamo all'ATTENZIONE indica potenziali danni
all'hardware o la perdita dei dati se non sono seguite le istruzioni.
AVVISO: Un avviso all'ATTENZIONE segnala il potenziale di danni
alle proprietà, di lesioni personali o di morte.
____________________
Le informazioni contenute in questo documento sono soggette a variazione senza
preavviso.
© 2013 Dell Inc. Reservados todos os direitos. Stampato in China. Stampato su
carta riciclata.
È severamente proibita la riproduzione in qualsivoglia forma di questi materiali senza
la previa autorizzazione scritta di Dell Inc..
Marchi utilizzati in questo testo: Dell, il logo DELL sono marchi di Dell Inc.; DLP e il
®
logo DLP
sono marchi di TEXAS INSTRUMENTS INCORPORATED.
Altri marchi di fabbrica e nomi commerciali possono essere utilizzati in questo
documento sia in riferimento alle aziende che rivendicano il marchio e i nomi sia in
riferimento ai prodotti stessi. Dell Inc. nega qualsiasi partecipazione di proprietà
relativa a marchi di fabbrica e nomi commerciali diversi da quelli di sua proprietà.
Modello S520
Settembre 2013 Rev. A00
Sostituzione della lampada del
proiettore Dell™ S520
Il seguente messaggio appare sullo schermo quando la lampada del
proiettore sta per esaurirsi e necessita di essere cambiata:
La lampada sta raggiungendo il termine della sua durata utile. È
suggerita la sostituzione! www.dell.com/lamps
ATTENZIONE: Prima di iniziare le procedure descritte in questa
sezione, seguire le Istruzioni di sicurezza.
Per sostituire la lampada:
1
Spegnere il proiettore e scollegare il cavo di alimentazione.
AVVISO: Durante l'uso, la lampadina diventa molto calda. Non
cercare di sostituire la lampadina prima di aver lasciato raffreddare
il proiettore per almeno 30 minuti.
2
Lasciare che il proiettore si raffreddi per almeno 30 minuti.

3
Allentare le viti che fissano il coperchio della lampadina e rimuovere il
coperchio.
ATTENZIONE: Non toccare mai la lampada o la sua parte in vetro. É
molto fragile e potrebbe rompersi se toccata.
