Dell POWERVAULT MD1000: инструкция
Раздел: Профоборудование
Тип: Аппарат
Инструкция к Аппарату Dell POWERVAULT MD1000
Оглавление
- Примечания, замечания и предупреждения
- Характеристики системы
- Прочая полезная информация Получение технической поддержки Установка и конфигурирование
- Распаковка системы Установка направляющих кронштейнов и системы в стойку
- Подсоединение шнуров питания Фиксация шнуров питания кронштейнами
- Включение системы Установка лицевой панели
- Технические спецификации Накопители Возможности подключения Модули управления стойками Объединительная плата Разъемы на задней панели
- Светодиодные индикаторы Источники питания
- Питание жестких дисков (для каждого слота) Габаритные размеры Условия эксплуатации

Getting Started
With Your System
Začínáme se systémem
Guide de mise en route
Erste Schritte mit dem System
Τα πρώτα βήµατα Με το σύστηµά σας
Rozpoczęcie pracy z systemem
Начало работы с системой
Procedimientos iniciales con el sistema
Sisteminizi Kullanmaya Başlarken
Model AMP01
www.dell.com | support.dell.com


Getting Started
With Your System
www.dell.com | support.dell.com

Notes, Notices, and Cautions
NOTE: A NOTE indicates important information that helps you make better use of your computer.
NOTICE: A NOTICE indicates either potential damage to hardware or loss of data and tells you how to avoid
the problem.
CAUTION: A CAUTION indicates a potential for property damage, personal injury, or death.
____________________
Information in this document is subject to change without notice.
© 2006 Dell Inc. All rights reserved.
Reproduction in any manner whatsoever without the written permission of Dell Inc. is strictly forbidden.
Trademarks used in this text: Dell, the DELL logo, and Dell OpenManage are trademarks of Dell Inc.
Other trademarks and trade names may be used in this document to refer to either the entities claiming the marks and names
or their products. Dell Inc. disclaims any proprietary interest in trademarks and trade names other than its own.
Model AMP01
April 2010 P/N FK446 Rev. A01

System Features
This section describes the major hardware and software features of your system. It also provides
information about other documents you may need when setting up your system and how to obtain
technical assistance.
Major features of your system include:
• Enclosure storage in an efficient rack-mount design
• Capacity for either 15 3.5-inch, hot-plug, 3.0-Gbps, serial-attached SCSI (SAS) hard drives
or 15 3.5-inch, hot-plug, 3.0-Gbps, Serial ATA (SATA) hard drives
• Host-based RAID support via a PERC 5/E adapter
• Redundant hot-plug power supply and cooling fans that are integrated for improved serviceability
• Optional second enclosure management module (EMM) for redundant system management
capability
• Support for either of the following direct-attach configurations:
– Unified mode for direct connectivity of up to 15 hard drives
– Split mode (with dual EMMs) providing direct connectivity to drives 0 through 6 on one
EMM and a separate direct connectivity to drives 7 through 14 on the second EMM
• Front-panel, two-position switch for setting the enclosure mode (unified or split mode)
• Support for up to three daisy-chained storage enclosures in unified mode for a total of 45 hard
drives
• In-band enclosure management provided through SCSI enclosure services (SES)
• RAID and system management using Dell OpenManage™ Server Administrator Storage
Management Service
• Four sensors for monitoring ambient temperatures (with redundant EMMs)
• Over-temperature shutdown capability
• Audible warning for critical component failure
• Support for a wide range of servers (See your system’s readme file for supported systems.
An updated readme can be viewed from the Dell website at
support.dell.com.
)
Getting Started With Your System 3
Other Information You May Need
CAUTION: The Product Information Guide provides important safety and regulatory information. Warranty
information may be included within this document or as a separate document.
• The
Rack Installation Instructions
or
Rack Installation Guide
included with your rack solution
describes how to install your system into a rack.
• The
Hardware Owner’s Manual
provides information about system features and describes how
to troubleshoot the system and install or replace system components.
• CDs included with your system provide documentation and tools for configuring and managing
your system.
• Release notes or readme files may be included to provide last-minute updates to the system or
documentation or advanced technical reference material intended for experienced users or
technicians.
Obtaining Technical Assistance
If you do not understand a procedure in this guide or if the system does not perform as expected,
see your Hardware Owner’s Manual.
Dell Enterprise Training and Certification is available; see www.dell.com/training for more information.
This service may not be offered in all locations.
Installation and Configuration
CAUTION: Before performing the following procedure, read and follow the safety instructions and important
regulatory information in your Product Information Guide.
NOTE: Turn off the host server before installing and configuring the system.
This section describes the steps to set up your system for the first time.
4 Getting Started With Your System
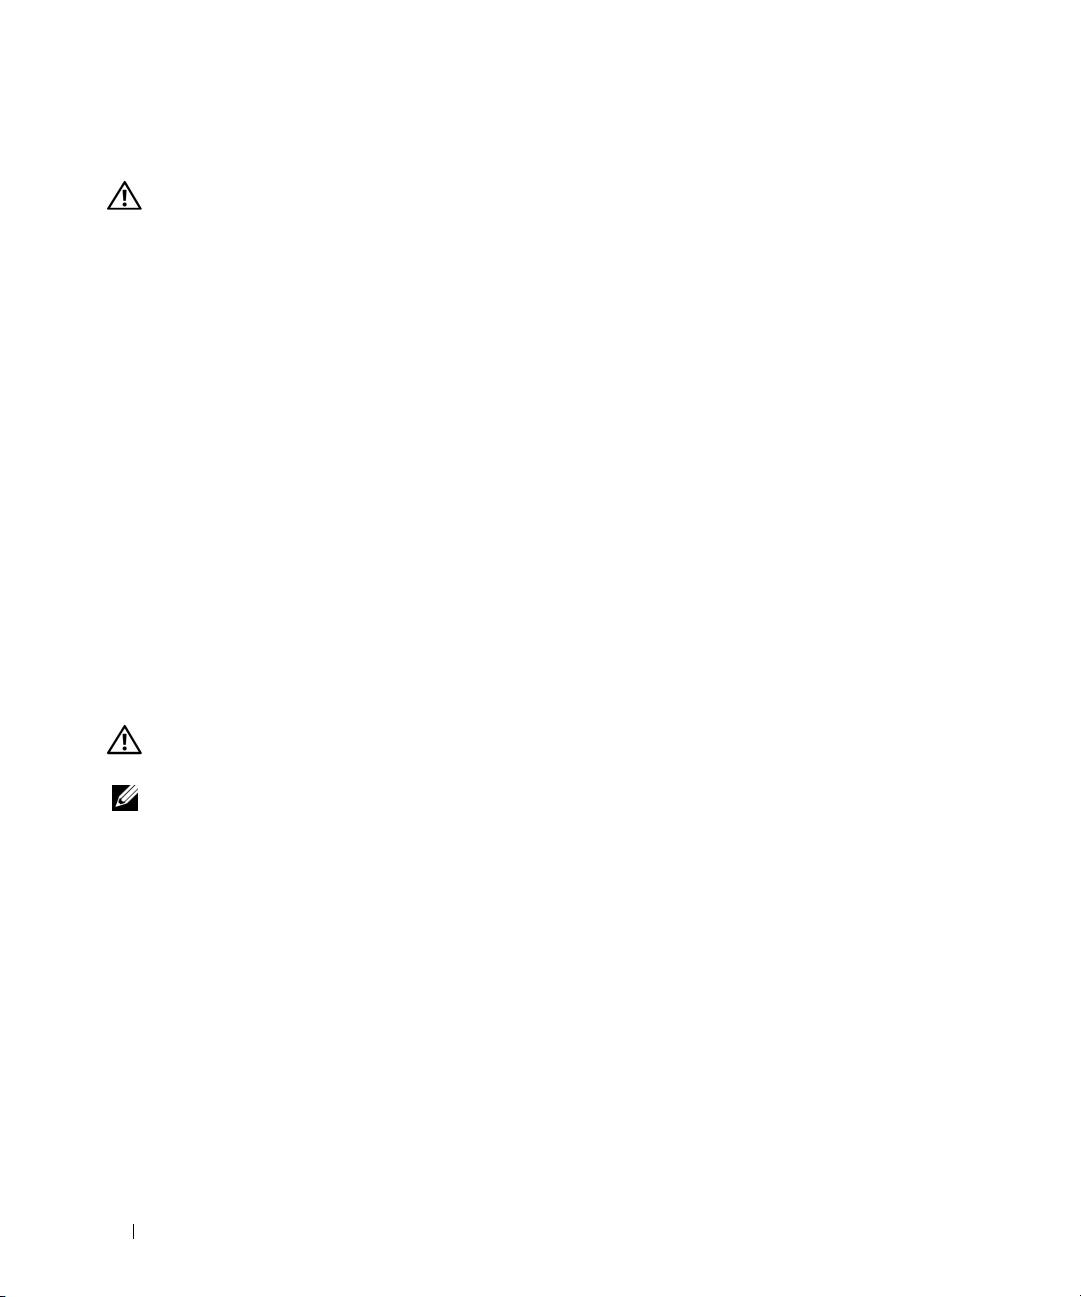
Unpacking the System
Unpack your system and identify each item.
Keep all shipping materials in case you need them later.
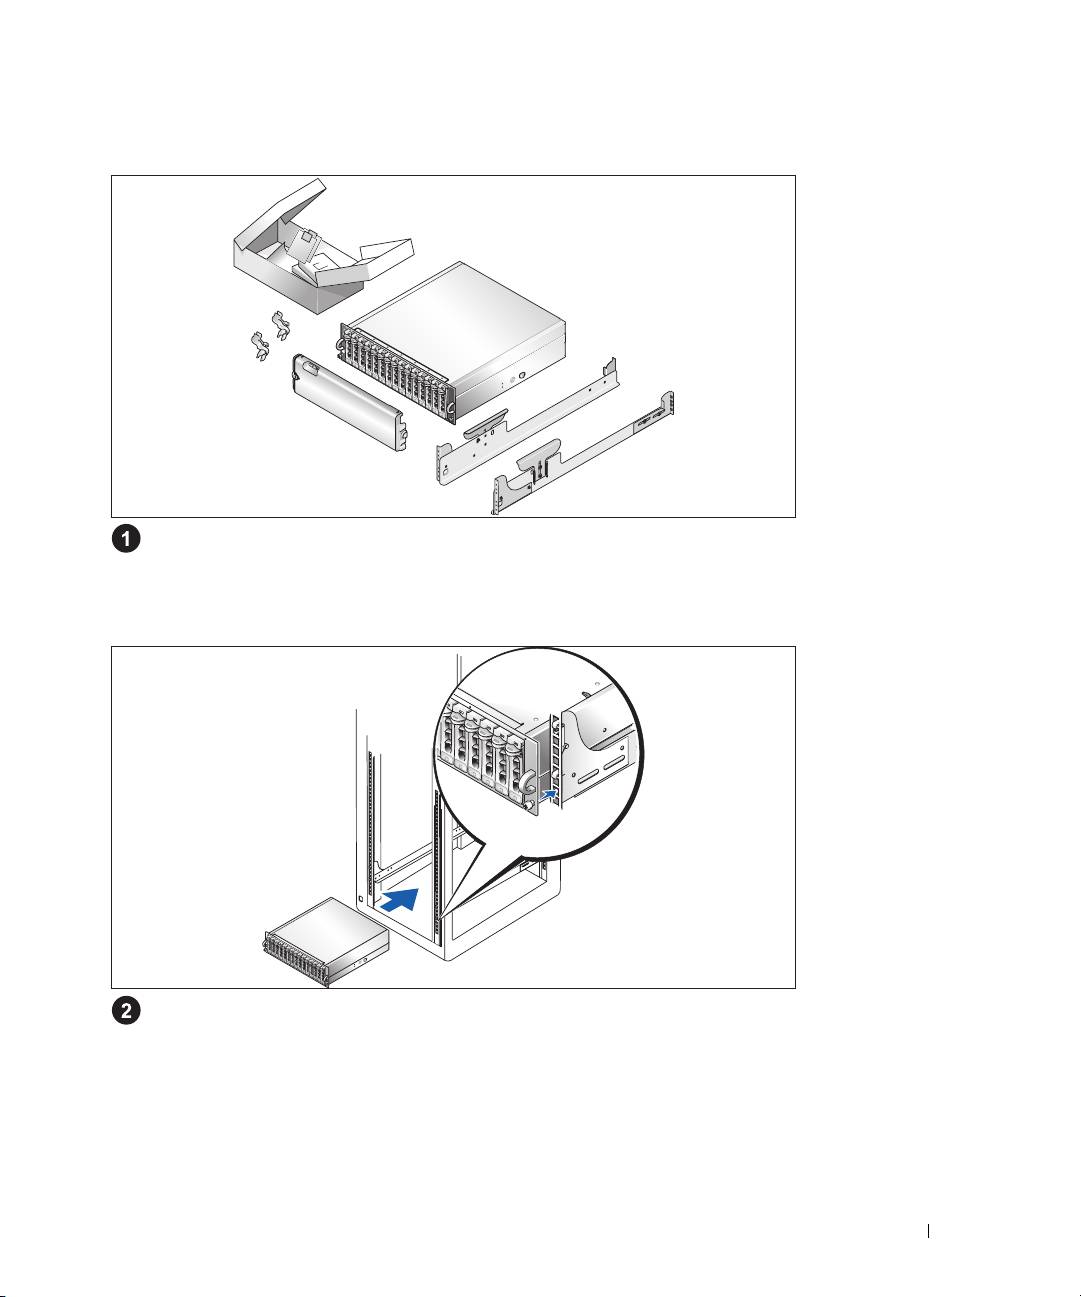
Installing the Rails and System in a Rack
Once you have read the "Safety Instructions" located in the rack installation documentation
for your system, install the rails and the system in the rack.
See your rack installation documentation for instructions on installing your system in a rack.
Getting Started With Your System 5
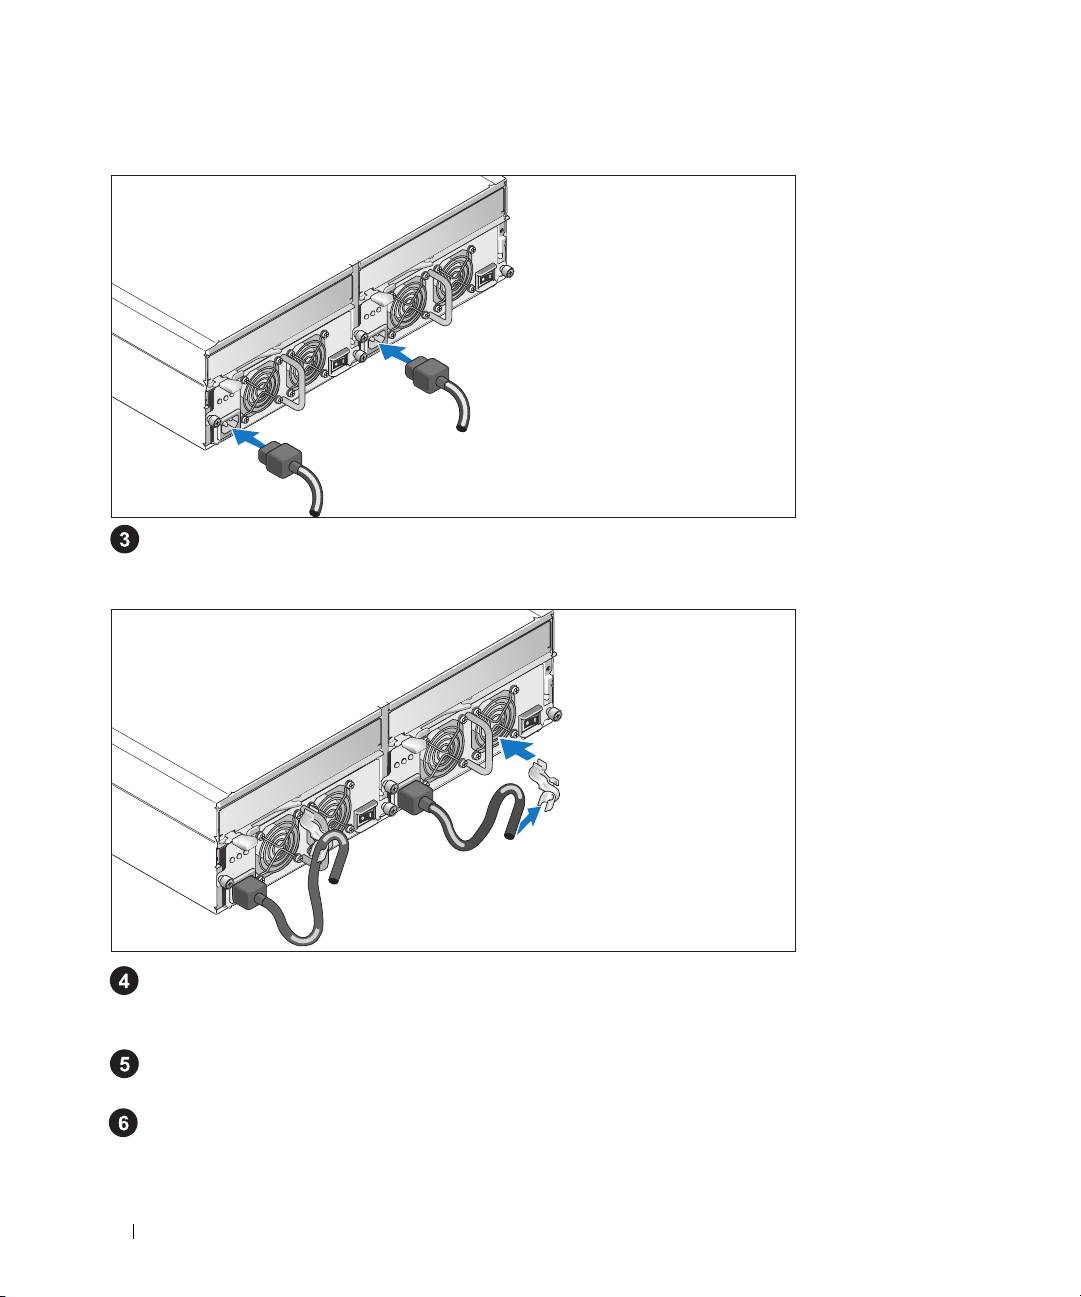
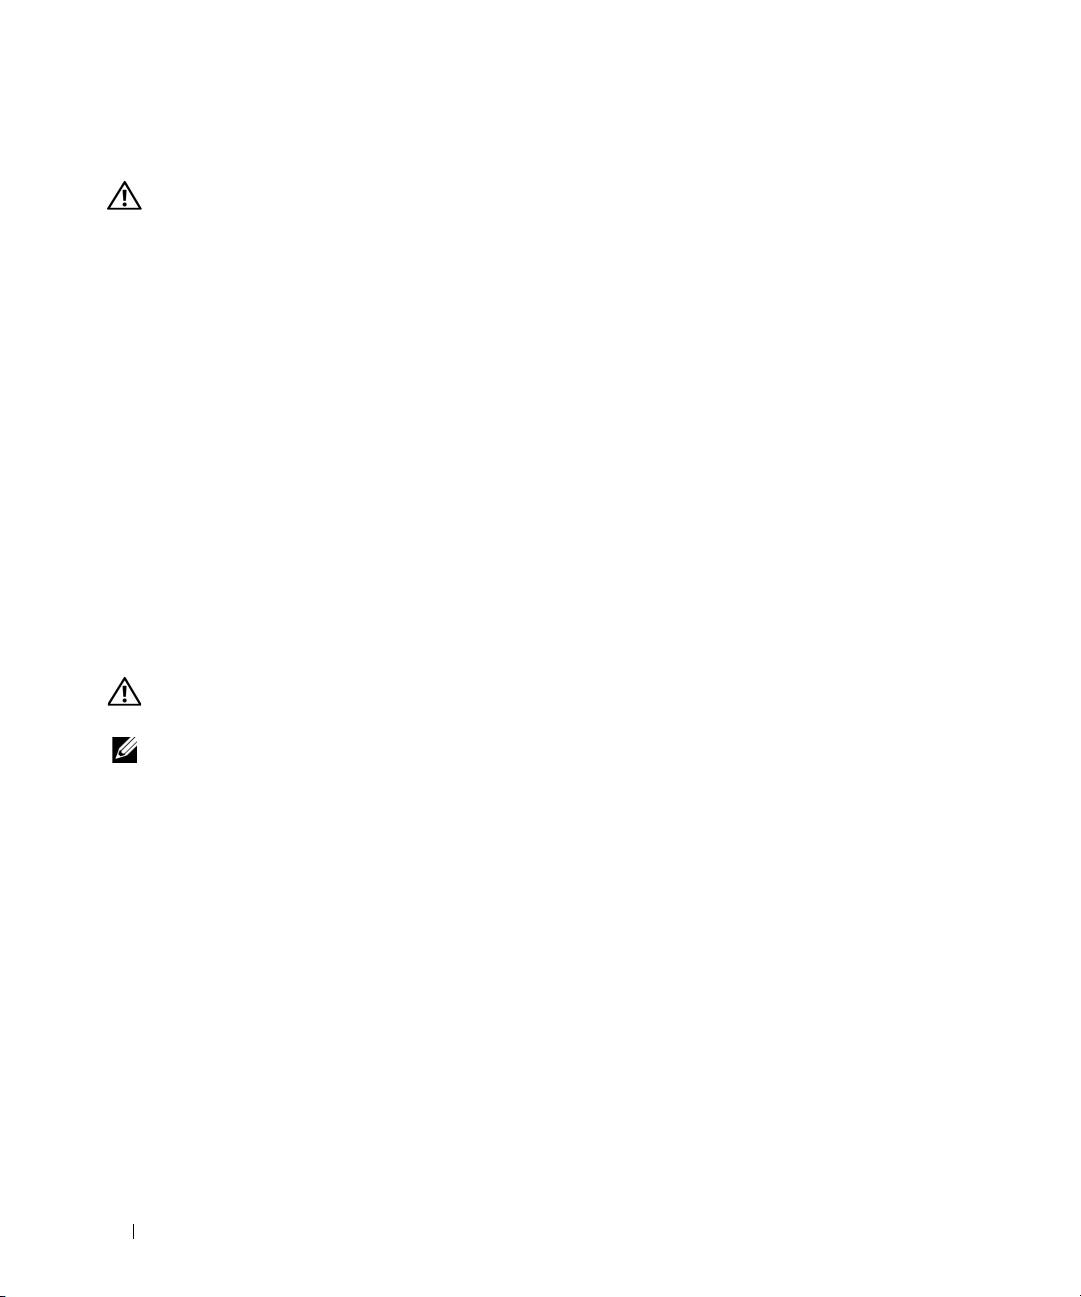
Connecting the Power Cables
Connect both power cables to the power supply/cooling fan modules.
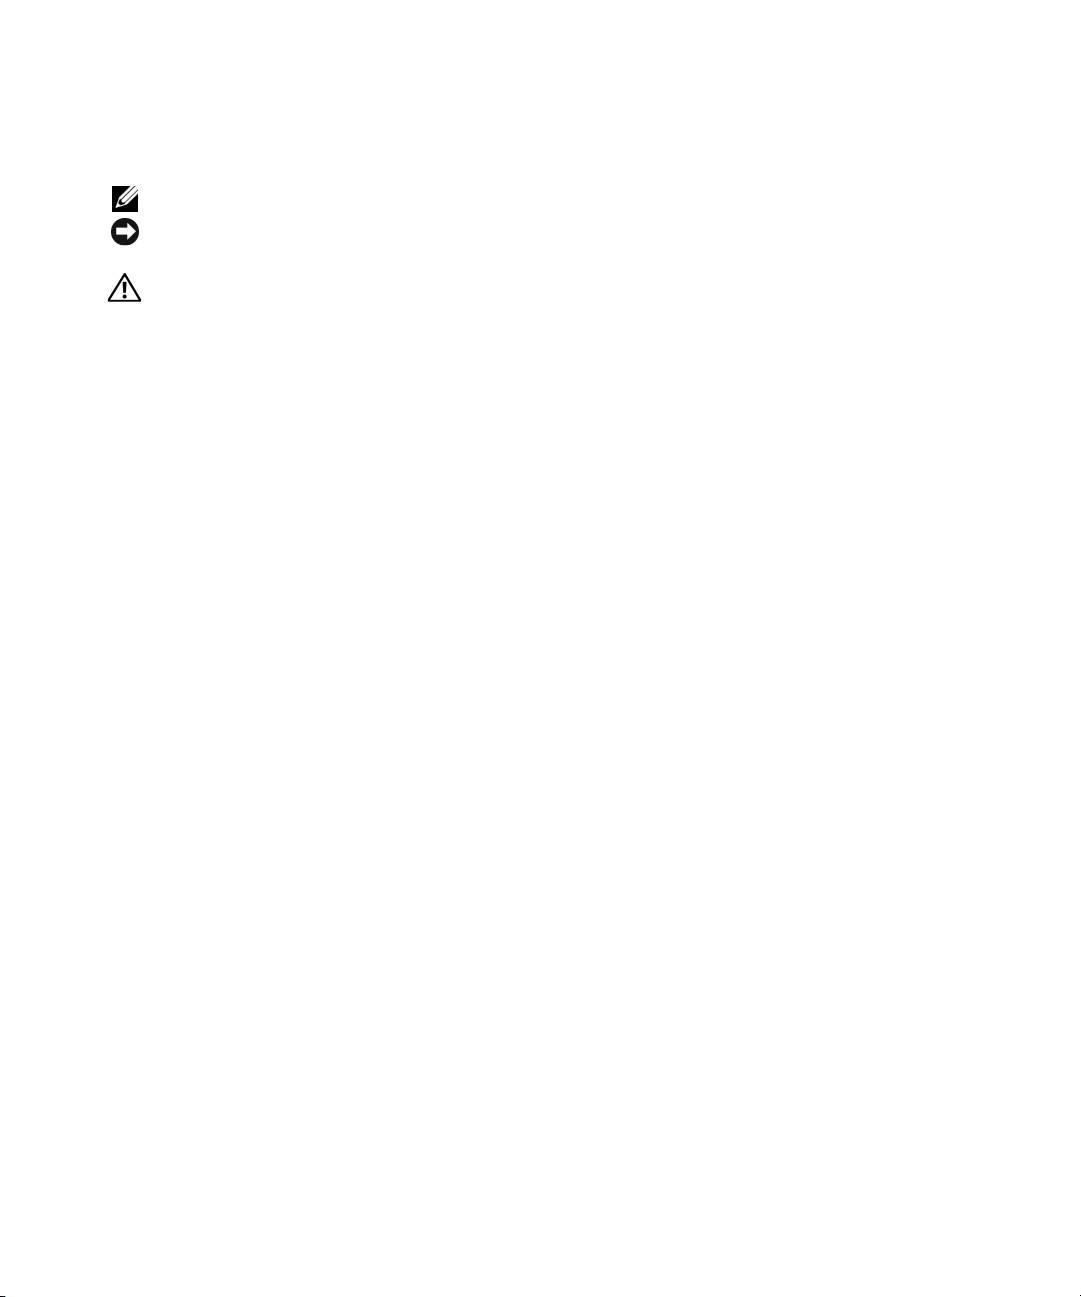
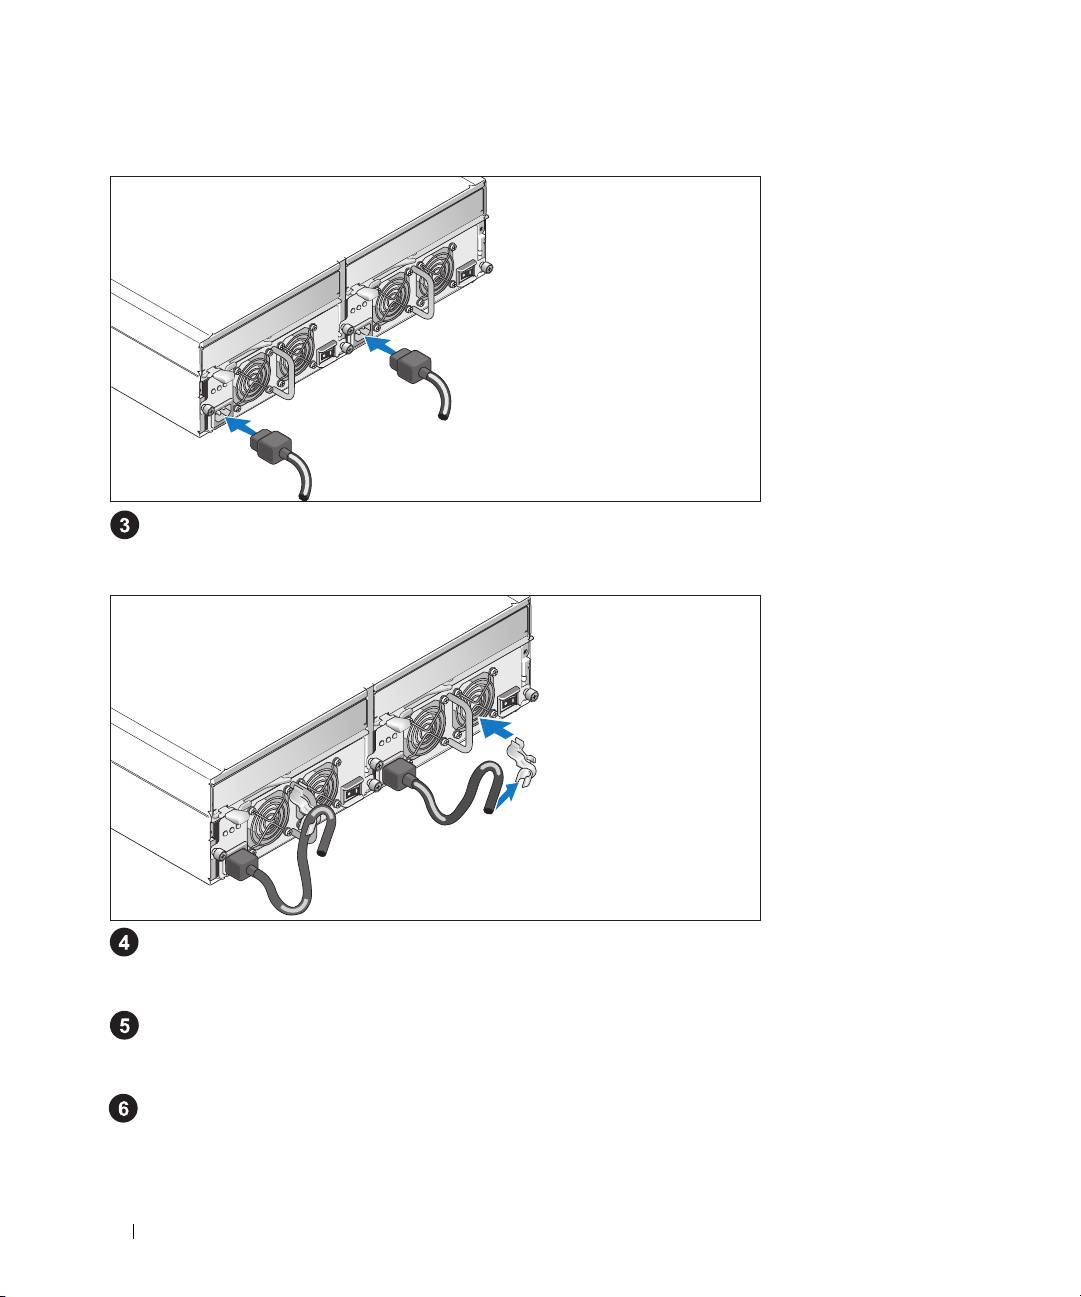
Attaching the Power Cord Retention Bracket
Attach the power cord retention bracket to the power supply loop by affixing the back clasp of the
bracket to the top of the loop and the middle clasp to the vertical middle of the loop. Attach the
system power cable to the bracket’s cable clasp. Repeat the procedure for the second power supply.
Plug the other end of the power cables into a grounded electrical outlet or a separate power source
such as
an uninterruptible po
wer supply (UPS) or a power distribution unit (PDU).
Configure the storage mode for your system by setting the configuration switch on the front of the
system and cabling the EMM(s) according to the instructions provided in the
Hardware Owner’s
Manual
.
6 Getting Started With Your System

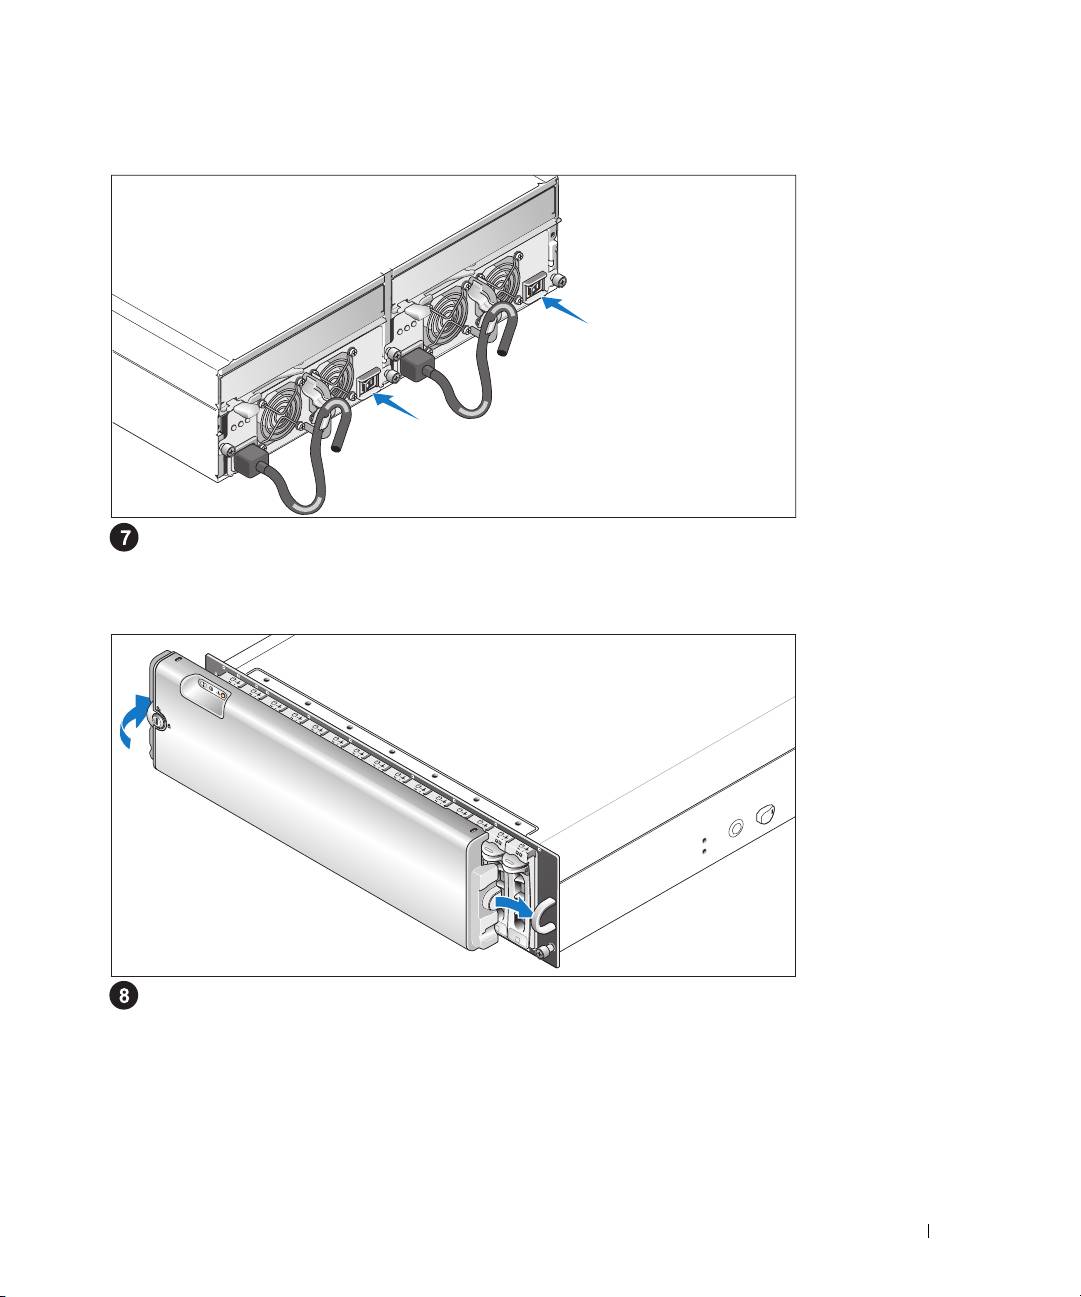
Turning on the System
With the host server off, complete all cabling for the system. Power on the system by turning on both
power supply/cooling fan modules. Power on the host server.
Installing the Bezel
Install the bezel (optional) by inserting the right edge of the bezel into the right front loop on the
system, and then pressing the left edge of the bezel to the system until the bezel snaps into place.
Getting Started With Your System 7

Technical Specifications
Drives
SAS hard drives up to 15 1-inch-by-3.5-inch SAS hot-plug hard drives (3.0 Gbps)
at speeds of 10K or 15K rpm (See your system readme file for
supported disk capacities.)
SATA hard drives up to 15 1-inch-by-3.5-inch SATA hot-plug hard drives (3.0 Gbps)
at speeds of 7.2K rpm. Connectivity to the system backplane is
provided through an interposer assembly.
Connectivity
Configurations support for either of the following configurations:
• unified mode for direct connectivity to 15 hard drives
• split mode with dual EMMs providing a direct connectivity to
drives 0 though 6 and a separate direct connectivity to drives 7
though 14
Enclosure Management Modules
EMMs 1 or 2 modules
Sensors 1 sensor per EMM
Backplane Board
Connectors
• 15 SAS hard-drive connectors
• 2 power supply/cooling fan module connectors
• 2 sets of EMM connectors (6 connectors each EMM)
• 1 control panel connector for front LEDs and enclosure mode
switch
Sensors 2 temperature sensors
Back-Panel Connectors
SAS connectors (per EMM)
• 1 SAS "IN" connector for connection to the host
• 1 SAS "OUT" connector for expansion to an additional enclosure
Serial connector (per EMM) 1 6-pin UART mini-DIN connector (for factory use only)
8 Getting Started With Your System

LED Indicators
Front panel
• 1 two-color LED indicator for system status
• 2 single-color LED indicators for power and split mode
Hard-drive carrier
• 1 single-color activity LED
• 1 two-color LED status indicator per drive
EMM 3 two-color LED status indicators, one each for the two EMM SAS
ports and one for the EMM status
Power supply/
3 LED status indicators for power supply status, power supply/fan
cooling fan module
fault, and AC status
Power Supplies
Wattage 488 W maximum continuous; 550 W peak
Heat dissipation 200 W
Voltage 100–240 V rated (actual 90–264 V)
Frequency 47–63 Hz
Amperage 7.2 A at 100 V, 3.6 A at 200 V
Available Hard-Drive Power (Per Slot)
Supported hard-drive power
up to 1.3 A at +12 V
consumption
up to 1.5 A at +5 V
Physical
Height 13.11 cm (5.16 inches)
Width 44.63 cm (17.57 inches)
Depth 48.01 cm (18.9 inches)
Weight (maximum
35.37 kg (78 lb)
configuration)
Getting Started With Your System 9

Environmental
Temperature:
Operating
10° to 35°C (50° to 95°F)
Storage
–40° to 65°C (–40° to 149°F)
Relative humidity
Operating
20% to 80% (noncondensing)
Storage
5% to 95% (noncondensing)
Altitude
Operating
–16 to 3048 m (–50 to 10,000 ft)
Storage
–16 to 10,600 m (–50 to 35,000 ft)
BTU per hour 1430
10 Getting Started With Your System

Začínáme se systémem
www.dell.com | support.dell.com
Poznámky, upozornění a varování
POZNÁMKA: POZNÁMKA označuje důležitou informaci, s jejíž pomocí lépe využijete svůj počítač.
UPOZORNĚNÍ: UPOZORNĚNÍ poukazuje na možnost poškození hardwaru nebo ztráty dat a poskytuje
návod, jak se danému problému vyhnout.
POZOR: Výstraha („POZOR“) poukazuje na riziko poškození majetku, poranění nebo smrtelného
úrazu.
____________________
Informace obsažené v tomto dokumentu podléhají změnám bez předchozího upozornění.
© 2006 Dell Inc. Všechna práva vyhrazena.
Reprodukce v jakékoli formě je bez písemného svolení společnosti Dell Inc. přísně zakázána.
Ochranné známky použité v tomto textu: Dell, logo DELL a Dell OpenManage jsou ochranné známky společnosti Dell Inc.
V tomto dokumentu mohou být použity další ochranné známky a obchodní názvy odkazující na subjekty, kterým tyto známky či názvy patří,
nebo na jejich výrobky. Společnost Dell Inc. se zříká jakýchkoli vlastnických zájmů o jiné než vlastní ochranné známky a obchodní názvy.
Model AMP01
Duben 2010 P/N FK446 Rev. A01

Systémové funkce
V této části jsou popsány hlavní hardwarové a softwarové funkce vašeho systému. Jsou v ní obsaženy
i informace o doplňujících dokumentech, které příp. potřebujete při instalaci systému, a informace k
odborné pomoci.
Hlavní funkce vašeho systému:
•
Uzavřené svazkové úložiště v účelně řešené konzolové konstrukci
•
Kapacita pro buď 15 3,5-palcových za provozu vyměnitelných, 3,0-Gbps, sériově připojených SCSI
(SAS) pevných disků, nebo 15 3,5-palcových, za provozu vyměnitelných, 3,0-Gbps, sériových ATA
(SATA) pevných disků
•
Podpora host-based RAID přes adaptér PERC 5/E
•
Záložní za provozu vyměnitelný napájecí zdroj a integrované chladicí větráky pro zlepšenou údržbu
•
Volitelný druhý svazkový modul EMM (enclosure management module) umožňující správu
záložního systému
•
Podpora následujících konfigurací přímého propojení:
–
Sjednocený režim pro přímé propojení až 15 pevných disků
–
Rozdělený režim (s dvěma moduly EMM) poskytující přímé propojení disků 0 až 6 na prvním
modulu EMM a oddělené přímé propojení disků 7 až 14 na druhém modulu EMM
•
Dvoupolohový přepínač na čelním panelu pro nastavení svazkového režimu (sjednocený nebo
rozdělený režim)
•
Podpora až tří zřetězených ukládacích svazků ve sjednoceném režimu pro celkem 45 pevných disků
•
In-band správa svazků prostřednictvím SES (SCSI enclosure services)
•
Správa RAID a systému s použitím Dell OpenManage™ Server Administrator Storage Management
Service
•
Čtyři senzory pro monitorování okolní teploty (s redundantními EMM)
•
Funkce vypnutí při přehřátí
•
Akustické varování při kritickém selhání komponent
•
Podpora širokého spektra serverů (Informace o podporovaných systémech naleznete v souboru
„readme“. Aktualizovaný soubor „readme“ naleznete na stránkách společnosti Dell na adrese
support.dell.com.
)
Začínáme se systémem 13
Další užitečné informace
POZOR: Informační příručka produktu obsahuje důležité bezpečnostní a právní informace.
Informace o záruce je součástí tohoto dokumentu nebo je přiložena samostatně.
•
Pokyny pro instalaci do stojanu
nebo
Příručka pro instalaci do stojanu
dodané s vaším stojanovým
systémem popisují instalaci vašeho systému do stojanu.
•
Uživatelská příručka k hardwaru
obsahuje informaci o funkcích systému a popisuje řešení problémů
se systémem a instalaci nebo výměnu systémových komponent.
•
CD dodaná se systémem obsahují dokumentaci a nástroje pro konfiguraci a správu vašeho systému.
•
Poznámky a soubory „readme“ mohou být také součástí dodávky a obsahují poslední aktualizace k
systému nebo dokumentaci, příp. rozšířené technické materiály určené zkušeným uživatelům a technikům.
Odborná pomoc
Nerozumíte-li některému z postupů popsaných v této příručce nebo nepracuje-li systém podle očekávání,
nahlédněte do Uživatelské příručky k hardwaru.
Společnosti Dell rovněž nabízí trénink a certifikaci (Dell Enterprise Training and Certification); pro více
informací navštivte www.dell.com/training. Tato služba nemusí být nabízena ve všech regionech.
Instalace a konfigurace
POZOR: Před provedením následujícího postupu si pročtěte a postupujte podle následujících
bezpečnostních pokynů a důležitých předpisů uvedených v Informační příručka produktu.
POZNÁMKA: Vypněte hostitelský server, nežnainstalujete a nakonfigurujete systém.
V této části jsou popsány kroky, které je nutné provést při první instalaci vašeho systému.
14 Začínáme se systémem

Rozbalení systému
Rozbalte systém a identifikujte jeho jednotlivé součásti.
Veškerý obalový materiál uschovejte pro případ pozdější potřeby.
Instalace kolejniček a systému do stojanu
Nejprve si přečtěte „Bezpečnostní pokyny“ uvedené v instalační dokumentaci stojanu a systému,
potom proveďte instalaci kolejniček a systém do stojanu.
Pokyny pro instalaci systému do stojanu naleznete v dokumentaci pro instalování stojanu.
Začínáme se systémem 15
Připojení napájecích kabelů
Připojte oba napájecí kabely ke zdroji napájení a k modulům s chladicími ventilátory.
Umístění napájecích kabelů do retenčních svorek
Připevněte retenční svorku napájecího kabelu k fixačnímu oku tak, že zadní úchyt svorky připevníte k
horní části oka a střední úchyt ke svislému středu oka. Připevněte napájecí kabel systému do úchytu
kabelové svorky. Celý postup zopakujte u druhého napájecího kabelu.
Potom zasuňte druhý konec kabelu do uzemněné zásuvky ve zdi nebo ho připojte k samostatnému zdroji
napájení, např. k UPS (Uninterruptible Power Supply - zdroj nepřerušitelného napájení) nebo jednotce
rozvaděče (PDU).
Proveďte konfiguraci ukládacího režimu vašeho systému nastavením konfiguračního přepínače na čelním
panelu systému a kabelovým propojením modulu/modulů EMM podle pokynů uvedených v
Uživatelské
příručce k hardwaru
.
16 Začínáme se systémem
Zapnutí systému
Po vypnutí hostitelského serveru dokončete všechny rozvody systému. Zapněte systém
zapnutím obou napájecích zdrojů/modulů s chladicími ventilátory. Zapněte hostitelský server.
Instalace čelního krytu
Nainstalujte čelní kryt (volitelně) tak, že zasunete pravou hranu krytu do oka na pravé straně systému
a následně zatlačíte levou hrany krytu směrem k systému, až čelní kryt zapadne do své pozice.
Začínáme se systémem 17

Technická specifikace
Disky
SAS pevné disky až 15 SAS pevných disků, 1x3,5 palce, hot-plug, 3,0 Gb/s, při
rychlostech 10000 nebo 15000 ot./min (Viz soubor „readme“ vašeho
systému s výčtem podporovaných diskových kapacit.)
Pevné disky SATA až 15 1 x 3,5 palce pevných disků SATA za provozu vyměnitelných
(3,0 Gbps) s rychlostí 7,2K ot/min. Konektivita k zadní nosné desce
je poskytována pomocí vodicí tyče.
Konektivita
Konfigurace podpora následujících konfigurací:
•
sjednocený režim pro přímé propojení 15 pevných disků
•
rozdělený režim s dvěma moduly EMM poskytující přímé propojení
disků 0 až 6 a oddělené přímé propojení disků 7 až 14
Moduly pro správu uzavření
Moduly EMM 1 nebo 2 moduly
Senzory 1 senzor na EMM
Základní deska
Konektory
•
15 konektorů pro SAS pevné disky
•
2 konektory napájení/modul s chladicími ventilátory
•
2 sady konektorů EMM (6 konektorů pro každý EMM)
•
1 konektor ovládacího panelu pro čelní LED indikátory a přepínač
svazkových režimů
Senzory 2 teplotní senzory
Konektory na zadní stěně
SAS konektory
•
1 SAS „IN“ konektor pro připojení k host systému
(pro každý EMM modul)
•
1 SAS „OUT“ konektor pro rozšíření o další svazek
Sériový konektor
1 6-pin UART mini-DIN konektor (pouze pro tovární použití)
(pro každý EMM modul)
18 Začínáme se systémem
