Dell Precision 360: инструкция
Раздел: Бытовая, кухонная техника, электроника и оборудование
Тип: Компьютер
Инструкция к Компьютеру Dell Precision 360
Оглавление
- Примечания, предупреждения и предостережения Аббревиатуры и акронимы
- Содержание
- Поиск информации о компьютере Что вы ищете? Ищите здесь
- Что вы ищете? Ищите здесь
- Что вы ищете? Ищите здесь
- Что вы ищете? Ищите здесь
- Настройка компьютера 1 Подсоедините клавиатуру и мышь.
- 6 Убедитесь в том, что переключатель выбора напряжения установлен в соответствии с вашим местонахождением. Нажмите кнопки питания для включения компьютера и мониторов.
- Установка корпуса типа Mini-Tower — без плат расширения
- Установка корпуса типа Mini-Tower — с платой расширения
- Настольная установка (Desktop Setup ) — без плат расширения
- Настольная установка (Desktop Setup) — с платами расширения
- Соединения монитора Для плат с возможностью подключения двух мониторов с одним разъемом
- Для плат с возможностью подключения двух мониторов с 1 DVI- и 1 VGA-разъёмом Для плат с возможностью подключения двух мониторов с 2 DVI-разъёмами
- Завершение установки
- Открытие крышки компьютера
- Руководство-справочник по установке 91
- Внутри компьютера
- Настольный компьютер
- Решение проблем Устранение несовместимости программного и аппаратного обеспечения Microsoft Windows XP
- Windows 2000 Для использования Поиска неисправностей оборудования Windows 2000:
- Использование функции Восстановление системы в Windows XP Создание Контрольных точек восстановления Восстановление настроек компьютера до более раннего рабочего состояния
- Использование последней известной удачной конфигурации Windows 2000 Другие опции, помогающие решить конфликты с дополнительным устройством или программным обеспечением. Когда использовать программу диагностики Dell Diagnostics
- Запуск программы диагностики Dell Diagnostics Запуск программы диагностики Dell Diagnostics с жесткого диска
- Запуск программы диагностики Dell Diagnostics с Drivers and Utilities CD (CD-диск Драйверы и утилиты)
- Главное меню программы диагностики Dell Diagnostics 1 После загрузки программы диагностики Dell Diagnostics и появлении экрана
- 3 При выполнении тестирования с помощью опции Custom Test (Настройка тестирования) или Symptom Tree (Дерево симптомов) щелкните на вкладке, описываемой в следующей таблице для получения дополнительной информации.
- Коды звуковых сигналов
- Световые индикаторы системы Индикатор источника питания
- Индикатор источника питания
- Световые индикаторы диагностики Схемы световых индикаторов
- Схемы световых индикаторов
- Схемы световых индикаторов
- Схемы световых индикаторов
- Схемы световых индикаторов
- Наиболее часто задаваемые вопросы Как мне… Решение Где найти
- Как мне… Решение Где найти

Dell Precision™ Workstation 360
Setup and Quick Reference
Guide
Models: DHM and WHM
www.dell.com | support.dell.com

Notes, Notices, and Cautions
NOTE: A NOTE indicates important information that helps you make better use of your
computer.
NOTICE: A NOTICE indicates either potential damage to hardware or loss of data and tells you
how to avoid the problem.
CAUTION: A CAUTION indicates a potential for property damage, personal
injury, or death.
Abbreviations and Acronyms
For a complete list of abbreviations and acronyms, see the “Glossary” in the User’s Guide.
____________________
Information in this document is subject to change without notice.
© 2003 Dell Computer Corporation. All rights reserved.
Reproduction in any manner whatsoever without the written permission of Dell Computer Corporation is strictly
forbidden.
Trademarks used in this text: Dell, the DELL logo, and Dell Precision are trademarks of Dell Computer Corporation;
Microsoft, Windows, and Windows NT are registered trademarks of Microsoft Corporation.
Other trademarks and trade names may be used in this document to refer to either the entities claiming the marks and
names or their products. Dell Computer Corporation disclaims any proprietary interest in trademarks and trade names
other than its own.
Models: DHM and WHM
February 2003 P/N G0428 Rev. A00

Contents
Finding Information for Your Computer . . . . . . . . . . . . . . 5
Setting Up Your Computer
. . . . . . . . . . . . . . . . . . . . . 8
Monitor Connections
. . . . . . . . . . . . . . . . . . . . . . . 14
Completed Setup
. . . . . . . . . . . . . . . . . . . . . . . . . 16
Opening the Computer Cover
. . . . . . . . . . . . . . . . . . . 17
Inside Your Computer
. . . . . . . . . . . . . . . . . . . . . . . 19
Solving Problems
. . . . . . . . . . . . . . . . . . . . . . . . . 21
Resolving Software and Hardware Incompatibilities
. . . . . . 21
Using System Restore in Windows XP
. . . . . . . . . . . . . 23
Using the Last Known Good Configuration in Windows 2000
. . 24
When to Use the Dell Diagnostics
. . . . . . . . . . . . . . . 24
Starting the Dell Diagnostics
. . . . . . . . . . . . . . . . . . 25
Beep Codes
. . . . . . . . . . . . . . . . . . . . . . . . . . 27
Error Messages
. . . . . . . . . . . . . . . . . . . . . . . . 28
System Lights
. . . . . . . . . . . . . . . . . . . . . . . . . 28
Diagnostic Lights
. . . . . . . . . . . . . . . . . . . . . . . 30
Frequently Asked Questions . . . . . . . . . . . . . . . . . . . . 33
Contents 3

4 Contents
Finding Information for Your Computer
Dell provides the following resource and support tools. Additional resources may be shipped
with your computer.
What are you looking for? Find It Here
• A diagnostic program for my computer
Drivers and Utilities CD
• Drivers for my computer
(also known as the ResourceCD)
•My User’s Guide
Documentation and drivers are already
• My device documentation
installed on your computer when shipped
from Dell. You can use the CD to reinstall
drivers, run the Dell Diagnostics, or access
your documentation.
Readme files may be included on your CD
to provide last-minute updates about
technical changes to your computer or
advanced technical-reference material for
experienced users or technicians.
• System board connectors
System Information Label
• Location of system board components
or
Located on the inside of your computer cover.
Setup and Quick Reference Guide 5

What are you looking for? Find It Here
• Warranty Information
Dell System Information Guide
• Safety Information
®
®
• How to remove and replace parts
User’s Guide Icon (Microsoft
Windows
2000)
www.dell.com | support.dell.com
• Technical specifications
Double-click the User’s Guides icon on your desktop.
• How to configure system settings
• How to troubleshoot and solve problems
Windows XP Help and Support Center
1
Click the Start button and click Help and Support.
2 Click User’s and system guides and click User’s guides.
• Express Service Code and Service Tag
Express Service Code and Product Key Label
• Windows
License Label
These labels are located on your computer.
• Latest drivers for my computer
Dell Support Website — support.dell.com
• Answers to technical service and support
The Dell Support website provides several online tools, including:
questions
• Solutions — Troubleshooting hints and tips, articles from
• Online discussions with other users and
technicians, and online courses
technical support
• Community Forum — Online discussion with other Dell customers
• Documentation for my computer
• Upgrades — Upgrade information for components, such as memory,
including the Service Manual
the hard drive, and the operating system
• Customer Care — Contact information, order status, warranty,
and repair information
• Downloads — Drivers, patches, and software updates
• Reference — Computer documentation, product specifications,
and white papers
6 Setup and Quick Reference Guide

What are you looking for? Find It Here
• Service call status and support history
Dell Premier Support Website —
• Top technical issues for my computer
premiersupport.dell.com
• Frequently asked questions
The Dell Premier Support website is customized for corporate,
• File downloads
government, and education customers. This website may not be
available in all regions.
• Details on my computer configuration
• Service contract for my computer
• How to use Windows XP
Windows XP Help and Support Center
• Documentation for my computer
1 Click the Start button and click Help and Support.
• Documentation for devices
2 Type a word or phrase that describes your problem
(such as a modem)
and click the arrow icon.
3 Click the topic that describes your problem.
4 Follow the instructions on the screen.
• How to reinstall my operating system Operating System CD
After you reinstall the operating system
using the Operating System
Reinstallation CD, use the Drivers and
Utilities CD to reinstall drivers for the
devices that came with your computer.
The product key for your operating
system is located on your computer.
or
Setup and Quick Reference Guide 7

Setting Up Your Computer
CAUTION: Before performing any of the procedures in this section,
follow the safety instructions in the System Information Guide.
NOTICE: If your computer has an expansion card installed (such as a network card), connect
the appropriate cable to the card, not to the connector on the computer back panel.
You must complete all steps to properly set up your computer. See the appropriate figures
that follow the instructions.
1 Connect the keyboard and mouse.
NOTICE: Do not attempt to operate a PS/2 mouse and a USB mouse simultaneously.
www.dell.com | support.dell.com
2 Connect the modem or network cable.
Insert the network cable, not the phone line, into the network connector. If you have
an optional modem, connect the phone line to the modem.
NOTICE: Do not connect a modem cable to the network adapter. Voltage from telephone
communications can cause damage to the network adapter.
3
Connect the monitor.
Align and gently insert the monitor cable to avoid bending connector pins. Tighten
the thumbscrews on the cable connectors.
NOTE: Some flat-panel displays and graphic cards support Digital Visual Interface (DVI). If
your monitor and card have DVI connectors, Dell recommends that you use DVI instead of VGA.
A second monitor is optional and requires a multimonitor graphics adapter card. To
enable dual-monitor support, both monitors must be attached when the computer
starts. See “Monitor Connections” on page 14 for more information on attaching two
monitors.
4 Connect the speakers.
5 Connect power cables to the computer, monitor, and devices and insert the other ends
of the power cables to electrical outlets.
8 Setup and Quick Reference Guide

6 Verify that the voltage selection switch is set correctly for your location.
Your computer is equipped with one of the following:
• A fixed-voltage power supply — Computers with a fixed-voltage power supply
do not have a voltage selection switch on the back panel and operate at only
one voltage (see the regulatory label on the outside of the computer for its
operating voltage).
• An auto-sensing voltage circuit — Computers with an auto-sensing voltage circuit
do not have a voltage selection switch on the back panel and automatically detect
the correct operating voltage.
• A manual voltage selection switch — Computers with a voltage selection switch
on the back panel must be manually set to operate at the correct operating
voltage.
NOTICE: To help avoid damaging a computer with a manual voltage selection switch, set the
switch for the voltage that most closely matches the AC power available in your location. For
Japan, the voltage selection switch must be set to the 115-V position even though the AC power
available in Japan is 100 V. Also, ensure that your monitor and attached devices are electrically
rated to operate with the AC power available in your location.
7
Press the power buttons to turn on the computer and monitors.
See “Completed Setup” on page 16.
NOTE: Before you install any devices or software that did not ship with your computer, read the
documentation that came with the software or device, or contact the vendor to verify that the
software or device is compatible with your computer and operating system.
Setup and Quick Reference Guide 9
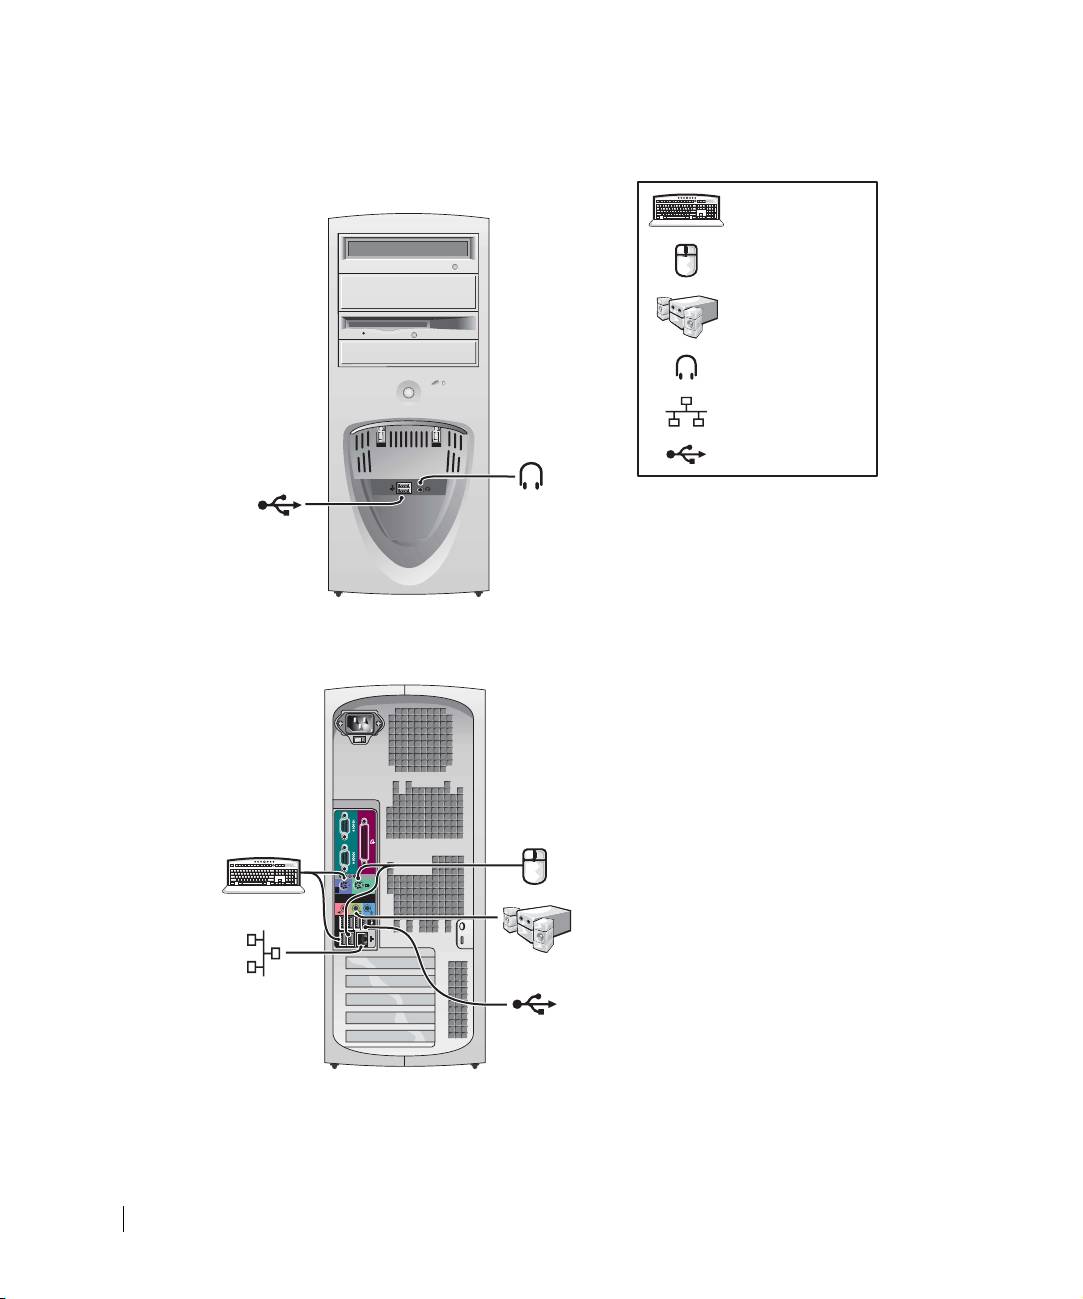
Mini-Tower Setup — Without Expansion Cards
keyboard
mouse
speakers
headphones
network
www.dell.com | support.dell.com
USB
10 Setup and Quick Reference Guide
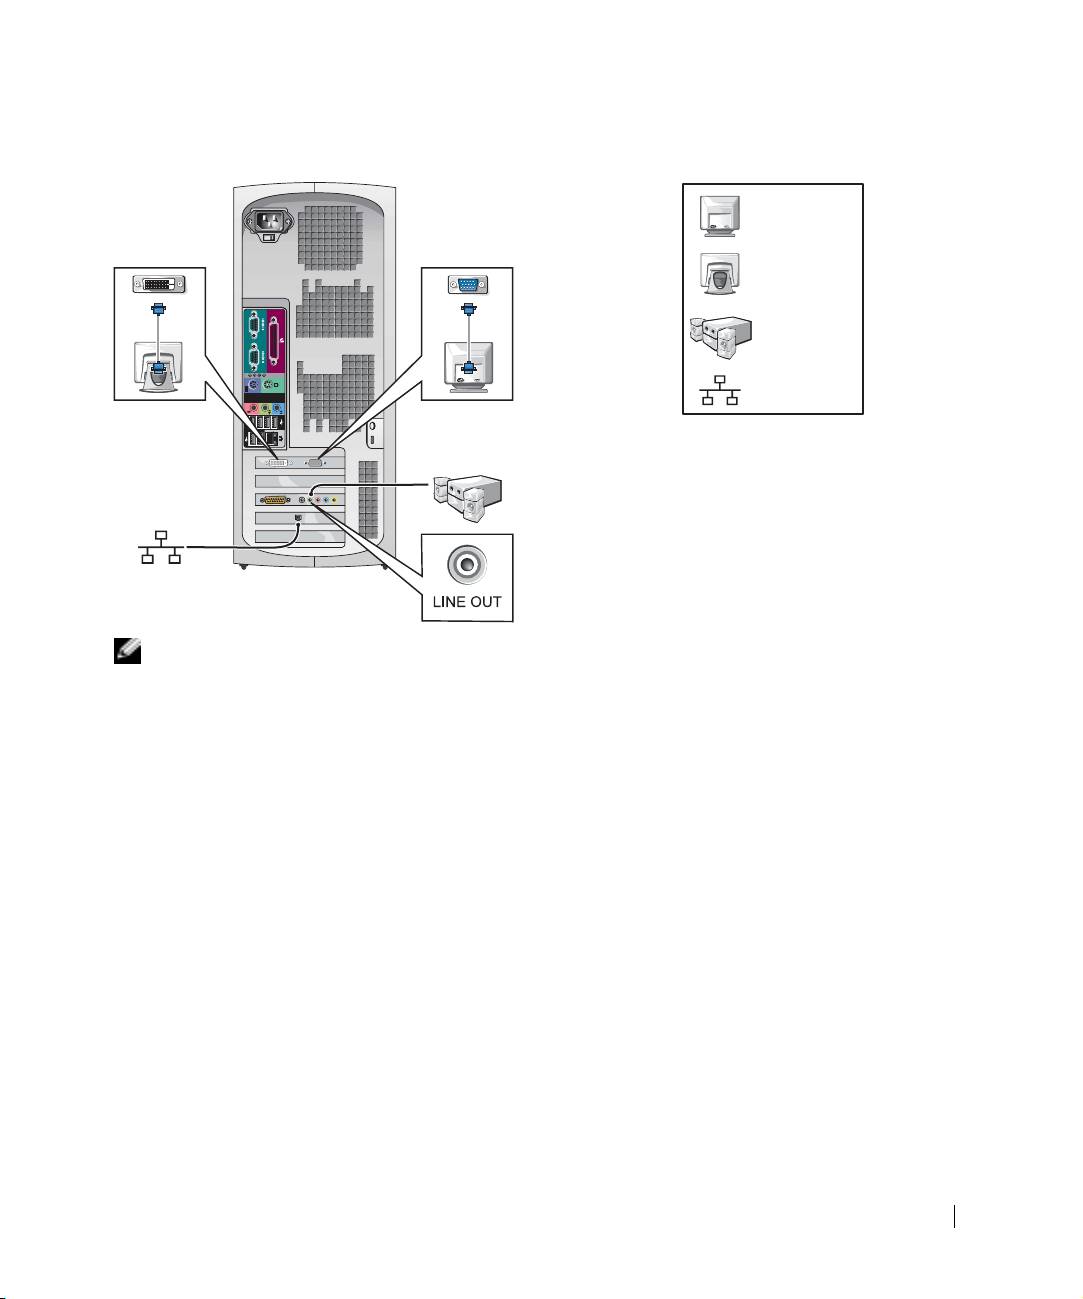
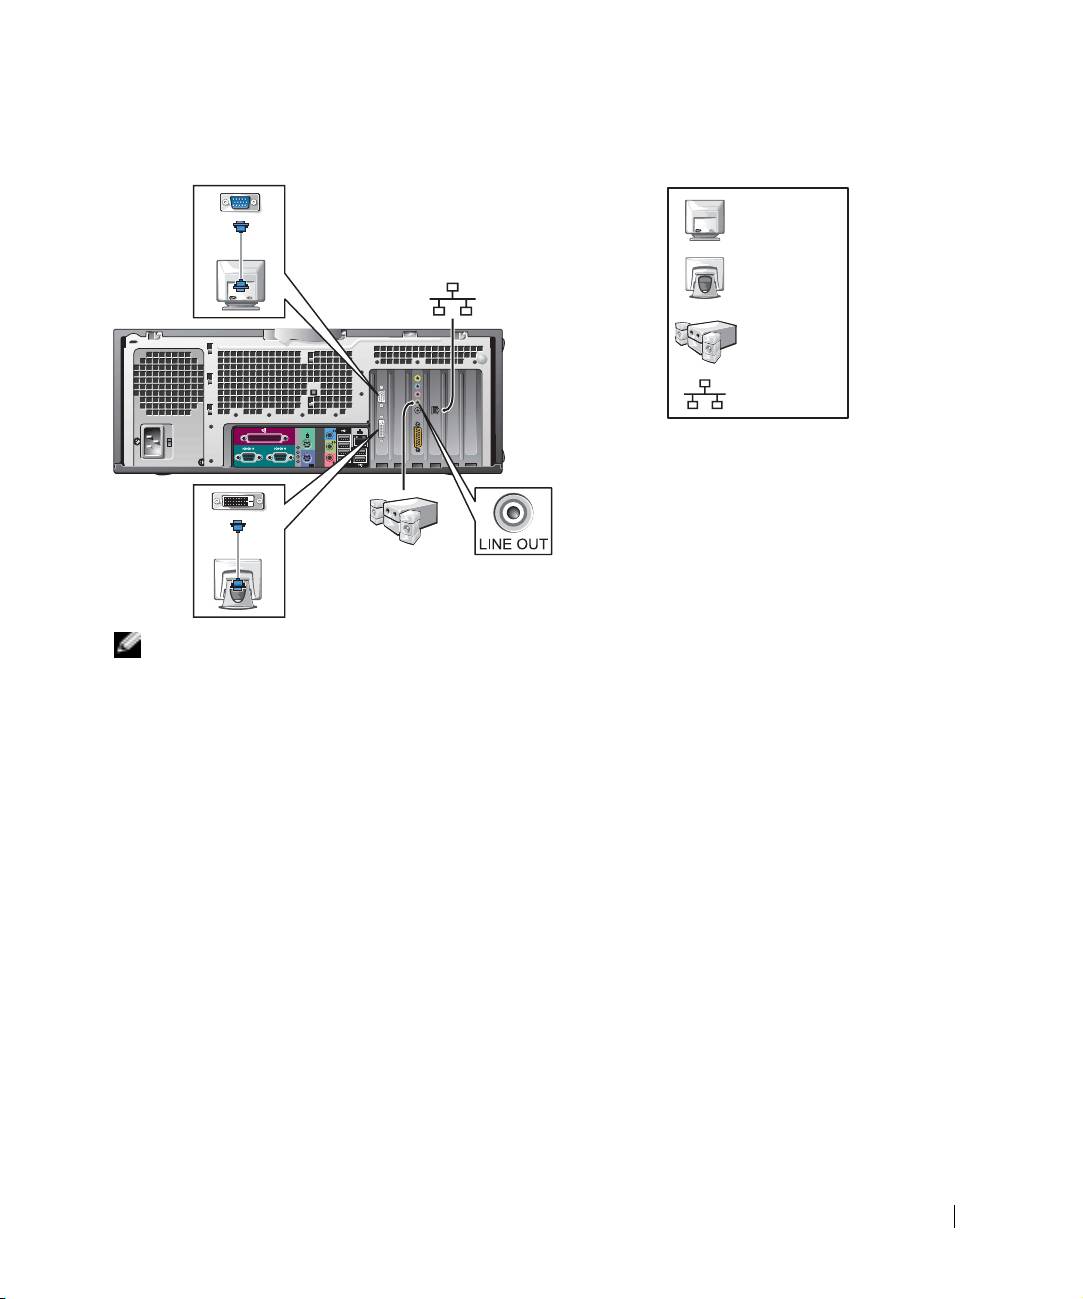
Mini-Tower Setup — With Expansion Card
monitor
flat-panel
monitor
speakers
network
NOTE: For more information on setting up monitors with your specific graphics card,
see “Monitor Connections” on page 14.
Setup and Quick Reference Guide 11
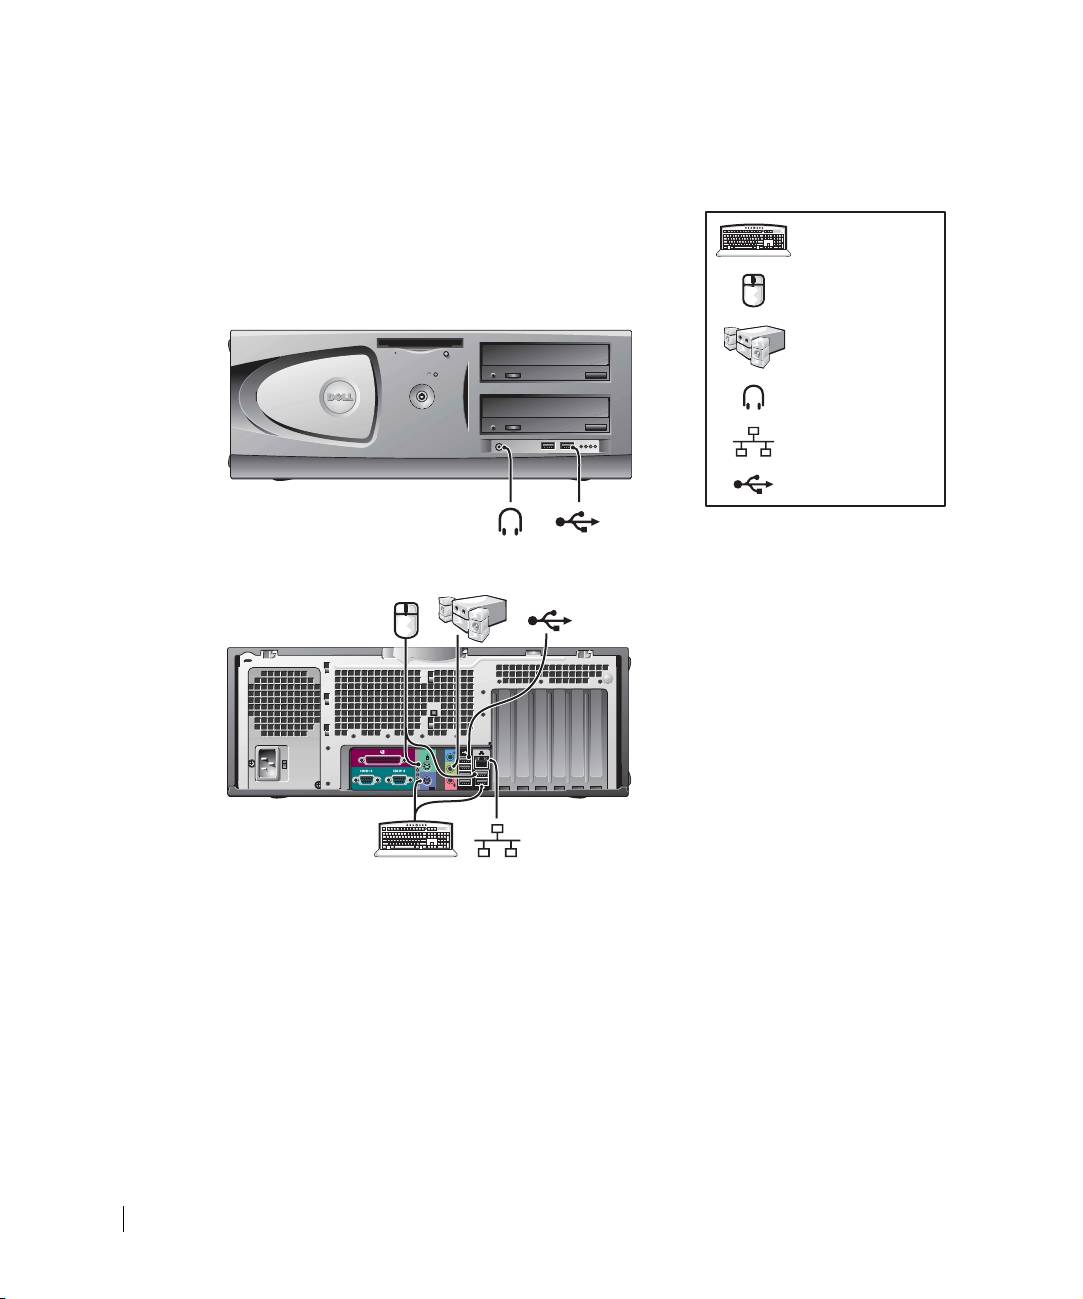
Desktop Setup — Without Expansion Cards
keyboard
mouse
speakers
headphones
www.dell.com | support.dell.com
network
USB
12 Setup and Quick Reference Guide
Desktop Setup — With Expansion Cards
monitor
flat-panel
monitor
speakers
network
NOTE: For more information on setting up two monitors, see “Monitor Connections”
on page 14.
Setup and Quick Reference Guide 13
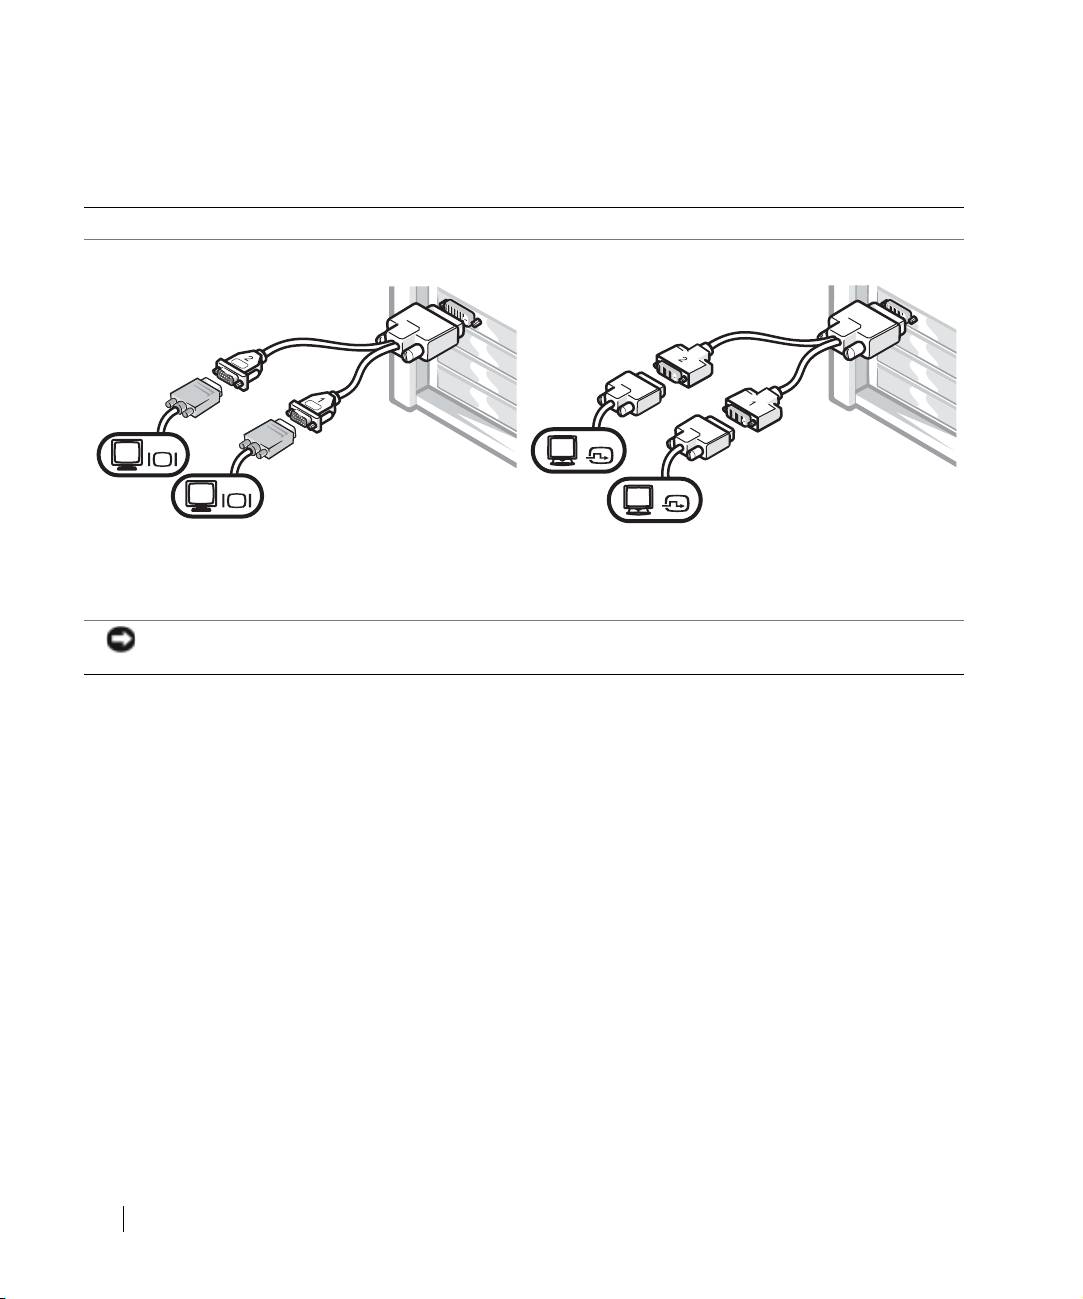
Monitor Connections
For dual monitor capable cards with a single connector
Dual VGA Y Cable Adapter
Dual DVI Y Cable Adapter
www.dell.com | support.dell.com
VGA
DVI
VGA
DVI
• This adapter cable can support one or two VGA
• This adapter cable can support one or two DVI
monitors. The cable is color coded: blue for the
monitors. The cable is color coded: blue for the
primary monitor and black for an optional secondary
primary monitor and black for an optional secondary
monitor.
monitor.
NOTICE: The Y Cable Adapter provided with your computer is unique to the graphics card in your computer.
Adapter cables from other graphics cards should not be used.
14 Setup and Quick Reference Guide
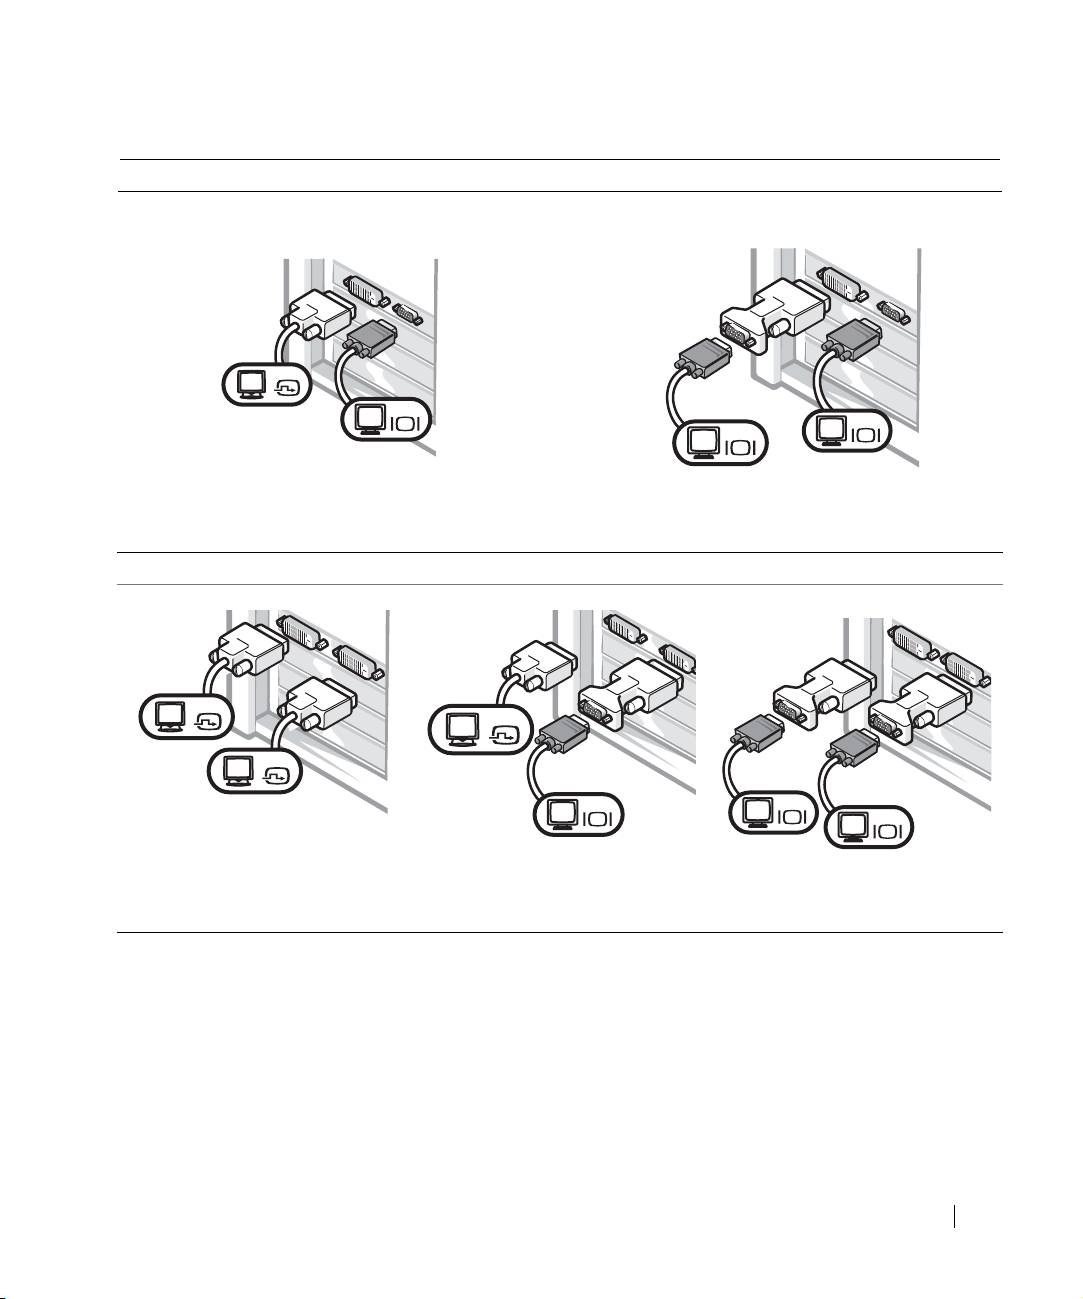
For dual-monitor capable cards with 1 DVI and 1 VGA connector
Single DVI/Single VGA
Dual VGA With VGA Adapter
DVI
VGA
VGA
VGA
• Use the appropriate connector when you connect
• Use the VGA adapter when you want to connect
to one or two monitors.
to two VGA monitors.
For dual-monitor capable cards with 2 DVI connectors
Dual DVI
Dual DVI With One VGA Adapter
Dual DVI With Two VGA Adapters
DVI
DVI
DVI
VGA
VGA
VGA
• Use the DVI connectors to
• Use the VGA adapter to connect
• Use two VGA adapters to
connect to one or two DVI
a VGA monitor to one DVI
connect two VGA monitors
monitors.
connector.
to the DVI connectors.
Setup and Quick Reference Guide 15
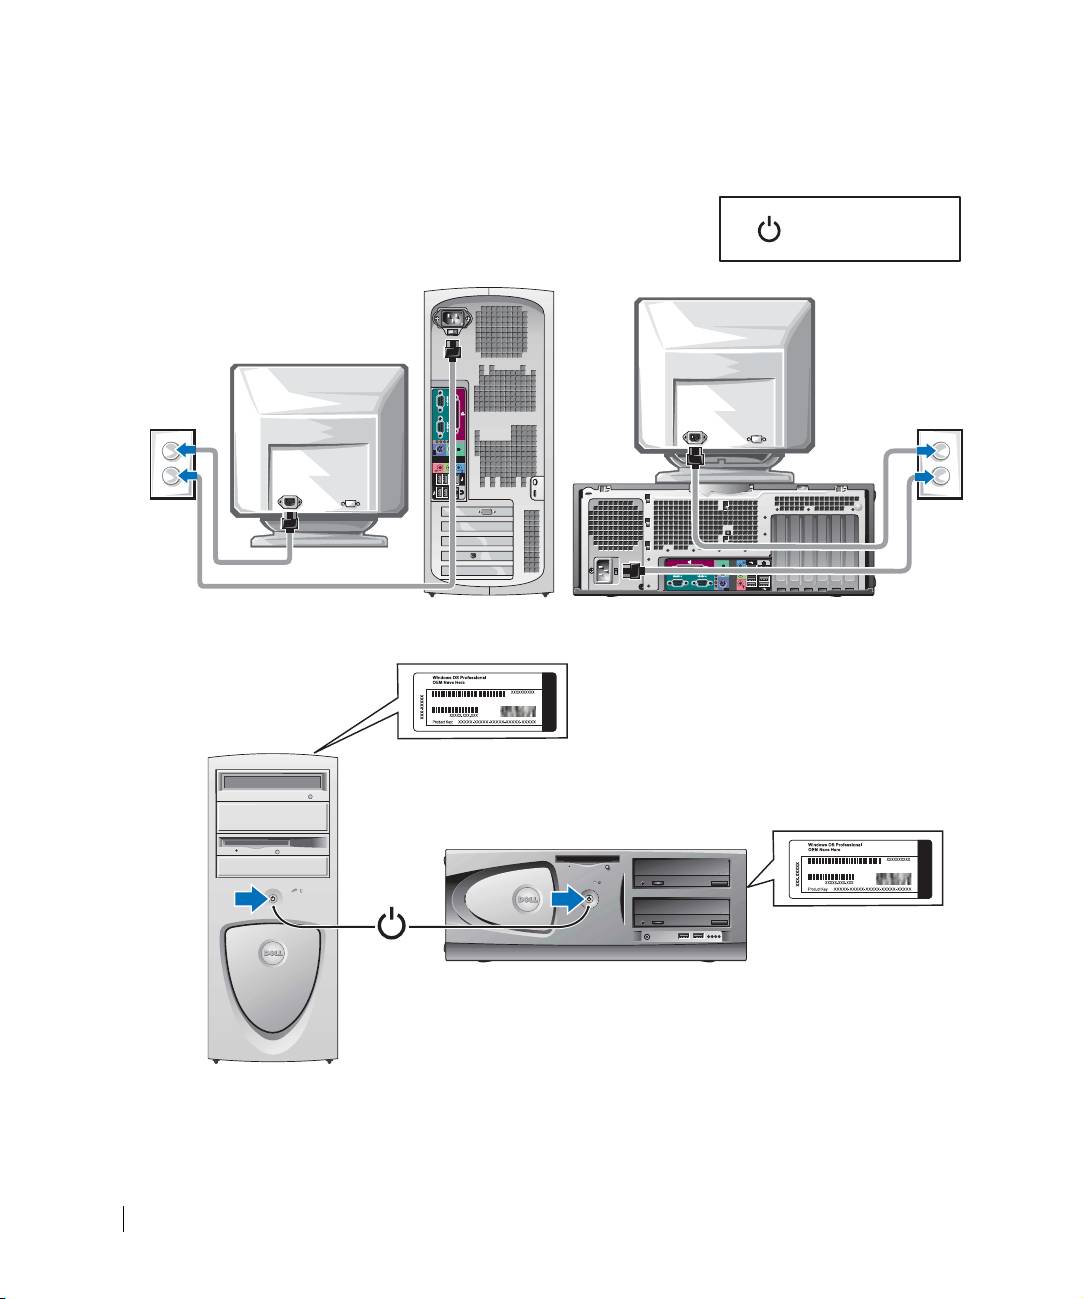
Completed Setup
power
www.dell.com | support.dell.com
Microsoft Windows Product Key
Microsoft Windows Product Key
16 Setup and Quick Reference Guide

Opening the Computer Cover
CAUTION: Before performing any of the procedures in this section, follow the
safety instructions in the System Information Guide.
1
Shut down the computer through the Start menu.
2 Ensure that your computer and attached devices are turned off. If your computer and
attached devices did not automatically turn off when you shut down your computer,
turn them off now.
NOTICE: To disconnect a network cable, first unplug the cable from your computer and then
unplug it from the network wall jack.
3
Disconnect any telephone or telecommunication lines from the computer.
4 Disconnect your computer and all attached devices from electrical outlets, and then
press the power button to ground the system board.
5 If you have installed a padlock through the padlock ring on the back panel, remove the
padlock.
CAUTION: To guard against electrical shock, always unplug your computer from
the electrical outlet before opening the cover.
6
Lay the computer on its side as shown in the illustration.
NOTICE: Ensure that sufficient space exists to accommodate the open cover—at least 30 cm
(1 ft) of desktop space.
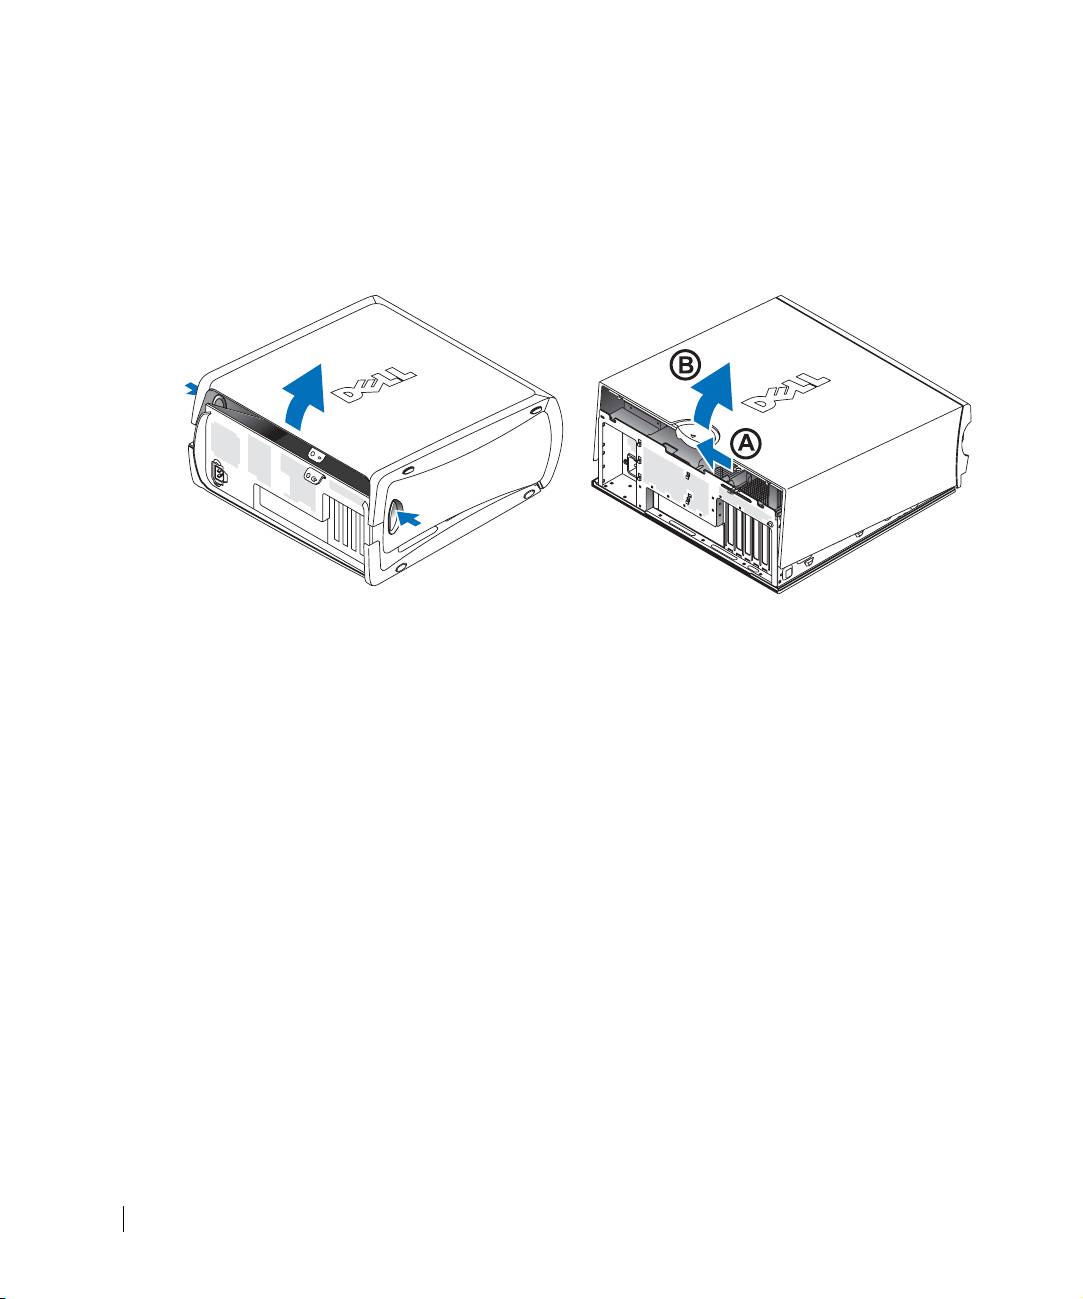
7
Open the computer cover.
– For the mini-tower, push the buttons on both ends and lift the cover open.
– For the desktop, slide the cover release latch toward the power supply of the
computer. Raise the cover, and pivot it toward the front of the computer.
Setup and Quick Reference Guide 17
8 Ground yourself by touching an unpainted metal surface on the computer, such as the
metal at the back of the computer, before touching anything inside your computer.
While you work, periodically touch any unpainted metal surface on the computer to
dissipate any static electricity that could harm internal components.
www.dell.com | support.dell.com
18 Setup and Quick Reference Guide
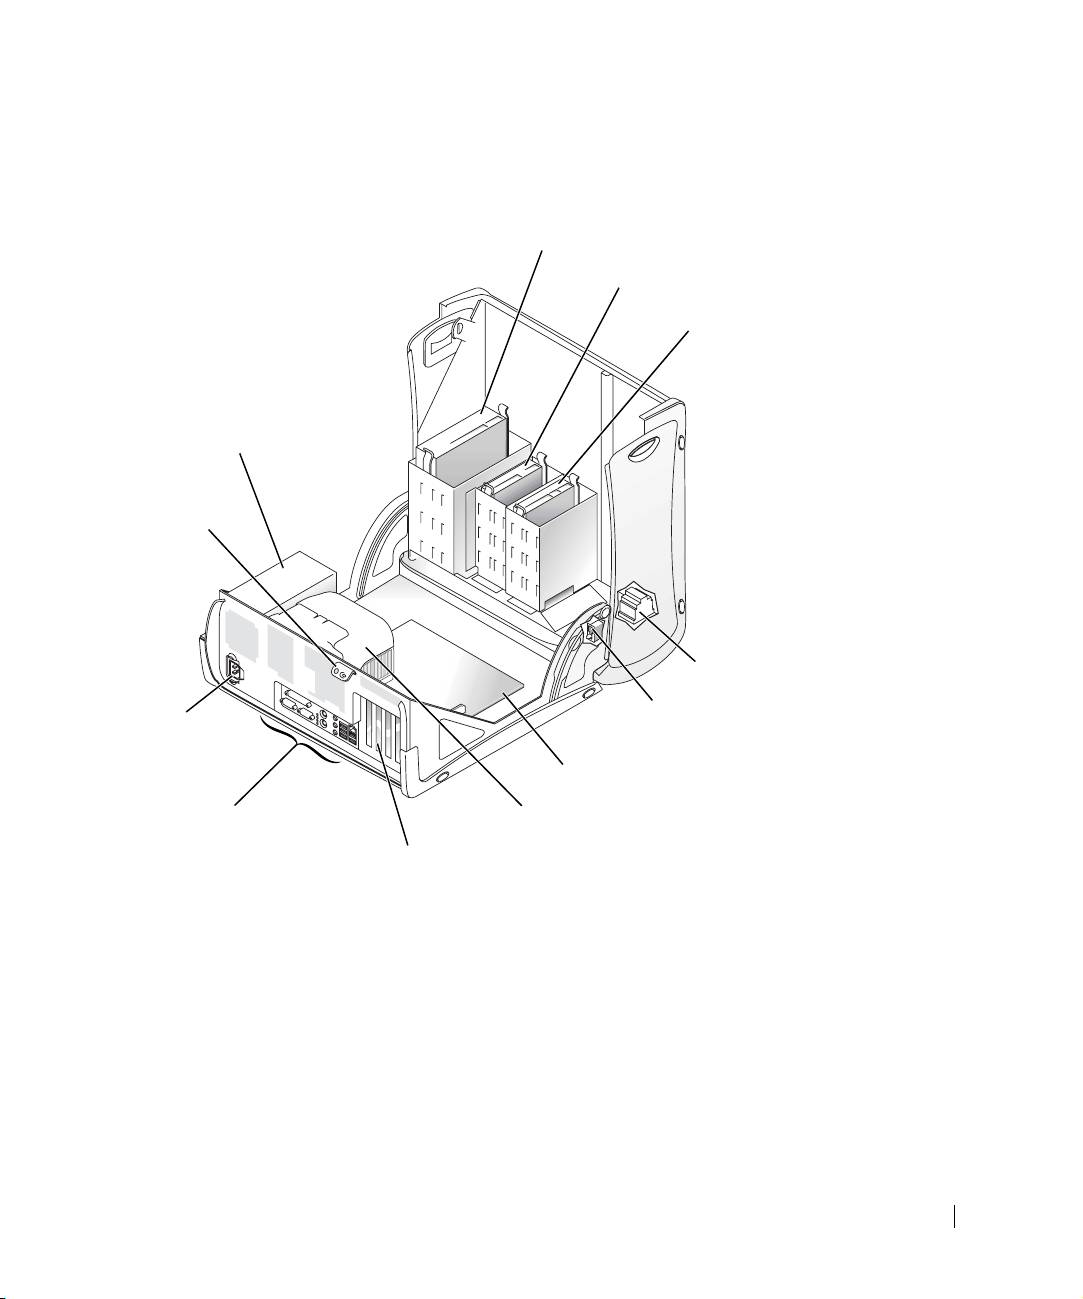
Inside Your Computer
Mini-Tower Computer
removable media drive
floppy drive
hard drive
power supply
padlock ring
optional speaker
power
chassis intrusion
connector
switch
system board
back-panel
connectors
microprocessor airflow shroud
AGP and PCI expansion-card slots
Setup and Quick Reference Guide 19
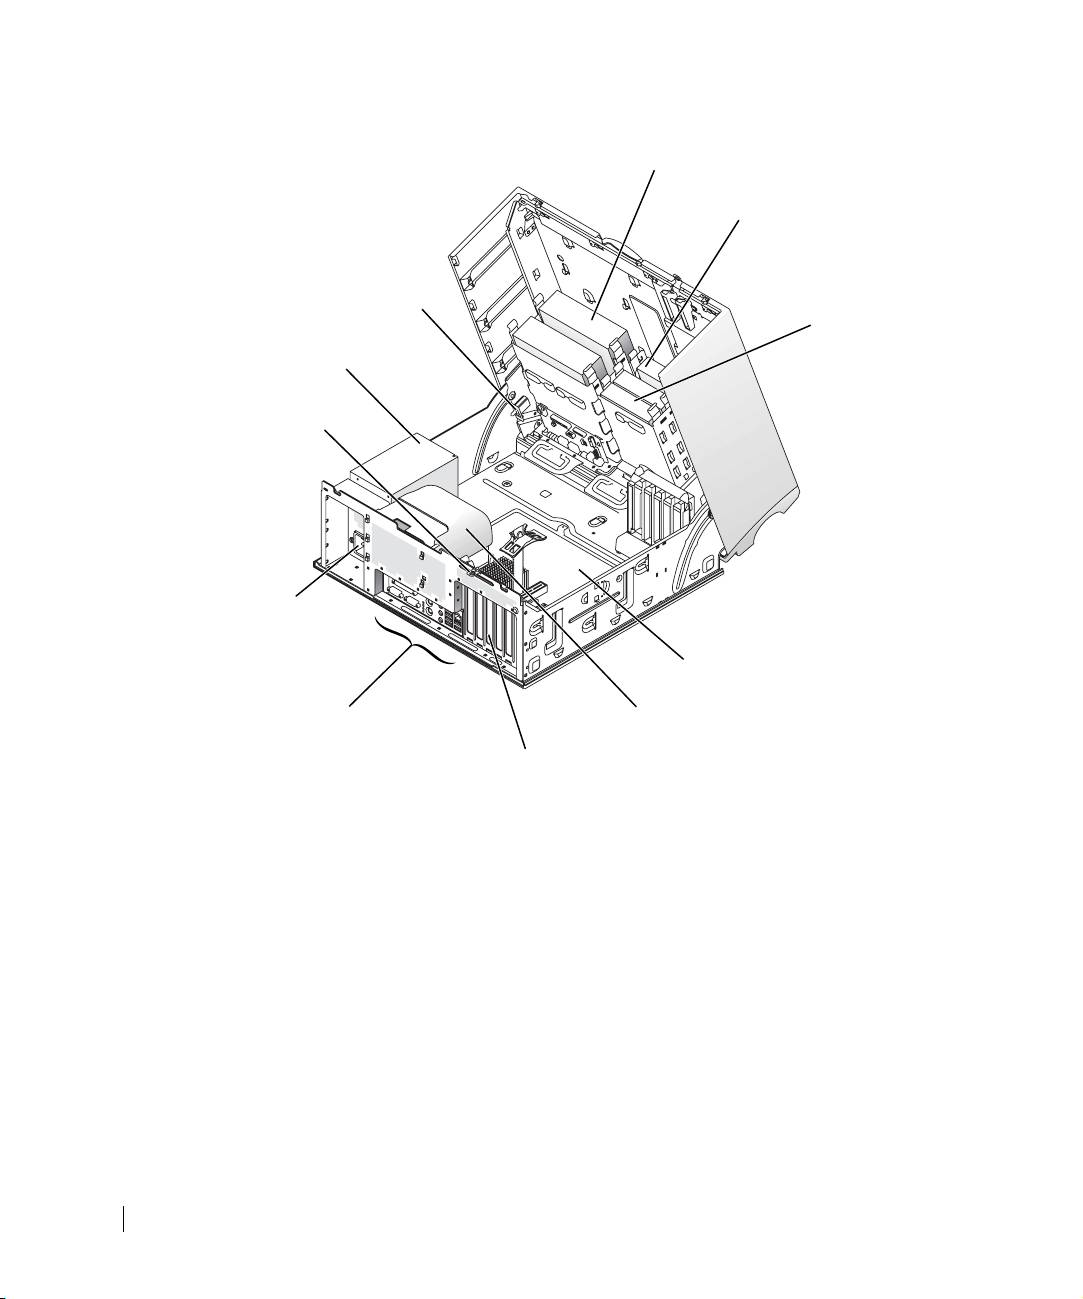
Desktop Computer
removable media drive
floppy drive
chassis
intrusion switch
hard drive
power supply
padlock ring
www.dell.com | support.dell.com
power
connector
system board
back-panel
connectors
microprocessor airflow shroud
AGP and PCI expansion-card slots
20 Setup and Quick Reference Guide
