Dell PowerVault MD3000i: инструкция
Раздел: Компьютерные комплектующие
Тип:
Инструкция к Dell PowerVault MD3000i
Оглавление
- Примечания, замечания и предупреждения
- Характеристики системы Характеристики производительности Характеристики масштабируемости Характеристики доступности
- Характеристики управляемости и возможности обслуживания Поддержка операционных систем
- Дополнительная полезная информация
- Получение технической поддержки Установка Распаковка системы
- Установка направляющих кронштейнов и системы встойку
- Подсоединение шнура питания и установка кронштейна для фиксации шнура питания
- Начало работы с системой 93
- Включение системы
- Технические характеристики Диски Модули RAID-котроллеров Разъемы на задней панели RAID-контроллера
- Объединительная плата Светодиодные индикаторы
- Источники питания Питание физических дисков (для каждого слота) Габаритные размеры Условия эксплуатации (стойка)
- Условия эксплуатации (модуль аварийного питания)

Getting Started
With Your System
Začínáme se systémem
Guide de mise en route
Erste Schritte mit dem System
Τα πρώτα βήματα με το σύστημά σας
Rozpoczęcie pracy z systemem
Начало работы с системой
Procedimientos iniciales con el sistema
Sistem Başlangıç Kılavuzu
תכרעמה םע הדובעה תליחת
FILE LOCATION: J:\DL\DL102196\DTP\UW791fc1.fm
DELL CONFIDENTIAL – PRELIMINARY 4/30/10 – FOR PROOF ONLY
Current template as of 4/26/2007
Model AMP01


Getting Started
With Your System
FILE LOCATION: J:\DL\DL102196\DTP\UW791et1.fm
DELL CONFIDENTIAL – PRELIMINARY 4/23/10 – FOR PROOF ONLY
Model AMP01

FILE LOCATION: J:\DL\DL102196\DTP\UW791et1.fm
Notes, Notices, and Cautions
NOTE: A NOTE indicates important information that helps you make better use
of your computer.
NOTICE: A NOTICE indicates either potential damage to hardware or loss of data
and tells you how to avoid the problem.
CAUTION: A CAUTION indicates a potential for property damage, personal injury,
or death.
____________________
Information in this document is subject to change without notice.
© 2007 Dell Inc. All rights reserved.
Reproduction in any manner whatsoever without the written permission of Dell Inc. is strictly
forbidden.
Trademarks used in this text: Dell, the DELL logo, PowerVault, and Dell OpenManage are trademarks
of Dell Inc.; Microsoft, Windows, and Windows Server are either registered trademarks or trademarks
of Microsoft Corporation in the United States and/or other countries; SUSE and NetWare are registered
trademarks of Novell, Inc., in the United States and other countries; Red Hat and Enterprise Linux are
registered trademarks of Red Hat, Inc.; Intel and Intel XScale are registered trademarks of Intel
Corporation in the U.S. and other countries.
Other trademarks and trade names may be used in this document to refer to either the entities claiming
the marks and names or their products. Dell Inc. disclaims any proprietary interest in trademarks and
trade names other than its own.
Model AMP01
April 2010 P/N UW791 Rev. A01

System Features
This section describes the major hardware and software features of your
system. It also provides information about other documents you may need
when setting up your system and how to obtain technical assistance.
Performance Features
®
®
• 667-MHz Intel
XScale
processor
• 512-MB high-speed data cache memory
Scalability Features
• Capacity for 15 1-inch, hot-plug, 3.0-Gbps, serial-attached SCSI (SAS)
physical disks.
• Support for up to two daisy-chained storage enclosures for a total
of 45 physical disks.
• Controller capable of supporting sessions from 32 iSCSI initiators
(16 hosts with redundant connections) simultaneously with multiple
connections per session. For more information, refer to the
Dell
PowerVault MD Systems Support Matrix
at
support.dell.com
.
• Support for a wide range of servers. (For additional support information,
refer to the
Dell PowerVault MD Systems Support Matrix
at
support.dell.com
).
• Support for both simplex (single controller) and duplex (dual controller)
array configurations.
Availability Features
• Up to two active/active RAID controller modules (duplex configuration)
for redundant data and system management capability; simplex
configuration also available
• Battery backup unit (BBU) to power the RAID controller system memory
(cache) for a minimum of 72 hours in case of a power outage
• Redundant hot-plug power supply and cooling modules that are combined
for easy serviceability
Getting Started With Your System 3

Manageability and Serviceability Features
• Efficient rack-mount designed storage system
• Hot-pluggable drives
• Four sensors for monitoring ambient temperatures
• Over-temperature shutdown protection capability
• Configuration and monitoring via the MD Storage Manager software
Supported Operating Systems
Your system supports the following operating systems:
®
®
• Microsoft
Windows
Storage Server 2003 R2
®
• Microsoft Windows Server
2003 R2 Standard and Enterprise Editions
• Microsoft Windows Server 2003 Service Pack 1(SP1) with patches
• Microsoft Windows Server 2003 Service Pack 2 (SP2)
• Microsoft Windows Server XP Professional SP2 (management station only,
no I/0 attach)
®
®
•Red Hat
Enterprise Linux
V4.0 with Update 4 (AS, ES, WS), 32 bit
and 64 bit (2.6 kernel)
®
•SUSE
Linux Enterprise Server V9.0 service pack 3 with Intel
EM64T(2.6 kernel)
For more information, refer to the
Dell PowerVault MD Systems Support Matrix
at
support.dell.com
.
Other Information You May Need
CAUTION: The Product Information Guide provides important safety and
regulatory information. Warranty information may be included within this
document or as a separate document.
•The
Rack Installation Instructions
included with your rack solution
describes how to install your system into a rack.
•The
Hardware Owner’s Manual
provides information about system
features and describes how to troubleshoot the system and install or
replace system components. This document can be found on the CDs
that came with your system or at
support.dell.com
.
4 Getting Started With Your System
• CDs included with your system provide documentation and tools for
installing, configuring, and managing your system.
• The
Dell PowerVault MD Systems Support Matrix
at
support.dell.com
provides compatibility information, including servers, operating systems,
controllers, software, and hardware configurations.
• Updates are sometimes included with the system to describe changes
to the system, software, and/or documentation.
NOTE: Always check for updates on support.dell.com and read the updates
first because they often supersede information in other documents.
• Release notes or readme files may be included to provide current updates
to the system or documentation or advanced technical reference material
intended for experienced users or technicians.
Obtaining Technical Assistance
If you do not understand a procedure in this guide or if the system does
not perform as expected, see your Hardware Owner’s Manual.
Dell Enterprise Training and Certification is available; see
www.dell.com/training for more information. This service may not be offered
in all locations.
Installation
CAUTION: Before performing the following procedure, read and follow the safety
instructions and important regulatory information in your Product Information
Guide.
This section describes the steps to set up your system for the first time.
For more detailed information, refer to the Installation Guide provided
on the CDs that came with your system.
Unpack the System
Unpack your system and identify each item. Keep all shipping materials
in case you need them later.
Getting Started With Your System 5
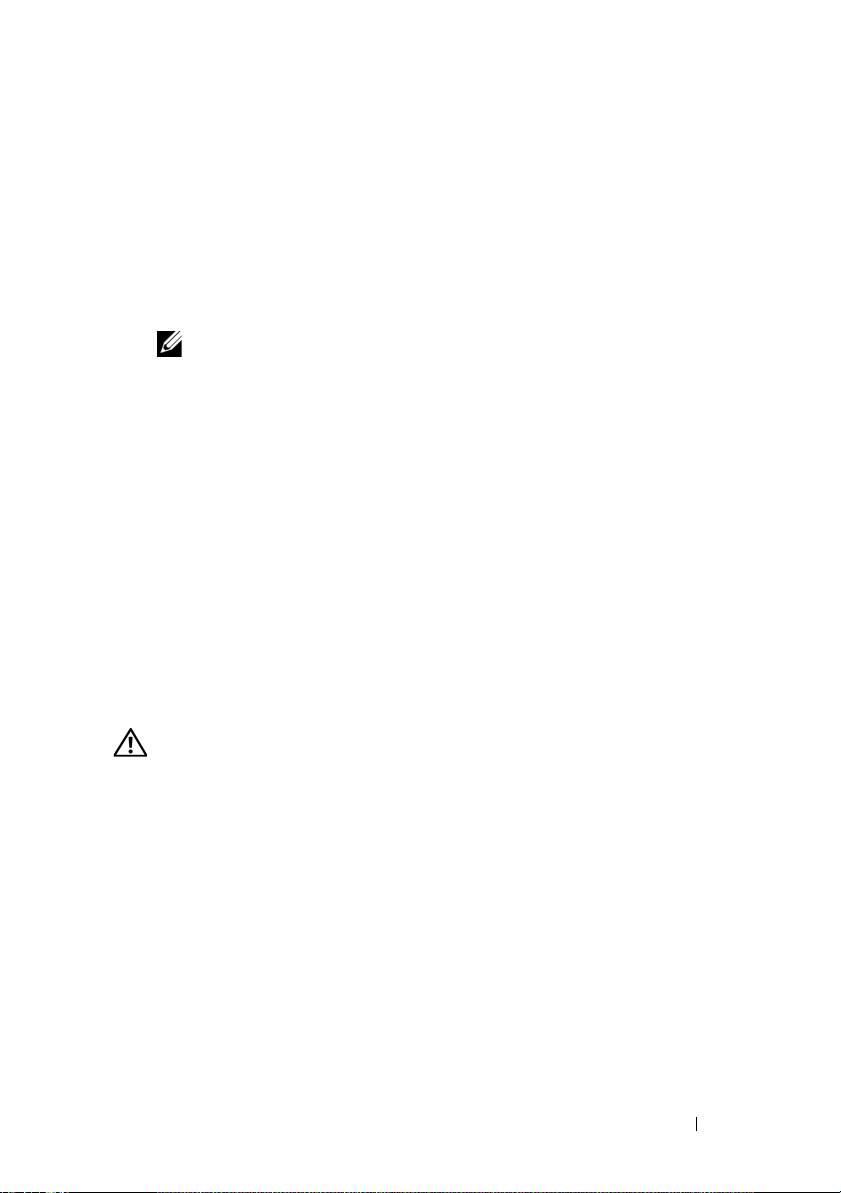
Install the Rails and System in a Rack
Install the rails and system in the rack once you have read the "Safety
Instructions" located in the rack installation documentation for your system.
See your rack installation documentation for instructions on installing your
system in a rack.
6 Getting Started With Your System
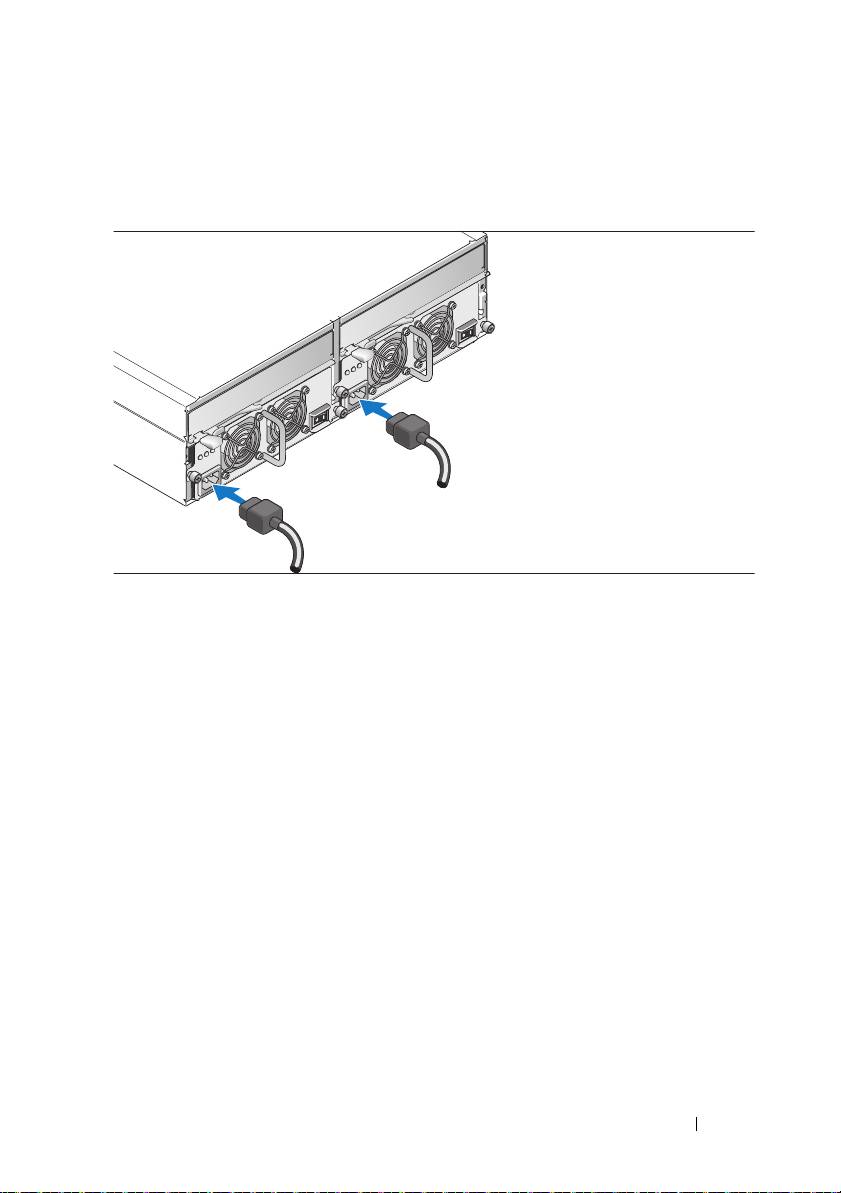
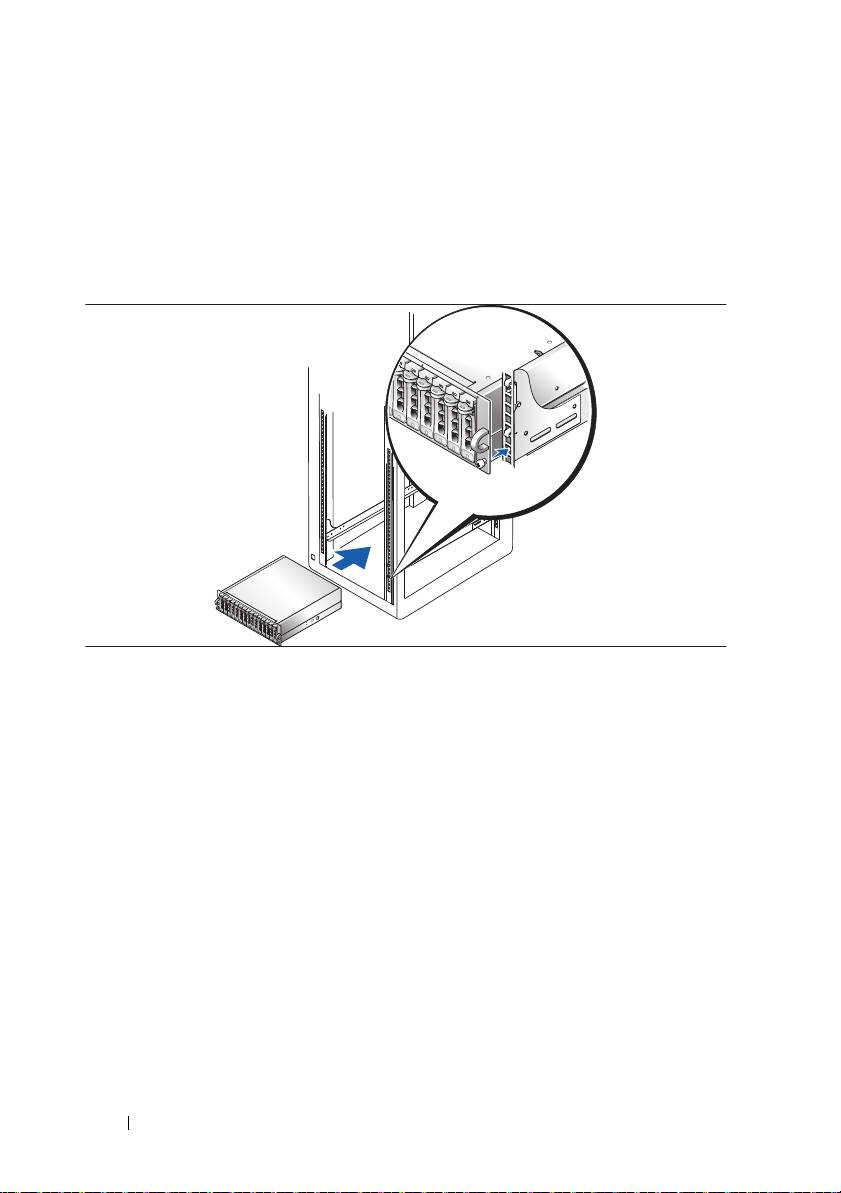
Connect the Power Cables and Power Cord Retention Bracket
Connect both power cables to the power supply/cooling fan modules.
Attach the power cord retention bracket to the power supply loop by affixing
the back clasp of the bracket to the top of the loop and the middle clasp to
the vertical middle of the loop. Attach the system power cable to the bracket’s
cable clasp. Repeat the procedure for the second power supply.
Getting Started With Your System 7
Plug the other end of the power cables into a grounded electrical outlet
or a separate power source such as
an uninterruptible po
wer supply (UPS)
or a power distribution unit (PDU).
Cable the RAID controller modules according to the instructions provided
in the
Hardware Owner’s Manual
.
8 Getting Started With Your System
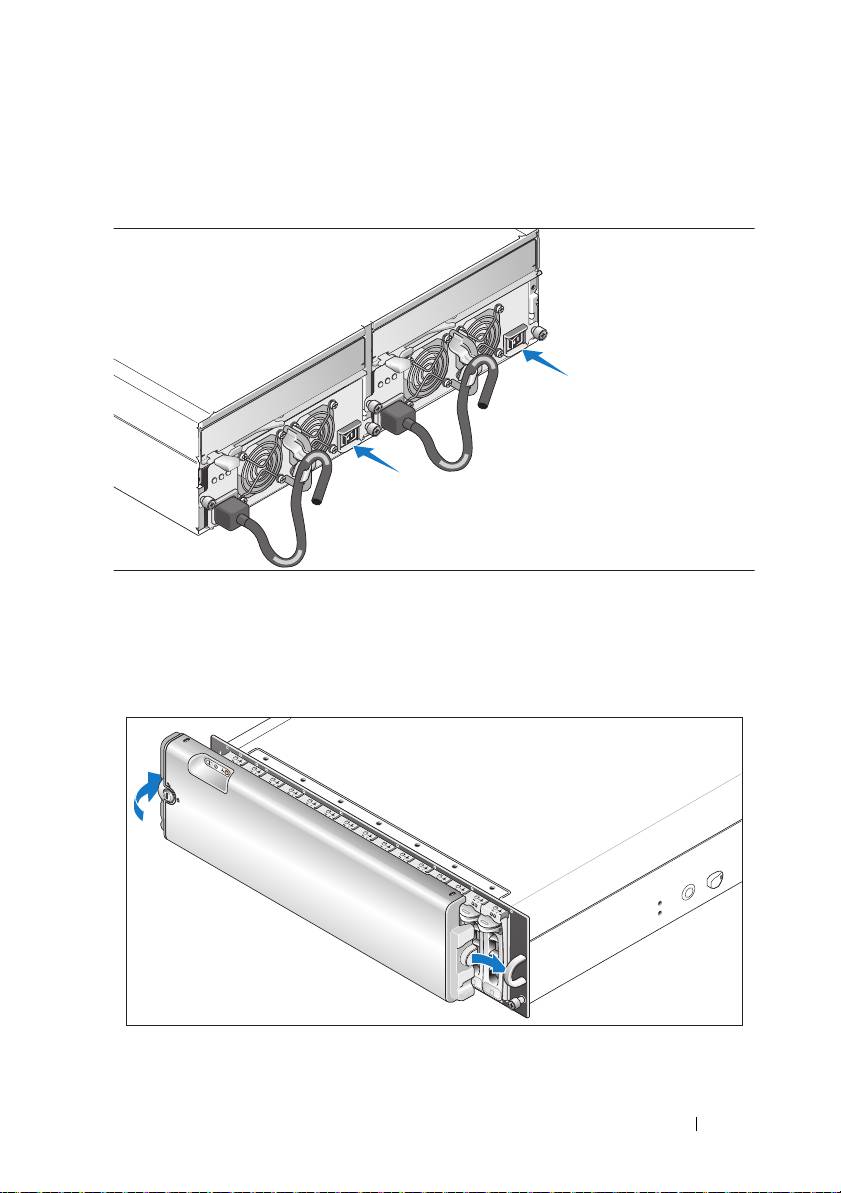
Turn on the System
Turn on the system by turning on both power supply/cooling fan modules.
If you have purchased the optional system bezel, install it after turning on
the system. Insert the right edge of the bezel into the right front loop on the
system, and then press the left edge of the bezel to the system until the bezel
snaps into place.
Getting Started With Your System 9

Specifications
Disks
Physical disks Up to 15 1-inch-by-3.5-inch SAS hot-plug
physical disks (3.0 Gbps). (See your
system readme file for supported disk
capacities.)
RAID Controller Modules
iSCSI RAID controllers
• Two hot-pluggable active/active
controllers (or one controller in simplex
mode)
• 512 MB of cache per controller
• Simplex or duplex configurations
• One temperature sensor per controller
RAID Controller Back-Panel Connectors
iSCSI ports (per RAID controller)
• One 100/1000 BASE-T iSCSI Port 0 "In"
connector for connecting hosts
• One 100/1000 BASE-T iSCSI Port 1 "In"
connector for connecting additional
hosts
SAS expansion port
One 3.0 Gbps SAS Port "Out" connector
(per RAID controller)
for expansion to an additional enclosure
Debug connector
One 6-pin mini-DIN connector
(per RAID controller)
Management port
One 10/100 BASE-T connection for out-
(per RAID controller)
of-band management of the enclosure
10 Getting Started With Your System

Backplane Board
Connectors
• 15 SAS physical-disk connectors
• Two power supply/cooling fan module
connectors
• Two sets of RAID controller connectors
(six connectors each controller)
• One control panel connector for front
LEDs
Sensors Two temperature sensors
LED Indicators
Front panel
• One two-color LED indicator for system
status
• Two single-color LED indicators
(one for power; one nonfunctional)
Physical disk carrier
• One single-color activity LED
• One two-color LED status indicator
per disk
RAID controller The following single-color LEDs:
• Battery fault
• Cache active
• Controller fault
• Controller power
• Ethernet link
• Ethernet activity
• SAS Out fault/active
• iSCSI In fault (2)
• iSCSI In active (2)
Power supply/cooling fan module Three LED status indicators for power
supply status, power supply/fan fault,
and AC status
Getting Started With Your System 11

Power Supplies
Wattage 488 W maximum continuous; 550 W
peak
Voltage 100–240 V rated (actual 90–264 V)
Frequency 47–63 Hz
Amperage 7.2 A at 100 V, 3.6 A at 200 V
Available Physical Disk Power (Per Slot)
Supported physical-disk power
up to 1.3 A at +12 V
consumption
up to 1.5 A at +5 V
Physical
Height 13.11 cm (5.16 in)
Width 44.63 cm (17.57 in)
Depth 48.01 cm (18.9 in)
Weight (maximum configuration) 35.37 kg (78 lb)
Environmental (Enclosure)
NOTE: For additional information about environmental measurements for specific
system configurations, see dell.com/environmental_datasheets
Temperature
Operating
10° to 35°C (50° to 95°F)
Storage
–40° to 65°C (–40° to 149°F)
Relative humidity
Operating
5% to 80% (noncondensing)
Storage
5% to 95% (noncondensing)
Altitude
Operating
–16 to 3048 m (–50 to 10,000 ft)
Storage
–16 to 10,600 m (–50 to 35,000 ft)
BTU per hour 1430 (maximum)
12 Getting Started With Your System

Environmental (Battery Backup Unit [BBU])
NOTE: For additional information about environmental measurements for specific
system configurations, see dell.com/environmental_datasheets
Maximum input power
• +12 VDC +/–5% at 1 A
• +3.3 VDC +/–5% at 150 mA
• Operating temperature range: 5° to
35°C (41° to 95°F)
Regulated output voltage from BBU
• +2.5 VDC +/–3% at 20 mA to 120 mA
• Operating temperature range: 5° to
45°C (41° to 113°F)
Minimum retention time (life
72 hours for 512-MB DDR-I DIMM,
expectancy)
2.5 V at 120 mA
Working temperature range (dry bulb)
• 5° to 35°C (41° to 95°F)
• Maximum dry bulb temperature
derated by 3.3°C (37.9°F) per 1000 m
(3281 ft) above 500 m (1640 ft)
Working relative humidity range 5% to 90% noncondensing
Storage temperature range (dry bulb)
• –10° to 45°C (14° to 113°F) for
3 months maximum
• Maximum dry bulb temperature
derated by 3.3°C (37.9°F, guaranteed)
per 1000 m (3281 ft) above 500 m
(1640 ft)
Transit temperature range (dry bulb) –20° to 60°C (–4° to 140°F) for 1 week
maximum
Storage and transit humidity range 5% to 95% relative humidity
Storage and transit maximum
1°C (33.8°F) per minute to a maximum
temperature gradient
of 20°C (68°F) per hour
Storage and transit maximum humidity
30% relative humidity per hour
gradient
Getting Started With Your System 13

14 Getting Started With Your System

Začínáme
se systémem
FILE LOCATION: J:\DL\DL102196\DTP\UW791zt1.fm
DELL CONFIDENTIAL – PRELIMINARY 4/23/10 – FOR PROOF ONLY
Model AMP01

FILE LOCATION: J:\DL\DL102196\DTP\UW791zt1.fm
Poznámky a upozornění
POZNÁMKA: POZNÁMKA označuje důležitou informaci, s jejíž pomocí
lépe využijete svůj počítač.
UPOZORNĚNÍ: UPOZORNĚNÍ poukazuje na možnost poškození
hardwaru nebo ztráty dat a poskytuje návod, jak se danému problému
vyhnout.
POZOR: Výstraha („POZOR“) poukazuje na riziko poškození
majetku, poranění nebo smrtelného úrazu.
____________________
Informace obsažené v tomto dokumentu podléhají změnám bez předchozího upozornění.
© 2007 Dell Inc. Všechna práva vyhrazena.
Reprodukce jakýmkoli způsobem bez písemného povolení společnosti Dell Inc. je přísně zakázána.
Obchodní známky použité v tomto textu: Dell, logo DELL, PowerVault a Dell OpenManage jsou
obchodní známky společnosti Dell Inc.; Microsoft, Windows a Windows Server jsou registrované
obchodní známky nebo obchodní známky společnosti Microsoft Corporation ve Spojených státech
amerických a/nebo dalších zemích; SUSE a NetWare jsou registrované obchodní známky společnosti
Novell, Inc. ve Spojených státech amerických a dalších zemích; Red Hat a Enterprise Linux jsou
registrované obchodní známky společnosti Red Hat, Inc.; Intel a Intel XScale jsou registrované
obchodní známky společnosti Intel Corporation ve Spojených státech amerických a dalších zemích.
V tomto dokumentu mohou být použity další obchodní známky a názvy odkazující na subjekty,
kterým tyto známky či názvy patří, nebo na jejich výrobky. Společnost Dell Inc. se zříká jakýchkoli
vlastnických zájmů o jiné než vlastní ochranné známky a obchodní názvy.
Model AMP01
Duben 2010 Č. dílu UW791 Rev. A01

Systémové funkce
V této části jsou popsány hlavní hardwarové a softwarové funkce vašeho systému.
Jsou v ní obsaženy i informace o doplňujících dokumentech, které příp.
potřebujete při instalaci systému, a informace k odborné pomoci.
Výkon
®
®
•
667 MHz Intel
XScale
procesor
•
512 MB vysokorychlostní datové cache paměti
Rozšiřitelnost
•
Kapacita pro 15 sériově propojených SCSI (SAS) pevných disků,
1x3,5 palce, hot-plug, 3,0 Gb/s.
•
Podpora až dvou zřetězených ukládacích svazků pro celkem 45 pevných disků.
•
Řadič podporující až 32 relací iSCSI iniciátorů (16 hostitelů s redundantními
spojeními) současně s násobnými spojeními na jednu relaci. Pro více
informací nahlédněte do
Dell PowerVault MD Systems Support Matrix
na adrese
support.dell.com
.
•
Podpora širokého spektra serverů. (Pro více informací o podporovaných
systémech nahlédněte do
Dell PowerVault MD Systems Support Matrix
na adrese
support.dell.com
).
•
Podpora simplexní (jeden řadič) i duplexní (duální řadič) konfigurace polí.
Dostupnost
•
Až dva aktivní/aktivní moduly RAID řadičů (duplexní konfigurace)
umožňující správu záložních dat a systému; simplexní konfigurace rovněž
k dispozici.
•
Záložní napájecí zdroj pro zajištění napájení paměti systému RAID řadiče
(cache) v případě výpadku napětí po dobu min. 72 hodin.
•
Záložní hot-plug napájecí zdroj a kombinované chladicí moduly pro snadnou
údržbu.
Začínáme se systémem 17

Správa a servis
•
Úložný systém v účelně řešené konzolové konstrukci
•
Disky vyměnitelné za provozu
•
Čtyři senzory pro sledování okolní provozní teploty
•
Ochranná funkce vypnutí při přehřátí
•
Konfigurace a monitorování prostřednictvím softwaru MD Storage Manager
Podporované operační systémy
Váš systém podporuje následující operační systémy:
®
®
•
Microsoft
Windows
Storage Server 2003 R2
®
•
Microsoft Windows Server
2003 R2 Standard a Enterprise Editions
•
Microsoft Windows Server 2003 Service Pack 1 (SP1) se záplatami (patches)
•
Microsoft Windows Server 2003 Service Pack 2 (SP2)
•
Microsoft Windows Server XP Professional SP2 (pouze správc. stanice,
bez připojených I/0)
®
®
•
Red Hat
Enterprise Linux
V4.0 s aktualizací 4 (AS, ES, WS), 32 bit
a 64 bit (2.6 kernel)
®
•
SUSE
Linux Enterprise Server V9.0 service pack 3 s Intel
EM64T(2.6 kernel)
Pro více informací nahlédněte do
Dell PowerVault MD Systems Support Matrix
na adrese
support.dell.com
.
18 Začínáme se systémem
