Dell DX6000G: инструкция
Раздел: Компьютерные комплектующие
Тип:
Инструкция к Dell DX6000G
Оглавление
- Примечания, предупреждения и предостережения
- Установка и конфигурирование Распаковка системы Установка направляющих и системы в стойку
- Дополнительно: подключение клавиатуры, мыши и монитора Подключение кабелей питания
- Фиксация кабелей питания Включение системы
- Установка дополнительной лицевой панели Прочая полезная информация
- Получение технической поддержки Информация NOM (только для Мексики) Технические характеристики Процессор Шина расширения
- Шина расширения Память Накопители Разъемы
- Разъемы Видео Power (Питание) Физические характеристики
- Условия эксплуатации
- Условия эксплуатации

Dell DX6000G Systems
Getting Started
With Your System
Začínáme se systémem
Guide de mise en route
Handbuch zum Einstieg in das System
Τα πρώτα βήματα με το σύστημά σας
Rozpoczęcie pracy z systemem
Noţiuni introductive despre sistemul dvs
Начало работы с системой
Introducción al sistema
Sisteminizi Kullanmaya Başlarken


Dell DX6000G Systems
Getting Started
With Your System
Regulatory Model E07S Series
Notes, Cautions, and Warnings
NOTE: A NOTE indicates important information that helps you make better use of
your computer.
CAUTION: A CAUTION indicates potential damage to hardware or loss of data if
instructions are not followed.
WARNING: A WARNING indicates a potential for property damage, personal
injury, or death.
___________________
Information in this publication is subject to change without notice.
© 2010 Dell Inc. All rights reserved.
Reproduction of these materials in any manner whatsoever without the written permission of Dell Inc.
is strictly forbidden.
®
®
Trademarks used in this text: Dell™ and the DELL logo are trademarks of Dell Inc. Intel
and Xeon
are registered trademarks of Intel Corporation in the U.S. and other countries.
Other trademarks and trade names may be used in this publication to refer to either the entities claiming
the marks and names or their products. Dell Inc. disclaims any proprietary interest in trademarks and
trade names other than its own.
Regulatory Model E07S Series
December 2010 P/N 2GNRM Rev. A00

Installation and Configuration
WARNING: Before performing the following procedure, review the safety
instructions that came with the system.
Unpacking the System
Unpack your system and identify each item.
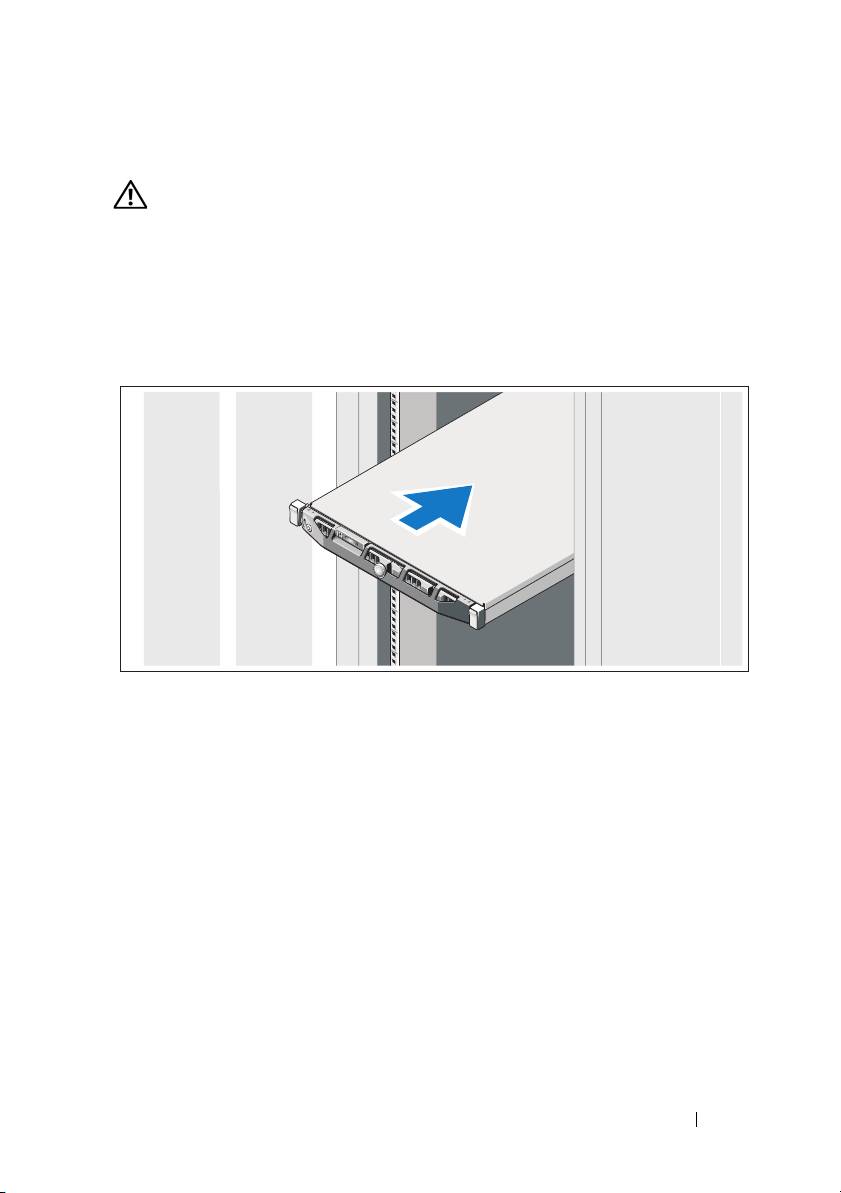
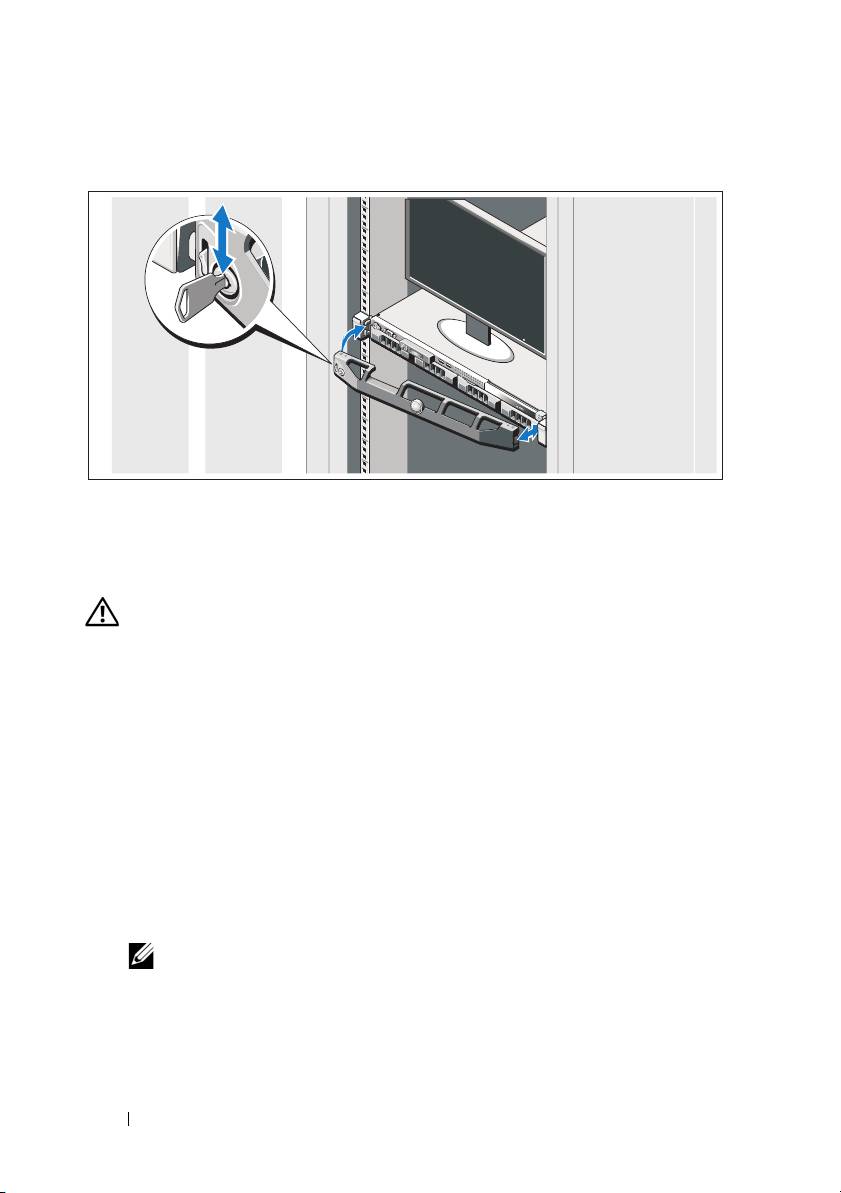
Installing the Rails and System in a Rack
Assemble the rails and install the system in the rack following the safety
instructions and the rack installation instructions provided with your system.
Getting Started With Your System 3

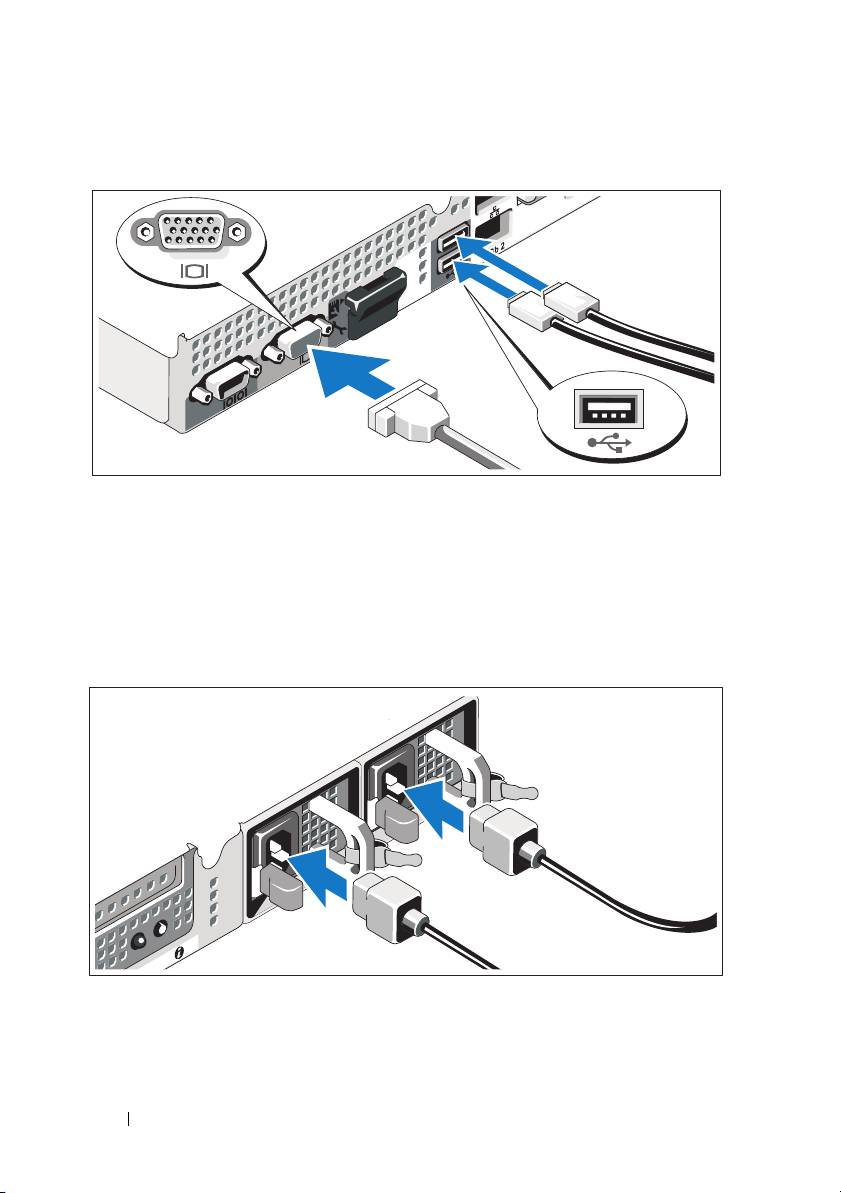
Optional – Connecting the Keyboard, Mouse, and Monitor
Connect the keyboard, mouse, and monitor (optional).
The connectors on the back of your system have icons indicating which cable
to plug into each connector. Be sure to tighten the screws (if any) on the
monitor's cable connector.
Connecting the Power Cable(s)
Connect the system’s power cable(s) to the system and, if a monitor is used,
connect the monitor’s power cable to the monitor.
4 Getting Started With Your System
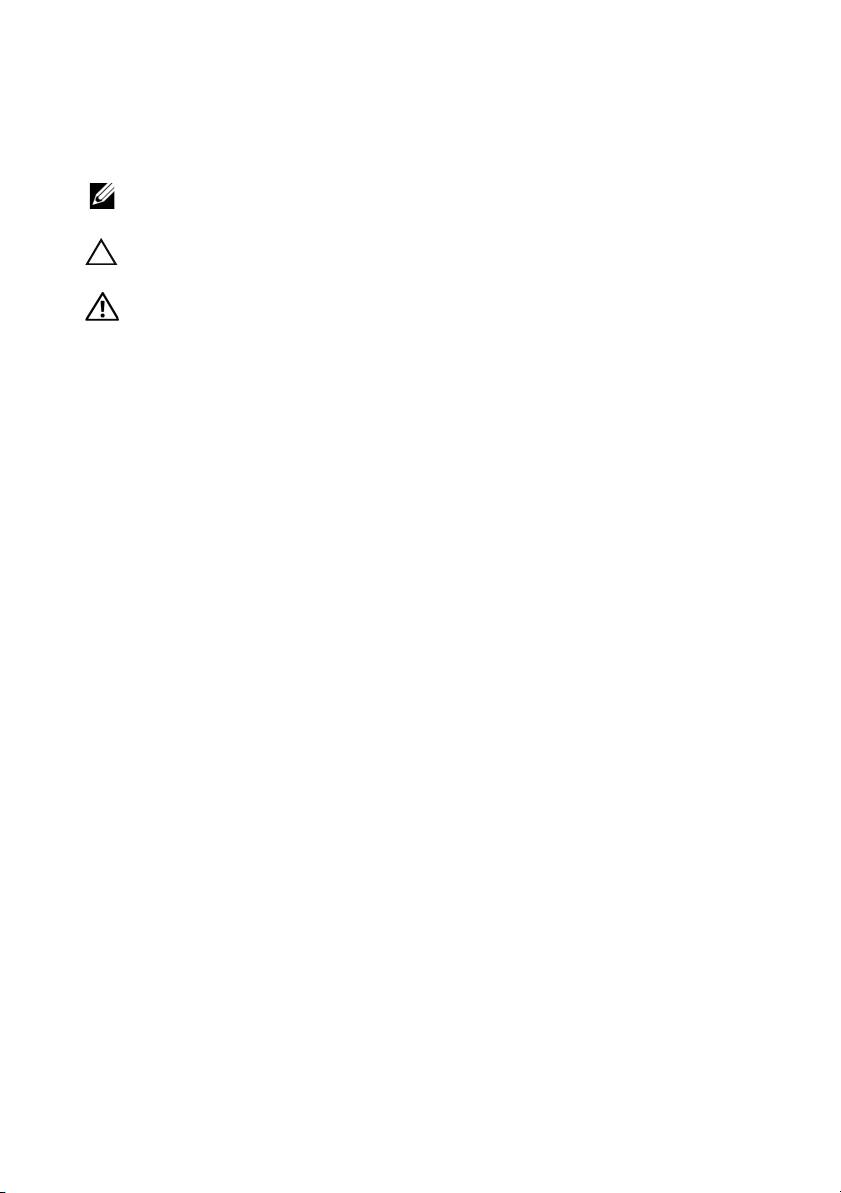
Securing the Power Cable(s)
Bend the system power cable into a loop as shown in the illustration and
secure the cable to the bracket using the provided strap.
Plug the other end of the power cable into a grounded electrical outlet or
a separate power source such as an uninterruptible power supply (UPS) or
a power distribution unit (PDU).
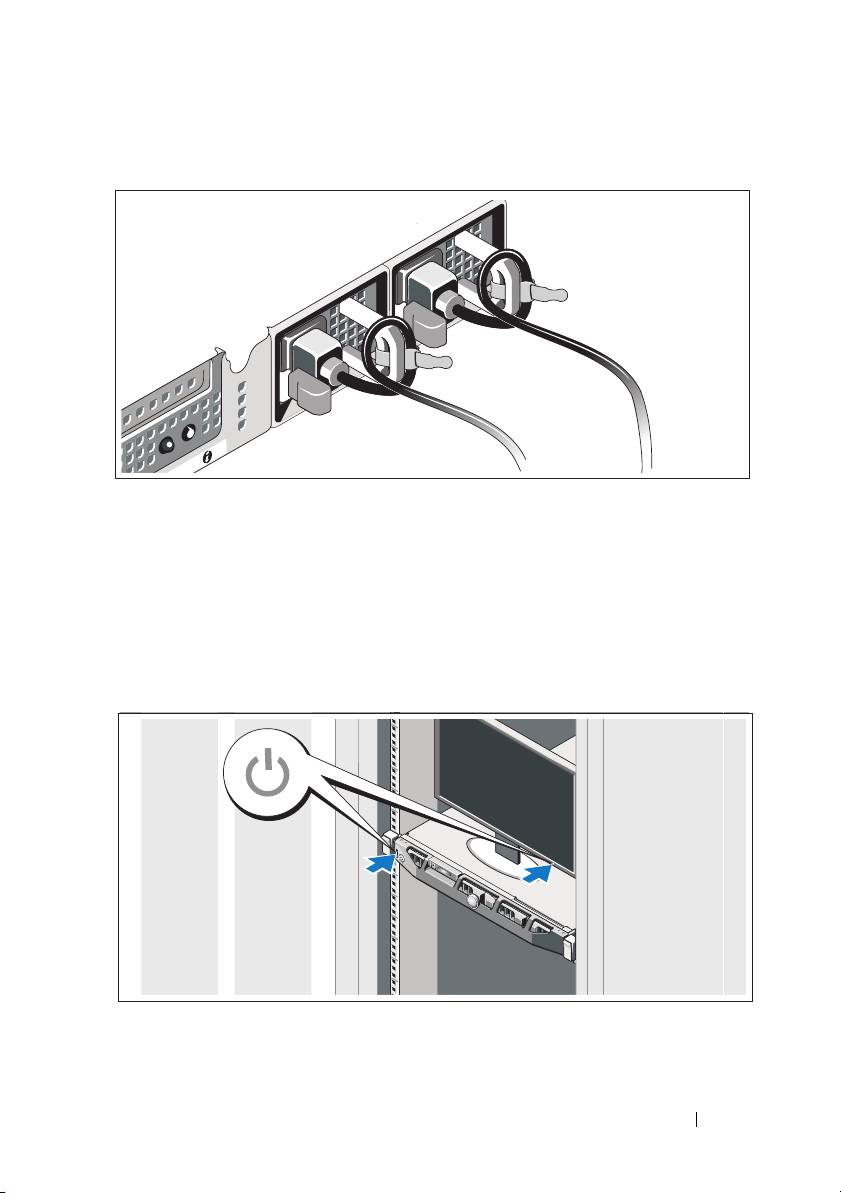
Turning On the System
Press the power button on the system and the monitor. The power indicators
should light.
Getting Started With Your System 5

Installing the Optional Bezel
Install the bezel (optional).
Other Information You May Need
WARNING: See the safety and regulatory information that shipped with your
system. Warranty information may be included within this document or as a
separate document.
• The rack documentation included with your rack solution describes how to
install your system into a rack.
•The
Hardware
Owner’s Manual
provides information about system features
and describes how to troubleshoot the system and install or replace system
components. This document is available online at
support.dell.com/manuals
.
• Any media that ships with your system that provides documentation and
tools for configuring and managing your system, including those
pertaining to the operating system, system management, system updates,
and system components that you purchased with your system.
NOTE: Always check for updates on support.dell.com/manuals and read the
updates first because they often supersede information in other documents.
6 Getting Started With Your System

Obtaining Technical Assistance
If you do not understand a procedure in this guide or if the system does not
perform as expected, see your Hardware Owner’s Manual. Dell offers
comprehensive hardware training and certification. See dell.com/training for
more information. This service may not be offered in all locations.
NOM Information (Mexico Only)
The following information is provided on the device described in this
document in compliance with the requirements of the official Mexican
standards (NOM):
Importer:
Model number: E07S
Supply voltage: 100 V to 240 V CA
Frequency: 50/60 Hz
Current consumption: 7 A to 3.5 A
Technical Specifications
Processor
Processor type Intel Xeon processor 56xx series
Expansion Bus
Bus type PCI Express Generation 2
Expansion slots One full-height, half-length x16 link
Memory
Architecture 1066 MHz or 1333 MHz DDR3 registered or
unbuffered Error Correcting Code (ECC)
DIMMs.
Memory module sockets Eight 240-pin
Getting Started With Your System 7

Memory (continued)
Memory module capacities 1 GB, 2 GB, 4 GB, or 8 GB
Minimum RAM 1 GB (one processor) or
2 GB (two processors)
Maximum RAM 32 GB (one processor) or
64 GB (two processors)
Drives
Hard drives Up to four 3.5-inch, hot-swappable SAS or
SATA internal drives
Diskette drive Optional external USB 1.44 MB
Optical drive One internal slimline SATA DVD-ROM or
DVD+/-RW drive
NOTE: DVD devices are data only.
Optional external USB DVD-ROM
Connectors
Back
NIC
Two RJ-45 (for integrated 1 GB NICs)
Serial
9-pin, DTE, 16550-compatible
USB
Two 4-pin, USB 2.0-compliant
Video
15-pin VGA
Front
Video
15-pin VGA
USB
Two 4-pin, USB 2.0-compliant
Internal
USB
Two 4-pin, USB 2.0-compliant
Video
Video type Matrox G200, integrated in Winbond
WPCM450
Video memory 8 MB
8 Getting Started With Your System

Power
AC power supply (per power supply)
Wattage
500 W
Voltage
100-240 VAC, 50/60 Hz, 7-3.5 A
Heat dissipation
1706 BTU/hr maximum
Maximum inrush current
Under typical line conditions and over
the entire system ambient operating range,
the inrush current may reach 25 A per power
supply for 10 ms or less.
Batteries
System battery
CR 2032 3.0 V lithium coin cell
Physical
Height 4.3 cm (1.69 in)
Width 43.4 cm (17.09 in)
Depth 62.7 cm (24.69 in)
Weight (maximum configuration) 15.9 kg (35.02 lb)
Environmental
NOTE: For additional information about environmental measurements for specific
system configurations, see dell.com/environmental_datasheets.
Temperature
Operating
10 °C to 35 °C (50 °F to 95 °F) with a
maximum temperature gradation of
10 °C per hour
NOTE: For altitudes above 2950 feet, the
maximum operating temperature is derated
1º F/550 ft.
Storage
–40 °C to 65 °C (–40 °F to 149 °F) with
a maximum temperature gradation of
20 °C per hour
Getting Started With Your System 9

Environmental (continued)
Relative humidity
Operating
20% to 80% (noncondensing) with
a maximum humidity gradation of
10% per hour
Storage
5% to 95% (noncondensing)
Maximum vibration
Operating
0.26 Grms at 5 Hz to 500 Hz for 15 min
Storage
1.54 Grms at 10 Hz to 250 Hz for 15 min
Maximum shock
Operating
One shock pulse in the positive z axis
(one pulse on each side of the system) of
31 G for 2.6 ms in the operational
orientation
Storage
Six consecutively executed shock pulses
in the positive and negative x, y, and z
axes (one pulse on each side of the
system) of 71 G for up to 2 ms
Altitude
Operating
–16 m to 3048 m (–50 ft to 10,000 ft)
NOTE: For altitudes above 2950 feet, the
maximum operating temperature is derated
1ºF/550 ft.
Storage
–16 m to 10,600 m (–50 ft to 35,000 ft)
Airborne Contaminant Level
Class
G1 as defined by ISA-S71.04-1985
10 Getting Started With Your System

Systémy Dell DX6000G
Začínáme se systémem
Regulační model: E07S Series

Poznámky a upozornění
POZNÁMKA:
POZNÁMKA označuje důležité informace, které pomáhají lepšímu využití
počítače.
UPOZORNĚNÍ: UPOZORNĚNÍ poukazuje na možnost poškození hardwaru nebo
ztráty dat v případě nedodržení pokynů.
VAROVÁNÍ: VAROVÁNÍ upozorňuje na potenciální nebezpečí poškození majetku,
úrazu nebo smrti.
___________________
Informace v této publikaci se mohou bez předchozího upozornění změnit.
© 2010 Dell Inc. Všechna práva vyhrazena.
Jakákoli reprodukce těchto materiálů bez písemného povolení společnosti Dell Inc. je přísně zakázána.
Ochranné známky použité v tomto textu: Dell™ a logo DELL jsou ochranné známky společnosti
®
®
Dell Inc. Intel
a Xeon
jsou registrované ochranné známky společnosti Intel Corporation v USA a
dalších zemích.
V této publikaci mohou být použity další ochranné známky a obchodní názvy s odkazem na společnosti
vlastnící tyto známky a názvy nebo na jejich produkty. Společnost Dell Inc. nemá vlastnické zájmy
vůči ochranným známkám a obchodním názvům jiným než svým vlastním.
Regulační model: E07S Series
Prosinec 2010 Č. dílu 2GNRM Rev. A00
Instalace a konfigurace
VAROVÁNÍ: Před provedením následujícího postupu si prostudujte bezpečnostní
pokyny dodané se systémem.
Rozbalení systému
Rozbalte systém a identifikujte jeho jednotlivé součásti.
Instalace kolejniček a systému do stojanu
Sestavte kolejničky a nainstalujte systém do stojanu podle bezpečnostních
pokynů a pokynů k instalaci do stojanu dodaných se systémem.
Začínáme se systémem
13
Volitelné – Připojení klávesnice, myši a monitoru
Připojte klávesnici, myš a monitor (volitelné).
Konektory na zadní straně systému mají ikony znázorňující, který kabel se má
připojit ke kterému konektoru. Zajistěte, aby šrouby na konektoru kabelu
monitoru byly dobře dotaženy (je-li jimi konektor vybaven).
Připojení napájecích kabelů
Připojte napájecí kabely k systému, a pokud používáte monitor, připojte napájecí
kabel také k monitoru.
14
Začínáme se systémem

Zajištění napájecích kabelů
Ohněte napájecí kabel systému do smyčky, jak je znázorněno na obrázku, a
připevněte jej dodanou páskou k držáku.
Poté zasuňte druhý konec napájecího kabelu do uzemněné elektrické zásuvky
nebo jej připojte k samostatnému zdroji napájení, například ke zdroji
nepřerušitelného napájení (UPS) nebo jednotce rozvaděče (PDU).
Zapnutí systému
Stiskněte vypínač na systému a na monitoru. Indikátory napájení by se měly
rozsvítit.
Začínáme se systémem
15
Instalace volitelného čelního krytu
Nainstalujte čelní kryt (volitelný).
Další užitečné informace
VAROVÁNÍ: Prostudujte si informace o bezpečnosti a předpisech, které byly
dodány se systémem. Informace o záruce jsou součástí tohoto dokumentu nebo
jsou přiloženy samostatně.
• Pokyny k instalaci do stojanu dodané se stojanovým řešením popisují
instalaci systému do stojanu.
•
Příručka majitele
hardwaru
obsahuje informace o funkcích systému a
popisuje řešení problémů se systémem a instalaci nebo výměnu systémových
komponent. Tento dokument je k dispozici online na adrese
support.dell.com/manuals
.
• Média dodaná se systémem obsahují dokumentaci a nástroje pro
konfiguraci a správu systému. Mohou být dodána například média týkající
se operačního systému, softwaru pro správu systému, aktualizací systému a
komponent zakoupených se systémem.
POZNÁMKA:
Vždy nejprve zkontrolujte a pročtěte aktualizace uvedené na adrese
support.dell.com/manuals
, protože tyto aktualizace často nahrazují informace v
ostatních dokumentech.
16
Začínáme se systémem
Odborná pomoc
Nerozumíte-li některému z postupů popsaných v této příručce nebo nepracuje-li
systém podle očekávání, nahlédněte do
Příručky majitele hardwaru
. Společnost
Dell nabízí v souvislosti s hardwarem kompletní školení a certifikaci. Další
informace naleznete na webových stránkách
dell.com/training
. Tato služba
nemusí být nabízena ve všech regionech.
Informace NOM (jen pro Mexiko)
K zařízení popsanému v tomto dokumentu se vztahují v souladu s požadavky
oficiálních mexických norem NOM následující informace:
Dovozce:
Číslo modelu: E07S
Napájecí napětí: 100 V až 240 V stř.
Frekvence: 50/60 Hz
Spotřeba proudu: 7 A až 3,5 A
Technické specifikace
Procesor
Typ procesoru Procesor řady Intel Xeon 56xx
Rozšiřovací sběrnice
Typ sběrnice PCI Express 2. generace
Rozšiřovací sloty Jeden slot x16 s plnou výškou a poloviční
délkou
Pamět’
Architektura Pamět’ové moduly DIMM s taktovací
frekvencí 1066 nebo 1333 MHz, typ DDR3,
registrované nebo bez vyrovnávací paměti, s
ochranou ECC
Začínáme se systémem
17

Pamět’ (pokračování)
Sloty pro pamět’ové moduly Osm 240kolíkových
Kapacity pamět’ových modulů 1 GB, 2 GB, 4 GB nebo 8 GB
Minimum paměti RAM 1 GB (jeden procesor) nebo
2 GB (dva procesory)
Maximum paměti RAM 32 GB (jeden procesor) nebo
64 GB (dva procesory)
Jednotky
Pevné disky Až čtyři 3,5palcové interní disky SAS nebo
SATA připojitelné za provozu
Disketová jednotka Volitelná externí jednotka USB 1,44 MB
Optická jednotka Jedna interní jednotka SATA DVD-ROM
nebo DVD+/-RW
POZNÁMKA:
Zařízení DVD jsou určena pouze
pro data.
Volitelná externí jednotka USB DVD-ROM
Konektory
Vzadu
Sít’ové
Dva konektory RJ-45 (pro integrované sít’ové
karty 1 Gb/s)
Sériový
9kolíkový, DTE, kompatibilní s normou
16550
USB
Dva 4kolíkové, USB 2.0
Video
15kolíkový VGA
Vpředu
Video
15kolíkový VGA
USB
Dva 4kolíkové, USB 2.0
Interní
USB
Dva 4kolíkové, USB 2.0
18
Začínáme se systémem
