Pioneer KRL-37V – page 3
Manual for Pioneer KRL-37V
Table of contents
- OPERATION MANUAL Contents
- Introduction
- Introduction
- Introduction Controlling other equipment using the supplied remote control unit Presetting manufacture codes Manufacture codes
- Introduction
- Using with other equipment (STB) Using with other equipment (VCR)
- Using with other equipment (DVD/DVR)
- Introduction
- Preparation
- Preparation CAUTION Cautions regarding the remote control unit
- Installation precautions
- Quick guide
- Quick guide Supplying power to the antenna Bundling the cables
- Checking signal strength and channel strength Confirm the following before turning on the power
- Watching TV Daily operation
- Watching TV EPG (Electronic Programme Guide) EPG Overview Useful settings for using EPG
- Selecting a programme using EPG
- Timer recording using EPG
- Using the MHEG-5 application (UK Teletext
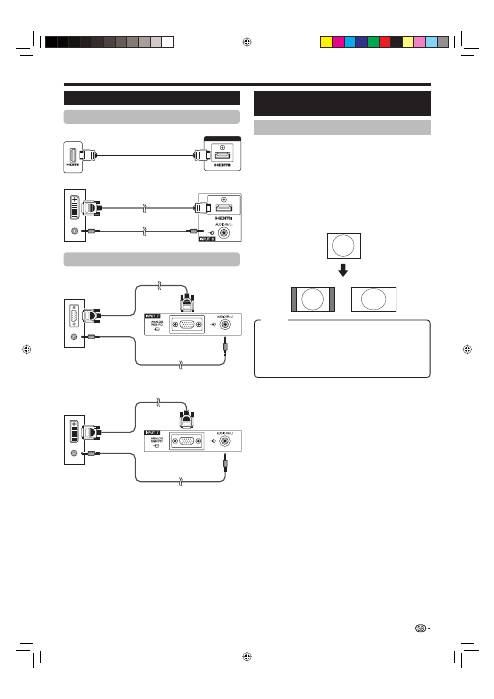
- Connecting external devices NOTE
- Connecting external devices HDMI connection Component connection S-VIDEO/VIDEO connection
- Controlling devices with SCART using i/o link.A SCART connection
- Speaker/amplifier connection
- Connecting external devices Inserting a smart card
- HDMI CONTROL Controlling HDMI devices using HDMI CONTROL
- HDMI CONTROL connection
- MODE D’EMPLOI
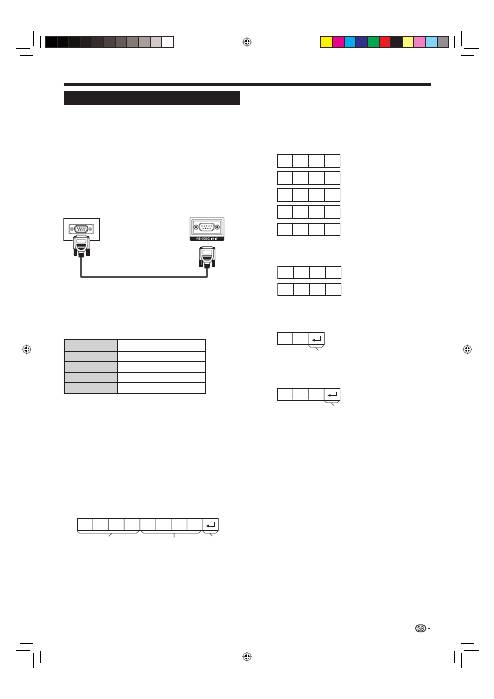
Connecting a PC
NOTE
The PC input terminals are DDC1/2B-compatible.
Refer to page 42 for a list of PC signals compatible with
the TV.
A Macintosh adaptor may be required for use for some
Macintosh computers.
When connecting to a PC, the input signal type is
automatically detected except 1,024
g
768 and 1,360
g
768 signals. Refer to
Selection input resolution
on page
40.
•
•
•
•
Analogue Connection
NOTE
Refer to page 35 for AV signals (480i/480p/576i/576p/
720p/1080i/1080p). The ANALOGUE RGB (PC) terminal
(INPUT7) is not compatible with 480i/576i/1080p signals.
•
Connecting a PC
HDMI Connection
Displaying a PC image on the
screen
Selecting the picture size
You can select the picture size.
Press
SCREEN SIZE
.
The
SCREEN SIZE
menu displays.
Press
SCREEN SIZE
or
a
/
b
to select a
desired item on the menu.
NOTE
Connect the PC before making adjustments.
Selectable picture size may vary with input signal type.
EXAMPLE
1
•
2
•
•
FULL:
An image fully fills the screen.
CINEMA:
For 14:9 letterbox pictures. Bars may appear
on the top and bottom with some programmes.
4:3:
Keeps the original aspect ratio in a full screen display.
Dot by Dot:
Displays an image with the same number of
pixels on the screen.
39
ø 3.5 mm stereo minijack cable
INPUT4 or 5
HDMI-certified cable
PC
INPUT6
DVI/HDMI cable
RGB cable
ø 3.5 mm stereo minijack cable
ø 3.5 mm stereo minijack cable
DVI/RGB conversion cable
4:3
FULL
Item
PC
INPUT7
PC
INPUT7
PC
KRL3237V_GB.indd 39
KRL3237V_GB.indd 39
2008/06/13 14:50:32
2008/06/13 14:50:32
Connecting a PC
Press
a
/
b
to select the specific adjustment
item.
Press
c
/
d
to adjust the item to the desired
position.
1
2
Reset
H-Pos. [
90]
a
b
a
b
a
b
a
b
V-Pos.
Clock
Phase
[ 39]
[ 90]
[ 20]
NOTE
You can only select the “Input Signal” on the “Setup” menu
when receiving one of the two input signals listed above.
•
1024 x 768
1360 x 768
(Example)
Fine Sync.
Setup
NOTE
For resetting all adjustment items to the factory preset
values, press
a
/
b
to select “Reset”, and then press
ENTER
.
“Clock” and “Phase” in the “Fine Sync.” menu can be
adjusted only when inputting analogue signals through the
INPUT7 terminal.
Selecting input resolution
Some input signals may have to be registered
manually to display properly.
The pairs of input signals (resolutions) in the list
below are not distinguishable when received. In such
cases, you have to set the correct signal manually.
After setting once, it will display when the same
signal (resolution) is input again.
•
•
•
•
Input Signal
Setup
30%
NOTE
When “Auto Sync.” is successful, “Auto Sync completed
successfully” displays. If not, “Auto Sync.” failed.
“Auto Sync.” may fail even if “Auto Sync completed
successfully” displays.
“Auto Sync.” may fail if the PC image has low resolution,
has unclear (black) edges, or is moved while executing
“Auto Sync.”.
Be sure to connect the PC to the TV and switch it on
before starting “Auto Sync.”.
“Auto Sync.” can be executed only when inputting
analogue signals through the INPUT7 terminal.
Adjusting the PC image manually
Ordinarily you can easily adjust the picture as
necessary to change image position using “Auto
Sync.”. In some cases, however, manual adjustment is
needed to optimise the image.
•
•
•
•
•
Auto Sync.
Setup
Adjusting the PC image
automatically
This function enables the screen to be automatically
adjusted to its best possible condition when the
analogue terminals of the TV and PC are connected
with a commercially available DVI/RGB conversion
cable, etc.
H-Pos.:
Centres the image by moving it to the left or
right.
V-Pos.:
Centres the image by moving it up or down.
Clock:
Adjusts when the image flickers with vertical
stripes.
Phase:
Adjusts when characters have low contrast or
when the image flickers.
40
Item
KRL3237V_GB.indd 40
KRL3237V_GB.indd 40
2008/06/13 14:50:34
2008/06/13 14:50:34
Connecting a PC
C1 C2 C3 C4 P1 P2 P3 P4
Communication conditions
Set the RS-232C communications settings on the PC
to match the TV’s communications conditions. The
TV’s communications settings are as follows:
Baud rate:
9,600 bps
Data length:
8 bits
Parity bit:
None
Stop bit:
1 bit
Flow control:
None
Communication procedure
Send the control commands from the PC via the RS-
232C connector.
The TV operates according to the received command
and sends a response message to the PC.
Do not send multiple commands at the same time.
Wait until the PC receives the OK response before
sending the next command.
Make sure to send “A” with the carriage return and
confirm that “ERR” returns before operating.
Command format
0
0
5
5
1
0
0
–
3
0
0
0
0
9
0
?
?
?
?
?
O
K
E
R
R
Response code format
RS-232C port specifications
PC Control of the TV
When a programme is set, the TV can be controlled
from the PC using the RS-232C terminal. The input
signal (PC/video) can be selected, the volume
can be adjusted and various other adjustments
and settings can be made, enabling automatic
programmed playing.
Use an RS-232C serial control cable (cross type)
(commercially available) for the connections.
NOTE
This operation system should be used by a person who is
accustomed to using PCs.
•
•
•
Parameter
Input the parameter values, aligning left, and fill with
blank(s) for the remainder (Be sure that four values are
input for the parameter).
When the input parameter is not within an adjustable
range, “ERR” returns (Refer to “Response code
format”).
When “?” is input for some commands, the present
setting value responds.
After sending the return code (0DH), make sure to
send the line feed (0AH) as well.
Command four-digits: Command. The text of four
characters.
Parameter four-digits: Parameter 0–9, blank, ?
41
RS-232C serial control cable
(cross type)
Eight ASCII codes
e
CR
Command four-digits
Parameter four-digits
Return code
Normal response
Problem response (communication error or incorrect
command)
Return code (0DH)
Return code (0DH)
KRL3237V_GB.indd 41
KRL3237V_GB.indd 41
2008/06/13 14:50:35
2008/06/13 14:50:35
Connecting a PC
NOTE
This TV has only limited PC compatibility, correct operation
can only be guaranteed if the video card conforms exactly
to the VESA 60 Hz standard. Any variations from this
standard will result in picture distortions.
•
CONTROL ITEM
COMMAND
PARAMETER
CONTROL CONTENTS
POWER SETTING
P
O W R
0
_
_
_
POWER OFF
INPUT SELECTION A
I
T
G D
_
_
_
_
INPUT SWITCHING (TOGGLE)
I
T
V
D
_
_
_
_
TV (CHANNEL FIXED)
I
D
T
V
_
_
_
_
DTV (CHANNEL FIXED)
I
A
V
D
*
_
_
_
INPUT1–8 (1–8)
CHANNEL
D
C
C
H
*
*
_
_
TV DIRECT CHANNEL (1–99)
C
H
U
P
_
_
_
_
CHANNEL UP
C
H
D W
_
_
_
_
CHANNEL DOWN
D
T
V
D
*
*
*
_
THREE DIGIT DTV DIRECT
CHANNEL (1–999) (Non-Nordic
countries)
D
T
V
D
*
*
*
*
FOUR DIGIT DTV DIRECT
CHANNEL (1–9999) (Nordic
countries only)
D
T
U
P
_
_
_
_
DTV CHANNEL UP
D
T
D W
_
_
_
_
DTV CHANNEL DOWN
INPUT SELECTION B
I
N
P
1
0
_
_
_
INPUT1 (Y/C)
I
N
P
1
1
_
_
_
INPUT1 (CVBS)
I
N
P
1
2
_
_
_
INPUT1 (RGB)
I
N
P
2
0
_
_
_
INPUT2 (Y/C)
I
N
P
2
1
_
_
_
INPUT2 (CVBS)
I
N
P
2
2
_
_
_
INPUT2 (RGB)
I
N
P
3
0
_
_
_
INPUT3
I
N
P
3
1
_
_
_
INPUT3 (S-VIDEO)
I
N
P
3
2
_
_
_
INPUT3 (VIDEO)
AV SELECTION
A
V M D
0
_
_
_
TOGGLE
A
V M D
1
_
_
_
STANDARD
A
V M D
2
_
_
_
MOVIE
A
V M D
3
_
_
_
GAME
A
V M D
4
_
_
_
USER
A
V M D
5
_
_
_
DYNAMIC (Fixed)
A
V M D
6
_
_
_
DYNAMIC
A
V M D
7
_
_
_
PC
A
V M D
8
_
_
_
x.v.Colour
A
V M D
?
?
?
?
1–8
VOLUME
V
O
L
M
*
*
_
_
VOLUME (0–60)
CONTROL ITEM
COMMAND
PARAMETER
CONTROL CONTENTS
POSITION
H
P
O
S
*
*
*
_
H-POSITION (AV/PC)
V
P
O
S
*
*
*
_
V-POSITION (AV/PC)
C
L
C
K
*
*
*
_
CLOCK (0–180)
P
H
S
E
*
*
_
_
PHASE (0–40)
SCREEN SIZE
W
I
D
E
0
_
_
_
TOGGLE (AV)
W
I
D
E
1
_
_
_
4:3 (AV)
W
I
D
E
2
_
_
_
CINEMA 14:9 (AV)
W
I
D
E
3
_
_
_
WIDE (AV)
W
I
D
E
4
_
_
_
FULL (AV)
W
I
D
E
5
_
_
_
ZOOM (AV)
W
I
D
E
6
_
_
_
CINEMA (AV)
W
I
D
E
7
_
_
_
4:3 (PC)
W
I
D
E
8
_
_
_
CINEMA (PC)
W
I
D
E
9
_
_
_
FULL (PC)
W
I
D
E
1
0
_
_
DOT by DOT (AV/PC)
W
I
D
E
1
1
_
_
UNDERSCAN (AV)
MUTE
M U
T
E
0
_
_
_
TOGGLE
M U
T
E
1
_
_
_
MUTE ON
M U
T
E
2
_
_
_
MUTE OFF
SURROUND
A
C
S
U
0
_
_
_
SURROUND TOGGLE
A
C
S
U
1
_
_
_
SURROUND ON
A
C
S
U
2
_
_
_
SURROUND OFF
AUDIO CHANGE
A
C
H
A
_
_
_
_
TOGGLE
SLEEP TIMER
O
F
T
M
0
_
_
_
OFF
O
F
T
M
1
_
_
_
SLEEP TIMER 30 MIN
O
F
T
M
2
_
_
_
SLEEP TIMER 1 HOUR
O
F
T
M
3
_
_
_
SLEEP TIMER 1 HOUR 30 MIN
O
F
T
M
4
_
_
_
SLEEP TIMER 2 HOUR
O
F
T
M
5
_
_
_
SLEEP TIMER 2 HOUR 30 MIN
TEXT
T
E
X
T
0
_
_
_
TEXT OFF
T
E
X
T
1
_
_
_
TEXT ON (TOGGLE)
D
C
P
G
*
*
*
_
DIRECT PAGE JUMP (100–899)
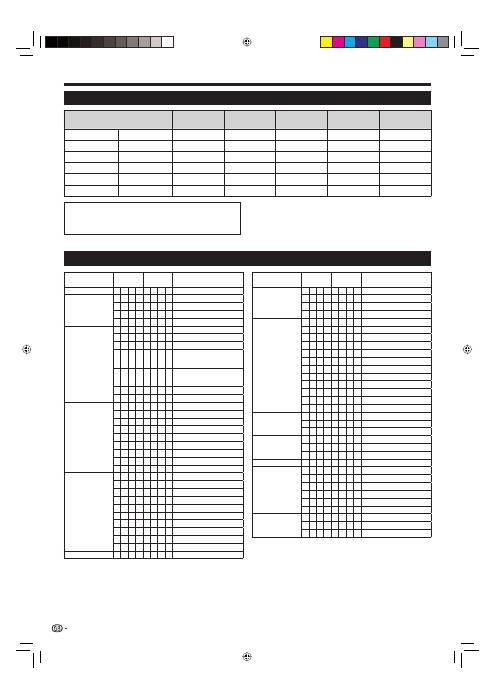
PC compatibility chart
Resolution
Horizontal
Frequency
Vertical
Frequency
Analogue (D-
Sub)
Digital (HDMI)
VESA
Standard
VGA
640
g
480
31.5 kHz
60 Hz
✔
✔
✔
SVGA
800
g
600
37.9 kHz
60 Hz
✔
✔
✔
XGA
1,024
g
768
48.4 kHz
60 Hz
✔
✔
✔
WXGA
1,360
g
768
47.7 kHz
60 Hz
✔
✔
✔
SXGA
1,280
g
1,024
64.0 kHz
60 Hz
✔
✔
✔
SXGA+
1,400
g
1,050
65.3 kHz
60 Hz
✔
✔
VGA, SVGA, XGA, WXGA, SXGA and SXGA+ are
registered trademarks of International Business
Machines Corporation.
RS-232C command list
42
KRL3237V_GB.indd 42
KRL3237V_GB.indd 42
2008/06/13 14:50:36
2008/06/13 14:50:36
Appendix
Troubleshooting
Problem
Possible Solution
No power.
•
Check if you pressed
a
(TV)
on the remote control unit.
If the indicator on the TV lights up red, press
a
(TV)
.
Is the AC cord disconnected?
Check if you pressed
a
on the TV.
•
•
•
The TV cannot be operated.
•
External influences such as lightning, static electricity, etc., may cause improper operation. In this
case, operate the TV after first turning off the power, or unplugging the AC cord and re-plugging
it in after one or two minutes.
•
Remote control unit does not operate.
•
Are batteries inserted with polarity (
e
,
f
) aligned?
Are batteries worn out? (Replace with new batteries.)
Are you using it under strong or fluorescent lighting?
Is a fluorescent light illuminating to the remote control sensor?
•
•
•
•
Picture is cut off.
•
Is the image position correct?
Are screen mode adjustments (
SCREEN SIZE
) such as picture size made correctly? (Pages 35
and 39)
•
•
Strange colour, light colour, or dark
colour, or colour misalignment.
•
Adjust the picture tone.
Is the room too bright? The picture may look dark in a room that is too bright.
Check the “Colour System” setting (Pages 33 and 38).
•
•
•
Power is suddenly turned off.
•
The TV’s internal temperature has increased.
Remove any objects blocking the vent or clean.
Is the “Sleep Timer” set? Select “Off” from the “Sleep Timer” menu (Page 32).
Is “No Signal Off” or “Ecology” activated?
•
•
•
No picture.
•
Are connections to external equipment correct? (Pages 21–23)
Is the input signal type selected correctly after connection? (Page 38)
Is the correct input source selected? (Page 16)
Is a non-compatible signal being input? (Page 42)
Is the picture adjustment correct? (Pages 30–31)
Is the antenna connected properly? (Page 14)
Is “On” selected in “Audio Only”? (Page 36)
•
•
•
•
•
•
•
No sound.
•
Is the volume too low?
Make sure that headphones are not connected.
Check if you pressed
e
on the remote control unit.
•
•
•
The TV sometimes makes a cracking
sound.
•
This is not a malfunction. This happens when the cabinet slightly expands and contracts
according to changes in temperature. This does not affect the TV’s performance.
•
Cautions regarding use in high and low temperature environments
When the TV is used in a low temperature space (e.g. room, office), the picture may leave trails or appear slightly delayed.
This is not a malfunction, and the TV will recover when the temperature returns to normal.
Do not leave the TV in a hot or cold location. Also, do not leave the TV in a location exposed to direct sunlight or near a
heater, as this may cause the cabinet to deform and the LCD panel to malfunction.
Storage temperature:
e
5 °C to
e
35 °C.
•
•
Information on the software license for this product
Software composition
The software included in this product is comprised of various software components whose individual copyrights are held by
Pioneer or by third parties.
Software developed by Pioneer and open source software
The copyrights for the software components and various relevant documents included with this product that were developed
or written by Pioneer are owned by Pioneer and are protected by the Copyright Act, international treaties, and other relevant
laws. This product also makes use of freely distributed software and software components whose copyrights are held by
third parties. These include software components covered by a GNU General Public License (hereafter GPL), a GNU Lesser
General Public License (hereafter LGPL) or other license agreement.
Obtaining source code
Some of the open source software licensors require the distributor to provide the source code with the executable software
components. GPL and LGPL include similar requirements. For information on obtaining the source code for the open source
software and for obtaining the GPL, LGPL, and other license agreement information, contact your local Pioneer Customer Service.
We are unable to answer any questions about the source code for the open source software. The source code for the
software components whose copyrights are held by Pioneer is not distributed.
Acknowledgements
The following open source software components are included in this product:
• linux kernel • modutils • glibc • zlib • libpng
43
KRL3237V_GB.indd 43
KRL3237V_GB.indd 43
2008/06/13 14:50:37
2008/06/13 14:50:37
Appendix
Download Setup
Digital Setup
Message List
Information
Go to “HOME MENU” > “Setup” > “Reset”.
Press
c
/
d
to select “Yes”, and then press
ENTER
.
“Now, TV will restart automatically. OK?” displays on
the screen.
Press
c
/
d
to select “Yes”, and then press
ENTER
.
“Now initialising...” displays on the screen and blinks.
After the reset has completed, the power shuts
off and then comes back on. The screen will have
returned to its original settings.
Now initialising...
1
2
•
3
•
•
Reset
Setup
Identification
Setup
Receiver Report
Information
Display reports regarding failures and changes for
timer settings.
Reset
If complex adjustments are made so that the settings
cannot be restored to normal, you can reset the
settings to the factory preset values.
Searching for updates*
All countries except UK and Sweden are set to “No”
for this function.
The TV automatically determines whether a new
software version is available when the TV is in standby
mode.
*
Updating your TV via DVB-T
Ensure that your TV software version is always up to
date. From time to time Pioneer will make updated TV
base software and DVB software available.
Yes:
Automatically searches for new software updates
available when the TV is in standby mode.
No:
Does not search for update information.
Now:
Checks if there is new software immediately.
Downloading the software
You can select the method of update.
If the software is updated, the confirmation
message “New download information has been
detected.” appears.
If the TV receives the update service while in standby
mode, a confirmation message displays after turning
on the power.
Follow the screen prompts.
1
•
2
Yes:
Starts downloading immediately. It takes
approximately one hour to update. You cannot carry
out other operations while downloading.
Cancels the download by pressing
ENTER
on the
remote control unit when “Discontinue” is displayed on
the screen during the update.
No:
Starts downloading automatically several minutes
after entering standby mode.
•
When new software is detected, you can confirm the
update information and download the software from
“Message List”.
NOTE
When the TV succeeds at downloading new software,
the message is updated in the “Message List” of the
“Information” menu.
The software update will not be carried out if there is no
new software available at the specified download time.
•
•
Identification
CLEARING THE PIN
Go to “HOME MENU” > “Setup”.
Press
a
/
b
to select “Auto Installation”,
“Programme Setup”, “Child Lock” or “Reset”,
and then press
ENTER
. The PIN input window
will display.
Press and hold both
i
k
and
P
k
on the TV
simultaneously until the message appears on
the screen.
1
2
3
You can check the TV ID on the screen for reporting to
customer service.
NOTE
The TV must remain in standby mode for download. Do not
turn off the power using
a
on the TV.
Updating the software may take some time.
•
•
44
Item
Item
KRL3237V_GB.indd 44
KRL3237V_GB.indd 44
2008/06/13 14:50:37
2008/06/13 14:50:37
Appendix
Specifications
Item
32
o
Flat screen TV,
Model: KRL-32V
37
o
Flat screen TV,
Model: KRL-37V
LCD panel
32
o
Advanced Super View & BLACK TFT LCD
37
o
Advanced Super View & BLACK TFT LCD
Resolution
2 073 600 pixels (1 920
g
1 080)
Video Colour System
PAL/SECAM/NTSC 3.58/NTSC 4.43/PAL 60
TV Function
TV-Standard
Analogue
CCIR (B/G, D/K, I, L/L’)
Digital
DVB-T (OFDM)
Receiving
Channel
VHF/UHF
E2–E12 ch (VHF), E21–E69 ch (UHF), F2–F10 ch, I21–I69 ch, IR A–IR J ch (Digital: E5–E69 ch)
CATV
Hyper-band, S1–S41 ch
TV-Tuning System
Auto Preset 999 ch: non-Nordic / 9999 ch: Nordic (ATV: 99 ch), Auto Label, Auto Sort
Audio
Analogue
NICAM/A2
Digital
MPEG AUDIO
Brightness
450 cd/m
2
Backlight life
60 000 hours (when “Backlight” is set to the default position)
Viewing angles
H: 176°, V: 176°
Audio Power
10 W
g
2
Speaker
(100 mm
g
40 mm)
g
2, Ø 20 mm
g
2
Terminals
Antenna
UHF/VHF 75
q
Din type (Analogue & Digital)
RS-232C
D-Sub 9 pin male connector
INPUT1
SCART (AV input, Y/C input, RGB input, TV output)
INPUT2
SCART (AV input/monitor output, Y/C input, AV Link, RGB input)
INPUT3
S-VIDEO (Y/C input), RCA pin (AV input)
INPUT4
HDMI
INPUT5
HDMI
INPUT6
HDMI, Ø 3.5 mm jack
INPUT7
15 pin mini D-sub, Ø 3.5 mm jack
INPUT8
COMPONENT IN: Y/P
B
(C
B
)/P
R
(C
R
), RCA pin (AUDIO R/L)
DIGITAL AUDIO OUTPUT
Optical SPDIF Digital audio output
C. I. (Common Interface)
EN50221, R206001
OUTPUT
RCA pin (AUDIO R/L)
Headphones
Ø 3.5 mm jack (Audio output)
OSD language
Czech, Danish, Dutch, English, Estonian, Finnish, French, German, Greek, Hungarian, Italian,
Latvian, Lithuanian, Norwegian, Polish, Portuguese, Russian, Slovak, Slovene, Spanish,
Swedish, Turkish
Power Requirement
AC 220–240 V, 50 Hz
Power Consumption
140 W (0.4 W Standby) (Method IEC62087)
171 W (0.4 W Standby) (Method IEC62087)
Weight
15.0 kg (Without stand), 18.0 kg (With stand)
18.0 kg (Without stand), 21.0 kg (With stand)
Operating temperature
0 °C to
e
40 °C
As a part of our policy of continuous improvement, Pioneer reserves the right to make design and specification
changes for product improvement without prior notice. The performance specification figures indicated are
nominal values of production units. There may be some deviations from these values in individual units.
NOTE
Refer to the inside back cover for dimensional drawings.
•
•
45
KRL3237V_GB.indd 45
KRL3237V_GB.indd 45
2008/06/13 14:50:39
2008/06/13 14:50:39
Information for users on collection and disposal of old equipment and used batteries
These symbols on the products, packaging, and/or
accompanying documents mean that used electrical and
electronic products and batteries should not be mixed with general household waste.
For proper treatment, recovery and recycling of old products and used batteries, please take them to
applicable collection points in accordance with your national legislation.
By disposing of these products and batteries correctly, you will help to save valuable resources and prevent any
potential negative effects on human health and the environment which could otherwise arise from inappropriate waste
handling.
For more information about collection and recycling of old products and batteries, please contact your local
municipality, your waste disposal service or the point of sale where you purchased the items.
These symbols are only valid in the European Union.
For countries outside the European Union:
If you wish to discard these items, please contact your local authorities or dealer and ask for the correct method of
disposal.
(Symbol examples for
batteries)
Rating table for Child Lock
AGE
4
5
6
7
8
9
10
11
12
13
14
15
16
17
18
Universal viewing
✔
—
—
—
—
—
—
—
—
—
—
—
—
—
—
Parental approval pref.
✔
✔
✔
✔
✔
—
—
—
—
—
—
—
—
—
—
X-rated
✔
✔
✔
✔
✔
✔
✔
✔
✔
✔
✔
✔
✔
✔
✔
Universal viewing
Parental approval pref.
X-rated
Universal viewing
—
—
—
Parental approval pref.
✔
—
—
X-rated
✔
✔
—
End of life disposal
(Symbol for equipment)
46
User-
adjusted rating
Broadcasted
rating
User-
adjusted rating
Broadcasted
rating
KRL3237V_GB.indd 46
KRL3237V_GB.indd 46
2008/06/13 14:50:39
2008/06/13 14:50:39

Memo
47
KRL3237V_GB.indd 47
KRL3237V_GB.indd 47
2008/06/13 14:50:41
2008/06/13 14:50:41

Memo
48
KRL3237V_GB.indd 48
KRL3237V_GB.indd 48
2008/06/13 14:50:41
2008/06/13 14:50:41

MODE D’EMPLOI
Table des matières ............................................................ 1
Introduction ........................................................................ 2
Cher client Pioneer ........................................................ 2
Précautions de sécurité importantes ............................. 2
Télécommande ............................................................. 3
Commande d’autres appareils au
moyen de la télécommande fournie ....................... 4
Marques ....................................................................... 8
Téléviseur (Vue de face)................................................. 9
Téléviseur (Vue de dos) ................................................. 9
Préparation ...................................................................... 10
Accessoires fournis ..................................................... 10
Pose de l’ensemble du socle ...................................... 10
Insertion des piles ....................................................... 11
Utilisation de la télécommande .................................... 11
Précautions sur la télécommande .......................... 11
Précautions de montage ........................................ 12
Guide rapide ..................................................................... 13
Présentation de la première mise en service ................ 13
Avant de mettre le téléviseur sous tension ................... 14
Assemblage des câbles ......................................... 14
Auto installation initiale ................................................ 15
Vérification de la force du signal
et de la force du canal ......................................... 15
Regarder la télévision ..................................................... 16
Opérations quotidiennes ............................................. 16
Mise sous/hors tension .......................................... 16
Commutation entre les chaînes analogiques et
numériques ......................................................... 16
Changement de canal ............................................ 16
Sélection d’une source vidéo externe ..................... 16
Sélection du mode sonore ..................................... 16
EPG (Electronic Programme Guide =
guides des programmes électronique) ...................... 17
Aperçu d’EPG ............................................................. 17
Réglages pratiques pour utiliser EPG .......................... 17
Sélection d’un programme à l’aide d’EPG ................... 18
Enregistrement par minuterie à l’aide d’EPG ............... 19
Annuler l’enregistrement programmé........................... 19
Télétexte ..................................................................... 20
Utilisation de l’application MHEG-5
(Royaume-Uni uniquement) ...................................... 20
Raccordement d’appareils externes ............................. 21
Présentation des branchements .................................. 21
Connexion HDMI ................................................... 22
Connexion Composantes ...................................... 22
Connexion S-VIDEO/VIDEO ................................... 22
Connexion PÉRITEL ............................................... 23
Contrôle des appareils PÉRITEL avec i/o link.A ...... 23
Raccordement d’enceinte/amplificateur ................. 24
Insertion d’une carte à mémoire .................................. 25
HDMI CONTROL .............................................................. 26
Commande d’appareils HDMI à l’aide d’HDMI
CONTROL ................................................................ 26
Connexion HDMI CONTROL ....................................... 27
Réglage HDMI CONTROL ........................................... 27
Commande d’un appareil HDMI CONTROL ................ 28
Utilisation des menus ...................................................... 29
Qu’est-ce que le HOME MENU ? ................................ 29
Opérations courantes ............................................ 29
Réglage de base .............................................................. 30
Réglages de l’image.................................................... 30
AV SELECTION ...................................................... 31
Réglages du son ......................................................... 31
Réglages de l’économie d’énergie .............................. 31
Réglages des canaux numériques ......................... 32
Réglages des canaux analogiques ......................... 33
Réglages du mot de passe/contrôle parental ......... 34
Réglages de la langue (langue, sous-titre, multi audio) ... 34
Fonctions de visualisation pratiques ............................. 35
Sélection de la taille d’image ....................................... 35
Sélection automatique de la taille d’image WSS
(Signalisation grand écran)................................... 35
Sélection manuelle de la taille d’image WSS
(Signalisation grand écran)................................... 35
Sélection manuelle de la taille d’image ................... 35
Sélection manuelle de la taille d’image
d’enregistrement ................................................. 36
Sélection automatique de la taille d’image HDMI .... 36
Autres réglages Image et Audio .................................. 36
Réglage de la position de l’image ........................... 36
Réduction du bruit à l’écran ................................... 36
Réglage automatique du volume ............................ 36
Accentuation des dialogues ................................... 36
Sortie audio uniquement ........................................ 36
Réglages de l’affichage ............................................... 37
Affichage du canal ................................................. 37
Affichage de l’heure et de la date ........................... 37
Autres fonctions pratiques ............................................. 38
Réglage lors de l’utilisation d’appareils externes .......... 38
Réglages de la source d’entrée .............................. 38
Omission d’entrée spécifique ................................. 38
Réglages du système couleur ................................ 38
Fonctionnalités supplémentaires ................................. 38
Branchement d’un ordinateur ........................................ 39
Branchement d’un ordinateur...................................... 39
Affichage de l’image d’un ordinateur
sur l’écran du téléviseur ............................................ 39
Sélection de la taille de l’image .............................. 39
Réglage automatique de l’image de l’ordinateur ..... 40
Réglage manuel de l’image de l’ordinateur ............. 40
Sélection de la résolution d’entrée .............................. 40
Spécifications du port RS-232C .................................. 41
Tableau des ordinateurs compatibles .......................... 42
Liste de commande RS-232C ..................................... 42
Annexe .............................................................................. 43
Guide de dépannage .................................................. 43
Mise à jour du téléviseur via DVB-T ............................. 44
Réinitial. ...................................................................... 44
Identification................................................................ 44
Fiche technique .......................................................... 45
Mise au rebut en fin de vie .......................................... 46
FRANÇAIS
Les illustrations et l’OSD (On-Screen Display = affichages à l’écran) dans ce mode d’emploi sont fournis à titre explicatif et
peuvent être légèrement différents des opérations réelles.
Les exemples utilisés dans ce mode d’emploi reposent sur le modèle KRL-37V.
•
•
Table des matières
1
FRANÇAIS
KRL3237V_FR.indd 1
KRL3237V_FR.indd 1
2008/06/13 14:47:12
2008/06/13 14:47:12
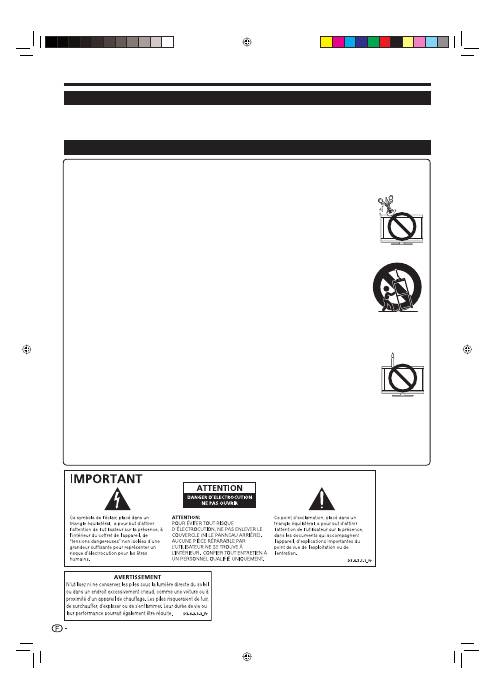
Nettoyage — Débranchez le cordon secteur de la prise électrique avant de nettoyer l’appareil. Utilisez un chiffon mouillé
pour le nettoyer. N’utilisez pas de produits nettoyant liquides ou en aérosols.
Eau et humidité — N’utilisez pas l’appareil à proximité de l’eau, près d’une baignoire, d’un lavabo, d’un évier, d’une
machine à laver, d’une piscine et dans un sous-sol humide.
Ne placez pas de vases ou tout autre récipient rempli d’eau sur cet appareil.
L’eau pourrait se renverser sur celui-ci et entraîner un incendie ou une électrocution.
Support — Ne placez pas l’appareil sur un chariot, un support, un trépied ou une table instable. Ceci
risquerait de causer la chute de l’appareil et de provoquer par là des blessures graves et d’endommager
l’appareil. Utilisez uniquement un chariot, un support, un trépied, une applique ou une table
recommandés par le fabriquant ou vendus avec l’appareil. Pour monter l’appareil sur un mur, suivez les
instructions du fabricant. N’utilisez que du matériel recommandé par ce dernier.
Pour déplacer l’appareil placé sur un chariot, procédez au transport avec précaution. Des arrêts brusques,
une force excessive ou des irrégularités de la surface du sol peuvent provoquer la chute de l’appareil.
Ventilation — Les évents et autres ouvertures du coffret sont destinés à la ventilation. Ne les recouvrez
pas et ne les bloquez pas car une ventilation insuffisante risque de provoquer une surchauffe et/ou de
réduire la durée de vie de l’appareil. Ne placez pas l’appareil sur un lit, un sofa, un tapis ou une autre
surface similaire risquant de bloquer les ouvertures de ventilation. Ce produit n’est pas conçu pour être
encastré ; ne le placez pas dans des endroits clos comme une bibliothèque ou une étagère, sauf si une
ventilation adéquate est prévue ou si les instructions du fabricant sont respectées.
Le panneau LCD utilisé dans cet appareil est en verre. Il peut donc se briser s’il tombe ou s’il subit un
choc. Veillez à ne pas vous blesser avec des éclats de verre si le panneau LCD vient à se briser.
Sources de chaleur — Éloignez l’appareil des sources de chaleur comme les radiateurs, les chauffages et autres appareils
produisant de la chaleur (y compris les amplificateurs).
Afin d’empêcher tout incendie, ne placez jamais une bougie ou autres flammes nues au dessus ou près de l’ensemble du
téléviseur.
Afin d’empêcher tout incendie ou électrocution, ne placez pas le cordon secteur sous l’ensemble du
téléviseur ou autres objets volumineux.
N’affichez pas une image fixe pendant une période prolongée, sous peine de laisser une image rémanente à l’écran.
Il y a toujours consommation d’énergie si la prise principale est branchée.
Entretien — Ne tentez pas de procéder vous-même à l’entretien de l’appareil. La dépose des couvercles
risque de vous exposer à de hautes tensions et d’autres situations dangereuses. Faites appel à un
technicien qualifié pour l’entretien.
Le panneau LCD est un appareil de très haute technologie vous offrant des détails fins de l’image.
Dû au grand nombre de pixels, un certain nombre de pixels non actifs peuvent apparaître occasionnellement à l’écran sous la
forme de point fixe bleu, vert ou rouge. Ceci rentre dans les spécifications du produit et ne constitue pas un défaut.
Précautions lors du transport du téléviseur
Lors du transport du téléviseur, ne le transportez pas en le tenant par les haut-parleurs. Veillez à toujours le transporter à
deux, en le tenant à deux mains — une main de chaque côté du téléviseur.
•
•
•
•
•
•
•
•
•
•
•
•
•
Introduction
Cher client Pioneer
Nous vous remercions pour votre achat de ce téléviseur à écran plat Pioneer. Pour en assurer la sécurité et le bon
fonctionnement pendant de longues années, veuillez lire attentivement les Précautions de sécurité importantes
avant de l’utiliser.
Précautions de sécurité importantes
2
KRL3237V_FR.indd 2
KRL3237V_FR.indd 2
2008/06/13 14:47:13
2008/06/13 14:47:13
Introduction
TV
DTV
RADIO
1
2
3
4
5
6
7
8
TV
INPUT
4
5
6
7
8
9
1
2
3
0
P.INFO
INFO
P
CH RETURN
EXIT
DVD TOPMENU/
GUIDE
EPG
ENTER
HOME
MENU
MENU
RETURN
CTRL
HDMI
REC STOP
HDD
AV
SELECTION
CM SKIP
DVD
TOOLS
SCREEN
SIZE
SOURCE
TV
STB DVR VCR
DVD
SELECT
1
2
3
4
12
5
7
9
11
13
10
6
8
14
19
20
15
17
18
21
22
16
a
(TV) (Attente/Marche)
(Page 16)
INPUT1–8
Sélectionne une source d’entrée
(Page 16).
Touches de changement de
mode
TV
Appuyez sur cette touche pour
accéder au mode télévision
analogique traditionnel.
DTV
Appuyez sur cette touche pour
accéder au mode télévision numérique.
RADIO
DTV : Bascule entre le mode Radio
et Données.
Lorsque seule la diffusion des
données (pas de radiodiffusion)
est transmise par DVB, la
radiodiffusion est sautée.
Touches numériques 0–9
Pour sélectionner le canal.
Entrez les numéros de votre choix.
Règle la page en mode Télétexte.
Si vous sélectionnez les cinq pays
nordiques (la Suède, la Norvège, la
Finlande, le Danemark ou l’Islande)
pour le réglage Pays dans le menu
« Autoinstallation » (page 32), les services
DTV sont de quatre chiffres. Pour les
autres pays, ils sont de trois chiffres.
p
(INFO)
Appuyez sur cette touche pour afficher
les informations sur la chaîne (numéro
de canal, signal, etc.) dans le coin
supérieur droit de l’écran (Page 37).
CH RETURN
Appuyez sur cette touche pour
revenir à l’entrée externe ou au canal
précédemment sélectionné.
P
k
/
l
(
e
/
f
)
Sélectionne le canal télévisé.
Sélectionne la page en mode Télétexte.
e
(Sourdine)
Marche/arrêt du son du téléviseur.
g
(EXIT)
Pour quitter l’écran « HOME MENU ».
a
/
b
/
c
/
d
(Curseur)
Sélectionne la rubrique désirée sur
l’écran de réglage.
ENTER
Exécute une commande au sein de
l’écran du « HOME MENU ».
ATV/DTV : Affiche la liste des
émissions lorsqu’aucun autre écran
du « HOME MENU » n’est exécuté.
h
(HOME MENU)
Marche/arrêt de l’écran du « HOME
MENU ».
1
2
3
•
4
•
5
6
7
8
9
0
Q
Touches pour les opérations
pratiques
1
(Sous-page)
(Page 20)
[
(Sous-titre)
Active/désactive les langues des
sous-titres (Pages 20 et 34).
k
(Révèle le télétexte masqué)
(Page 20)
3
(Geler/Maintenir)
Appuyez sur cette touche pour faire
un arrêt sur image sur une image
animée.
Télétexte : Interrompt la mise à jour
automatique des pages télétexte ou
libère le mode de maintien.
m
(Télétexte)
ATV : Affiche le télétexte analogique
(Page 20).
DTV : Sélectionne MHEG-5 et le
télétexte pour la télévision numérique
(DTV) (Page 20).
P. INFO
Appuyez sur cette touche pour
afficher les informations sur les
émissions transmises par diffusion
vidéo numérique dans le coin
supérieur gauche de l’écran (DTV
uniquement).
i
k
/
l
(Volume)
Augmente/baisse le volume sonore
du téléviseur.
EPG
DTV : Affiche l’écran EPG (Pages
17–19).
6
(RETURN)
Revient à l’écran du « HOME
MENU » précédent.
Touches pour HDMI CONTROL
Si un appareil externe est raccordé
par l’intermédiaire de câbles HDMI
et est compatible avec HDMI
CONTROL, vous pouvez utiliser ces
touches HDMI CONTROL. Voir page
26 et 28 pour les détails.
Touches pour les réglages
d’image
SCREEN SIZE
Sélectionne une taille d’écran (Pages
35 et 39).
AV SELECTION
Sélectionne un réglage vidéo (Page 31).
SELECT
Commute la sélection entre
TV
,
STB
,
DVD/DVR
et
VCR
, pour vous
permettre de commander, au moyen
de la télécommande fournie, d’autres
appareils raccordés (Page 4–7).
t
(Mode sonore)
Sélectionne le mode son multiplex
(Page 16).
R
T
Y
U
I
O
P
A
S
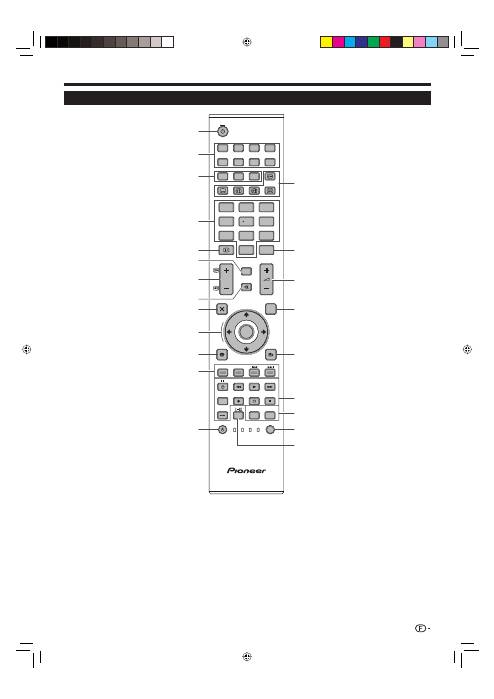
Télécommande
Touches de couleur (Rouge/
Verte/Jaune/Bleue)
Les touches de couleur servent à
sélectionner les rubriques colorées
équivalentes sur l’écran (EPG,
MHEG-5, Télétexte par ex.).
a
(SOURCE)
(Page 6–7)
W
E
REMARQUE
Maintenez enfoncés
9
et
18
de la télécommande pour afficher la démonstration « 100Hz » dans un double écran.
•
3
KRL3237V_FR.indd 3
KRL3237V_FR.indd 3
2008/06/13 14:47:16
2008/06/13 14:47:16
Introduction
Commande d’autres appareils
au moyen de la télécommande
fournie
Vous pouvez commander d’autres appareils raccordés
au moyen de la télécommande fournie : un boîtier
décodeur (STB), un lecteur DVD, un enregistreur DVD/
HDD (DVR), un lecteur BD ou un magnétoscope.
Avant d’utiliser cette fonction, il est nécessaire de
programmer la télécommande fournie avec le code
fabricant de l’appareil que vous souhaitez commander.
Pour commander l’appareil, appuyez sur
SELECT
de
la télécommande pour sélectionner le mode convenant
à l’appareil ; la sélection passe de
TV
,
STB
,
DVD/
DVR
à
VCR
. Les témoins de mode correspondant
sur la télécommande indiquent le mode actuellement
sélectionné.
CTRL
HDMI
REC STOP
HDD
AV
SELECTION
CM SKIP
DVD
TOOLS
SCREEN
SIZE
SOURCE
TV
STB DVR VCR
DVD
SELECT
REMARQUE
Pour commander un lecteur BD, sélectionnez le
mode DVD/DVR.
Programmation des codes fabricant
Appuyez sur
SELECT
de la télécommande pour
sélectionner le mode STB, DVD/DVR ou VCR
selon l’appareil.
Après avoir confirmé que le témoin du mode
précédemment sélectionné est éteint, maintenez
enfoncé
SELECT
, puis appuyez sur
1
de la
télécommande.
Le témoin de mode correspondant clignote.
Appuyez sur
0
–
9
pour saisir le code fabricant à
trois chiffres.
Consultez la liste des codes fabricant afin de trouver
un code adéquat. Le témoin de mode s’allume
pendant environ une seconde, puis s’éteint ; la
programmation du code fabricant est terminée.
EXIT
DVD TOPMENU/
GUIDE
EPG
4 5 6
7 8 9
0
P.INFO
1 2 3
INFO
SOURCE
TV
STB DVR VCR
DVD
SELECT
CTRL
HDD
AV
SELECTION
CM SKIP
DVD
TOOLS
SCREEN
SIZE
•
1
2
•
3
•
REMARQUE
Si vous n’effectuez aucune opération pendant
environ une minute, alors qu’un témoin de mode
clignote, la procédure de programmation de code
est annulée.
Si vous saisissez un code ne figurant pas dans le
tableau, un témoin de mode clignote rapidement
pendant environ une seconde, puis se remet à
clignoter normalement.
Pour quitter la procédure de programmation du
code pendant qu’un témoin de code clignote, vous
pouvez appuyer sur
SELECT
de la télécommande.
Les codes fabricant par défaut pour les modes STB,
DVD/DVR et VCR sont respectivement « 000 »,
« 100 » et « 500 ».
Codes fabricant
Il se peut que vous ne puissiez pas commander en
partie ou en totalité tous les appareils figurant dans
les tableaux au moyen de la télécommande fournie.
Boîtier décodeur (STB)
000
PIONEER 1 (par défaut)
001
PIONEER 2
002
CANAL SATELLITE
003
HUMAX
004
PACE 1
005
PACE 2
006
QUALI-TV
007
SKY DIGITAL
DVD
100
PIONEER 1 (par défaut)
101
PIONEER 2
102
AKAI
103
DENON
104
HITACHI
105
JVC
106
KENWOOD 1
107
KENWOOD 2
108
PANASONIC 1
109
PANASONIC 2
110
PHILIPS 1
111
PHILIPS 2
112
SAMSUNG
113
SHARP
114
SONY 1
115
SONY 2
116
SONY 3
117
THOMSON
118
TOSHIBA
119
YAMAHA
•
•
•
•
*
4
KRL3237V_FR.indd 4
KRL3237V_FR.indd 4
2008/06/13 14:47:17
2008/06/13 14:47:17
Introduction
DVR
200
PIONEER 1
201
PIONEER 2
202
PIONEER 3
203
PANASONIC
204
PHILIPS 1
205
PHILIPS 2
206
SHARP
207
SONY
208
TOSHIBA
BD
300
PIONEER
301
LG
302
PANASONIC
303
SAMSUNG
304
SONY
305
TOSHIBA
Magnétoscope
500
PIONEER 1 (par défaut)
501
PIONEER 2
502
AIWA 1
503
AIWA 2
504
AKAI 1
505
AKAI 2
506
AKAI 3
507
DAEWOO
508
GRUNDIG 1
509
GRUNDIG 2
510
GRUNDIG 3
511
GRUNDIG 4
512
HITACHI 1
513
HITACHI 2
514
HITACHI 3
515
JVC 1
516
JVC 2
517
JVC 3
518
JVC 4
519
JVC 5
520
LOEWE 1
521
LOEWE 2
522
MATSUI
523
ORION
524
PANASONIC 1
525
PANASONIC 2
526
PHILIPS 1
Magnétoscope
527
PHILIPS 2
528
PHILIPS 3
529
SANYO
530
SAMSUNG 1
531
SAMSUNG 2
532
SAMSUNG 3
533
SAMSUNG 4
534
SHARP
535
SONY 1
536
SONY 2
537
SONY 3
538
SONY 4
539
SONY 5
540
SONY 6
541
SONY 7
542
THOMSON
543
TOSHIBA
5
KRL3237V_FR.indd 5
KRL3237V_FR.indd 5
2008/06/13 14:47:18
2008/06/13 14:47:18
Introduction
Utilisation de la télécommande avec un autre appareil (STB)
Touches de commande STB (Boîtier
décodeur)
En mode STB, les touches de la télécommande
fonctionnent comme suit.
0–9
Fonctionnent comme des touches numériques.
INFO
Appuyez sur cette touche pour afficher les informations
sur l’émission actuelle.
P
k
/
l
Appuyez sur cette touche pour syntoniser sur une chaîne
supérieure ou inférieure.
EXIT
Appuyez sur cette touche pour quitter l’écran de menu
des émissions ou l’écran du guide des émissions.
ENTER
Appuyez sur cette touche pour activer la fonction sélectionnée.
a
/
b
/
c
/
d
Appuyez sur cette touche pour sélectionner les éléments sur
l’écran de menu des émissions ou l’écran du guide des émissions.
MENU
Appuyez sur cette touche pour afficher l’écran de menu
des émissions.
SOURCE
a
Active ou désactive le boîtier décodeur.
GUIDE
Appuyez sur cette touche pour afficher l’écran du guide
des émissions.
RETURN
Lorsque l’écran de menu des émissions est affiché,
appuyez sur cette touche pour rétablir l’écran
immédiatement précédent.
E
1
2
3
4
5
6
7
8
9
TV
DTV
RADIO
4
5
6
7
8
9
1
2
3
0
P.INFO
INFO
P
CH RETURN
CTRL
HDMI
REC STOP
HDD
AV
SELECTION
CM SKIP
DVD
TOOLS
SCREEN
SIZE
SOURCE
TV
STB DVR VCR
DVD
SELECT
TV
DTV
RADIO
P.INFO
INFO
CH RETURN
CTRL
HDMI
REC STOP
HDD
AV
SELECTION
CM SKIP
DVD
TOOLS
SCREEN
SIZE
TV
STB DVR
DVD
SELECT
5
3
4
7
6
2
1
Utilisation de la télécommande avec un autre appareil (magnétoscope)
TV
DTV
RADIO
4
5
6
7
8
9
1
2
3
0
P.INFO
INFO
P
CH RETURN
EXIT
DVD TOPMENU/
GUIDE
EPG
ENTER
HOME
MENU
MENU
RETURN
SOURCE
TV
STB DVR VCR
DVD
SELECT
TV
DTV
RADIO
P.INFO
CH RETURN
TV
DVR VCR
DVD
SELECT
1
2
3
4
6
7
5
8
9
Touches de commande du
magnétoscope (VCR)
En mode VCR, les touches de la télécommande
fonctionnent comme suit.
0–9
Fonctionnent comme des touches numériques.
P
k
/
l
Appuyez sur cette touche pour sélectionner les chaînes
du tuner TV sur le magnétoscope.
l
(PAUSE/IMAGE FIXE)
Suspend la lecture et fige les images.
p
(ENR)
Lance l’enregistrement.
SOURCE
a
Allume ou éteint le magnétoscope.
m
(REMBOBINAGE)
Rembobine la cassette et permet la recherche d’image.
n
(LECTURE)
Lance la lecture.
o
(AVANCE RAPIDE)
Avance rapidement la cassette et permet la recherche
d’image.
r
(ARRÊT)
Arrête la lecture.
E
1
2
3
4
5
6
7
6
KRL3237V_FR.indd 6
KRL3237V_FR.indd 6
2008/06/13 14:47:18
2008/06/13 14:47:18
Utilisation de la télécommande avec un autre appareil (DVD/DVR)
Touches de commande du DVD/DVR
En mode DVD/DVR, les touches de la télécommande
fonctionnent comme suit.
0–9
Fonctionnent comme des touches numériques.
P
k
/
l
(Enregistreur DVD/HDD (DVR) uniquement)
Appuyez sur cette touche pour modifier la chaîne du
tuner intégré dans l’enregistreur DVD/HDD (DVR).
ENTER
Appuyez sur cette touche pour activer la fonction sélectionnée.
a
/
b
/
c
/
d
Appuyez sur cette touche pour sélectionner des éléments
sur l’écran de menu du DVD.
MENU
Appuyez sur cette touche pour afficher le menu du DVD.
l
(PAUSE/IMAGE FIXE)
Suspend la lecture et fige les images.
p
(ENR) (Enregistreur DVD/HDD (DVR) uniquement)
Lance l’enregistrement.
TOOLS (Lecteur BD Pioneer uniquement)
Appuyez sur cette touche pour afficher le menu « TOOLS ».
SOURCE
a
Met sous ou hors tension le lecteur DVD ou l’enregistreur
DVD/HDD (DVR).
DVD TOP MENU
Le menu supérieur du DVD apparaît lorsque vous
appuyez sur cette touche.
RETURN
Lorsque le menu du DVD est affiché, appuyez sur cette
touche pour rétablir l’écran immédiatement précédent.
j
(RECHERCHE DE CHAPITRE)
À chaque pression sur cette touche, vous reculez au
début du chapitre précédent.
k
(RECHERCHE DE CHAPITRE)
À chaque pression sur cette touche, vous avancez au
début du chapitre suivant.
m
(BALAYAGE)
Appuyez sur cette touche pour reculer.
n
(LECTURE)
Lance la lecture.
o
(BALAYAGE)
Appuyez sur cette touche pour effectuer une avance rapide.
r
(ARRÊT)
Appuyez sur cette touche pour arrêter la lecture
ou l’enregistrement. Avec certains lecteurs DVD ou
enregistreurs DVD/HDD (DVR), si vous appuyez deux fois
sur cette touche, le plateau de disque peut s’ouvrir.
REC STOP (Enregistreur DVD/HDD (DVR)
uniquement)
Appuyez sur
p
et
r
simultanément pour arrêter
l’enregistrement. Cette opération n’est disponible que
pour les enregistreurs DVD/HDD (DVR) Pioneer et Sony.
HDD (Enregistreur DVD/HDD (DVR) uniquement)
Appuyez sur cette touche pour sélectionner le disque dur
(HDD) pour lecture ou enregistrement.
DVD (Enregistreur DVD/HDD (DVR) uniquement)
Appuyez sur cette touche pour sélectionner le DVD pour
lecture ou enregistrement.
REMARQUE
Vous pouvez commander un lecteur BD en mode DVD/DVR.
Le lecteur DVD, l’enregistreur DVD/HDD (DVR) ou le lecteur
BD ne peuvent pas être sélectionnés simultanément.
E
1
2
3
4
5
6
7
8
9
0
Q
W
E
R
T
Y
•
•
TV
DTV
RADIO
1
2
3
4
5
6
7
8
TV
INPUT
4
5
6
7
8
9
1
2
3
0
P.INFO
INFO
P
CH RETURN
EXIT
DVD TOPMENU/
GUIDE
EPG
ENTER
HOME
MENU
MENU
RETURN
CTRL
HDMI
REC STOP
HDD
AV
SELECTION
CM SKIP
DVD
TOOLS
SCREEN
SIZE
SOURCE
TV
STB DVR VCR
DVD
SELECT
TV
DTV
RADIO
1
2
3
4
5
6
7
8
TV
INPUT
P.INFO
INFO
CH RETURN
EXIT
CTRL
HDMI
REC STOP
CM SKIP
TV
STB
VCR
SELECT
1
4
8
5
6
7
3
9
10
14
15
12
11
13
16
2
Introduction
7
KRL3237V_FR.indd 7
KRL3237V_FR.indd 7
2008/06/13 14:47:21
2008/06/13 14:47:21
Introduction
Marques
« HDMI, le logo HDMI et High-Definition Multimedia Interface sont des marques de
commerce ou des marques déposées de HDMI Licensing LLC. »
•
Fabriqué sous licence de Dolby Laboratories.
« Dolby » et le sigle double-D sont des marques de commerce de Dolby
Laboratories.
•
•
TruSurround XT, SRS et le
h
symbole sont des marques déposées de SRS
Labs, Inc.
TruSurround XT technologie est incorporé sous licence de SRS Labs, Inc.
•
•
Le logo « HD ready 1080P » est une marque de commerce de EICTA.
•
Le logo DVB est une marque déposée du projet DVB (Digital Video Broadcasting).
•
« x.v.Colour » et
sont des marques de Sony Corporation.
•
8
KRL3237V_FR.indd 8
KRL3237V_FR.indd 8
2008/06/13 14:47:22
2008/06/13 14:47:22
Introduction
12
13
14
7
8
9
10
11
1
2
3
4
5
6
15
16
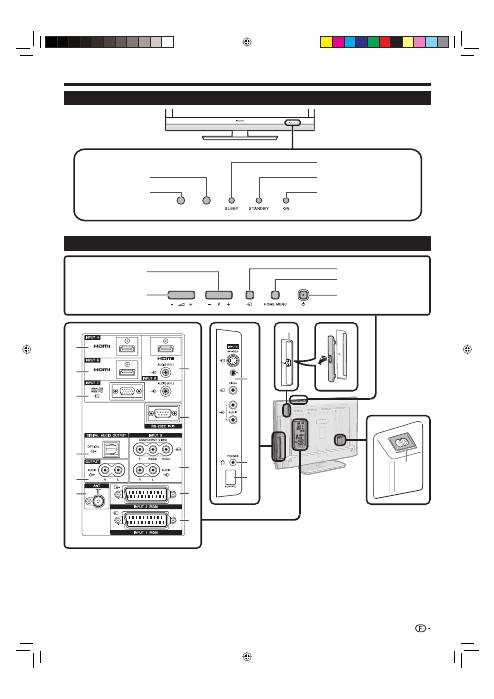
Prise INPUT4 (HDMI)
Prise INPUT5 (HDMI)
Prises INPUT7 (ANALOGUE RGB/
AUDIO)
Prise DIGITAL AUDIO OUTPUT
Prises OUTPUT (AUDIO)
Prise ANT (antenne)
1
2
3
4
5
6
Téléviseur (Vue de face)
Téléviseur (Vue de dos)
Prises INPUT6 (HDMI/AUDIO)
Prise RS-232C
Prises INPUT8 (COMPONENT/
AUDIO)
Prise INPUT2 (RGB)
Prise INPUT1 (RGB)
7
8
9
10
11
Prises INPUT3
PHONES (Casque)
Connecteur SERVICE
Fente COMMON INTERFACE
Prise AC INPUT
12
13
14
15
16
RLS = Room Light Sensor (Capteur de lumière ambiante)
*
9
Capteur de
télécommande
Indicateur
ON
Indicateur
SLEEP
Indicateur
STANDBY
Touche
HOME MENU
Touche
a
(Alimentation)
i
k
/
l
Touches de
volume
P
k
/
l
Touches de
programme (canal)
b
Touche (Source d’entrée)
RLS*
AVERTISSEMENT :
Une pression sonore excessive en
provenance des écouteurs ou du casque
peut entraîner une perte auditive.
KRL3237V_FR.indd 9
KRL3237V_FR.indd 9
2008/06/13 14:47:25
2008/06/13 14:47:25
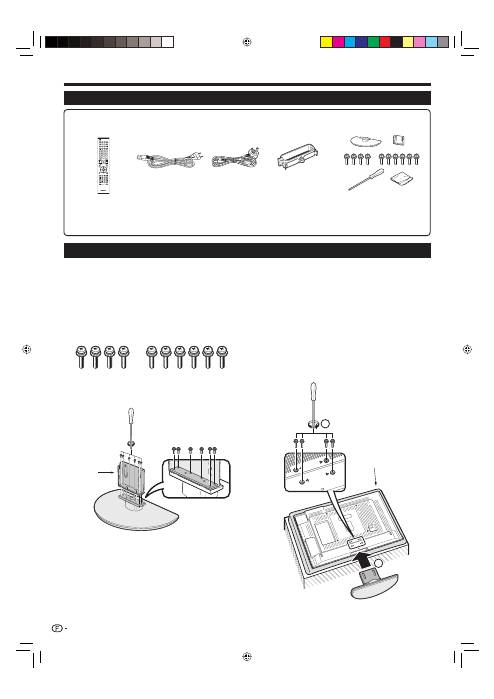
Confirmez la présence des dix vis fournies avec
l’ensemble du socle.
Fixez le pied de soutien pour l’ensemble du
socle sur la base à l’aide de six vis avec le
tournevis (fourni) comme illustré.
1
2
Préparation
Insertion du socle.
Insérez le socle dans les ouvertures sous le
téléviseur (Maintenez le socle afin qu’il ne
tombe pas du bord de la surface de travail).
Insérez et serrez les quatre vis courtes dans
les quatre trous de vis au dos du téléviseur.
3
1
2
1
2
REMARQUE
Pour déposer le socle, procédez aux étapes ci-dessus
dans l’ordre inverse.
•
Accessoires fournis
Pose de l’ensemble du socle
Avant de poser (ou déposer) l’ensemble du socle, débranchez le cordon secteur de la prise AC INPUT.
Avant de procéder aux opérations, étendez un rembourrage sur la surface de travail sur laquelle vous placerez le
téléviseur. Ceci lui évitera d’être endommagé.
ATTENTION
Fixez le socle dans le bon sens.
Veillez à bien suivre les instructions. Un montage incorrect du socle peut entraîner la chute du téléviseur.
•
•
•
•
10
Télécommande (
g
1)
Cordon secteur (
g
2)
Ensemble du socle (
g
1)
Serre-câbles (
g
1)
Pages 3 et 11
Page 10
Page 14
Page 14
Mode d’emploi (ce document)
Feuillet de garantie
•
•
Pile alcaline format « AA » (
g
2) ... Page 11
•
Pieds de
soutien
Coussin
moelleux
SOURCE
TV
STB DVR VCR
DVD
SELECT
HOME
MENU
MENU
RETURN
EXIT
DVD TOPMENU/
GUIDE
EPG
P
4
5
6
7
8
9
0
P.INFO
1
2
3
INFO
CH RETURN
TV
CTRL
HDMI
REC STOP
HDD
AV
SELECTION
CM SKIP
DVD
TOOLS
SCREEN
SIZE
DTV
RADIO
1
2
3
4
5
6
7
8
TV
INPUT
ENTER
KRL3237V_FR.indd 10
KRL3237V_FR.indd 10
2008/06/13 14:47:28
2008/06/13 14:47:28
