Kenwood kdc-bt500u: INSTALLATION / CONNECTION
INSTALLATION / CONNECTION: Kenwood kdc-bt500u
INSTALLATION / CONNECTION
Warning
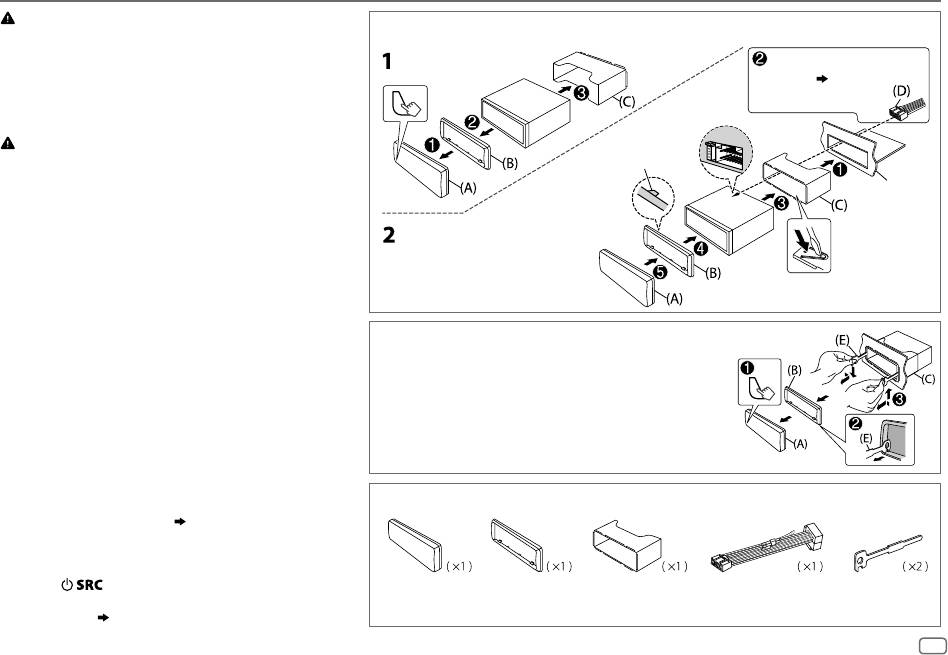
Installing the unit (in-dash mounting)
•
The unit can only be used with a 12V DC power supply, negative ground.
•
Disconnect the battery’s negative terminal before wiring and mounting.
Do the required
•
Do not connect Battery wire (yellow) and Ignition wire (red) to the
wiring. (
24
)
car chassis or Ground wire (black) to prevent a short circuit.
•
Insulate unconnected wires with vinyl tape to prevent a short circuit.
•
Be sure to ground this unit to the car’s chassis again after installation.
Caution
•
For safety’s sake, leave wiring and mounting to professionals. Consult
Hook on the top side
the car audio dealer.
Orientate the trim
•
Dashboard of
Install this unit in the console of your vehicle. Do not touch the metal
plate as illustrated
your car
parts of this unit during and shortly after use of the unit. Metal parts
before fitting.
such as the heat sink and enclosure become hot.
•
Do not connect the
[
wires of speakers to the car chassis or Ground
wire (black), or connect them in parallel.
•
Mount the unit at an angle of less than 30º.
Bend the appropriate tabs to hold the
•
If your vehicle wiring harness does not have the ignition terminal,
mounting sleeve firmly in place.
connect Ignition wire (red) to the terminal on the vehicle’s fuse box
which provides 12 V DC power supply and is turned on and off by the
How to remove the unit
ignition key.
1
Detach the faceplate.
•
Keep all cables away from heat dissipate metal parts.
2 Fit the catch pin on the extraction keys into the
•
After the unit is installed, check whether the brake lamps, blinkers,
holes on both sides of the trim plate, then pull it
wipers, etc. on the car are working properly.
out.
•
If the fuse blows, first make sure the wires are not touching car’s
3 Insert the extraction keys deeply into the slots
chassis, then replace the old fuse with one that has the same rating.
on each side, then follow the arrows as shown
Basic procedure
on the right.
1
Remove the key from the ignition switch, then
disconnect the [ terminal of the car battery.
Part list for installation
2 Connect the wires properly.
See Wiring connection. (
24
)
3 Install the unit to your car.
See Installing the unit (in-dash mounting).
4 Connect the [ terminal of the car battery.
5 Press to turn on the power.
(A)
Faceplate
(B)
Trim plate
(C)
Mounting
(D)
Wiring harness
(E)
Extraction
6 Detach the faceplate and reset the unit within
sleeve
key
5seconds. (
3
)
ENGLISH
23
JS_KWD_KDC_BT500U_EN_EN_11.indd 23JS_KWD_KDC_BT500U_EN_EN_11.indd 23 9/10/2015 1:43:30 PM9/10/2015 1:43:30 PM
Book Size: B6L (182 mm x 128 mm)
Data Size: B6L (182 mm x 128 mm)

Wiring connection
If your car does not have an ISO terminal :
Rear/ Subwoofer output
We recommend installing the unit with a
For 3-way crossover: Woofer output
commercially available custom wiring harness
specific for your car and leave this job to
Antenna terminal
professionals for your safety. Consult your car
audio dealer.
Microphone input
jack
(
9
)
When connecting to an external amplifier,
connect its ground wire to the car’s chassis to
Fuse (10A)
Connecting the ISO connectors on some VW/Audi or Opel
avoid damaging the unit.
(Vauxhall) automobiles
You may need to modify the wiring of the supplied wiring harness as
illustrated below.
If no connections are made, do not let the wire come out from the tab.
A7 (Red) Ignition wire (Red)
Yellow (Battery wire)
UnitVehicle
STEERING WHEEL
Red (Ignition wire)
Light blue/yellow
REMOTE INPUT
To the steering wheel remote control
A4 (Yellow)
Battery wire (Yellow)
(Steering remote control
REMOTE CONT
adapter
wire)
Default wiring
Pin
Color and function
To the power control terminal when
Red (A7)
ANT CONT
A4 Yellow
:
Battery
Blue/White
using the optional power amplifier or
A5 Blue/White
:
Power control
(Power control wire/
P. CONT
to the antenna control terminal in the
Antenna control wire)
A7 Red
:
Ignition (ACC)
Yellow (A4)
vehicle
A8 Black
:
Earth (ground) connection
B1
Purple
]
:
Rear speaker (right)
B2
Purple/black
[
For 3-way crossover: Tweeter (right)
Brown
To connect the Kenwood navigation
MUTE
B3
Gray
]
(Mute control wire)
:
Front speaker (right)
system, refer your navigations manual
B4
Gray/black
[
For 3-way crossover: Mid range speaker (right)
B5
White
]
:
Front speaker (left)
B6
White/black
[
For 3-way crossover: Mid range speaker (left)
ISO connectors
B7
Green
]
:
Rear speaker (left)
B8
Green/black
[
For 3-way crossover: Tweeter (left)
24
JS_KWD_KDC_BT500U_EN_EN_10.indd 24JS_KWD_KDC_BT500U_EN_EN_10.indd 24 30/9/2015 11:44:09 AM30/9/2015 11:44:09 AM
Data Size: B6L (182 mm x 128 mm)
Book Size: B6L (182 mm x 128 mm)
JS_KWD_KDC_BT500U_EN_EN_5.indd 25JS_KWD_KDC_BT500U_EN_EN_5.indd 25 27/8/2015 3:39:45 PM27/8/2015 3:39:45 PM

INHALT VOR DER INBETRIEBNAHME
VOR DER INBETRIEBNAHME 2
WICHTIG
•
Um richtige Verwendung sicherzustellen, lesen Sie die Bedienungsanleitung vor der Verwendung des Produkts sorgfältig durch.
GRUNDLAGEN 3
Es ist besonders wichtig, dass Sie die als Warnung und Vorsicht gekennzeichneten Hinweise in dieser Anleitung lesen und
beachten.
ERSTE SCHRITTE 3
•
Bitte bewahren Sie die Anleitung an sicherer Stelle und griffbereit zum Nachschlagen auf.
1 Wählen Sie die Anzeigesprache
und brechen Sie die
Warnung
Demonstration ab
Bedienen Sie keine Funktion, die Ihre Aufmerksamkeit vom Straßenverkehr ablenkt.
2 Stellen Sie die Uhrzeit und das
Datum ein
Vorsicht
3 Festlegen der
Lautstärkeeinstellung:
•
Stellen Sie die Lautstärke so ein, dass Sie immer noch Geräusche von außerhalb des Fahrzeugs hören können, um Unfälle zu
Anfangseinstellungen
vermeiden.
•
Senken Sie die Lautstärke vor dem Abspielen digitaler Tonquellen, um Beschädigung der Lautsprecher durch plötzliche
RADIO 5
Tonspitzen zu vermeiden.
Allgemeines:
CD / USB / iPod / ANDROID 7
•
Vermeiden Sie Verwendung des externen Geräts, wenn dieses das sichere Fahren behindern kann.
•
Stellen Sie sicher, dass alle wichtigen Daten gesichert sind. Wir übernehmen keine Haftung für jeglichen Verlust
BLUETOOTH® 9
aufgenommener Daten.
•
Stellen Sie sicher, dass keine Metallgegenstände (wie etwa Münzen oder Werkzeuge) ins Innere des Geräts gelangen und
AUX 14
Kurzschlüsse verursachen.
•
Wenn ein Disc-Fehler durch Kondensationsbildung auf der Laserlinse auftritt, werfen Sie die Disc aus und warten Sie eine Zeit
AUDIOEINSTELLUNGEN 14
lang, bis die Kondensation getrocknet ist.
•
Die USB-Kennung ist auf dem Hauptgerät angegeben. Zum Betrachten nehmen Sie die Frontblende ab.
(
3
)
DISPLAY-EINSTELLUNGEN 17
•
Je nach dem Typ des Fahrzeugs wird die Antenne automatisch ausgeschoben, wenn Sie die Einheit mit angeschlossenem
Antennensteuerkabel (
24
) einschalten. Schalten Sie beim Parken in einem Bereich mit niedriger Decke die Einheit aus oder
FEHLERSUCHE 17
stellen Sie die Quelle auf STANDBY.
ZUR BEZUGNAHME 19
Wie Sie diese Anleitung lesen
Wartung
•
Die Bedienung wird im Wesentlichen anhand der Tasten auf der Frontblende erläutert.
Weitere Informationen
•
Englischsprachige Anzeigen werden zur Erklärung verwendet. Sie können die Anzeigesprache im [
FUNCTION
]-Menü wählen.
(
5
)
TECHNISCHE DATEN 21
•
[
XX
] zeigt die gewählten Punkte an.
•
(
XX
) zeigt an, das Bezugsinformationen auf der angegebenen Seitennummer vorhanden sind.
EINBAU / ANSCHLUSS 23
2
JS_KWD_KDC_BT500U_EN_GE.indd 2JS_KWD_KDC_BT500U_EN_GE.indd 2 13/10/2015 1:27:53 PM13/10/2015 1:27:53 PM
Book Size: B6L (182 mm x 128 mm)
Data Size: B6L (182 mm x 128 mm)
Оглавление
- BASICS GETTING STARTED
- RADIO
- CD / USB / iPod / ANDROID
- BLUETOOTH®
- AUX AUDIO SETTINGS
- DISPLAY SETTINGS TROUBLESHOOTING
- REFERENCES
- SPECIFICATIONS
- INSTALLATION / CONNECTION
- GRUNDLAGEN ERSTE SCHRITTE
- RADIO
- CD / USB / iPod / ANDROID
- BLUETOOTH®
- AUX AUDIOEINSTELLUNGEN
- DISPLAY-EINSTELLUNGEN FEHLERSUCHE
- ZUR BEZUGNAHME
- TECHNISCHE DATEN
- EINBAU / ANSCHLUSS
- ОСНОВНЫЕ СВЕДЕНИЯ НАЧАЛО ЭКСПЛУАТАЦИИ
- РАДИОПРИЕМНИК
- CD / USB / iPod / ANDROID
- BLUETOOTH®
- AUX ЗВУКОВЫЕ НАСТРОЙКИ
- НАСТРОЙКИ ДИСПЛЕЯ УСТРАНЕНИЕ ПРОБЛЕМ
- СПРАВОЧНЫЕ МАТЕРИАЛЫ
- ТЕХНИЧЕСКИЕ ХАРАКТЕРИСТИКИ
- УСТАНОВКА И ПОДКЛЮЧЕНИЕ


