Kenwood DDX155: REFERENCE
REFERENCE: Kenwood DDX155
REFERENCE
Maintenance
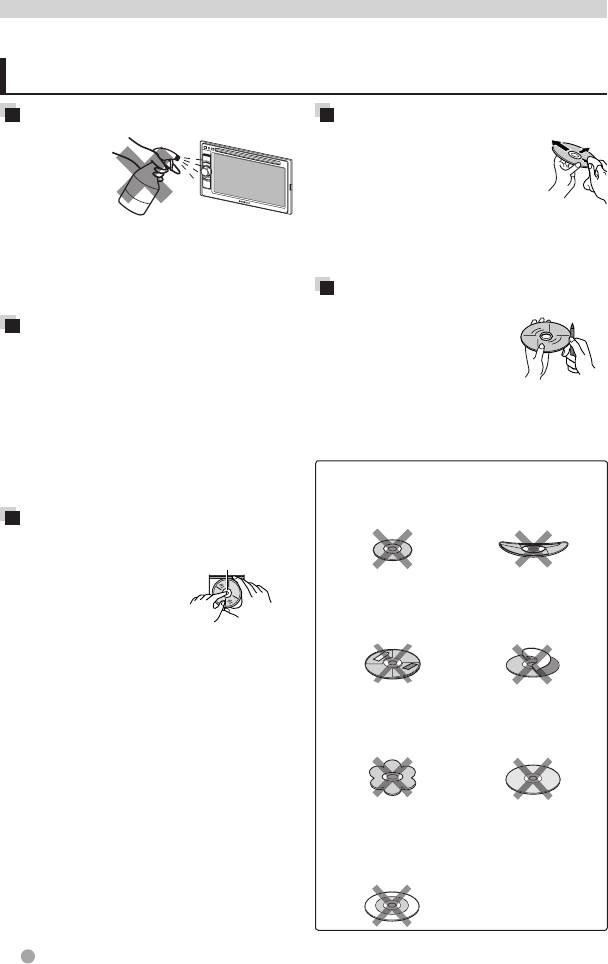
Caution on cleaning the unit
To keep discs clean
Do not use
A dirty disc may not play correctly.
any solvent
Ifadiscdoesbecomedirty,wipe
(forexample,
it with a soft cloth in a straight line
thinner,benzine,
from center to edge.
etc.),detergent,
• Donotuseanysolvents(for
orinsecticide.Thismaydamagethemonitor
example,conventionalrecordcleaner,
or the unit.
spray,thinner,benzine,etc.)tocleandiscs.
Recommended cleaning method:
To play new discs
Gentlywipethepanelwithasoft,drycloth.
Newdiscsmayhavesome
Moisture condensation
rough spots around the inner
Moisture may condense on the lens inside
and outer edges. If such a disc
theunitinthefollowingcases:
is used, this unit may reject the
• Afterstartingtheheaterinthecar.
disc.
• Ifitbecomesveryhumidinsidethecar.
To remove these rough spots,rubthe
Should this occur, the unit may malfunction.
edgeswithapencilorball-pointpen,etc.
In this case, eject the disc and leave the unit
turned on for a few hours until the moisture
evaporates.
Do not use the following discs:
8 cm CD Warped disc
How to handle discs
When removing a disc
from its case, press
Center holder
down the center holder
of the case and lift the
Stickerandsticker
discout,holdingitbythe
residue Stick-onlabel
edges.
• Alwaysholdthediscbytheedges.Donot
touch its recording surface.
When storing a disc in its case, gently
insert the disc around the center holder (with
C-thru Disc (semi-
theprintedsurfacefacingup).
Unusualshape
transparent disc)
• Makesuretostorediscsintheircasesafter
use.
Transparent or semi-
transparent parts on its
recording area
30 English

More about this unit
File playback
Playing MP3/WMA files
• Thisunitcanplaybackfileswiththe
Playing MPEG1/MPEG2/MPEG4 files
extensioncode<.mp3>or<.wma>
• ThisunitcanplaybackMPEG1/MPEG2/
(regardlessofthelettercase—upper/
MPEG4fileswiththeextensioncode
lower).
<.mpg>,<.mpeg>or<.avi>.
• Thisunitcanplaybackthefilesmeeting
• Thestreamformatshouldconformto
theconditionsbelow:
MPEGsystem/programstream.
– Bitrate:
ThefileformatshouldbeMP@ML(Main
32kbps–320kbps
ProfileatMainLevel)/SP@ML(SimpleProfile
– Samplingfrequency:
atMainLevel)/MP@LL(MainProfileatLow
8kHz–48kHz
Level)/MPEG-4SP(SimpleProfile).
• ThisunitcanshowID3TagVersion
• AudiostreamsshouldconformtoMPEG1
1.0/1.1/2.2/2.3/2.4(forMP3).
AudioLayer-2,DolbyDigitalorMP3.
• ThisunitcanalsoshowWMATag.
• Themaximumbitrateforvideosignals
• ThisunitcanplaybackfilesrecordedinVBR
(average)is4Mbps.
(variablebitrate).
• Thefileencodedintheinterlacedscanning
• FilesrecordedinVBRhaveadiscrepancyin
modemaynotbeplayedbackcorrectly.
elapsed time indication.
• Thisunitcannotplaybackthefollowing
Playing JPEG files
files:
• ThisunitcanplaybackJPEGfileswiththe
– MP3 files encoded with MP3i and MP3
extensioncode<.jpg>.
PROformat.
• ThisunitcanplaybackJPEGfilesthatareat
– MP3filesencodedwithLayer1/2.
32x32to8192x7680resolution.
– WMAfilesencodedwithlossless,
Itmaytaketimetodisplaythefile.
professional, and voice format.
• ThisunitcanplaybackbaselineJPEGfiles.
– WMAfileswhicharenotbasedupon
ProgressiveJPEGfilesorlosslessJPEGfiles
WindowsMedia®Audio.
cannotbeplayed.
– WMAfilescopy-protectedwithDRM.
We bear no responsibility for any loss
Sound signals emitted
of data in an iPod/iPhone and USB
mass storage class device while using
through the rear terminals
this unit.
Through the analog terminals (Speaker
out/Front Preout/Rear Preout)
2-channelsignalisemitted.Whenplaying
multi-channelencodeddisc,multi-channel
signalsaredownmixed.
English 31

Troubleshooting
Whatappearstobetroubleisnotalwaysserious.Checkthefollowingpointsbeforecallinga
service center.
• Foroperationswiththeexternalcomponents,referalsototheinstructionssuppliedwith
theadaptersusedfortheconnections(aswellastheinstructionssuppliedwiththeexternal
components).
If there seems to be a problem
Symptom Remedy/Cause
Nosoundcomesoutofthe
• Adjustthevolumetotheoptimumlevel.
speakers.
• Checkthecordsandconnections.
Theunitdoesnotworkatall.
Reset the unit. (+page3)
General
Theremotecontrollerdoesnot
Replacethebattery.
work.
AME automatic presetting does
Store stations manually. (+page22)
notwork.
Static noise while listening to
Connect the antenna firmly.
TUNER
the radio.
• Recordable/Rewritablediscs
• Insertafinalizeddisc.
cannotbeplayedback.
• Finalizethediscswiththecomponentwhichyou
• TracksontheRecordable/
used for recording.
Rewritablediscscannotbe
skipped.
Playbackdoesnotstart. Theformatoffilesisnotsupportedbytheunit.
Disc in general
Nopictureappearsonthe
• Connectthevideocordcorrectly.
externalmonitor.
• Selectthecorrectinputontheexternalmonitor.
Disccannotbeplayedback. • Recordthetracksusingacompliantapplication
on the appropriate discs. (+page11)
• Addappropriateextensioncodestothefile
names.
Tracksarenotplayedbackas
Playbackordermaydifferfromtheoneplayedback
JPEG/MP3/WMA
you have intended them to play.
using other players.
MPEG1/MPEG2/MPEG4/
Nopictureappearsonthe
• Turnonthevideocomponentifitisnoton.
screen.
• Connectthevideocomponentcorrectly.
• When“
AV IN2
”isselectedasthesource,set<AV
AV IN1/
AV IN2
IN SETUP>to[AV IN2].
32 English

Symptom Remedy/Cause
Nosoundcomesoutofthe
• DisconnecttheiPod/iPhone,thenconnectit
speakers.
again.
• Selectanothersourceandthenreselect“iPod”.
TheiPod/iPhonedoesnotturn
• Checktheconnectingcableanditsconnection.
onordoesnotwork.
• Updatethefirmwareversion.
• Chargethebattery.
• CheckwhethertheiPod/iPhonecontrolmodeis
correctly selected. (+page20)
• ResettheiPod/iPhone.
Sound is distorted. Deactivatetheequalizereitheronthisunitorthe
iPod/iPhone.
iPod/iPhone
A lot of noise is generated. Turnoff(uncheck)the“VoiceOver”featureofthe
iPod.Fordetails,visit<http://www.apple.com>.
Sounddoesnotsynchronize
Select<iPod>for<AV IN SETUP>.(+page28)
with the video.
• Videoscannotbeplayed.
• ConnectUSBAudioandVideocableKCA-iP22F.
• Nosoundofvideoscomes
Othercablescannotbeused.
out.
• Select<iPod>for<AV IN SETUP>.(+ page
28)
“Reading...”keepsflashingonthe
Turnoffthepowerandonagain.
screen.
USB
Whileplayingatrack,soundis
ThetracksarenotproperlycopiedintotheUSB
sometimes interrupted.
device.Copytracksagain,andtryagain.
English 33

Accessories/Installation Procedure
Accessories
7 Reconnect the ·battery.
8 Presstheresetbutton.
1
1
1 *
6 *
9 Perform the Initial Setup.
WARNING
• Ifyouconnecttheignitionwire(red)and
thebatterywire(yellow)tothecarchassis
..........1
..........6(M5x6mm)
(ground),youmaycauseashortcircuit,
1
1
2 *
7 *
that in turn may start a fire. Always connect
those wires to the power source running
throughthefusebox.
• Donotcutoutthefusefromtheignition
wire(red)andthebatterywire(yellow).The
..........1
..........6(M5x7mm)
powersupplymustbeconnectedtothe
1
*
DDX1035/DDX1035M
3
wires via the fuse.
only.
2
*
DDX155only.
¤
• Mountingandwiringthisproductrequires
skillsandexperience.Forbestsafety,
..........1(2m)
leavethemountingandwiringworkto
4
professionals.
• Makesuretogroundtheunittoanegative
12V DC power supply.
• Donotinstalltheunitinaspotexposed
..........1
todirectsunlightorexcessiveheator
humidity. Also avoid places with too much
2
5 *
dustorthepossibilityofwatersplashing.
• Donotuseyourownscrews.Useonly
the screws provided. If you use the wrong
screws, you could damage the unit.
..........2
• Ifyourcar’signitiondoesnothaveanACC
position, connect the ignition wires to a
powersourcethatcanbeturnedonand
Installation Procedure
offwiththeignitionkey.Ifyouconnect
1 Topreventashortcircuit,removethekey
the ignition wire to a power source with
from the ignition and disconnect the ·
a constant voltage supply, such as with
battery.
batterywires,thebatterymaybedrained.
2 Maketheproperinputandoutputwire
• Ifthefuseblows,firstmakesurethewires
connections for each unit.
are not touching to cause a short circuit,
3 Connectthespeakerwiresofthewiring
then replace the old fuse with one with the
harness. (Accessory 2 )
same rating.
4 Connect the wiring harness wires in the
• Insulateunconnectedwireswithvinyltape
followingorder:ground,battery,ignition.
orothersimilarmaterial.Topreventashort
(Accessory 1 )
circuit, do not remove the caps on the ends
5 Connect the wiring harness connector to
of the unconnected wires or the terminals.
the unit.
6 Install the unit in your car.
34 English

• Connectthespeakerwirescorrectlytothe
terminalstowhichtheycorrespond.The
unitmaybedamagedorfailtoworkifyou
share the · wires or ground them to any
metal part in the car.
• Whenonlytwospeakersarebeing
connected to the system, connect the
connectorseithertoboththefrontoutput
terminalsortoboththerearoutput
terminals(donotuseonefromeach).For
example,ifyouconnecttheª connector
oftheleftspeakertoafrontoutput
terminal, do not connect the · connector
to a rear output terminal.
• Aftertheunitisinstalled,checkwhether
thebrakelamps,blinkers,wipers,etc.on
thecarareworkingproperly.
• Mounttheunitsothatthemountingangle
is 30° or less.
• Donotpresshardonthepanelsurface
when installing the unit to the vehicle.
Otherwisescars,damage,orfailuremay
result.
¤ CAUTION
Install this unit in the console of your
vehicle.
Do not touch the metal part of this unit
during and shortly after the use of the
unit.Metalpartsuchastheheatsinkand
enclosurebecomehot.
English 35
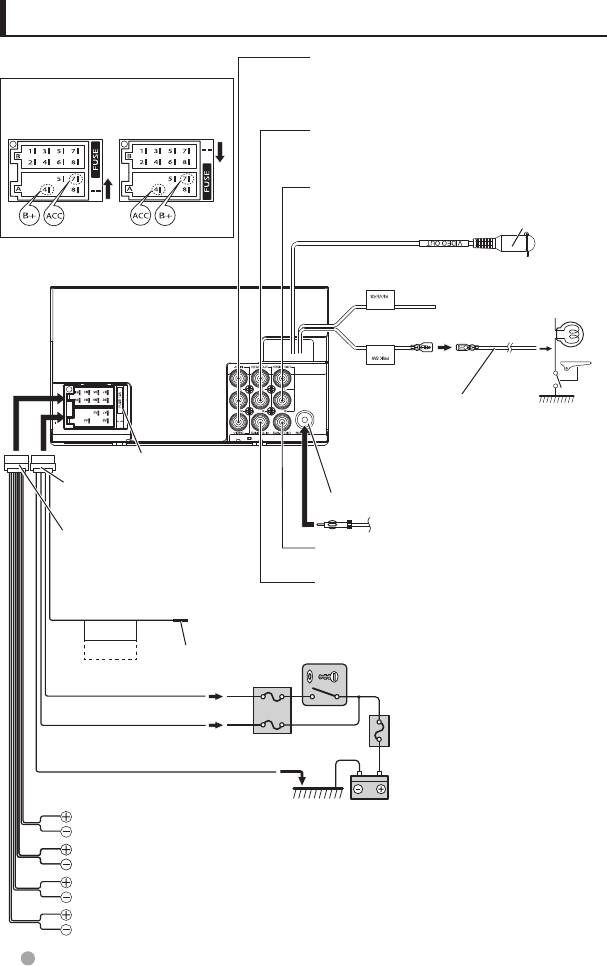
Connecting Wires to Terminals
Audio Video input 1 (AV IN1)
• Videoinput(Yellow)
Change the FUSE location to switch
• Audioleftinput(White)
ACC and B+ pin location on the ISO
• Audiorightinput(Red)
connector.
Rear Preout
• Audioleftoutput(White)
• Audiorightoutput(Red)
Front Preout
• Audioleftoutput(White)
VideoOutput
• Audiorightoutput(Red)
Purple/White(Reverse
sensorwire)
Connect to vehicle's reverse
lamp harness when using the
optional rear view camera.
LightGreen(Parking
sensorwire)
Extensioncable(Accessory3)
Forbestsafety,besureto
connecttheparkingsensor.
FUSE(15A)
Connecttothevehicle'sparking
⁄
brakedetectionswitchharness.
Accessory 1
(DDX1035/DDX1035Monly)
FM/AMantennainput
Antenna Cord
Accessory 2
(DDX1035/DDX1035Monly)
Subwoofer Preout (monaural)
Rear View Camera Input (Yellow)
Blue/White(Powercontrol/
Antennacontrolwire)
Tothepowercontrolterminalwhenusingtheoptionalpoweramplifier,
P.CONT.
ortotheantennacontrolterminalinthevehicle.(Max.350mA,12V)
ANT.CONT.
If no connections are made, do not remove the cap.
Red(Ignitionwire)
ACC
Ignitionkeyswitch
Yellow(Batterywire)
B+
Carfusebox
(Mainfuse)
Black(Groundwire)·(Tocarchassis)
Battery
Whiteª/White/black·:Tofrontspeaker(left)
Grayª/Gray/black·:Tofrontspeaker(right)
Greenª/Green/black·:Torearspeaker(left)
Purple ª/Purple/black·:Torearspeaker(right)
36 English
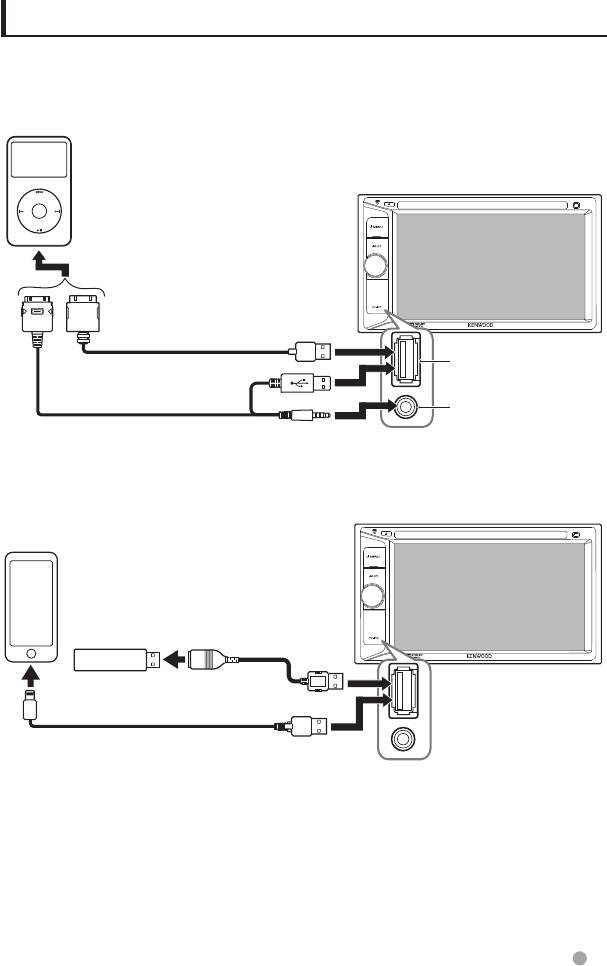
Connecting a USB device/iPod/iPhone
iPod/iPhone except for iPhone 5/
iPod touch (5th Generation)/
iPod nano (7th Generation)
(sold separately)
VideoOutput
KCA-iP102 (0.8 m)
(Sold separately)
USB terminal
KCA-iP22F (0.8 m)
(Sold separately)
iPod/Audio Visual
input 2 (iPod/AV IN2)
(iPod/AV Input 2
switchable)
iPhone 5/iPod touch (5th Generation)/
iPod nano (7th Generation) (sold
separately)
CA-U1EX
USB device
(max.: 500 mA)
(sold separately)
(Sold separately)
USB 2.0 cable (accessory of
the iPod/iPhone)
English 37

Installing/Removing the Unit
Installing the Unit (DDX155
Installing the Trim Plate
only)
1 Attach accessory 4 to the unit.
Bendthetabsofthemountingsleeve
4
with a screwdriver or similar utensil and
attach it in place.
Removing the Trim Plate
⁄
1 Remove accessory 4 to the unit.
• Makesurethattheunitisinstalledsecurely
inplace.Iftheunitisunstable,itmay
malfunction(eg,thesoundmayskip).
Installing the Unit
(DDX1035/ DDX1035M only)
6 or 7
CarBracket
4
6 or 7
38 English
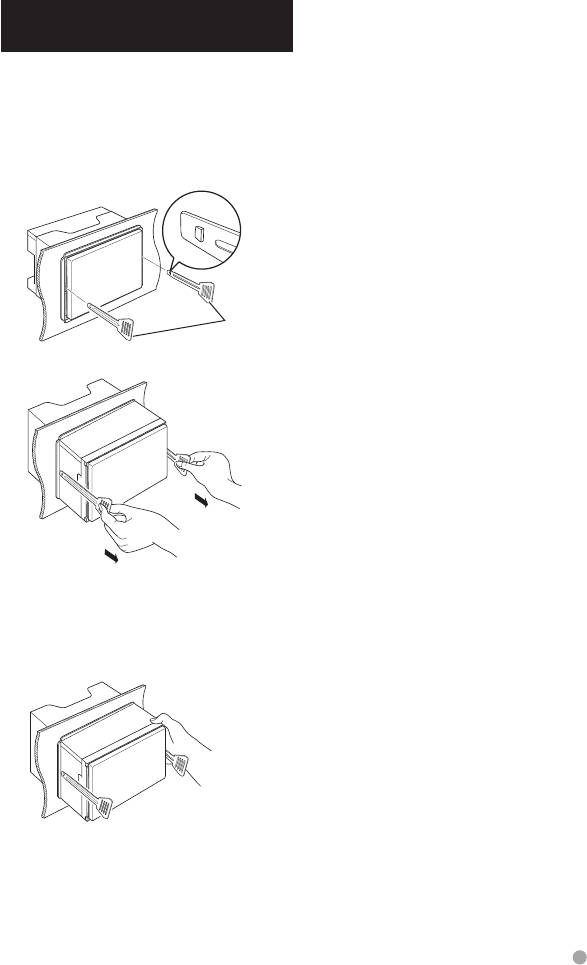
Removing the Unit (DDX155
only)
1 Removethetrimplatebyreferringto
the removal procedure in the section
“RemovingtheTrimPlate”.
2 Insertthetwoextractionkeys5 deeply
into the slots on each side, as shown. (The
protrusionatthetipoftheextractionkey
mustfacetowardtheunit.)
5
3 Pull out the unit halfway.
⁄
• Becarefultoavoidinjuryfromthecatchpinson
the removal tool.
4 Pull the unit all the way out with your
hands,beingcarefulnottodropit.
English 39

Specifications
Monitor section
USB interface section
Picture Size
USBStandard
: 6.2inches(diagonal)wide
: USB2.0FullSpeed
137.40mm(W)×77.28mm(H)
FileSystem
Display System
: FAT16/32
: TransparentTNLCDpanel
Maximum Power Supply Current
: DC5V
1 A
Drive System
D/A Converter
: TFTactivematrixsystem
: 24Bit
Number of Pixels
Video Decoder
: 1,152,000(800H×480V×RGB)
: MPEG1/MPEG2/MPEG4
Effective Pixels
Audio Decoder
: 99.99%
: MP3/WMA
Pixel Arrangement
: RGBstripedarrangement
FM tuner section
BackLighting
: LED
FrequencyRange(50kHz)
: 87.5MHz–108.0MHz
DVD player section
UsableSensitivity(S/N:26dB)
D/A Converter
: 11.2dBf(1.0μV/75Ω)
: 24bit
QuietingSensitivity(S/N:46dB)
Audio Decoder
: 16.4dBf(1.8μV/75Ω)
: LinearPCM/DolbyDigita/MP3/WMA
FrequencyResponse(±3.0dB)
Video Decoder
: 30Hz–14kHz
: MPEG1/MPEG2/MPEG4
S/N Ratio (dB)
Wow&Flutter
: 50dB(MONO)
: BelowMeasurableLimit
Selectivity(±400kHz)
FrequencyResponse
: ≥ 80 dB
: Samplingfrequency;
Stereo Separation
96kHz: 20Hz–22,000Hz
: 40dB(1kHz)
48kHz: 20Hz–22,000Hz
44.1kHz: 20Hz–20,000Hz
AM tuner section
Total Harmonic Distortion
FrequencyRange(9kHz)
: 0.020%(1kHz)
: 531kHz–1611kHz
S/N Ratio (dB)
UsableSensitivity
: 95dB(DVD-Video96kHz)
: 25μV
Dynamic Range
: 90dB(DVD-Video96kHz)
DiscFormat
: DVD-Video/VIDEO-CD/CD-DA
Samplingfrequency
: 44.1/48/96kHz
Quantifying Bit Number
: 16/20/24bit
40 English

Video section
General
Color System of External Video Input
Operating Voltage
: NTSC/PAL
: 14.4V(10.5V–16Vallowable)
ExternalVideoInputLevel(RCA/minijack)
Maximum Current Consumption
: 1Vp-p/75Ω
: 10A
External Audio Max Input Level (RCA/
Operational Temperature Range
minijack)
: –10°C–+60°C
: 1.5V/10kΩ
Installation Dimensions (W × H × D)
VideoOutputLevel(RCAjack)
: 183.0×112.0×158.7mm
: 1Vp-p/75Ω
(DDX155)
VideoinputLevel(RCAjack)
178.0×100.8×160.0mm
: 1Vp-p/75Ω
(DDX1035/DDX1035M)
Color System of DVD Video Output
Weight
: NTSC
: 2.1kg(DDX155)
1.9kg(DDX1035/DDX1035M)
Audio section
MaximumPower(Front&Rear)
• Althoughtheeffectivepixelsfortheliquid
: 40W×4
crystalpanelisgivenas99.99%ormore,
0.01%ofpixelsmaynotlightormaylight
FullBandwidthPower(Front&Rear)
incorrectly.
(PWRDIN45324,+B=14.4V)
• Specificationsaresubjecttochange
: 20W×4
without notice.
(at less than 1% THD)
: 14W×4
Preout Level (V)
: 2V/10kΩ
Preout Impedance
: ≤600Ω
SpeakerImpedance
: 4Ω–8Ω
Tone
Bass: 100Hz±15dB
Middle: 1kHz±15dB
Treble: 12.5kHz±15dB
English 41

• “DVDLogo”isatrademarkofDVDFormat/LogoLicensingCorporationregisteredintheUS,
Japan and other countries.
• MicrosoftandWindowsMediaareeitherregisteredtrademarksortrademarksofMicrosoft
CorporationintheUnitedStatesand/orothercountries.
• ManufacturedunderlicensefromDolbyLaboratories.Dolbyandthedouble-Dsymbolare
trademarksofDolbyLaboratories.
• “MadeforiPod,”and“MadeforiPhone”meanthatanelectronicaccessoryhasbeendesigned
toconnectspecificallytoiPod,oriPhone,respectively,andhasbeencertifiedbythe
developertomeetAppleperformancestandards.Appleisnotresponsiblefortheoperation
of this device or its compliance with safety and regulatory standards. Please note that the use
of this accessory with iPod or iPhone may affect wireless performance.
iPhone,iPod,iPodclassic,iPodnano,andiPodtoucharetrademarksofAppleInc.,registered
in the U.S. and other countries.
• THISPRODUCTISLICENSEDUNDERTHEMPEG-4VISUALPATENTPORTFOLIOLICENSEFOR
THEPERSONALANDNON-COMMERCIALUSEOFACONSUMERFOR(i)ENCODINGVIDEO
INCOMPLIANCEWITHTHEMPEG-4VISUALSTANDARD("MPEG-4VIDEO")AND/OR(ii)
DECODINGMPEG-4VIDEOTHATWASENCODEDBYACONSUMERENGAGEDINAPERSONAL
ANDNON-COMMERCIALACTIVITYAND/ORWASOBTAINEDFROMAVIDEOPROVIDER
LICENSEDBYMPEGLATOPROVIDEMPEG-4VIDEO.NOLICENSEISGRANTEDORSHALLBE
IMPLIEDFORANYOTHERUSE.ADDITIONALINFORMATIONINCLUDINGTHATRELATINGTO
PROMOTIONAL,INTERNALANDCOMMERCIALUSESANDLICENSINGMAYBEOBTAINED
FROMMPEGLA,LLC.
SEEHTTP://WWW.MPEGLA.COM.
42 English

English 43

Содержание
Перед эксплуатацией ................... 45
СПРАВОЧНЫЕ МАТЕРИАЛЫ
Сброс параметров устройства ................................... 45
Техническое обслуживание ........ 72
ВВЕДЕНИЕ
Дополнительная информация об
Обзор основного устройства ...... 47
этом устройстве ...................... 73
Обзор пульта дистанционного
Поиск неисправностей ................ 74
управления ............................. 48
Принадлежности/процедура
Настройка часов ........................... 50
установки ................................ 76
Подсоединение проводов к
ОПЕРАЦИИ С ИСТОЧНИКОМ AV
клеммам .................................. 78
Выбор источника
Подключение устройства
воспроизведения ................... 51
USB/iPod/iPhone...................... 79
Операции с диском ...................... 52
Установка/удаление
Вставка диска .......................................................................... 52
устройства ............................... 80
Извлечение диска ................................................................ 52
Операции в меню видео ................................................. 56
Технические характеристики ..... 82
Операции с USB ............................. 58
Подключение устройства USB .................................... 58
Прослушивание с устройства
iPod/iPhone .............................. 61
Подготовка ................................................................................ 61
Прослушивание радио ................ 64
Использование других внешних
устройств ................................. 65
Регулировка звука ....................... 66
Выбор предустановленного
звукового режима................................................................ 66
Сохранение ваших настроек ....................................... 66
Регулировка настроек звука ...... 67
Настройки воспроизведения
видео ........................................ 68
Использование камеры
заднего вида ........................... 69
Показ изображения с камеры заднего вида .... 69
Настройка системы ...................... 70
44 Русский
Перед эксплуатацией
ПРЕДУПРЕЖДЕНИЯ:
Температура внутри машины...
(для предотвращения несчастных
Еслимашинадолгоевремястоялавусловиях
холоднойилижаркойпогоды,топеред
случаев и повреждений)
эксплуатациейустройстваподождите,пока
• НЕУСТАНАВЛИВАЙТЕникакиеустройстваиНЕ
температура в машине нормализуется.
ПРОКЛАДЫВАЙТЕкабеливместах,где;
– они могут помешать работе рулевого колеса
Сброс параметров устройства
и рычага переключения передач.
– они могут помешать работе устройств
Кнопка сброса
безопасности,напримерподушек
безопасности.
Еслиустройствоработаетнекорректно,нажмите
– они могут ухудшить видимость.
кнопку сброса. При нажатии кнопки сброса
• НЕОПЕРИРУЙТЕустройствомвовремя
устройство вернется к заводским настройкам
движения.
(за исключением зарегистрированных устройств
Еслинеобходимоиспользоватьустройство
Bluetooth).
вовремядвижения,будьтеособенно
Как читать эту инструкцию:
внимательны.
• Внастоящемруководстверассматриваются
• Вовремядвиженияводительнедолжен
операции,выполняемыеспомощьюкнопок
смотреть на монитор.
на панели монитора и сенсорной панели.
Подробнееобоперациях,выполняемыхс
Меры предосторожности при
пультадистанционногоуправления,см.
+
обращении с монитором:
стр. 48.
• Встроенный в устройство монитор изготовлен
• <>обозначаетэкраны/меню/операции/
сиспользованиемвысокоточныхтехнологий,
настройки,появляющиесянасенсорной
но может иметь некоторое количество
панели.
неэффективныхточек.Этогонельзяизбежать,и
• []обозначаеткнопкинасенсорнойпанели.
это не рассматривается в качестве дефекта.
• Неподвергайтемониторвоздействиюпрямых
солнечных лучей.
• Ненажимайтенасенсорнуюпанель
шариковой ручкой или аналогичным
предметом с острым концом.
Нажимайтенакнопкисенсорнойпанели
пальцем(есливыноситеперчатки,тоснимайте
их).
• Приоченьнизкихилиоченьвысоких
температурах...
– Внутрипроисходятхимическиеизменения,
которые вызывают неисправности.
– Изображения могут быть нечеткими или
медленно перемещаться. В подобных
условиях изображения и звук могут
бытьнесинхронизированы,либоможет
пострадать качество изображения.
В целях безопасности...
• Неделайтезвукслишкомгромким,поскольку
это создает опасность при движении за счет
Дисплеиипанеливэтойинструкции
заглушениязвуковснаружи,атакжеможет
приведенывкачествепримеров,позволяющих
вызвать нарушения слуха.
наиболее наглядно объяснять действия.
• Передвыполнениемкаких-либосложных
Поэтому они могут отличаться от дисплеев и
операций остановите машину.
панелей,имеющихсявдействительности.
Русский 45

Маркировка изделий, оснащенных
лазерами
Ккорпусуустройстваприкрепленатабличка,
указывающая,чтоустройствоиспользует
лазерныелучикласса1.Этоозначает,чтов
устройстве используются лазерные лучи слабой
интенсивности. Они не представляют опасности
и не распространяют опасную радиацию вне
устройства.
Дата изготовления (месяц/год)
находится на этикетке устройства.
В соответствии с Законом Российской Федерации
“О защите прав потребителей” срок службы
(годности)данноготовара,“поистечении
которого он может представлять опасность
дляжизни,здоровьяпотребителя,причинять
вред его имуществу или окружающей среде”
составляет семь (7) лет со дня производства. Этот
срокявляетсявременем,втечениекоторого
потребитель данного товара может безопасно
им пользоваться при условии соблюдения
инструкциипоэксплуатацииданноготовара,
проводянеобходимоеобслуживание,
включающеезаменурасходныхматериалови/
или соответствующее ремонтное обеспечение в
специализированном сервисном центре.
Дополнительныекосметическиематериалык
данномутовару,поставляемыевместесним,
могут храниться в течение двух (2) лет со дня eгo
производства.
Срокслужбы(годности),кромесрокахранения
дополнительныхкосметическихматериалов,
упомянутыхвпредыдущихдвухпунктах,не
затрагиваетникакихдругихправпотребителя,
вчастности,гарантийногосвидетельства
KENWOOD,котороеонможетполучитьв
соответствии с законом о правах потребителя
илидругихзаконов,связанныхсним.
46 Русский


