Indesit KN6C61X: Start-up and use
Start-up and use: Indesit KN6C61X

16
GB
Start-up and use
!
The first time you use your appliance, heat the
empty oven with its door closed at its maximum
temperature for at least half an hour. Ensure that the
room is well ventilated before switching the oven off
and opening the oven door. The appliance may emit
a slightly unpleasant odour caused by protective
substances used during the manufacturing process
burning away.
!
Before operating the product, remove all plastic
film from the sides of the appliance.
Starting the oven
1. Select the desired cooking mode by turning the
SELECTOR knob.
2. Select the recommended temperature for the
cooking mode or the desired temperature by turning
the THERMOSTAT knob.
A list detailing cooking modes and suggested
cooking temperatures can be found in the relevant
table (
see Oven cooking advice table
).
During cooking it is always possible to:
• Change the cooking mode by turning the
SELECTOR knob.
• Change the temperature by turning the
THERMOSTAT knob.
• Set the total cooking time and the cooking end
time (
see below
).
• Stop cooking by turning the SELECTOR knob to
the “0” position.
!
Never put objects directly on the bottom of the
oven; this will prevent the enamel coating from being
damaged. Only use position 1 in the oven when
cooking with the rotisserie spit.
!
Always place cookware on the rack(s) provided.
THERMOSTAT indicator light
When this is illuminated, the oven is generating
heat. It switches off when the inside of the oven
reaches the selected temperature. At this point the
light illuminates and switches off alternately,
indicating that the thermostat is working and is
maintaining the temperature at a constant level.
Oven light
This is switched on by turning the SELECTOR knob
to any position other than “0”. It remains lit as long
as the oven is operating. By selecting
8
8
8
8
8
with the
knob, the light is switched on without any of the
heating elements being activated.
Cooking modes
!
A temperature value between 50°C and MAX can be
set for all cooking modes except the following:
• GRILL (recommended: set only to MAX power level)
• GRATIN (recommended: do not exceed 200°C).
TRADITIONAL OVEN
mode
Both the top and bottom heating elements will be
activated. When using this traditional cooking mode, it
is best to use one cooking rack only. If more than one
rack is used, the heat will be distributed in an uneven
manner.
OVEN BAKING
mode
The rear heating element and the fan are switched on,
thus guaranteeing the distribution of heat in a delicate
and uniform manner throughout the entire oven. This
mode is ideal for baking and cooking temperature
sensitive foods (such as cakes that need to rise) and
for the preparation of pastries on 3 shelves
simultaneously.
MULTILEVEL
mode
All the heating elements (top, bottom and circular), as
well as the fan, will be activated. Since the heat
remains constant throughout the oven, the air cooks
and browns food in a uniform manner. A maximum of
two racks may be used at the same time.
PIZZA OVEN
mode
The circular heating elements and the elements at the
bottom of the oven are switched on and the fan is
activated. This combination heats the oven rapidly by
producing a considerable amount of heat, particularly
from the element at the bottom. If you use more than
one rack at a time, switch the position of the dishes
halfway through the cooking process.
GRILL
mode
The central part of the top heating element and the
rotisserie spit (where present) are activated. The
high and direct temperature of the grill is
recommended for food that requires a high surface
temperature (veal and beef steaks, fillet steak and
entrecôte). This cooking mode uses a limited
amount of energy and is ideal for grilling small
dishes. Place the food in the centre of the rack, as it
will not be cooked properly if it is placed in the
corners.
GB
17
GRATIN
mode
The top heating element and the rotisserie (where
present) are activated and the fan begins to operate.
This combination of features increases the
effectiveness of the unidirectional thermal radiation
provided by the heating elements through forced
circulation of the air throughout the oven. This helps
prevent food from burning on the surface and allows
the heat to penetrate right into the food.
!
The GRILL and GRATIN cooking modes must be
performed with the oven door shut.
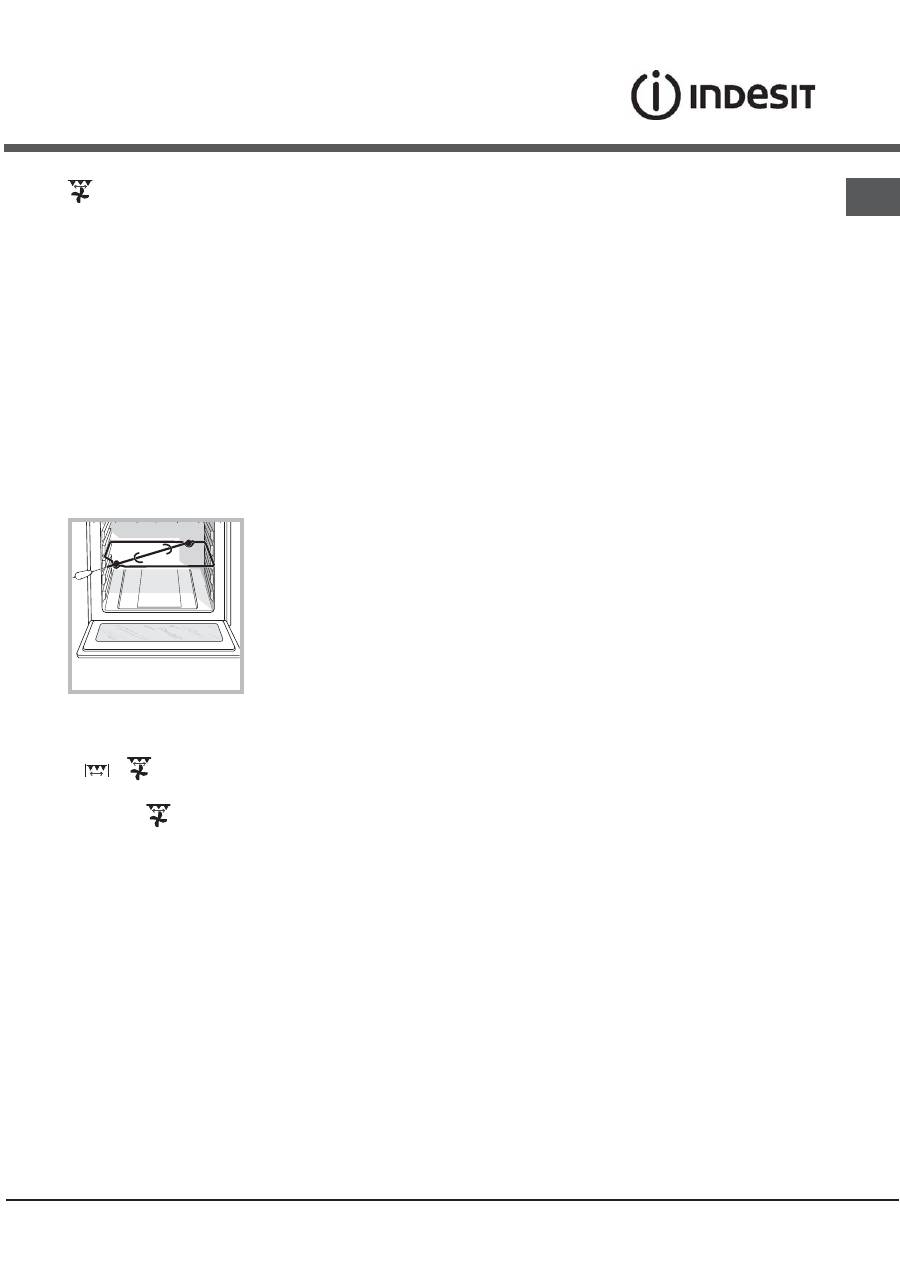
Spit roast
(only available in certain models)
To operate the spit roast function (
see diagram
) proceed
as follows:
1. Place the dripping
pan in position 1.
2. Place the rotisserie
support in position 3
and insert the spit in the hole provided on the
back panel of the oven.
3. Start the rotisserie using the knob to select MODE
or
.
!
When the
mode is activated, the spit will stop
if the door is opened.
Practical cooking advice
!
Do not place racks in position 1 or 5 during fan-
assisted cooking. Excessive direct heat can burn
temperature sensitive foods.
MULTILEVEL
• Use positions 2 and 4, placing the food which
requires more heat on the rack in position 2.
• Place the dripping pan on the bottom and the rack
on top.
GRILL
• When using the GRILL cooking mode, place the
rack in position 5 and the dripping pan in position
1 to collect cooking residues (fat and/or grease).
When using the GRATIN cooking mode, place the
rack in position 2 or 3 and the dripping pan in
position 1 to collect cooking residues.
• We recommend that the power level is set to
maximum. The top heating element is regulated
by a thermostat and may not always operate
constantly.
PIZZA OVEN
• Use a light aluminium pizza pan. Place it on the
rack provided.
For a crispy crust, do not use the dripping pan as
it prevents the crust from forming by extending
the total cooking time.
• If the pizza has a lot of toppings, we recommend
adding the mozzarella cheese on top of the pizza
halfway through the cooking process.
Timer
To activate the Timer proceed as follows:
1. Turn the TIMER knob in a clockwise direction
4
for almost one complete revolution to set the buzzer.
2. Turn the TIMER knob in an anticlockwise direction
5
to set the desired length of time.

18
GB
Oven cooking advice table
Cooking
modes
Foods Weight
(in kg)
Rack Position Pre-heating
time
(minutes)
Recommended
temperature
Cooking
time
(minutes)
Traditional
Oven
Duck
Roast veal or beef
Pork roast
Biscuits (short pastry)
Tarts
1
1
1
-
1
3
3
3
3
3
15
15
15
15
15
200
200
200
180
180
65-75
70-75
70-80
15-20
30-35
Baking
Mode
Tarts
Fruit cakes
Plum cake
Sponge cake
Stuffed pancakes (on 2 racks)
Small cakes (on 2 racks)
Cheese puffs (on 2 racks)
Cream puffs (on 3 racks)
Biscuits (on 3 racks)
Meringues (on 3 racks)
0.5
1
0.7
0.5
1.2
0.6
0.4
0.7
0.7
0.5
3
2 or 3
3
3
2 and 4
2 and 4
2 and 4
1 and 3 and 5
1 and 3 and 5
1 and 3 and 5
15
15
15
15
15
15
15
15
15
15
180
180
180
160
200
190
210
180
180
90
20-30
40-45
40-50
25-30
30-35
20-25
15-20
20-25
20-25
180
Multi-
cooking
Pizza (on 2 racks)
Lasagne
Lamb
Roast chicken + potatoes
Mackerel
Plum cake
Cream puffs (on 2 racks)
Biscuits (on 2 racks)
Sponge cake (on 1 rack)
Sponge cake (on 2 racks)
Savoury pies
1
1
1
1+1
1
1
0.5
0.5
0.5
1
1.5
2 and 4
3
2
2 and 4
2
2
2 and 4
2 and 4
2
2 and 4
3
15
10
10
15
10
10
10
10
10
10
15
230
180
180
200
180
170
190
180
170
170
200
15-20
30-35
40-45
60-70
30-35
40-50
20-25
10-15
15-20
20-25
25-30
Pizza Mode
Pizza
Roast veal or beef
Chicken
0.5
1
1
3
2
2 or 3
15
10
10
220
220
180
15-20
25-30
60-70
Soles and cuttlefish
Squid and prawn kebabs
Cuttlefish
Cod filet
Grilled vegetables
Veal steak
Sausages
Hamburgers
Mackerels
Toasted sandwiches (or toast)
0.7
0.6
0.6
0.8
0.4
0.8
0.6
0.6
1
4 and 6
4
4
4
4
3 or 4
4
4
4
4
4
-
-
-
-
-
-
-
-
-
-
Max
Max
Max
Max
Max
Max
Max
Max
Max
Max
10-12
8-10
10-15
10-15
15-20
15-20
15-20
10-12
15-20
3-5
Barbecue
With rotisserie
(where present)
Veal on the spit
Chicken on the spit
Lamb on the spit
1.0
1.5
1.0
-
-
-
5
5
5
Max
Max
Max
80-90
70-80
70-80
Grilled chicken
Cuttlefish
1.5
1.5
2
2
10
10
200
200
55-60
30-35
Gratin
With rotisserie
(where present)
Veal on the spit
Lamb on the spit
Chicken (on the spit) +
potatoes (roasted)
1.5
1.5
1.5
-
-
2
2
2
5
5
5
5
200
200
200
200
70-80
70-80
70-75
70-75
Оглавление
- Installazione
- Descrizionedell’apparecchio
- Avvio e utilizzo
- Utilizzo del piano cotturavetroceramica
- Precauzioni e consigli
- Manutenzione e cura
- Assistenza
- Operating Instructions
- Installation
- Descriptionof the appliance
- Start-up and use
- Using the glass ceramic hob
- Precautions and tips
- Care and maintenance
- Mode d’emploi
- Installation
- Description de l’appareil
- Mise en marche et utilisation
- Utilisation du plan de cuissonvitrocéramique
- Précautions et conseils
- Nettoyage et entretien
- Руководство по эксплуатации
- Монтаж
- Описание изделия
- Включение и эксплуатация
- Стеклокерамическаяварочная панель
- Предосторожности и рекомендации
- Техническое обслуживание и уход
- Gebruiksaanwijzing
- Installatie
- Beschrijving van het apparaat
- Starten en gebruik
- Gebruik van de glaskeramischekookplaat
- Voorzorgsmaatregelen enadvies
- Onderhoud en verzorging
- Bedienungsanleitung
- Installation
- Beschreibung des Gerätes
- Inbetriebsetzung undGebrauch
- Nutzung des Glaskeramik-Kochfeldes
- Vorsichtsmaßregeln undHinweise
- Reinigung und Pflege
