Pioneer DJM-900SRT: Adjusting the buffer size (when using Windows ASIO) Setting the audio data output from this unit to the computer Checking the version of the driver software Checking the latest information on the driver software
Adjusting the buffer size (when using Windows ASIO) Setting the audio data output from this unit to the computer Checking the version of the driver software Checking the latest information on the driver software: Pioneer DJM-900SRT
Table of contents
- Contents
- Before start
- Installing the software
- Installation Procedure (Windows) Installing the Serato DJ software Installation procedure (Mac OS X)
- Installation Procedure (Windows) Installation procedure (Mac OS X) 9 Log in.
- 11 Read the terms of the license agreement carefully, and if you agree, click [Agree].
- Connections Rear panel
- Connecting input terminals Connecting output terminals
- Connecting to the control panel Connecting this unit and computer
- Operation Control Panel
- Basic Operation
- Advanced Operations About PRO DJ LINK Using the QUANTIZE function
- Using the FADER START function Using the SOUND COLOR FX function Using the BEAT EFFECT function Using the LINK MONITOR function
- Operating DJ software using the MIDI function Operating the [X-PAD]
- Operating an external MIDI sequencer
- Types of effects Types of SOUND COLOR FX effects Types of BEAT EFFECT
- MIDI assignment map Category
- Category
- Changing the settings About the auto standby function About the talk over function Setting preferences About the setting utility software
- Adjusting the buffer size (when using Windows ASIO) Setting the audio data output from this unit to the computer Checking the version of the driver software Checking the latest information on the driver software
- Additional information Troubleshooting
- Block Diagram
- Acquiring the manual About trademarks and registered trademarks
- Specifications
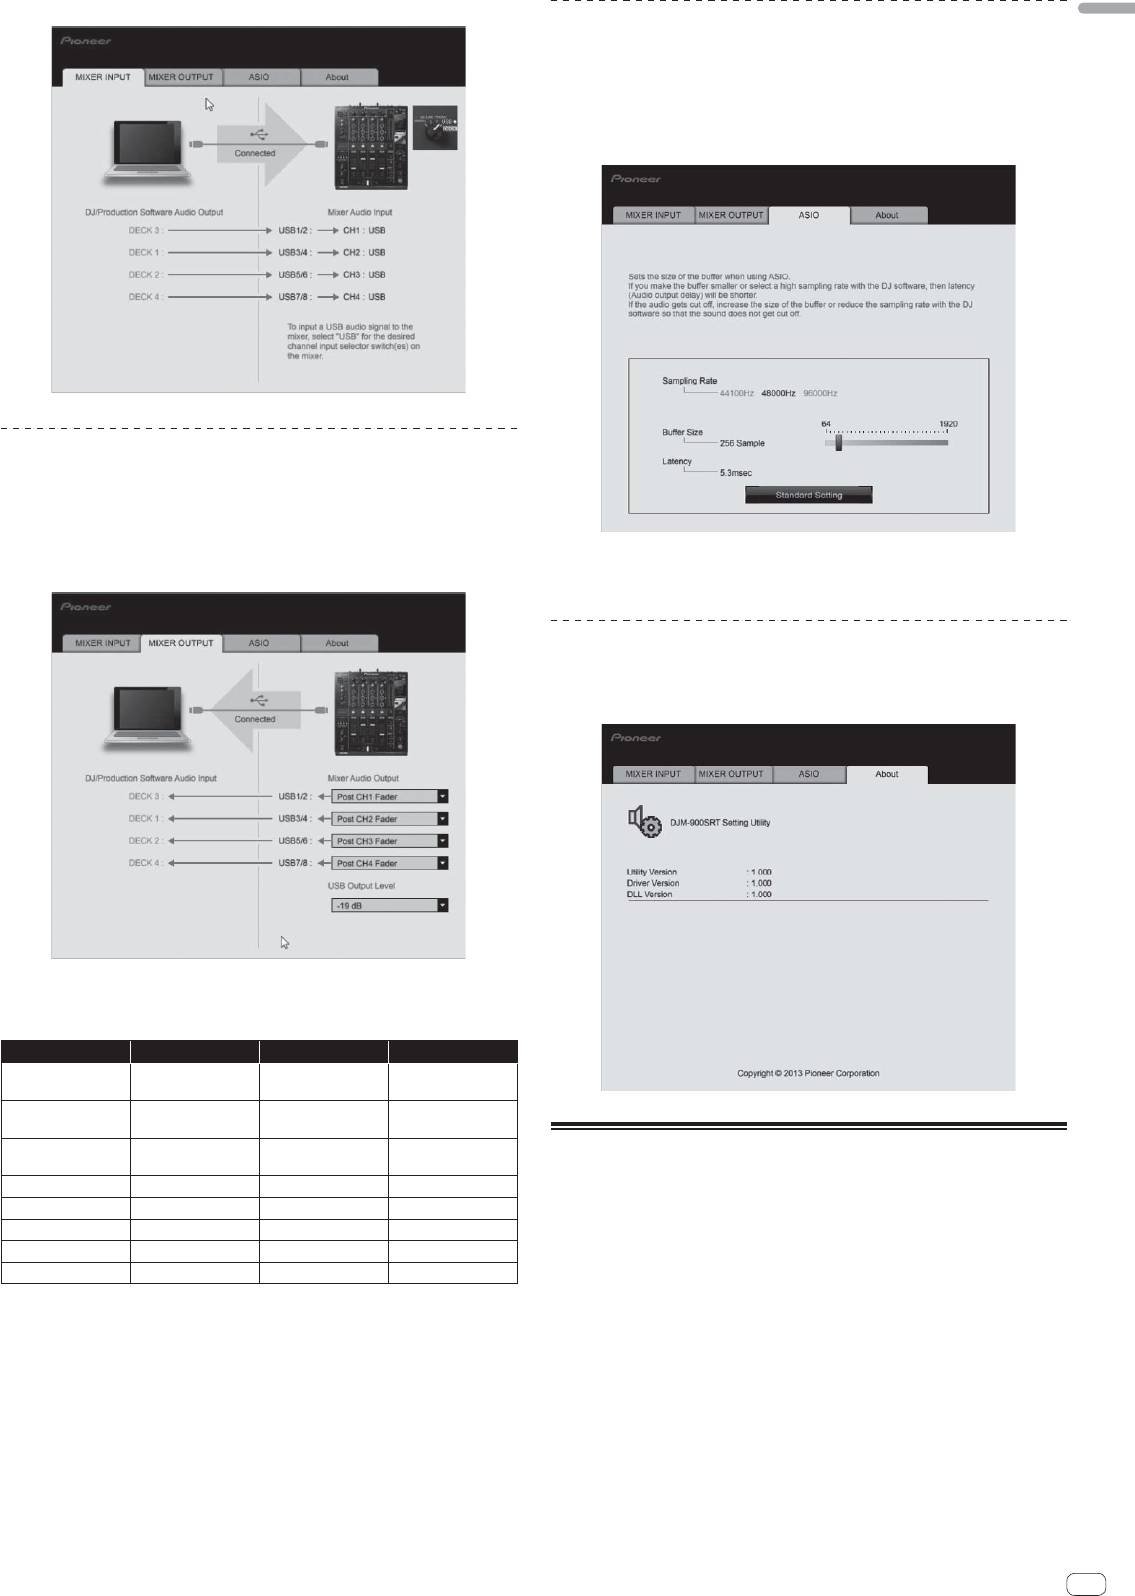
Click the [MIXER INPUT] tab.
English
Adjusting the buffer size (when using Windows
ASIO)
If an application using this unit as the default audio device (DJ software, etc.) is run-
ning, quit that application before adjusting the buffer size.
Display the setting utility before starting.
Click the [ASIO] tab.
Setting the audio data output from this unit to
the computer
When Serato DJ is running and using this unit as the default audio device, set the
audio data output in Serato DJ.
Display the setting utility before starting.
If the buffer size is made large, drops in audio data (breaks in the sound)
occur less easily, but the time lag due to the delay in the transfer of the audio
1 Click the [MIXER OUTPUT] tab.
data (latency) increases.
Checking the version of the driver software
Display the setting utility before starting.
Click the [About] tab.
2 Click the [Mixer Audio Output] pull-down menu.
Select and set the audio data to be output to the computer from the flow of audio
signals inside this unit.
CH1 CH2 CH3 CH4
CH1 Control Tone
CH2 Control Tone
CH3 Control Tone
CH4 Control Tone
1
1
1
1
PHONO
PHONO
PHONO
PHONO
CH1 Control Tone
CH2 Control Tone
CH3 Control Tone
CH4 Control Tone
1
1
1
1
CD/LINE
CD/LINE
CD/LINE
CD/LINE
CH1 Control Tone
CH2 Control Tone
CH3 Control Tone
CH4 Control Tone
Checking the latest information on the
1
1
1
1
DIGITAL
DIGITAL
DIGITAL
DIGITAL
2
2
2
2
driver software
Post CH1 Fader
Post CH2 Fader
Post CH3 Fader
Post CH4 Fader
2
2
2
2
Cross Fader A
Cross Fader A
Cross Fader A
Cross Fader A
For the latest information on the driver software for exclusive use with this unit, visit
2
2
2
2
Cross Fader B
Cross Fader B
Cross Fader B
Cross Fader B
our website shown below.
MIC MIC MIC MIC
http://pioneerdj.com/support/
2
2
2
2
Operation cannot be guaranteed when multiple units of this mixer are con-
MIX (REC OUT)
MIX (REC OUT)
MIX (REC OUT)
MIX (REC OUT)
nected to a single computer.
1 The audio data is output with the same volume at which it is input to this unit, regardless of
the [USB Output Level] setting.
2 When using for applications other than recording, pay attention to the DJ application’s set-
tings so that no audio loops are generated. If audio loops are generated, sound may be input
or output at unintended volumes.
3 Click the [USB Output Level] pull-down menu.
Adjust the volume of the audio data output from this unit.
The [USB Output Level] setting is applied equally to all audio data. However,
when 1 on the table at step 2 is selected, the audio data is output with the same
volume at which it is input to this unit.
If not enough volume can be achieved with the DJ software’s volume adjustment
alone, change the [USB Output Level] setting to adjust the volume of the audio
data output from this unit. Note that the sound will be distorted if the volume is
raised too high.
En
25
