Pioneer CDJ-400: PANEL FACILITIES 7. HOLD button
PANEL FACILITIES 7. HOLD button: Pioneer CDJ-400
Table of contents
- IMPORTANT VENTILATION CAUTION Operating Environment
- FEATURES
- BEFORE OPERATING (FEATURES) CONTENTS
- DISCS USABLE WITH THIS UNIT Types of discs playable on this unit Playing MP3 files
- BEFORE OPERATING (DISCS USABLE WITH THIS UNIT)
- CAUTIONS REGARDING HANDLING Location Storing Discs Installation Guidelines Condensation Cleaning and Handling Compact Discs Cleaning the Player CD Lens Cleaner
- CONNECTIONS 2. Connecting control cable for relay play
- 3. Connecting to other devices 4. Connecting the power cord
- PANEL FACILITIES 7. HOLD button
- 30. Jog touch indicators Rear Panel
- About TEXT display Removing the jog sheet
- DISC LOADING/UNLOADING
- DJ PLAYER OPERATIONS Starting playback Auto cue function Resume function To stop playback To temporarily interrupt playback
- Track cueing Jog dial functions Rotary search Fast-forward/fast-reverse
- Scratch Jog Effect Digital Jog Break Change playback speed Applying master tempo
- Mixing different tracks Cue point settings
- ADVANCED OPERATIONS Fader start playback Loop playback Scratch play Spin play Reverse play
- Relay play using two players Cue point/loop point memory Writing and reading data
- MIDI SETTING
- TROUBLESHOOTING Symptom
- Error message display
- SPECIFICATIONS
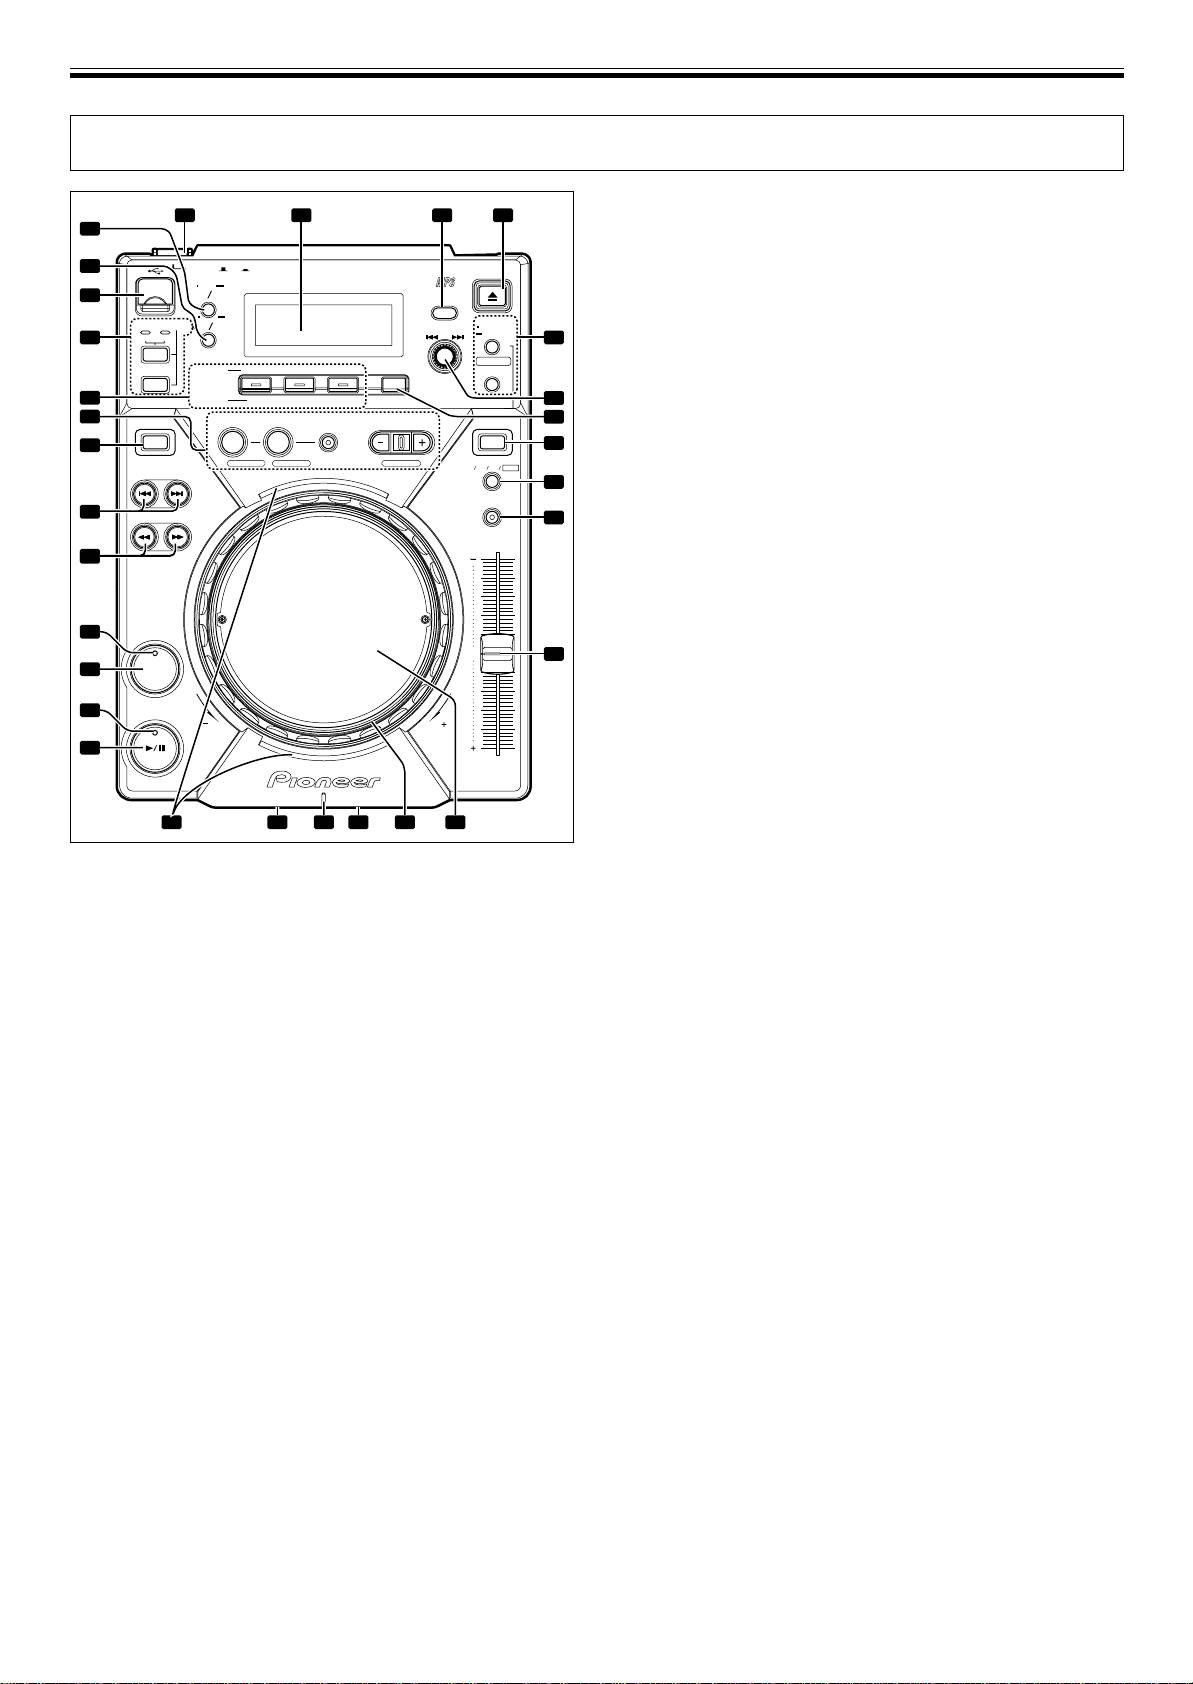
BEFORE OPERATING (PANEL FACILITIES)
PANEL FACILITIES
8. JOG MODE VINYL button
1 3 4
2
VINYL mode: The button indicator lights. When the surface of
29
the jog dial is pressed during playback, play stops, and if the
28
POWER
OFF
ON
EJECT
jog dial is then rotated, sound is produced in accordance with
MULTI PLAYER
CDJ
-
400
TIME
AUTO
the degree of rotation.
27
MODE
CUE
BACK
CDJ mode: The above action does not occur when the jog dial
SOURCE SELECT
TEXT
UTILITY
MODE
MODE
SELECT PUSH
MEMORY
26
MEMORY PC
DELETE
5
is pressed.
USB
CUE/LOOP
¶ The currently set jog mode is stored in memory even when
SCRATCH
BUBBLE TRANS
WAH
JOG EFFECT
CALL
power is turned off.
CD
HOLD
DIGITAL
25
JOG BREAK
JET ROLL WAH
6
9. TEMPO control range button (±6/±10/±16/WIDE)
24
REALTIME CUE
DIRECTION JOG MODE
IN OUT RELOOP/EXIT BEAT LOOP
7
Changes the variable range of the tempo control. (☞P.16)
REV LOOP VINYL
23
8
¶ The tempo range will be saved in memory when the power
LOOP DIVIDEOUT ADJUSTHOT LOOP
TEMPO
±6 ±10 ±16 WIDE
TRACK SEARCH
is turned off.
9
MASTER TEMPO
10. MASTER TEMPO button/indicator
22
SEARCH
10
Turns the Master Tempo function ON/OFF (lights when turned
ON). (☞P.16)
23
21
11. TEMPO control slider
Controls the track’s tempo (playback speed). (☞P.16)
12. Jog dial (–REV/+FWD) (☞P.15)
20
A photograph or other graphic of your choice can be inserted
0
11
19
CUE
(☞P.12)
13. Jog indicator
18
PLAY/PAUSE
¶ Indicator lights when disc is inserted during normal mode,
REV FWD
or if USB memory is selected during normal mode.
17
TEMPO
¶ The illumination pattern of the jog indicator can be
changed.
7 Changing the jog indicator’s illumination pattern.
14
1213151630
1. Hold the TEXT MODE/UTILITY MODE button depressed for
one second or more to enter utility setting mode.
Turn the rotary dial so that the display screen shows [JOG
1. POWER switch (—OFF/ _ON)
ILLUMI], and then press to confirm the selection.
This switch is located on the rear panel of the unit. Switches
The display screen will show [PATTERN 1].
the unit’s power ON/OFF.
2. Turn the rotary dial to change the illumination pattern.
2. Display (☞P.12)
Patterns can be chosen from PATTERN 1 to PATTERN 6.
3. Folder BACK button
3. Press the rotary dial to confirm.
Returns to the next higher level in the folder hierarchy when
Utility setting mode will be canceled if no command is en-
using a CD-ROM or USB memory with a hierarchical folder
tered for 15 seconds. Pressing the BACK button will also
structure (☞P.15).
exit the setting mode.
4. EJECT button
14. Disc loading slot
Ejects the disc. (☞P.13)
Located in front panel. (☞P.13)
5. CUE/LOOP button
15. Disc indicator
7 CUE/LOOP MEMORY/DELETE button
¶ When no disc is inserted, the indicator is turned off.
Use to record cue points and loop points. (☞P.19)
¶ When disc loading is completed, indicator turns on.
7 CUE/LOOP CALL buttons (2, 3)
16. Forced ejection hole
Use to call cue points and loop points recorded. (☞P.19)
Located in front panel of the unit. (☞P.13)
6. Rotary dial (SELECT PUSH 4, ¢)
17. PLAY/PAUSE button (6)
Use to select tracks in forward or reverse direction (track ad-
(☞P.14)
vance) and to select folders. (☞P.15)
18. PLAY/PAUSE indicator (6)
Press to confirm folder/track selections.
Lights when playing, and flashes when in pause mode.
7. HOLD button
19. CUE button
Preserves the effect of the Digital Jog Break and Scratch Jog
Use to set and confirm cue point. (☞P.17)
Effect. (☞P.16)
20. CUE indicator
Lights when cue point is set, and flashes when in pause mode.
21. SEARCH buttons (1, ¡)
Use to perform fast-forward and fast-reverse (with sound)
during playback mode. (☞P.15)
10
<DRB1451>
En


